Timescaledb - Other
Pages: 248
Integrate Managed Service for TimescaleDB and Google Data Studio
URL: llms-txt#integrate-managed-service-for-timescaledb-and-google-data-studio
Contents:
- Before you begin
- Connecting to a Managed Service for TimescaleDB data source from Data Studio
You can create reports or perform some analysis on data you have in Managed Service for TimescaleDB using Google Data Studio. You can use Data Studio to integrate other data sources, such as YouTube Analytics, MySQL, BigQuery, AdWords, and others.
- You should also have a Google account.
- In the overview page of your service:
- Download the CA certificate named
ca.pemfor your service. - Make a note of the
Host,Port,Database name,User, andPasswordfields for the service.
- Download the CA certificate named
Connecting to a Managed Service for TimescaleDB data source from Data Studio
- Log in to Google and open [Google Data Studio][google-data-studio].
- Click the
Create +button and chooseData source. - Select
PostgreSQLas the Google Connector. - In the
Database Authenticationtab, type details for theHost Name,Port,Database,Username, andPasswordfields. - Select
Enable SSLand upload your server certificate file,ca.pem. - Click
AUTHENTICATE. - Choose the table to be queried, or select
CUSTOM QUERYto create an SQL query. - Click
CONNECT.
===== PAGE: https://docs.tigerdata.com/mst/integrations/logging/ =====
Integrate Datadog with Tiger Cloud
URL: llms-txt#integrate-datadog-with-tiger-cloud
Contents:
- Prerequisites
- Monitor Tiger Cloud service metrics with Datadog
- Create a data exporter
- Manage a data exporter
- Attach a data exporter to a Tiger Cloud service
- Monitor Tiger Cloud service metrics
- Edit a data exporter
- Delete a data exporter
- Reference
- Configure Datadog Agent to collect metrics for your Tiger Cloud services
[Datadog][datadog] is a cloud-based monitoring and analytics platform that provides comprehensive visibility into applications, infrastructure, and systems through real-time monitoring, logging, and analytics.
This page explains how to:
- [Monitor Tiger Cloud service metrics with Datadog][datadog-monitor-cloud]
This integration is available for [Scale and Enterprise][pricing-plan-features] pricing plans.
- Configure Datadog Agent to collect metrics for your Tiger Cloud service
This integration is available for all pricing plans.
To follow the steps on this page:
- Create a target [Tiger Cloud service][create-service] with the Real-time analytics capability.
You need your [connection details][connection-info].
- Sign up for [Datadog][datadog-signup].
You need your [Datadog API key][datadog-api-key] to follow this procedure.
- Install [Datadog Agent][datadog-agent-install].
Monitor Tiger Cloud service metrics with Datadog
Export telemetry data from your Tiger Cloud services with the time-series and analytics capability enabled to Datadog using a Tiger Cloud data exporter. The available metrics include CPU usage, RAM usage, and storage.
Create a data exporter
A Tiger Cloud data exporter sends telemetry data from a Tiger Cloud service to a third-party monitoring tool. You create an exporter on the [project level][projects], in the same AWS region as your service:
- In Tiger Cloud Console, open [Exporters][console-integrations]
- Click
New exporter - Select
MetricsforData typeandDatadogfor provider
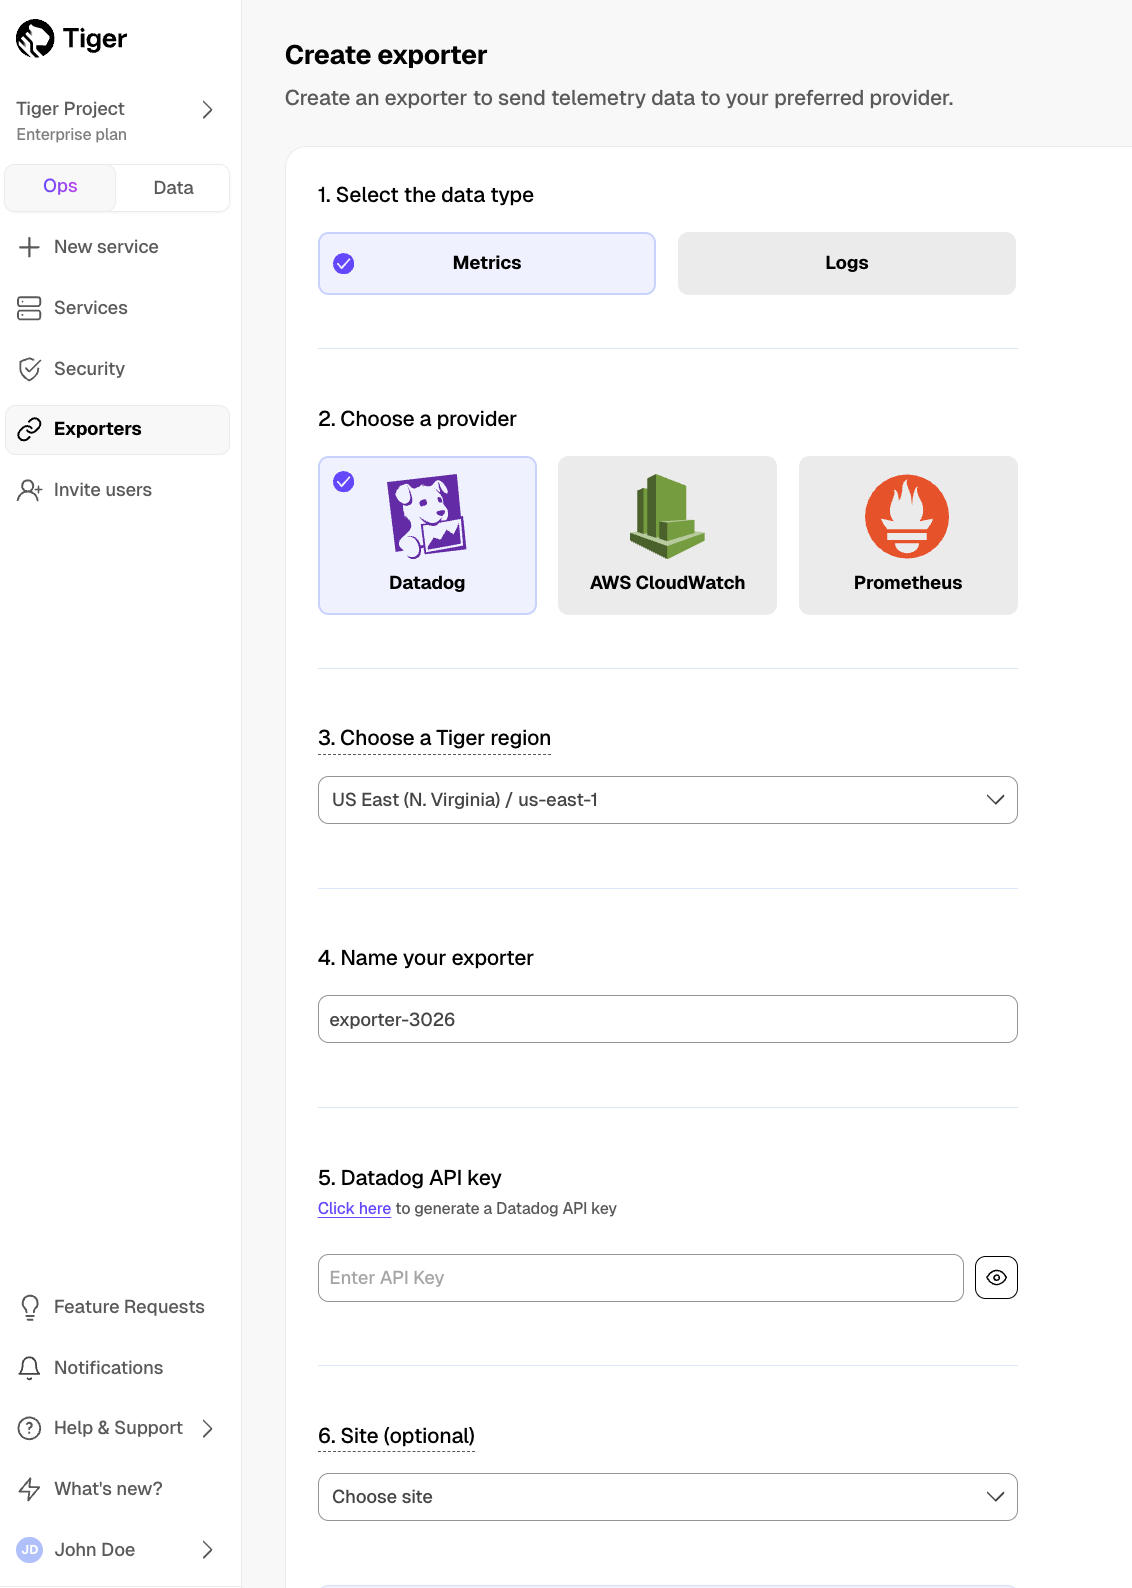
- Choose your AWS region and provide the API key
The AWS region must be the same for your Tiger Cloud exporter and the Datadog provider.
- Set
Siteto your Datadog region, then clickCreate exporter
Manage a data exporter
This section shows you how to attach, monitor, edit, and delete a data exporter.
Attach a data exporter to a Tiger Cloud service
To send telemetry data to an external monitoring tool, you attach a data exporter to your Tiger Cloud service. You can attach only one exporter to a service.
To attach an exporter:
- In [Tiger Cloud Console][console-services], choose the service
- Click
Operations>Exporters - Select the exporter, then click
Attach exporter - If you are attaching a first
Logsdata type exporter, restart the service
Monitor Tiger Cloud service metrics
You can now monitor your service metrics. Use the following metrics to check the service is running correctly:
timescale.cloud.system.cpu.usage.millicorestimescale.cloud.system.cpu.total.millicorestimescale.cloud.system.memory.usage.bytestimescale.cloud.system.memory.total.bytestimescale.cloud.system.disk.usage.bytestimescale.cloud.system.disk.total.bytes
Additionally, use the following tags to filter your results.
| Tag | Example variable | Description |
|---|---|---|
host | us-east-1.timescale.cloud | |
project-id | ||
service-id | ||
region | us-east-1 | AWS region |
role | replica or primary | For service with replicas |
node-id | For multi-node services |
Edit a data exporter
To update a data exporter:
- In Tiger Cloud Console, open [Exporters][console-integrations]
- Next to the exporter you want to edit, click the menu >
Edit - Edit the exporter fields and save your changes
You cannot change fields such as the provider or the AWS region.
Delete a data exporter
To remove a data exporter that you no longer need:
Disconnect the data exporter from your Tiger Cloud services
In [Tiger Cloud Console][console-services], choose the service.
- Click
Operations>Exporters. - Click the trash can icon.
- Repeat for every service attached to the exporter you want to remove.
- Click
The data exporter is now unattached from all services. However, it still exists in your project.
Delete the exporter on the project level
In Tiger Cloud Console, open [Exporters][console-integrations]
- Next to the exporter you want to edit, click menu >
Delete - Confirm that you want to delete the data exporter.
- Next to the exporter you want to edit, click menu >
When you create the IAM OIDC provider, the URL must match the region you create the exporter in. It must be one of the following:
| Region | Zone | Location | URL |
|---|---|---|---|
ap-southeast-1 | Asia Pacific | Singapore | irsa-oidc-discovery-prod-ap-southeast-1.s3.ap-southeast-1.amazonaws.com |
ap-southeast-2 | Asia Pacific | Sydney | irsa-oidc-discovery-prod-ap-southeast-2.s3.ap-southeast-2.amazonaws.com |
ap-northeast-1 | Asia Pacific | Tokyo | irsa-oidc-discovery-prod-ap-northeast-1.s3.ap-northeast-1.amazonaws.com |
ca-central-1 | Canada | Central | irsa-oidc-discovery-prod-ca-central-1.s3.ca-central-1.amazonaws.com |
eu-central-1 | Europe | Frankfurt | irsa-oidc-discovery-prod-eu-central-1.s3.eu-central-1.amazonaws.com |
eu-west-1 | Europe | Ireland | irsa-oidc-discovery-prod-eu-west-1.s3.eu-west-1.amazonaws.com |
eu-west-2 | Europe | London | irsa-oidc-discovery-prod-eu-west-2.s3.eu-west-2.amazonaws.com |
sa-east-1 | South America | São Paulo | irsa-oidc-discovery-prod-sa-east-1.s3.sa-east-1.amazonaws.com |
us-east-1 | United States | North Virginia | irsa-oidc-discovery-prod.s3.us-east-1.amazonaws.com |
us-east-2 | United States | Ohio | irsa-oidc-discovery-prod-us-east-2.s3.us-east-2.amazonaws.com |
us-west-2 | United States | Oregon | irsa-oidc-discovery-prod-us-west-2.s3.us-west-2.amazonaws.com |
Configure Datadog Agent to collect metrics for your Tiger Cloud services
Datadog Agent includes a [Postgres integration][datadog-postgres] that you use to collect detailed Postgres database metrics about your Tiger Cloud services.
- Connect to your Tiger Cloud service
For Tiger Cloud, open an [SQL editor][run-queries] in [Tiger Cloud Console][open-console]. For self-hosted TimescaleDB, use [psql][psql].
Add the
datadoguser to your Tiger Cloud serviceTest the connection and rights for the datadog user
Update the following command with your [connection details][connection-info], then run it from the command line:
You see the output from the pg_stat_database table, which means you have given the correct rights to datadog.
Connect Datadog to your Tiger Cloud service
Configure the [Datadog Agent Postgres configuration file][datadog-config]; it is usually located on the Datadog Agent host at:
- Linux:
/etc/datadog-agent/conf.d/postgres.d/conf.yaml - MacOS:
/opt/datadog-agent/etc/conf.d/postgres.d/conf.yaml - Windows:
C:\ProgramData\Datadog\conf.d\postgres.d\conf.yaml
- Linux:
Integrate Datadog Agent with your Tiger Cloud service:
Use your [connection details][connection-info] to update the following and add it to the Datadog Agent Postgres configuration file:
- Add Tiger Cloud metrics
Tags to make it easier for build Datadog dashboards that combine metrics from the Tiger Cloud data exporter and Datadog Agent. Use your [connection details][connection-info] to update the following and add it to <datadog_home>/datadog.yaml:
- Restart Datadog Agent
See how to [Start, stop, and restart Datadog Agent][datadog-agent-restart].
Metrics for your Tiger Cloud service are now visible in Datadog. Check the Datadog Postgres integration documentation for a comprehensive list of [metrics][datadog-postgres-metrics] collected.
===== PAGE: https://docs.tigerdata.com/integrations/decodable/ =====
Examples:
Example 1 (sql):
create user datadog with password '<password>';Example 2 (sql):
grant pg_monitor to datadog;Example 3 (sql):
grant SELECT ON pg_stat_database to datadog;Example 4 (bash):
psql "postgres://datadog:<datadog password>@<host>:<port>/tsdb?sslmode=require" -c \
    "select * from pg_stat_database LIMIT(1);" \
    && echo -e "\e[0;32mPostgres connection - OK\e[0m" || echo -e "\e[0;31mCannot connect to Postgres\e[0m"
Major TimescaleDB upgrades
URL: llms-txt#major-timescaledb-upgrades
Contents:
- Prerequisites
- Check the TimescaleDB and Postgres versions
- Plan your upgrade path
- Check for failed retention policies
- Export your policy settings
- Implement your upgrade path
- Verify the updated policy settings and jobs
A major upgrade is when you update from TimescaleDB X.<minor version> to Y.<minor version>. A minor upgrade is when you update from TimescaleDB <major version>.x, to TimescaleDB <major version>.y. You can run different versions of TimescaleDB on different databases within the same Postgres instance. This process uses the Postgres ALTER EXTENSION function to upgrade TimescaleDB independently on different databases.
When you perform a major upgrade, new policies are automatically configured based on your current configuration. In order to verify your policies post upgrade, in this upgrade process you export your policy settings before upgrading.
Tiger Cloud is a fully managed service with automatic backup and restore, high availability with replication, seamless scaling and resizing, and much more. You can try Tiger Cloud free for thirty days.
This page shows you how to perform a major upgrade. For minor upgrades, see [Upgrade TimescaleDB to a minor version][upgrade-minor].
- Install the Postgres client tools on your migration machine. This includes
psql, andpg_dump. - Read [the release notes][relnotes] for the version of TimescaleDB that you are upgrading to.
- [Perform a backup][backup] of your database. While TimescaleDB upgrades are performed in-place, upgrading is an intrusive operation. Always make sure you have a backup on hand, and that the backup is readable in the case of disaster.
Check the TimescaleDB and Postgres versions
To see the versions of Postgres and TimescaleDB running in a self-hosted database instance:
- Set your connection string
This variable holds the connection information for the database to upgrade:
Retrieve the version of Postgres that you are running
Postgres returns something like:
Retrieve the version of TimescaleDB that you are running
Postgres returns something like:
Plan your upgrade path
Best practice is to always use the latest version of TimescaleDB. Subscribe to our releases on GitHub or use Tiger Cloud and always get latest update without any hassle.
Check the following support matrix against the versions of TimescaleDB and Postgres that you are running currently and the versions you want to update to, then choose your upgrade path.
For example, to upgrade from TimescaleDB 1.7 on Postgres 12 to TimescaleDB 2.17.2 on Postgres 15 you need to:
- Upgrade TimescaleDB to 2.10
- Upgrade Postgres to 15
- Upgrade TimescaleDB to 2.17.2.
You may need to [upgrade to the latest Postgres version][upgrade-pg] before you upgrade TimescaleDB.
| TimescaleDB version | Postgres 17 | Postgres 16 | Postgres 15 | Postgres 14 | Postgres 13 | Postgres 12 | Postgres 11 | Postgres 10 |
|---|---|---|---|---|---|---|---|---|
| 2.22.x | ✅ | ✅ | ✅ | ❌ | ❌ | ❌ | ❌ | ❌ |
| 2.21.x | ✅ | ✅ | ✅ | ❌ | ❌ | ❌ | ❌ | ❌ |
| 2.20.x | ✅ | ✅ | ✅ | ❌ | ❌ | ❌ | ❌ | ❌ |
| 2.17 - 2.19 | ✅ | ✅ | ✅ | ✅ | ❌ | ❌ | ❌ | ❌ |
| 2.16.x | ❌ | ✅ | ✅ | ✅ | ❌ | ❌ | ❌ | ❌ |
| 2.13 - 2.15 | ❌ | ✅ | ✅ | ✅ | ✅ | ❌ | ❌ | ❌ |
| 2.12.x | ❌ | ❌ | ✅ | ✅ | ✅ | ❌ | ❌ | ❌ |
| 2.10.x | ❌ | ❌ | ✅ | ✅ | ✅ | ✅ | ❌ | ❌ |
| 2.5 - 2.9 | ❌ | ❌ | ❌ | ✅ | ✅ | ✅ | ❌ | ❌ |
| 2.4 | ❌ | ❌ | ❌ | ❌ | ✅ | ✅ | ❌ | ❌ |
| 2.1 - 2.3 | ❌ | ❌ | ❌ | ❌ | ✅ | ✅ | ✅ | ❌ |
| 2.0 | ❌ | ❌ | ❌ | ❌ | ❌ | ✅ | ✅ | ❌ |
| 1.7 | ❌ | ❌ | ❌ | ❌ | ❌ | ✅ | ✅ | ✅ |
We recommend not using TimescaleDB with Postgres 17.1, 16.5, 15.9, 14.14, 13.17, 12.21. These minor versions [introduced a breaking binary interface change][postgres-breaking-change] that, once identified, was reverted in subsequent minor Postgres versions 17.2, 16.6, 15.10, 14.15, 13.18, and 12.22. When you build from source, best practice is to build with Postgres 17.2, 16.6, etc and higher. Users of Tiger Cloud and platform packages for Linux, Windows, MacOS, Docker, and Kubernetes are unaffected.
Check for failed retention policies
When you upgrade from TimescaleDB 1 to TimescaleDB 2, scripts automatically configure updated features to work as expected with the new version. However, not everything works in exactly the same way as previously.
Before you begin this major upgrade, check the database log for errors related to failed retention policies that could have occurred in TimescaleDB 1. You can either remove the failing policies entirely, or update them to be compatible with your existing continuous aggregates.
If incompatible retention policies are present when you perform the upgrade, the ignore_invalidation_older_than setting is automatically turned off, and a notice is shown.
Export your policy settings
- Set your connection string
This variable holds the connection information for the database to upgrade:
Connect to your Postgres deployment
Save your policy statistics settings to a
.csvfileSave your continuous aggregates settings to a
.csvfileSave your drop chunk policies to a
.csvfileSave your reorder policies to a
.csvfileExit your psql session
Implement your upgrade path
You cannot upgrade TimescaleDB and Postgres at the same time. You upgrade each product in the following steps:
Upgrade TimescaleDB
If your migration path dictates it, upgrade Postgres
Follow the procedure in [Upgrade Postgres][upgrade-pg]. The version of TimescaleDB installed in your Postgres deployment must be the same before and after the Postgres upgrade.
If your migration path dictates it, upgrade TimescaleDB again
Check that you have upgraded to the correct version of TimescaleDB
Postgres returns something like:
To upgrade TimescaleDB in a Docker container, see the Docker container upgrades section.
Verify the updated policy settings and jobs
- Verify the continuous aggregate policy jobs
Postgres returns something like:
- Verify the information for each policy type that you exported before you upgraded.
For continuous aggregates, take note of the config information to verify that all settings were converted correctly.
- Verify that all jobs are scheduled and running as expected
Postgres returns something like:
You are running a shiny new version of TimescaleDB.
===== PAGE: https://docs.tigerdata.com/self-hosted/multinode-timescaledb/multinode-ha/ =====
Examples:
Example 1 (bash):
export SOURCE="postgres://<user>:<password>@<source host>:<source port>/<db_name>"Example 2 (shell):
psql -X -d source -c "SELECT version();"Example 3 (shell):
-----------------------------------------------------------------------------------------------------------------------------------------
    PostgreSQL 17.2 (Ubuntu 17.2-1.pgdg22.04+1) on aarch64-unknown-linux-gnu, compiled by gcc (Ubuntu 11.4.0-1ubuntu1~22.04) 11.4.0, 64-bit
    (1 row)
Example 4 (sql):
psql -X -d source -c "\dx timescaledb;"Migrate with downtime
URL: llms-txt#migrate-with-downtime
Contents:
- Prerequisites
- Migrate to Tiger Cloud
- Prepare to migrate
- Align the version of TimescaleDB on the source and target
- Migrate the roles from TimescaleDB to your Tiger Cloud service
- Upload your data to the target Tiger Cloud service
- Validate your Tiger Cloud service and restart your app
- Prepare to migrate
- Align the extensions on the source and target
- Migrate the roles from TimescaleDB to your Tiger Cloud service
You use downtime migration to move less than 100GB of data from a self-hosted database to a Tiger Cloud service.
Downtime migration uses the native Postgres [pg_dump][pg_dump] and [pg_restore][pg_restore] commands. If you are migrating from self-hosted TimescaleDB, this method works for hypertables compressed into the columnstore without having to convert the data back to the rowstore before you begin.
If you want to migrate more than 400GB of data, create a Tiger Cloud Console support request, or send us an email at support@tigerdata.com saying how much data you want to migrate. We pre-provision your Tiger Cloud service for you.
However, downtime migration for large amounts of data takes a large amount of time. For more than 100GB of data, best practice is to follow [live migration].
This page shows you how to move your data from a self-hosted database to a Tiger Cloud service using shell commands.
Best practice is to use an [Ubuntu EC2 instance][create-ec2-instance] hosted in the same region as your Tiger Cloud service to move data. That is, the machine you run the commands on to move your data from your source database to your target Tiger Cloud service.
Before you move your data:
- Create a target [Tiger Cloud service][created-a-database-service-in-timescale].
Each Tiger Cloud service has a single Postgres instance that supports the [most popular extensions][all-available-extensions]. Tiger Cloud services do not support tablespaces, and there is no superuser associated with a service. Best practice is to create a Tiger Cloud service with at least 8 CPUs for a smoother experience. A higher-spec instance can significantly reduce the overall migration window.
To ensure that maintenance does not run while migration is in progress, best practice is to [adjust the maintenance window][adjust-maintenance-window].
Install the Postgres client tools on your migration machine.
This includes psql, pg_dump, and pg_dumpall.
- Install the GNU implementation of
sed.
Run sed --version on your migration machine. GNU sed identifies itself as GNU software, BSD sed returns sed: illegal option -- -.
Migrate to Tiger Cloud
To move your data from a self-hosted database to a Tiger Cloud service:
This section shows you how to move your data from self-hosted TimescaleDB to a Tiger Cloud service using pg_dump and psql from Terminal.
Prepare to migrate
- Take the applications that connect to the source database offline
The duration of the migration is proportional to the amount of data stored in your database. By disconnection your app from your database you avoid and possible data loss.
- Set your connection strings
These variables hold the connection information for the source database and target Tiger Cloud service:
You find the connection information for your Tiger Cloud service in the configuration file you downloaded when you created the service.
Align the version of TimescaleDB on the source and target
Ensure that the source and target databases are running the same version of TimescaleDB.
Check the version of TimescaleDB running on your Tiger Cloud service:
Update the TimescaleDB extension in your source database to match the target service:
If the TimescaleDB extension is the same version on the source database and target service, you do not need to do this.
For more information and guidance, see Upgrade TimescaleDB.
Ensure that the Tiger Cloud service is running the Postgres extensions used in your source database.
Check the extensions on the source database:
- For each extension, enable it on your target Tiger Cloud service:
Migrate the roles from TimescaleDB to your Tiger Cloud service
Roles manage database access permissions. To migrate your role-based security hierarchy to your Tiger Cloud service:
- Dump the roles from your source database
Export your role-based security hierarchy. <db_name> has the same value as <db_name> in source. I know, it confuses me as well.
If you only use the default postgres role, this step is not necessary.
- Remove roles with superuser access
Tiger Cloud service do not support roles with superuser access. Run the following script to remove statements, permissions and clauses that require superuser permissions from roles.sql:
- Dump the source database schema and data
The pg_dump flags remove superuser access and tablespaces from your data. When you run pgdump, check the run time, [a long-running pg_dump can cause issues][long-running-pgdump].
To dramatically reduce the time taken to dump the source database, using multiple connections. For more information, see [dumping with concurrency][dumping-with-concurrency] and [restoring with concurrency][restoring-with-concurrency].
Upload your data to the target Tiger Cloud service
This command uses the [timescaledb_pre_restore] and [timescaledb_post_restore] functions to put your database in the correct state.
Validate your Tiger Cloud service and restart your app
Update the table statistics.
Verify the data in the target Tiger Cloud service.
Check that your data is correct, and returns the results that you expect,
- Enable any Tiger Cloud features you want to use.
Migration from Postgres moves the data only. Now manually enable Tiger Cloud features like [hypertables][about-hypertables], [hypercore][data-compression] or [data retention][data-retention] while your database is offline.
- Reconfigure your app to use the target database, then restart it.
And that is it, you have migrated your data from a self-hosted instance running TimescaleDB to a Tiger Cloud service.
This section shows you how to move your data from self-hosted Postgres to a Tiger Cloud service using pg_dump and psql from Terminal.
Migration from Postgres moves the data only. You must manually enable Tiger Cloud features like [hypertables][about-hypertables], [hypercore][data-compression] or [data retention][data-retention] after the migration is complete. You enable Tiger Cloud features while your database is offline.
Prepare to migrate
- Take the applications that connect to the source database offline
The duration of the migration is proportional to the amount of data stored in your database. By disconnection your app from your database you avoid and possible data loss.
- Set your connection strings
These variables hold the connection information for the source database and target Tiger Cloud service:
You find the connection information for your Tiger Cloud service in the configuration file you downloaded when you created the service.
Align the extensions on the source and target
Ensure that the Tiger Cloud service is running the Postgres extensions used in your source database.
Check the extensions on the source database:
- For each extension, enable it on your target Tiger Cloud service:
Migrate the roles from TimescaleDB to your Tiger Cloud service
Roles manage database access permissions. To migrate your role-based security hierarchy to your Tiger Cloud service:
- Dump the roles from your source database
Export your role-based security hierarchy. <db_name> has the same value as <db_name> in source. I know, it confuses me as well.
If you only use the default postgres role, this step is not necessary.
- Remove roles with superuser access
Tiger Cloud service do not support roles with superuser access. Run the following script to remove statements, permissions and clauses that require superuser permissions from roles.sql:
- Dump the source database schema and data
The pg_dump flags remove superuser access and tablespaces from your data. When you run pgdump, check the run time, [a long-running pg_dump can cause issues][long-running-pgdump].
To dramatically reduce the time taken to dump the source database, using multiple connections. For more information, see [dumping with concurrency][dumping-with-concurrency] and [restoring with concurrency][restoring-with-concurrency].
Upload your data to the target Tiger Cloud service
Validate your Tiger Cloud service and restart your app
Update the table statistics.
Verify the data in the target Tiger Cloud service.
Check that your data is correct, and returns the results that you expect,
- Enable any Tiger Cloud features you want to use.
Migration from Postgres moves the data only. Now manually enable Tiger Cloud features like [hypertables][about-hypertables], [hypercore][data-compression] or [data retention][data-retention] while your database is offline.
- Reconfigure your app to use the target database, then restart it.
And that is it, you have migrated your data from a self-hosted instance running Postgres to a Tiger Cloud service.
To migrate your data from an Amazon RDS/Aurora Postgres instance to a Tiger Cloud service, you extract the data to an intermediary EC2 Ubuntu instance in the same AWS region as your RDS/Aurora Postgres instance. You then upload your data to a Tiger Cloud service. To make this process as painless as possible, ensure that the intermediary machine has enough CPU and disk space to rapidLy extract and store your data before uploading to Tiger Cloud.
Migration from RDS/Aurora Postgres moves the data only. You must manually enable Tiger Cloud features like [hypertables][about-hypertables], [data compression][data-compression] or [data retention][data-retention] after the migration is complete. You enable Tiger Cloud features while your database is offline.
This section shows you how to move your data from a Postgres database running in an Amazon RDS/Aurora Postgres instance to a Tiger Cloud service using pg_dump and psql from Terminal.
Create an intermediary EC2 Ubuntu instance
- In [https://console.aws.amazon.com/rds/home#databases:][databases], select the RDS/Aurora Postgres instance to migrate.
- Click
Actions>Set up EC2 connection. PressCreate EC2 instanceand use the following settings:- AMI: Ubuntu Server.
- Key pair: use an existing pair or create a new one that you will use to access the intermediary machine.
- VPC: by default, this is the same as the database instance.
- Configure Storage: adjust the volume to at least the size of RDS/Aurora Postgres instance you are migrating from. You can reduce the space used by your data on Tiger Cloud using [Hypercore][hypercore].
- Click
Lauch instance. AWS creates your EC2 instance, then clickConnect to instance>SSH client. Follow the instructions to create the connection to your intermediary EC2 instance.
Install the psql client tools on the intermediary instance
Connect to your intermediary EC2 instance. For example:
On your intermediary EC2 instance, install the Postgres client.
Keep this terminal open, you need it to connect to the RDS/Aurora Postgres instance for migration.
Set up secure connectivity between your RDS/Aurora Postgres and EC2 instances
- In [https://console.aws.amazon.com/rds/home#databases:][databases], select the RDS/Aurora Postgres instance to migrate.
- Scroll down to
Security group rules (1)and select theEC2 Security Group - Inboundgroup. TheSecurity Groups (1)window opens. Click theSecurity group ID, then clickEdit inbound rules

On your intermediary EC2 instance, get your local IP address:
Bear with me on this one, you need this IP address to enable access to your RDS/Aurora Postgres instance.
In
Edit inbound rules, clickAdd rule, then create aPostgreSQL,TCPrule granting access to the local IP address for your EC2 instance (told you 😃). Then clickSave rules.

Test the connection between your RDS/Aurora Postgres and EC2 instances
- In [https://console.aws.amazon.com/rds/home#databases:][databases], select the RDS/Aurora Postgres instance to migrate.
- On your intermediary EC2 instance, use the values of
Endpoint,Port,Master username, andDB nameto create the postgres connectivity string to theSOURCEvariable.

The value of Master password was supplied when this RDS/Aurora Postgres instance was created.
Test your connection:
You are connected to your RDS/Aurora Postgres instance from your intermediary EC2 instance.
Migrate your data to your Tiger Cloud service
To securely migrate data from your RDS instance:
Prepare to migrate
- Take the applications that connect to the RDS instance offline
The duration of the migration is proportional to the amount of data stored in your database. By disconnection your app from your database you avoid and possible data loss. You should also ensure that your source RDS instance is not receiving any DML queries.
Connect to your intermediary EC2 instance
Set your connection strings
These variables hold the connection information for the RDS instance and target Tiger Cloud service:
You find the connection information for SOURCE in your RDS configuration. For TARGET in the configuration file you downloaded when you created the Tiger Cloud service.
Align the extensions on the source and target
Ensure that the Tiger Cloud service is running the Postgres extensions used in your source database.
Check the extensions on the source database:
- For each extension, enable it on your target Tiger Cloud service:
Migrate roles from RDS to your Tiger Cloud service
Roles manage database access permissions. To migrate your role-based security hierarchy to your Tiger Cloud service:
- Dump the roles from your RDS instance
Export your role-based security hierarchy. If you only use the default postgres role, this step is not necessary.
AWS RDS does not allow you to export passwords with roles. You assign passwords to these roles when you have uploaded them to your Tiger Cloud service.
- Remove roles with superuser access
Tiger Cloud services do not support roles with superuser access. Run the following script to remove statements, permissions and clauses that require superuser permissions from roles.sql:
Upload the roles to your Tiger Cloud service
Manually assign passwords to the roles
AWS RDS did not allow you to export passwords with roles. For each role, use the following command to manually assign a password to a role:
Migrate data from your RDS instance to your Tiger Cloud service
- Dump the data from your RDS instance to your intermediary EC2 instance
The pg_dump flags remove superuser access and tablespaces from your data. When you run pgdump, check the run time, [a long-running pg_dump can cause issues][long-running-pgdump].
To dramatically reduce the time taken to dump the RDS instance, using multiple connections. For more information, see [dumping with concurrency][dumping-with-concurrency] and [restoring with concurrency][restoring-with-concurrency].
- Upload your data to your Tiger Cloud service
Validate your Tiger Cloud service and restart your app
Update the table statistics.
Verify the data in the target Tiger Cloud service.
Check that your data is correct, and returns the results that you expect,
- Enable any Tiger Cloud features you want to use.
Migration from Postgres moves the data only. Now manually enable Tiger Cloud features like [hypertables][about-hypertables], [hypercore][data-compression] or [data retention][data-retention] while your database is offline.
- Reconfigure your app to use the target database, then restart it.
And that is it, you have migrated your data from an RDS/Aurora Postgres instance to a Tiger Cloud service.
This section shows you how to move your data from a Managed Service for TimescaleDB instance to a Tiger Cloud service using pg_dump and psql from Terminal.
Prepare to migrate
- Take the applications that connect to the source database offline
The duration of the migration is proportional to the amount of data stored in your database. By disconnection your app from your database you avoid and possible data loss.
- Set your connection strings
These variables hold the connection information for the source database and target Tiger Cloud service:
You find the connection information for your Tiger Cloud service in the configuration file you downloaded when you created the service.
Align the version of TimescaleDB on the source and target
Ensure that the source and target databases are running the same version of TimescaleDB.
Check the version of TimescaleDB running on your Tiger Cloud service:
Update the TimescaleDB extension in your source database to match the target service:
If the TimescaleDB extension is the same version on the source database and target service, you do not need to do this.
For more information and guidance, see Upgrade TimescaleDB.
Ensure that the Tiger Cloud service is running the Postgres extensions used in your source database.
Check the extensions on the source database:
- For each extension, enable it on your target Tiger Cloud service:
Migrate the roles from TimescaleDB to your Tiger Cloud service
Roles manage database access permissions. To migrate your role-based security hierarchy to your Tiger Cloud service:
- Dump the roles from your source database
Export your role-based security hierarchy. <db_name> has the same value as <db_name> in source. I know, it confuses me as well.
MST does not allow you to export passwords with roles. You assign passwords to these roles when you have uploaded them to your Tiger Cloud service.
- Remove roles with superuser access
Tiger Cloud services do not support roles with superuser access. Run the following script to remove statements, permissions and clauses that require superuser permissions from roles.sql:
- Dump the source database schema and data
The pg_dump flags remove superuser access and tablespaces from your data. When you run pgdump, check the run time, [a long-running pg_dump can cause issues][long-running-pgdump].
To dramatically reduce the time taken to dump the source database, using multiple connections. For more information, see [dumping with concurrency][dumping-with-concurrency] and [restoring with concurrency][restoring-with-concurrency].
Upload your data to the target Tiger Cloud service
This command uses the [timescaledb_pre_restore] and [timescaledb_post_restore] functions to put your database in the correct state.
Upload your data
Manually assign passwords to the roles
MST did not allow you to export passwords with roles. For each role, use the following command to manually assign a password to a role:
Validate your Tiger Cloud service and restart your app
Update the table statistics.
Verify the data in the target Tiger Cloud service.
Check that your data is correct, and returns the results that you expect,
- Enable any Tiger Cloud features you want to use.
Migration from Postgres moves the data only. Now manually enable Tiger Cloud features like [hypertables][about-hypertables], [hypercore][data-compression] or [data retention][data-retention] while your database is offline.
- Reconfigure your app to use the target database, then restart it.
And that is it, you have migrated your data from a Managed Service for TimescaleDB instance to a Tiger Cloud service.
===== PAGE: https://docs.tigerdata.com/migrate/live-migration/ =====
Examples:
Example 1 (bash):
export SOURCE="postgres://<user>:<password>@<source host>:<source port>/<db_name>"
   export TARGET="postgres://tsdbadmin:<PASSWORD>@<HOST>:<PORT>/tsdb?sslmode=require"
Example 2 (bash):
psql target -c "SELECT extversion FROM pg_extension WHERE extname = 'timescaledb';"Example 3 (bash):
psql source -c "ALTER EXTENSION timescaledb UPDATE TO '<version here>';"Example 4 (bash):
psql source -c "SELECT * FROM pg_extension;"last()
URL: llms-txt#last()
Contents:
- Samples
- Required arguments
The last aggregate allows you to get the value of one column as ordered by another. For example, last(temperature, time) returns the latest temperature value based on time within an aggregate group.
The last and first commands do not use indexes, they perform a sequential scan through the group. They are primarily used for ordered selection within a GROUP BY aggregate, and not as an alternative to an ORDER BY time DESC LIMIT 1 clause to find the latest value, which uses indexes.
Get the temperature every 5 minutes for each device over the past day:
This example uses first and last with an aggregate filter, and avoids null values in the output:
Required arguments
| Name | Type | Description |
|---|---|---|
value | ANY ELEMENT | The value to return |
time | TIMESTAMP or INTEGER | The timestamp to use for comparison |
===== PAGE: https://docs.tigerdata.com/api/histogram/ =====
Examples:
Example 1 (sql):
SELECT device_id, time_bucket('5 minutes', time) AS interval,
  last(temp, time)
FROM metrics
WHERE time > now () - INTERVAL '1 day'
GROUP BY device_id, interval
ORDER BY interval DESC;
Example 2 (sql):
SELECT
   TIME_BUCKET('5 MIN', time_column) AS interv,
   AVG(temperature) as avg_temp,
   first(temperature,time_column) FILTER(WHERE time_column IS NOT NULL) AS beg_temp,
   last(temperature,time_column) FILTER(WHERE time_column IS NOT NULL) AS end_temp
FROM sensors
GROUP BY interv
About Tiger Cloud services
URL: llms-txt#about-tiger-cloud-services
Contents:
- Learn more about Tiger Cloud
- Keep testing during your free trial
- Advanced configuration
Tiger Cloud is the modern Postgres data platform for all your applications. It enhances Postgres to handle time series, events, real-time analytics, and vector search—all in a single database alongside transactional workloads.
You get one system that handles live data ingestion, late and out-of-order updates, and low latency queries, with the performance, reliability, and scalability your app needs. Ideal for IoT, crypto, finance, SaaS, and a myriad other domains, Tiger Cloud allows you to build data-heavy, mission-critical apps while retaining the familiarity and reliability of Postgres.
A Tiger Cloud service is a single optimised Postgres instance extended with innovations in the database engine and cloud infrastructure to deliver speed without sacrifice. A Tiger Cloud service is 10-1000x faster at scale! It is ideal for applications requiring strong data consistency, complex relationships, and advanced querying capabilities. Get ACID compliance, extensive SQL support, JSON handling, and extensibility through custom functions, data types, and extensions.
Each service is associated with a project in Tiger Cloud. Each project can have multiple services. Each user is a [member of one or more projects][rbac].
You create free and standard services in Tiger Cloud Console, depending on your [pricing plan][pricing-plans]. A free service comes at zero cost and gives you limited resources to get to know Tiger Cloud. Once you are ready to try out more advanced features, you can switch to a paid plan and convert your free service to a standard one.

The Free pricing plan and services are currently in beta.
To the Postgres you know and love, Tiger Cloud adds the following capabilities:
Standard services:
Real-time analytics: store and query [time-series data][what-is-time-series] at scale for real-time analytics and other use cases. Get faster time-based queries with hypertables, continuous aggregates, and columnar storage. Save money by compressing data into the columnstore, moving cold data to low-cost bottomless storage in Amazon S3, and deleting old data with automated policies.
- AI-focused: build AI applications from start to scale. Get fast and accurate similarity search with the pgvector and pgvectorscale extensions.
- Hybrid applications: get a full set of tools to develop applications that combine time-based data and AI.
All standard Tiger Cloud services include the tooling you expect for production and developer environments: [live migration][live-migration], [automatic backups and PITR][automatic-backups], [high availability][high-availability], [read replicas][readreplica], [data forking][operations-forking], [connection pooling][connection-pooling], [tiered storage][data-tiering], [usage-based storage][how-plans-work], secure in-Tiger Cloud Console [SQL editing][in-console-editors], service [metrics][metrics] and [insights][insights], [streamlined maintenance][maintain-upgrade], and much more. Tiger Cloud continuously monitors your services and prevents common Postgres out-of-memory crashes.
Postgres with TimescaleDB and vector extensions
Free services offer limited resources and a basic feature scope, perfect to get to know Tiger Cloud in a development environment.
Learn more about Tiger Cloud
Read about Tiger Cloud features in the documentation:
- Create your first [hypertable][hypertable-info].
- Run your first query using [time_bucket()][time-bucket-info].
- Trying more advanced time-series functions, starting with [gap filling][gap-filling-info] or [real-time aggregates][aggregates-info].
Keep testing during your free trial
You're now on your way to a great start with Tiger Cloud.
You have an unthrottled, 30-day free trial with Tiger Cloud to continue to test your use case. Before the end of your trial, make sure you add your credit card information. This ensures a smooth transition after your trial period concludes.
If you have any questions, you can [join our community Slack group][slack-info] or [contact us][contact-timescale] directly.
Advanced configuration
Tiger Cloud is a versatile hosting service that provides a growing list of advanced features for your Postgres and time-series data workloads.
For more information about customizing your database configuration, see the [Configuration section][configuration].
The TimescaleDB Terraform provider provides configuration management resources for Tiger Cloud. You can use it to create, rename, resize, delete, and import services. For more information about the supported service configurations and operations, see the Terraform provider documentation.
===== PAGE: https://docs.tigerdata.com/use-timescale/write-data/ =====
Integrate DBeaver with Tiger
URL: llms-txt#integrate-dbeaver-with-tiger
Contents:
- Prerequisites
- Connect DBeaver to your Tiger Cloud service
[DBeaver][dbeaver] is a free cross-platform database tool for developers, database administrators, analysts, and everyone working with data. DBeaver provides an SQL editor, administration features, data and schema migration, and the ability to monitor database connection sessions.
This page explains how to integrate DBeaver with your Tiger Cloud service.
To follow the steps on this page:
- Create a target [Tiger Cloud service][create-service] with the Real-time analytics capability.
You need [your connection details][connection-info]. This procedure also works for [self-hosted TimescaleDB][enable-timescaledb].
- Download and install [DBeaver][dbeaver-downloads].
Connect DBeaver to your Tiger Cloud service
To connect to Tiger Cloud:
- Start
DBeaver - In the toolbar, click the plug+ icon
- In
Connect to a databasesearch forTimescaleDB - Select
TimescaleDB, then clickNext - Configure the connection
Use your [connection details][connection-info] to add your connection settings. 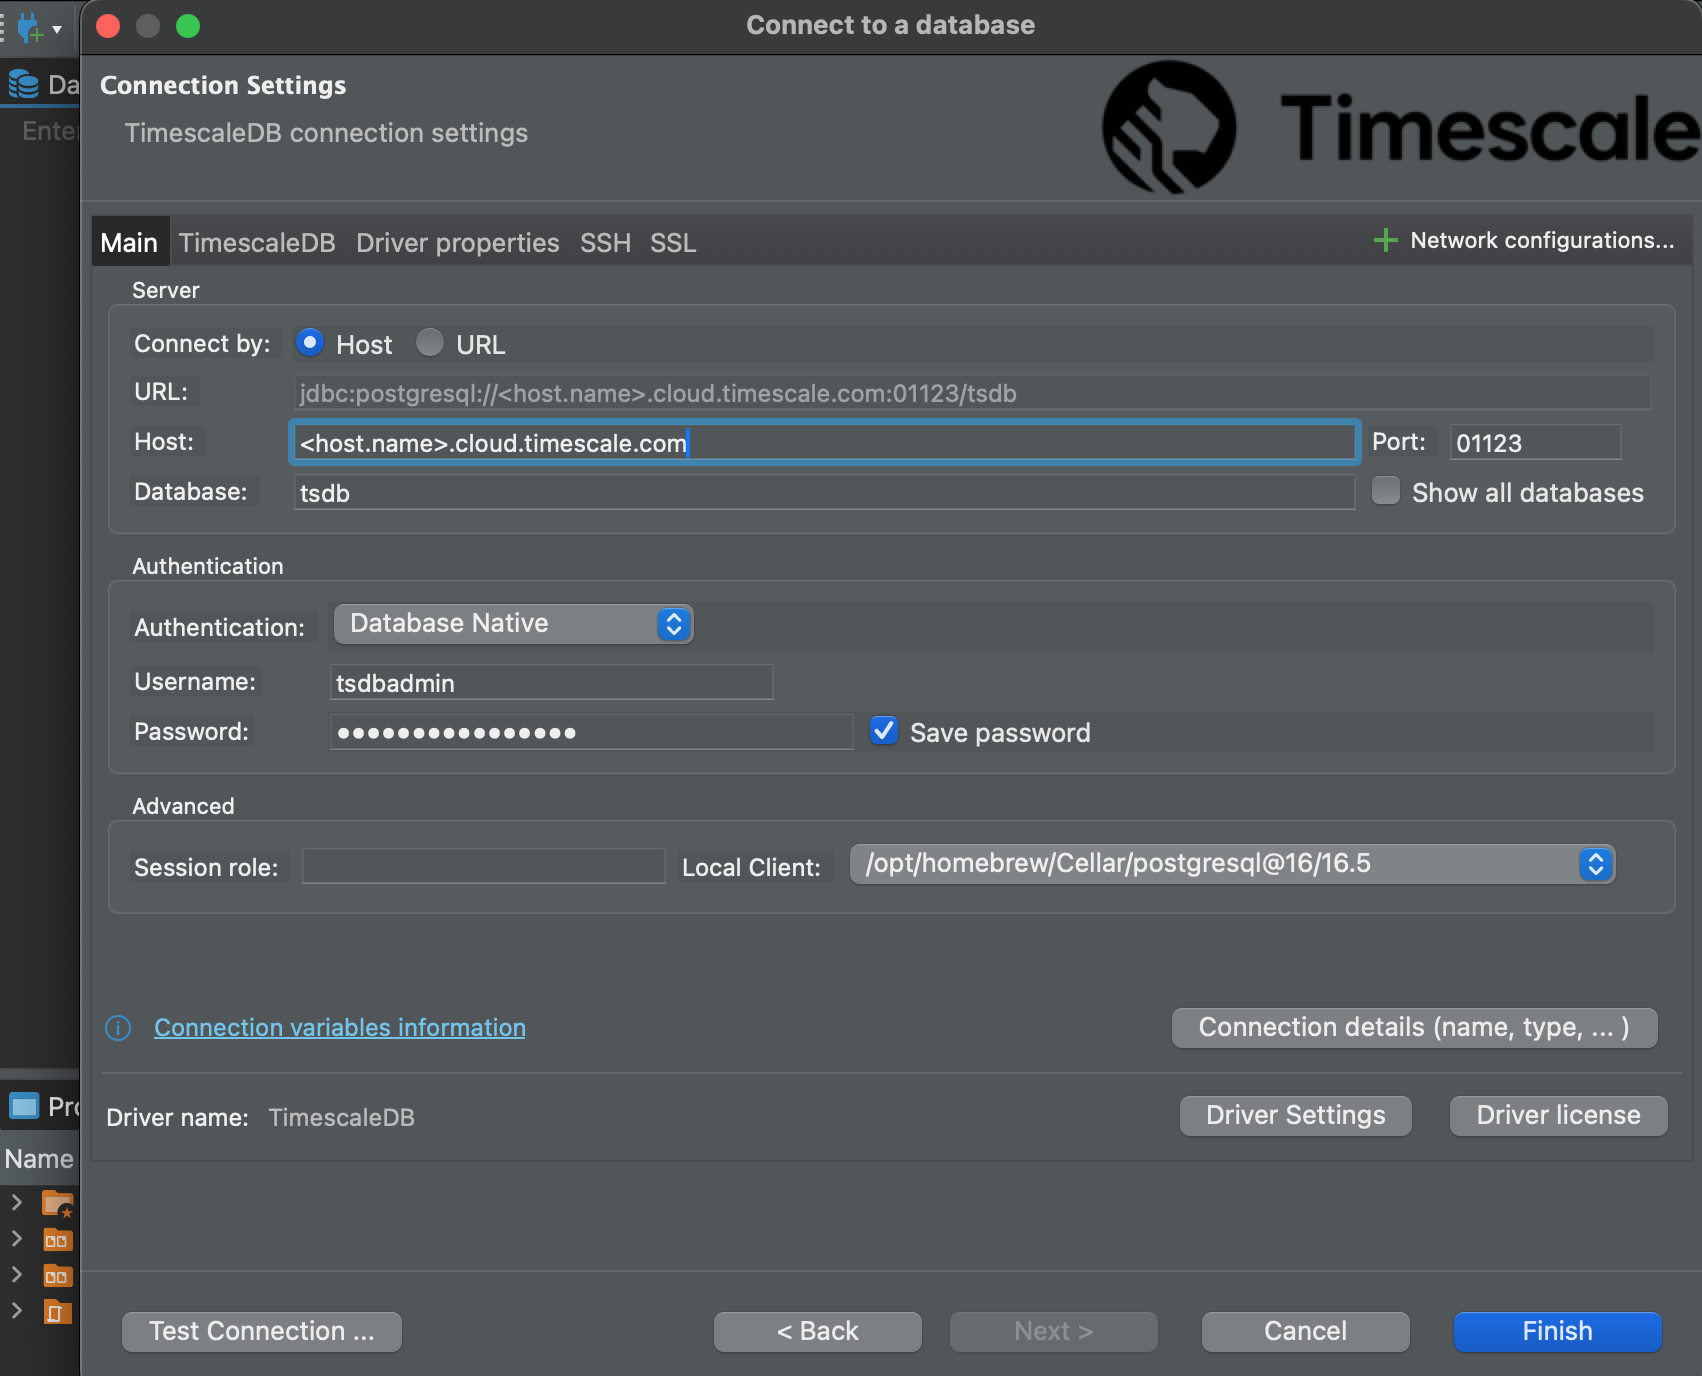
If you configured your service to connect using a [stricter SSL mode][ssl-mode], in the SSL tab check Use SSL and set SSL mode to the configured mode. Then, in the CA Certificate field type the location of the SSL root CA certificate.
- Click
Test Connection. When the connection is successful, clickFinish
Your connection is listed in the Database Navigator.
You have successfully integrated DBeaver with Tiger Cloud.
===== PAGE: https://docs.tigerdata.com/integrations/qstudio/ =====
Integrate pgAdmin with Tiger
URL: llms-txt#integrate-pgadmin-with-tiger
Contents:
- Prerequisites
- Connect pgAdmin to your Tiger Cloud service
[pgAdmin][pgadmin] is a feature-rich open-source administration and development platform for Postgres. It is available for Chrome, Firefox, Edge, and Safari browsers, or can be installed on Microsoft Windows, Apple macOS, or various Linux flavors.
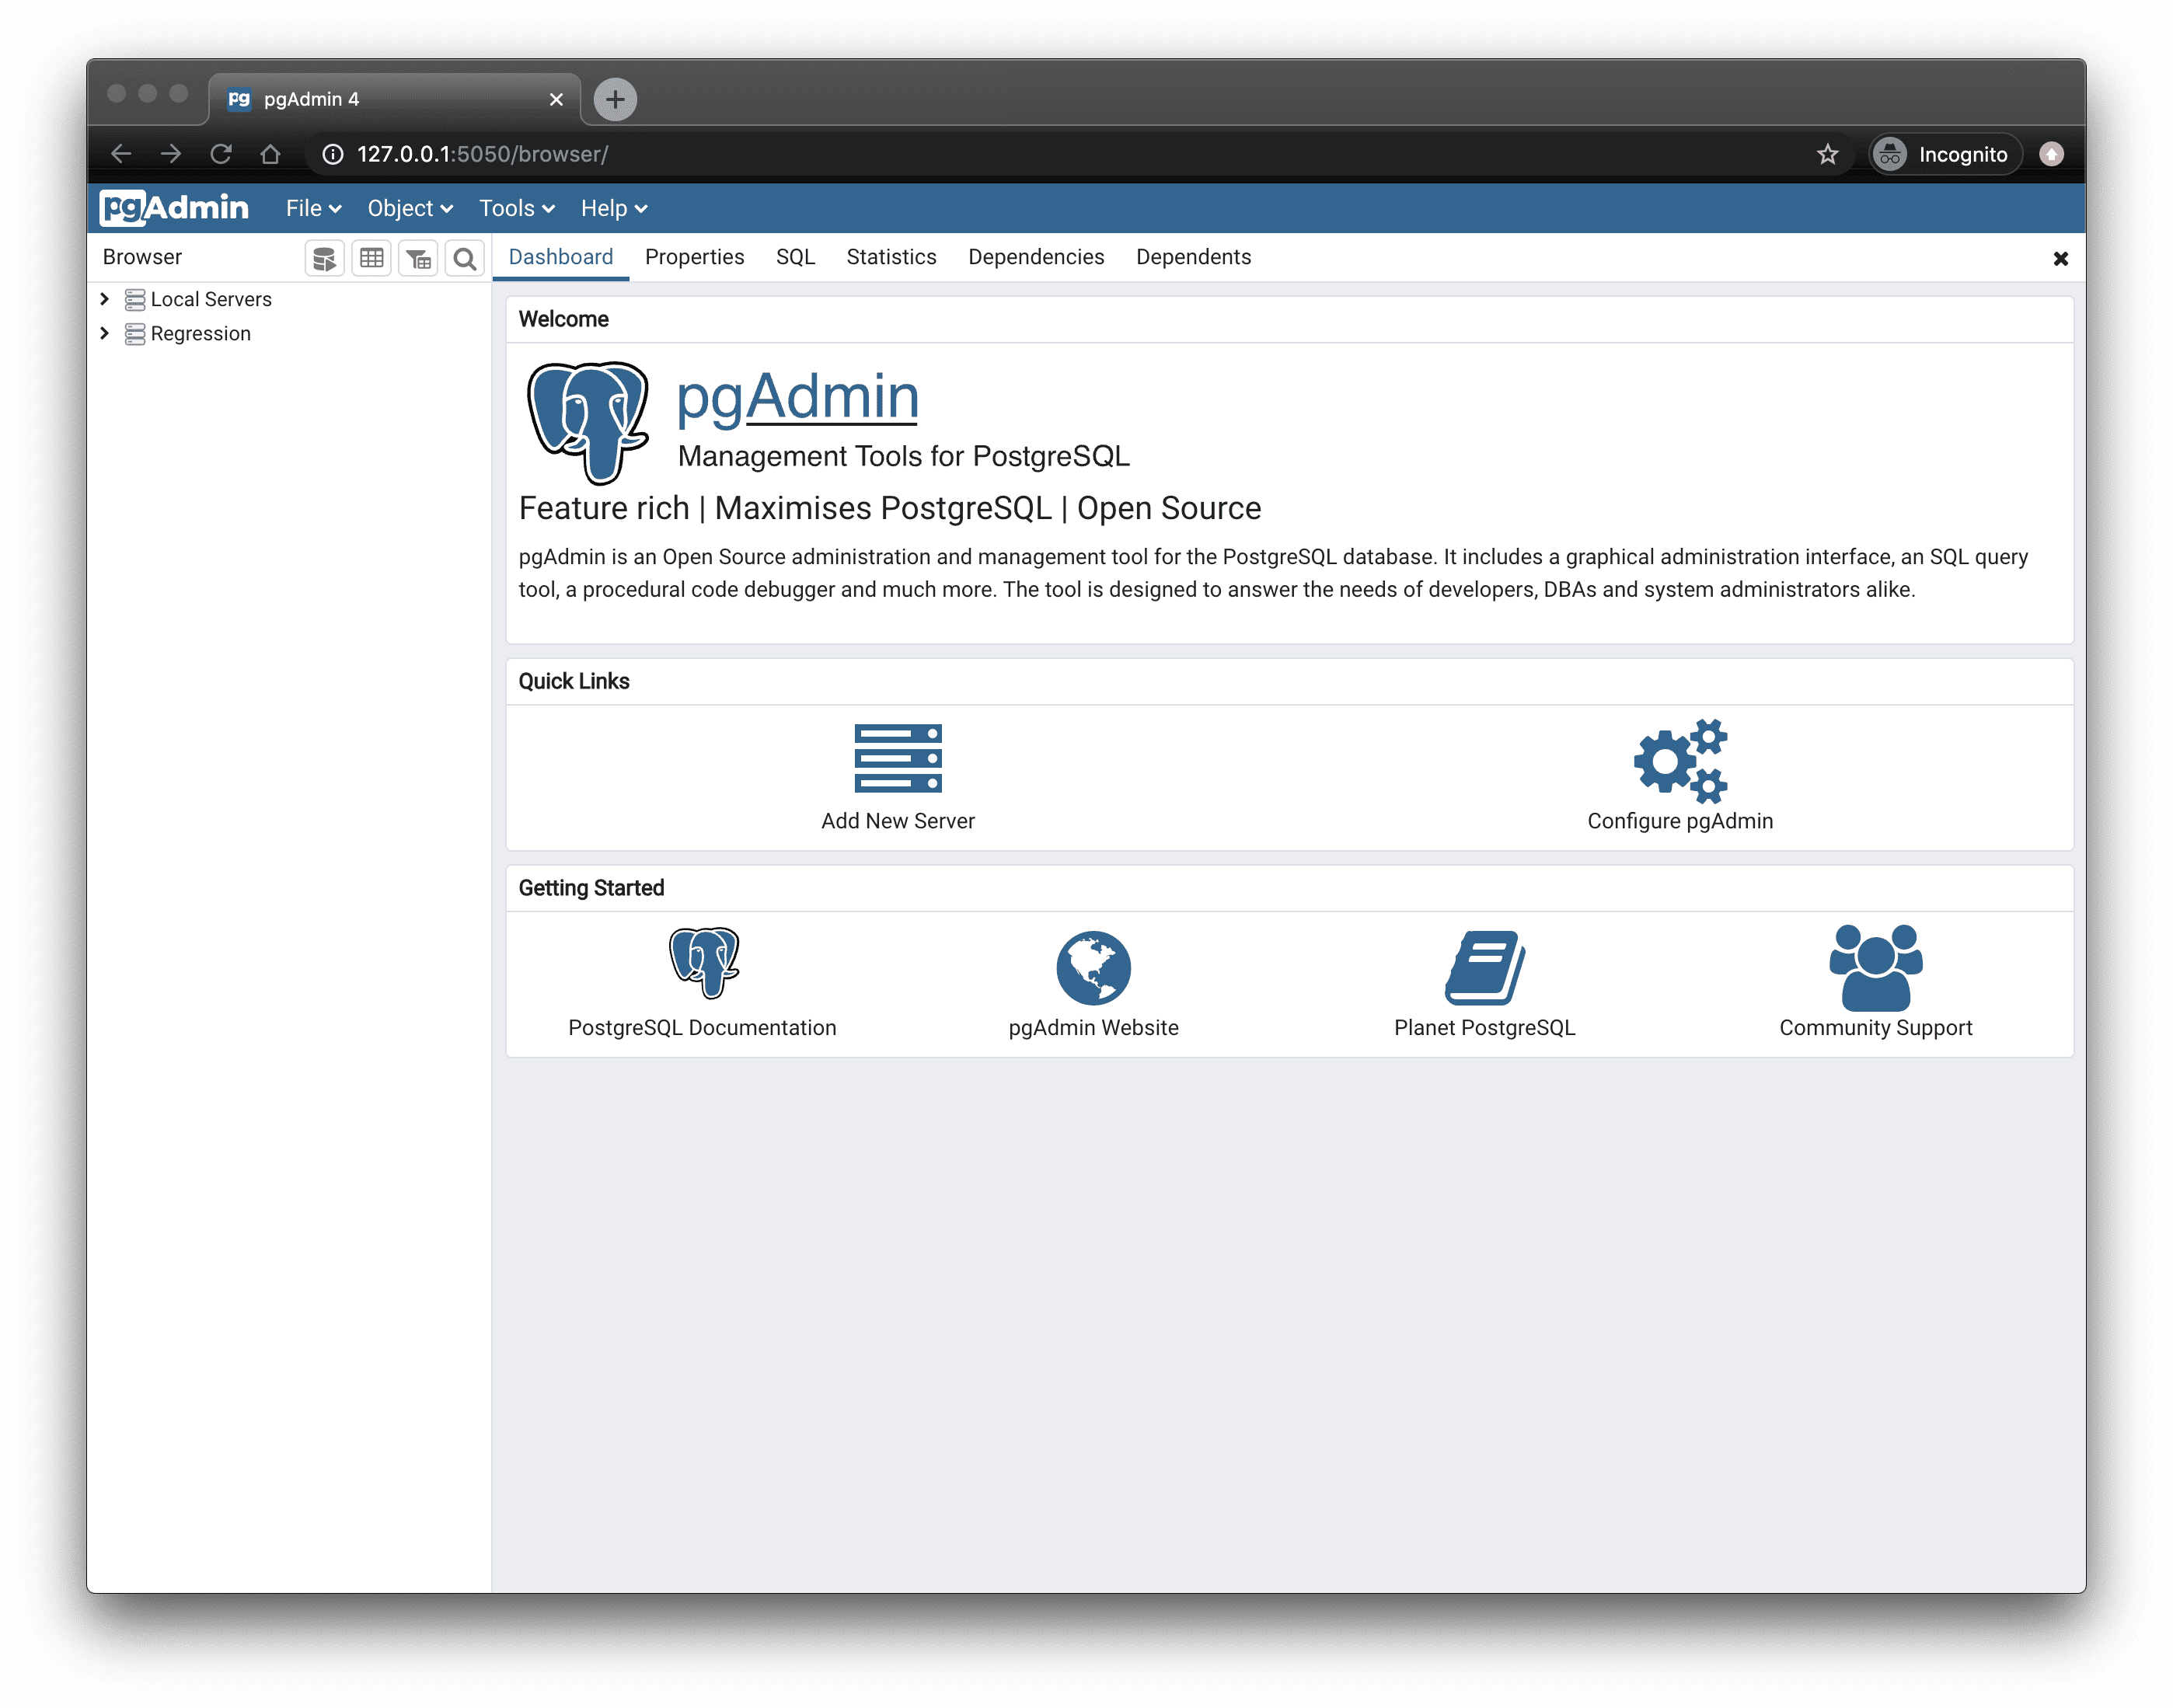
This page explains how to integrate pgAdmin with your Tiger Cloud service.
To follow the steps on this page:
- Create a target [Tiger Cloud service][create-service] with the Real-time analytics capability.
You need [your connection details][connection-info]. This procedure also works for [self-hosted TimescaleDB][enable-timescaledb].
- [Download][download-pgadmin] and install pgAdmin.
Connect pgAdmin to your Tiger Cloud service
To connect to Tiger Cloud:
- Start pgAdmin
- In the
Quick Linkssection of theDashboardtab, clickAdd New Server - In
Register - Server>General, fill in theNameandCommentsfields with the server name and description, respectively - Configure the connection
- In the
Connectiontab, configure the connection using your [connection details][connection-info]. - If you configured your service to connect using a [stricter SSL mode][ssl-mode], then in the
SSLtab checkUse SSL, setSSL modeto the configured mode, and in theCA Certificatefield type the location of the SSL root CA certificate to use.
- In the
- Click
Save
You have successfully integrated pgAdmin with Tiger Cloud.
===== PAGE: https://docs.tigerdata.com/integrations/kubernetes/ =====
timescaledb_experimental.policies
URL: llms-txt#timescaledb_experimental.policies
Contents:
- Samples
- Available columns
The policies view provides information on all policies set on continuous aggregates.
Only policies applying to continuous aggregates are shown in this view. Policies applying to regular hypertables or regular materialized views are not displayed.
Experimental features could have bugs. They might not be backwards compatible, and could be removed in future releases. Use these features at your own risk, and do not use any experimental features in production.
Select from the timescaledb_experimental.policies table to view it:
Example of the returned output:
| Column | Type | Description |
|---|---|---|
relation_name | Name of the continuous aggregate | |
relation_schema | Schema of the continuous aggregate | |
schedule_interval | How often the policy job runs | |
proc_schema | Schema of the policy job | |
proc_name | Name of the policy job | |
config | Configuration details for the policy job | |
hypertable_schema | Schema of the hypertable that contains the actual data for the continuous aggregate view | |
hypertable_name | Name of the hypertable that contains the actual data for the continuous aggregate view |
===== PAGE: https://docs.tigerdata.com/api/informational-views/chunks/ =====
Examples:
Example 1 (sql):
SELECT * FROM timescaledb_experimental.policies;Example 2 (sql):
-[ RECORD 1 ]--------------------------------------------------------------------
relation_name     | mat_m1
relation_schema   | public
schedule_interval | @ 1 hour
proc_schema       | _timescaledb_internal
proc_name         | policy_refresh_continuous_aggregate
config            | {"end_offset": 1, "start_offset", 10, "mat_hypertable_id": 2}
hypertable_schema | _timescaledb_internal
hypertable_name   | _materialized_hypertable_2
-[ RECORD 2 ]--------------------------------------------------------------------
relation_name     | mat_m1
relation_schema   | public
schedule_interval | @ 1 day
proc_schema       | _timescaledb_internal
proc_name         | policy_compression
config            | {"hypertable_id": 2, "compress_after", 11}
hypertable_schema | _timescaledb_internal
hypertable_name   | _materialized_hypertable_2
-[ RECORD 3 ]--------------------------------------------------------------------
relation_name     | mat_m1
relation_schema   | public
schedule_interval | @ 1 day
proc_schema       | _timescaledb_internal
proc_name         | policy_retention
config            | {"drop_after": 20, "hypertable_id": 2}
hypertable_schema | _timescaledb_internal
hypertable_name   | _materialized_hypertable_2
Integrate Decodable with Tiger Cloud
URL: llms-txt#integrate-decodable-with-tiger-cloud
Contents:
- Prerequisites
- Connect Decodable to your Tiger Cloud service
[Decodable][decodable] is a real-time data platform that allows you to build, run, and manage data pipelines effortlessly.
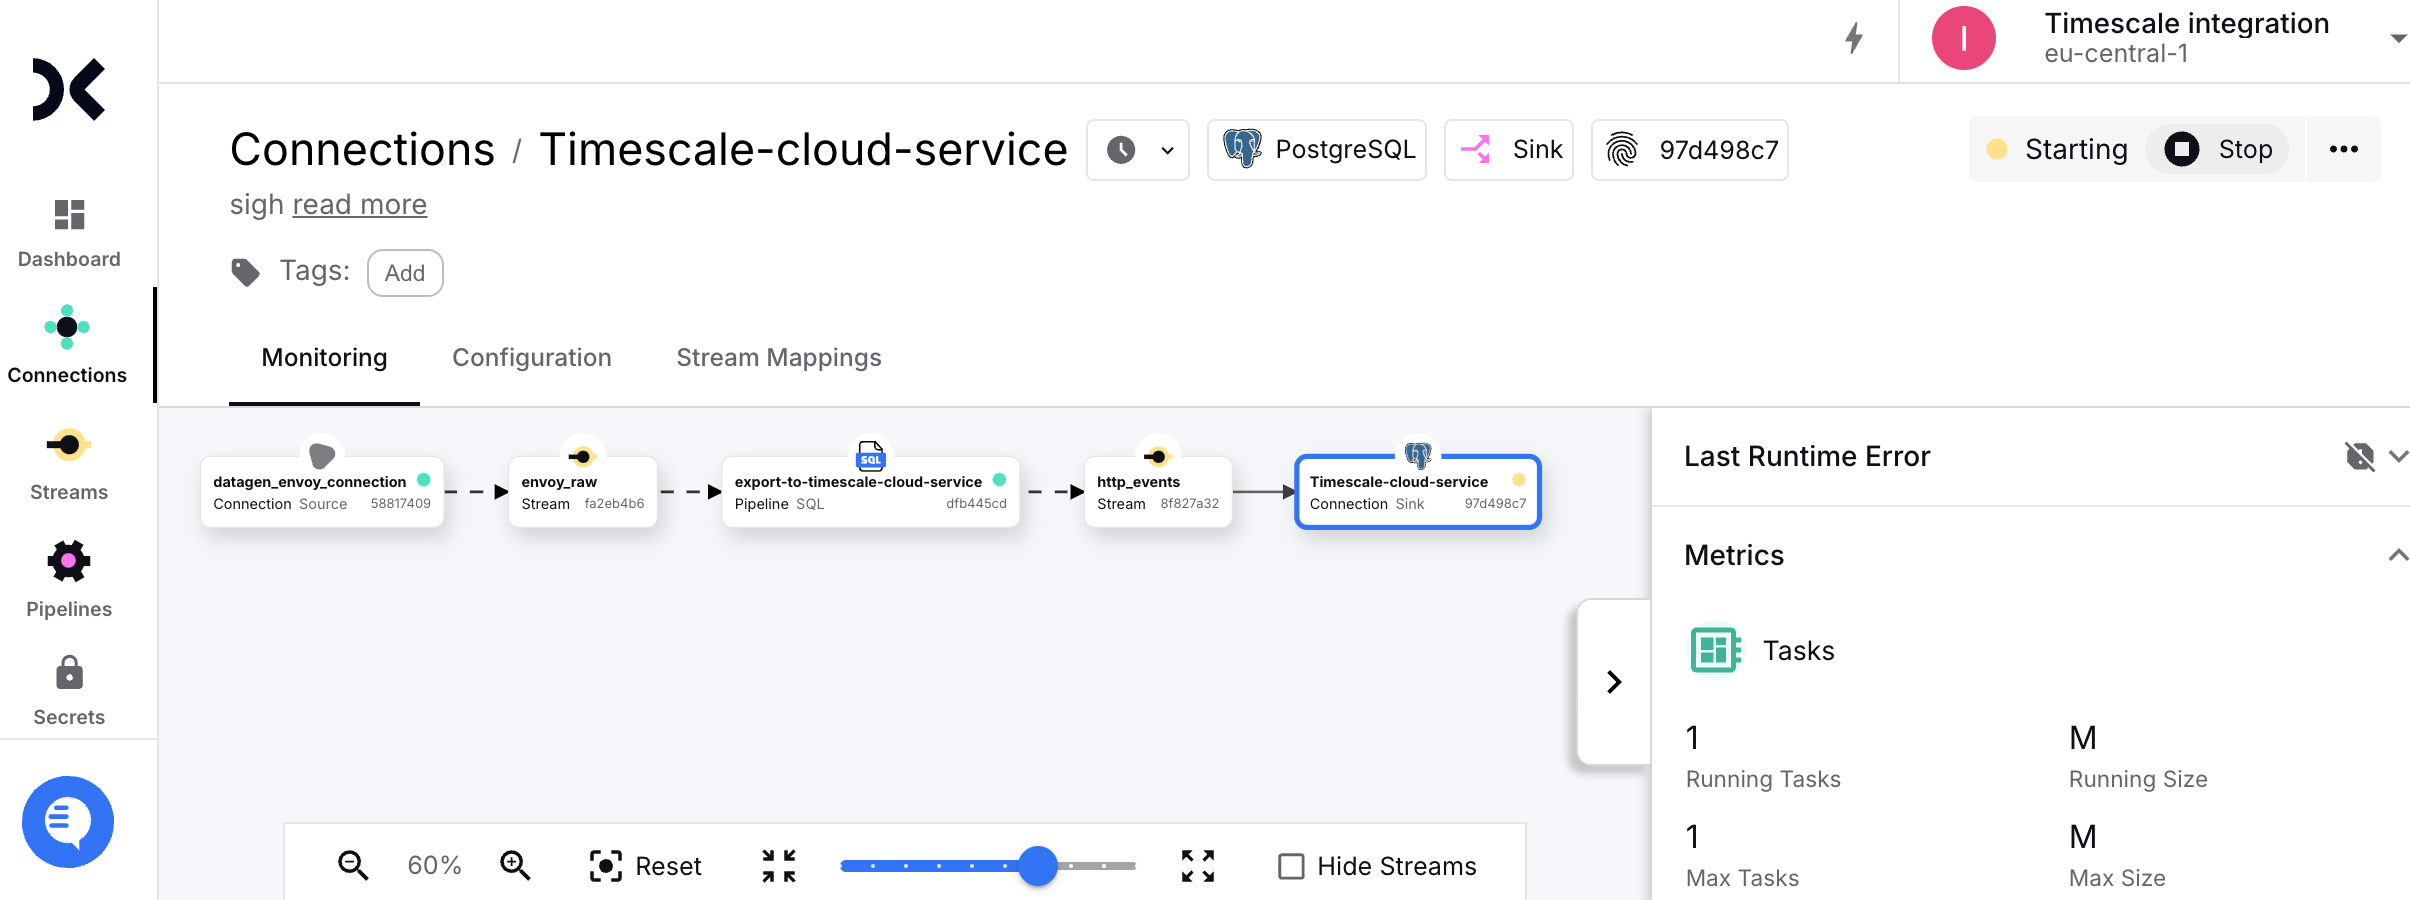
This page explains how to integrate Decodable with your Tiger Cloud service to enable efficient real-time streaming and analytics.
To follow the steps on this page:
- Create a target [Tiger Cloud service][create-service] with the Real-time analytics capability.
You need [your connection details][connection-info]. This procedure also works for [self-hosted TimescaleDB][enable-timescaledb].
- Sign up for [Decodable][sign-up-decodable].
This page uses the pipeline you create using the [Decodable Quickstart Guide][decodable-quickstart].
Connect Decodable to your Tiger Cloud service
To stream data gathered in Decodable to a Tiger Cloud service:
Create the sync to pipe a Decodable data stream into your Tiger Cloud service
Log in to your [Decodable account][decodable-app].
- Click
Connections, then clickNew Connection. - Select a
PostgreSQL sinkconnection type, then clickConnect. - Using your [connection details][connection-info], fill in the connection information.
- Click
Leave schema and JDBC options empty.
- Select the
http_eventssource stream, then clickNext.
Decodable creates the table in your Tiger Cloud service and starts streaming data.
Test the connection
Connect to your Tiger Cloud service.
For Tiger Cloud, open an [SQL editor][run-queries] in [Tiger Cloud Console][open-console]. For self-hosted TimescaleDB, use [psql][psql].
- Check the data from Decodable is streaming into your Tiger Cloud service.
You see something like:
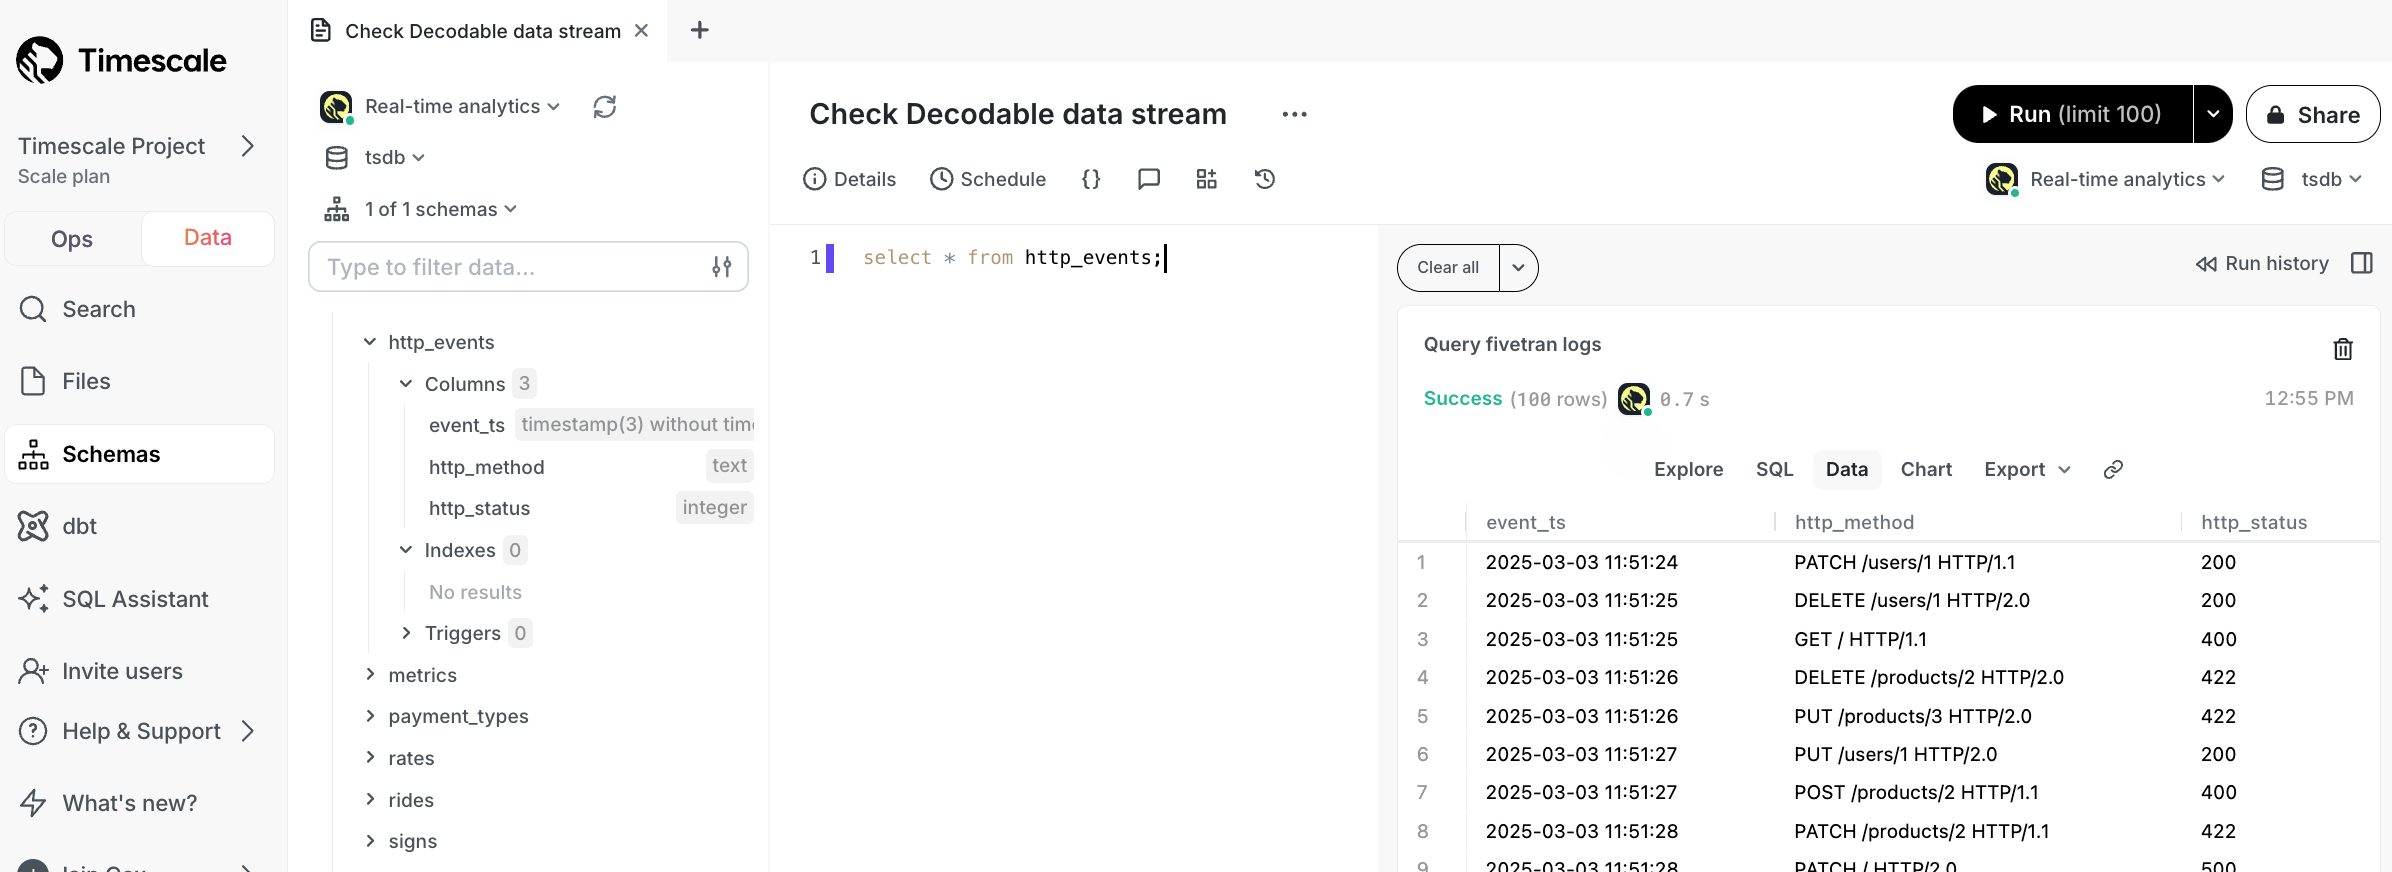
You have successfully integrated Decodable with Tiger Cloud.
===== PAGE: https://docs.tigerdata.com/integrations/debezium/ =====
Examples:
Example 1 (sql):
SELECT * FROM http_events;to_uuidv7_boundary()
URL: llms-txt#to_uuidv7_boundary()
Contents:
- Samples
- Arguments
Create a UUIDv7 object from a Postgres timestamp for use in range queries.
ts is converted to a UNIX timestamp split into millisecond and sub-millisecond parts.

The random bits of the UUID are set to zero in order to create a "lower" boundary UUID.
For example, you can use the returned UUIDvs to find all rows with UUIDs where the timestamp is less than the boundary UUID's timestamp.
- Create a boundary UUID from a timestamp:
Returns something like:
- Use a boundary UUID to find all UUIDs with a timestamp below
'2025-09-04 10:00':
| Name | Type | Default | Required | Description |
|---|---|---|---|---|
ts | TIMESTAMPTZ | - | ✔ | The timestamp used to return a UUIDv7 object |
===== PAGE: https://docs.tigerdata.com/api/distributed-hypertables/cleanup_copy_chunk_operation_experimental/ =====
Examples:
Example 1 (sql):
postgres=# SELECT to_uuidv7_boundary('2025-09-04 11:01');Example 2 (terminaloutput):
to_uuidv7_boundary
    --------------------------------------
     019913f5-30e0-7000-8000-000000000000
Example 3 (sql):
SELECT * FROM uuid_events WHERE event_id < to_uuidv7_boundary('2025-09-04 10:00');Virtual Private Cloud
URL: llms-txt#virtual-private-cloud
Contents:
- Prerequisites
- Set up a secured connection between Tiger Cloud and AWS
- Create a Peering VPC in Tiger Cloud Console
- Complete the VPC connection in AWS
- Set up security groups in AWS
- Attach a Tiger Cloud service to the Peering VPC
- Migrate a Tiger Cloud service between VPCs
You use Virtual Private Cloud (VPC) peering to ensure that your Tiger Cloud services are only accessible through your secured AWS infrastructure. This reduces the potential attack vector surface and improves security.
The data isolation architecture that ensures a highly secure connection between your apps and Tiger Cloud is:
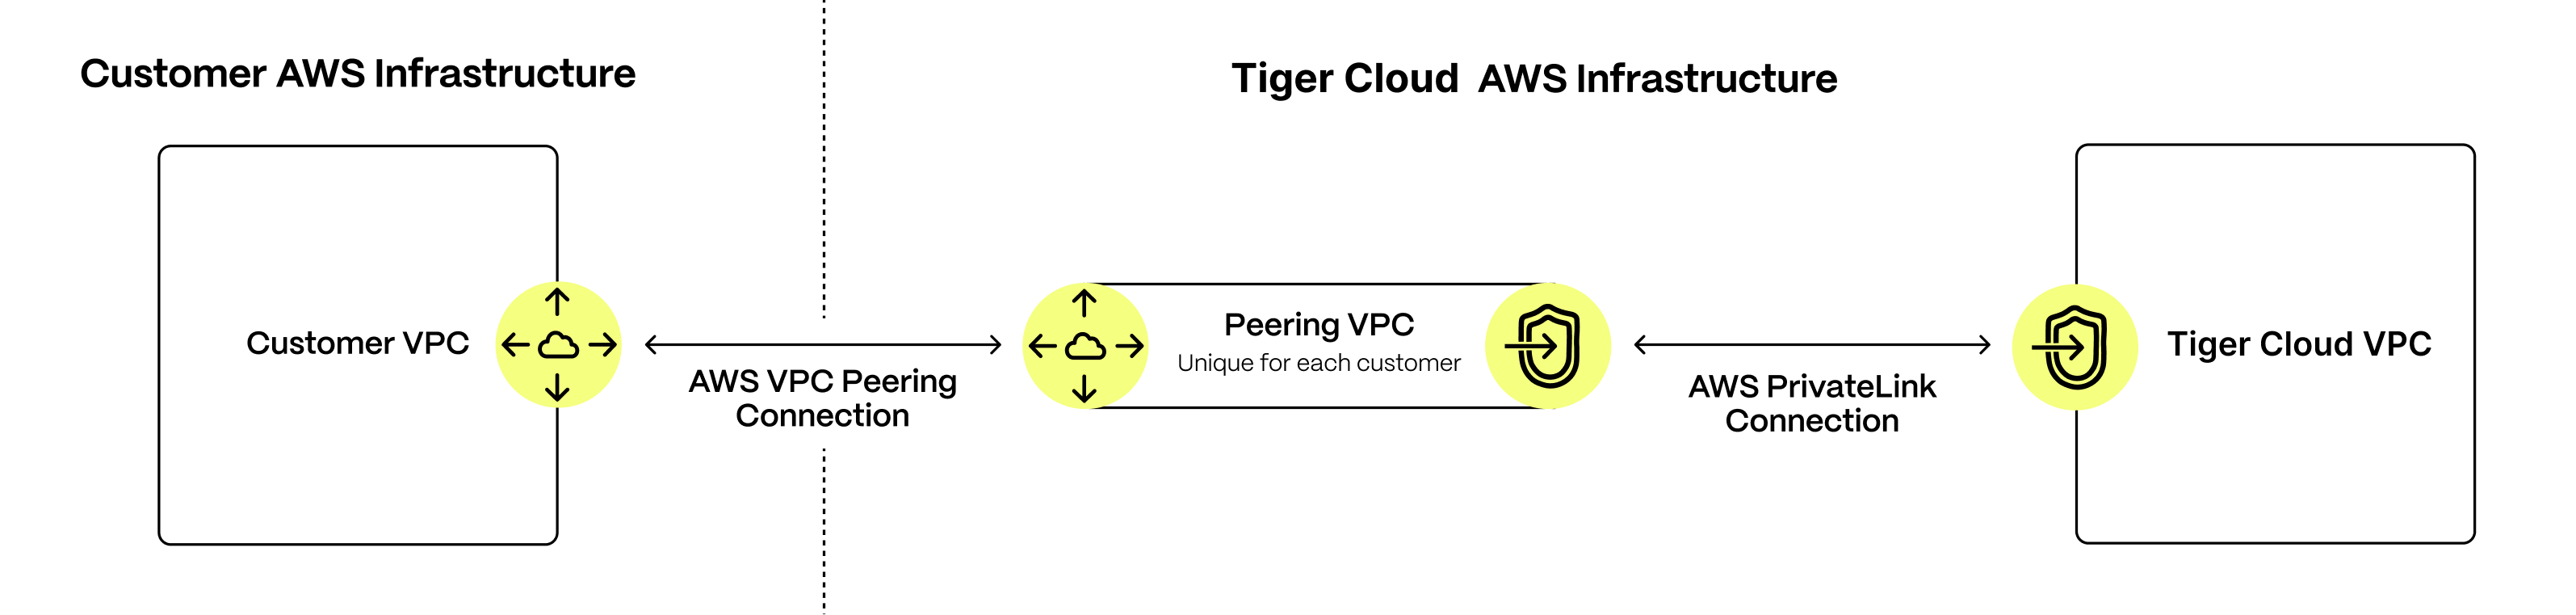
Your customer apps run inside your AWS Customer VPC, your Tiger Cloud services always run inside the secure Tiger Cloud VPC. You control secure communication between apps in your VPC and your services using a dedicated Peering VPC. The AWS PrivateLink connecting Tiger Cloud VPC to the dedicated Peering VPC gives the same level of protection as using a direct AWS PrivateLink connection. It only enables communication to be initiated from your Customer VPC to services running in the Tiger Cloud VPC. Tiger Cloud cannot initiate communication with your Customer VPC.
To configure this secure connection, you first create a Peering VPC with AWS PrivateLink in Tiger Cloud Console. After you have accepted and configured the peering connection to your Customer VPC, you use AWS Security Groups to restrict the apps in your Customer VPC that are visible to the Peering VPC. The last step is to attach individual services to the Peering VPC in Tiger Cloud Console.
You create each Peering VPC on a [Tiger Cloud project level][project-members].
You can attach:
- Up to 50 Customer VPCs to a Peering VPC.
- A Tiger Cloud service to a single Peering VPC at a time. The service and the Peering VPC must be in the same AWS region. However, you can peer a Customer VPC and a Peering VPC that are in different regions.
- Multiple Tiger Cloud services to the same Peering VPC.
You cannot attach a Tiger Cloud service to multiple Peering VPCs at the same time.
The number of Peering VPCs you can create in your project depends on your [pricing plan][pricing-plans]. If you need another Peering VPC, either contact support@tigerdata.com or change your pricing plan in [Tiger Cloud Console][console-login].
To set up VPC peering, you need the following permissions in your AWS account:
- Accept VPC peering requests
- Configure route table rules
- Configure security group and firewall rules
Set up a secured connection between Tiger Cloud and AWS
To connect to a Tiger Cloud service using VPC peering, your apps and infrastructure must be already running in an Amazon Web Services (AWS) VPC. You can peer your VPC from any AWS region. However, your Peering VPC must be within one of the [Cloud-supported regions][tsc-regions].
The stages to create a secured connection between Tiger Cloud services and your AWS infrastructure are:
- [Create a Peering VPC in Tiger Cloud Console][aws-vpc-setup-vpc]
- [Complete the VPC connection in your AWS][aws-vpc-complete]
- [Set up security groups in your AWS][aws-vpc-security-groups]
- [Attach a Tiger Cloud service to the Peering VPC][aws-vpc-connect-vpcs]
Create a Peering VPC in Tiger Cloud Console
Create the VPC and the peering connection that enables you to securely route traffic between Tiger Cloud and your Customer VPC in a logically isolated virtual network.
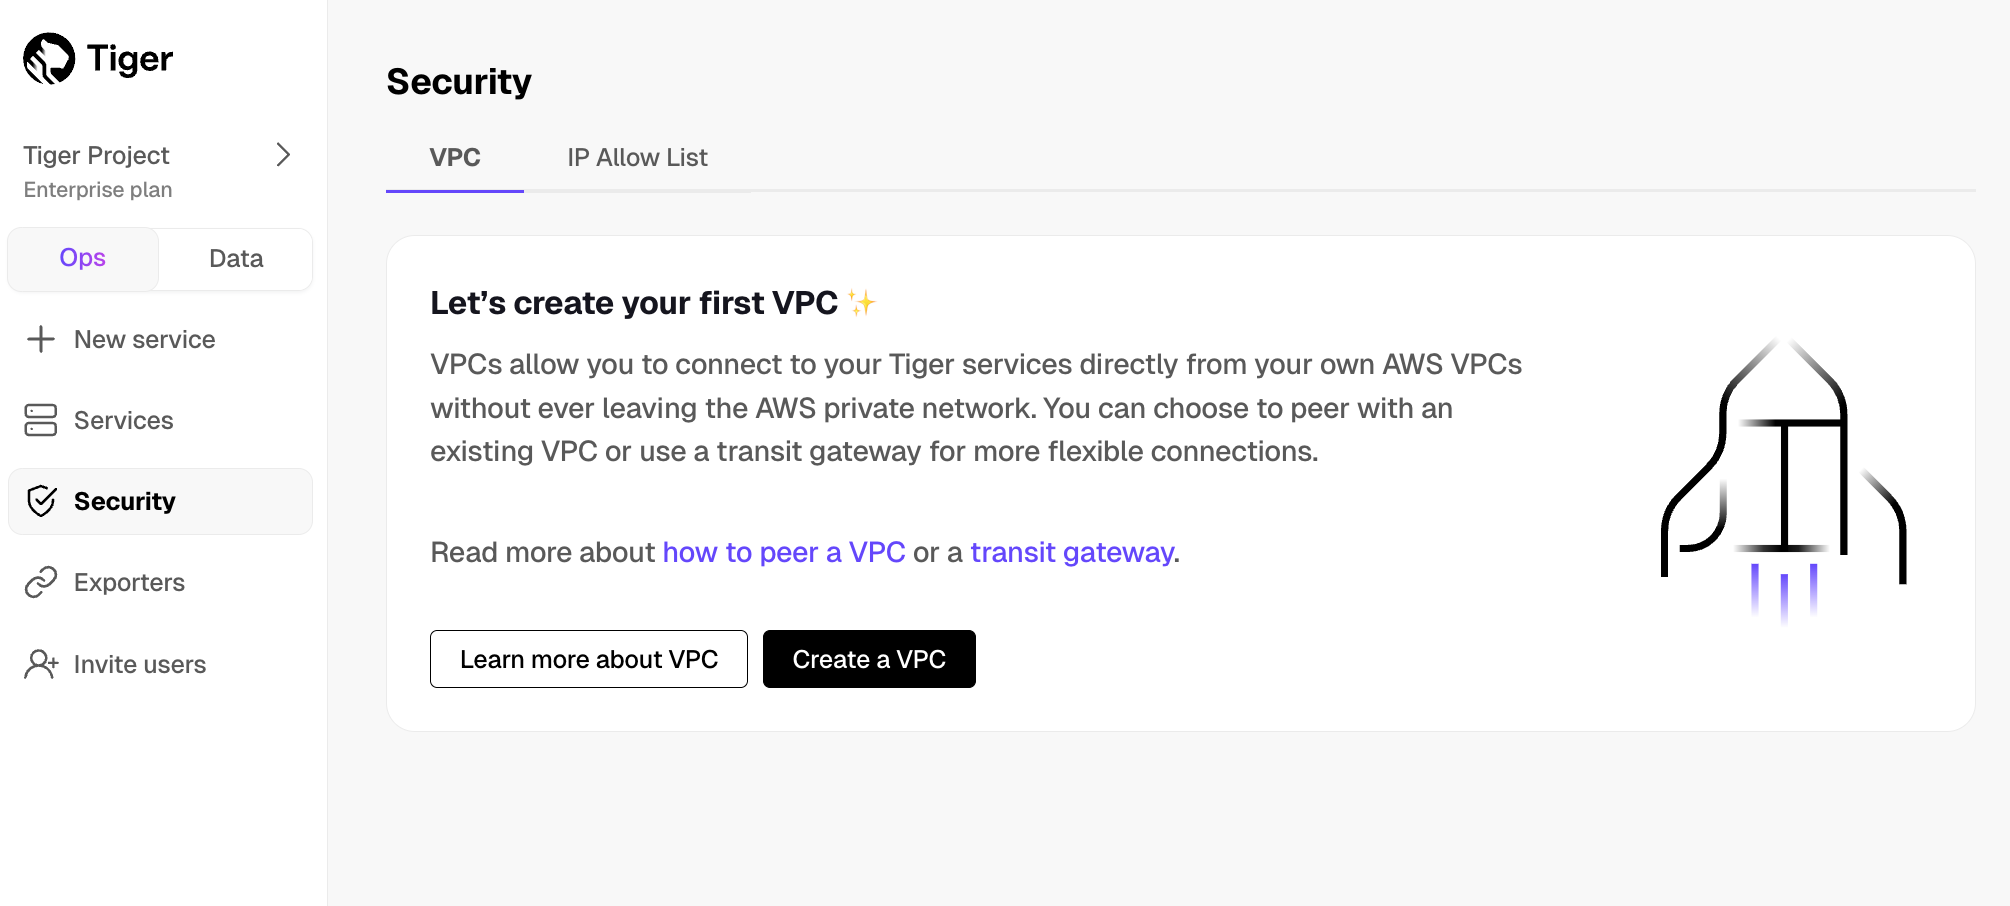
- In [Tiger Cloud Console > Security > VPC][console-vpc], click
Create a VPC
- Choose your region and IP range, name your VPC, then click
Create VPC
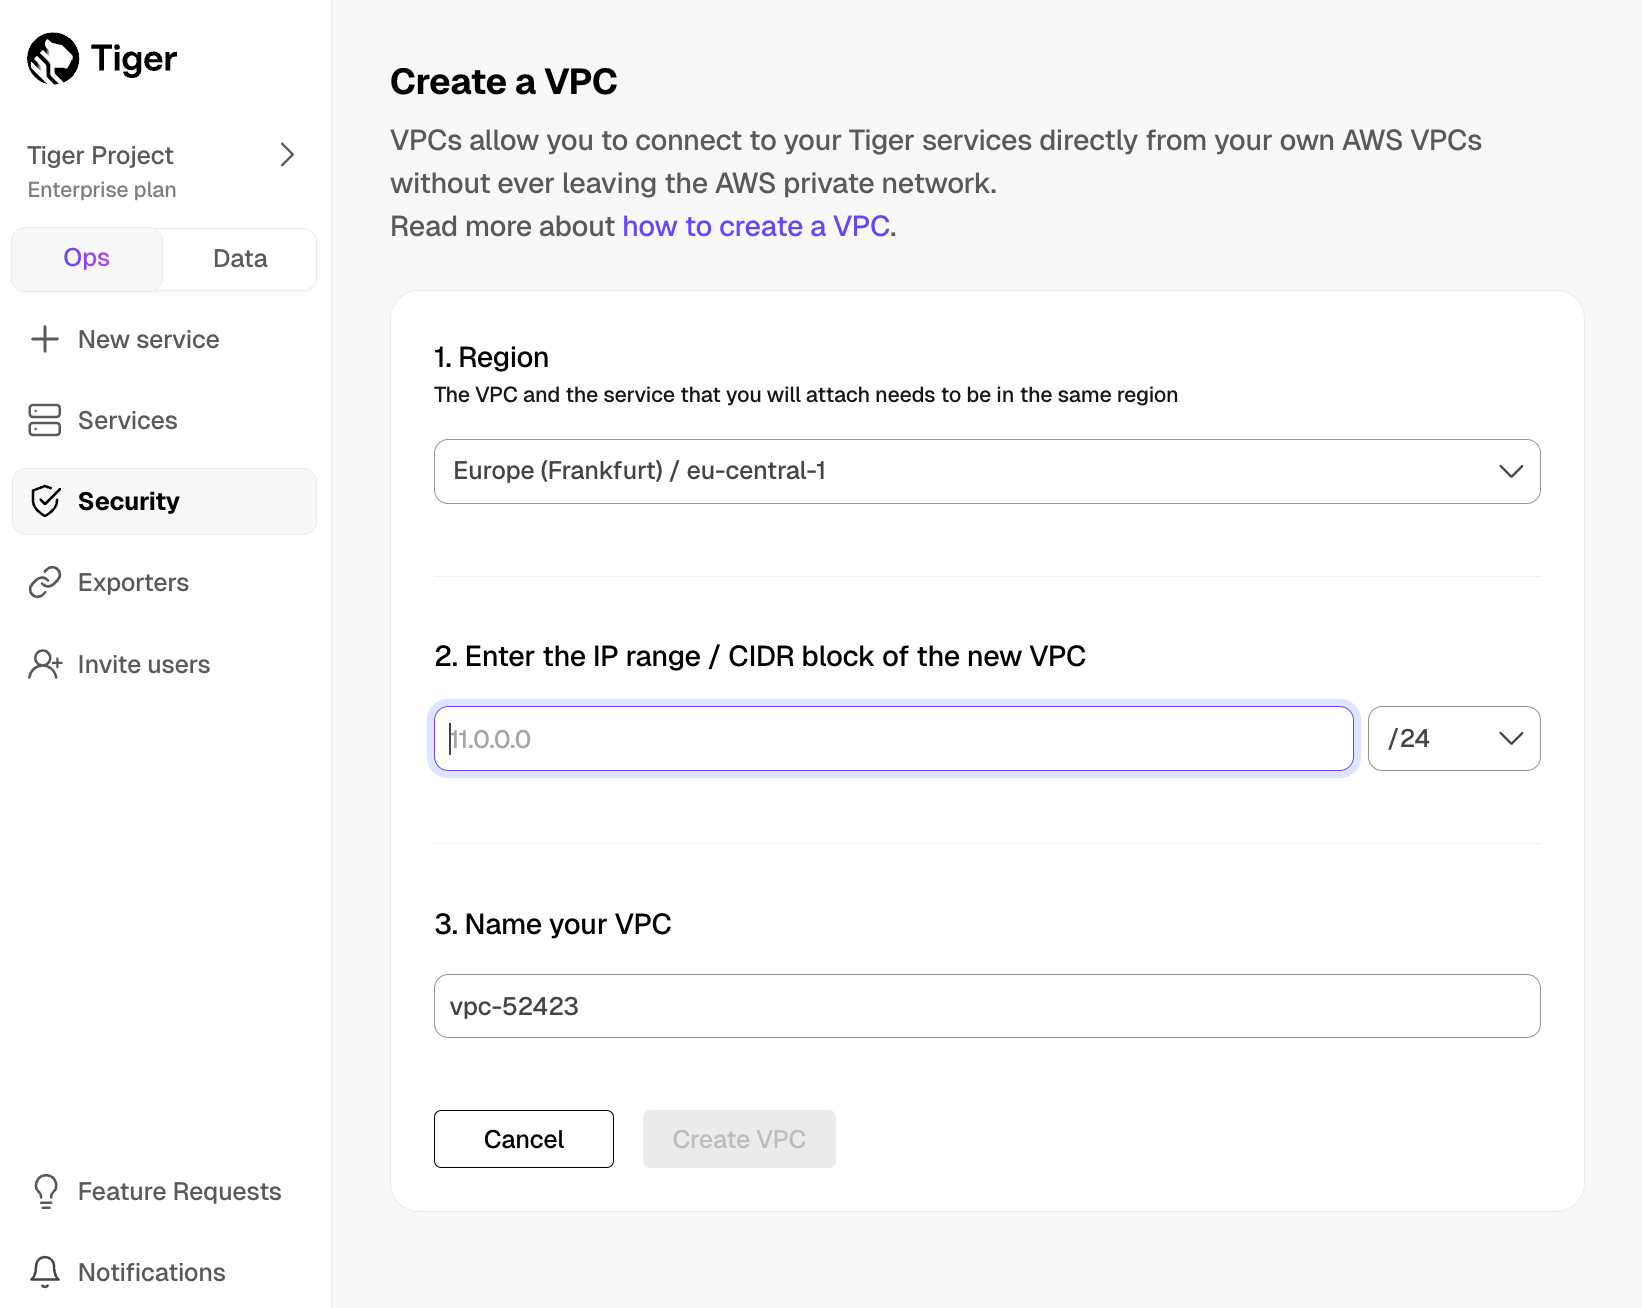
The IP ranges of the Peering VPC and Customer VPC should not overlap.
For as many peering connections as you need:
In the
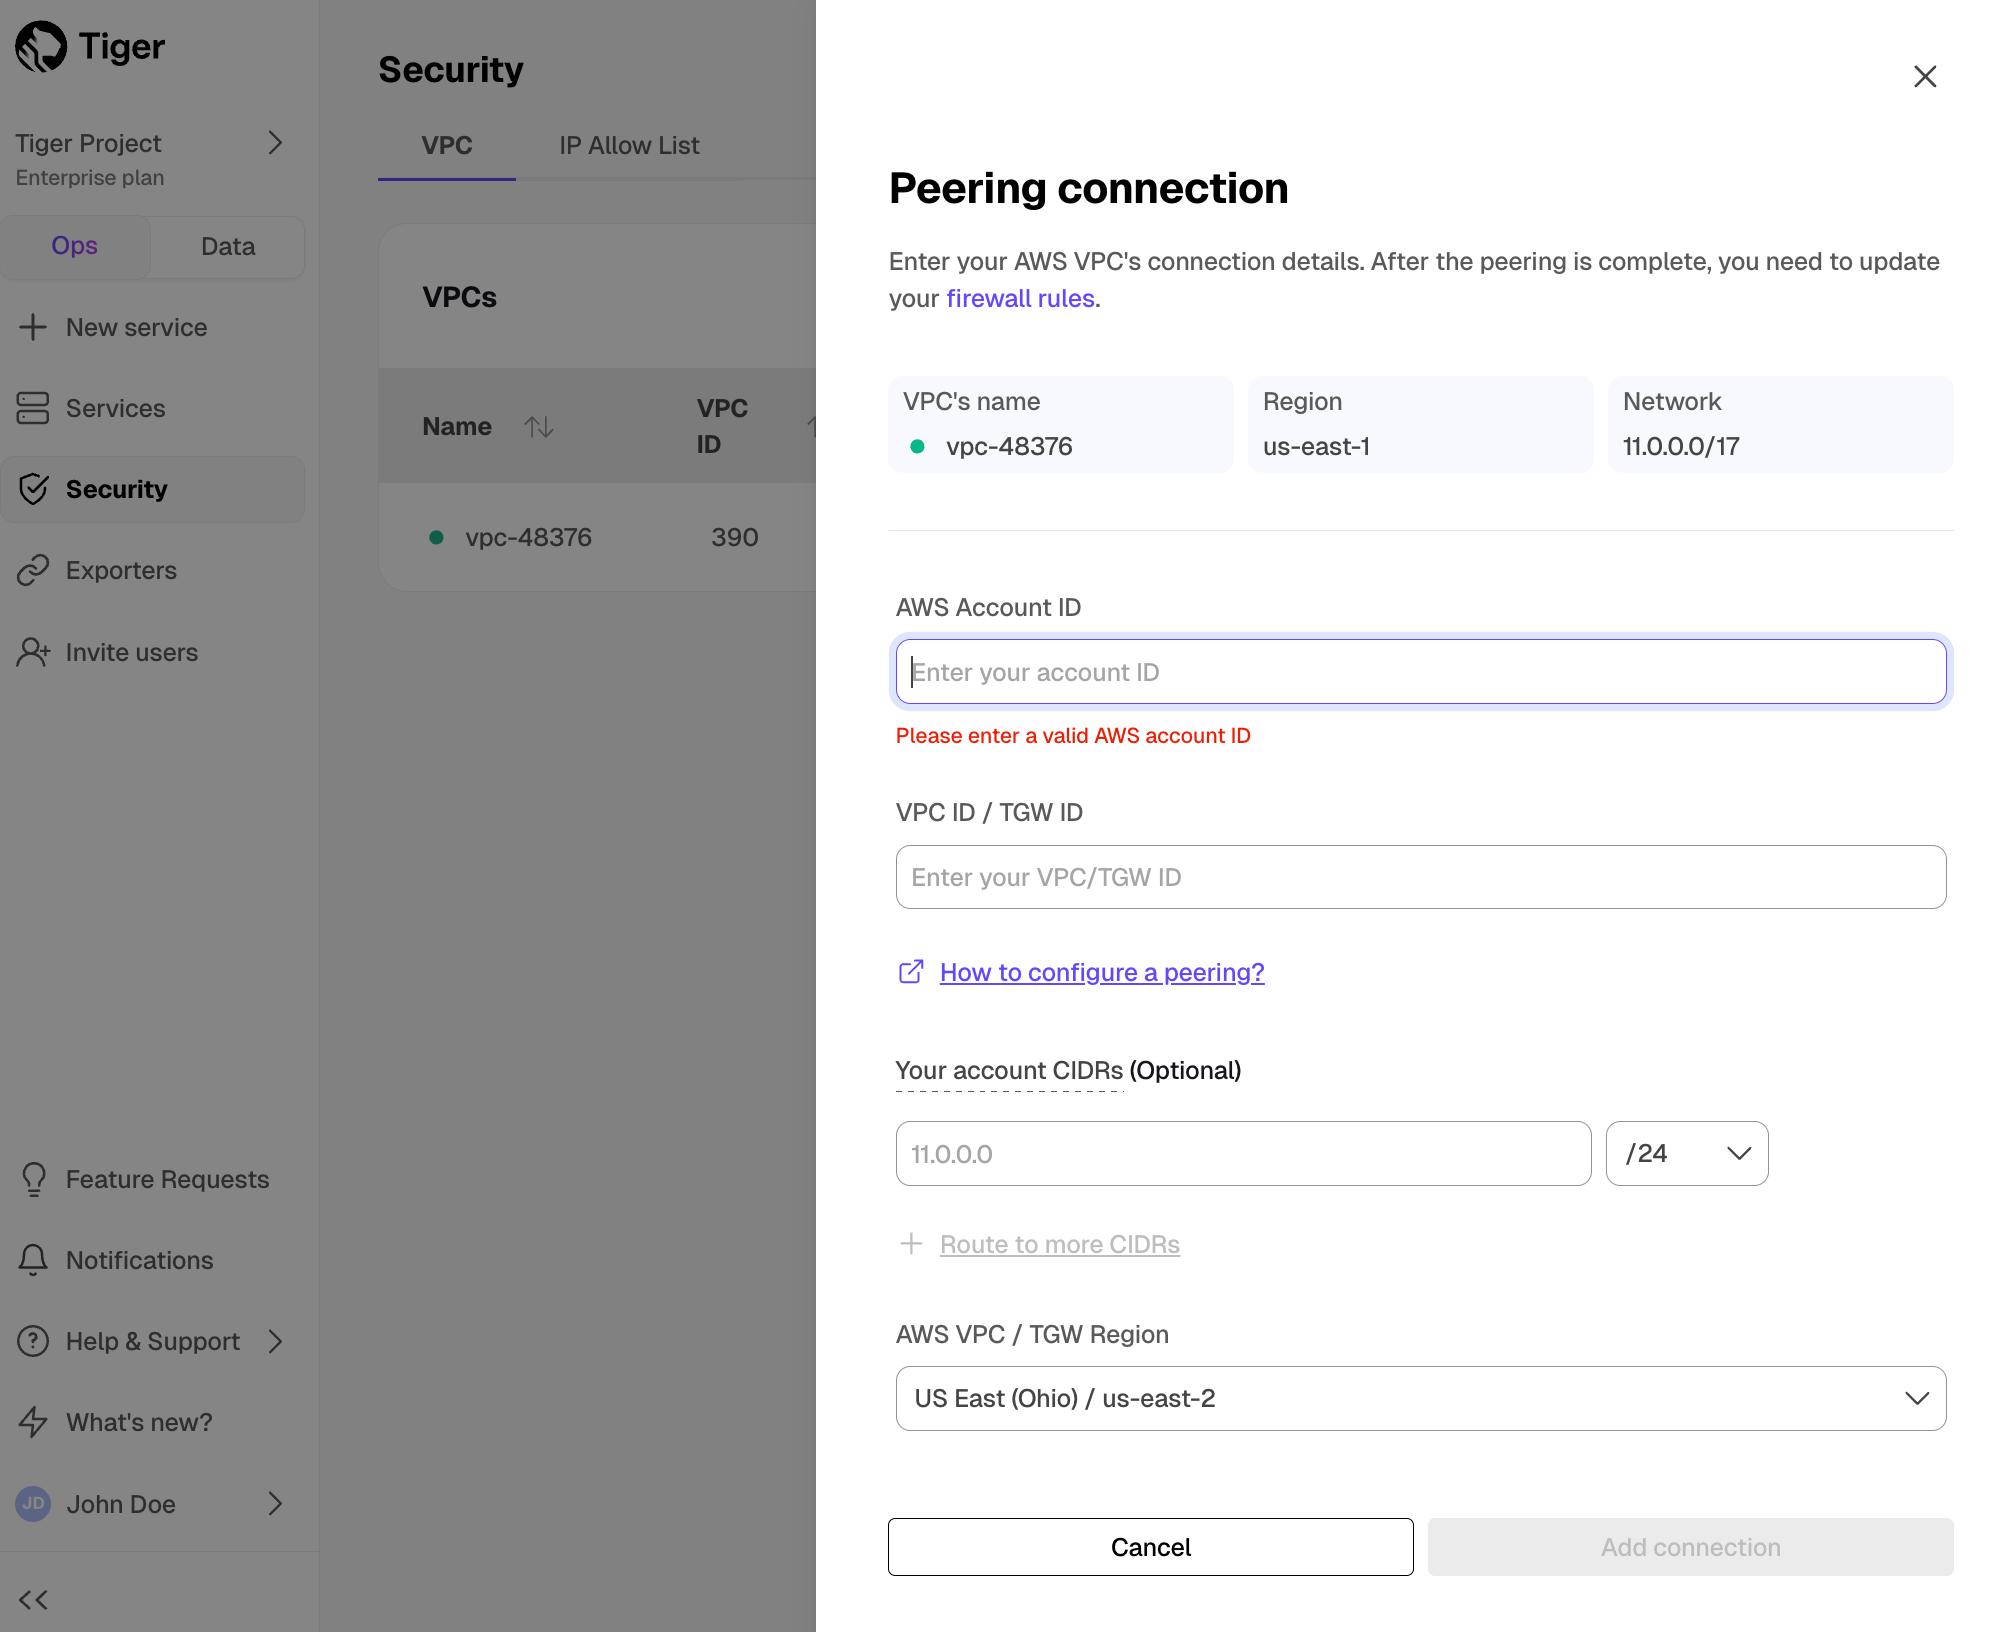
VPC Peeringcolumn, clickAdd. 2. Enter information about your existing Customer VPC, then clickAdd Connection.
- You can attach:
- Up to 50 Customer VPCs to a Peering VPC.
- A Tiger Cloud service to a single Peering VPC at a time. The service and the Peering VPC must be in the same AWS region. However, you can peer a Customer VPC and a Peering VPC that are in different regions.
- Multiple Tiger Cloud services to the same Peering VPC.
- You cannot attach a Tiger Cloud service to multiple Peering VPCs at the same time.
The number of Peering VPCs you can create in your project depends on your [pricing plan][pricing-plans]. If you need another Peering VPC, either contact support@tigerdata.com or change your pricing plan in [Tiger Cloud Console][console-login].
Tiger Cloud sends a peering request to your AWS account so you can [complete the VPC connection in AWS][aws-vpc-complete].
Complete the VPC connection in AWS
When you receive the Tiger Cloud peering request in AWS, edit your routing table to match the IP Range and CIDR block between your Customer and Peering VPCs.
When you peer a VPC with multiple CIDRs, all CIDRs are added to the Tiger Cloud rules automatically. After you have finished peering, further changes in your VPC's CIDRs are not detected automatically. If you need to refresh the CIDRs, recreate the peering connection.
The request acceptance process is an important safety mechanism. Do not accept a peering request from an unknown account.
- In [AWS > VPC Dashboard > Peering connections][aws-dashboard], select the peering connection request from Tiger Cloud
Copy the peering connection ID to the clipboard. The connection request starts with pcx-.
In the peering connection, click
Route Tables, then select theRoute Table IDthat corresponds to your VPCIn
Routes, clickEdit routes
You see the list of existing destinations.
 .
If you do not already have a destination that corresponds to the IP range / CIDR block of your Peering VPC:
- Click
Add route, and set: *Destination: the CIDR block of your Peering VPC. For example:10.0.0.7/17. *Target: the peering connection ID you copied to your clipboard. 2. ClickSave changes.
Network traffic is secured between your AWS account and Tiger Cloud for this project.
Set up security groups in AWS
Security groups allow specific inbound and outbound traffic at the resource level. You can associate a VPC with one or more security groups, and each instance in your VPC may belong to a different set of security groups. The security group choices for your VPC are:
- Create a security group to use for your Tiger Cloud VPC only.
- Associate your VPC with an existing security group.
- Do nothing, your VPC is automatically associated with the default one.
To create a security group specific to your Tiger Cloud Peering VPC:
[AWS > VPC Dashboard > Security Groups][aws-security-groups], click
Create security groupEnter the rules for this security group:
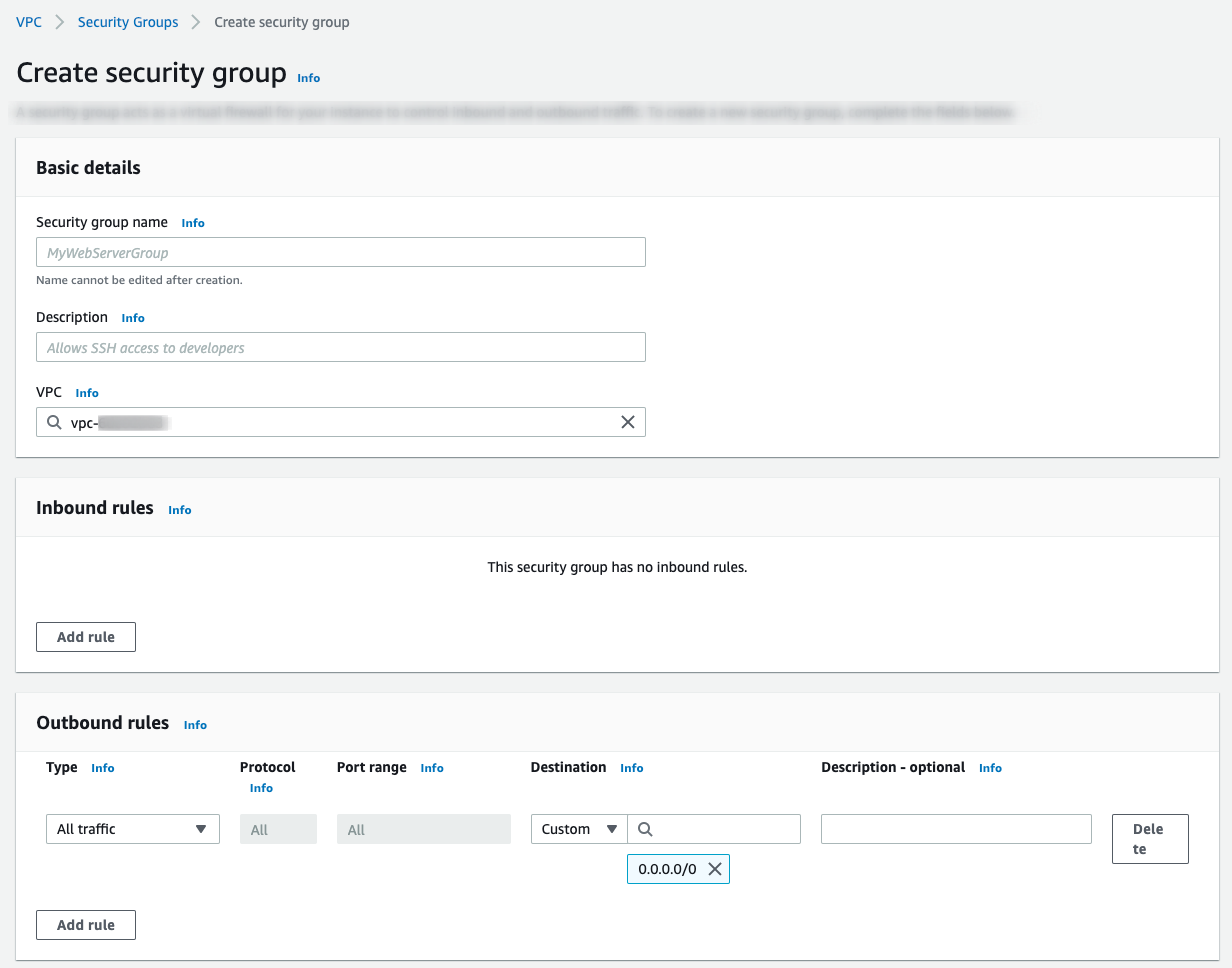
VPC: select the VPC that is peered with Tiger Cloud.Inbound rules: leave empty.Outbound rules:Type:Custom TCPProtocol:TCPPort range:5432Destination:CustomInfo: the CIDR block of your Tiger Cloud Peering VPC.
- Click
Add rule, then clickCreate security group
Attach a Tiger Cloud service to the Peering VPC
Now that Tiger Cloud is communicating securely with your AWS infrastructure, you can attach one or more services to the Peering VPC.
After you attach a service to a Peering VPC, you can only access it through the peered AWS VPC. It is no longer accessible using the public internet.
- In [Tiger Cloud Console > Services][console-services] select the service you want to connect to the Peering VPC
- Click
Operations>Security>VPC - Select the VPC, then click
Attach VPC
And that is it, your service is now securely communicating with your AWS account inside a VPC.
Migrate a Tiger Cloud service between VPCs
To ensure that your applications continue to run without interruption, you keep service attached to the Peering VPC. However, you can change the Peering VPC your service is attached to, or disconnect from the Peering VPC and enable access to the service from the public internet.
Tiger Cloud uses a different DNS for services that are attached to a Peering VPC. When you migrate a service between public access and a Peering VPC, you need to update your connection string.
- In [Tiger Cloud Console > Services][console-services] select the service to migrate
If you don't have a service, [create a new one][create-service].
- Click
Operations>Security>VPC - Select the VPC, then click
Attach VPC
Migration takes a few minutes to complete and requires a change to DNS settings for the service. The service is not accessible during this time. If you receive a DNS error, allow some time for DNS propagation.
===== PAGE: https://docs.tigerdata.com/use-timescale/security/read-only-role/ =====
Counter aggregation
URL: llms-txt#counter-aggregation
Contents:
- Run a counter aggregate query using a delta function
- Running a counter aggregate query using a delta function
- Run a counter aggregate query using an extrapolated delta function
- Running a counter aggregate query using an extrapolated delta function
- Run a counter aggregate query with a continuous aggregate
- Parallelism and ordering
When you are monitoring application performance, there are two main types of metrics that you can collect: gauges, and counters. Gauges fluctuate up and down, like temperature or speed, while counters always increase, like the total number of miles travelled in a vehicle.
When you process counter data, it is usually assumed that if the value of the counter goes down, the counter has been reset. For example, if you wanted to count the total number of miles travelled in a vehicle, you would expect the values to continuously increase: 1, 2, 3, 4, and so on. If the counter reset to 0, you would expect that this was a new trip, or an entirely new vehicle. This can become a problem if you want to continue counting from where you left off, rather than resetting to 0. A reset could occur if you have had a short server outage, or any number of other reasons. To get around this, you can analyze counter data by looking at the change over time, which accounts for resets.
Accounting for resets can be difficult to do in SQL, so TimescaleDB has developed aggregate and accessor functions that handle calculations for counters in a more practical way.
Counter aggregates can be used in continuous aggregates, even though they are not parallelizable in Postgres. For more information, see the section on parallelism and ordering.
For more information about counter aggregation API calls, see the [hyperfunction API documentation][hyperfunctions-api-counter-agg].
Run a counter aggregate query using a delta function
In this procedure, we are using an example table called example that contains counter data.
Running a counter aggregate query using a delta function
Create a table called
example:Create a counter aggregate and the delta accessor function. This gives you the change in the counter's value over the time period, accounting for any resets. This allows you to search for fifteen minute periods where the counter increased by a larger or smaller amount:
You can also use the
time_bucketfunction to produce a series of deltas over fifteen minute increments:
Run a counter aggregate query using an extrapolated delta function
If your series is less regular, the deltas are affected by the number of samples in each fifteen minute period. You can improve this by using the extrapolated_delta function. To do this, you need to provide bounds that define where to extrapolate to. In this example, we use the time_bucket_range function, which works in the same way as time_bucket but produces an open ended range of all the times in the bucket. This example also uses a CTE to do the counter aggregation, which makes it a little easier to understand what's going on in each part.
Running a counter aggregate query using an extrapolated delta function
- Create a hypertable called
example:
If you are self-hosting TimescaleDB v2.19.3 and below, create a [Postgres relational table][pg-create-table], then convert it using [create_hypertable][create_hypertable]. You then enable hypercore with a call to [ALTER TABLE][alter_table_hypercore].
- Create a counter aggregate and the extrapolated delta function:
In this procedure, Prometheus is used to do the extrapolation. TimescaleDB's current extrapolation function is built to mimic the Prometheus project's increase function, which measures the change of a counter extrapolated to the edges of the queried region.
Run a counter aggregate query with a continuous aggregate
Your counter aggregate might be more useful if you make a continuous aggregate out of it.
Create the continuous aggregate:
You can also re-aggregate from the continuous aggregate into a larger bucket size:
Parallelism and ordering
The counter reset calculations require a strict ordering of inputs, which means they are not parallelizable in Postgres. This is because Postgres handles parallelism by issuing rows randomly to workers. However, if your parallelism can guarantee sets of rows that are disjointed in time, the algorithm can be parallelized, as long as it is within a time range, and all rows go to the same worker. This is the case for both continuous aggregates and for distributed hypertables, as long as the partitioning keys are in the group by, even though the aggregate itself doesn't really make sense otherwise.
For more information about parallelism and ordering, see our [developer documentation][gh-parallelism-ordering]
===== PAGE: https://docs.tigerdata.com/use-timescale/hyperfunctions/heartbeat-agg/ =====
Examples:
Example 1 (sql):
CREATE TABLE example (
        measure_id      BIGINT,
        ts              TIMESTAMPTZ ,
        val             DOUBLE PRECISION,
        PRIMARY KEY (measure_id, ts)
    );
Example 2 (sql):
SELECT measure_id,
        delta(
            counter_agg(ts, val)
        )
    FROM example
    GROUP BY measure_id;
Example 3 (sql):
SELECT measure_id,
        time_bucket('15 min'::interval, ts) as bucket,
        delta(
            counter_agg(ts, val)
        )
    FROM example
    GROUP BY measure_id, time_bucket('15 min'::interval, ts);
Example 4 (sql):
CREATE TABLE example (
        measure_id      BIGINT,
        ts              TIMESTAMPTZ ,
        val             DOUBLE PRECISION,
        PRIMARY KEY (measure_id, ts)
    ) WITH (
      tsdb.hypertable,
      tsdb.partition_column='ts',
      tsdb.chunk_interval='15 days'
    );
timescaledb_information.data_nodes
URL: llms-txt#timescaledb_information.data_nodes
Contents:
- Samples
- Available columns
Get information on data nodes. This function is specific to running TimescaleDB in a multi-node setup.
[Multi-node support is sunsetted][multi-node-deprecation].
TimescaleDB v2.13 is the last release that includes multi-node support for Postgres versions 13, 14, and 15.
Get metadata related to data nodes.
| Name | Type | Description |
|---|---|---|
node_name | TEXT | Data node name. |
owner | REGCLASS | Oid of the user, who added the data node. |
options | JSONB | Options used when creating the data node. |
===== PAGE: https://docs.tigerdata.com/api/informational-views/hypertable_compression_settings/ =====
Examples:
Example 1 (sql):
SELECT * FROM timescaledb_information.data_nodes;

 node_name    | owner      | options
--------------+------------+--------------------------------
 dn1         | postgres   | {host=localhost,port=15431,dbname=test}
 dn2         | postgres   | {host=localhost,port=15432,dbname=test}
(2 rows)
create_distributed_restore_point()
URL: llms-txt#create_distributed_restore_point()
Contents:
- Required arguments
- Returns
- Errors
- Sample usage
[Multi-node support is sunsetted][multi-node-deprecation].
TimescaleDB v2.13 is the last release that includes multi-node support for Postgres versions 13, 14, and 15.
Creates a same-named marker record, for example restore point, in the write-ahead logs of all nodes in a multi-node TimescaleDB cluster.
The restore point can be used as a recovery target on each node, ensuring the entire multi-node cluster can be restored to a consistent state. The function returns the write-ahead log locations for all nodes where the marker record was written.
This function is similar to the Postgres function [pg_create_restore_point][pg-create-restore-point], but it has been modified to work with a distributed database.
This function can only be run on the access node, and requires superuser privileges.
Required arguments
| Name | Description |
|---|---|
name | The restore point name |
| Column | Type | Description |
|---|---|---|
node_name | NAME | Node name, or NULL for access node |
node_type | TEXT | Node type name: access_node or data_node |
restore_point | [PG_LSN][pg-lsn] | Restore point log sequence number |
An error is given if:
- The restore point
nameis more than 64 characters - A recovery is in progress
- The current WAL level is not set to
replicaorlogical - The current user is not a superuser
- The current server is not the access node
- TimescaleDB's 2PC transactions are not enabled
This example create a restore point called pitr across three data nodes and the access node:
===== PAGE: https://docs.tigerdata.com/api/distributed-hypertables/copy_chunk_experimental/ =====
Examples:
Example 1 (sql):
SELECT * FROM create_distributed_restore_point('pitr');
 node_name |  node_type  | restore_point
-----------+-------------+---------------
           | access_node | 0/3694A30
 dn1       | data_node   | 0/3694A98
 dn2       | data_node   | 0/3694B00
 dn3       | data_node   | 0/3694B68
(4 rows)
JSONB support for semi-structured data
URL: llms-txt#jsonb-support-for-semi-structured-data
Contents:
- Index the JSONB structure
- Index individual fields
You can use JSON and JSONB to provide semi-structured data. This is most useful for data that contains user-defined fields, such as field names that are defined by individual users and vary from user to user. We recommend using this in a semi-structured way, for example:
When you are defining a schema using JSON, ensure that common fields, such as time, user_id, and device_id, are pulled outside of the JSONB structure and stored as columns. This is because field accesses are more efficient on table columns than inside JSONB structures. Storage is also more efficient.
You should also use the JSONB data type, that is, JSON stored in a binary format, rather than JSON data type. JSONB data types are more efficient in both storage overhead and lookup performance.
Use JSONB for user-defined data rather than sparse data. This works best for most data sets. For sparse data, use NULLable fields and, if possible, run on top of a compressed file system like ZFS. This will work better than a JSONB data type, unless the data is extremely sparse, for example, more than 95% of fields for a row are empty.
Index the JSONB structure
When you index JSONB data across all fields, it is usually best to use a GIN (generalized inverted) index. In most cases, you can use the default GIN operator, like this:
For more information about GIN indexes, see the [Postgres documentation][json-indexing].
This index only optimizes queries where the WHERE clause uses the ?, ?&, ?|, or @> operator. For more information about these operators, see the [Postgres documentation][json-operators].
Index individual fields
JSONB columns sometimes have common fields containing values that are useful to index individually. Indexes like this can be useful for ordering operations on field values, [multicolumn indexes][multicolumn-index], and indexes on specialized types, such as a postGIS geography type. Another advantage of indexes on individual field values is that they are often smaller than GIN indexes on the entire JSONB field. To create an index like this, it is usually best to use a [partial index][partial-index] on an [expression][expression-index] accessing the field. For example:
In this example, the expression being indexed is the cpu field inside the data JSONB object, cast to a double. The cast reduces the size of the index by storing the much smaller double, instead of a string. The WHERE clause ensures that the only rows included in the index are those that contain a cpu field, because the data ? 'cpu' returns true. This also serves to reduce the size of the index by not including rows without a cpu field. Note that in order for a query to use the index, it must have data ? 'cpu' in the WHERE clause.
This expression can also be used with a multi-column index, for example, by adding time DESC as a leading column. Note, however, that to enable index-only scans, you need data as a column, not the full expression ((data->>'cpu')::double precision).
===== PAGE: https://docs.tigerdata.com/use-timescale/schema-management/about-tablespaces/ =====
Examples:
Example 1 (sql):
CREATE TABLE metrics (
  time TIMESTAMPTZ,
  user_id INT,
  device_id INT,
  data JSONB
);
Example 2 (sql):
CREATE INDEX idxgin ON metrics USING GIN (data);Example 3 (sql):
CREATE INDEX idxcpu
  ON metrics(((data->>'cpu')::double precision))
  WHERE data ? 'cpu';
IP allow list
URL: llms-txt#ip-allow-list
Contents:
- Create and attach an IP allow list in the ops mode
- Create an IP allow list in the data mode
You can restrict access to your Tiger Cloud services to trusted IP addresses only. This prevents unauthorized connections without the need for a [Virtual Private Cloud][vpc-peering]. Creating IP allow lists helps comply with security standards such as SOC 2 or HIPAA that require IP filtering. This is especially useful in regulated industries like finance, healthcare, and government.
For a more fine-grained control, you create separate IP allow lists for [the ops mode and the data mode][modes].
Create and attach an IP allow list in the ops mode
You create an IP allow list at the [project level][members], then attach your service to it.
You attach a service to either one VPC, or one IP allow list. You cannot attach a service to a VPC and an IP allow list at the same time.
- In [Tiger Cloud Console][console], select
Security>IP Allow List, then clickCreate IP Allow List
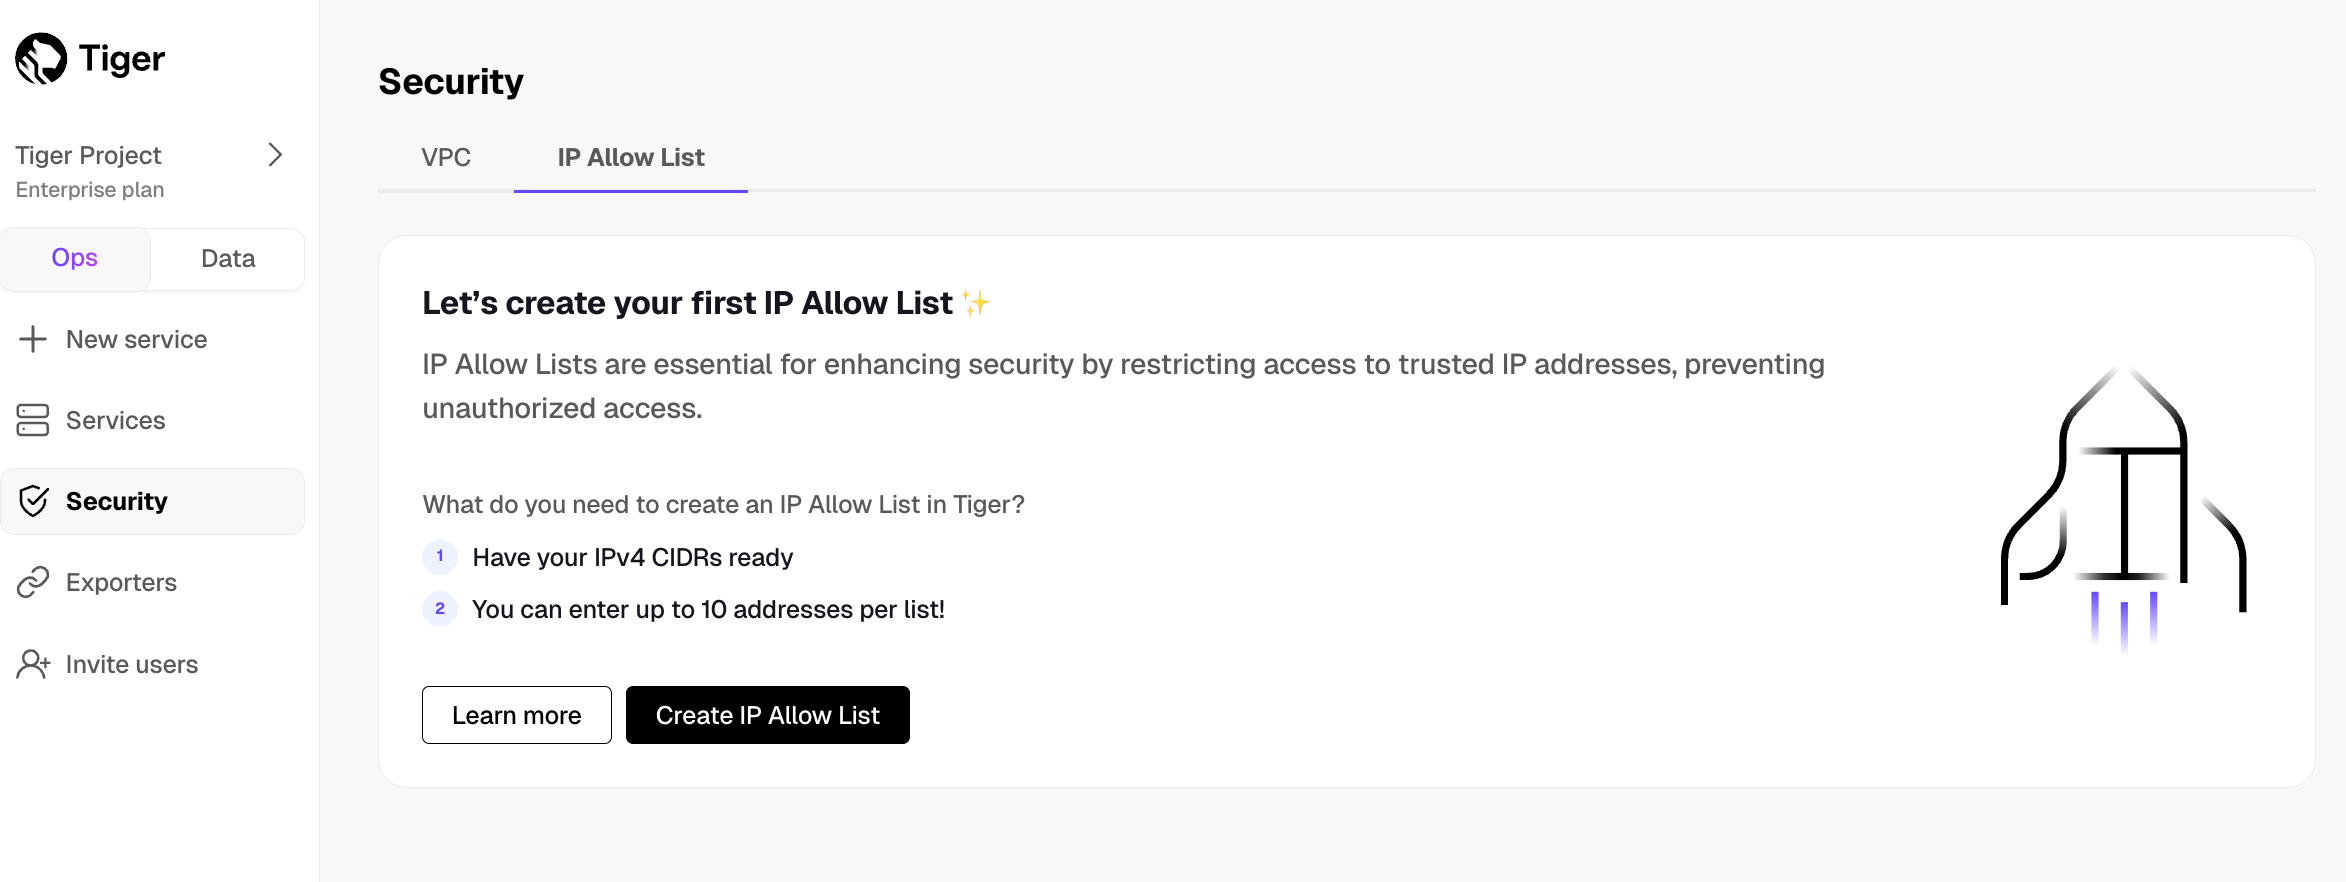
- Enter your trusted IP addresses
The number of IP addresses that you can include in one list depends on your [pricing plan][pricing-plans].
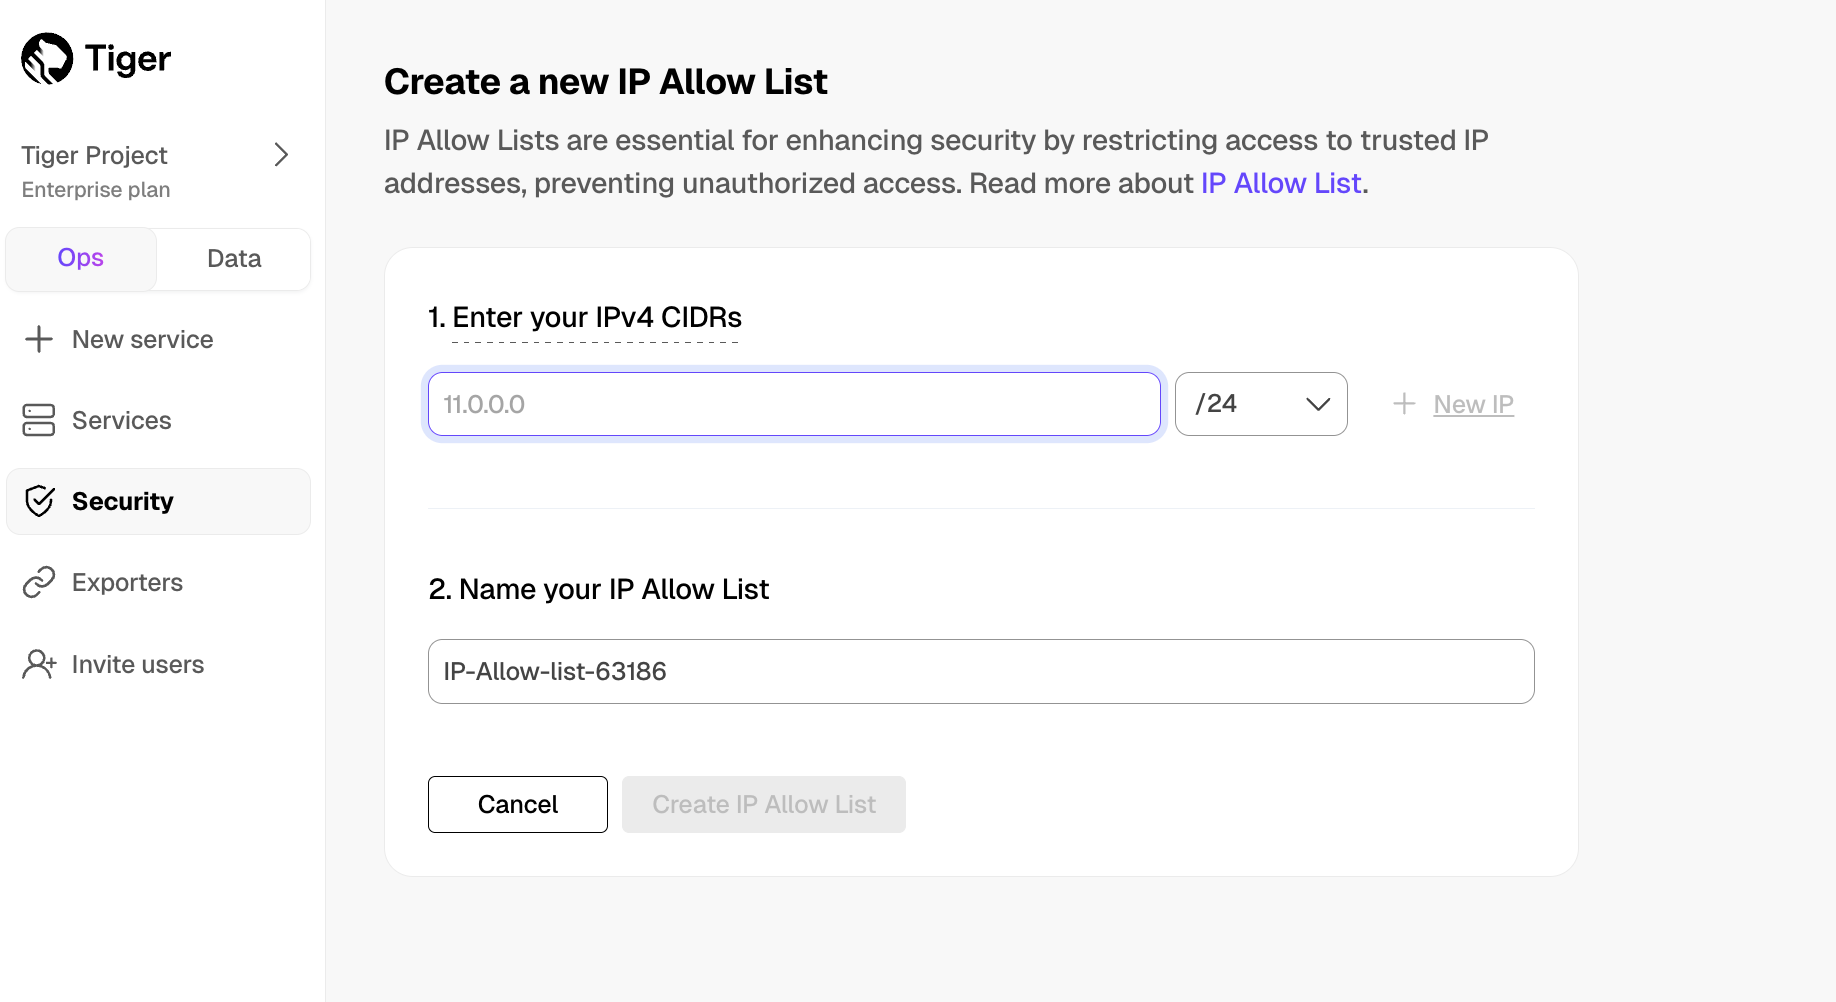
- Name your allow list and click
Create IP Allow List
Click + Create IP Allow List to create another list. The number of IP allow lists you can create depends on your [pricing plan][pricing-plans].
- Select a Tiger Cloud service, then click
Operations>Security>IP Allow List
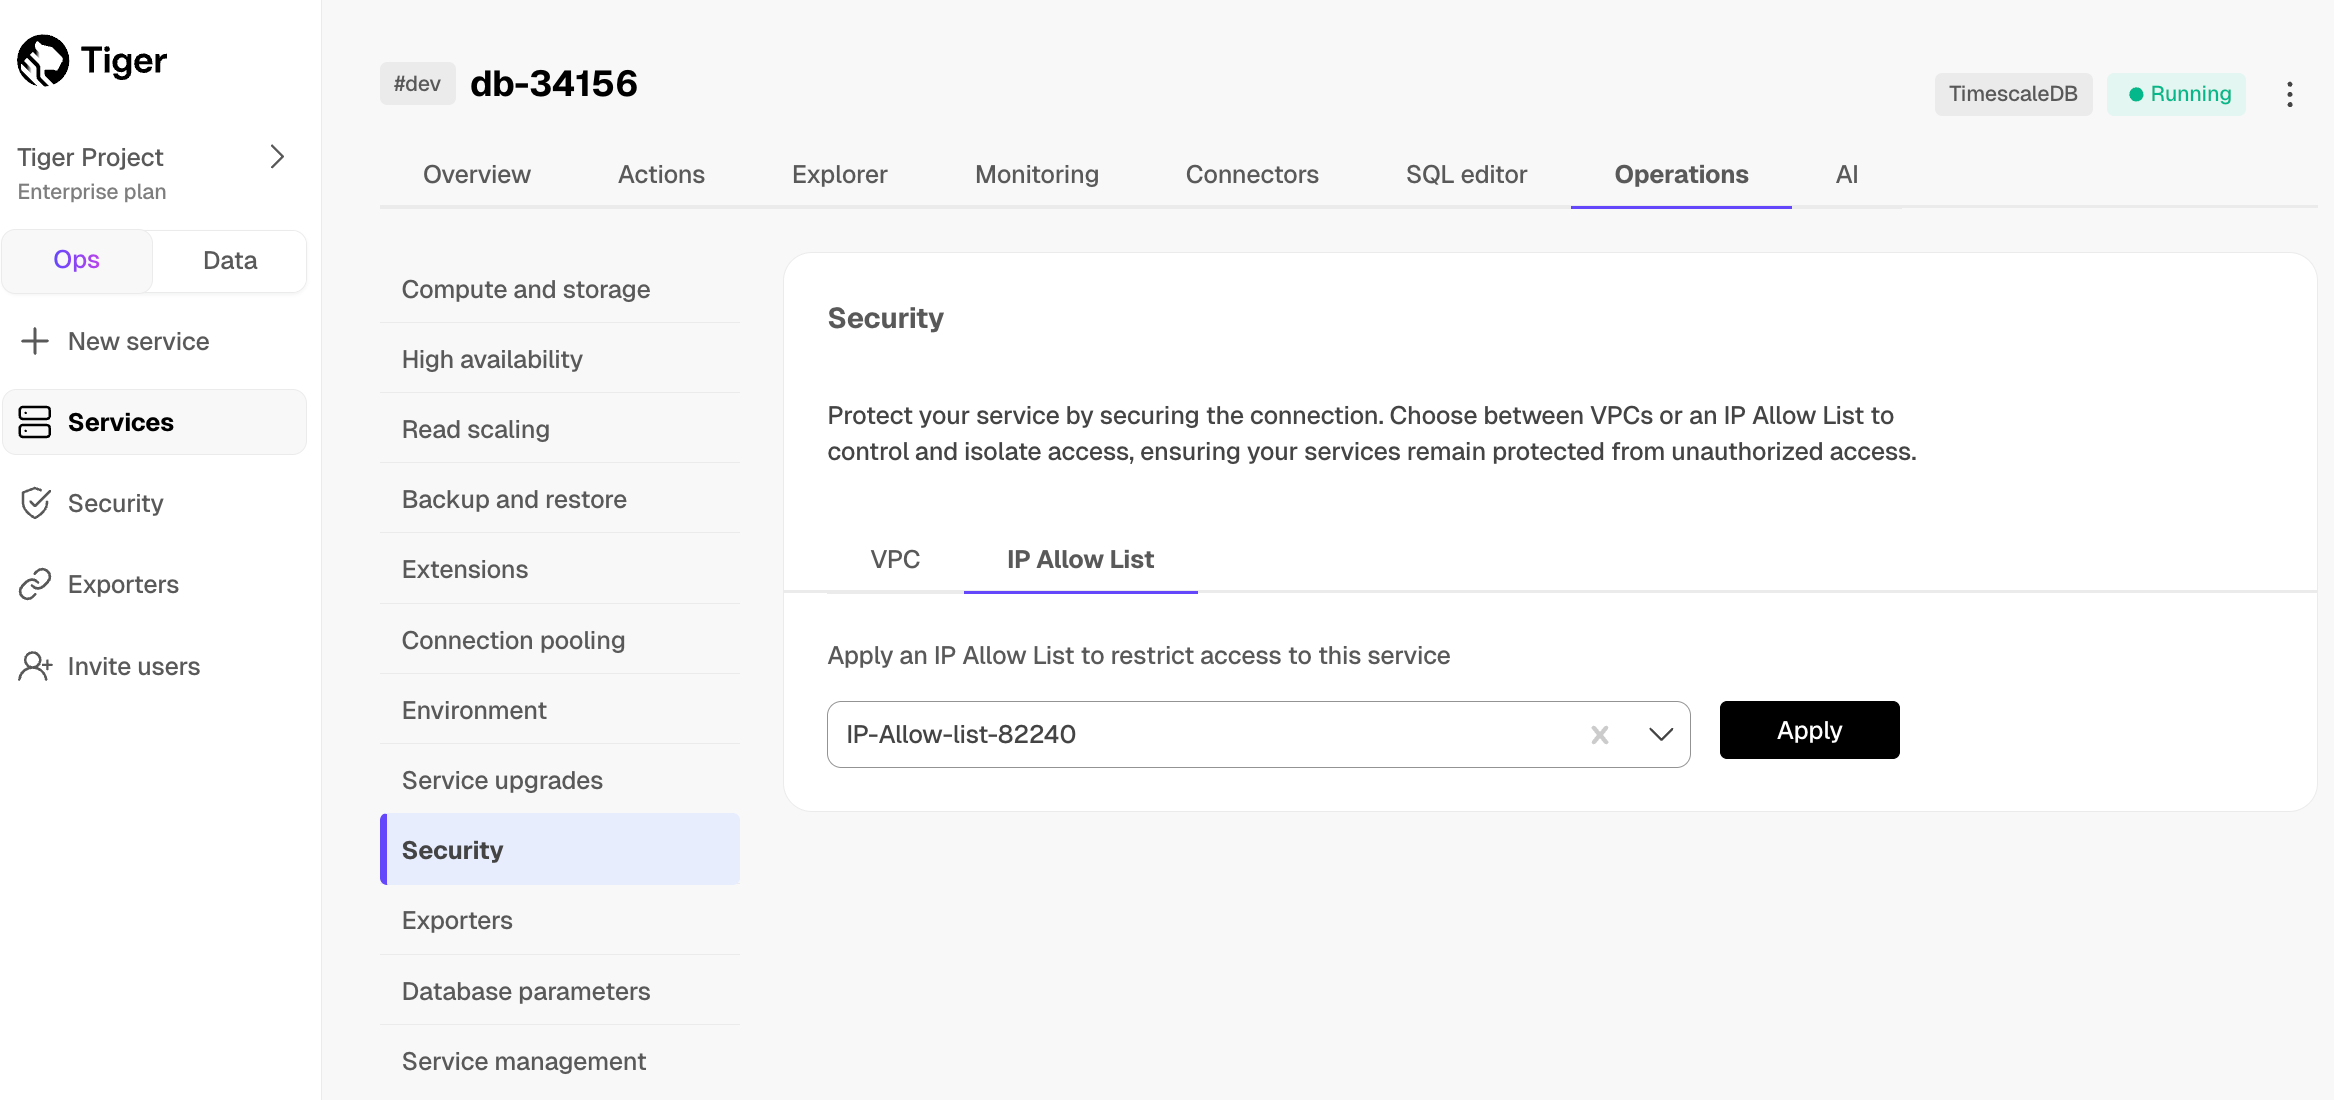
Select the list in the drop-down and click
ApplyType
Applyin the confirmation popup
You have created and attached an IP allow list for the operations available in the ops mode. You can unattach or change the list attached to a service from the same tab.
Create an IP allow list in the data mode
You create an IP allow list in the data mode settings.
In [Tiger Cloud Console][console], toggle
DataClick the project name in the upper left corner, then select
SettingsScroll down and toggle
IP AllowlistAdd IP addresses
Click
Add entry.- Enter an IP address or a range of IP addresses.
- Click
Add. - When all the IP addresses have been added, click
Apply. - Click
Confirm.
You have successfully added an IP allow list for querying your service in the data mode.
===== PAGE: https://docs.tigerdata.com/use-timescale/security/multi-factor-authentication/ =====
Integrate Terraform with Tiger
URL: llms-txt#integrate-terraform-with-tiger
Contents:
- Prerequisites
- Configure Terraform
[Terraform][terraform] is an infrastructure-as-code tool that enables you to safely and predictably provision and manage infrastructure.
This page explains how to configure Terraform to manage your Tiger Cloud service or self-hosted TimescaleDB.
To follow the steps on this page:
- Create a target [Tiger Cloud service][create-service] with the Real-time analytics capability.
You need [your connection details][connection-info]. This procedure also works for [self-hosted TimescaleDB][enable-timescaledb].
- [Download and install][terraform-install] Terraform.
Configure Terraform
Configure Terraform based on your deployment type:
You use the [Tiger Data Terraform provider][terraform-provider] to manage Tiger Cloud services:
Generate client credentials for programmatic use
In [Tiger Cloud Console][console], click
Projectsand save yourProject ID, then clickProject settings.Click
Create credentials, then savePublic keyandSecret key.Configure Tiger Data Terraform provider
Create a
main.tfconfiguration file with at least the following content. Changex.y.zto the [latest version][terraform-provider] of the provider.Create a
terraform.tfvarsfile in the same directory as yourmain.tfto pass in the variable values:Add your resources
Add your Tiger Cloud services or VPC connections to the main.tf configuration file. For example:
You can now manage your resources with Terraform. See more about [available resources][terraform-resources] and [data sources][terraform-data-sources].
You use the [cyrilgdn/postgresql][pg-provider] Postgres provider to connect to your self-hosted TimescaleDB instance.
Create a main.tf configuration file with the following content, using your [connection details][connection-info]:
You can now manage your database with Terraform.
===== PAGE: https://docs.tigerdata.com/integrations/azure-data-studio/ =====
Examples:
Example 1 (hcl):
terraform {
         required_providers {
           timescale = {
             source  = "timescale/timescale"
             version = "x.y.z"
           }
         }
       }

       provider "timescale" {
        project_id = var.ts_project_id
        access_key = var.ts_access_key
        secret_key = var.ts_secret_key
       }

       variable "ts_project_id" {
        type = string
       }

       variable "ts_access_key" {
        type = string
       }

       variable "ts_secret_key" {
        type = string
       }
Example 2 (hcl):