Complete code samples
This section contains complete code samples.
Complete code sample
Execute more complex queries
===== PAGE: https://docs.tigerdata.com/_partials/_migrate_self_postgres_implement_migration_path/ =====
You cannot upgrade TimescaleDB and Postgres at the same time. You upgrade each product in the following steps:
Upgrade TimescaleDB
If your migration path dictates it, upgrade Postgres
Follow the procedure in [Upgrade Postgres][upgrade-pg]. The version of TimescaleDB installed in your Postgres deployment must be the same before and after the Postgres upgrade.
If your migration path dictates it, upgrade TimescaleDB again
Check that you have upgraded to the correct version of TimescaleDB
Postgres returns something like:
===== PAGE: https://docs.tigerdata.com/_partials/_migrate_dual_write_validate_production_load/ =====
Now that dual-writes have been in place for a while, the target database should be holding up to production write traffic. Now would be the right time to determine if the target database can serve all production traffic (both reads and writes). How exactly this is done is application-specific and up to you to determine.
===== PAGE: https://docs.tigerdata.com/_partials/_prereqs-cloud-no-connection/ =====
To follow the steps on this page:
- Create a target [Tiger Cloud service][create-service] with real-time analytics enabled.
===== PAGE: https://docs.tigerdata.com/_partials/_migrate_import_prerequisites/ =====
Best practice is to use an [Ubuntu EC2 instance][create-ec2-instance] hosted in the same region as your Tiger Cloud service as a migration machine. That is, the machine you run the commands on to move your data from your source database to your target Tiger Cloud service.
Before you migrate your data:
- Create a target [Tiger Cloud service][created-a-database-service-in-timescale].
Each Tiger Cloud service has a single database that supports the [most popular extensions][all-available-extensions]. Tiger Cloud services do not support tablespaces, and there is no superuser associated with a service. Best practice is to create a Tiger Cloud service with at least 8 CPUs for a smoother experience. A higher-spec instance can significantly reduce the overall migration window.
- To ensure that maintenance does not run during the process, [adjust the maintenance window][adjust-maintenance-window].
===== PAGE: https://docs.tigerdata.com/_partials/_hypercore-intro-short/ =====
[Hypercore][hypercore] is the hybrid row-columnar storage engine in TimescaleDB used by hypertables. Traditional databases force a trade-off between fast inserts (row-based storage) and efficient analytics (columnar storage). Hypercore eliminates this trade-off, allowing real-time analytics without sacrificing transactional capabilities.
Hypercore dynamically stores data in the most efficient format for its lifecycle:
- Row-based storage for recent data: the most recent chunk (and possibly more) is always stored in the rowstore, ensuring fast inserts, updates, and low-latency single record queries. Additionally, row-based storage is used as a writethrough for inserts and updates to columnar storage.
- Columnar storage for analytical performance: chunks are automatically compressed into the columnstore, optimizing storage efficiency and accelerating analytical queries.
Unlike traditional columnar databases, hypercore allows data to be inserted or modified at any stage, making it a flexible solution for both high-ingest transactional workloads and real-time analytics—within a single database.
===== PAGE: https://docs.tigerdata.com/_partials/_caggs-intro/ =====
In modern applications, data usually grows very quickly. This means that aggregating it into useful summaries can become very slow. If you are collecting data very frequently, you might want to aggregate your data into minutes or hours instead. For example, if an IoT device takes temperature readings every second, you might want to find the average temperature for each hour. Every time you run this query, the database needs to scan the entire table and recalculate the average. TimescaleDB makes aggregating data lightning fast, accurate, and easy with continuous aggregates.
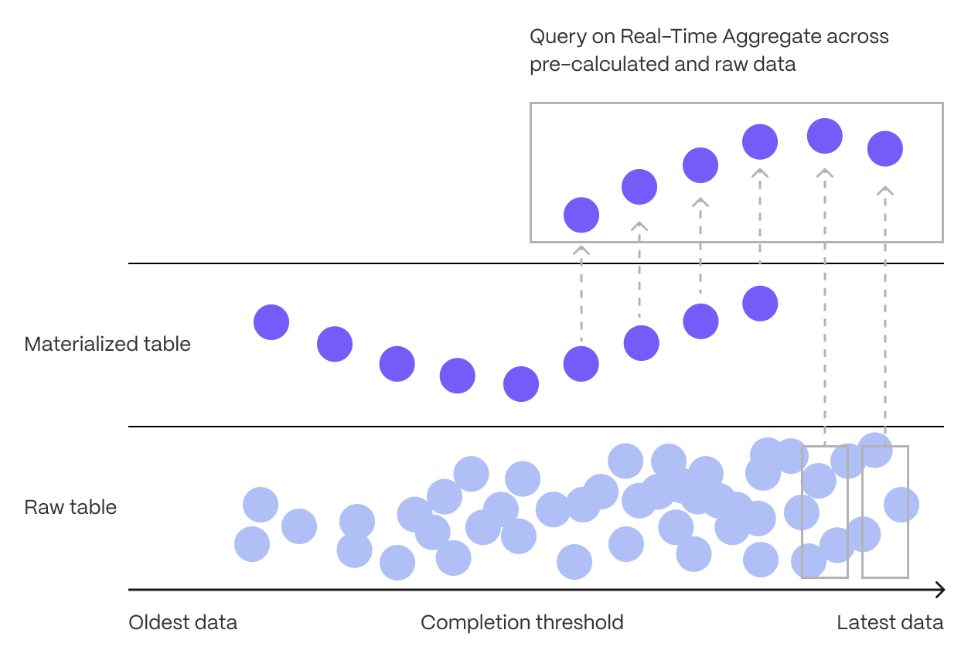
Continuous aggregates in TimescaleDB are a kind of hypertable that is refreshed automatically in the background as new data is added, or old data is modified. Changes to your dataset are tracked, and the hypertable behind the continuous aggregate is automatically updated in the background.
Continuous aggregates have a much lower maintenance burden than regular Postgres materialized views, because the whole view is not created from scratch on each refresh. This means that you can get on with working your data instead of maintaining your database.
Because continuous aggregates are based on hypertables, you can query them in exactly the same way as your other tables. This includes continuous aggregates in the rowstore, compressed into the [columnstore][hypercore], or [tiered to object storage][data-tiering]. You can even create [continuous aggregates on top of your continuous aggregates][hierarchical-caggs], for an even more fine-tuned aggregation.
[Real-time aggregation][real-time-aggregation] enables you to combine pre-aggregated data from the materialized view with the most recent raw data. This gives you up-to-date results on every query. In TimescaleDB v2.13 and later, real-time aggregates are DISABLED by default. In earlier versions, real-time aggregates are ENABLED by default; when you create a continuous aggregate, queries to that view include the results from the most recent raw data.
===== PAGE: https://docs.tigerdata.com/_partials/_kubernetes-prereqs/ =====
- Install [self-managed Kubernetes][kubernetes-install] or sign up for a Kubernetes [Turnkey Cloud Solution][kubernetes-managed].
- Install [kubectl][kubectl] for command-line interaction with your cluster.
===== PAGE: https://docs.tigerdata.com/_partials/_high-availability-setup/ =====
- In [Tiger Cloud Console][cloud-login], select the service to enable replication for.
- Click
Operations, then selectHigh availability. - Choose your replication strategy, then click
Change configuration.
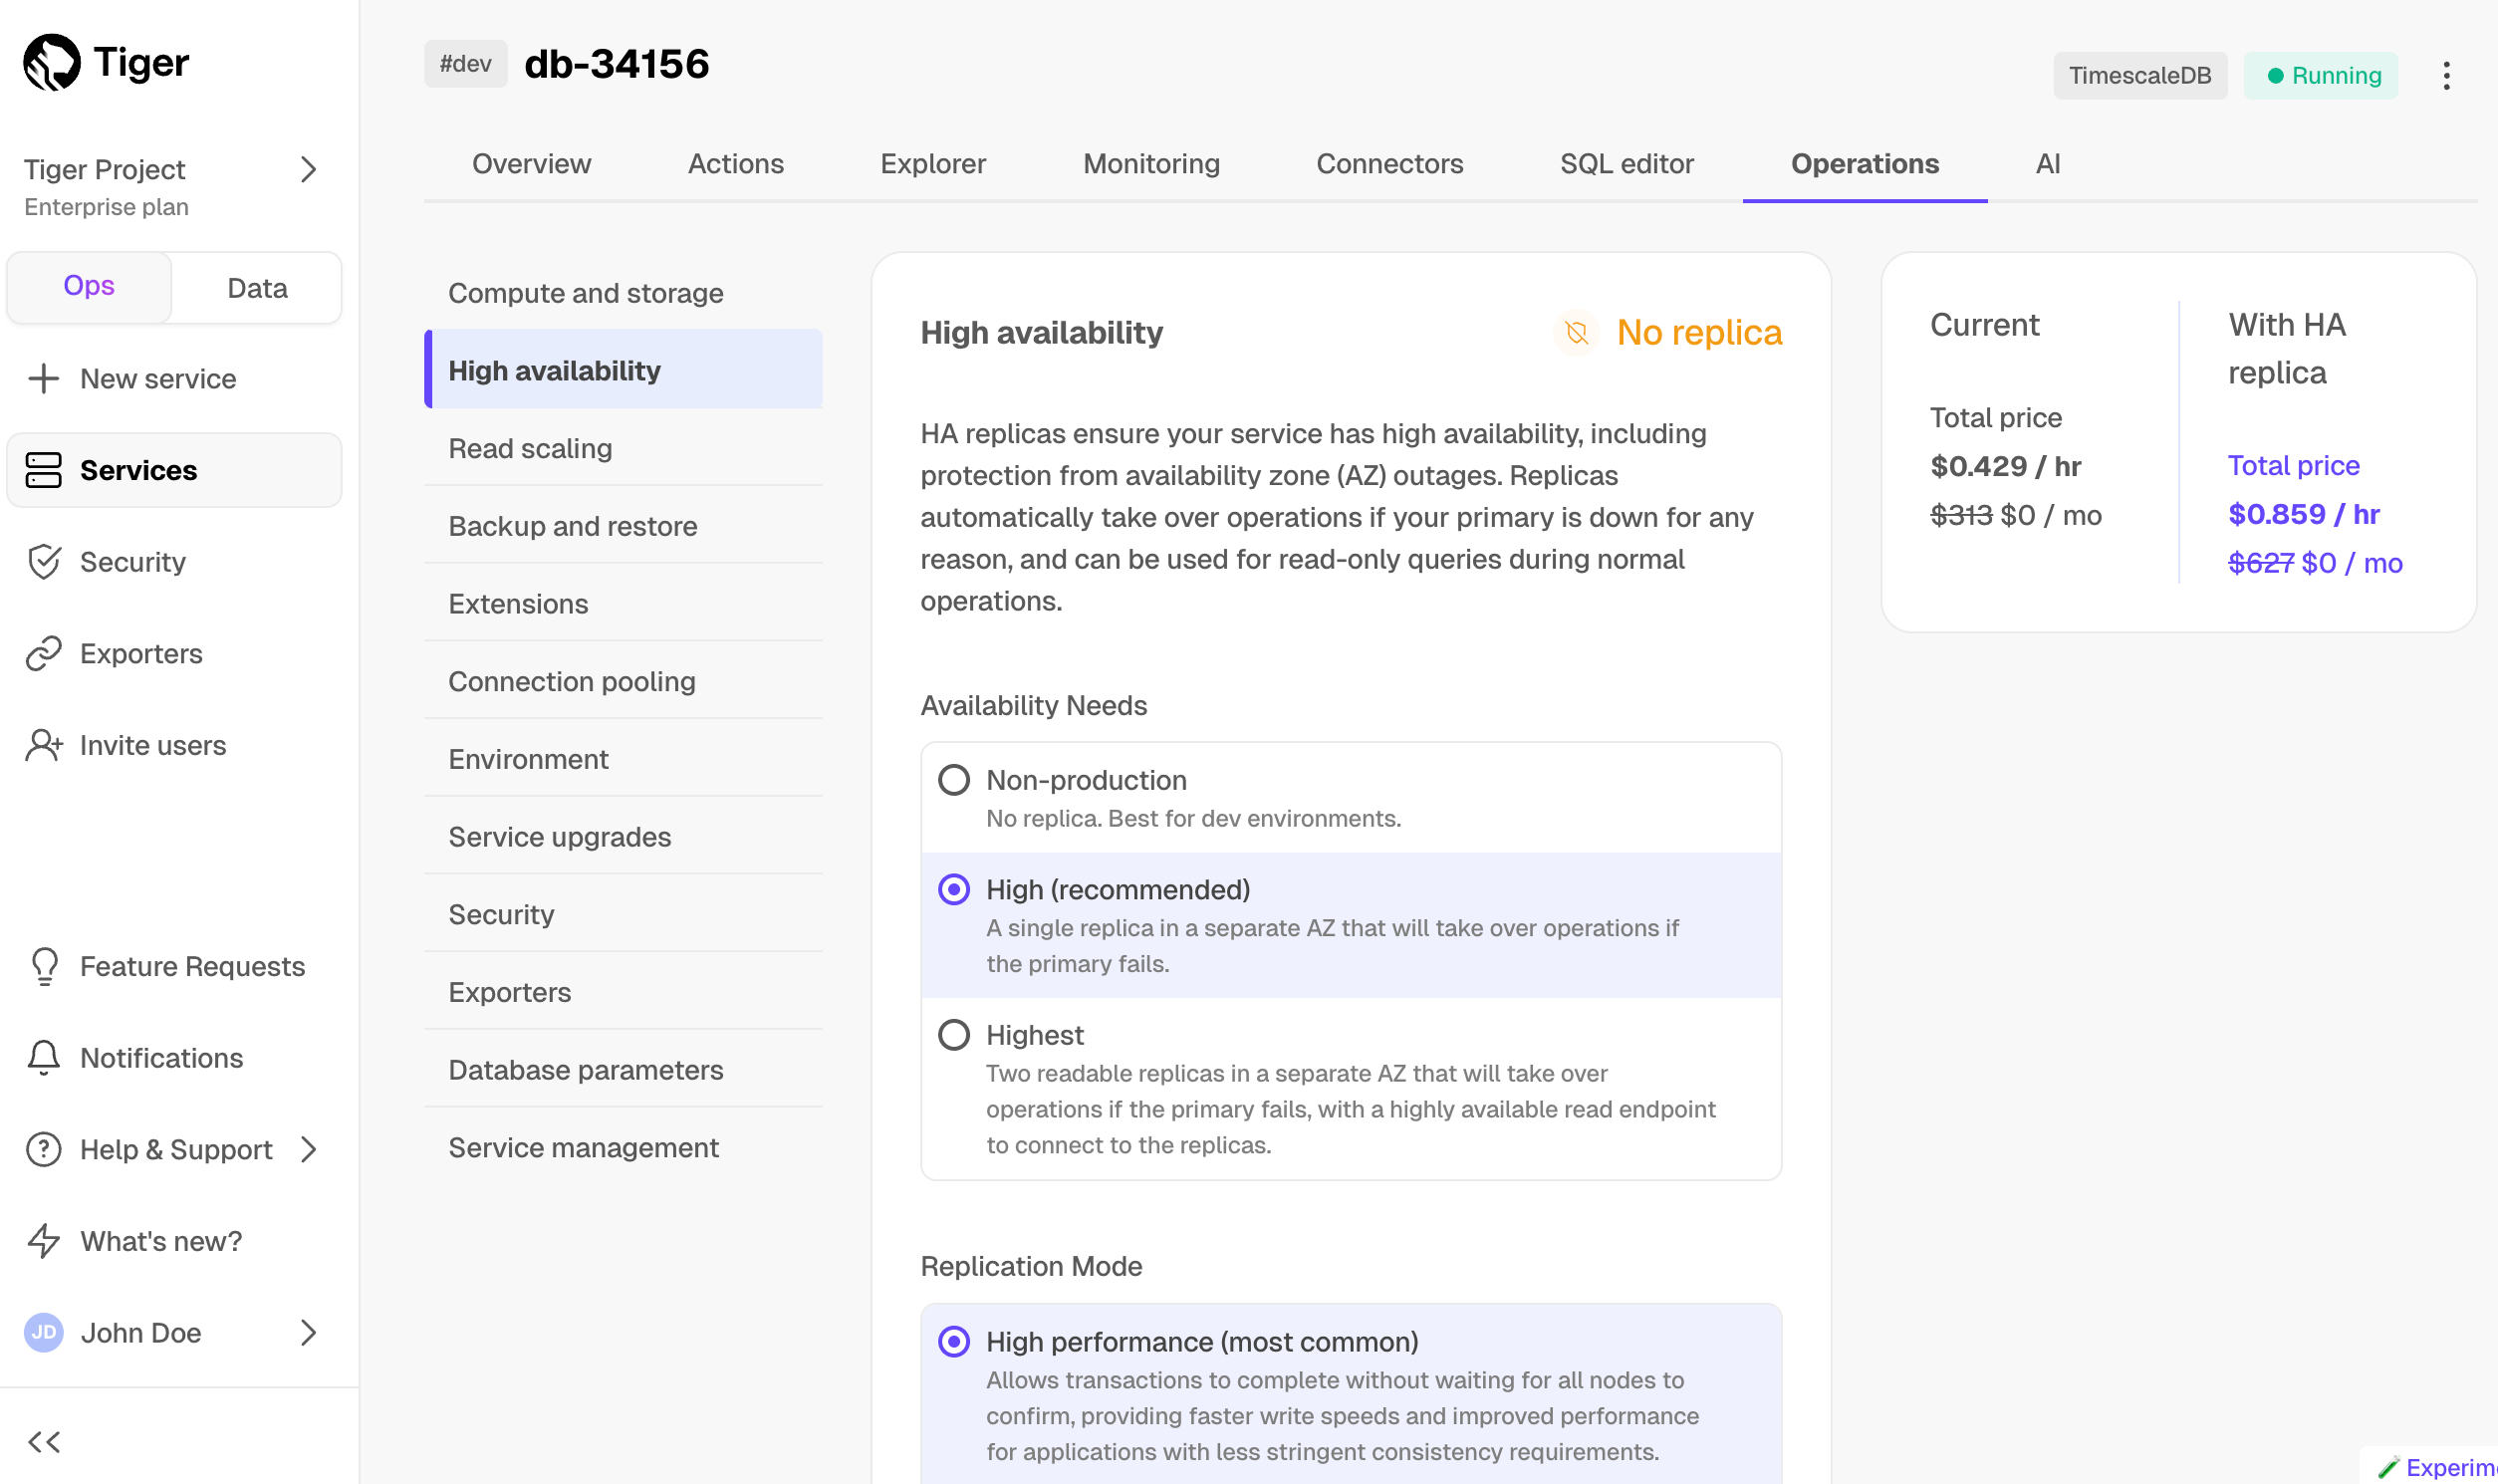
- In
Change high availability configuration, clickChange config.
===== PAGE: https://docs.tigerdata.com/_partials/_vpc-limitations/ =====
- You can attach:
- Up to 50 Customer VPCs to a Peering VPC.
- A Tiger Cloud service to a single Peering VPC at a time. The service and the Peering VPC must be in the same AWS region. However, you can peer a Customer VPC and a Peering VPC that are in different regions.
- Multiple Tiger Cloud services to the same Peering VPC.
- You cannot attach a Tiger Cloud service to multiple Peering VPCs at the same time.
The number of Peering VPCs you can create in your project depends on your [pricing plan][pricing-plans]. If you need another Peering VPC, either contact support@tigerdata.com or change your pricing plan in [Tiger Cloud Console][console-login].
===== PAGE: https://docs.tigerdata.com/_partials/_integration-apache-kafka-install/ =====
- Extract the Kafka binaries to a local folder
From now on, the folder where you extracted the Kafka binaries is called <KAFKA_HOME>.
- Configure and run Apache Kafka
Use the -daemon flag to run this process in the background.
- Create Kafka topics
In another Terminal window, navigate to <KAFKA_HOME>, then call kafka-topics.sh and create the following topics:
accounts: publishes JSON messages that are consumed by the timescale-sink connector and inserted into your Tiger Cloud service.deadletter: stores messages that cause errors and that Kafka Connect workers cannot process.
- Test that your topics are working correctly
Run
kafka-console-producerto send messages to theaccountstopic:Send some events. For example, type the following:
In another Terminal window, navigate to <KAFKA_HOME>, then run
kafka-console-consumerto consume the events you just sent:You see
===== PAGE: https://docs.tigerdata.com/_partials/_migrate_live_tune_source_database_awsrds/ =====
Updating parameters on a Postgres instance will cause an outage. Choose a time that will cause the least issues to tune this database.
Update the DB instance parameter group for your source database
In [https://console.aws.amazon.com/rds/home#databases:][databases], select the RDS instance to migrate.
Click
Configuration, scroll down and note theDB instance parameter group, then clickParameter groups
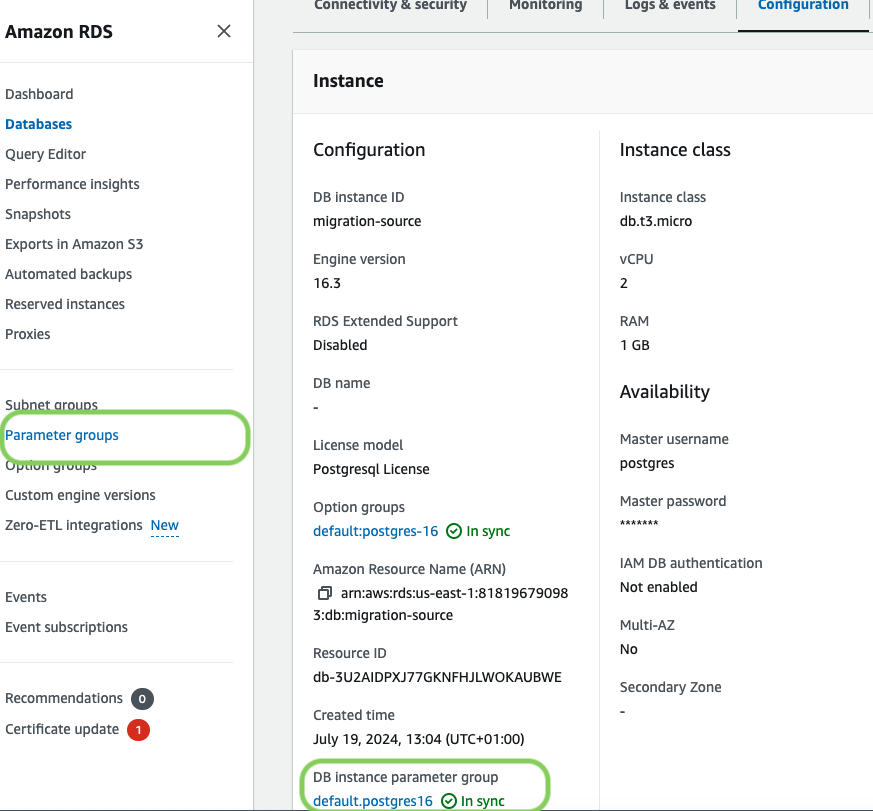
Click
Create parameter group, fill in the form with the following values, then clickCreate.- Parameter group name - whatever suits your fancy.
- Description - knock yourself out with this one.
- Engine type -
PostgreSQL - Parameter group family - the same as
DB instance parameter groupin yourConfiguration.
- In
Parameter groups, select the parameter group you created, then clickEdit. - Update the following parameters, then click
Save changes.rds.logical_replicationset to1: record the information needed for logical decoding.wal_sender_timeoutset to0: disable the timeout for the sender process.
In RDS, navigate back to your [databases][databases], select the RDS instance to migrate, and click
Modify.Scroll down to
Database options, select your new parameter group, and clickContinue.- Click
Apply immediatelyor choose a maintenance window, then clickModify DB instance.
- Click
Changing parameters will cause an outage. Wait for the database instance to reboot before continuing.
Verify that the settings are live in your database.
Enable replication
DELETEandUPDATEoperations
Replica identity assists data replication by identifying the rows being modified. Your options are that each table and hypertable in the source database should either have:
- A primary key: data replication defaults to the primary key of the table being replicated. Nothing to do.
- A viable unique index: each table has a unique, non-partial, non-deferrable index that includes only columns marked as
NOT NULL. If a UNIQUE index does not exist, create one to assist the migration. You can delete if after migration.
For each table, set REPLICA IDENTITY to the viable unique index:
- No primary key or viable unique index: use brute force.
For each table, set REPLICA IDENTITY to FULL:
For each UPDATE or DELETE statement, Postgres reads the whole table to find all matching rows. This results in significantly slower replication. If you are expecting a large number of UPDATE or DELETE operations on the table, best practice is to not use FULL.
===== PAGE: https://docs.tigerdata.com/_partials/_foreign-data-wrappers/ =====
You use Postgres foreign data wrappers (FDWs) to query external data sources from a Tiger Cloud service. These external data sources can be one of the following:
- Other Tiger Cloud services
- Postgres databases outside of Tiger Cloud
If you are using VPC peering, you can create FDWs in your Customer VPC to query a service in your Tiger Cloud project. However, you can't create FDWs in your Tiger Cloud services to query a data source in your Customer VPC. This is because Tiger Cloud VPC peering uses AWS PrivateLink for increased security. See [VPC peering documentation][vpc-peering] for additional details.
Postgres FDWs are particularly useful if you manage multiple Tiger Cloud services with different capabilities, and need to seamlessly access and merge regular and time-series data.
To follow the steps on this page:
- Create a target [Tiger Cloud service][create-service] with the Real-time analytics capability.
You need [your connection details][connection-info]. This procedure also works for [self-hosted TimescaleDB][enable-timescaledb].