Set default privileges
Default privileges need to be manually modified using [distributed_exec][distributed_exec], if they are to apply across all data nodes. The roles and schemas that the default privileges reference need to exist on the data nodes prior to executing the command.
New data nodes are assumed to already have any altered default privileges. The default privileges are not automatically applied retrospectively to new data nodes.
Manage tablespaces
Nodes might be configured with different disks, and therefore tablespaces need to be configured manually on each node. In particular, an access node might not have the same storage configuration as data nodes, since it typically does not store a lot of data. Therefore, it is not possible to assume that the same tablespace configuration exists across all nodes in a multi-node cluster.
===== PAGE: https://docs.tigerdata.com/self-hosted/multinode-timescaledb/about-multinode/ =====
Examples:
Example 1 (sql):
CREATE ROLE alice WITH LOGIN PASSWORD 'mypassword' CONNECTION LIMIT 10;
CALL distributed_exec($$ CREATE ROLE alice WITH LOGIN CONNECTION LIMIT -1; $$);
Example 2 (sql):
CREATE ROLE alice WITHOUT LOGIN;
CALL distributed_exec($$ CREATE ROLE alice WITH LOGIN; $$);
Example 3 (sql):
GRANT USAGE ON FOREIGN SERVER dn1,dn2,dn3 TO alice;Example 4 (sql):
ALTER ROLE alice CREATEROLE;
CALL distributed_exec($$ ALTER ROLE alice CREATEROLE; $$);
Back up and recover your Tiger Cloud services
URL: llms-txt#back-up-and-recover-your-tiger-cloud-services
Contents:
- Automatic backups
- Enable cross-region backup
- Create a point-in-time recovery fork
- Create a service fork
Tiger Cloud provides comprehensive backup and recovery solutions to protect your data, including automatic daily backups, cross-region protection, and point-in-time recovery.
Tiger Cloud automatically handles backup for your Tiger Cloud services using the pgBackRest tool. You don't need to perform backups manually. What's more, with [cross-region backup][cross-region], you are protected when an entire AWS region goes down.
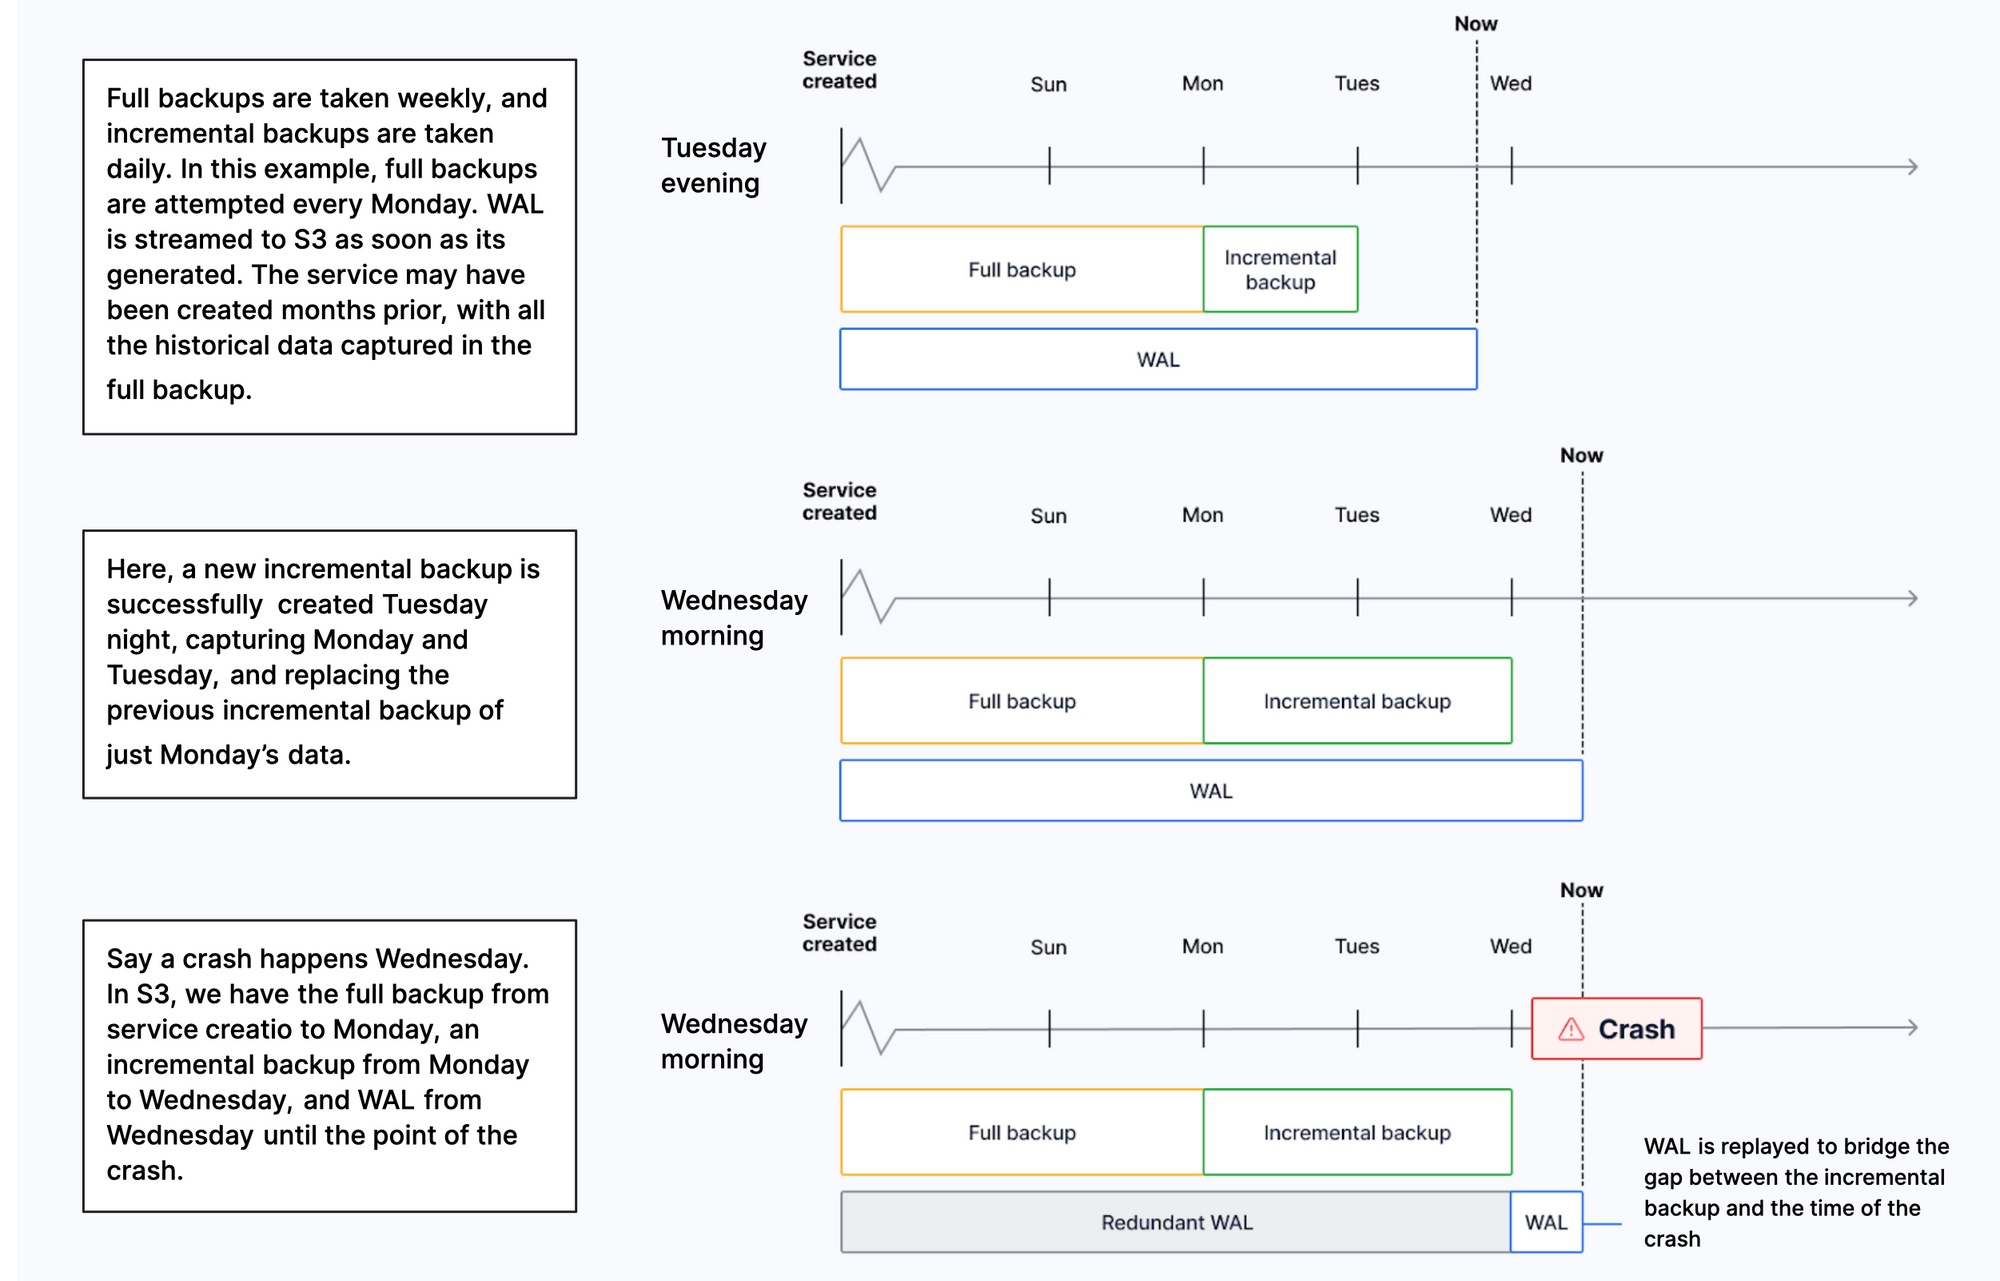
Tiger Cloud automatically creates one full backup every week, and incremental backups every day in the same region as your service. Additionally, all [Write-Ahead Log (WAL)][wal] files are retained back to the oldest full backup. This means that you always have a full backup available for the current and previous week:
On [Scale and Performance][pricing-and-account-management] pricing plans, you can check the list of backups for the previous 14 days in Tiger Cloud Console. To do so, select your service, then click Operations > Backup and restore > Backup history.
In the event of a storage failure, a service automatically recovers from a backup to the point of failure. If the whole availability zone goes down, your Tiger Cloud services are recovered in a different zone. In the event of a user error, you can [create a point-in-time recovery fork][create-fork].
Enable cross-region backup
For added reliability, you can enable cross-region backup. This protects your data when an entire AWS region goes down. In this case, you have two identical backups of your service at any time, but one of them is in a different AWS region. Cross-region backups are updated daily and weekly in the same way as a regular backup. You can have one cross-region backup for a service.
You enable cross-region backup when you create a service, or configure it for an existing service in Tiger Cloud Console:
In [Console][console], select your service and click
Operations>Backup & restore.In
Cross-region backup, select the region in the dropdown and clickEnable backup.
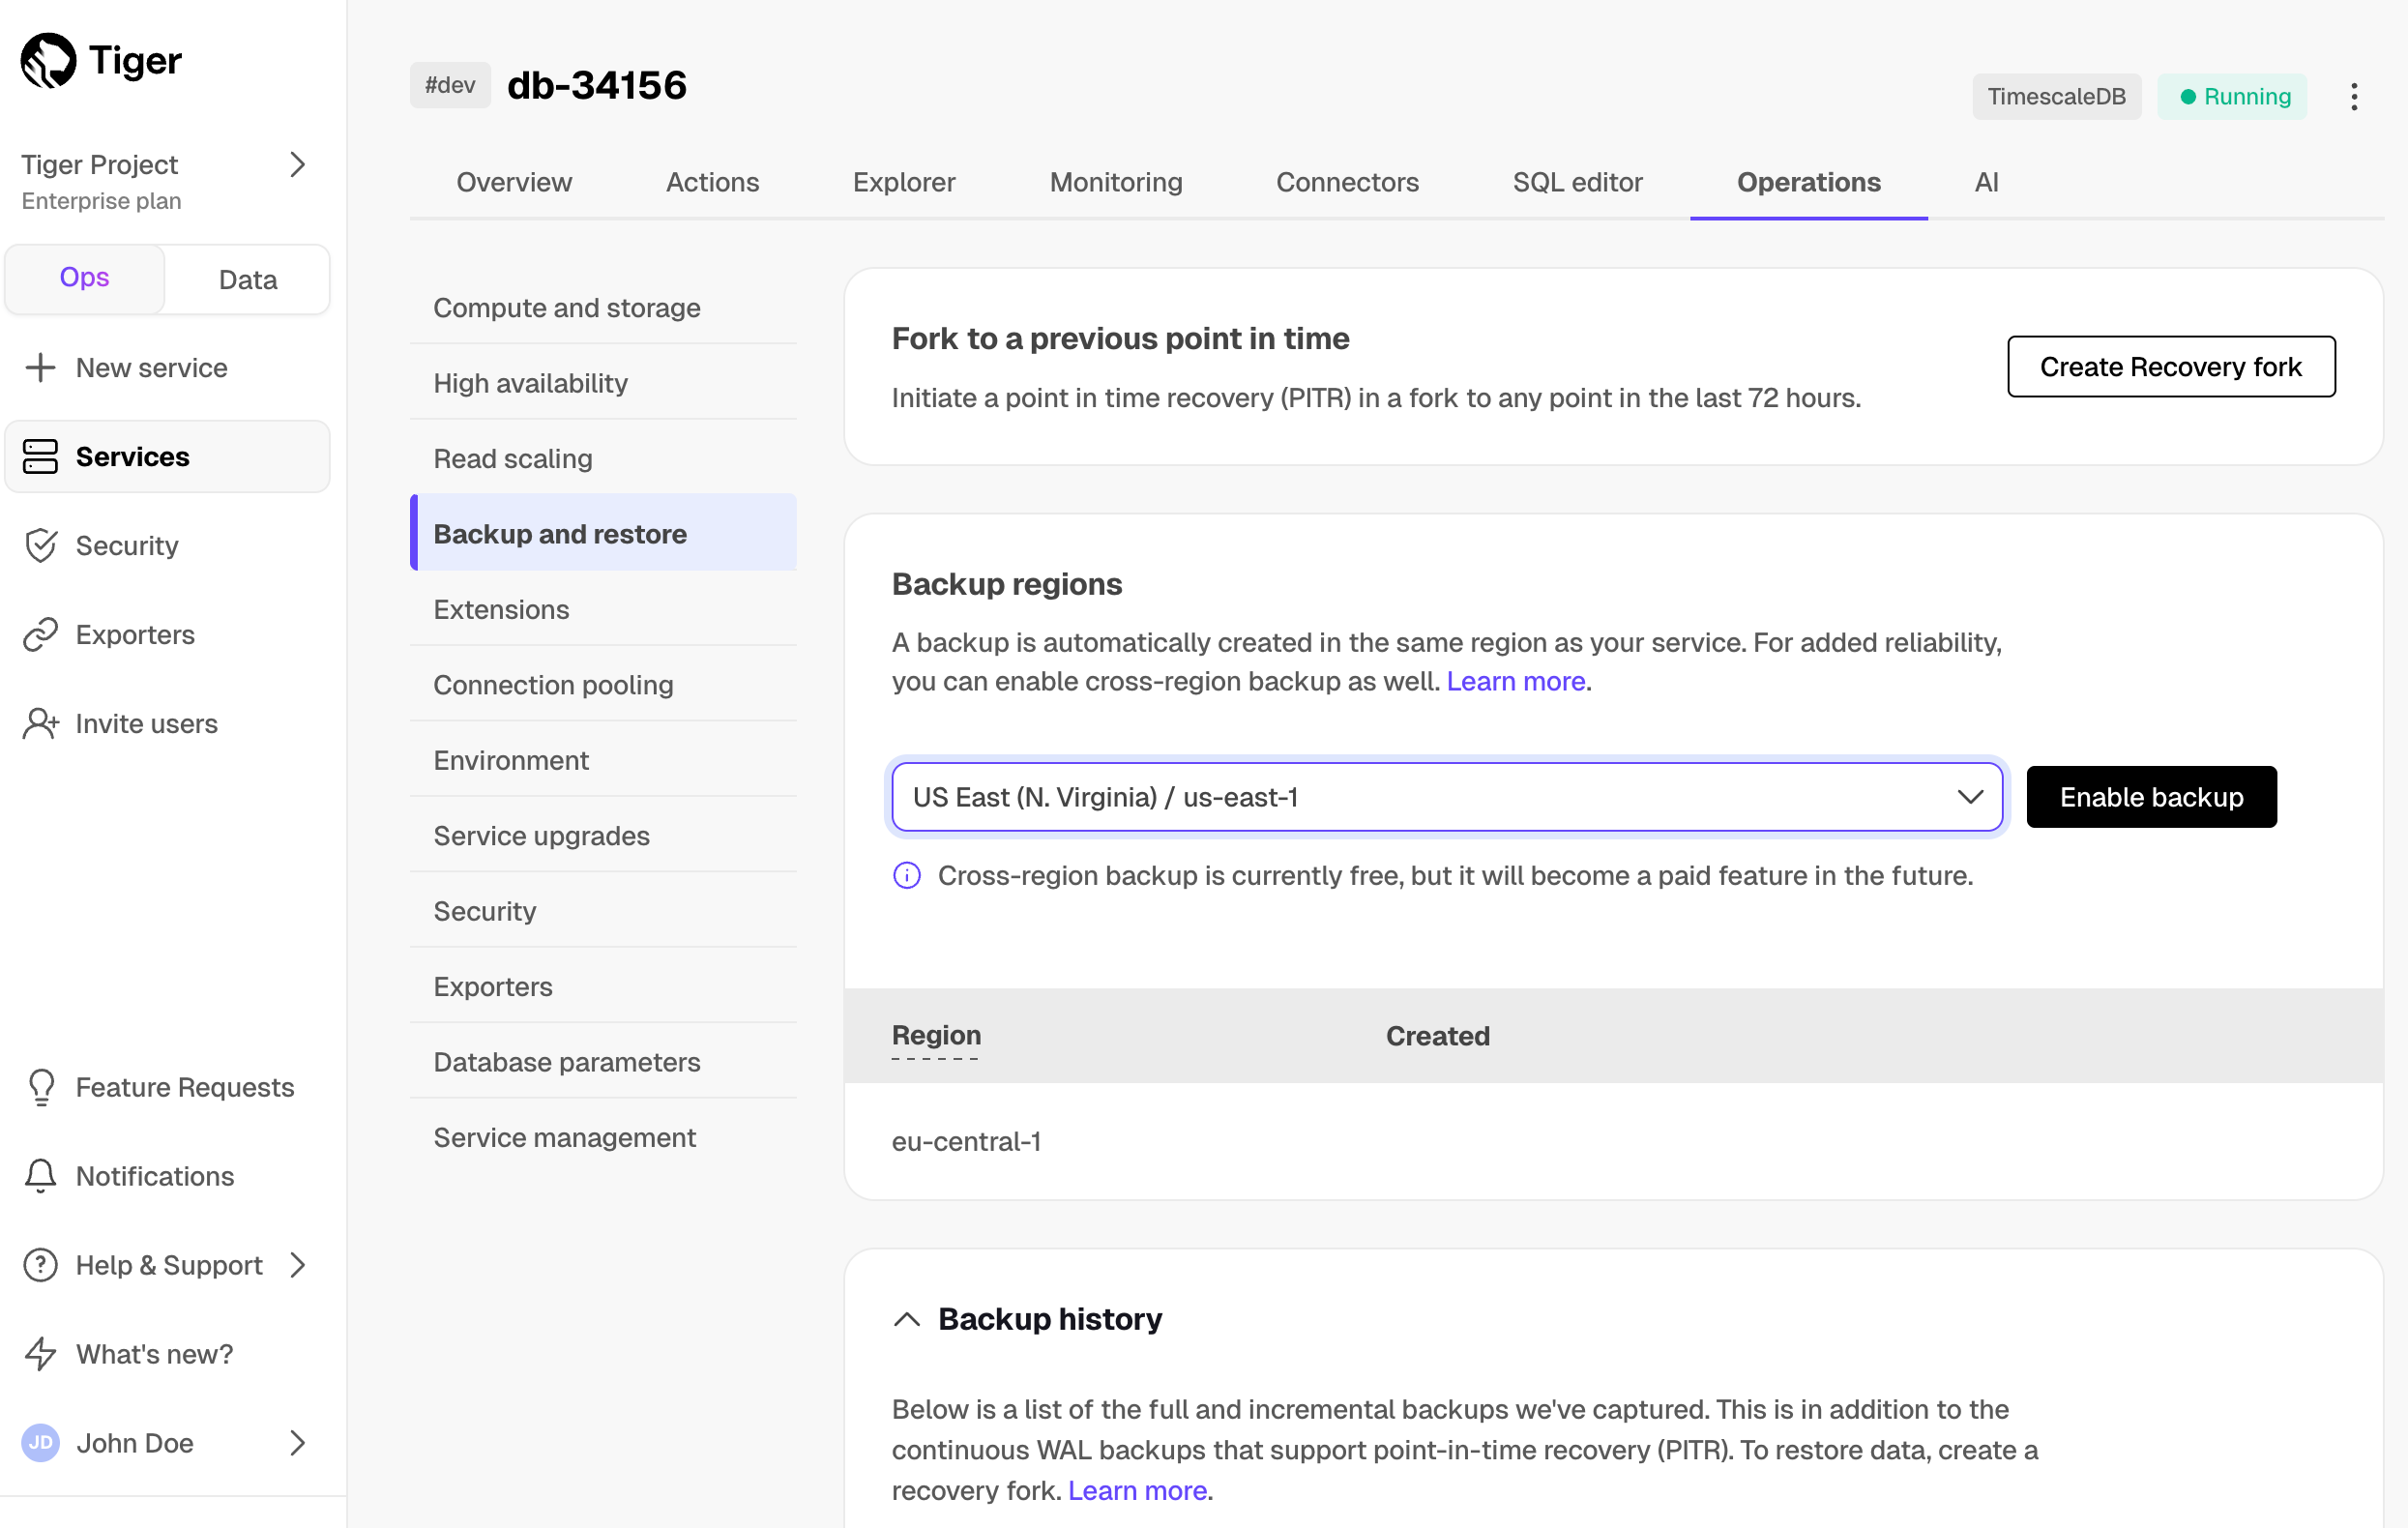
You can now see the backup, its region, and creation date in a list.
You can have one cross-region backup per service. To change the region of your backup:
In [Console][console], select your service and click
Operations>Backup & restore.Click the trash icon next to the existing backup to disable it.
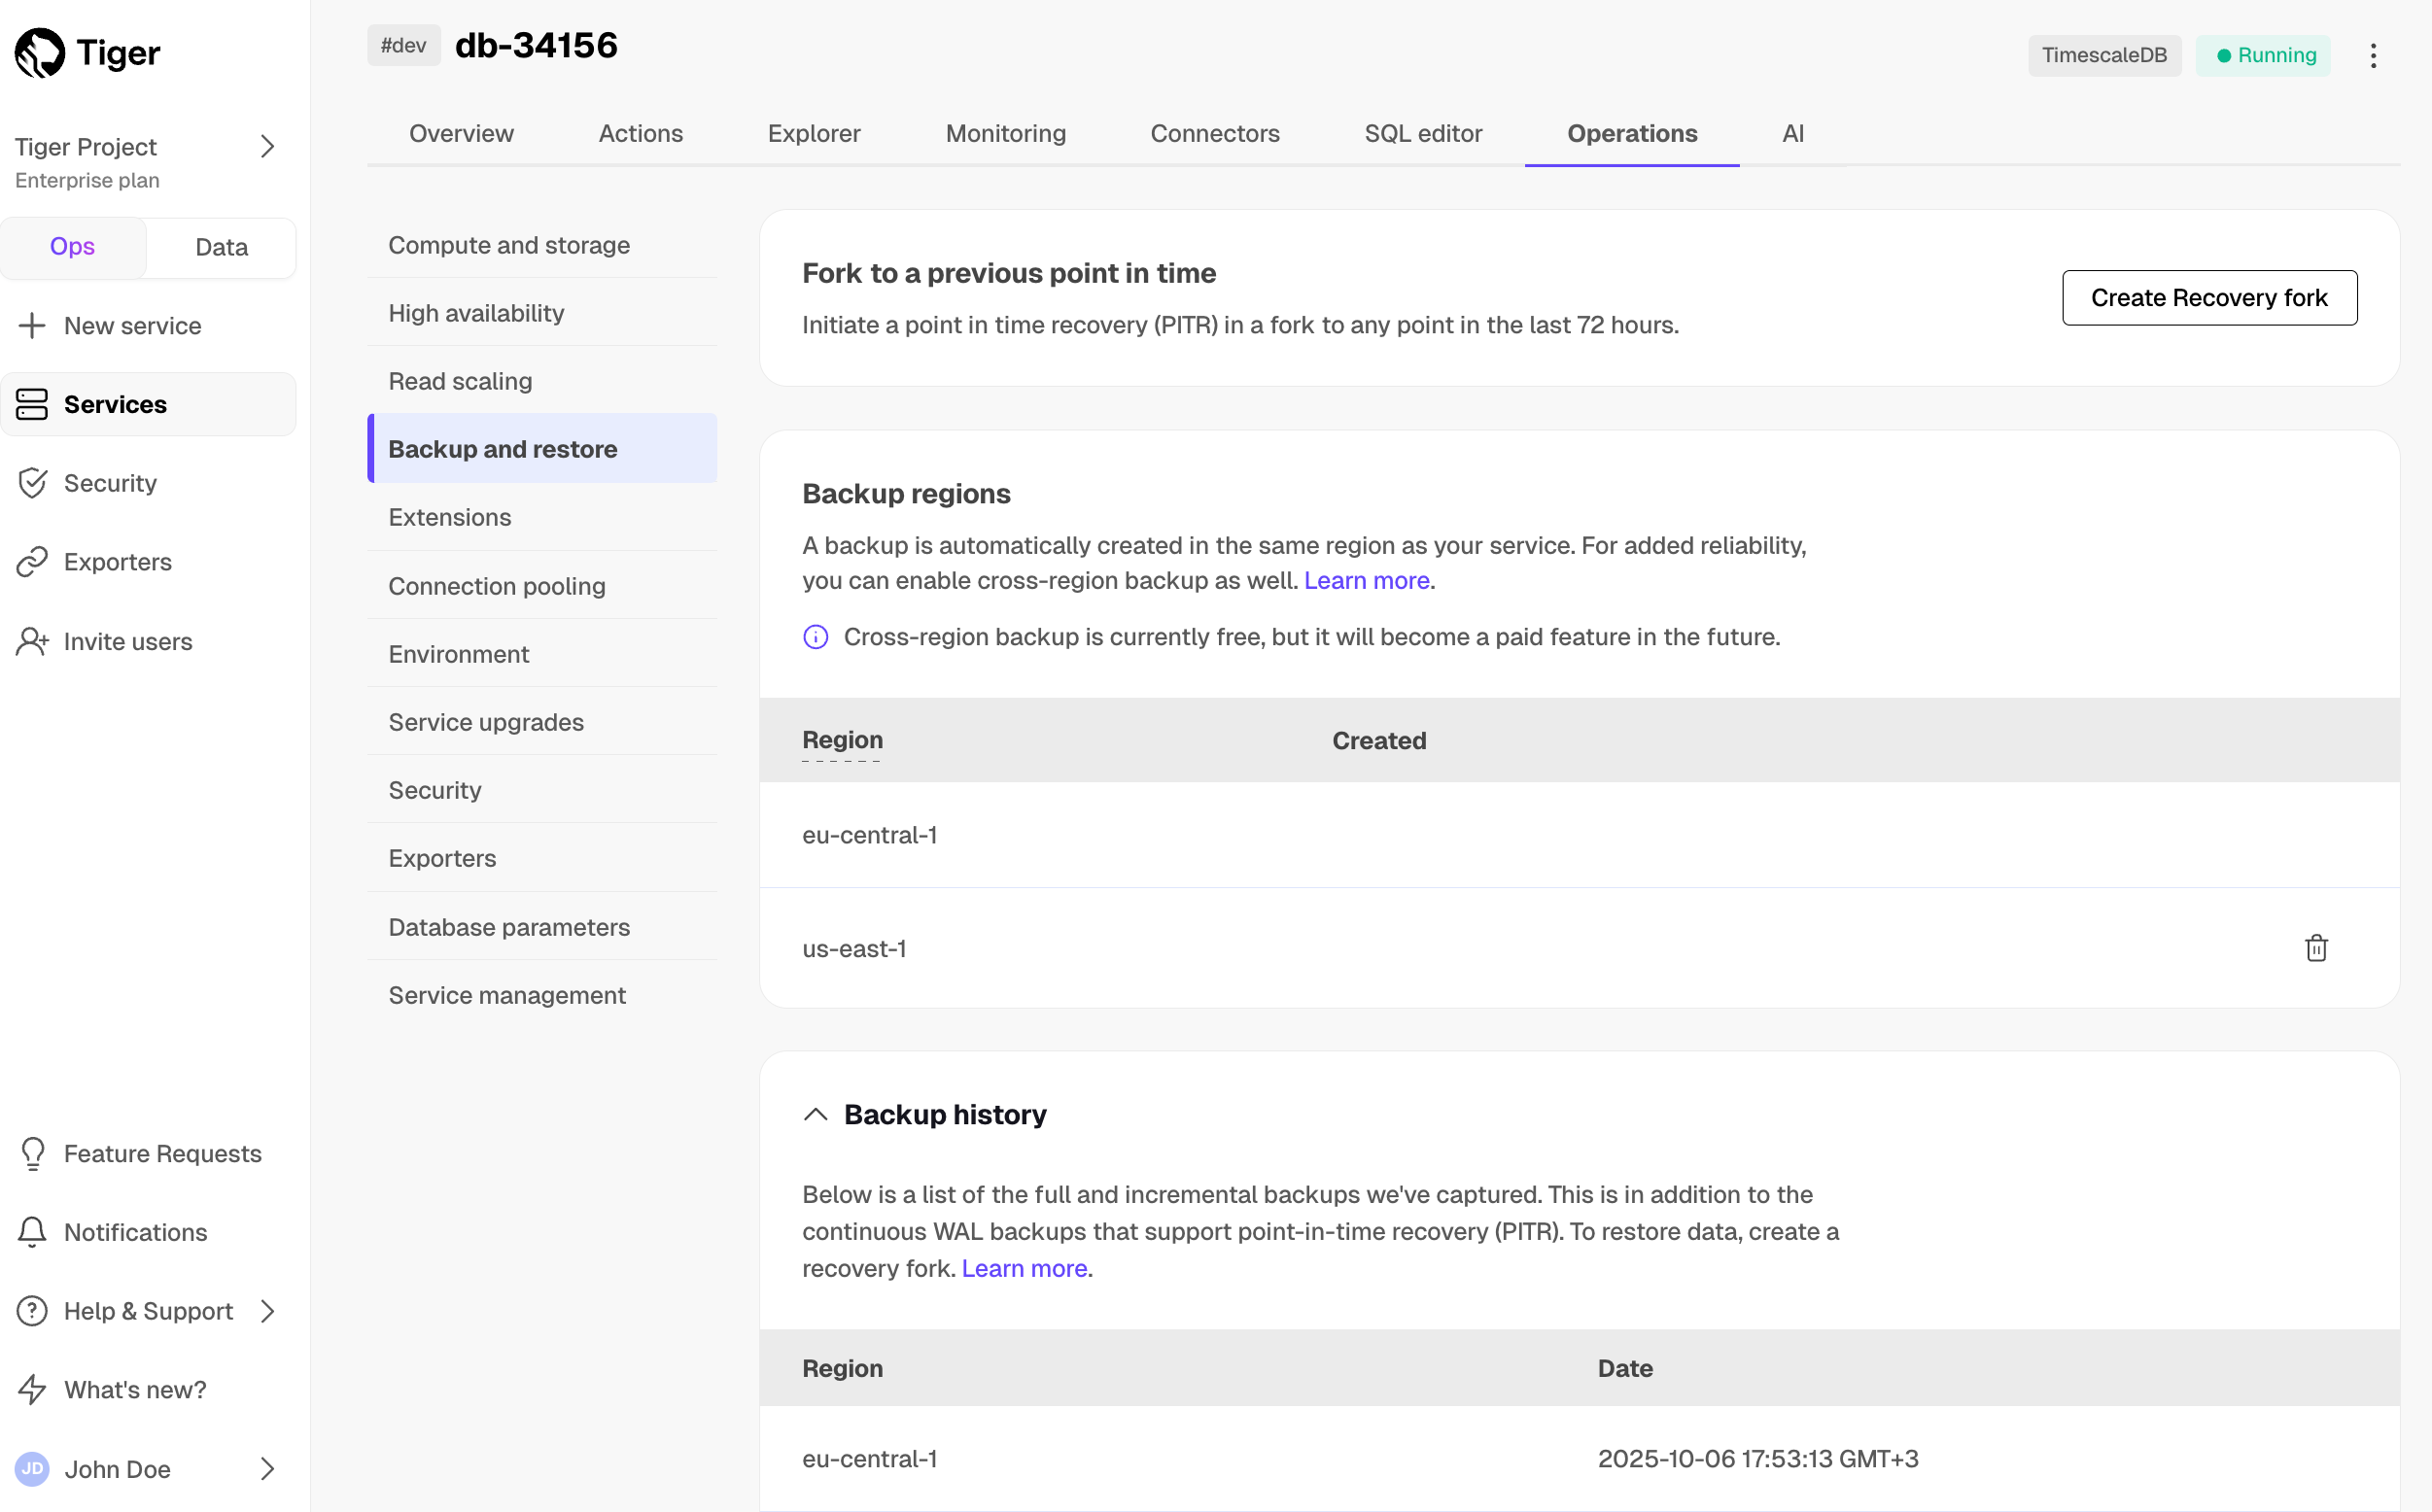
- Create a new backup in a different region.
Create a point-in-time recovery fork
To recover your service from a destructive or unwanted action, create a point-in-time recovery fork. You can recover a service to any point within the period [defined by your pricing plan][pricing-and-account-management]. The provision time for the recovery fork is typically less than twenty minutes, but can take longer depending on the amount of WAL to be replayed. The original service stays untouched to avoid losing data created since the time of recovery.
All tiered data remains recoverable during the PITR period. When restoring to any point-in-time recovery fork, your service contains all data that existed at that moment - whether it was stored in high-performance or low-cost storage.
When you restore a recovery fork:
- Data restored from a PITR point is placed into high-performance storage
- The tiered data, as of that point in time, remains in tiered storage
To avoid paying for compute for the recovery fork and the original service, pause the original to only pay storage costs.
You initiate a point-in-time recovery from a same-region or cross-region backup in Tiger Cloud Console:
- In [Tiger Cloud Console][console], from the
Serviceslist, ensure the service you want to recover has a status ofRunningorPaused. - Navigate to
Operations>Service managementand clickCreate recovery fork. - Select the recovery point, ensuring the correct time zone (UTC offset).
- Configure the fork.
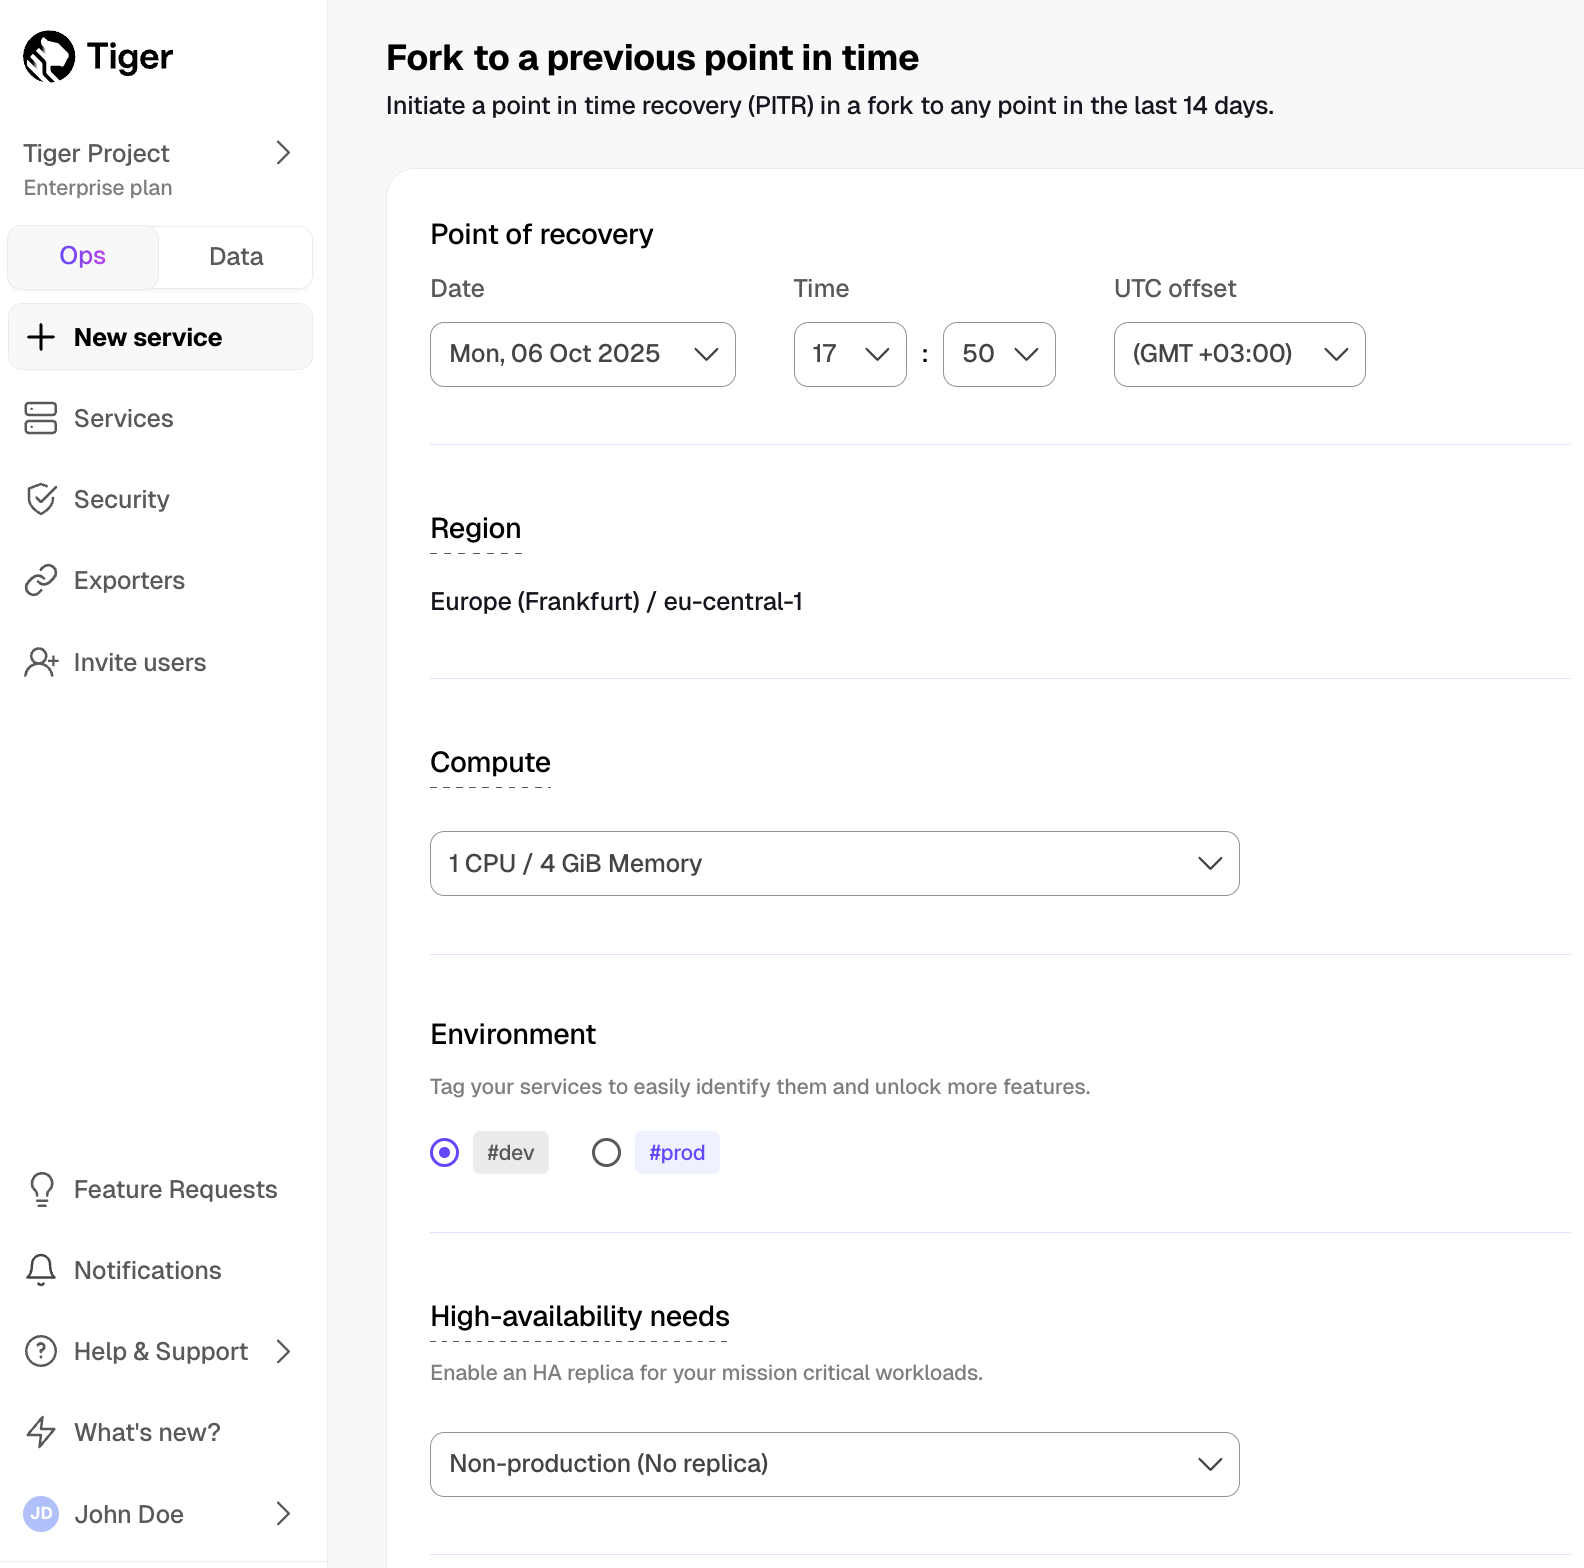
You can configure the compute resources, add an HA replica, tag your fork, and add a connection pooler. Best practice is to match the same configuration you had at the point you want to recover to.
- Confirm by clicking
Create recovery fork.
A fork of the service is created. The recovered service shows in Services with a label specifying which service it has been forked from.
- Update the connection strings in your app
Since the point-in-time recovery is done in a fork, to migrate your application to the point of recovery, change the connection strings in your application to use the fork.
Contact us, and we will assist in recovering your service.
Create a service fork
To manage development forks:
- Install Tiger CLI
Use the terminal to install the CLI:
Set up API credentials
Log Tiger CLI into your Tiger Data account:
Tiger CLI opens Console in your browser. Log in, then click Authorize.
You can have a maximum of 10 active client credentials. If you get an error, open [credentials][rest-api-credentials] and delete an unused credential.
- Select a Tiger Cloud project:
If only one project is associated with your account, this step is not shown.
Where possible, Tiger CLI stores your authentication information in the system keychain/credential manager. If that fails, the credentials are stored in ~/.config/tiger/credentials with restricted file permissions (600). By default, Tiger CLI stores your configuration in ~/.config/tiger/config.yaml.
- Test your authenticated connection to Tiger Cloud by listing services
This call returns something like: - No services:
- One or more services:
- Fork the service
By default a fork matches the resource of the parent Tiger Cloud services. For paid plans specify --cpu and/or --memory for dedicated resources.
You see something like:
When you are done, delete your forked service
Use the CLI to request service delete:
Validate the service delete:
You see something like:
===== PAGE: https://docs.tigerdata.com/use-timescale/fork-services/ =====
Examples:
Example 1 (shell):
curl -s https://packagecloud.io/install/repositories/timescale/tiger-cli/script.deb.sh | sudo os=any dist=any bash
    sudo apt-get install tiger-cli
Example 2 (shell):
curl -s https://packagecloud.io/install/repositories/timescale/tiger-cli/script.deb.sh | sudo os=any dist=any bash
    sudo apt-get install tiger-cli
Example 3 (shell):
curl -s https://packagecloud.io/install/repositories/timescale/tiger-cli/script.rpm.sh | sudo os=rpm_any dist=rpm_any bash
    sudo yum install tiger-cli
Example 4 (shell):
curl -s https://packagecloud.io/install/repositories/timescale/tiger-cli/script.rpm.sh | sudo os=rpm_any dist=rpm_any bash
    sudo yum install tiger-cli
Analyze the Bitcoin blockchain
URL: llms-txt#analyze-the-bitcoin-blockchain
Contents:
- Prerequisites
- Steps in this tutorial
- About analyzing the Bitcoin blockchain with Tiger Cloud
The financial industry is extremely data-heavy and relies on real-time and historical data for decision-making, risk assessment, fraud detection, and market analysis. Tiger Data simplifies management of these large volumes of data, while also providing you with meaningful analytical insights and optimizing storage costs.
In this tutorial, you use Tiger Cloud to ingest, store, and analyze transactions on the Bitcoin blockchain.
[Blockchains][blockchain-def] are, at their essence, a distributed database. The [transactions][transactions-def] in a blockchain are an example of time-series data. You can use TimescaleDB to query transactions on a blockchain, in exactly the same way as you might query time-series transactions in any other database.
Before you begin, make sure you have:
- Signed up for a [free Tiger Data account][cloud-install].
- Signed up for a [Grafana account][grafana-setup] to graph your queries.
Steps in this tutorial
This tutorial covers:
- [Setting up your dataset][blockchain-dataset]
- [Querying your dataset][blockchain-analyze]
About analyzing the Bitcoin blockchain with Tiger Cloud
This tutorial uses a sample Bitcoin dataset to show you how to aggregate blockchain transaction data, and construct queries to analyze information from the aggregations. The queries in this tutorial help you determine if a cryptocurrency has a high transaction fee, shows any correlation between transaction volumes and fees, or if it's expensive to mine.
It starts by setting up and connecting to a Tiger Cloud service, create tables, and load data into the tables using psql. If you have already completed the [beginner blockchain tutorial][blockchain-query], then you already have the dataset loaded, and you can skip straight to the queries.
You then learn how to conduct analysis on your dataset using Timescale hyperfunctions. It walks you through creating a series of continuous aggregates, and querying the aggregates to analyze the data. You can also use those queries to graph the output in Grafana.
===== PAGE: https://docs.tigerdata.com/tutorials/financial-tick-data/ =====
Try the key features in Tiger Data products
URL: llms-txt#try-the-key-features-in-tiger-data-products
Contents:
- Prerequisites
- Optimize time-series data in hypertables with hypercore
- Enhance query performance for analytics
- Write fast and efficient analytical queries
- Slash storage charges
- Reduce the risk of downtime and data loss
Tiger Cloud offers managed database services that provide a stable and reliable environment for your applications.
Each Tiger Cloud service is a single optimised Postgres instance extended with innovations such as TimescaleDB in the database engine, in a cloud infrastructure that delivers speed without sacrifice. A radically faster Postgres for transactional, analytical, and agentic workloads at scale.
Tiger Cloud scales Postgres to ingest and query vast amounts of live data. Tiger Cloud provides a range of features and optimizations that supercharge your queries while keeping the costs down. For example:
- The hypercore row-columnar engine in TimescaleDB makes queries up to 350x faster, ingests 44% faster, and reduces storage by 90%.
- Tiered storage in Tiger Cloud seamlessly moves your data from high performance storage for frequently accessed data to low cost bottomless storage for rarely accessed data.
The following figure shows how TimescaleDB optimizes your data for superfast real-time analytics:
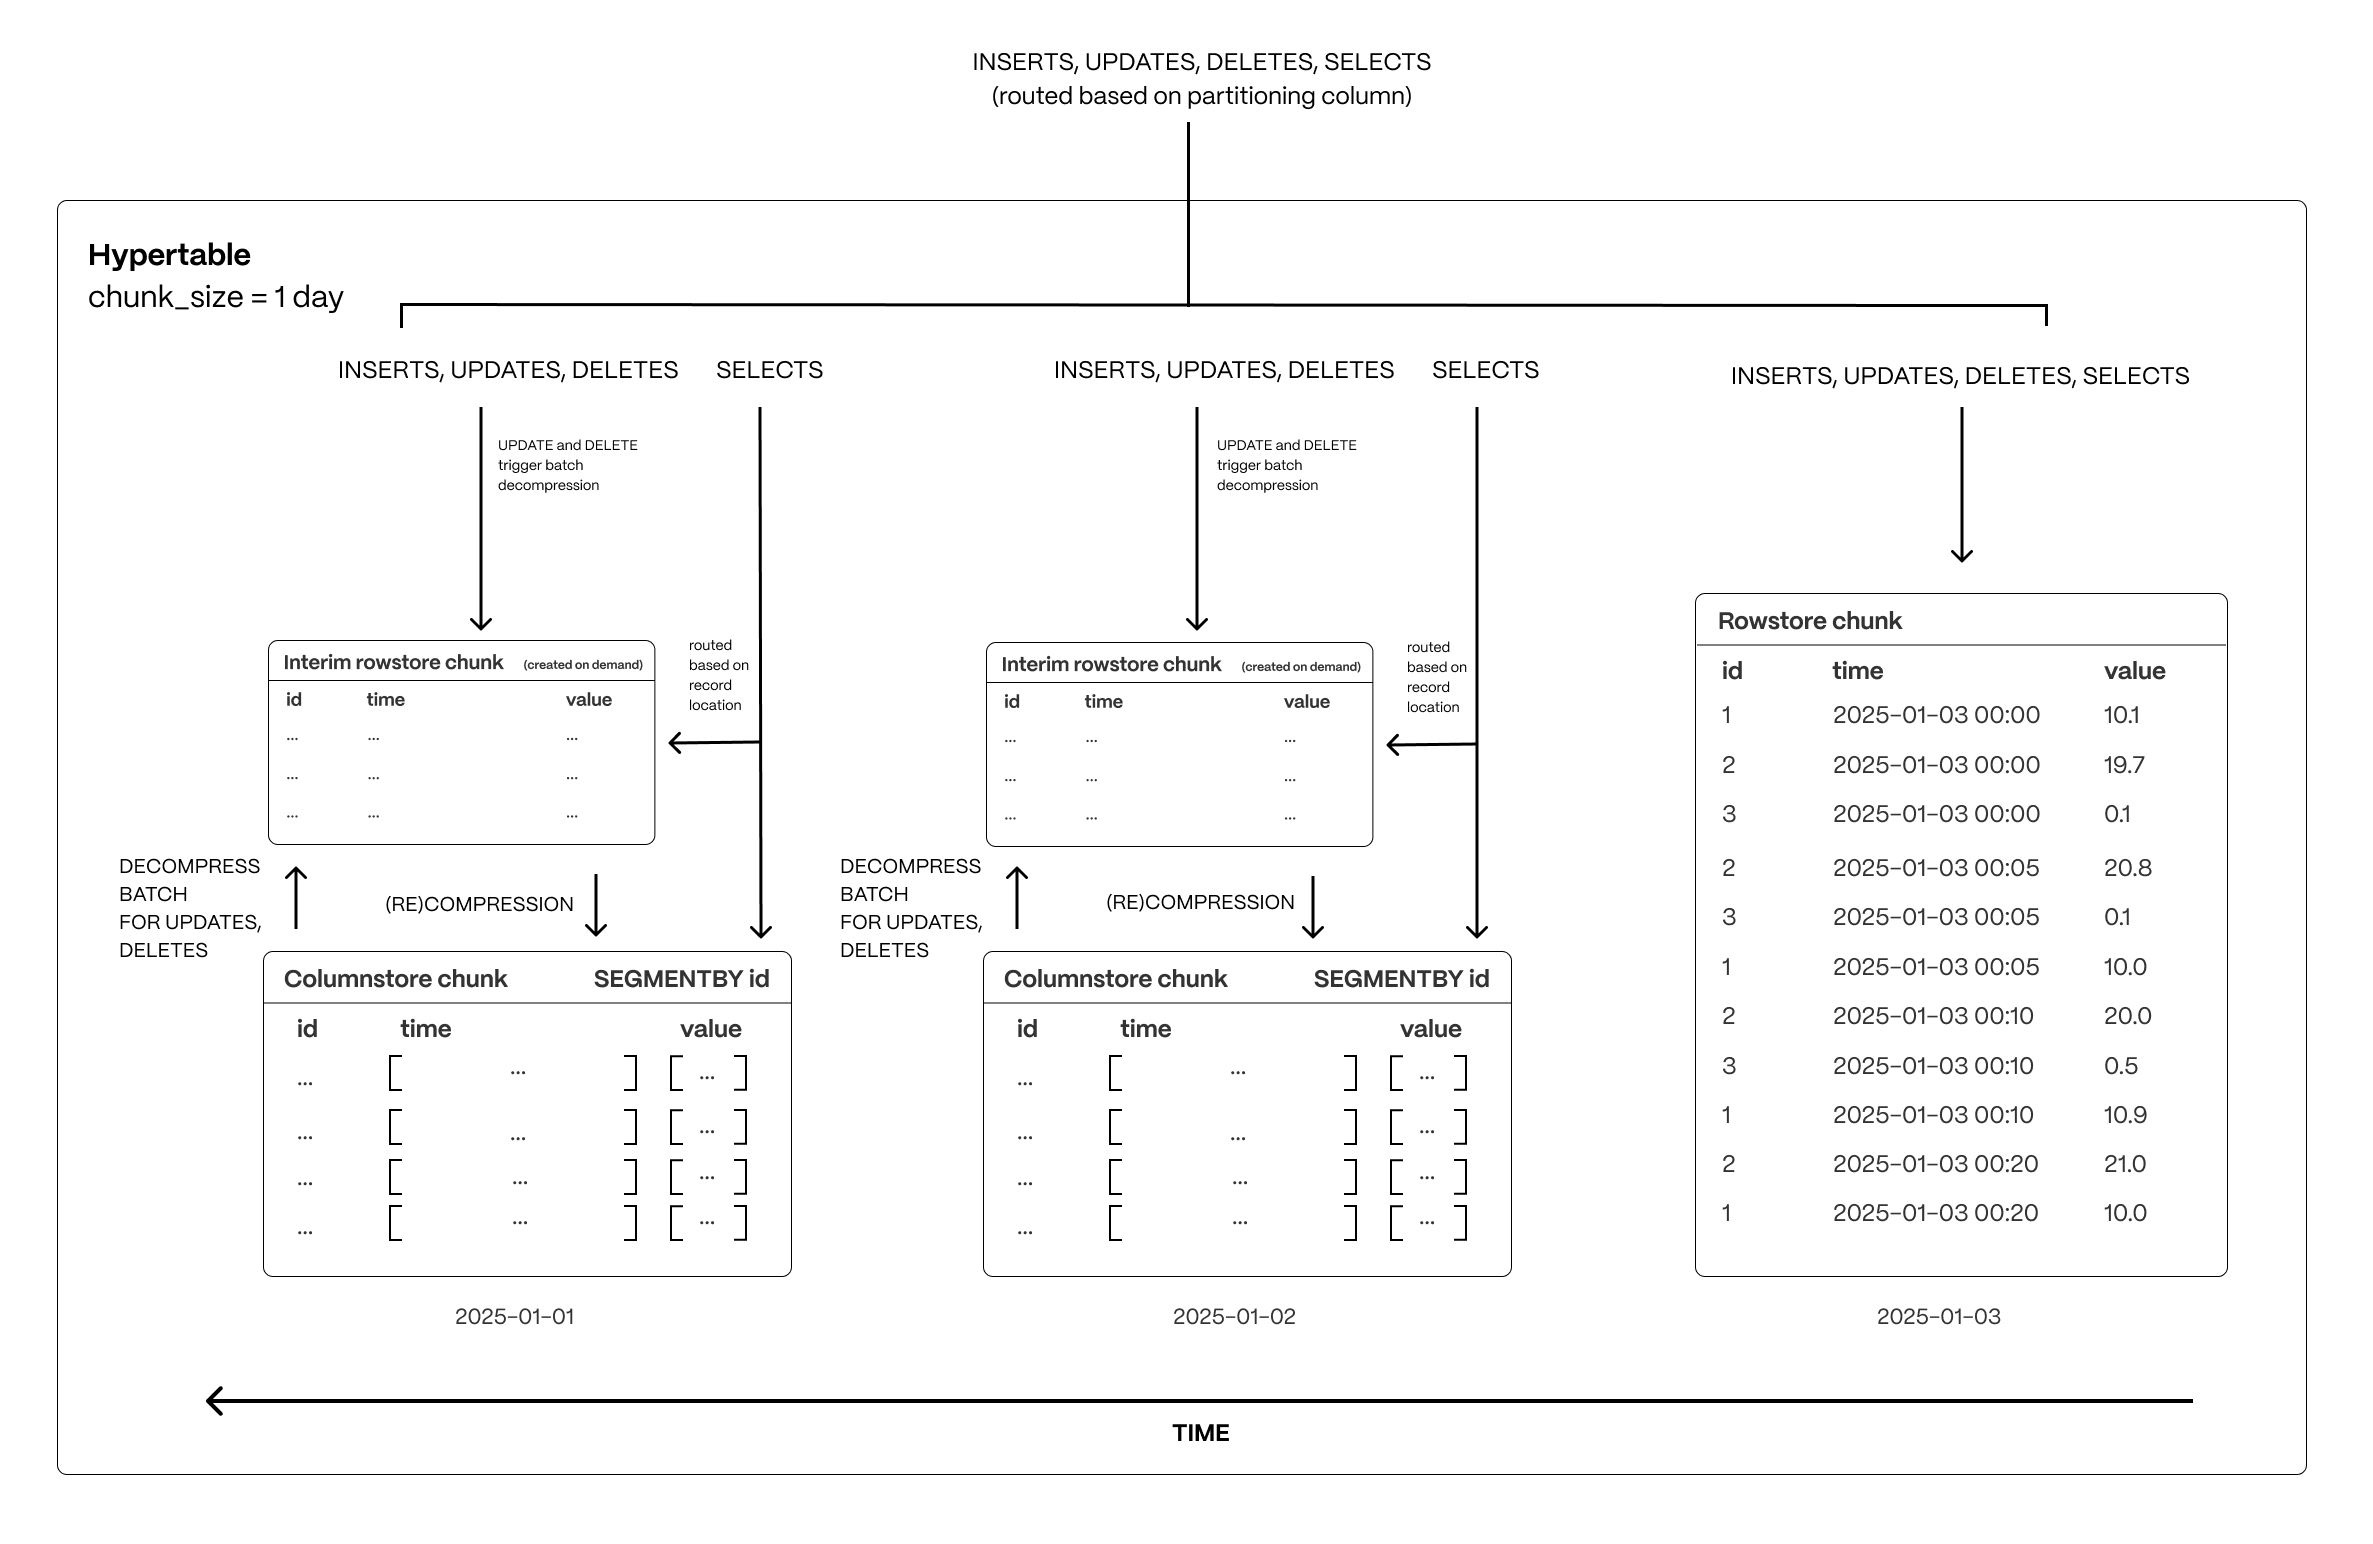
This page shows you how to rapidly implement the features in Tiger Cloud that enable you to ingest and query data faster while keeping the costs low.
To follow the steps on this page:
- Create a target [Tiger Cloud service][create-service] with the Real-time analytics capability.
You need [your connection details][connection-info]. This procedure also works for [self-hosted TimescaleDB][enable-timescaledb].
Optimize time-series data in hypertables with hypercore
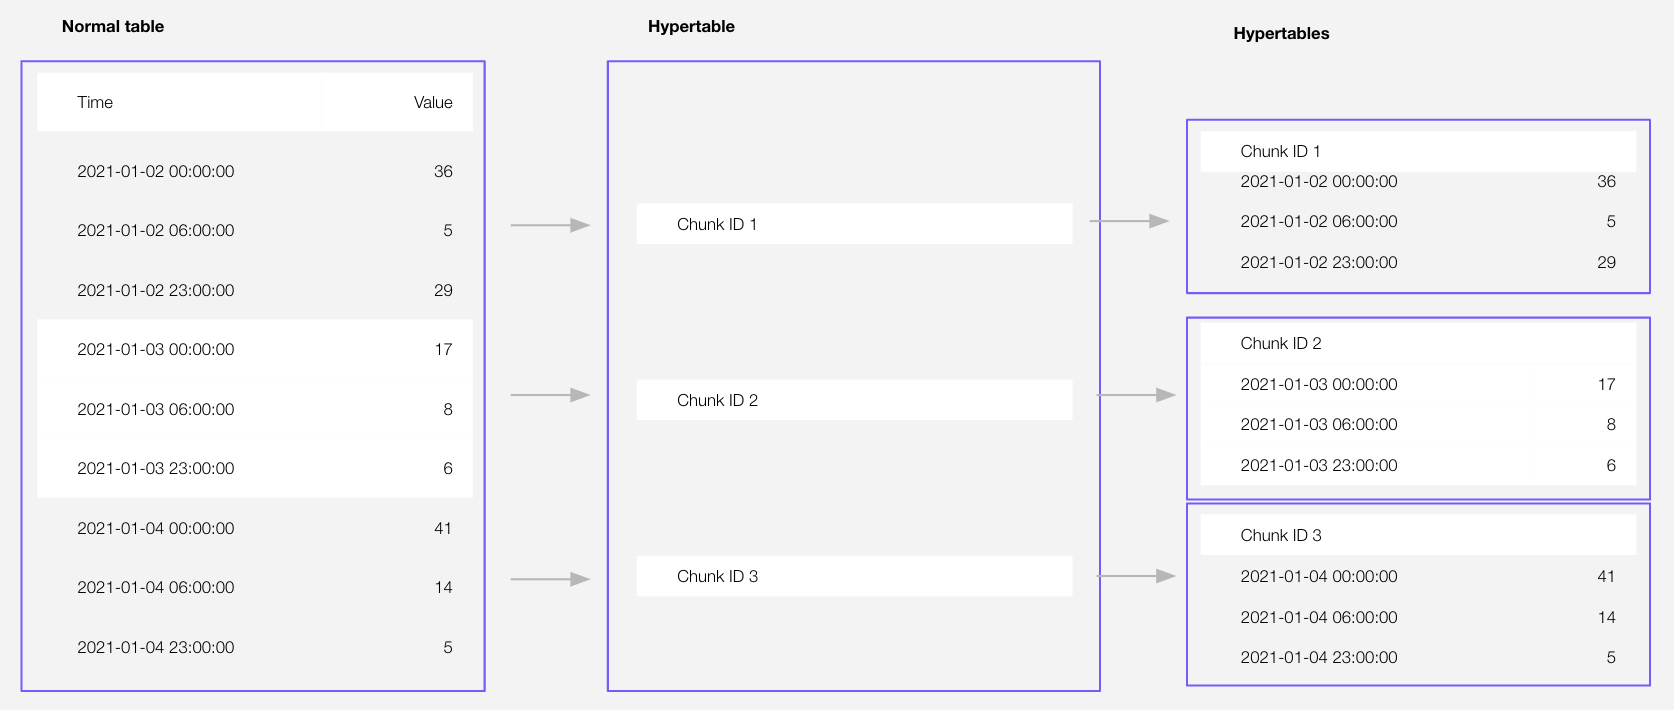
Time-series data represents the way a system, process, or behavior changes over time. Hypertables are Postgres tables that help you improve insert and query performance by automatically partitioning your data by time. Each hypertable is made up of child tables called chunks. Each chunk is assigned a range of time, and only contains data from that range. When you run a query, TimescaleDB identifies the correct chunk and runs the query on it, instead of going through the entire table. You can also tune hypertables to increase performance even more.
[Hypercore][hypercore] is the hybrid row-columnar storage engine in TimescaleDB used by hypertables. Traditional databases force a trade-off between fast inserts (row-based storage) and efficient analytics (columnar storage). Hypercore eliminates this trade-off, allowing real-time analytics without sacrificing transactional capabilities.
Hypercore dynamically stores data in the most efficient format for its lifecycle:
- Row-based storage for recent data: the most recent chunk (and possibly more) is always stored in the rowstore, ensuring fast inserts, updates, and low-latency single record queries. Additionally, row-based storage is used as a writethrough for inserts and updates to columnar storage.
- Columnar storage for analytical performance: chunks are automatically compressed into the columnstore, optimizing storage efficiency and accelerating analytical queries.
Unlike traditional columnar databases, hypercore allows data to be inserted or modified at any stage, making it a flexible solution for both high-ingest transactional workloads and real-time analytics—within a single database.
Hypertables exist alongside regular Postgres tables. You use regular Postgres tables for relational data, and interact with hypertables and regular Postgres tables in the same way.
This section shows you how to create regular tables and hypertables, and import relational and time-series data from external files.
Import some time-series data into hypertables
Unzip crypto_sample.zip to a
<local folder>.
This test dataset contains: - Second-by-second data for the most-traded crypto-assets. This time-series data is best suited for optimization in a [hypertable][hypertables-section]. - A list of asset symbols and company names. This is best suited for a regular relational table.
To import up to 100 GB of data directly from your current Postgres-based database, [migrate with downtime][migrate-with-downtime] using native Postgres tooling. To seamlessly import 100GB-10TB+ of data, use the [live migration][migrate-live] tooling supplied by Tiger Data. To add data from non-Postgres data sources, see [Import and ingest data][data-ingest].
- Upload data into a hypertable:
To more fully understand how to create a hypertable, how hypertables work, and how to optimize them for performance by tuning chunk intervals and enabling chunk skipping, see [the hypertables documentation][hypertables-section].
The Tiger Cloud Console data upload creates hypertables and relational tables from the data you are uploading: 1. In [Tiger Cloud Console][portal-ops-mode], select the service to add data to, then click Actions > Import data > Upload .CSV. 1. Click to browse, or drag and drop <local folder>/tutorial_sample_tick.csv to upload. 1. Leave the default settings for the delimiter, skipping the header, and creating a new table. 1. In Table, provide crypto_ticks as the new table name. 1. Enable hypertable partition for the time column and click Process CSV file.
The upload wizard creates a hypertable containing the data from the CSV file. 1. When the data is uploaded, close Upload .CSV.
If you want to have a quick look at your data, press Run . 1. Repeat the process with <local folder>/tutorial_sample_assets.csv and rename to crypto_assets.
There is no time-series data in this table, so you don't see the hypertable partition option.
In Terminal, navigate to
<local folder>and connect to your service.You use your [connection details][connection-info] to fill in this Postgres connection string.Create tables for the data to import:
- For the time-series data:
- In your sql client, create a hypertable:
Create a [hypertable][hypertables-section] for your time-series data using [CREATE TABLE][hypertable-create-table]. For [efficient queries][secondary-indexes], remember to segmentby the column you will use most often to filter your data. For example:
If you are self-hosting TimescaleDB v2.19.3 and below, create a [Postgres relational table][pg-create-table], then convert it using [create_hypertable][create_hypertable]. You then enable hypercore with a call to [ALTER TABLE][alter_table_hypercore].
- For the relational data:
In your sql client, create a normal Postgres table:
1. Speed up data ingestion:
When you set timescaledb.enable_direct_compress_copy your data gets compressed in memory during ingestion with COPY statements. By writing the compressed batches immediately in the columnstore, the IO footprint is significantly lower. Also, the [columnstore policy][add_columnstore_policy] you set is less important, INSERT already produces compressed chunks.
Please note that this feature is a tech preview and not production-ready. Using this feature could lead to regressed query performance and/or storage ratio, if the ingested batches are not correctly ordered or are of too high cardinality.
To enable in-memory data compression during ingestion:
Important facts
- High cardinality use cases do not produce good batches and lead to degreaded query performance.
- The columnstore is optimized to store 1000 records per batch, which is the optimal format for ingestion per segment by.
- WAL records are written for the compressed batches rather than the individual tuples.
- Currently only
COPYis support,INSERTwill eventually follow. - Best results are achieved for batch ingestion with 1000 records or more, upper boundary is 10.000 records.
- Continous Aggregates are not supported at the moment.
Upload the dataset to your service:
Have a quick look at your data
You query hypertables in exactly the same way as you would a relational Postgres table. Use one of the following SQL editors to run a query and see the data you uploaded: - Data mode: write queries, visualize data, and share your results in [Tiger Cloud Console][portal-data-mode] for all your Tiger Cloud services. This feature is not available under the Free pricing plan. - SQL editor: write, fix, and organize SQL faster and more accurately in [Tiger Cloud Console][portal-ops-mode] for a Tiger Cloud service. - psql: easily run queries on your Tiger Cloud services or self-hosted TimescaleDB deployment from Terminal.
Enhance query performance for analytics
Hypercore is the TimescaleDB hybrid row-columnar storage engine, designed specifically for real-time analytics and powered by time-series data. The advantage of hypercore is its ability to seamlessly switch between row-oriented and column-oriented storage. This flexibility enables TimescaleDB to deliver the best of both worlds, solving the key challenges in real-time analytics.
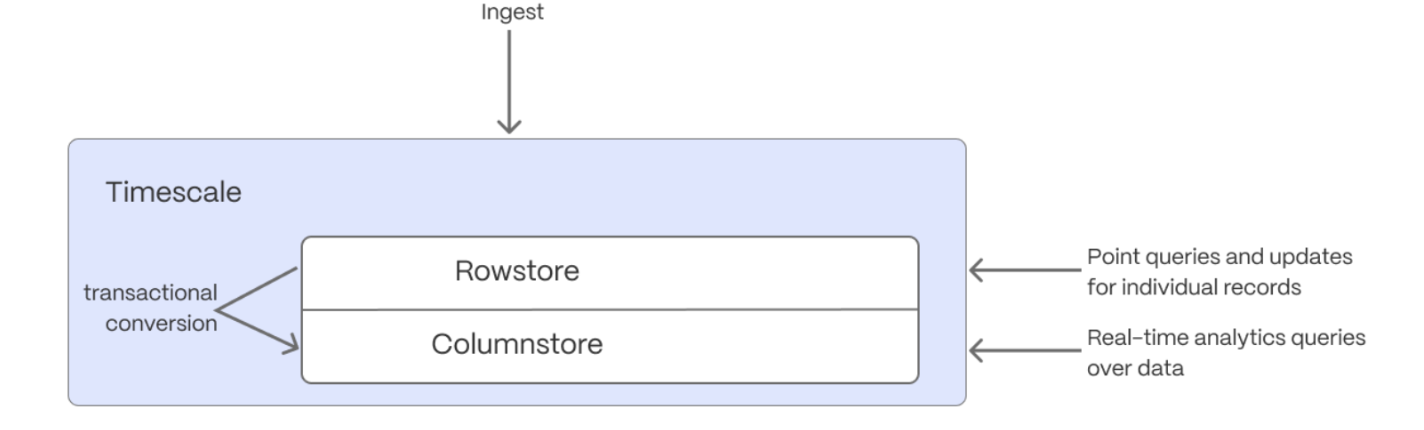
When TimescaleDB converts chunks from the rowstore to the columnstore, multiple records are grouped into a single row. The columns of this row hold an array-like structure that stores all the data. Because a single row takes up less disk space, you can reduce your chunk size by up to 98%, and can also speed up your queries. This helps you save on storage costs, and keeps your queries operating at lightning speed.
hypercore is enabled by default when you call [CREATE TABLE][hypertable-create-table]. Best practice is to compress data that is no longer needed for highest performance queries, but is still accessed regularly in the columnstore. For example, yesterday's market data.
- Add a policy to convert chunks to the columnstore at a specific time interval
For example, yesterday's data:
If you have not configured a segmentby column, TimescaleDB chooses one for you based on the data in your hypertable. For more information on how to tune your hypertables for the best performance, see [efficient queries][secondary-indexes].
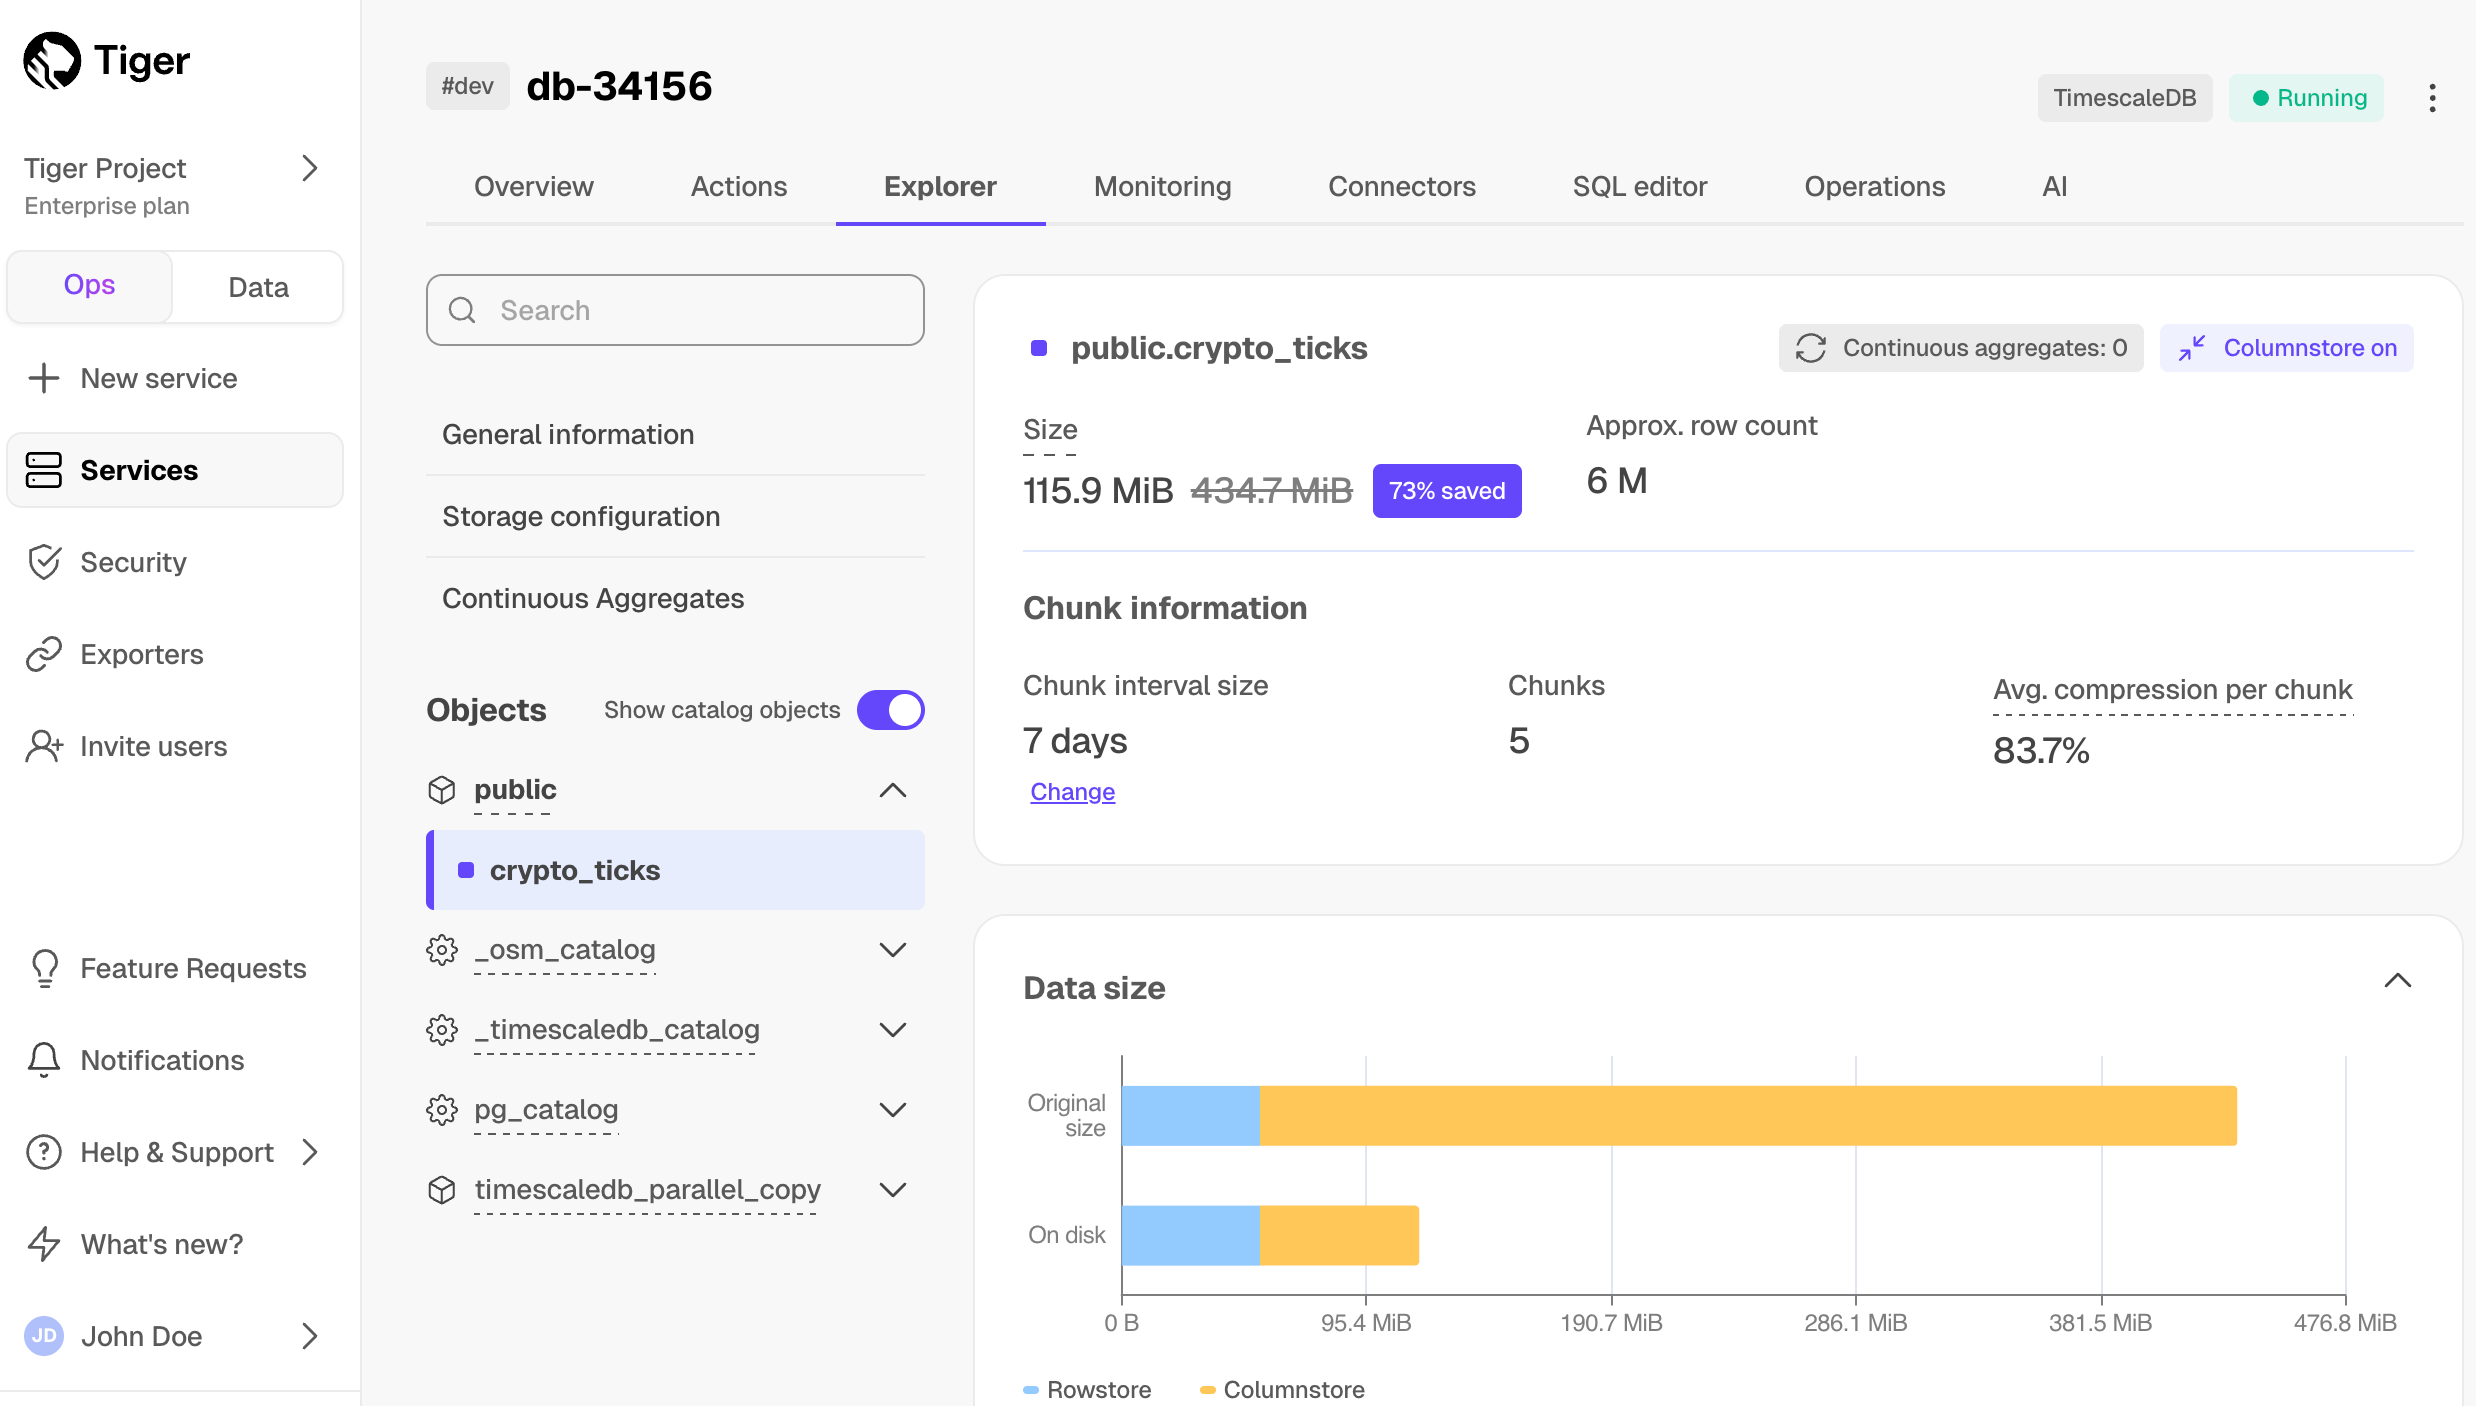
- View your data space saving
When you convert data to the columnstore, as well as being optimized for analytics, it is compressed by more than 90%. This helps you save on storage costs and keeps your queries operating at lightning speed. To see the amount of space saved, click Explorer > public > crypto_ticks.
Write fast and efficient analytical queries
Aggregation is a way of combing data to get insights from it. Average, sum, and count are all examples of simple aggregates. However, with large amounts of data, aggregation slows things down, quickly. Continuous aggregates are a kind of hypertable that is refreshed automatically in the background as new data is added, or old data is modified. Changes to your dataset are tracked, and the hypertable behind the continuous aggregate is automatically updated in the background.
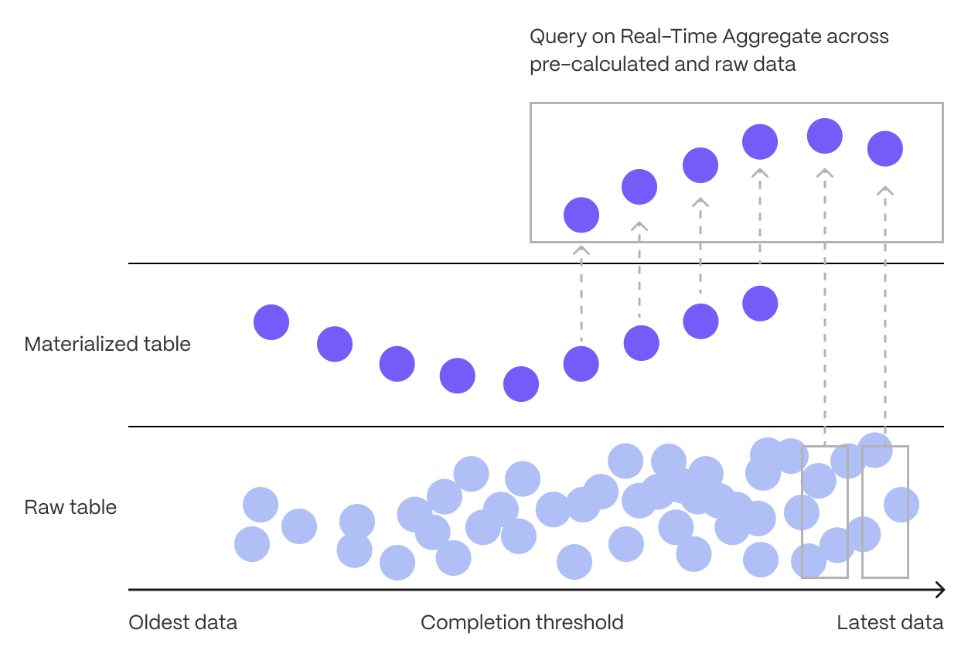
You create continuous aggregates on uncompressed data in high-performance storage. They continue to work on [data in the columnstore][test-drive-enable-compression] and [rarely accessed data in tiered storage][test-drive-tiered-storage]. You can even create [continuous aggregates on top of your continuous aggregates][hierarchical-caggs].
You use time buckets to create a continuous aggregate. Time buckets aggregate data in hypertables by time interval. For example, a 5-minute, 1-hour, or 3-day bucket. The data grouped in a time bucket uses a single timestamp. Continuous aggregates minimize the number of records that you need to look up to perform your query.
This section shows you how to run fast analytical queries using time buckets and continuous aggregate in Tiger Cloud Console. You can also do this using psql.
This feature is not available under the Free pricing plan.
- Connect to your service
In [Tiger Cloud Console][portal-data-mode], select your service in the connection drop-down in the top right.
- Create a continuous aggregate
For a continuous aggregate, data grouped using a time bucket is stored in a Postgres MATERIALIZED VIEW in a hypertable. timescaledb.continuous ensures that this data is always up to date. In data mode, use the following code to create a continuous aggregate on the real-time data in the crypto_ticks table:
This continuous aggregate creates the [candlestick chart][charts] data you use to visualize the price change of an asset.
Create a policy to refresh the view every hour
Have a quick look at your data
You query continuous aggregates exactly the same way as your other tables. To query the assets_candlestick_daily continuous aggregate for all assets:
In [Tiger Cloud Console][portal-ops-mode], select the service you uploaded data to
Click
Explorer>Continuous Aggregates>Create a Continuous Aggregatenext to thecrypto_tickshypertableCreate a view called
assets_candlestick_dailyon thetimecolumn with an interval of1 day, then clickNext step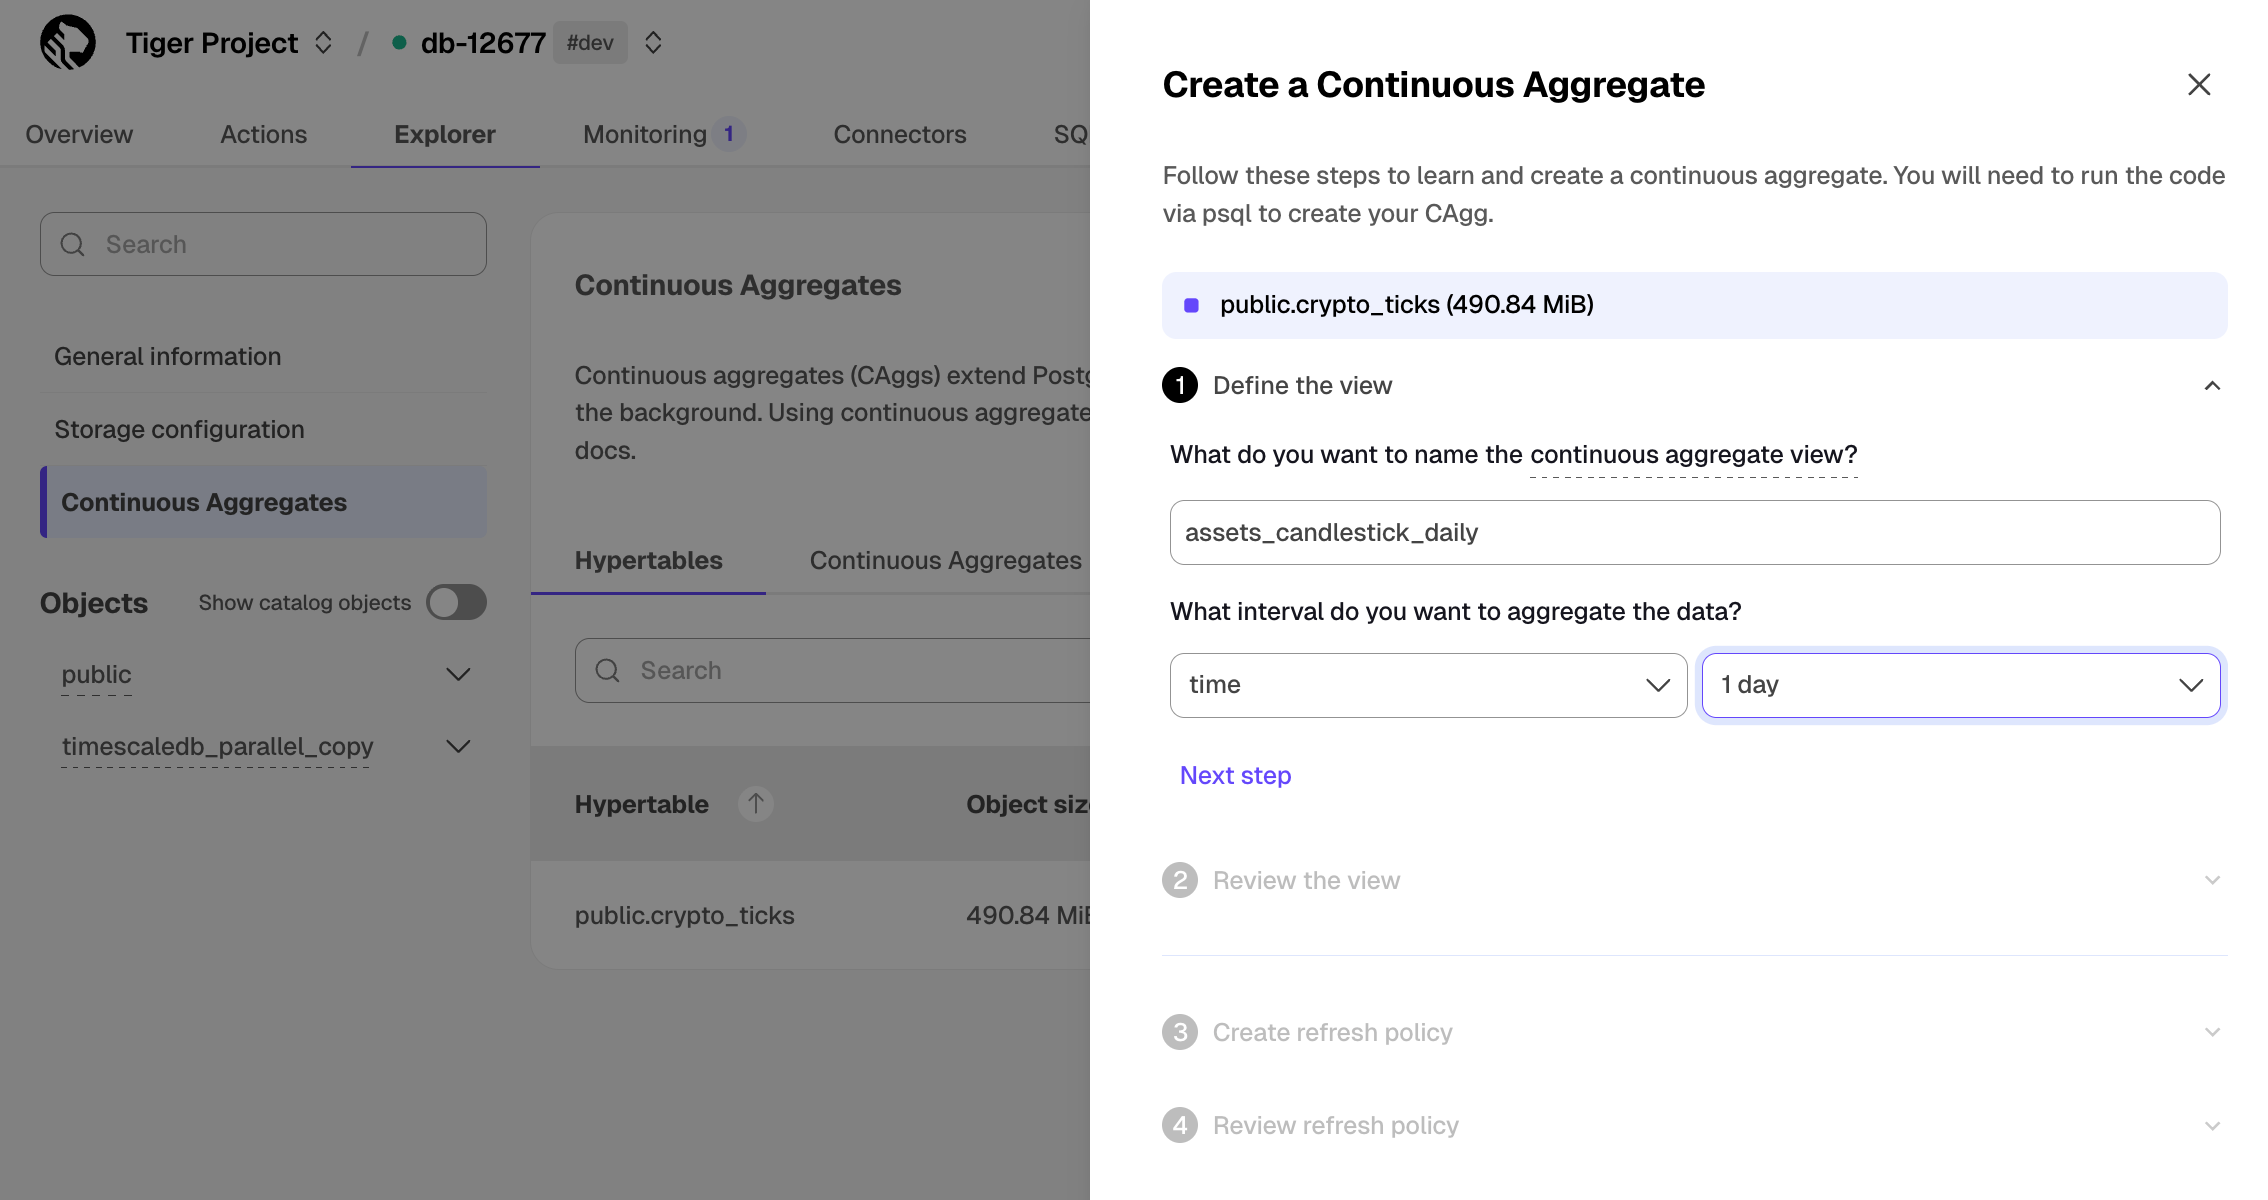
Update the view SQL with the following functions, then click
RunWhen the view is created, click
Next stepDefine a refresh policy with the following values:
How far back do you want to materialize?:3 weeksWhat recent data to exclude?:24 hoursHow often do you want the job to run?:3 hours
Click
Next step, then clickRun
Tiger Cloud creates the continuous aggregate and displays the aggregate ID in Tiger Cloud Console. Click DONE to close the wizard.
To see the change in terms of query time and data returned between a regular query and a continuous aggregate, run the query part of the continuous aggregate ( SELECT ...GROUP BY day, symbol; ) and compare the results.
Slash storage charges
In the previous sections, you used continuous aggregates to make fast analytical queries, and hypercore to reduce storage costs on frequently accessed data. To reduce storage costs even more, you create tiering policies to move rarely accessed data to the object store. The object store is low-cost bottomless data storage built on Amazon S3. However, no matter the tier, you can [query your data when you need][querying-tiered-data]. Tiger Cloud seamlessly accesses the correct storage tier and generates the response.
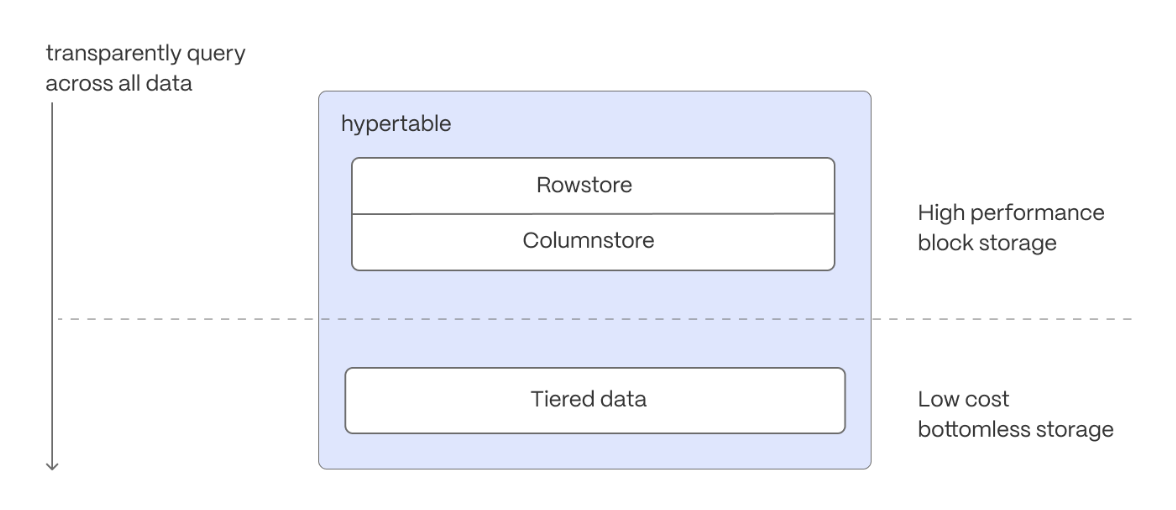
To set up data tiering:
Enable data tiering
In [Tiger Cloud Console][portal-ops-mode], select the service to modify.
In
Explorer, clickStorage configuration>Tiering storage, then clickEnable tiered storage.
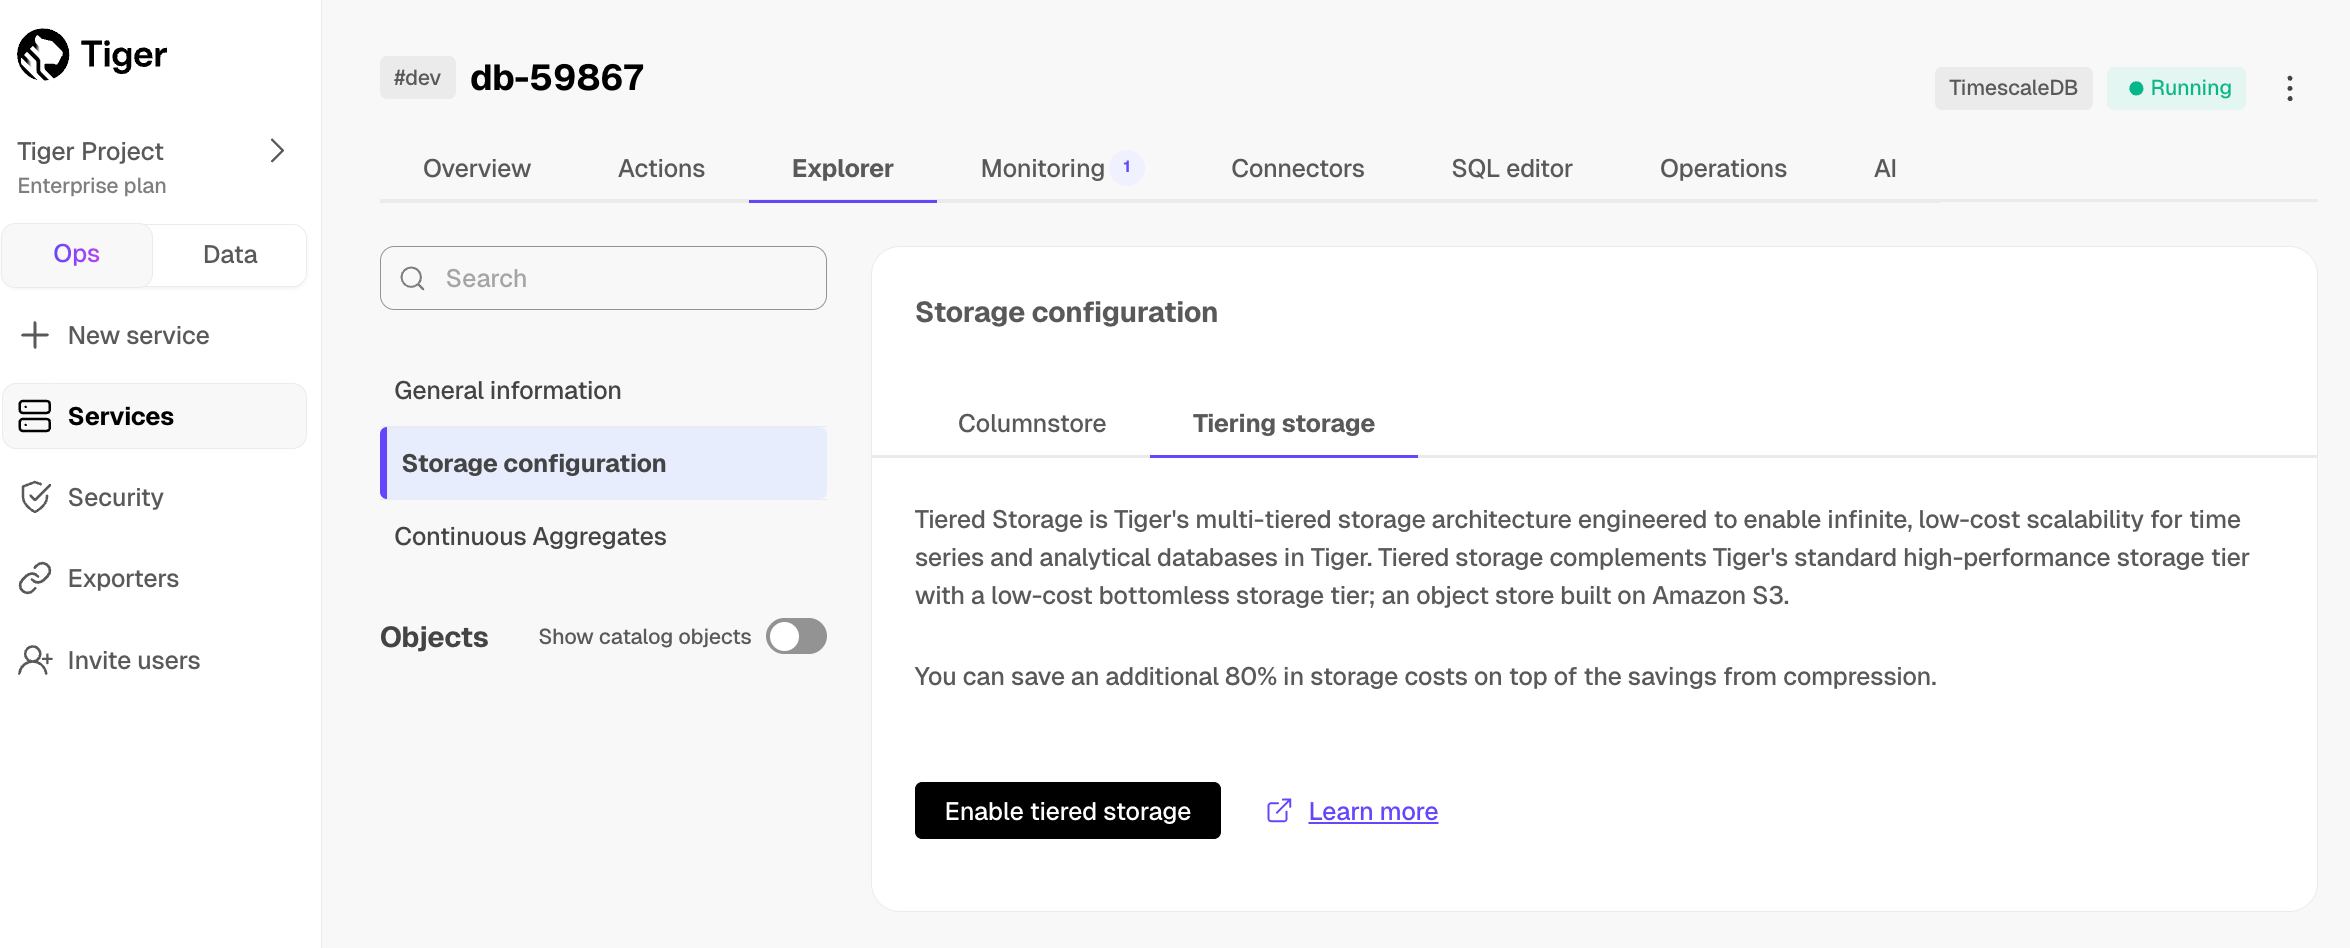
When tiered storage is enabled, you see the amount of data in the tiered object storage.
- Set the time interval when data is tiered
In Tiger Cloud Console, click Data to switch to the data mode, then enable data tiering on a hypertable with the following query:
- Query tiered data
You enable reads from tiered data for each query, for a session or for all future sessions. To run a single query on tiered data:
Enable reads on tiered data:
Query the data:
Disable reads on tiered data:
For more information, see [Querying tiered data][querying-tiered-data].
Reduce the risk of downtime and data loss
By default, all Tiger Cloud services have rapid recovery enabled. However, if your app has very low tolerance for downtime, Tiger Cloud offers high-availability replicas. HA replicas are exact, up-to-date copies of your database hosted in multiple AWS availability zones (AZ) within the same region as your primary node. HA replicas automatically take over operations if the original primary data node becomes unavailable. The primary node streams its write-ahead log (WAL) to the replicas to minimize the chances of data loss during failover.
- In [Tiger Cloud Console][cloud-login], select the service to enable replication for.
- Click
Operations, then selectHigh availability. - Choose your replication strategy, then click
Change configuration.
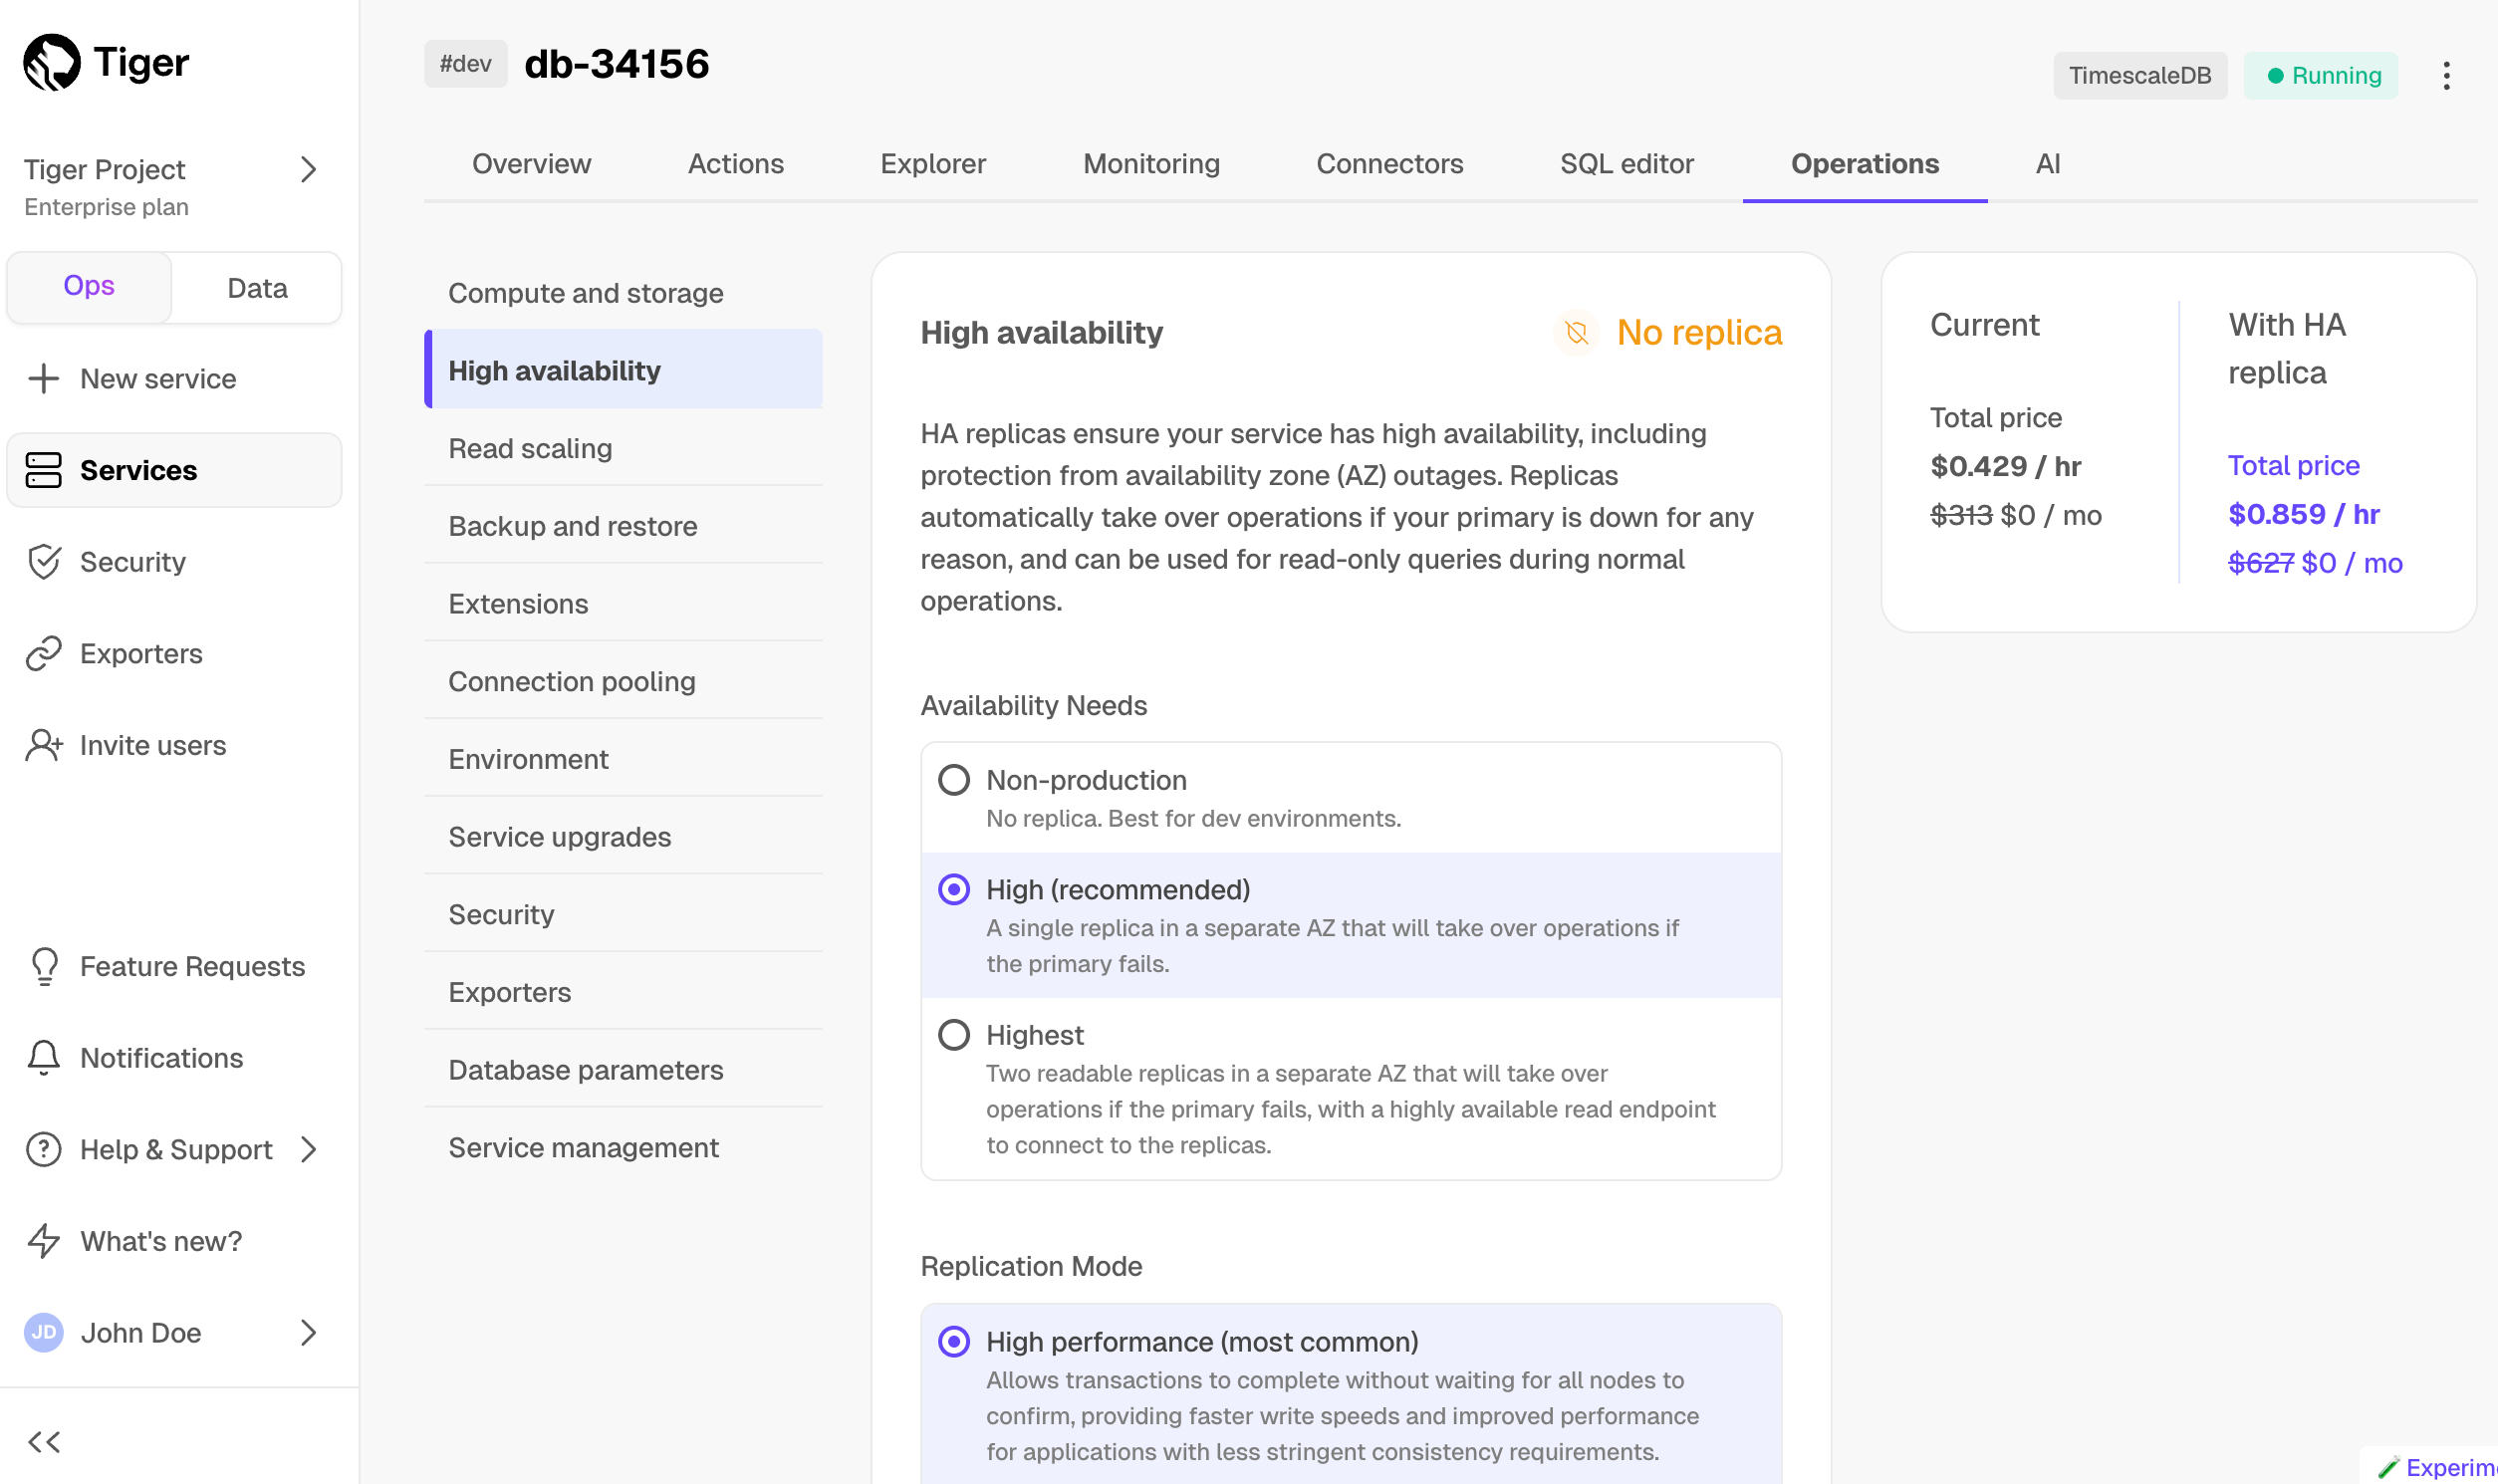
- In
Change high availability configuration, clickChange config.
For more information, see [High availability][high-availability].
What next? See the [use case tutorials][tutorials], interact with the data in your Tiger Cloud service using [your favorite programming language][connect-with-code], integrate your Tiger Cloud service with a range of [third-party tools][integrations], plain old [Use Tiger Data products][use-timescale], or dive into [the API][use-the-api].
===== PAGE: https://docs.tigerdata.com/getting-started/start-coding-with-timescale/ =====
Examples:
Example 1 (bash):