Specify configuration parameters as boot options
Alternatively, one or more parameters can be passed in to the docker run command via a -c option, as in the following.
Additional examples of passing in arguments at boot can be found in our [discussion about using WAL-E][wale] for incremental backup.
===== PAGE: https://docs.tigerdata.com/self-hosted/configuration/telemetry/ =====
Examples:
Example 1 (bash):
Using postgresql.conf at this path:
/usr/local/var/postgres/postgresql.conf

Is this correct? [(y)es/(n)o]: y
Writing backup to:
/var/folders/cr/zpgdkv194vz1g5smxl_5tggm0000gn/T/timescaledb_tune.backup201901071520

shared_preload_libraries needs to be updated
Current:
#shared_preload_libraries = 'timescaledb'
Recommended:
shared_preload_libraries = 'timescaledb'
Is this okay? [(y)es/(n)o]: y
success: shared_preload_libraries will be updated

Tune memory/parallelism/WAL and other settings? [(y)es/(n)o]: y
Recommendations based on 8.00 GB of available memory and 4 CPUs for PostgreSQL 11

Memory settings recommendations
Current:
shared_buffers = 128MB
#effective_cache_size = 4GB
#maintenance_work_mem = 64MB
#work_mem = 4MB
Recommended:
shared_buffers = 2GB
effective_cache_size = 6GB
maintenance_work_mem = 1GB
work_mem = 26214kB
Is this okay? [(y)es/(s)kip/(q)uit]:
Example 2 (bash):
timescaledb-tune --quiet --yes --dry-run >> /path/to/postgresql.confExample 3 (sql):
psql: FATAL:  out of shared memory
HINT:  You might need to increase max_locks_per_transaction.
Example 4 (unknown):
max_locks_per_transaction = 2 * num_chunks / max_connectionsService configuration
URL: llms-txt#service-configuration
Tiger Cloud service use the default Postgres server configuration settings. You can optimize your service configuration using the following TimescaleDB and Grand Unified Configuration (GUC) parameters.
- [TimescaleDB configuration and tuning][tigerpostgres-config]
- [Grand Unified Configuration (GUC) parameters][gucs]
===== PAGE: https://docs.tigerdata.com/api/administration/ =====
Integrate a slack-native AI agent
URL: llms-txt#integrate-a-slack-native-ai-agent
Contents:
- Prerequisites
- Create a Slack app
- Install and configure your Tiger Agent instance
- Add information from MCP servers to your Tiger Agent
- Customize prompts for personalization
- Advanced configuration options
Tiger Agents for Work is a Slack-native AI agent that you use to unify the knowledge in your company. This includes your Slack history, docs, GitHub repositories, Salesforce and so on. You use your Tiger Agent to get instant answers for real business, technical, and operations questions in your Slack channels.
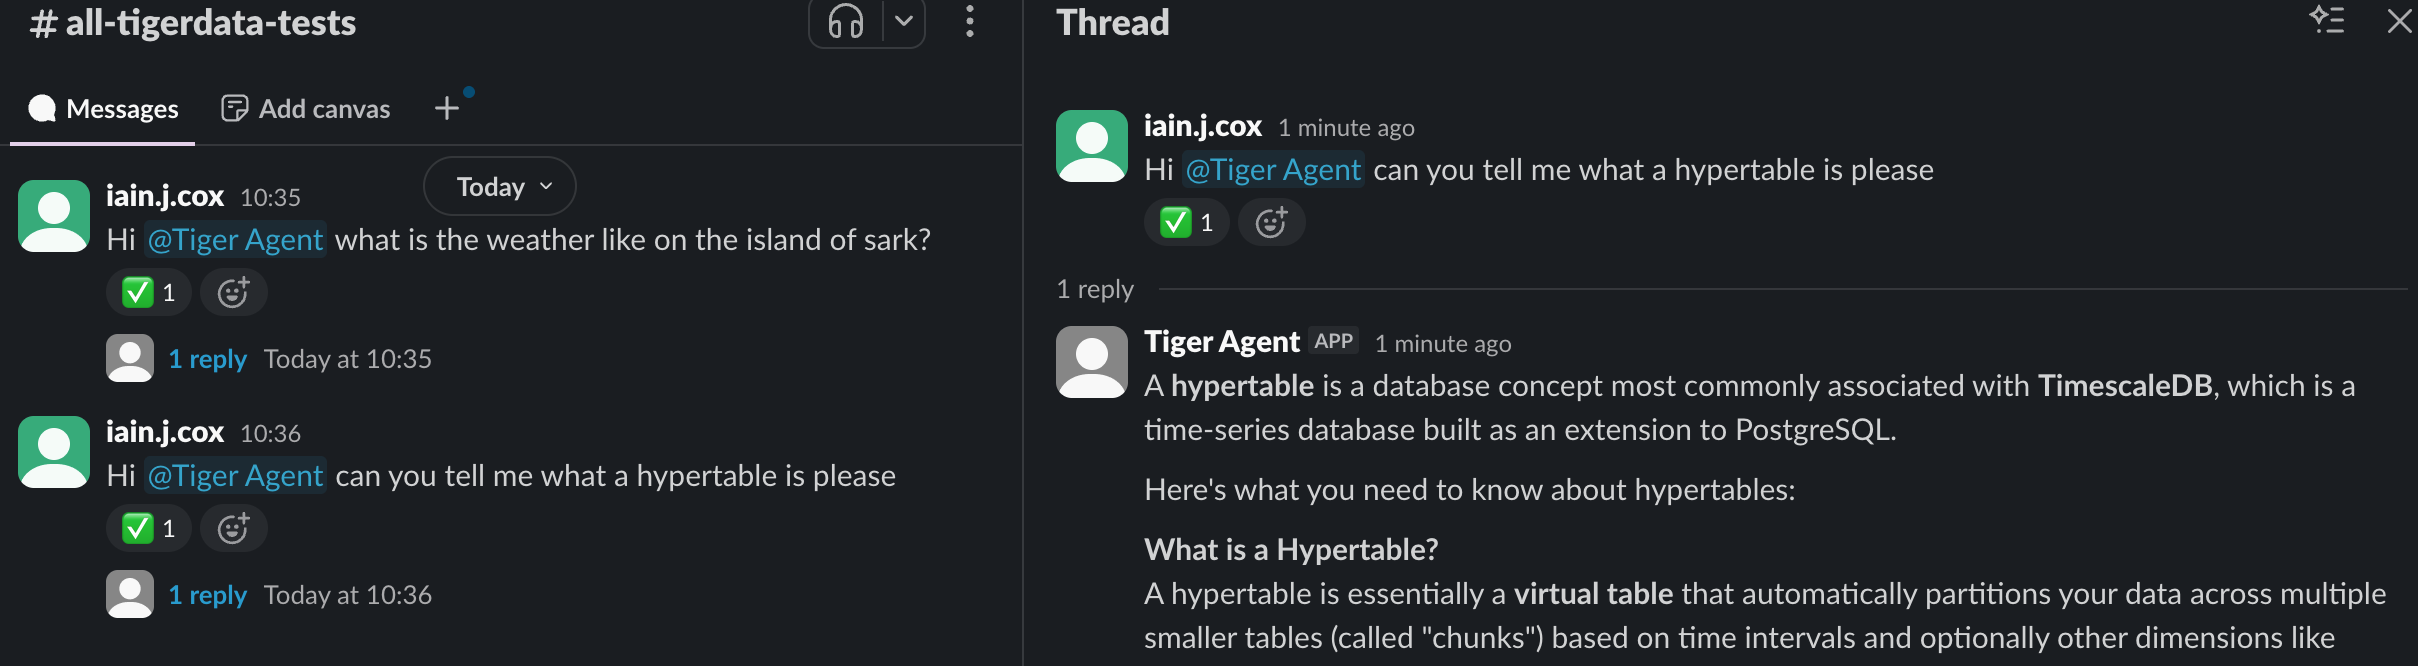
Tiger Agents for Work can handle concurrent conversations with enterprise-grade reliability. They have the following features:
- Durable and atomic event handling: Postgres-backed event claiming ensures exactly-once processing, even under high concurrency and failure conditions
- Bounded concurrency: fixed worker pools prevent resource exhaustion while maintaining predictable performance under load
- Immediate event processing: Tiger Agents for Work provide real-time responsiveness. Events are processed within milliseconds of arrival rather than waiting for polling cycles
- Resilient retry logic: automatic retry with visibility thresholds, plus stuck or expired event cleanup
- Horizontal scalability: run multiple Tiger Agent instances simultaneously with coordinated work distribution across all instances
- AI-Powered Responses: use the AI model of your choice, you can also integrate with MCP servers
- Extensible architecture: zero code integration for basic agents. For more specialized use cases, easily customize your agent using [Jinja templates][jinja-templates]
- Complete observability: detailed tracing of event flow, worker activity, and database operations with full [Logfire][logfire] instrumentation
This page shows you how to install the Tiger Agent CLI, connect to the Tiger Data MCP server, and customize prompts for your specific needs.
To follow the procedure on this page you need to:
- Create a [Tiger Data account][create-account].
This procedure also works for [self-hosted TimescaleDB][enable-timescaledb].
- Install the [uv package manager][uv-install]
- Get an [Anthropic API key][claude-api-key]
- Optional: get a [Logfire token][logfire]
Create a Slack app
Before installing Tiger Agents for Work, you need to create a Slack app that the Tiger Agent will connect to. This app provides the security tokens for Slack integration with your Tiger Agent:
Create a manifest for your Slack App
In a temporary directory, download the Tiger Agent Slack manifest template:
Edit
slack-manifest.jsonand customize your name and description of your Slack App. For example:Copy the contents of
slack-manifest.jsonto the clipboard:Create the Slack app
Go to api.slack.com/apps.
- Click
Create New App. - Select
From a manifest. - Choose your workspace, then click
Next. - Paste the contents of
slack-manifest.jsonand clickNext. - Click
Create.
- Click
Generate an app-level token
In your app settings, go to
Basic Information.- Scroll to
App-Level Tokens. - Click
Generate Token and Scopes. - Add a
Token Name, then clickAdd Scope, addconnections:writethen clickGenerate. - Copy the
xapp-*token locally and clickDone.
- Scroll to
Install your app to a Slack workspace
In the sidebar, under
Settings, clickInstall App.- Click
Install to <workspace name>, then clickAllow. - Copy the
xoxb-Bot User OAuth Token locally.
- Click
You have created a Slack app and obtained the necessary tokens for Tiger Agent integration.
Install and configure your Tiger Agent instance
Tiger Agents for Work are a production-ready library and CLI written in Python that you use to create Slack-native AI agents. This section shows you how to configure a Tiger Agent to connect to your Slack app, and give it access to your data and analytics stored in Tiger Cloud.
Create a project directory
Create a Tiger Agent environment with your Slack, AI Assistant, and database configuration
Download
.env.sampleto a local.envfile:- In
.env, add your Slack tokens and Anthropic API key:
- In
Add the [connection details][connection-info] for the Tiger Cloud service you are using for this Tiger Agent:
- Save and close
.env.
- Save and close
Add the default Tiger Agent prompts to your project
Install Tiger Agents for Work to manage and run your AI-powered Slack bots
Install the Tiger Agent CLI using uv.
tiger-agent is installed in ~/.local/bin/tiger-agent. If necessary, add this folder to your PATH.
- Verify the installation.
You see the Tiger Agent CLI help output with the available commands and options.
Connect your Tiger Agent with Slack
Run your Tiger Agent:
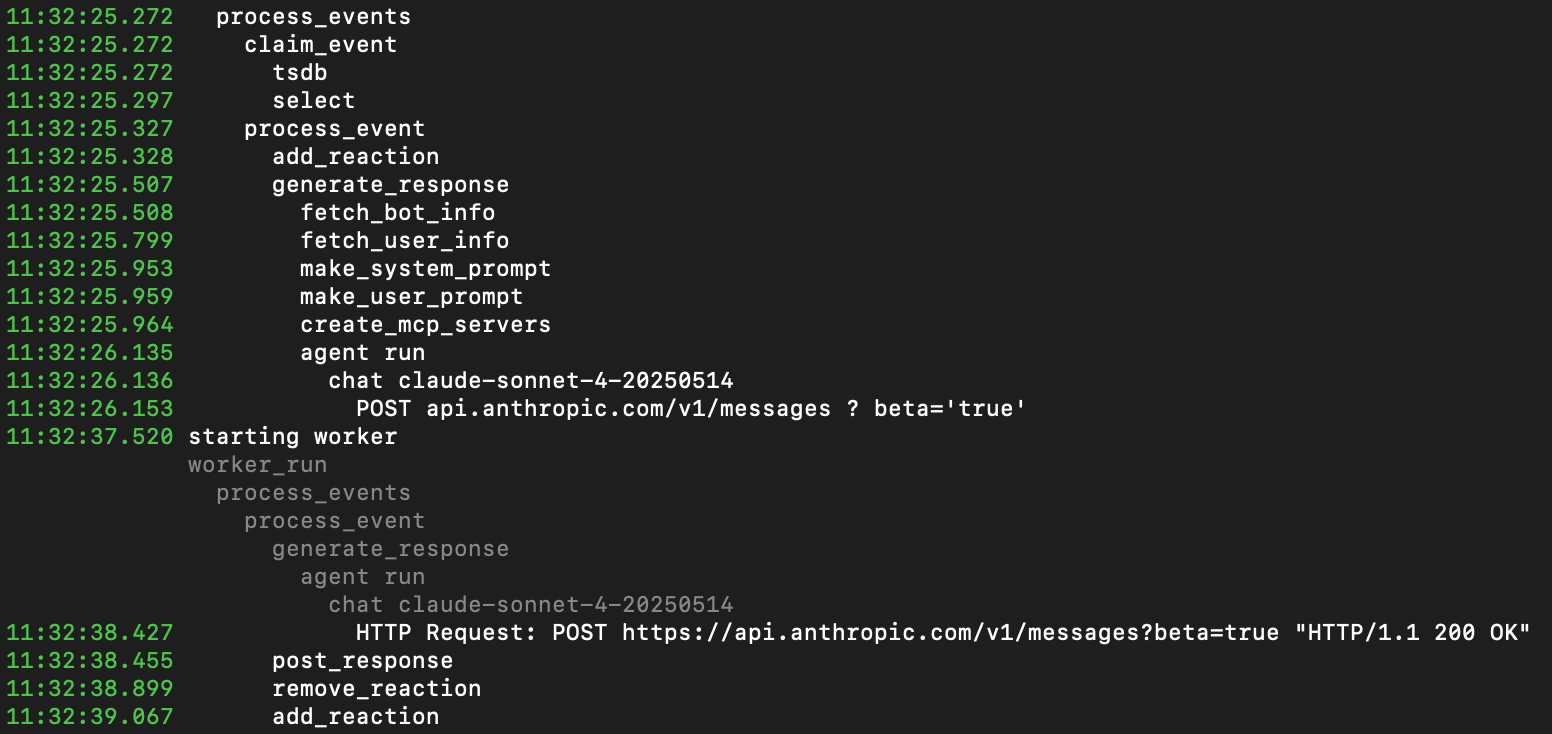
If you open the explorer in [Tiger Cloud Console][portal-ops-mode], you can see the tables used by your Tiger Agent.In Slack, open a public channel app and ask Tiger Agent a couple of questions. You see the response in your public channel and log messages in the terminal.
Add information from MCP servers to your Tiger Agent
To increase the amount of specialized information your AI Assistant can use, you can add MCP servers supplying data your users need. For example, to add the Tiger Data MCP server to your Tiger Agent:
- Copy the example
mcp_config.jsonto your project
In my-tiger-agent, run the following command:
- Configure your Tiger Agent to connect to the most useful MCP servers for your organization
For example, to add the Tiger Data documentation MCP server to your Tiger Agent, update the docs entry to the following:
To avoid errors, delete all entries in `mcp_config.json` with invalid URLs. For example the `github` entry with `http://github-mcp-server/mcp`.
- Restart your Tiger Agent
You have configured your Tiger Agent to connect to the Tiger MCP Server. For more information, see [MCP Server Configuration][mcp-configuration-docs].
Customize prompts for personalization
Tiger Agents for Work uses Jinja2 templates for dynamic, context-aware prompt generation. This system allows for sophisticated prompts that adapt to conversation context, user preferences, and event metadata. Tiger Agents for Work uses the following templates:
system_prompt.md: defines the AI Assistant's role, capabilities, and behavior patterns. This template sets the foundation for the way your Tiger Agent will respond and interact.user_prompt.md: formats the user's request with relevant context, providing the AI Assistant with the information necessary to generate an appropriate response.
To change the way your Tiger Agents interact with users in your Slack app:
- Update the prompt
For example, in prompts/system_prompt.md, add another item in the Response Protocol section to fine tune the behavior of your Tiger Agents. For example:
- Test your configuration
Run Tiger Agent with your custom prompt:
For more information, see [Prompt tempates][prompt-templates].
Advanced configuration options
For additional customization, you can modify the following Tiger Agent parameters:
--model: change AI model (default:anthropic:claude-sonnet-4-20250514)--num-workers: adjust concurrent workers (default:5)--max-attempts: set retry attempts per event (default:3)
Example with custom settings:
Your Tiger Agents are now configured with Tiger Data MCP server access and personalized prompts.
===== PAGE: https://docs.tigerdata.com/ai/key-vector-database-concepts-for-understanding-pgvector/ =====
Examples:
Example 1 (bash):
curl -O https://raw.githubusercontent.com/timescale/tiger-agents-for-work/main/slack-manifest.jsonExample 2 (json):
"display_information": {
        "name": "Tiger Agent",
        "description": "Tiger AI Agent helps you easily access your business information, and tune your Tiger services",
        "background_color": "#000000"
      },
      "features": {
        "bot_user": {
          "display_name": "Tiger Agent",
          "always_online": true
        }
      },
Example 3 (shell):
cat slack-manifest.json| pbcopyExample 4 (bash):
mkdir my-tiger-agent
   cd my-tiger-agent
to_epoch()
URL: llms-txt#to_epoch()
Contents:
- Required arguments
- Sample usage
Given a timestamptz, returns the number of seconds since January 1, 1970 (the Unix epoch).
Required arguments
| Name | Type | Description |
|---|---|---|
date | TIMESTAMPTZ | Timestamp to use to calculate epoch |
Convert a date to a Unix epoch time:
The output looks like this:
===== PAGE: https://docs.tigerdata.com/tutorials/ingest-real-time-websocket-data/ =====
Examples:
Example 1 (sql):
SELECT to_epoch('2021-01-01 00:00:00+03'::timestamptz);Example 2 (sql):
to_epoch
------------
 1609448400
Metrics and Datadog
URL: llms-txt#metrics-and-datadog
Contents:
- Prerequisites
- Upload a Datadog API key
- Uploading a Datadog API key to MST
- Activate Datadog integration for a service
- Activating Datadog integration for a service
- Datadog dashboards
Datadog is a popular cloud-based monitoring service. You can send metrics to Datadog using a metrics collection agent for graphing, service dashboards, alerting, and logging. Managed Service for TimescaleDB (MST) can send data directly to Datadog for monitoring. Datadog integrations are provided free of charge on Managed Service for TimescaleDB.
You need to create a Datadog API key, and use the key to enable metrics for your service.
Datadog logging is not currently supported on MST.
Before you begin, make sure you have:
- Created a service.
- Signed up for [Datadog][datadog-login], and can log in to your Datadog dashboard.
- Created an API key in your Datadog account. For more information about creating a Datadog API key, see Datadog API and Application Keys.
Upload a Datadog API key
To integrate MST with Datadog you need to upload the API key that you generated in your Datadog account to MST.
Uploading a Datadog API key to MST
- In [MST Console][mst-login], choose the project you want to connect to Datadog, and click
Integration Endpoints. - Select
Datadog, then chooseCreate new. - In
Add new Datadog service integration. complete these details:- In the
Endpoint integrationsection, give your endpoint a name, and paste the API key from your Datadog dashboard. Ensure you choose the site location that matches where your Datadog service is hosted. - Optional: In the
Endpoint tagssection, you can add custom tags to help you manage your integrations.
- In the
- Click
Add endpointto save the integration.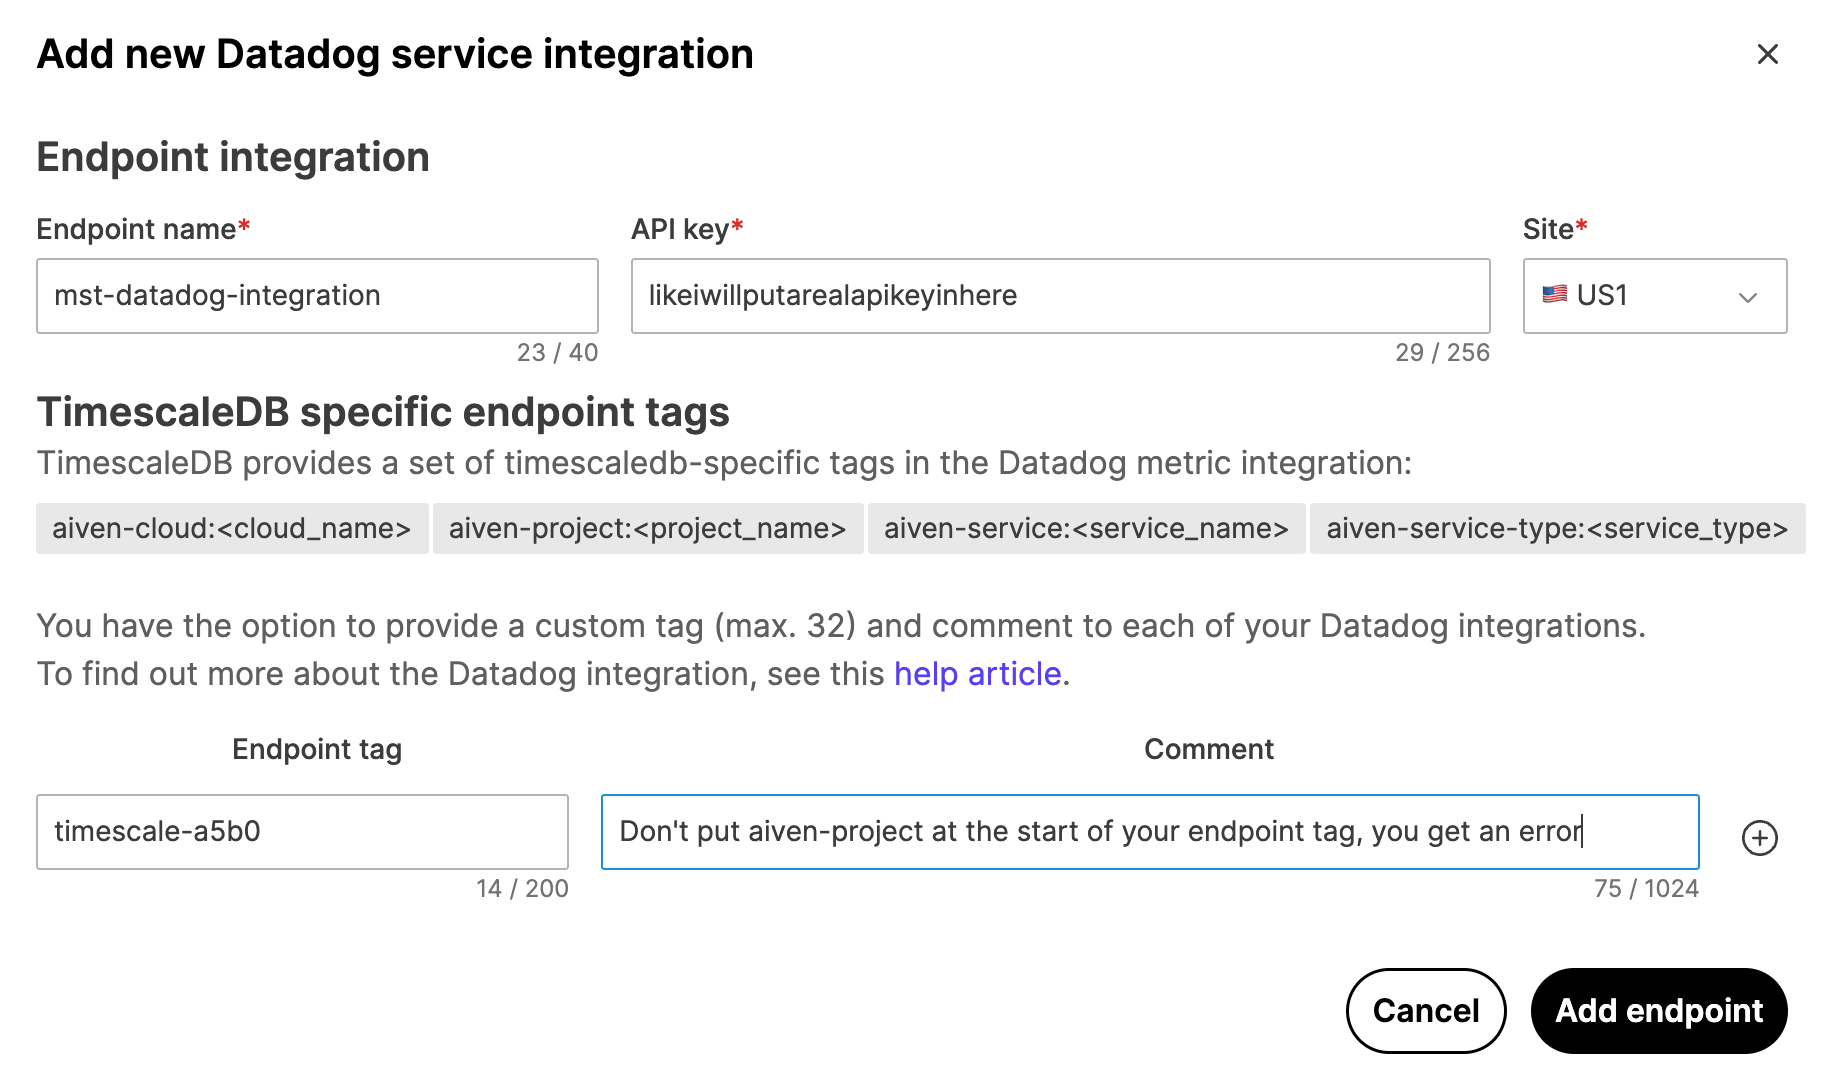
Activate Datadog integration for a service
When you have successfully added the endpoint, you can set up one of your service to send data to Datadog.
Activating Datadog integration for a service
- Sign in to MST Console, navigate to
Services, and select the service you want to monitor. - In the
Integrationstab, go toExternal integrationssection and selectDatadog Metrics. - In the
Datadog integrationdialog, select the Datadog endpoint that you created. - Click
Enable.
The Datadog endpoint is listed under Enabled integrations for the service.
Datadog dashboards
When you have your Datadog integration set up successfully, you can use the Datadog dashboard editor to configure your visualizations. For more information, see the [Datadog Dashboard documentation][datadog-dashboard-docs].
===== PAGE: https://docs.tigerdata.com/mst/integrations/prometheus-mst/ =====
Advanced parameters
URL: llms-txt#advanced-parameters
Contents:
- Multiple databases
- Policies
timescaledb.max_background_workers (int)
- Tiger Cloud service tuning
timescaledb.disable_load (bool)
It is possible to configure a wide variety of Tiger Cloud service database parameters by navigating to the Advanced parameters tab under the Database configuration heading. The advanced parameters are displayed in a scrollable and searchable list.
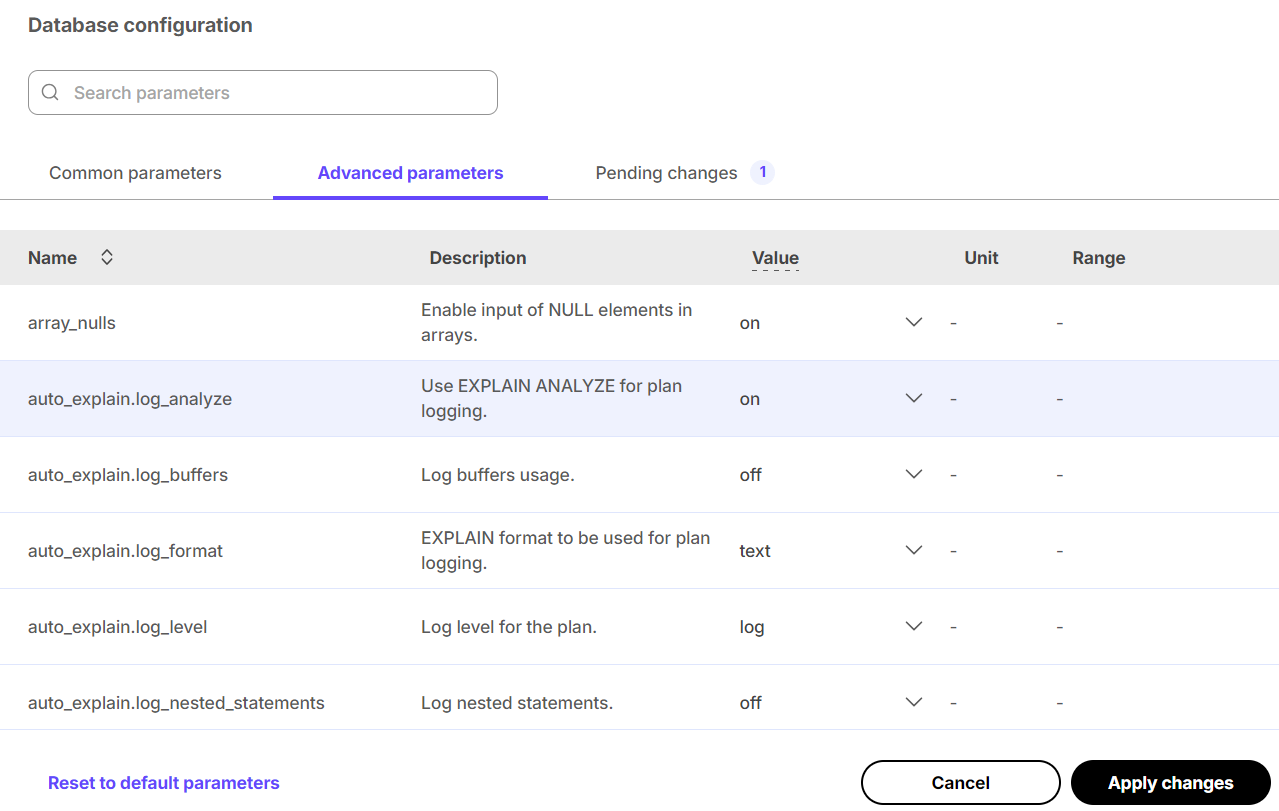
As with the basic database configuration parameters, any changes are highlighted and the Apply changes, or Apply changes and restart, button is available, prompting you to confirm changes before the service is modified.
Multiple databases
To create more than one database, you need to create a new service for each database. Tiger Cloud does not support multiple databases within the same service. Having a separate service for each database affords each database its own isolated resources.
You can also use [schemas][schemas] to organize tables into logical groups. A single database can contain multiple schemas, which in turn contain tables. The main difference between isolating with databases versus schemas is that a user can access objects in any of the schemas in the database they are connected to, so long as they have the corresponding privileges. Schemas can help isolate smaller use cases that do not warrant their own service.
Please refer to the [Grand Unified Configuration (GUC) parameters][gucs] for a complete list.
timescaledb.max_background_workers (int)
Max background worker processes allocated to TimescaleDB. Set to at least 1 + the number of databases loaded with the TimescaleDB extension in a Postgres instance. Default value is 16.
Tiger Cloud service tuning
timescaledb.disable_load (bool)
Disable the loading of the actual extension
===== PAGE: https://docs.tigerdata.com/use-timescale/ha-replicas/read-scaling/ =====
Analyze financial tick data - Set up the dataset
URL: llms-txt#analyze-financial-tick-data---set-up-the-dataset
Contents:
- Prerequisites
- Optimize time-series data in a hypertable
- Create a standard Postgres table for relational data
- Load financial data
- Connect Grafana to Tiger Cloud
This tutorial uses a dataset that contains second-by-second trade data for the most-traded crypto-assets. You optimize this time-series data in a a hypertable called assets_real_time. You also create a separate table of asset symbols in a regular Postgres table named assets.
The dataset is updated on a nightly basis and contains data from the last four weeks, typically around 8 million rows of data. Trades are recorded in real-time from 180+ cryptocurrency exchanges.
To follow the steps on this page:
- Create a target [Tiger Cloud service][create-service] with the Real-time analytics capability.
You need [your connection details][connection-info]. This procedure also works for [self-hosted TimescaleDB][enable-timescaledb].
Optimize time-series data in a hypertable
Hypertables are Postgres tables in TimescaleDB that automatically partition your time-series data by time. Time-series data represents the way a system, process, or behavior changes over time. Hypertables enable TimescaleDB to work efficiently with time-series data. Each hypertable is made up of child tables called chunks. Each chunk is assigned a range of time, and only contains data from that range. When you run a query, TimescaleDB identifies the correct chunk and runs the query on it, instead of going through the entire table.
[Hypercore][hypercore] is the hybrid row-columnar storage engine in TimescaleDB used by hypertables. Traditional databases force a trade-off between fast inserts (row-based storage) and efficient analytics (columnar storage). Hypercore eliminates this trade-off, allowing real-time analytics without sacrificing transactional capabilities.
Hypercore dynamically stores data in the most efficient format for its lifecycle:
- Row-based storage for recent data: the most recent chunk (and possibly more) is always stored in the rowstore, ensuring fast inserts, updates, and low-latency single record queries. Additionally, row-based storage is used as a writethrough for inserts and updates to columnar storage.
- Columnar storage for analytical performance: chunks are automatically compressed into the columnstore, optimizing storage efficiency and accelerating analytical queries.
Unlike traditional columnar databases, hypercore allows data to be inserted or modified at any stage, making it a flexible solution for both high-ingest transactional workloads and real-time analytics—within a single database.
Because TimescaleDB is 100% Postgres, you can use all the standard Postgres tables, indexes, stored procedures, and other objects alongside your hypertables. This makes creating and working with hypertables similar to standard Postgres.
- Connect to your Tiger Cloud service
In [Tiger Cloud Console][services-portal] open an [SQL editor][in-console-editors]. You can also connect to your service using [psql][connect-using-psql].
- Create a hypertable to store the real-time cryptocurrency data
Create a [hypertable][hypertables-section] for your time-series data using [CREATE TABLE][hypertable-create-table]. For [efficient queries][secondary-indexes] on data in the columnstore, remember to segmentby the column you will use most often to filter your data:
If you are self-hosting TimescaleDB v2.19.3 and below, create a [Postgres relational table][pg-create-table], then convert it using [create_hypertable][create_hypertable]. You then enable hypercore with a call to [ALTER TABLE][alter_table_hypercore].
Create a standard Postgres table for relational data
When you have relational data that enhances your time-series data, store that data in standard Postgres relational tables.
- Add a table to store the asset symbol and name in a relational table
You now have two tables within your Tiger Cloud service. A hypertable named crypto_ticks, and a normal Postgres table named crypto_assets.
Load financial data
This tutorial uses real-time cryptocurrency data, also known as tick data, from [Twelve Data][twelve-data]. To ingest data into the tables that you created, you need to download the dataset, then upload the data to your Tiger Cloud service.
- Unzip crypto_sample.zip to a
<local folder>.
This test dataset contains second-by-second trade data for the most-traded crypto-assets and a regular table of asset symbols and company names.
To import up to 100GB of data directly from your current Postgres-based database, [migrate with downtime][migrate-with-downtime] using native Postgres tooling. To seamlessly import 100GB-10TB+ of data, use the [live migration][migrate-live] tooling supplied by Tiger Data. To add data from non-Postgres data sources, see [Import and ingest data][data-ingest].
In Terminal, navigate to
<local folder>and connect to your service.The connection information for a service is available in the file you downloaded when you created it.
At the
psqlprompt, use theCOPYcommand to transfer data into your Tiger Cloud service. If the.csvfiles aren't in your current directory, specify the file paths in these commands:
Because there are millions of rows of data, the COPY process could take a few minutes depending on your internet connection and local client resources.
Connect Grafana to Tiger Cloud
To visualize the results of your queries, enable Grafana to read the data in your service:
- Log in to Grafana
In your browser, log in to either: - Self-hosted Grafana: at http://localhost:3000/. The default credentials are admin, admin. - Grafana Cloud: use the URL and credentials you set when you created your account.
- Add your service as a data source
- Open
Connections>Data sources, then clickAdd new data source. - Select
PostgreSQLfrom the list. - Configure the connection:
Host URL,Database name,Username, andPassword
- Open
Configure using your [connection details][connection-info]. Host URL is in the format <host>:<port>. - TLS/SSL Mode: select require. - PostgreSQL options: enable TimescaleDB. - Leave the default setting for all other fields.
- Click
Save & test.
Grafana checks that your details are set correctly.
===== PAGE: https://docs.tigerdata.com/tutorials/financial-tick-data/financial-tick-compress/ =====
Examples:
Example 1 (sql):
CREATE TABLE crypto_ticks (
        "time" TIMESTAMPTZ,
        symbol TEXT,
        price DOUBLE PRECISION,
        day_volume NUMERIC
    ) WITH (
       tsdb.hypertable,
       tsdb.partition_column='time',
       tsdb.segmentby='symbol',
       tsdb.orderby='time DESC'
    );
Example 2 (sql):
CREATE TABLE crypto_assets (
        symbol TEXT UNIQUE,
        "name" TEXT
    );
Example 3 (bash):