Hypertables
Tiger Cloud supercharges your real-time analytics by letting you run complex queries continuously, with near-zero latency. Under the hood, this is achieved by using hypertables—Postgres tables that automatically partition your time-series data by time and optionally by other dimensions. When you run a query, Tiger Cloud identifies the correct partition, called chunk, and runs the query on it, instead of going through the entire table.
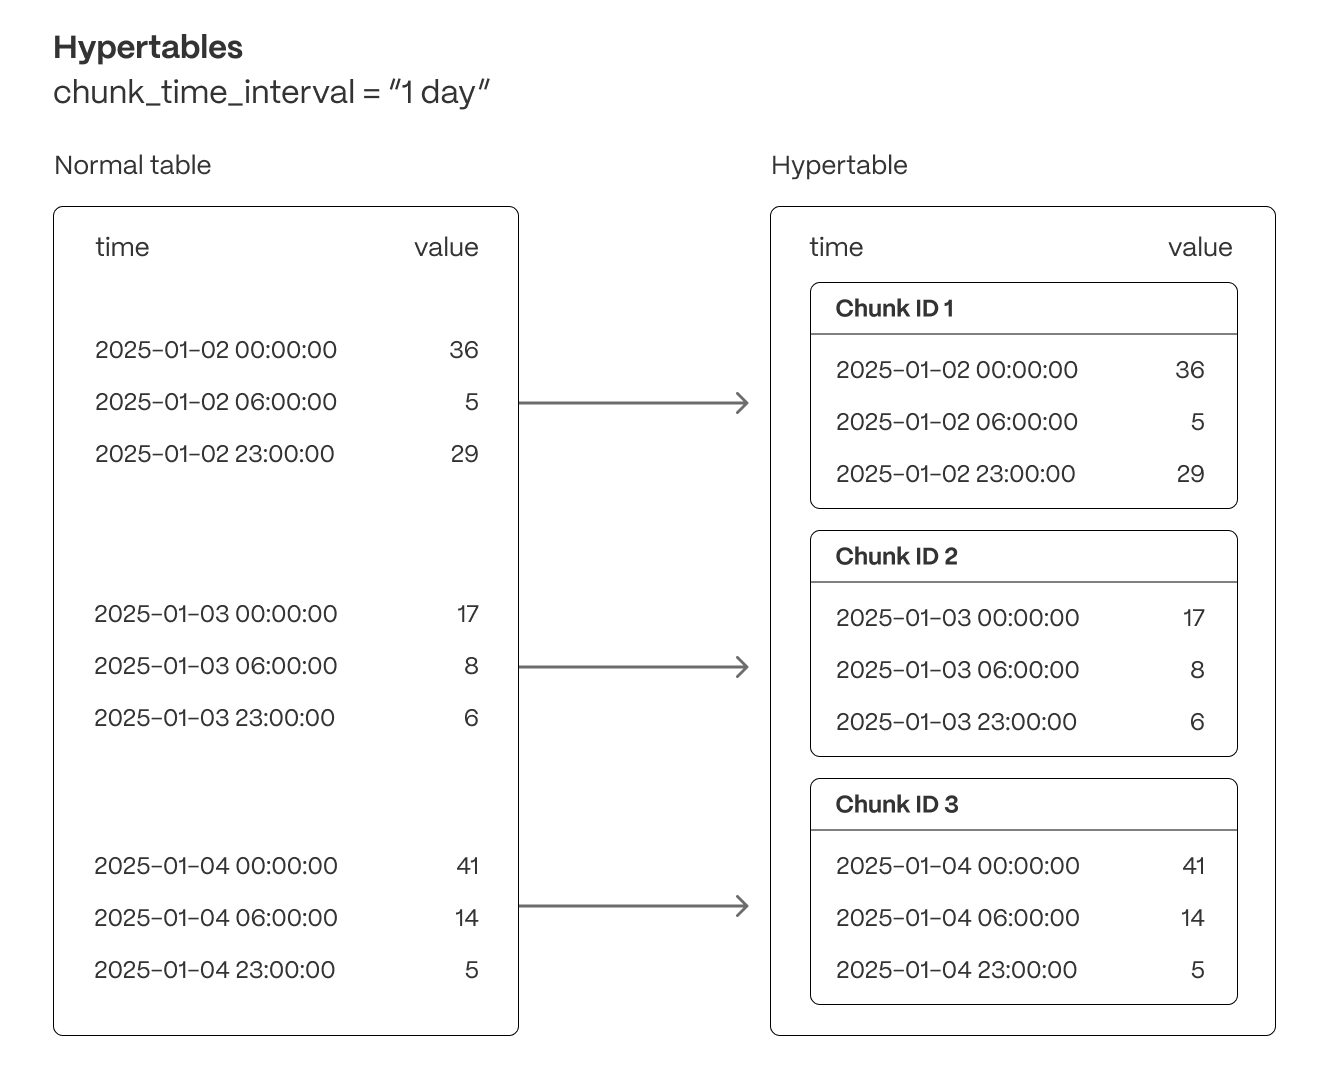
Hypertables offer the following benefits:
Efficient data management with [automated partitioning by time][chunk-size]: Tiger Cloud splits your data into chunks that hold data from a specific time range. For example, one day or one week. You can configure this range to better suit your needs.
Better performance with [strategic indexing][hypertable-indexes]: an index on time in the descending order is automatically created when you create a hypertable. More indexes are created on the chunk level, to optimize performance. You can create additional indexes, including unique indexes, on the columns you need.
Faster queries with [chunk skipping][chunk-skipping]: Tiger Cloud skips the chunks that are irrelevant in the context of your query, dramatically reducing the time and resources needed to fetch results. Even more—you can enable chunk skipping on non-partitioning columns.
Advanced data analysis with [hyperfunctions][hyperfunctions]: Tiger Cloud enables you to efficiently process, aggregate, and analyze significant volumes of data while maintaining high performance.
To top it all, there is no added complexity—you interact with hypertables in the same way as you would with regular Postgres tables. All the optimization magic happens behind the scenes.
Inheritance is not supported for hypertables and may lead to unexpected behavior.
Partition by time
Each hypertable is partitioned into child hypertables called chunks. Each chunk is assigned a range of time, and only contains data from that range.
Time partitioning
Typically, you partition hypertables on columns that hold time values. [Best practice is to use timestamptz][timestamps-best-practice] column type. However, you can also partition on date, integer, timestamp and [UUIDv7][uuidv7_functions] types.
By default, each hypertable chunk holds data for 7 days. You can change this to better suit your needs. For example, if you set chunk_interval to 1 day, each chunk stores data for a single day.
TimescaleDB divides time into potential chunk ranges, based on the chunk_interval. Each hypertable chunk holds data for a specific time range only. When you insert data from a time range that doesn't yet have a chunk, TimescaleDB automatically creates a chunk to store it.
In practice, this means that the start time of your earliest chunk does not necessarily equal the earliest timestamp in your hypertable. Instead, there might be a time gap between the start time and the earliest timestamp. This doesn't affect your usual interactions with your hypertable, but might affect the number of chunks you see when inspecting it.
Best practices for scaling and partitioning
Best practices for maintaining a high performance when scaling include:
- Limit the number of hypertables in your service; having tens of thousands of hypertables is not recommended.
- Choose a strategic chunk size.
Chunk size affects insert and query performance. You want a chunk small enough to fit into memory so you can insert and query recent data without reading from disk. However, having too many small and sparsely filled chunks can affect query planning time and compression. The more chunks in the system, the slower that process becomes, even more so when all those chunks are part of a single hypertable.
Postgres builds the index on the fly during ingestion. That means that to build a new entry on the index, a significant portion of the index needs to be traversed during every row insertion. When the index does not fit into memory, it is constantly flushed to disk and read back. This wastes IO resources which would otherwise be used for writing the heap/WAL data to disk.
The default chunk interval is 7 days. However, best practice is to set chunk_interval so that prior to processing, the indexes for chunks currently being ingested into fit within 25% of main memory. For example, on a system with 64 GB of memory, if index growth is approximately 2 GB per day, a 1-week chunk interval is appropriate. If index growth is around 10 GB per day, use a 1-day interval.
You set chunk_interval when you [create a hypertable][hypertable-create-table], or by calling [set_chunk_time_interval][chunk_interval] on an existing hypertable.
For a detailed analysis of how to optimize your chunk sizes, see the [blog post on chunk time intervals][blog-chunk-time]. To learn how to view and set your chunk time intervals, see [Optimize hypertable chunk intervals][change-chunk-intervals].
Hypertable indexes
By default, indexes are automatically created when you create a hypertable. The default index is on time, descending. You can prevent index creation by setting the create_default_indexes option to false.
Hypertables have some restrictions on unique constraints and indexes. If you want a unique index on a hypertable, it must include all the partitioning columns for the table. To learn more, see [Enforce constraints with unique indexes on hypertables][hypertables-and-unique-indexes].
You can prevent index creation by setting the create_default_indexes option to false.
Partition by dimension
Partitioning on time is the most common use case for hypertable, but it may not be enough for your needs. For example, you may need to scan for the latest readings that match a certain condition without locking a critical hypertable.
The use case for a partitioning dimension is a multi-tenant setup. You isolate the tenants using the tenant_id space partition. However, you must perform extensive testing to ensure this works as expected, and there is a strong risk of partition explosion.
You add a partitioning dimension at the same time as you create the hypertable, when the table is empty. The good news is that although you select the number of partitions at creation time, as your data grows you can change the number of partitions later and improve query performance. Changing the number of partitions only affects chunks created after the change, not existing chunks. To set the number of partitions for a partitioning dimension, call set_number_partitions. For example:
Create the hypertable with the 1-day interval chunk interval
sqlCREATE TABLE conditions( "time" timestamptz not null, device_id integer, temperature float ) WITH( timescaledb.hypertable, timescaledb.partition_column='time', timescaledb.chunk_interval='1 day' );Add a hash partition on a non-time column
sqlselect * from add_dimension('conditions', by_hash('device_id', 3));Now use your hypertable as usual, but you can also ingest and query efficiently by the
device_idcolumn.Change the number of partitions as you data grows
sqlselect set_number_partitions('conditions', 5, 'device_id');
===== PAGE: https://docs.tigerdata.com/use-timescale/hypercore/ =====
Hypercore
Hypercore is a hybrid row-columnar storage engine in TimescaleDB. It is designed specifically for real-time analytics and powered by time-series data. The advantage of hypercore is its ability to seamlessly switch between row-oriented and column-oriented storage, delivering the best of both worlds:
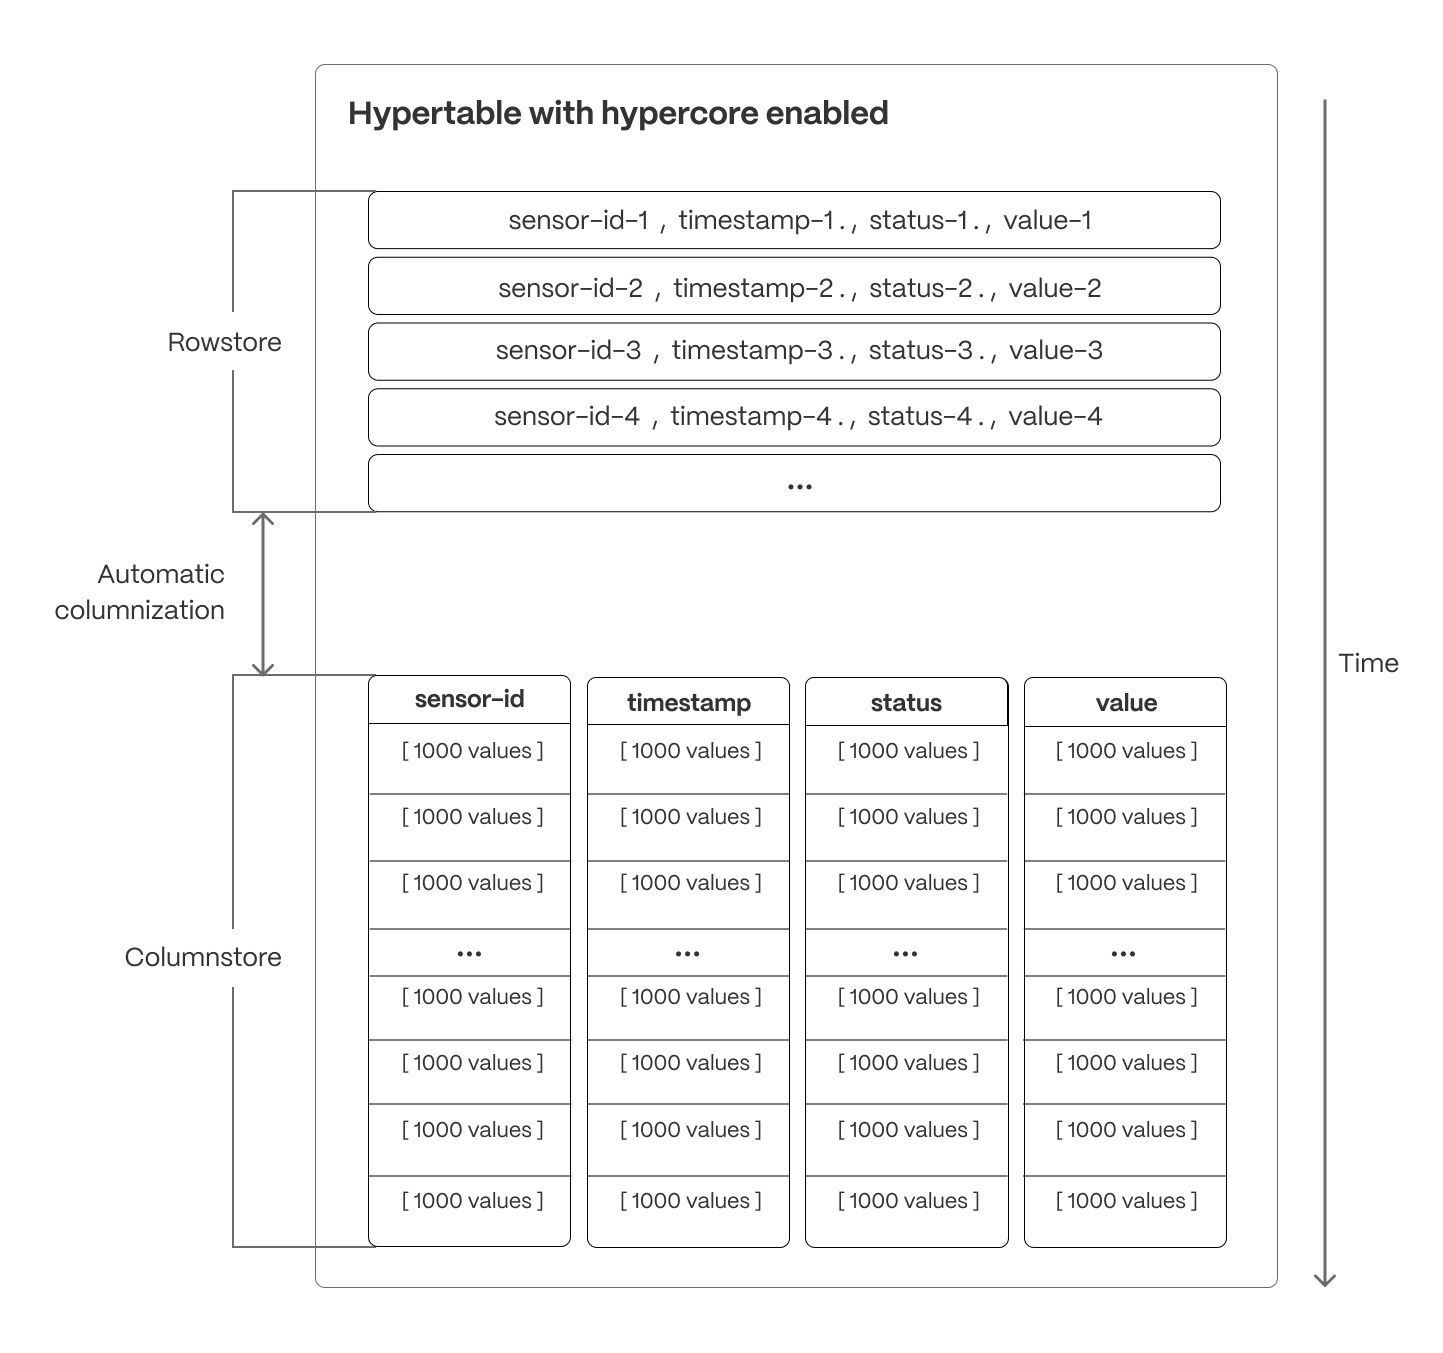
Hypercore solves the key challenges in real-time analytics:
- High ingest throughput
- Low-latency ingestion
- Fast query performance
- Efficient handling of data updates and late-arriving data
- Streamlined data management
Hypercore’s hybrid approach combines the benefits of row-oriented and column-oriented formats:
Fast ingest with rowstore: new data is initially written to the rowstore, which is optimized for high-speed inserts and updates. This process ensures that real-time applications easily handle rapid streams of incoming data. Mutability—upserts, updates, and deletes happen seamlessly.
Efficient analytics with columnstore: as the data cools and becomes more suited for analytics, it is automatically converted to the columnstore. This columnar format enables fast scanning and aggregation, optimizing performance for analytical workloads while also saving significant storage space.
Faster queries on compressed data in columnstore: in the columnstore conversion, hypertable chunks are compressed by up to 98%, and organized for efficient, large-scale queries. Combined with [chunk skipping][chunk-skipping], this helps you save on storage costs and keeps your queries operating at lightning speed.
Fast modification of compressed data in columnstore: just use SQL to add or modify data in the columnstore. TimescaleDB is optimized for superfast INSERT and UPSERT performance.
Full mutability with transactional semantics: regardless of where data is stored, hypercore provides full ACID support. Like in a vanilla Postgres database, inserts and updates to the rowstore and columnstore are always consistent, and available to queries as soon as they are completed.
For an in-depth explanation of how hypertables and hypercore work, see the [Data model][data-model].
This section shows the following:
- [Optimize your data for real-time analytics][setup-hypercore]
- [Improve query and upsert performance using secondary indexes][secondary-indexes]
- [Compression methods in hypercore][compression-methods]
- [Troubleshooting][troubleshooting]
===== PAGE: https://docs.tigerdata.com/use-timescale/continuous-aggregates/ =====
Continuous aggregates
From real-time dashboards to performance monitoring and historical trend analysis, data aggregation is a must-have for any sort of analytical application. To address this need, TimescaleDB uses continuous aggregates to precompute and store aggregate data for you. Using Postgres [materialized views][postgres-materialized-views], TimescaleDB incrementally refreshes the aggregation query in the background. When you do run the query, only the data that has changed needs to be computed, not the entire dataset. This means you always have the latest aggregate data at your fingertips—and spend as little resources on it, as possible.
In this section you:
- [Learn about continuous aggregates][about-caggs] to understand how it works before you begin using it.
- [Create a continuous aggregate][cagg-create] and query it.
- [Create a continuous aggregate on top of another continuous aggregate][cagg-on-cagg].
- [Add refresh policies][cagg-autorefresh] to an existing continuous aggregate.
- [Manage time][cagg-time] in your continuous aggregates.
- [Drop data][cagg-drop] from your continuous aggregates.
- [Manage materialized hypertables][cagg-mat-hypertables].
- [Use real-time aggregates][cagg-realtime].
- [Convert continuous aggregates to the columnstore][cagg-compression].
- [Migrate your continuous aggregates][cagg-migrate] from old to new format. Continuous aggregates created in TimescaleDB v2.7 and later are in the new format, unless explicitly created in the old format.
- [Troubleshoot][cagg-tshoot] continuous aggregates.
===== PAGE: https://docs.tigerdata.com/use-timescale/services/ =====
About Tiger Cloud services
Tiger Cloud is the modern Postgres data platform for all your applications. It enhances Postgres to handle time series, events, real-time analytics, and vector search—all in a single database alongside transactional workloads.
You get one system that handles live data ingestion, late and out-of-order updates, and low latency queries, with the performance, reliability, and scalability your app needs. Ideal for IoT, crypto, finance, SaaS, and a myriad other domains, Tiger Cloud allows you to build data-heavy, mission-critical apps while retaining the familiarity and reliability of Postgres.
A Tiger Cloud service is a single optimised Postgres instance extended with innovations in the database engine and cloud infrastructure to deliver speed without sacrifice. A Tiger Cloud service is 10-1000x faster at scale! It is ideal for applications requiring strong data consistency, complex relationships, and advanced querying capabilities. Get ACID compliance, extensive SQL support, JSON handling, and extensibility through custom functions, data types, and extensions.
Each service is associated with a project in Tiger Cloud. Each project can have multiple services. Each user is a [member of one or more projects][rbac].
You create free and standard services in Tiger Cloud Console, depending on your [pricing plan][pricing-plans]. A free service comes at zero cost and gives you limited resources to get to know Tiger Cloud. Once you are ready to try out more advanced features, you can switch to a paid plan and convert your free service to a standard one.

The Free pricing plan and services are currently in beta.
To the Postgres you know and love, Tiger Cloud adds the following capabilities:
Standard services:
- Real-time analytics: store and query [time-series data][what-is-time-series] at scale for real-time analytics and other use cases. Get faster time-based queries with hypertables, continuous aggregates, and columnar storage. Save money by compressing data into the columnstore, moving cold data to low-cost bottomless storage in Amazon S3, and deleting old data with automated policies.
- AI-focused: build AI applications from start to scale. Get fast and accurate similarity search with the pgvector and pgvectorscale extensions.
- Hybrid applications: get a full set of tools to develop applications that combine time-based data and AI.
All standard Tiger Cloud services include the tooling you expect for production and developer environments: [live migration][live-migration], [automatic backups and PITR][automatic-backups], [high availability][high-availability], [read replicas][readreplica], [data forking][operations-forking], [connection pooling][connection-pooling], [tiered storage][data-tiering], [usage-based storage][how-plans-work], secure in-Tiger Cloud Console [SQL editing][in-console-editors], service [metrics][metrics] and [insights][insights], [streamlined maintenance][maintain-upgrade], and much more. Tiger Cloud continuously monitors your services and prevents common Postgres out-of-memory crashes.
Free services:
Postgres with TimescaleDB and vector extensions
Free services offer limited resources and a basic feature scope, perfect to get to know Tiger Cloud in a development environment.
Learn more about Tiger Cloud
Read about Tiger Cloud features in the documentation:
- Create your first [hypertable][hypertable-info].
- Run your first query using [time_bucket()][time-bucket-info].
- Trying more advanced time-series functions, starting with [gap filling][gap-filling-info] or [real-time aggregates][aggregates-info].
Keep testing during your free trial
You're now on your way to a great start with Tiger Cloud.
You have an unthrottled, 30-day free trial with Tiger Cloud to continue to test your use case. Before the end of your trial, make sure you add your credit card information. This ensures a smooth transition after your trial period concludes.
If you have any questions, you can [join our community Slack group][slack-info] or [contact us][contact-timescale] directly.
Advanced configuration
Tiger Cloud is a versatile hosting service that provides a growing list of advanced features for your Postgres and time-series data workloads.
For more information about customizing your database configuration, see the [Configuration section][configuration].
The TimescaleDB Terraform provider provides configuration management resources for Tiger Cloud. You can use it to create, rename, resize, delete, and import services. For more information about the supported service configurations and operations, see the Terraform provider documentation.
===== PAGE: https://docs.tigerdata.com/use-timescale/write-data/ =====
Write data
Writing data in TimescaleDB works the same way as writing data to regular Postgres. You can add and modify data in both regular tables and hypertables using INSERT, UPDATE, and DELETE statements.
- [Learn about writing data in TimescaleDB][about-writing-data]
- [Insert data][insert] into hypertables
- [Update data][update] in hypertables
- [Upsert data][upsert] into hypertables
- [Delete data][delete] from hypertables
For more information about using third-party tools to write data into TimescaleDB, see the [Ingest data from other sources][ingest-data] section.
===== PAGE: https://docs.tigerdata.com/use-timescale/query-data/ =====
Query data
Hypertables in TimescaleDB are Postgres tables. That means you can query them with standard SQL commands.
- [About querying data][about-querying-data]
- [Select data with
SELECT][selecting-data] - [Get faster
DISTINCTqueries with SkipScan][skipscan] - [Perform advanced analytic queries][advanced-analytics]
===== PAGE: https://docs.tigerdata.com/use-timescale/time-buckets/ =====
Time buckets
Time buckets enable you to aggregate data in [hypertables][create-hypertable] by time interval. For example, you can group data into 5-minute, 1-hour, and 3-day buckets to calculate summary values.
- [Learn how time buckets work][about-time-buckets]
- [Use time buckets][use-time-buckets] to aggregate data
===== PAGE: https://docs.tigerdata.com/use-timescale/schema-management/ =====
Schema management
A database schema defines how the tables and indexes in your database are organized. Using a schema that is appropriate for your workload can result in significant performance improvements.
- [Learn about schema management][about-schema] to understand how it works before you begin using it.
- [Learn about indexing][about-indexing] to understand how it works before you begin using it.
- [Learn about tablespaces][about-tablespaces] to understand how they work before you begin using them.
- [Learn about constraints][about-constraints] to understand how they work before you begin using them.
- [Alter a hypertable][schema-alter] to modify your schema.
- [Create an index][schema-indexing] to speed up your queries.
- [Create triggers][schema-triggers] to propagate your schema changes to chunks.
- [Use JSON and JSONB][schema-json] for semi-structured data.
- [Query external databases][foreign-data-wrappers] with foreign data wrappers.
- [Troubleshoot][troubleshoot-schemas] your schemas.
===== PAGE: https://docs.tigerdata.com/use-timescale/configuration/ =====
Configuration
By default, Tiger Cloud uses the standard Postgres server configuration settings. However, in some cases, these settings are not appropriate, especially if you have larger servers that use more hardware resources such as CPU, memory, and storage.
This section contains information about tuning your Tiger Cloud service.
===== PAGE: https://docs.tigerdata.com/use-timescale/alerting/ =====
Alerting
Early issue detecting and prevention, ensuring high availability, and performance optimization are only a few of the reasons why alerting plays a major role for modern applications, databases, and services.
There are a variety of different alerting solutions you can use in conjunction with Tiger Cloud that are part of the Postgres ecosystem. Regardless of whether you are creating custom alerts embedded in your applications, or using third-party alerting tools to monitor event data across your organization, there are a wide selection of tools available.
Grafana
Grafana is a great way to visualize your analytical queries, and it has a first-class integration with Tiger Data products. Beyond data visualization, Grafana also provides alerting functionality to keep you notified of anomalies.
Within Grafana, you can [define alert rules][define alert rules] which are time-based thresholds for your dashboard data (for example, "Average CPU usage greater than 80 percent for 5 minutes"). When those alert rules are triggered, Grafana sends a message via the chosen notification channel. Grafana provides integration with webhooks, email and more than a dozen external services including Slack and PagerDuty.
To get started, first download and install [Grafana][Grafana-install]. Next, add a new [Postgres data source][PostgreSQL datasource] that points to your Tiger Cloud service. This data source was built by Tiger Data engineers, and it is designed to take advantage of the database's time-series capabilities. From there, proceed to your dashboard and set up alert rules as described above.
Alerting is only available in Grafana v4.0 and later.
Other alerting tools
Tiger Cloud works with a variety of alerting tools within the Postgres ecosystem. Users can use these tools to set up notifications about meaningful events that signify notable changes to the system.
Some popular alerting tools that work with Tiger Cloud include:
- [DataDog][datadog-install]
- [Nagios][nagios-install]
- [Zabbix][zabbix-install]
See the [integration guides][integration-docs] for details.
===== PAGE: https://docs.tigerdata.com/use-timescale/data-retention/ =====
Data retention
Data retention helps you save on storage costs by deleting old data. You can combine data retention with [continuous aggregates][caggs] to downsample your data.
In this section:
- [Learn about data retention][about-data-retention] before you start using it
- [Learn about data retention with continuous aggregates][retention-with-caggs] for downsampling data
- Create a [data retention policy][retention-policy]
- [Manually drop chunks][manually-drop] of data
- [Troubleshoot] data retention
===== PAGE: https://docs.tigerdata.com/use-timescale/data-tiering/ =====
Storage in Tiger
Tiered storage is a [hierarchical storage management architecture][hierarchical-storage] for [real-time analytics][create-service] services you create in Tiger Cloud.
Engineered for infinite low-cost scalability, tiered storage consists of the following:
High-performance storage tier: stores the most recent and frequently queried data. This tier comes in two types, standard and enhanced, and provides you with up to 64 TB of storage and 32,000 IOPS.
Object storage tier: stores data that is rarely accessed and has lower performance requirements. For example, old data for auditing or reporting purposes over long periods of time, even forever. The object storage tier is low-cost and bottomless.
No matter the tier your data is stored in, you can [query it when you need it][querying-tiered-data]. Tiger Cloud seamlessly accesses the correct storage tier and generates the response.
You [define tiering policies][creating-data-tiering-policy] that automatically migrate data from the high-performance storage tier to the object tier as it ages. You use [retention policies][add-retention-policies] to remove very old data from the object storage tier.
With tiered storage you don't need an ETL process, infrastructure changes, or custom-built, bespoke solutions to offload data to secondary storage and fetch it back in when needed. Kick back and relax, we do the work for you.
In this section, you:
- [Learn more about storage tiers][about-data-tiering]: understand how the tiers are built and how they differ.
- [Manage storage and tiering][enabling-data-tiering]: configure high-performance storage, object storage, and data tiering.
- [Query tiered data][querying-tiered-data]: query the data in the object storage.
- [Learn about replicas and forks with tiered data][replicas-and-forks]: understand how tiered storage works with forks and replicas of your service.
===== PAGE: https://docs.tigerdata.com/use-timescale/metrics-logging/ =====
Metrics and logging
Find metrics and logs for your services in Tiger Cloud Console, or integrate with third-party monitoring services:
- [Monitor][monitor] your services in Tiger Cloud Console.
- Export metrics to [Datadog][datadog].
- Export metrics to [Amazon Cloudwatch][cloudwatch].
- Export metrics to [Prometheus][prometheus].
===== PAGE: https://docs.tigerdata.com/use-timescale/ha-replicas/ =====
High availability and read replication
In Tiger Cloud, replicas are copies of the primary data instance in a Tiger Cloud service. If your primary becomes unavailable, Tiger Cloud automatically fails over to your HA replica.
The replication strategies offered by Tiger Cloud are:
[High Availability(HA) replicas][ha-replica]: significantly reduce the risk of downtime and data loss due to system failure, and enable services to avoid downtime during routine maintenance.
[Read replicas][read-replica]: safely scale a service to power your read-intensive apps and business intelligence tooling and remove the load from the primary data instance.
For MST, see [Failover in Managed Service for TimescaleDB][mst-failover]. For self-hosted TimescaleDB, see [Replication and high availability][self-hosted-ha].
Rapid recovery
By default, all services have rapid recovery enabled.
Because compute and storage are handled separately in Tiger Cloud, services recover quickly from compute failures, but usually need a full recovery from backup for storage failures.
Compute failure: the most common cause of database failure. Compute failures can be caused by hardware failing, or through things like unoptimized queries, causing increased load that maxes out the CPU usage. In these cases, data on disk is unaffected and only the compute and memory needs replacing. Tiger Cloud recovery immediately provisions new compute infrastructure for the service and mounts the existing storage to the new node. Any WAL that was in memory then replays. This process typically only takes thirty seconds. However, depending on the amount of WAL that needs replaying this may take up to twenty minutes. Even in the worst-case scenario, Tiger Cloud recovery is an order of magnitude faster than a standard recovery from backup.
Storage failure: in the rare occurrence of disk failure, Tiger Cloud automatically [performs a full recovery from backup][backup-recovery].
If CPU usage for a service runs high for long periods of time, issues such as WAL archiving getting queued behind other processes can occur. This can cause a failure and could result in a larger data loss. To avoid data loss, services are monitored for this kind of scenario.
===== PAGE: https://docs.tigerdata.com/use-timescale/upgrades/ =====
Maintenance and upgrades
Tiger Cloud offers managed database services that provide a stable and reliable environment for your applications. Each service is based on a specific version of the Postgres database and the TimescaleDB extension. To ensure that you benefit from the latest features, performance and security improvements, it is important that your Tiger Cloud service is kept up to date with the latest versions of TimescaleDB and Postgres.
Tiger Cloud has the following upgrade policies:
Minor software upgrades: handled automatically, you do not need to do anything.
Upgrades are performed on your Tiger Cloud service during a maintenance window that you [define to suit your workload][define-maintenance-window]. You can also [manually upgrade TimescaleDB][minor-manual-upgrade].
Critical security upgrades: installed outside normal maintenance windows when necessary, and sometimes require a short outage.
Downtime is usually between 30 seconds and 5 minutes. Tiger Data aims to notify you by email if downtime is required, so that you can plan accordingly. However, in some cases this is not possible.
Major upgrades: such as a new version of Postgres are performed [manually by you][manual-upgrade], or [automatically by Tiger Cloud][automatic-upgrade].
After a maintenance upgrade, the DNS name remains the same. However, the IP address often changes.
Minor software upgrades
If you do not [manually upgrade TimescaleDB][minor-manual-upgrade] for non-critical upgrades, Tiger Cloud performs upgrades automatically in the next available maintenance window. The upgrade is first applied to your services tagged #dev, and three weeks later to those tagged #prod. [Subscribe][subscribe] to get an email notification before your #prod services are upgraded. You can upgrade your #prod services manually sooner, if needed.
Most upgrades that occur during your maintenance windows do not require any downtime. This means that there is no service outage during the upgrade. However, all connections and transactions in progress during the upgrade are reset. Usually, the service connection is automatically restored after the reset.
Some minor upgrades do require some downtime. This is usually between 30 seconds and 5 minutes. If downtime is required for an upgrade, Tiger Data endeavors to notify you by email ahead of the upgrade. However, in some cases, we might not be able to do so. Best practice is to [schedule your maintenance window][define-maintenance-window] so that any downtime disrupts your workloads as little as possible and [minimize downtime with replicas][minimize-downtime]. If there are no pending upgrades available during a regular maintenance window, no changes are performed.
To track the status of maintenance events, see the Tiger Cloud [status page][status-page].
Minimize downtime with replicas
Maintenance upgrades require up to two automatic failovers. Each failover takes less than a few seconds. Tiger Cloud services with [high-availability replicas and read replicas][replicas-docs] require minimal write downtime during maintenance, read-only queries keep working throughout.
During a maintenance event, services with replicas perform maintenance on each node independently. When maintenance is complete on the primary node, it is restarted:
- If the restart takes more than a minute, a replica node is promoted to primary, given that the replica has no replication lag. Maintenance now proceeds on the newly promoted replica, following the same sequence. If the newly promoted replica takes more than a minute to restart, the former primary is promoted back. In total, the process may result in up to two minutes of write downtime and two failover events.
- If the maintenance on the primary node is completed within a minute and it comes back online, the replica remains the replica.
Manually upgrade TimescaleDB for non-critical upgrades
Non-critical upgrades are available before the upgrade is performed automatically by Tiger Cloud. To upgrade TimescaleDB manually:
Connect to your service
In [Tiger Cloud Console][cloud-login], select the service you want to upgrade.
Upgrade TimescaleDB
Either:
- Click
SQL Editor, then runALTEREXTENSION timescaledb UPDATE. - Click
⋮, thenPauseandResumethe service.
- Click
Upgrading to a newer version of Postgres allows you to take advantage of new features, enhancements, and security fixes. It also ensures that you are using a version of Postgres that's compatible with the newest version of TimescaleDB, allowing you to take advantage of everything it has to offer. For more information about feature changes between versions, see the [Tiger Cloud release notes][timescale-changelog], [supported systems][supported-systems], and the [Postgres release notes][postgres-relnotes].
Deprecations
To ensure you benefit from the latest features, optimal performance, enhanced security, and full compatibility with TimescaleDB, Tiger Cloud supports a defined set of Postgres major versions. To reduce the maintenance burden and continue providing a high-quality managed experience, as Postgres and TimescaleDB evolve, Tiger Data periodically deprecates older Postgres versions.
Tiger Data provides advance notification to allow you ample time to plan and perform your upgrade. The timeline deprecation is as follows:
- Deprecation notice period begins: you receive email notification of the deprecation and the timeline for the upgrade.
- Customer self-service upgrade window: best practice is to [manually upgrade to a new Postgres version][manual-upgrade] in this time.
- Automatic upgrade deadline: Tiger Cloud performs an [automatic upgrade][automatic-upgrade] of your service.
Manually upgrade Postgres for a service
Upgrading to a newer version of Postgres enables you to take advantage of new features, enhancements, and security fixes. It also ensures that you are using a version of Postgres that's compatible with the newest version of TimescaleDB.
For a smooth upgrade experience, make sure you:
- Plan ahead: upgrades cause downtime, so ideally perform an upgrade during a low traffic time.
- Run a test upgrade: [fork your service][operations-forking], then try out the upgrade on the fork before running it on your production system. This gives you a good idea of what happens during the upgrade, and how long it might take.
- Keep a copy of your service: if you're worried about losing your data, [fork your service][operations-forking] without upgrading, and keep this duplicate of your service. To reduce cost, you can immediately pause this fork and only pay for storage until you are comfortable deleting it after the upgrade is complete.
Tiger Cloud services with replicas cannot be upgraded. To upgrade a service with a replica, you must first delete the replica and then upgrade the service.
The following table shows you the compatible versions of Postgres and TimescaleDB.
| TimescaleDB version | Postgres 17 | Postgres 16 | Postgres 15 | Postgres 14 | Postgres 13 | Postgres 12 | Postgres 11 | Postgres 10 |
|---|---|---|---|---|---|---|---|---|
| 2.22.x | ✅ | ✅ | ✅ | ❌ | ❌ | ❌ | ❌ | ❌ |
| 2.21.x | ✅ | ✅ | ✅ | ❌ | ❌ | ❌ | ❌ | ❌ |
| 2.20.x | ✅ | ✅ | ✅ | ❌ | ❌ | ❌ | ❌ | ❌ |
| 2.17 - 2.19 | ✅ | ✅ | ✅ | ✅ | ❌ | ❌ | ❌ | ❌ |
| 2.16.x | ❌ | ✅ | ✅ | ✅ | ❌ | ❌ | ❌ | ❌ |
| 2.13 - 2.15 | ❌ | ✅ | ✅ | ✅ | ✅ | ❌ | ❌ | ❌ |
| 2.12.x | ❌ | ❌ | ✅ | ✅ | ✅ | ❌ | ❌ | ❌ |
| 2.10.x | ❌ | ❌ | ✅ | ✅ | ✅ | ✅ | ❌ | ❌ |
| 2.5 - 2.9 | ❌ | ❌ | ❌ | ✅ | ✅ | ✅ | ❌ | ❌ |
| 2.4 | ❌ | ❌ | ❌ | ❌ | ✅ | ✅ | ❌ | ❌ |
| 2.1 - 2.3 | ❌ | ❌ | ❌ | ❌ | ✅ | ✅ | ✅ | ❌ |
| 2.0 | ❌ | ❌ | ❌ | ❌ | ❌ | ✅ | ✅ | ❌ |
| 1.7 | ❌ | ❌ | ❌ | ❌ | ❌ | ✅ | ✅ | ✅ |
We recommend not using TimescaleDB with Postgres 17.1, 16.5, 15.9, 14.14, 13.17, 12.21. These minor versions [introduced a breaking binary interface change][postgres-breaking-change] that, once identified, was reverted in subsequent minor Postgres versions 17.2, 16.6, 15.10, 14.15, 13.18, and 12.22. When you build from source, best practice is to build with Postgres 17.2, 16.6, etc and higher. Users of Tiger Cloud and platform packages for Linux, Windows, MacOS, Docker, and Kubernetes are unaffected.
For more information about feature changes between versions, see the [Postgres release notes][postgres-relnotes] and [TimescaleDB release notes][timescale-relnotes].
Your Tiger Cloud service is unavailable until the upgrade is complete. This can take up to 20 minutes. Best practice is to test on a fork first, so you can estimate how long the upgrade will take.
To upgrade your service to a newer version of Postgres:
Connect to your service
In [Tiger Cloud Console][cloud-login], select the service you want to upgrade.
Disable high-availability replicas
- Click
Operations>High Availability, then clickChange configuaration. - Select
Non-production (No replica), then clickChange configuration.
- Click
Disable read replicas
- Click
Operations>Read scaling, then click the trash icon next to all replica sets.
- Click
Upgrade Postgres
- Click
Operations>Service Upgrades. - Click
Upgrade service, then confirm that you are ready to start the upgrade.
Your Tiger Cloud service is unavailable until the upgrade is complete. This normally takes up to 20 minutes. However, it can take longer if you have a large or complex service.
When the upgrade is finished, your service automatically resumes normal operations. If the upgrade is unsuccessful, the service returns to the state it was in before you started the upgrade.
- Click
Enable high-availability replicas and replace your read replicas
Automatic Postgres upgrades for a service
If you do not manually upgrade your services within the [customer self-service upgrade window][deprecation-window], Tiger Cloud performs an automatic upgrade. Automatic upgrades can result in downtime, best practice is to [manually upgrade your services][manual-upgrade] during a low-traffic period for your application.
During an automatic upgrade:
- Any configured [high-availability replicas][hareplica] or [read replicas][readreplica] are temporarily removed.
- The primary service is upgraded.
- High-availability replicas and read replicas are added back to the service.
Define your maintenance window
When you are considering your maintenance window schedule, best practice is to choose a day and time that usually has very low activity, such as during the early hours of the morning, or over the weekend. This helps minimize the impact of a short service interruption. Alternatively, you might prefer to have your maintenance window occur during office hours, so that you can monitor your system during the upgrade.
To change your maintenance window:
Connect to your service
In [Tiger Cloud Console][cloud-login], select the service you want to manage.
Set your maintenance window
- Click
Operations>Environment, then clickChange maintenance window.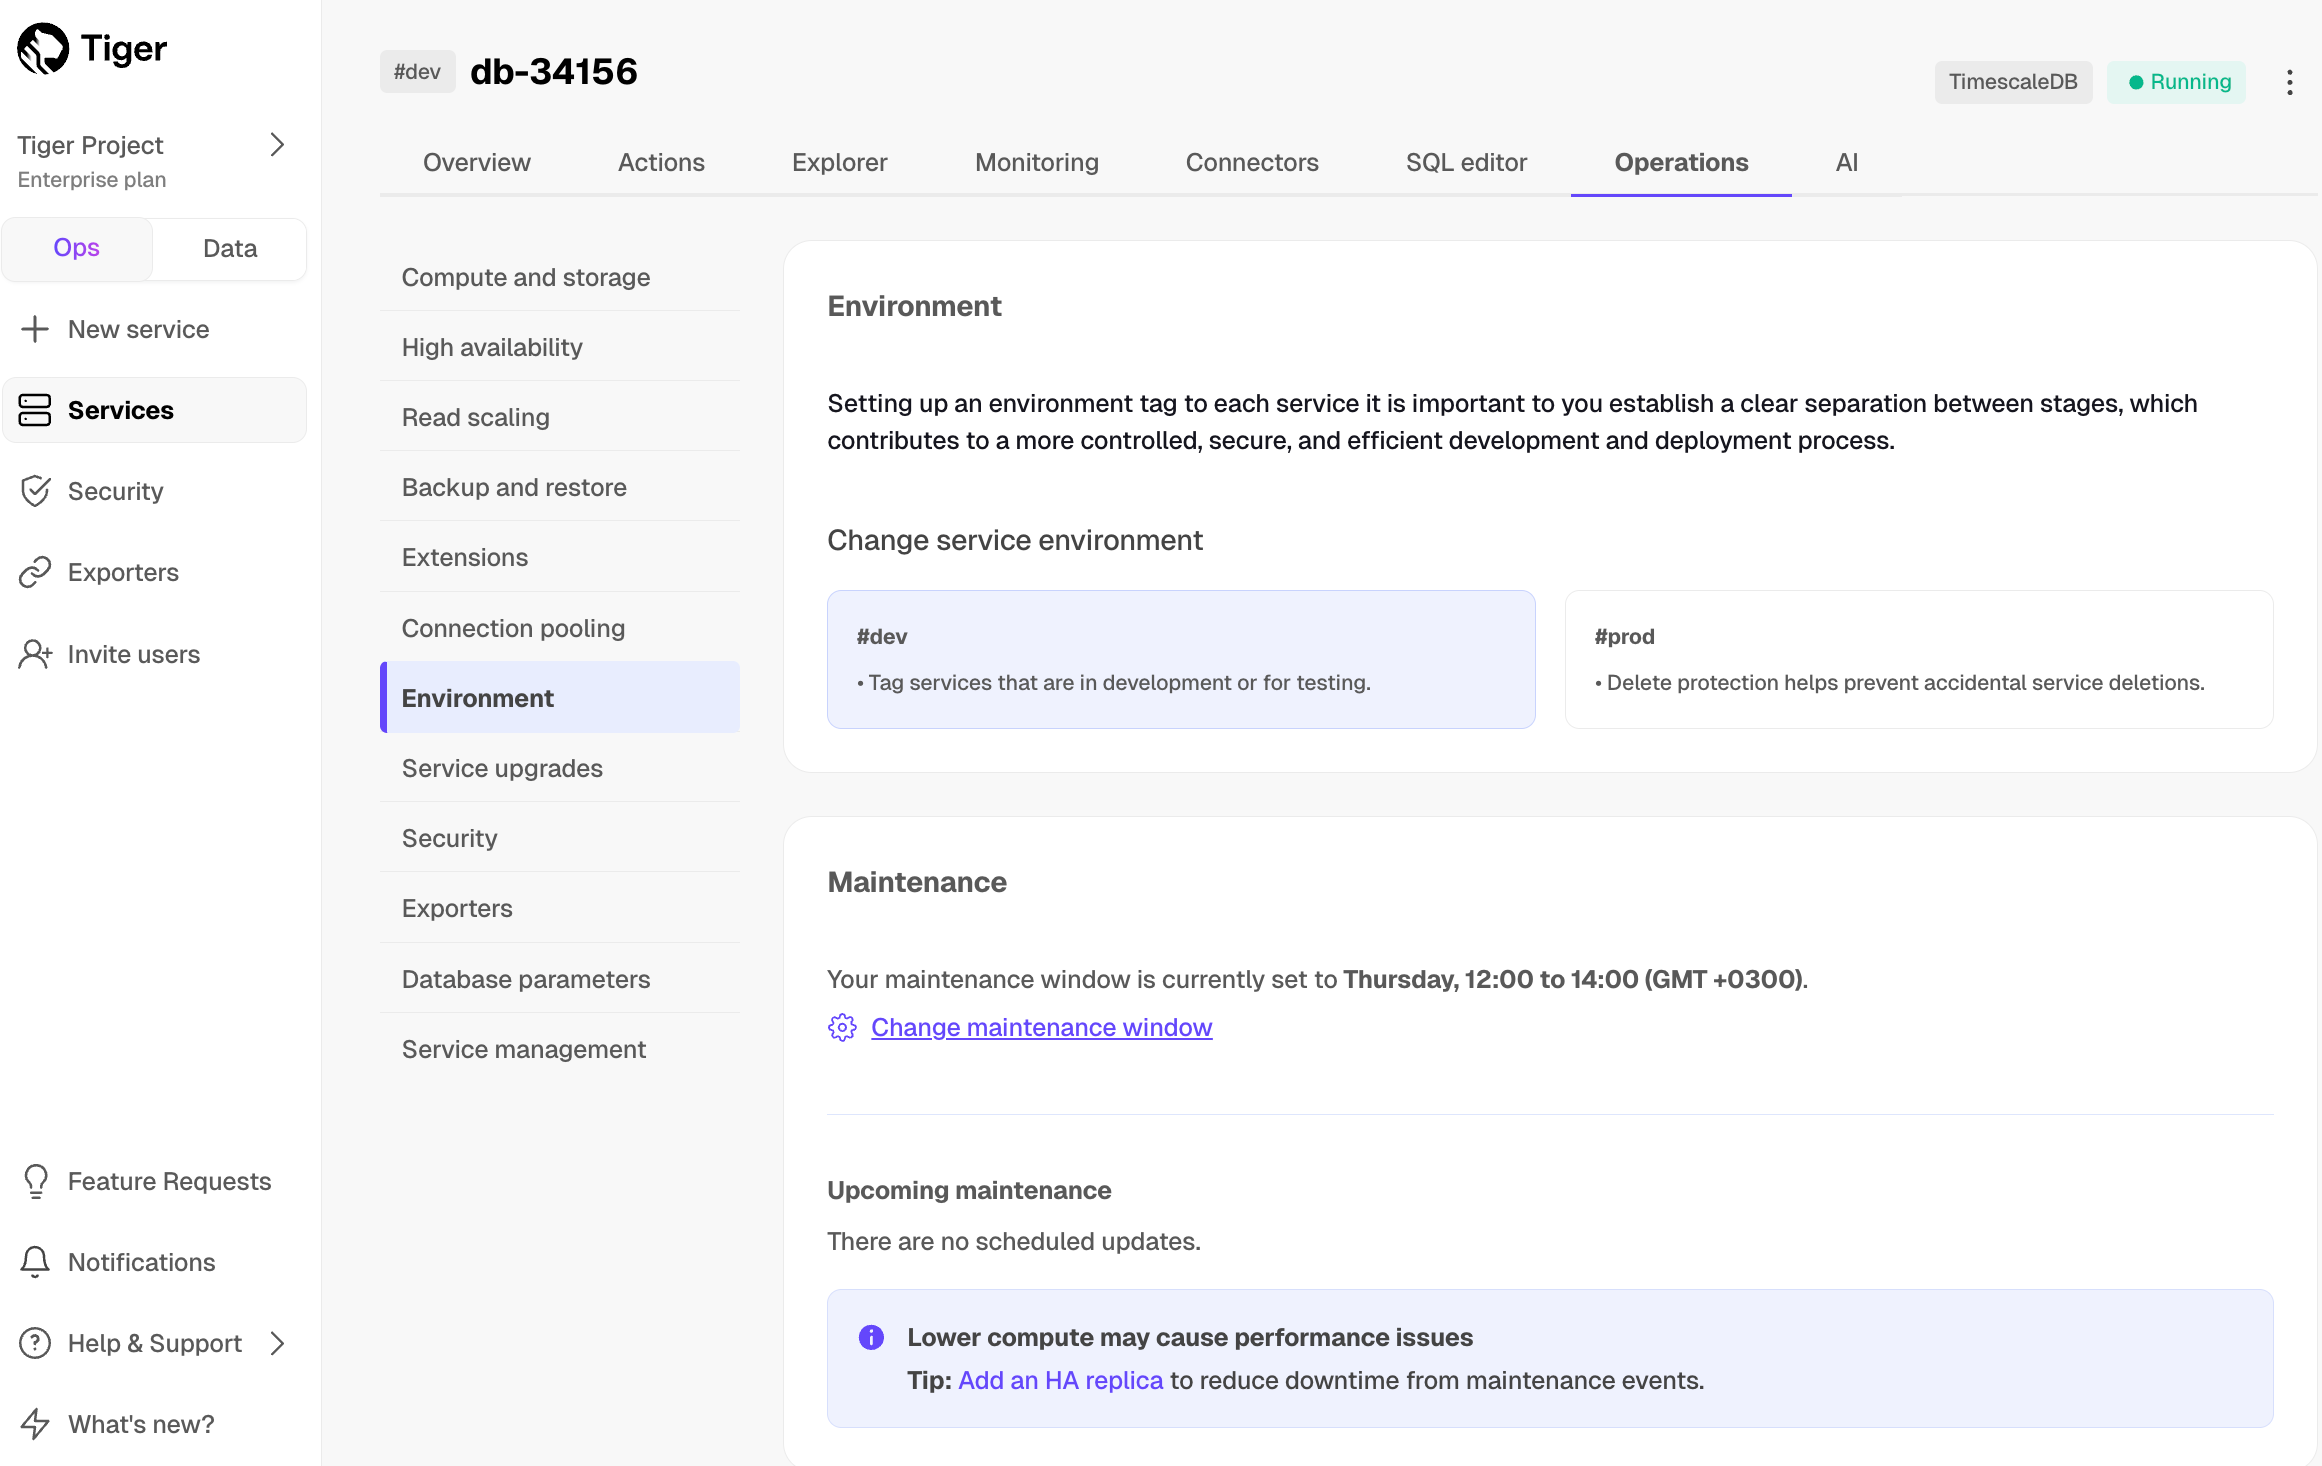
- Select the maintence window start time, then click
Apply.
Maintenance windows can run for up to four hours.
- Click
===== PAGE: https://docs.tigerdata.com/use-timescale/extensions/ =====
Postgres extensions
The following Postgres extensions are installed with each Tiger Cloud service:
- [Tiger Data extensions][timescale-extensions]
- [Postgres built-in extensions][built-ins]
- [Third-party extensions][third-party]
Tiger Data extensions
| Extension | Description | Enabled by default |
|---|---|---|
| [pgai][pgai] | Helper functions for AI workflows | For [AI-focused][services] services |
| [pg_textsearch][pg_textsearch] | [BM25][bm25-wiki]-based full-text search | Currently early access. For development and staging environments only |
| [pgvector][pgvector] | Vector similarity search for Postgres | For [AI-focused][services] services |
| [pgvectorscale][pgvectorscale] | Advanced indexing for vector data | For [AI-focused][services] services |
| [timescaledb_toolkit][timescaledb-toolkit] | TimescaleDB Toolkit | For [Real-time analytics][services] services |
| [timescaledb][timescaledb] | TimescaleDB | For all services |
Postgres built-in extensions
| Extension | Description | Enabled by default |
|---|---|---|
| [autoinc][autoinc] | Functions for autoincrementing fields | - |
| [amcheck][amcheck] | Functions for verifying relation integrity | - |
| [bloom][bloom] | Bloom access method - signature file-based index | - |
| [bool_plperl][bool-plper] | Transform between bool and plperl | - |
| [btree_gin][btree-gin] | Support for indexing common datatypes in GIN | - |
| [btree_gist][btree-gist] | Support for indexing common datatypes in GiST | - |
| [citext][citext] | Data type for case-insensitive character strings | - |
| [cube][cube] | Data type for multidimensional cubes | - |
| [dict_int][dict-int] | Text search dictionary template for integers | - |
| [dict_xsyn][dict-xsyn] | Text search dictionary template for extended synonym processing | - |
| [earthdistance][earthdistance] | Calculate great-circle distances on the surface of the Earth | - |
| [fuzzystrmatch][fuzzystrmatch] | Determine similarities and distance between strings | - |
| [hstore][hstore] | Data type for storing sets of (key, value) pairs | - |
| [hstore_plperl][hstore] | Transform between hstore and plperl | - |
| [insert_username][insert-username] | Functions for tracking who changed a table | - |
| [intagg][intagg] | Integer aggregator and enumerator (obsolete) | - |
| [intarray][intarray] | Functions, operators, and index support for 1-D arrays of integers | - |
| [isn][isn] | Data types for international product numbering standards | - |
| [jsonb_plperl][jsonb-plperl] | Transform between jsonb and plperl | - |
| [lo][lo] | Large object maintenance | - |
| [ltree][ltree] | Data type for hierarchical tree-like structures | - |
| [moddatetime][moddatetime] | Functions for tracking last modification time | - |
| [old_snapshot][old-snapshot] | Utilities in support of old_snapshot_threshold | - |
| [pgcrypto][pgcrypto] | Cryptographic functions | - |
| [pgrowlocks][pgrowlocks] | Show row-level locking information | - |
| [pgstattuple][pgstattuple] | Obtain tuple-level statistics | - |
| [pg_freespacemap][pg-freespacemap] | Examine the free space map (FSM) | - |
| [pg_prewarm][pg-prewarm] | Prewarm relation data | - |
| [pg_stat_statements][pg-stat-statements] | Track execution statistics of all SQL statements executed | For all services |
| [pg_trgm][pg-trgm] | Text similarity measurement and index searching based on trigrams | - |
| [pg_visibility][pg-visibility] | Examine the visibility map (VM) and page-level visibility info | - |
| [plperl][plperl] | PL/Perl procedural language | - |
| [plpgsql][plpgsql] | SQL procedural language | For all services |
| [postgres_fdw][postgres-fdw] | Foreign data wrappers | For all services |
| [refint][refint] | Functions for implementing referential integrity (obsolete) | - |
| [seg][seg] | Data type for representing line segments or floating-point intervals | - |
| [sslinfo][sslinfo] | Information about SSL certificates | - |
| [tablefunc][tablefunc] | Functions that manipulate whole tables, including crosstab | - |
| [tcn][tcn] | Trigger change notifications | - |
| [tsm_system_rows][tsm-system-rows] | TABLESAMPLE method which accepts the number of rows as a limit | - |
| [tsm_system_time][tsm-system-time] | TABLESAMPLE method which accepts the time in milliseconds as a limit | - |
| [unaccent][unaccent] | Text search dictionary that removes accents | - |
| [uuid-ossp][uuid-ossp] | Generate universally unique identifiers (UUIDs) | - |
Third-party extensions
| Extension | Description | Enabled by default |
|---|---|---|
| [h3][h3] | H3 bindings for Postgres | - |
| [pgaudit][pgaudit] | Detailed session and/or object audit logging | - |
| [pgpcre][pgpcre] | Perl-compatible RegEx | - |
| [pg_cron][pgcron] | SQL commands that you can schedule and run directly inside the database | Contact us to enable |
| [pg_repack][pgrepack] | Table reorganization in Postgres with minimal locks | - |
| [pgrouting][pgrouting] | Geospatial routing functionality | - |
| [postgis][postgis] | PostGIS geometry and geography spatial types and functions | - |
| [postgis_raster][postgis-raster] | PostGIS raster types and functions | - |
| [postgis_sfcgal][postgis-sfcgal] | PostGIS SFCGAL functions | - |
| [postgis_tiger_geocoder][postgis-tiger-geocoder] | PostGIS Tiger Cloud geocoder and reverse geocoder | - |
| [postgis_topology][postgis-topology] | PostGIS topology spatial types and functions | - |
| [unit][unit] | SI units for Postgres | - |
===== PAGE: https://docs.tigerdata.com/use-timescale/backup-restore/ =====
Back up and recover your Tiger Cloud services
Tiger Cloud provides comprehensive backup and recovery solutions to protect your data, including automatic daily backups, cross-region protection, and point-in-time recovery.
Automatic backups
Tiger Cloud automatically handles backup for your Tiger Cloud services using the pgBackRest tool. You don't need to perform backups manually. What's more, with [cross-region backup][cross-region], you are protected when an entire AWS region goes down.
Tiger Cloud automatically creates one full backup every week, and incremental backups every day in the same region as your service. Additionally, all [Write-Ahead Log (WAL)][wal] files are retained back to the oldest full backup. This means that you always have a full backup available for the current and previous week:
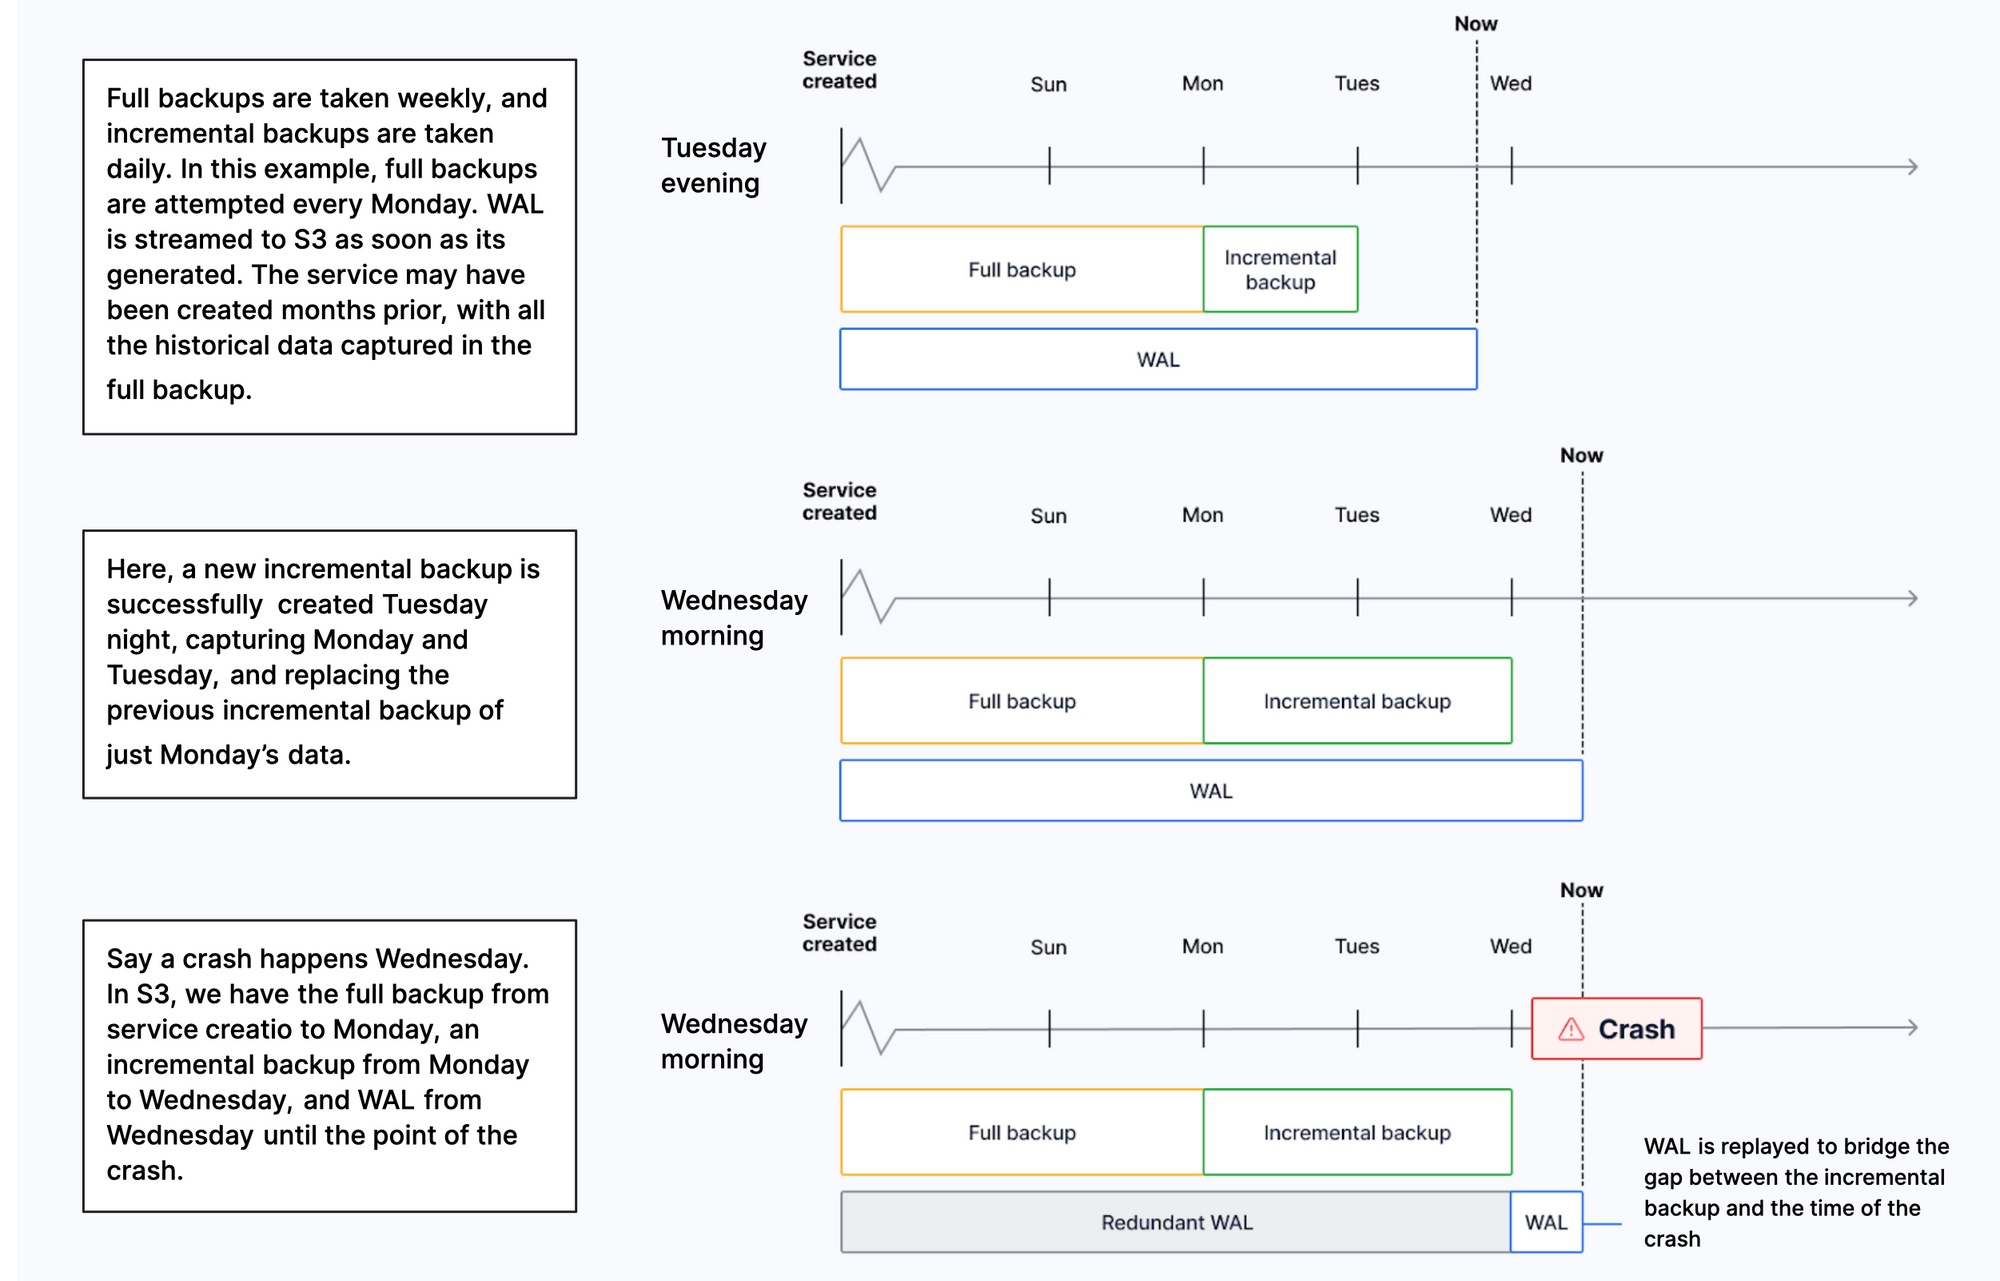
On [Scale and Performance][pricing-and-account-management] pricing plans, you can check the list of backups for the previous 14 days in Tiger Cloud Console. To do so, select your service, then click Operations > Backup and restore > Backup history.
In the event of a storage failure, a service automatically recovers from a backup to the point of failure. If the whole availability zone goes down, your Tiger Cloud services are recovered in a different zone. In the event of a user error, you can [create a point-in-time recovery fork][create-fork].
Enable cross-region backup
For added reliability, you can enable cross-region backup. This protects your data when an entire AWS region goes down. In this case, you have two identical backups of your service at any time, but one of them is in a different AWS region. Cross-region backups are updated daily and weekly in the same way as a regular backup. You can have one cross-region backup for a service.
You enable cross-region backup when you create a service, or configure it for an existing service in Tiger Cloud Console:
In [Console][console], select your service and click
Operations>Backup & restore.In
Cross-region backup, select the region in the dropdown and clickEnable backup.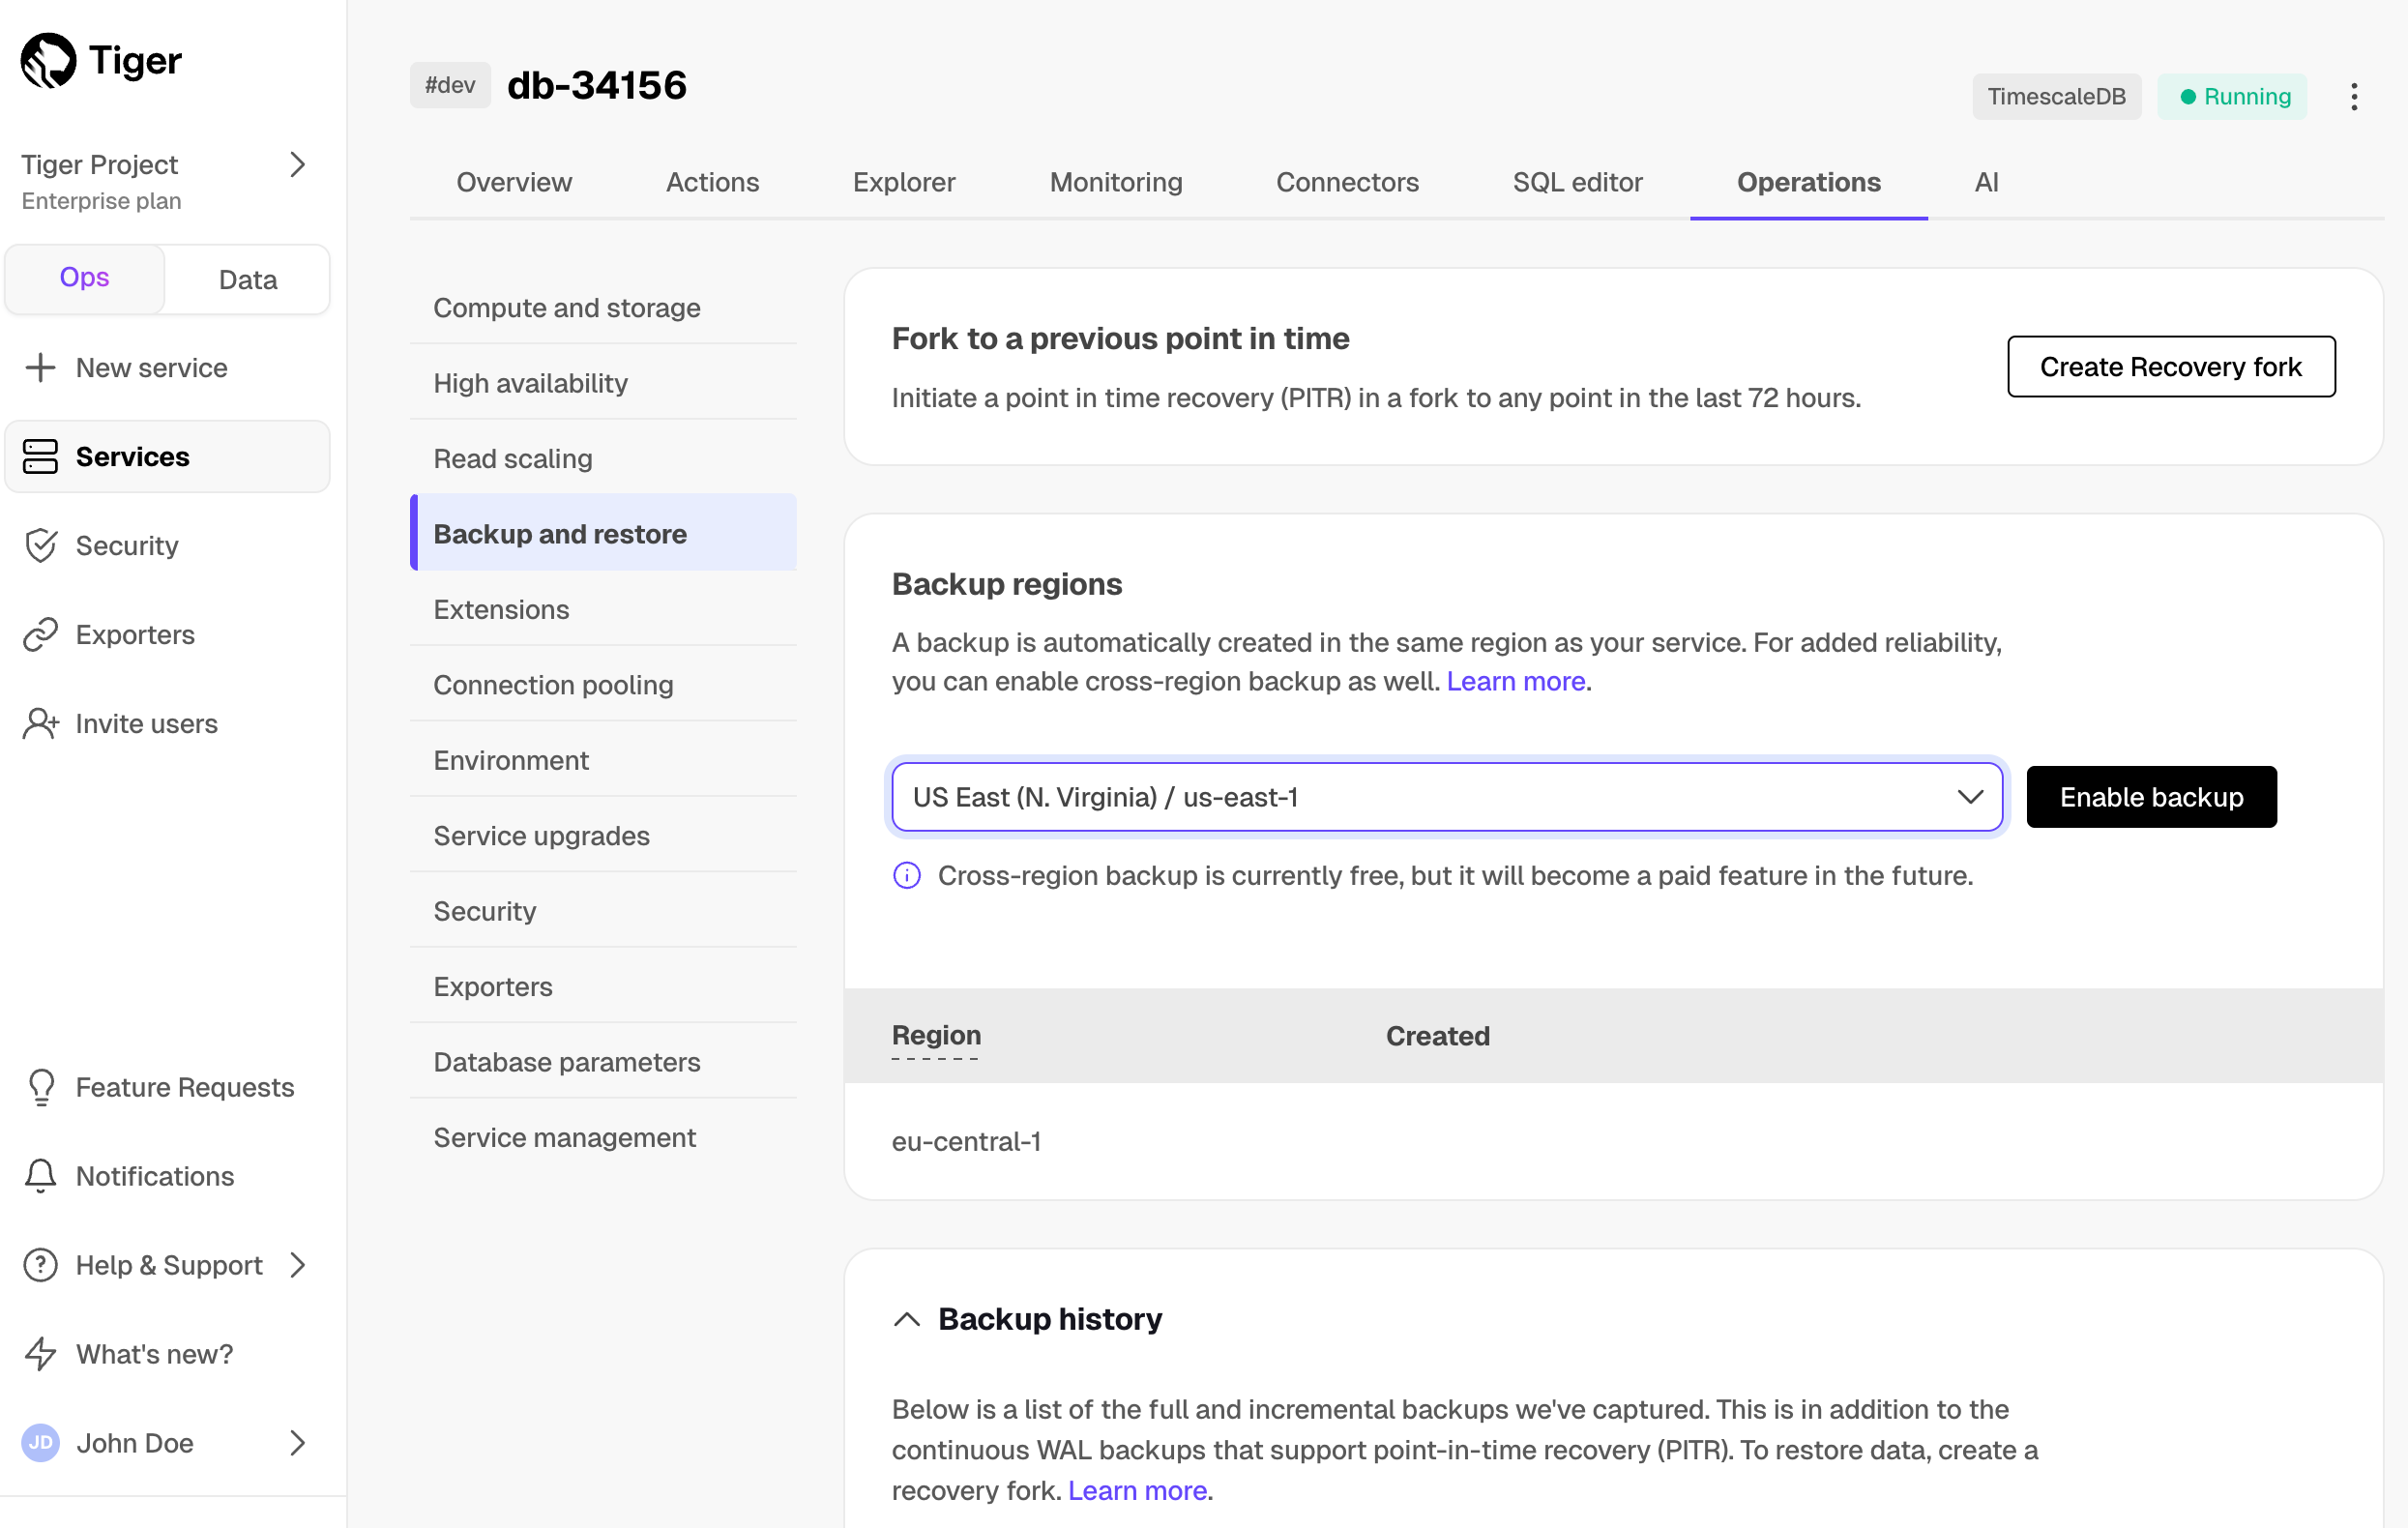
You can now see the backup, its region, and creation date in a list.
You can have one cross-region backup per service. To change the region of your backup:
In [Console][console], select your service and click
Operations>Backup & restore.Click the trash icon next to the existing backup to disable it.
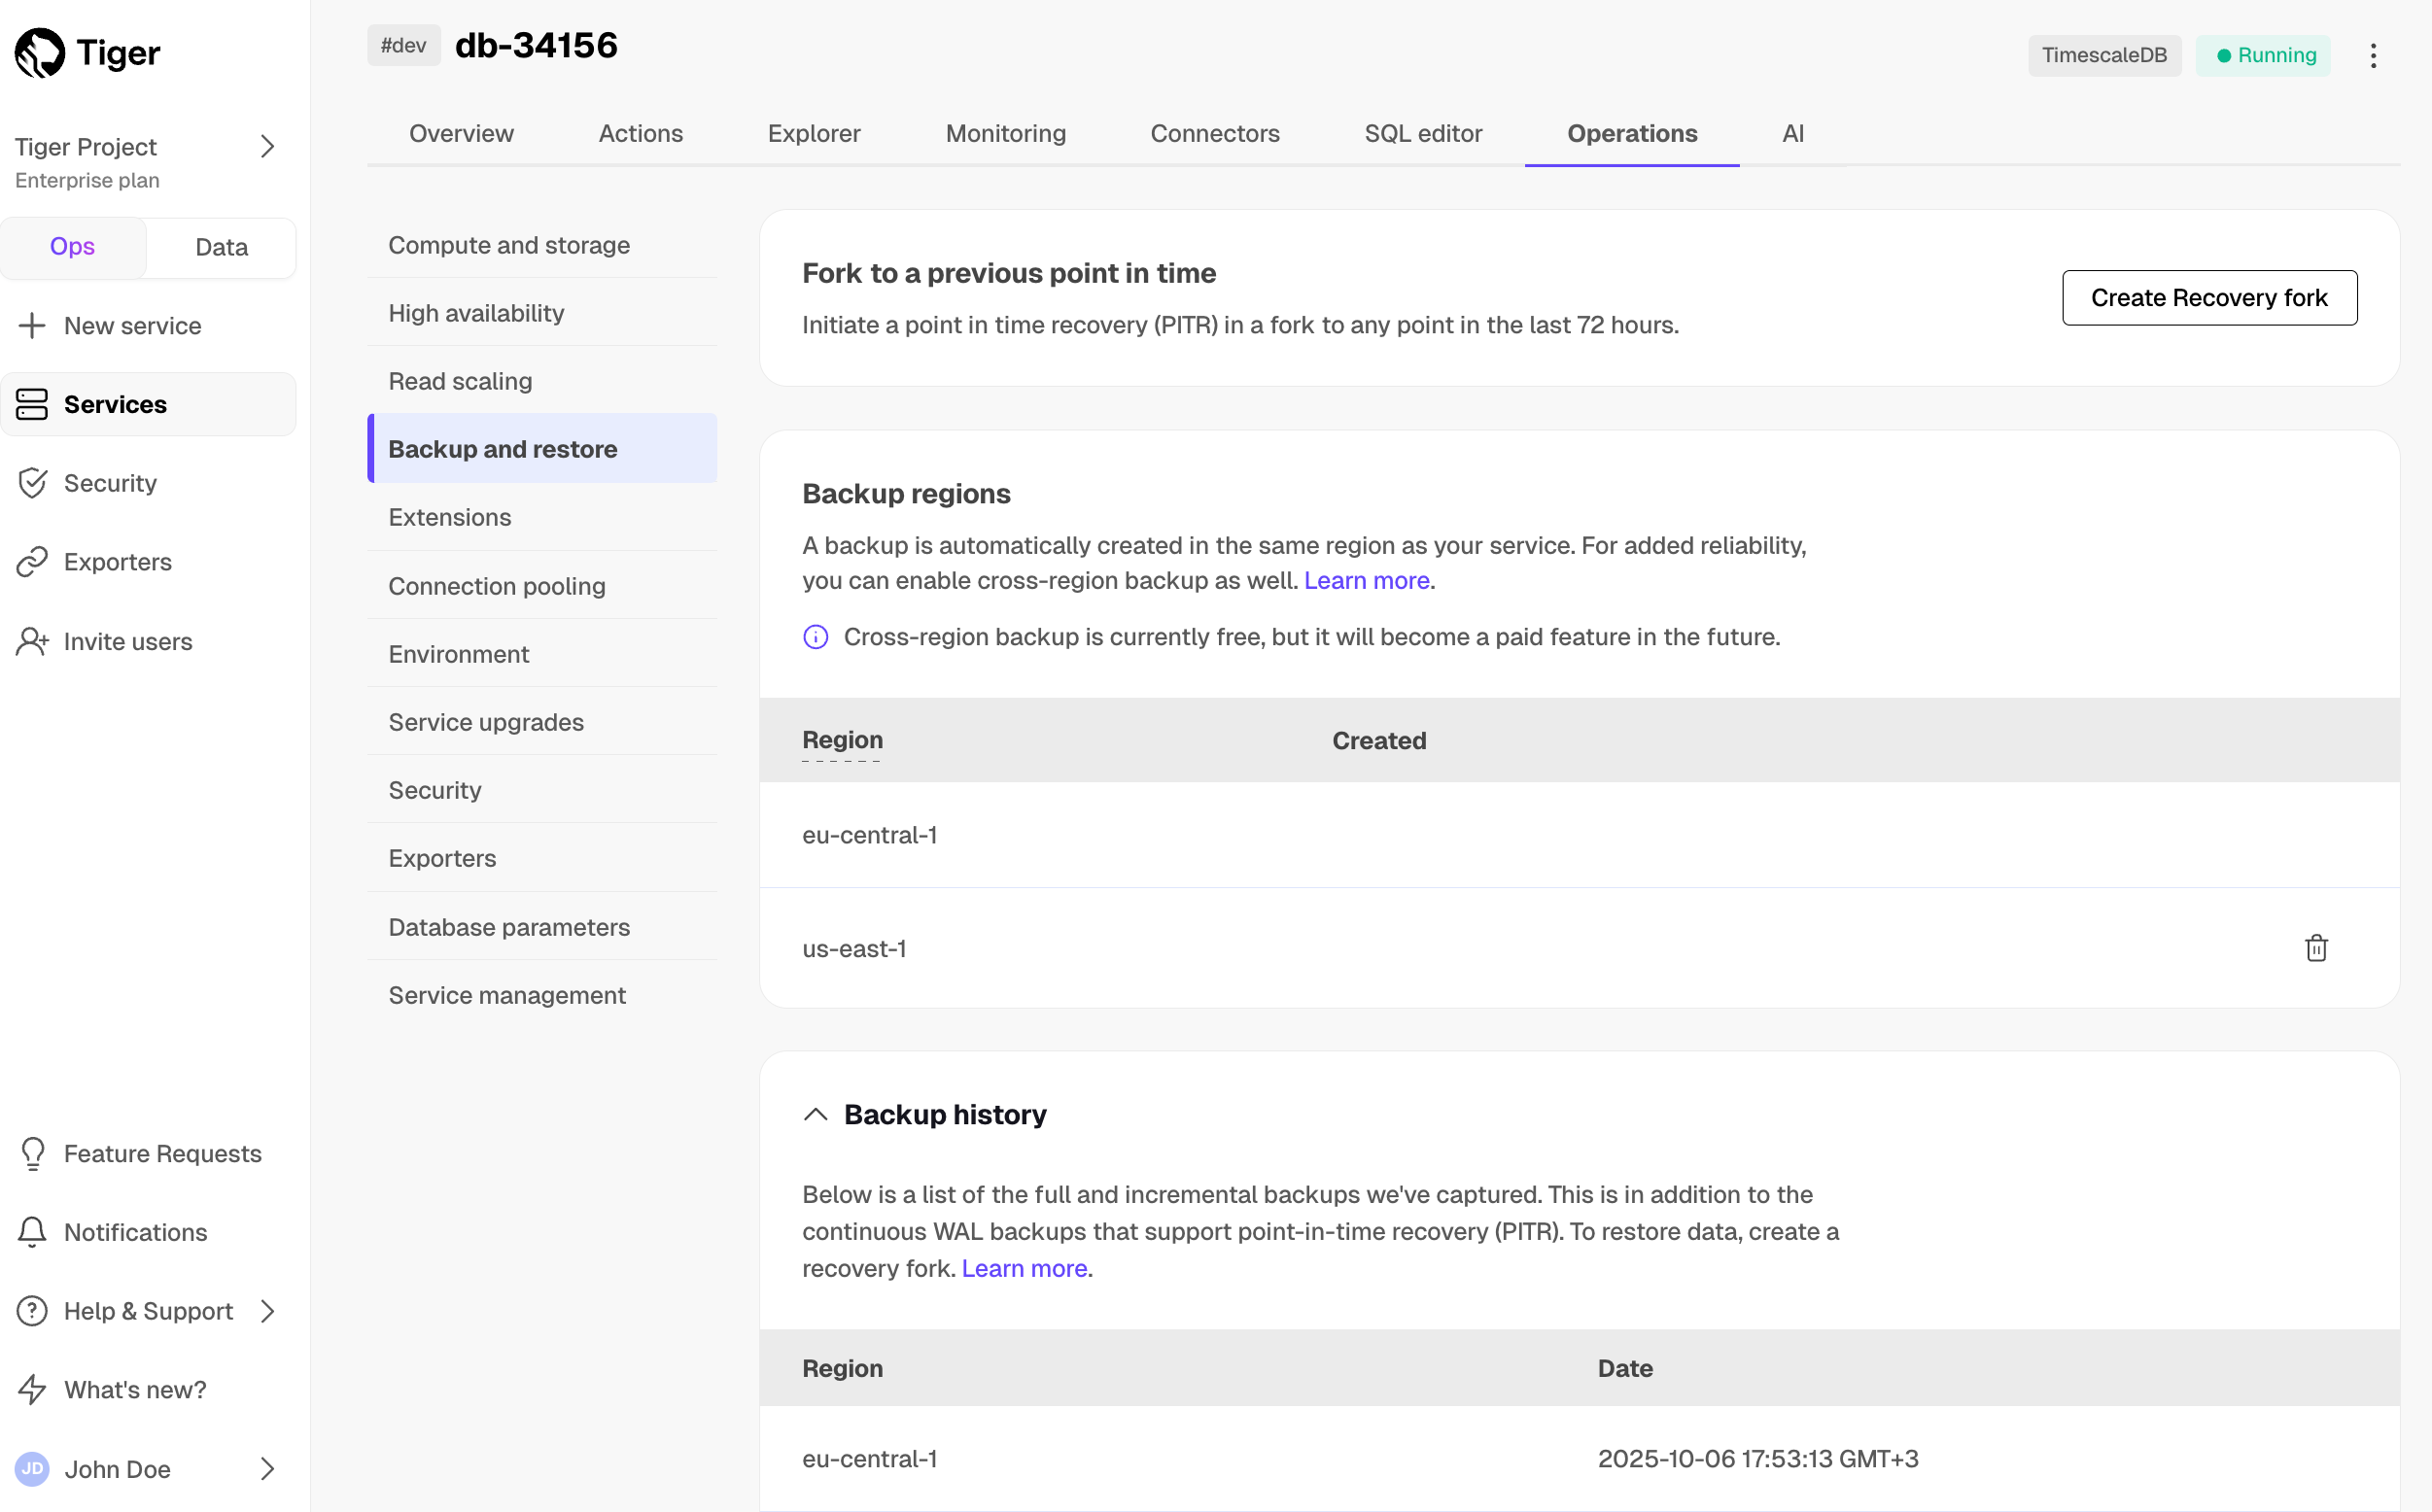
Create a new backup in a different region.
Create a point-in-time recovery fork
To recover your service from a destructive or unwanted action, create a point-in-time recovery fork. You can recover a service to any point within the period [defined by your pricing plan][pricing-and-account-management]. The provision time for the recovery fork is typically less than twenty minutes, but can take longer depending on the amount of WAL to be replayed. The original service stays untouched to avoid losing data created since the time of recovery.
All tiered data remains recoverable during the PITR period. When restoring to any point-in-time recovery fork, your service contains all data that existed at that moment - whether it was stored in high-performance or low-cost storage.
When you restore a recovery fork:
- Data restored from a PITR point is placed into high-performance storage
- The tiered data, as of that point in time, remains in tiered storage
To avoid paying for compute for the recovery fork and the original service, pause the original to only pay storage costs.
You initiate a point-in-time recovery from a same-region or cross-region backup in Tiger Cloud Console:
In [Tiger Cloud Console][console], from the
Serviceslist, ensure the service you want to recover has a status ofRunningorPaused.Navigate to
Operations>Service managementand clickCreate recovery fork.Select the recovery point, ensuring the correct time zone (UTC offset).
Configure the fork.
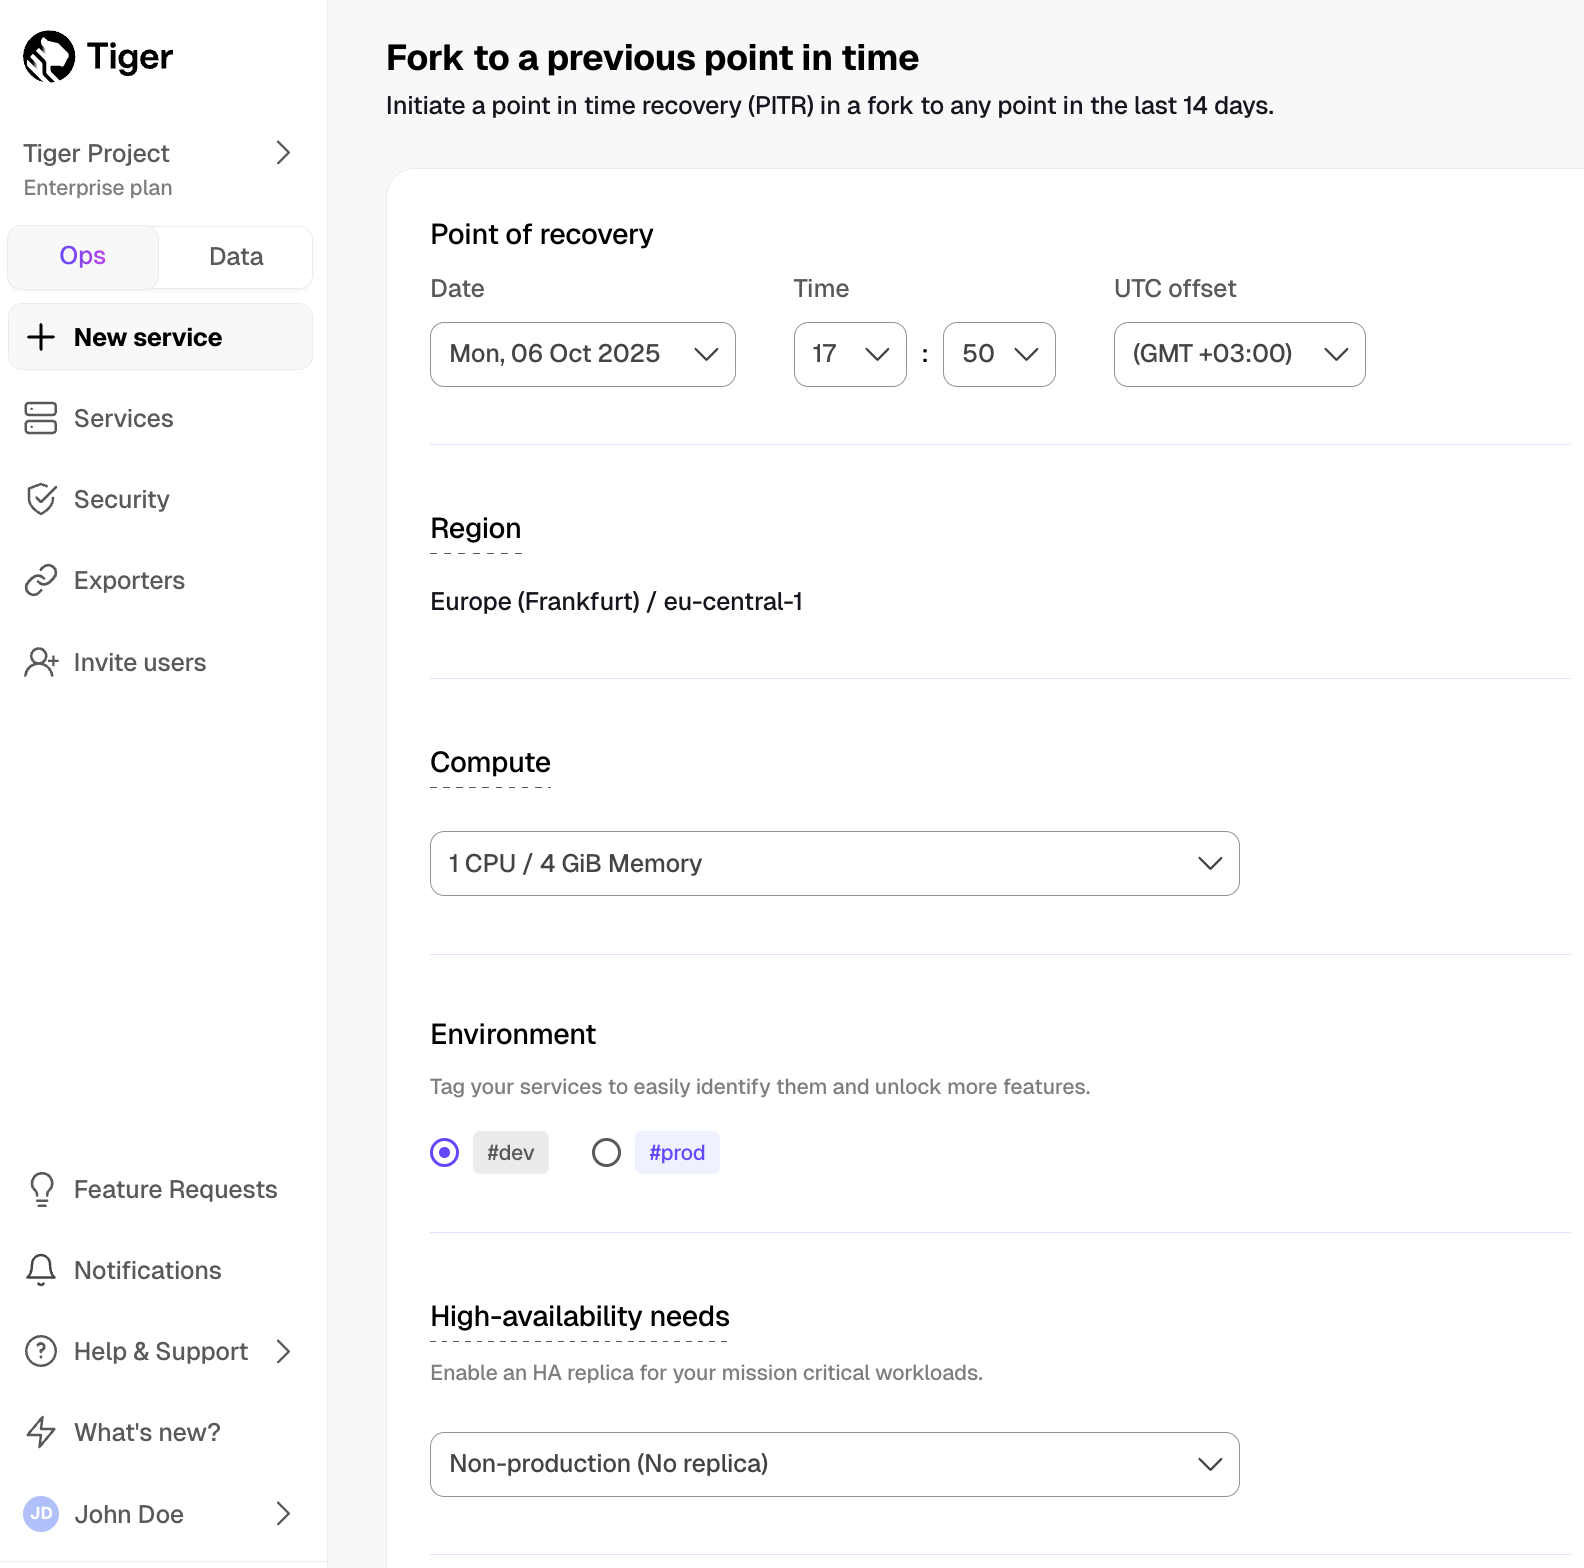
You can configure the compute resources, add an HA replica, tag your fork, and add a connection pooler. Best practice is to match the same configuration you had at the point you want to recover to.
Confirm by clicking
Create recovery fork.A fork of the service is created. The recovered service shows in
Serviceswith a label specifying which service it has been forked from.Update the connection strings in your app
Since the point-in-time recovery is done in a fork, to migrate your application to the point of recovery, change the connection strings in your application to use the fork.
Contact us, and we will assist in recovering your service.
Create a service fork
To manage development forks:
Install Tiger CLI
Use the terminal to install the CLI:
shellcurl -s https://packagecloud.io/install/repositories/timescale/tiger-cli/script.deb.sh | sudo os=any dist=any bash sudo apt-get install tiger-clishellcurl -s https://packagecloud.io/install/repositories/timescale/tiger-cli/script.deb.sh | sudo os=any dist=any bash sudo apt-get install tiger-clishellcurl -s https://packagecloud.io/install/repositories/timescale/tiger-cli/script.rpm.sh | sudo os=rpm_any dist=rpm_any bash sudo yum install tiger-clishellcurl -s https://packagecloud.io/install/repositories/timescale/tiger-cli/script.rpm.sh | sudo os=rpm_any dist=rpm_any bash sudo yum install tiger-clishellbrew install --cask timescale/tap/tiger-clishellcurl -fsSL https://cli.tigerdata.com | shSet up API credentials
Log Tiger CLI into your Tiger Data account:
shelltiger auth loginTiger CLI opens Console in your browser. Log in, then click
Authorize.You can have a maximum of 10 active client credentials. If you get an error, open [credentials][rest-api-credentials] and delete an unused credential.
Select a Tiger Cloud project:
terminaloutputAuth URL is: https://console.cloud.timescale.com/oauth/authorize?client_id=lotsOfURLstuff Opening browser for authentication... Select a project: > 1. Tiger Project (tgrproject) 2. YourCompany (Company wide project) (cpnproject) 3. YourCompany Department (dptproject) Use ↑/↓ arrows or number keys to navigate, enter to select, q to quitIf only one project is associated with your account, this step is not shown.
Where possible, Tiger CLI stores your authentication information in the system keychain/credential manager. If that fails, the credentials are stored in
~/.config/tiger/credentialswith restricted file permissions (600). By default, Tiger CLI stores your configuration in~/.config/tiger/config.yaml.
Test your authenticated connection to Tiger Cloud by listing services
bashtiger service listThis call returns something like:
No services:
terminaloutput🏜️ No services found! Your project is looking a bit empty. 🚀 Ready to get started? Create your first service with: tiger service createOne or more services:
terminaloutput┌────────────┬─────────────────────┬────────┬─────────────┬──────────────┬──────────────────┐ │ SERVICE ID │ NAME │ STATUS │ TYPE │ REGION │ CREATED │ ├────────────┼─────────────────────┼────────┼─────────────┼──────────────┼──────────────────┤ │ tgrservice │ tiger-agent-service │ READY │ TIMESCALEDB │ eu-central-1 │ 2025-09-25 16:09 │ └────────────┴─────────────────────┴────────┴─────────────┴──────────────┴──────────────────┘
Fork the service
shelltiger service fork tgrservice --now --no-wait --name bobBy default a fork matches the resource of the parent Tiger Cloud services. For paid plans specify
--cpuand/or--memoryfor dedicated resources.You see something like:
terminaloutput🍴 Forking service 'tgrservice' to create 'bob' at current state... ✅ Fork request accepted! 📋 New Service ID: <service_id> 🔐 Password saved to system keyring for automatic authentication 🎯 Set service '<service_id>' as default service. ⏳ Service is being forked. Use 'tiger service list' to check status. ┌───────────────────┬──────────────────────────────────────────────────────────────────────────────────────────────────┐ │ PROPERTY │ VALUE │ ├───────────────────┼──────────────────────────────────────────────────────────────────────────────────────────────────┤ │ Service ID │ <service_id> │ │ Name │ bob │ │ Status │ │ │ Type │ TIMESCALEDB │ │ Region │ eu-central-1 │ │ CPU │ 0.5 cores (500m) │ │ Memory │ 2 GB │