Attaching a new data node to a distributed hypertable
On the access node, at the
psqlprompt, add the data node:Attach the new data node to the distributed hypertable:
When you attach a new data node, the partitioning configuration of the distributed hypertable is updated to account for the additional data node, and the number of hash partitions are automatically increased to match. You can prevent this happening by setting the function parameter repartition to FALSE.
Move data between chunks Experimental
When you attach a new data node to a distributed hypertable, you can move existing data in your hypertable to the new node to free up storage on the existing nodes and make better use of the added capacity.
The ability to move chunks between data nodes is an experimental feature that is under active development. We recommend that you do not use this feature in a production environment.
Move data using this query:
The move operation uses a number of transactions, which means that you cannot roll the transaction back automatically if something goes wrong. If a move operation fails, the failure is logged with an operation ID that you can use to clean up any state left on the involved nodes.
Clean up after a failed move using this query. In this example, the operation ID of the failed move is ts_copy_1_31:
Remove a data node
You can also remove data nodes from an existing distributed hypertable.
You cannot remove a data node that still contains data for the distributed hypertable. Before you remove the data node, check that is has had all of its data deleted or moved, or that you have replicated the data on to other data nodes.
Remove a data node using this query. In this example, our distributed hypertable is called conditions:
===== PAGE: https://docs.tigerdata.com/self-hosted/multinode-timescaledb/multinode-administration/ =====
Examples:
Example 1 (sql):
SELECT hypertable_name, data_nodes
FROM timescaledb_information.hypertables
WHERE hypertable_name = 'conditions';
Example 2 (sql):
hypertable_name |              data_nodes
-----------------+---------------------------------------
conditions      | {data_node_1,data_node_2,data_node_3}
Example 3 (sql):
SELECT add_data_node('node3', host => 'dn3.example.com');Example 4 (sql):
SELECT attach_data_node('node3', hypertable => 'hypertable_name');Energy time-series data tutorial - set up dataset
URL: llms-txt#energy-time-series-data-tutorial---set-up-dataset
Contents:
- Prerequisites
- Optimize time-series data in hypertables
- Load energy consumption data
- Create continuous aggregates
- Connect Grafana to Tiger Cloud
This tutorial uses the energy consumption data for over a year in a hypertable named metrics.
To follow the steps on this page:
- Create a target [Tiger Cloud service][create-service] with the Real-time analytics capability.
You need [your connection details][connection-info]. This procedure also works for [self-hosted TimescaleDB][enable-timescaledb].
Optimize time-series data in hypertables
Hypertables are Postgres tables in TimescaleDB that automatically partition your time-series data by time. Time-series data represents the way a system, process, or behavior changes over time. Hypertables enable TimescaleDB to work efficiently with time-series data. Each hypertable is made up of child tables called chunks. Each chunk is assigned a range of time, and only contains data from that range. When you run a query, TimescaleDB identifies the correct chunk and runs the query on it, instead of going through the entire table.
[Hypercore][hypercore] is the hybrid row-columnar storage engine in TimescaleDB used by hypertables. Traditional databases force a trade-off between fast inserts (row-based storage) and efficient analytics (columnar storage). Hypercore eliminates this trade-off, allowing real-time analytics without sacrificing transactional capabilities.
Hypercore dynamically stores data in the most efficient format for its lifecycle:
- Row-based storage for recent data: the most recent chunk (and possibly more) is always stored in the rowstore, ensuring fast inserts, updates, and low-latency single record queries. Additionally, row-based storage is used as a writethrough for inserts and updates to columnar storage.
- Columnar storage for analytical performance: chunks are automatically compressed into the columnstore, optimizing storage efficiency and accelerating analytical queries.
Unlike traditional columnar databases, hypercore allows data to be inserted or modified at any stage, making it a flexible solution for both high-ingest transactional workloads and real-time analytics—within a single database.
Because TimescaleDB is 100% Postgres, you can use all the standard Postgres tables, indexes, stored procedures, and other objects alongside your hypertables. This makes creating and working with hypertables similar to standard Postgres.
- To create a hypertable to store the energy consumption data, call [CREATE TABLE][hypertable-create-table].
If you are self-hosting TimescaleDB v2.19.3 and below, create a [Postgres relational table][pg-create-table], then convert it using [create_hypertable][create_hypertable]. You then enable hypercore with a call to [ALTER TABLE][alter_table_hypercore].
Load energy consumption data
When you have your database set up, you can load the energy consumption data into the metrics hypertable.
This is a large dataset, so it might take a long time, depending on your network connection.
- Download the dataset:
Use your file manager to decompress the downloaded dataset, and take a note of the path to the
metrics.csvfile.At the psql prompt, copy the data from the
metrics.csvfile into your hypertable. Make sure you point to the correct path, if it is not in your current working directory:You can check that the data has been copied successfully with this command:
You should get five records that look like this:
Create continuous aggregates
In modern applications, data usually grows very quickly. This means that aggregating it into useful summaries can become very slow. If you are collecting data very frequently, you might want to aggregate your data into minutes or hours instead. For example, if an IoT device takes temperature readings every second, you might want to find the average temperature for each hour. Every time you run this query, the database needs to scan the entire table and recalculate the average. TimescaleDB makes aggregating data lightning fast, accurate, and easy with continuous aggregates.
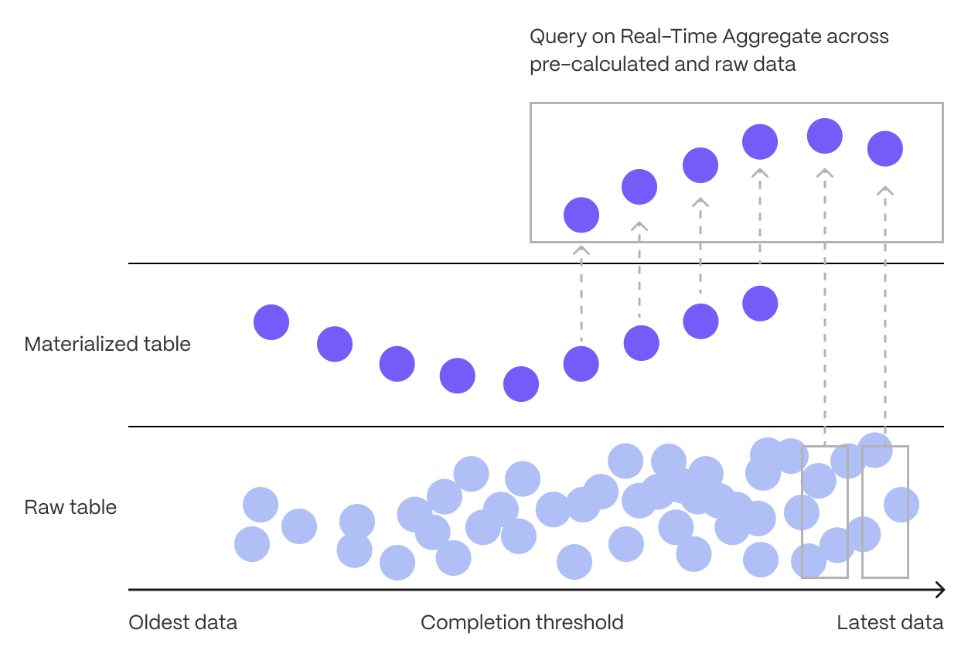
Continuous aggregates in TimescaleDB are a kind of hypertable that is refreshed automatically in the background as new data is added, or old data is modified. Changes to your dataset are tracked, and the hypertable behind the continuous aggregate is automatically updated in the background.
Continuous aggregates have a much lower maintenance burden than regular Postgres materialized views, because the whole view is not created from scratch on each refresh. This means that you can get on with working your data instead of maintaining your database.
Because continuous aggregates are based on hypertables, you can query them in exactly the same way as your other tables. This includes continuous aggregates in the rowstore, compressed into the [columnstore][hypercore], or [tiered to object storage][data-tiering]. You can even create [continuous aggregates on top of your continuous aggregates][hierarchical-caggs], for an even more fine-tuned aggregation.
[Real-time aggregation][real-time-aggregation] enables you to combine pre-aggregated data from the materialized view with the most recent raw data. This gives you up-to-date results on every query. In TimescaleDB v2.13 and later, real-time aggregates are DISABLED by default. In earlier versions, real-time aggregates are ENABLED by default; when you create a continuous aggregate, queries to that view include the results from the most recent raw data.
Monitor energy consumption on a day-to-day basis
Create a continuous aggregate
kwh_day_by_dayfor energy consumption:Add a refresh policy to keep
kwh_day_by_dayup-to-date:Monitor energy consumption on an hourly basis
Create a continuous aggregate
kwh_hour_by_hourfor energy consumption:Add a refresh policy to keep the continuous aggregate up-to-date:
Analyze your data
Now you have made continuous aggregates, it could be a good idea to use them to perform analytics on your data. For example, to see how average energy consumption changes during weekdays over the last year, run the following query:
You see something like:
| day | ordinal | value | | --- | ------- | ----- | | Mon | 2 | 23.08078714975423 | | Sun | 1 | 19.511430831944395 | | Tue | 3 | 25.003118897837307 | | Wed | 4 | 8.09300571759772 |
Connect Grafana to Tiger Cloud
To visualize the results of your queries, enable Grafana to read the data in your service:
- Log in to Grafana
In your browser, log in to either: - Self-hosted Grafana: at http://localhost:3000/. The default credentials are admin, admin. - Grafana Cloud: use the URL and credentials you set when you created your account.
- Add your service as a data source
- Open
Connections>Data sources, then clickAdd new data source. - Select
PostgreSQLfrom the list. - Configure the connection:
Host URL,Database name,Username, andPassword
- Open
Configure using your [connection details][connection-info]. Host URL is in the format <host>:<port>. - TLS/SSL Mode: select require. - PostgreSQL options: enable TimescaleDB. - Leave the default setting for all other fields.
- Click
Save & test.
Grafana checks that your details are set correctly.
===== PAGE: https://docs.tigerdata.com/tutorials/energy-data/query-energy/ =====
Examples:
Example 1 (sql):
CREATE TABLE "metrics"(
        created timestamp with time zone default now() not null,
        type_id integer                                not null,
        value   double precision                       not null
    ) WITH (
       tsdb.hypertable,
       tsdb.partition_column='time'
    );
Example 2 (sql):
\COPY metrics FROM metrics.csv CSV;Example 3 (sql):
SELECT * FROM metrics LIMIT 5;Example 4 (sql):
created            | type_id | value
   -------------------------------+---------+-------
    2023-05-31 23:59:59.043264+00 |      13 |  1.78
    2023-05-31 23:59:59.042673+00 |       2 |   126
    2023-05-31 23:59:59.042667+00 |      11 |  1.79
    2023-05-31 23:59:59.042623+00 |      23 | 0.408
    2023-05-31 23:59:59.042603+00 |      12 |  0.96
create_hypertable()
URL: llms-txt#create_hypertable()
Contents:
- Samples
- Required arguments
- Optional arguments
- Returns
- Units
This page describes the hypertable API supported prior to TimescaleDB v2.13. Best practice is to use the new [create_hypertable][api-create-hypertable] interface.
Creates a TimescaleDB hypertable from a Postgres table (replacing the latter), partitioned on time and with the option to partition on one or more other columns. The Postgres table cannot be an already partitioned table (declarative partitioning or inheritance). In case of a non-empty table, it is possible to migrate the data during hypertable creation using the migrate_data option, although this might take a long time and has certain limitations when the table contains foreign key constraints (see below).
After creation, all actions, such as ALTER TABLE, SELECT, etc., still work on the resulting hypertable.
For more information about using hypertables, including chunk size partitioning, see the [hypertable section][hypertable-docs].
Convert table conditions to hypertable with just time partitioning on column time:
Convert table conditions to hypertable, setting chunk_time_interval to 24 hours.
Convert table conditions to hypertable. Do not raise a warning if conditions is already a hypertable:
Time partition table measurements on a composite column type report using a time partitioning function. Requires an immutable function that can convert the column value into a supported column value:
Time partition table events, on a column type jsonb (event), which has a top level key (started) containing an ISO 8601 formatted timestamp:
Required arguments
| Name | Type | Description |
|---|---|---|
relation | REGCLASS | Identifier of table to convert to hypertable. |
time_column_name | REGCLASS | Name of the column containing time values as well as the primary column to partition by. |
Optional arguments
| Name | Type | Description |
|---|---|---|
partitioning_column | REGCLASS | Name of an additional column to partition by. If provided, the number_partitions argument must also be provided. |
number_partitions | INTEGER | Number of [hash partitions][hash-partitions] to use for partitioning_column. Must be > 0. |
chunk_time_interval | INTERVAL | Event time that each chunk covers. Must be > 0. Default is 7 days. |
create_default_indexes | BOOLEAN | Whether to create default indexes on time/partitioning columns. Default is TRUE. |
if_not_exists | BOOLEAN | Whether to print warning if table already converted to hypertable or raise exception. Default is FALSE. |
partitioning_func | REGCLASS | The function to use for calculating a value's partition. |
associated_schema_name | REGCLASS | Name of the schema for internal hypertable tables. Default is _timescaledb_internal. |
associated_table_prefix | TEXT | Prefix for internal hypertable chunk names. Default is _hyper. |
migrate_data | BOOLEAN | Set to TRUE to migrate any existing data from the relation table to chunks in the new hypertable. A non-empty table generates an error without this option. Large tables may take significant time to migrate. Defaults to FALSE. |
time_partitioning_func | REGCLASS | Function to convert incompatible primary time column values to compatible ones. The function must be IMMUTABLE. |
replication_factor | INTEGER | Replication factor to use with distributed hypertable. If not provided, value is determined by the timescaledb.hypertable_replication_factor_default GUC. |
data_nodes | ARRAY | This is the set of data nodes that are used for this table if it is distributed. This has no impact on non-distributed hypertables. If no data nodes are specified, a distributed hypertable uses all data nodes known by this instance. |
distributed | BOOLEAN | Set to TRUE to create distributed hypertable. If not provided, value is determined by the timescaledb.hypertable_distributed_default GUC. When creating a distributed hypertable, consider using [create_distributed_hypertable][create_distributed_hypertable] in place of create_hypertable. Default is NULL. |
| Column | Type | Description |
|---|---|---|
hypertable_id | INTEGER | ID of the hypertable in TimescaleDB. |
schema_name | TEXT | Schema name of the table converted to hypertable. |
table_name | TEXT | Table name of the table converted to hypertable. |
created | BOOLEAN | TRUE if the hypertable was created, FALSE when if_not_exists is true and no hypertable was created. |
If you use SELECT * FROM create_hypertable(...) you get the return value formatted as a table with column headings.
The use of the migrate_data argument to convert a non-empty table can lock the table for a significant amount of time, depending on how much data is in the table. It can also run into deadlock if foreign key constraints exist to other tables.
When converting a normal SQL table to a hypertable, pay attention to how you handle constraints. A hypertable can contain foreign keys to normal SQL table columns, but the reverse is not allowed. UNIQUE and PRIMARY constraints must include the partitioning key.
The deadlock is likely to happen when concurrent transactions simultaneously try to insert data into tables that are referenced in the foreign key constraints and into the converting table itself. The deadlock can be prevented by manually obtaining SHARE ROW EXCLUSIVE lock on the referenced tables before calling create_hypertable in the same transaction, see Postgres documentation for the syntax.
The time column supports the following data types:
| Description | Types |
|---|---|
| Timestamp | TIMESTAMP, TIMESTAMPTZ |
| Date | DATE |
| Integer | SMALLINT, INT, BIGINT |
The type flexibility of the 'time' column allows the use of non-time-based values as the primary chunk partitioning column, as long as those values can increment.
For incompatible data types (for example, jsonb) you can specify a function to the time_partitioning_func argument which can extract a compatible data type.
The units of chunk_time_interval should be set as follows:
- For time columns having timestamp or DATE types, the
chunk_time_intervalshould be specified either as anintervaltype or an integral value in microseconds. - For integer types, the
chunk_time_intervalmust be set explicitly, as the database does not otherwise understand the semantics of what each integer value represents (a second, millisecond, nanosecond, etc.). So if your time column is the number of milliseconds since the UNIX epoch, and you wish to have each chunk cover 1 day, you should specifychunk_time_interval => 86400000.
In case of hash partitioning (in other words, if number_partitions is greater than zero), it is possible to optionally specify a custom partitioning function. If no custom partitioning function is specified, the default partitioning function is used. The default partitioning function calls Postgres's internal hash function for the given type, if one exists. Thus, a custom partitioning function can be used for value types that do not have a native Postgres hash function. A partitioning function should take a single anyelement type argument and return a positive integer hash value. Note that this hash value is not a partition ID, but rather the inserted value's position in the dimension's key space, which is then divided across the partitions.
The time column in create_hypertable must be defined as NOT NULL. If this is not already specified on table creation, create_hypertable automatically adds this constraint on the table when it is executed.
===== PAGE: https://docs.tigerdata.com/api/hypertable/set_chunk_time_interval/ =====
Examples:
Example 1 (sql):
SELECT create_hypertable('conditions', 'time');Example 2 (sql):
SELECT create_hypertable('conditions', 'time', chunk_time_interval => 86400000000);
SELECT create_hypertable('conditions', 'time', chunk_time_interval => INTERVAL '1 day');
Example 3 (sql):
SELECT create_hypertable('conditions', 'time', if_not_exists => TRUE);Example 4 (sql):
CREATE TYPE report AS (reported timestamp with time zone, contents jsonb);

CREATE FUNCTION report_reported(report)
  RETURNS timestamptz
  LANGUAGE SQL
  IMMUTABLE AS
  'SELECT $1.reported';

SELECT create_hypertable('measurements', 'report', time_partitioning_func => 'report_reported');
hypertable_approximate_size()
URL: llms-txt#hypertable_approximate_size()
Contents:
- Samples
- Required arguments
- Returns
Get the approximate total disk space used by a hypertable or continuous aggregate, that is, the sum of the size for the table itself including chunks, any indexes on the table, and any toast tables. The size is reported in bytes. This is equivalent to computing the sum of total_bytes column from the output of hypertable_approximate_detailed_size function.
When a continuous aggregate name is provided, the function transparently looks up the backing hypertable and returns its statistics instead.
This function relies on the per backend caching using the in-built Postgres storage manager layer to compute the approximate size cheaply. The PG cache invalidation clears off the cached size for a chunk when DML happens into it. That size cache is thus able to get the latest size in a matter of minutes. Also, due to the backend caching, any long running session will only fetch latest data for new or modified chunks and can use the cached data (which is calculated afresh the first time around) effectively for older chunks. Thus it is recommended to use a single connected Postgres backend session to compute the approximate sizes of hypertables to get faster results.
For more information about using hypertables, including chunk size partitioning, see the [hypertable section][hypertable-docs].
Get the approximate size information for a hypertable.
Get the approximate size information for all hypertables.
Get the approximate size information for a continuous aggregate.
Required arguments
| Name | Type | Description |
|---|---|---|
hypertable | REGCLASS | Hypertable or continuous aggregate to show size of. |
| Name | Type | Description |
|---|---|---|
| hypertable_approximate_size | BIGINT | Total approximate disk space used by the specified hypertable, including all indexes and TOAST data |
NULL is returned if the function is executed on a non-hypertable relation.
===== PAGE: https://docs.tigerdata.com/api/hypertable/split_chunk/ =====
Examples:
Example 1 (sql):
SELECT * FROM hypertable_approximate_size('devices');
 hypertable_approximate_size
-----------------------------
                        8192
Example 2 (sql):
SELECT hypertable_name, hypertable_approximate_size(format('%I.%I', hypertable_schema, hypertable_name)::regclass)
  FROM timescaledb_information.hypertables;
Example 3 (sql):
SELECT hypertable_approximate_size('device_stats_15m');

 hypertable_approximate_size
-----------------------------
                        8192
decompress_chunk()
URL: llms-txt#decompress_chunk()
Contents:
- Samples
- Required arguments
- Optional arguments
- Returns
Old API since TimescaleDB v2.18.0 Replaced by <a href="https://docs.tigerdata.com/api/latest/hypercore/convert_to_rowstore/">convert_to_rowstore()</a>.
Before decompressing chunks, stop any compression policy on the hypertable you are decompressing. You can use SELECT alter_job(JOB_ID, scheduled => false); to prevent scheduled execution.
Decompress a single chunk:
Decompress all compressed chunks in a hypertable named metrics:
Required arguments
| Name | Type | Description |
|---|---|---|
chunk_name | REGCLASS | Name of the chunk to be decompressed. |
Optional arguments
| Name | Type | Description |
|---|---|---|
if_compressed | BOOLEAN | Disabling this will make the function error out on chunks that are not compressed. Defaults to true. |
| Column | Type | Description |
|---|---|---|
decompress_chunk | REGCLASS | Name of the chunk that was decompressed. |
===== PAGE: https://docs.tigerdata.com/api/compression/remove_compression_policy/ =====
Examples:
Example 1 (unknown):
Decompress all compressed chunks in a hypertable named `metrics`:detach_chunk()
URL: llms-txt#detach_chunk()
Contents:
- Samples
- Arguments
- Returns
Separate a chunk from a [hypertable][hypertables-section].
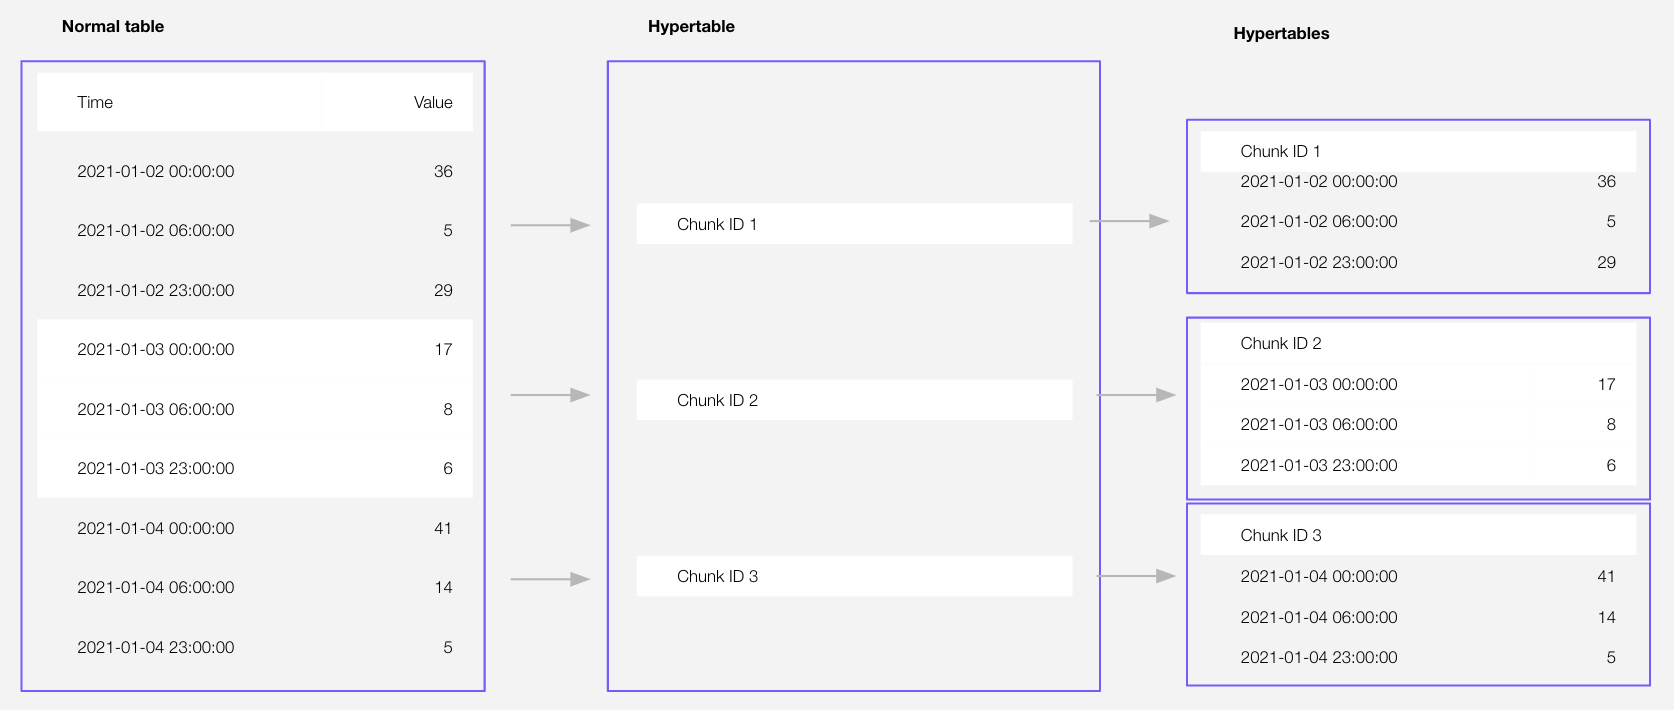
chunk becomes a standalone hypertable with the same name and schema. All existing constraints and indexes on chunk are preserved after detaching. Foreign keys are dropped.
In this initial release, you cannot detach a chunk that has been [converted to the columnstore][setup-hypercore].
Since TimescaleDB v2.21.0
Detach a chunk from a hypertable:
| Name | Type | Description |
|---|---|---|
chunk | REGCLASS | Name of the chunk to detach. |
This function returns void.
===== PAGE: https://docs.tigerdata.com/api/hypertable/attach_tablespace/ =====
Examples:
Example 1 (sql):
CALL detach_chunk('_timescaledb_internal._hyper_1_2_chunk');detach_data_node()
URL: llms-txt#detach_data_node()
Contents:
- Required arguments
- Optional arguments
- Returns
- Errors
- Sample usage
[Multi-node support is sunsetted][multi-node-deprecation].
TimescaleDB v2.13 is the last release that includes multi-node support for Postgres versions 13, 14, and 15.
Detach a data node from one hypertable or from all hypertables.
Reasons for detaching a data node include:
- A data node should no longer be used by a hypertable and needs to be removed from all hypertables that use it
- You want to have fewer data nodes for a distributed hypertable to partition across
Required arguments
| Name | Type | Description |
|---|---|---|
node_name | TEXT | Name of data node to detach from the distributed hypertable |
Optional arguments
| Name | Type | Description |
|---|---|---|
hypertable | REGCLASS | Name of the distributed hypertable where the data node should be detached. If NULL, the data node is detached from all hypertables. |
if_attached | BOOLEAN | Prevent error if the data node is not attached. Defaults to false. |
force | BOOLEAN | Force detach of the data node even if that means that the replication factor is reduced below what was set. Note that it is never allowed to reduce the replication factor below 1 since that would cause data loss. |
repartition | BOOLEAN | Make the number of hash partitions equal to the new number of data nodes (if such partitioning exists). This ensures that the remaining data nodes are used evenly. Defaults to true. |
The number of hypertables the data node was detached from.
Detaching a node is not permitted:
- If it would result in data loss for the hypertable due to the data node containing chunks that are not replicated on other data nodes
- If it would result in under-replicated chunks for the distributed hypertable (without the
forceargument)
Replication is currently experimental, and not a supported feature
Detaching a data node is under no circumstances possible if that would mean data loss for the hypertable. Nor is it possible to detach a data node, unless forced, if that would mean that the distributed hypertable would end up with under-replicated chunks.
The only safe way to detach a data node is to first safely delete any data on it or replicate it to another data node.
Detach data node dn3 from conditions:
===== PAGE: https://docs.tigerdata.com/api/distributed-hypertables/set_replication_factor/ =====
Examples:
Example 1 (sql):
SELECT detach_data_node('dn3', 'conditions');cleanup_copy_chunk_operation()
URL: llms-txt#cleanup_copy_chunk_operation()
Contents:
- Required arguments
- Sample usage
[Multi-node support is sunsetted][multi-node-deprecation].
TimescaleDB v2.13 is the last release that includes multi-node support for Postgres versions 13, 14, and 15.
You can [copy][copy_chunk] or [move][move_chunk] a chunk to a new location within a multi-node environment. The operation happens over multiple transactions so, if it fails, it is manually cleaned up using this function. Without cleanup, the failed operation might hold a replication slot open, which in turn prevents storage from being reclaimed. The operation ID is logged in case of a failed copy or move operation and is required as input to the cleanup function.
Experimental features could have bugs. They might not be backwards compatible, and could be removed in future releases. Use these features at your own risk, and do not use any experimental features in production.
Required arguments
| Name | Type | Description |
|---|---|---|
operation_id | NAME | ID of the failed operation |
Clean up a failed operation:
Get a list of running copy or move operations:
===== PAGE: https://docs.tigerdata.com/api/distributed-hypertables/create_distributed_restore_point/ =====
Examples:
Example 1 (sql):
CALL timescaledb_experimental.cleanup_copy_chunk_operation('ts_copy_1_31');Example 2 (sql):
SELECT * FROM _timescaledb_catalog.chunk_copy_operation;Enforce constraints with unique indexes
URL: llms-txt#enforce-constraints-with-unique-indexes
Contents:
- Create a hypertable and add unique indexes
- Create a hypertable from an existing table with unique indexes
You use unique indexes on a hypertable to enforce [constraints][constraints]. If you have a primary key, you have a unique index. In Postgres, a primary key is a unique index with a NOT NULL constraint.
You do not need to have a unique index on your hypertables. When you create a unique index, it must contain all the partitioning columns of the hypertable.
Create a hypertable and add unique indexes
To create a unique index on a hypertable:
- Determine the partitioning columns
Before you create a unique index, you need to determine which unique indexes are allowed on your hypertable. Begin by identifying your partitioning columns.
TimescaleDB traditionally uses the following columns to partition hypertables:
- The
timecolumn used to create the hypertable. Every TimescaleDB hypertable is partitioned by time. - Any space-partitioning columns. Space partitions are optional and not included in every hypertable.
- Create a hypertable
Create a [hypertable][hypertables-section] for your time-series data using [CREATE TABLE][hypertable-create-table]. For [efficient queries][secondary-indexes] on data in the columnstore, remember to segmentby the column you will use most often to filter your data. For example:
If you are self-hosting TimescaleDB v2.19.3 and below, create a [Postgres relational table][pg-create-table], then convert it using [create_hypertable][create_hypertable]. You then enable hypercore with a call to [ALTER TABLE][alter_table_hypercore].
- Create a unique index on the hypertable
When you create a unique index on a hypertable, it must contain all the partitioning columns. It may contain other columns as well, and they may be arranged in any order. You cannot create a unique index without time, because time is a partitioning column.
Create a unique index on
timeanddevice_idwith a call toCREATE UNIQUE INDEX:Create a unique index on
time,user_id, anddevice_id.
device_id is not a partitioning column, but this still works:
This restriction is necessary to guarantee global uniqueness in the index.
Create a hypertable from an existing table with unique indexes
If you create a unique index on a table before turning it into a hypertable, the same restrictions apply in reverse. You can only partition the table by columns in your unique index.
Create a relational table
Create a unique index on the table
For example, on device_id and time:
- Turn the table into a partitioned hypertable
- On
timeanddevice_id:
You get an error if you try to turn the relational table into a hypertable partitioned by time and user_id. This is because user_id is not part of the UNIQUE INDEX. To fix the error, add user_id to your unique index.
===== PAGE: https://docs.tigerdata.com/use-timescale/hypertables/hypertable-crud/ =====
Examples:
Example 1 (sql):
CREATE TABLE hypertable_example(
        time TIMESTAMPTZ,
        user_id BIGINT,
        device_id BIGINT,
        value FLOAT
      ) WITH (
        tsdb.hypertable,
        tsdb.partition_column='time',
        tsdb.segmentby = 'device_id',
        tsdb.orderby = 'time DESC'
      );
Example 2 (sql):
CREATE UNIQUE INDEX idx_deviceid_time
        ON hypertable_example(device_id, time);
Example 3 (sql):
CREATE UNIQUE INDEX idx_userid_deviceid_time
       ON hypertable_example(user_id, device_id, time);
Example 4 (sql):
CREATE TABLE another_hypertable_example(
      time TIMESTAMPTZ,
      user_id BIGINT,
      device_id BIGINT,
      value FLOAT
    );
timescaledb_information.compression_settings
URL: llms-txt#timescaledb_information.compression_settings
Contents:
- Samples
- Available columns
This view exists for backwards compatibility. The supported views to retrieve information about compression are:
- [timescaledb_information.hypertable_compression_settings][hypertable_compression_settings]
- [timescaledb_information.chunk_compression_settings][chunk_compression_settings].
This section describes a feature that is deprecated. We strongly recommend that you do not use this feature in a production environment. If you need more information, contact us.
Get information about compression-related settings for hypertables. Each row of the view provides information about individual orderby and segmentby columns used by compression.
How you use segmentby is the single most important thing for compression. It affects compresion rates, query performance, and what is compressed or decompressed by mutable compression.
The by_range dimension builder is an addition to TimescaleDB 2.13.
| Name | Type | Description |
|---|---|---|
hypertable_schema | TEXT | Schema name of the hypertable |
hypertable_name | TEXT | Table name of the hypertable |
attname | TEXT | Name of the column used in the compression settings |
segmentby_column_index | SMALLINT | Position of attname in the compress_segmentby list |
orderby_column_index | SMALLINT | Position of attname in the compress_orderby list |
orderby_asc | BOOLEAN | True if this is used for order by ASC, False for order by DESC |
orderby_nullsfirst | BOOLEAN | True if nulls are ordered first for this column, False if nulls are ordered last |
===== PAGE: https://docs.tigerdata.com/api/informational-views/dimensions/ =====
Examples:
Example 1 (sql):
CREATE TABLE hypertab (a_col integer, b_col integer, c_col integer, d_col integer, e_col integer);
SELECT table_name FROM create_hypertable('hypertab', by_range('a_col', 864000000));

ALTER TABLE hypertab SET (timescaledb.compress, timescaledb.compress_segmentby = 'a_col,b_col',
  timescaledb.compress_orderby = 'c_col desc, d_col asc nulls last');

SELECT * FROM timescaledb_information.compression_settings WHERE hypertable_name = 'hypertab';

-[ RECORD 1 ]----------+---------
hypertable_schema      | public
hypertable_name        | hypertab
attname                | a_col
segmentby_column_index | 1
orderby_column_index   |
orderby_asc            |
orderby_nullsfirst     |
-[ RECORD 2 ]----------+---------
hypertable_schema      | public
hypertable_name        | hypertab
attname                | b_col
segmentby_column_index | 2
orderby_column_index   |
orderby_asc            |
orderby_nullsfirst     |
-[ RECORD 3 ]----------+---------
hypertable_schema      | public
hypertable_name        | hypertab
attname                | c_col
segmentby_column_index |
orderby_column_index   | 1
orderby_asc            | f
orderby_nullsfirst     | t
-[ RECORD 4 ]----------+---------
hypertable_schema      | public
hypertable_name        | hypertab
attname                | d_col
segmentby_column_index |
orderby_column_index   | 2
orderby_asc            | t
orderby_nullsfirst     | f
Hypertables
URL: llms-txt#hypertables
Contents:
- Partition by time
- Time partitioning
- Best practices for scaling and partitioning
- Hypertable indexes
- Partition by dimension
Tiger Cloud supercharges your real-time analytics by letting you run complex queries continuously, with near-zero latency. Under the hood, this is achieved by using hypertables—Postgres tables that automatically partition your time-series data by time and optionally by other dimensions. When you run a query, Tiger Cloud identifies the correct partition, called chunk, and runs the query on it, instead of going through the entire table.
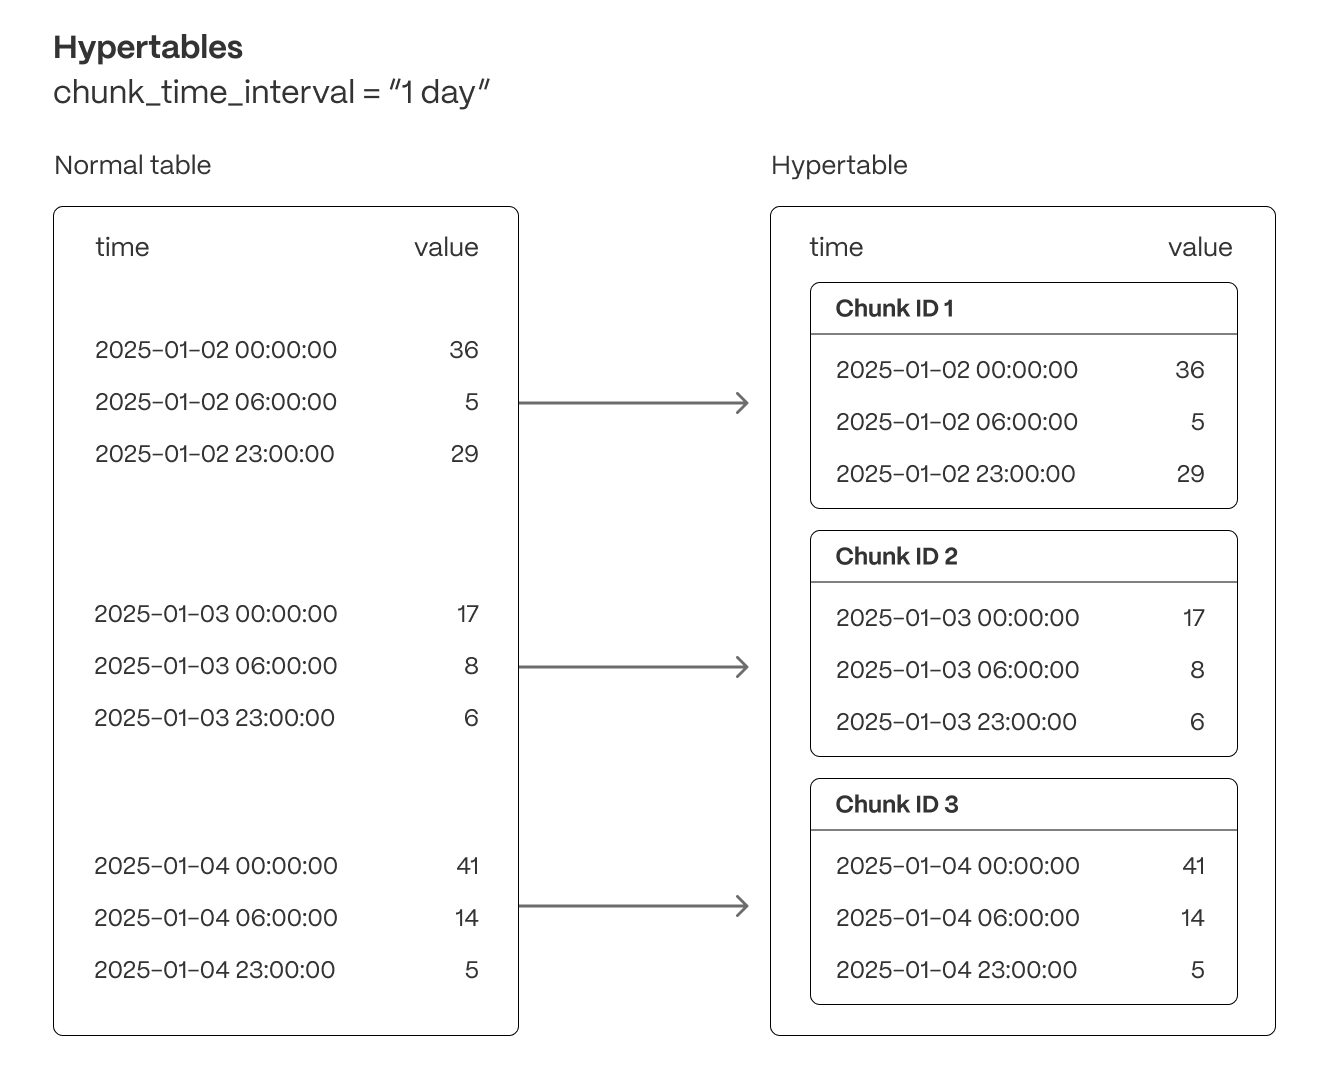
Hypertables offer the following benefits:
Efficient data management with [automated partitioning by time][chunk-size]: Tiger Cloud splits your data into chunks that hold data from a specific time range. For example, one day or one week. You can configure this range to better suit your needs.
Better performance with [strategic indexing][hypertable-indexes]: an index on time in the descending order is automatically created when you create a hypertable. More indexes are created on the chunk level, to optimize performance. You can create additional indexes, including unique indexes, on the columns you need.
Faster queries with [chunk skipping][chunk-skipping]: Tiger Cloud skips the chunks that are irrelevant in the context of your query, dramatically reducing the time and resources needed to fetch results. Even more—you can enable chunk skipping on non-partitioning columns.
Advanced data analysis with [hyperfunctions][hyperfunctions]: Tiger Cloud enables you to efficiently process, aggregate, and analyze significant volumes of data while maintaining high performance.
To top it all, there is no added complexity—you interact with hypertables in the same way as you would with regular Postgres tables. All the optimization magic happens behind the scenes.
Inheritance is not supported for hypertables and may lead to unexpected behavior.
Each hypertable is partitioned into child hypertables called chunks. Each chunk is assigned a range of time, and only contains data from that range.