Time partitioning
Typically, you partition hypertables on columns that hold time values. [Best practice is to use timestamptz][timestamps-best-practice] column type. However, you can also partition on date, integer, timestamp and [UUIDv7][uuidv7_functions] types.
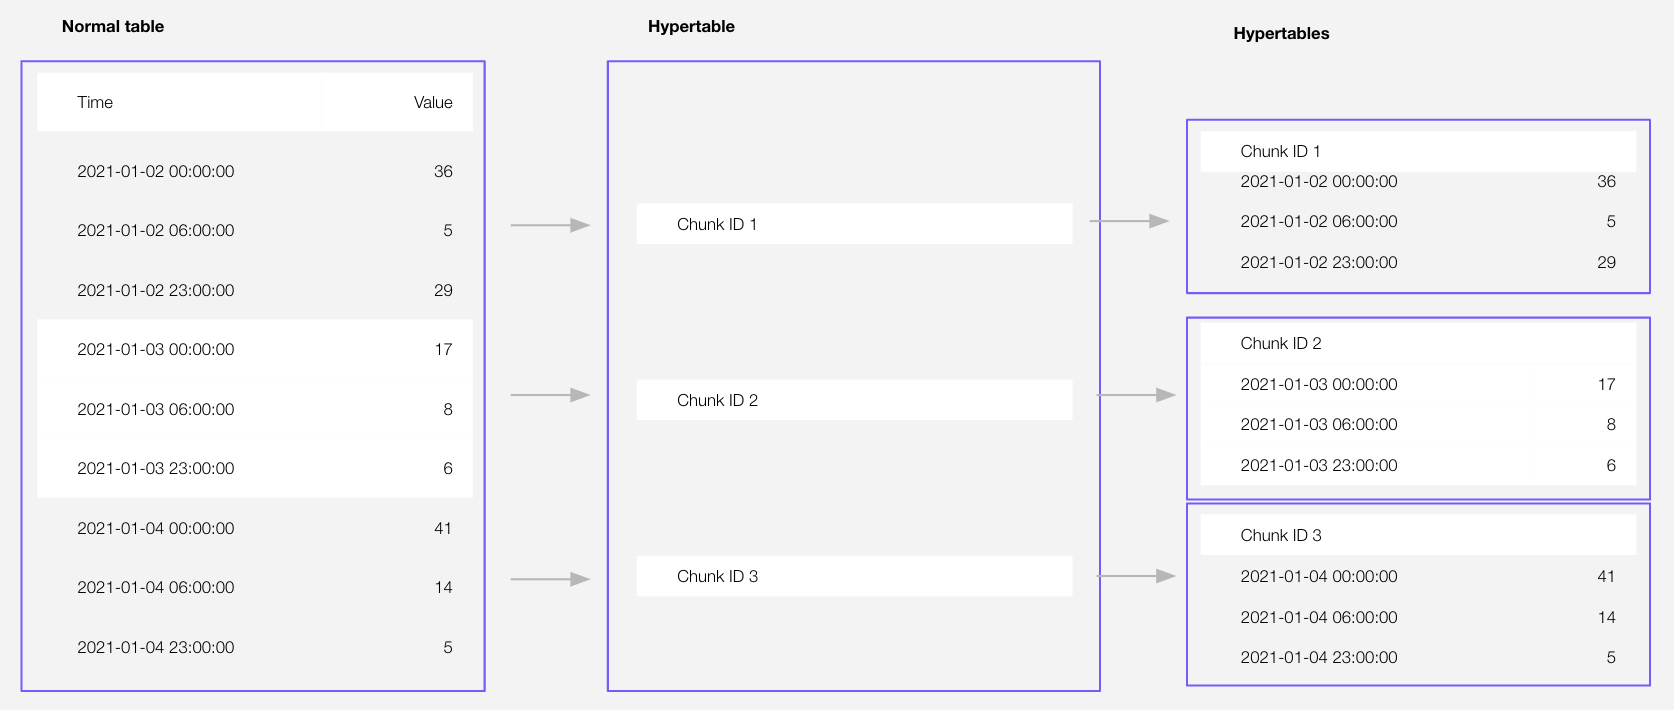
By default, each hypertable chunk holds data for 7 days. You can change this to better suit your needs. For example, if you set chunk_interval to 1 day, each chunk stores data for a single day.
TimescaleDB divides time into potential chunk ranges, based on the chunk_interval. Each hypertable chunk holds data for a specific time range only. When you insert data from a time range that doesn't yet have a chunk, TimescaleDB automatically creates a chunk to store it.
In practice, this means that the start time of your earliest chunk does not necessarily equal the earliest timestamp in your hypertable. Instead, there might be a time gap between the start time and the earliest timestamp. This doesn't affect your usual interactions with your hypertable, but might affect the number of chunks you see when inspecting it.
Best practices for scaling and partitioning
Best practices for maintaining a high performance when scaling include:
- Limit the number of hypertables in your service; having tens of thousands of hypertables is not recommended.
- Choose a strategic chunk size.
Chunk size affects insert and query performance. You want a chunk small enough to fit into memory so you can insert and query recent data without reading from disk. However, having too many small and sparsely filled chunks can affect query planning time and compression. The more chunks in the system, the slower that process becomes, even more so when all those chunks are part of a single hypertable.
Postgres builds the index on the fly during ingestion. That means that to build a new entry on the index, a significant portion of the index needs to be traversed during every row insertion. When the index does not fit into memory, it is constantly flushed to disk and read back. This wastes IO resources which would otherwise be used for writing the heap/WAL data to disk.
The default chunk interval is 7 days. However, best practice is to set chunk_interval so that prior to processing, the indexes for chunks currently being ingested into fit within 25% of main memory. For example, on a system with 64 GB of memory, if index growth is approximately 2 GB per day, a 1-week chunk interval is appropriate. If index growth is around 10 GB per day, use a 1-day interval.
You set chunk_interval when you [create a hypertable][hypertable-create-table], or by calling [set_chunk_time_interval][chunk_interval] on an existing hypertable.
For a detailed analysis of how to optimize your chunk sizes, see the [blog post on chunk time intervals][blog-chunk-time]. To learn how to view and set your chunk time intervals, see [Optimize hypertable chunk intervals][change-chunk-intervals].
Hypertable indexes
By default, indexes are automatically created when you create a hypertable. The default index is on time, descending. You can prevent index creation by setting the create_default_indexes option to false.
Hypertables have some restrictions on unique constraints and indexes. If you want a unique index on a hypertable, it must include all the partitioning columns for the table. To learn more, see [Enforce constraints with unique indexes on hypertables][hypertables-and-unique-indexes].
You can prevent index creation by setting the create_default_indexes option to false.
Partition by dimension
Partitioning on time is the most common use case for hypertable, but it may not be enough for your needs. For example, you may need to scan for the latest readings that match a certain condition without locking a critical hypertable.
The use case for a partitioning dimension is a multi-tenant setup. You isolate the tenants using the tenant_id space partition. However, you must perform extensive testing to ensure this works as expected, and there is a strong risk of partition explosion.
You add a partitioning dimension at the same time as you create the hypertable, when the table is empty. The good news is that although you select the number of partitions at creation time, as your data grows you can change the number of partitions later and improve query performance. Changing the number of partitions only affects chunks created after the change, not existing chunks. To set the number of partitions for a partitioning dimension, call set_number_partitions. For example:
Create the hypertable with the 1-day interval chunk interval
Add a hash partition on a non-time column
Now use your hypertable as usual, but you can also ingest and query efficiently by the device_id column.
- Change the number of partitions as you data grows
===== PAGE: https://docs.tigerdata.com/use-timescale/hypercore/ =====
Examples:
Example 1 (sql):
CREATE TABLE conditions(
      "time"      timestamptz not null,
      device_id   integer,
      temperature float
   )
   WITH(
      timescaledb.hypertable,
      timescaledb.partition_column='time',
      timescaledb.chunk_interval='1 day'
   );
Example 2 (sql):
select * from add_dimension('conditions', by_hash('device_id', 3));Example 3 (sql):
select set_number_partitions('conditions', 5, 'device_id');timescaledb_information.hypertable_compression_settings
URL: llms-txt#timescaledb_information.hypertable_compression_settings
Contents:
- Samples
- Arguments
Shows information about compression settings for each hypertable chunk that has compression enabled on it.
Show compression settings for all hypertables:
Find compression settings for a specific hypertable:
| Name | Type | Description |
|---|---|---|
hypertable | REGCLASS | Hypertable which has compression enabled |
chunk | REGCLASS | Hypertable chunk which has compression enabled |
segmentby | TEXT | List of columns used for segmenting the compressed data |
orderby | TEXT | List of columns used for ordering compressed data along with ordering and NULL ordering information |
===== PAGE: https://docs.tigerdata.com/api/informational-views/compression_settings/ =====
Examples:
Example 1 (sql):
SELECT * FROM timescaledb_information.hypertable_compression_settings;
hypertable               | measurements
chunk                    | _timescaledb_internal._hyper_2_97_chunk
segmentby                |
orderby                  | time DESC
Example 2 (sql):
SELECT * FROM timescaledb_information.hypertable_compression_settings WHERE hypertable::TEXT LIKE 'metrics';
hypertable               | metrics
chunk                    | _timescaledb_internal._hyper_1_12_chunk
segmentby                | metric_id
orderby                  | time DESC
move_chunk()
URL: llms-txt#move_chunk()
Contents:
- Samples
- Required arguments
- Optional arguments
TimescaleDB allows you to move data and indexes to different tablespaces. This allows you to move data to more cost-effective storage as it ages.
The move_chunk function acts like a combination of the [Postgres CLUSTER command][postgres-cluster] and [Postgres ALTER TABLE...SET TABLESPACE][postgres-altertable] commands. Unlike these Postgres commands, however, the move_chunk function uses lower lock levels so that the chunk and hypertable are able to be read for most of the process. This comes at a cost of slightly higher disk usage during the operation. For a more detailed discussion of this capability, see the documentation on [managing storage with tablespaces][manage-storage].
You must be logged in as a super user, such as the postgres user, to use the move_chunk() call.
Required arguments
| Name | Type | Description |
|---|---|---|
chunk | REGCLASS | Name of chunk to be moved |
destination_tablespace | NAME | Target tablespace for chunk being moved |
index_destination_tablespace | NAME | Target tablespace for index associated with the chunk you are moving |
Optional arguments
| Name | Type | Description |
|---|---|---|
reorder_index | REGCLASS | The name of the index (on either the hypertable or chunk) to order by |
verbose | BOOLEAN | Setting to true displays messages about the progress of the move_chunk command. Defaults to false. |
===== PAGE: https://docs.tigerdata.com/api/hypertable/hypertable_index_size/ =====
Logical backup with pg_dump and pg_restore
URL: llms-txt#logical-backup-with-pg_dump-and-pg_restore
Contents:
- Prerequisites
- Back up and restore an entire database
- Back up and restore individual hypertables
You back up and restore each self-hosted Postgres database with TimescaleDB enabled using the native Postgres [pg_dump][pg_dump] and [pg_restore][pg_restore] commands. This also works for compressed hypertables, you don't have to decompress the chunks before you begin.
If you are using pg_dump to backup regularly, make sure you keep track of the versions of Postgres and TimescaleDB you are running. For more information, see [Versions are mismatched when dumping and restoring a database][troubleshooting-version-mismatch].
This page shows you how to:
- [Back up and restore an entire database][backup-entire-database]
- [Back up and restore individual hypertables][backup-individual-tables]
You can also [upgrade between different versions of TimescaleDB][timescaledb-upgrade].
- A source database to backup from, and a target database to restore to.
- Install the
psqlandpg_dumpPostgres client tools on your migration machine.
Back up and restore an entire database
You backup and restore an entire database using pg_dump and psql.
- Set your connection strings
These variables hold the connection information for the source database to backup from and the target database to restore to:
- Backup your database
You may see some errors while pg_dump is running. See [Troubleshooting self-hosted TimescaleDB][troubleshooting] to check if they can be safely ignored.
Restore your database from the backup
Connect to your target database:
Create a new database and enable TimescaleDB:
Put your database in the right state for restoring:
Restore the database:
Return your database to normal operations:
Do not use pg_restore with the -j option. This option does not correctly restore the TimescaleDB catalogs.
Back up and restore individual hypertables
pg_dump provides flags that allow you to specify tables or schemas to back up. However, using these flags means that the dump lacks necessary information that TimescaleDB requires to understand the relationship between them. Even if you explicitly specify both the hypertable and all of its constituent chunks, the dump would still not contain all the information it needs to recreate the hypertable on restore.
To backup individual hypertables, backup the database schema, then backup only the tables you need. You also use this method to backup individual plain tables.
- Set your connection strings
These variables hold the connection information for the source database to backup from and the target database to restore to:
Backup the database schema and individual tables
Back up the hypertable schema:
Backup hypertable data to a CSV file:
For each hypertable to backup:
Restore the schema to the target database
Restore hypertables from the backup
For each hypertable to backup:
- Recreate the hypertable:
When you [create the new hypertable][create_hypertable], you do not need to use the same parameters as existed in the source database. This can provide a good opportunity for you to re-organize your hypertables if you need to. For example, you can change the partitioning key, the number of partitions, or the chunk interval sizes.
- Restore the data:
The standard COPY command in Postgres is single threaded. If you have a lot of data, you can speed up the copy using the [timescaledb-parallel-copy][parallel importer].
Best practice is to backup and restore a database at a time. However, if you have superuser access to Postgres instance with TimescaleDB installed, you can use pg_dumpall to back up all Postgres databases in a cluster, including global objects that are common to all databases, namely database roles, tablespaces, and privilege grants. You restore the Postgres instance using psql. For more information, see the [Postgres documentation][postgres-docs].
===== PAGE: https://docs.tigerdata.com/self-hosted/backup-and-restore/physical/ =====
Examples:
Example 1 (bash):
export SOURCE=postgres://<user>:<password>@<source host>:<source port>/<db_name>
   export TARGET=postgres://<user>:<password>@<source host>:<source port>
Example 2 (bash):
pg_dump -d "source" \
     -Fc -f <db_name>.bak
Example 3 (bash):
psql -d "target"Example 4 (sql):
CREATE DATABASE <restoration database>;
      \c <restoration database>
      CREATE EXTENSION IF NOT EXISTS timescaledb;
CREATE INDEX (Transaction Per Chunk)
URL: llms-txt#create-index-(transaction-per-chunk)
Contents:
- Samples
This option extends [CREATE INDEX][postgres-createindex] with the ability to use a separate transaction for each chunk it creates an index on, instead of using a single transaction for the entire hypertable. This allows INSERTs, and other operations to be performed concurrently during most of the duration of the CREATE INDEX command. While the index is being created on an individual chunk, it functions as if a regular CREATE INDEX were called on that chunk, however other chunks are completely unblocked.
This version of CREATE INDEX can be used as an alternative to CREATE INDEX CONCURRENTLY, which is not currently supported on hypertables.
- Not supported for
CREATE UNIQUE INDEX. - If the operation fails partway through, indexes might not be created on all hypertable chunks. If this occurs, the index on the root table of the hypertable is marked as invalid. You can check this by running
\d+on the hypertable. The index still works, and is created on new chunks, but if you want to ensure all chunks have a copy of the index, drop and recreate it.
You can also use the following query to find all invalid indexes:
Create an anonymous index:
===== PAGE: https://docs.tigerdata.com/api/continuous-aggregates/refresh_continuous_aggregate/ =====
Examples:
Example 1 (SQL):
CREATE INDEX ... WITH (timescaledb.transaction_per_chunk, ...);Example 2 (SQL):
SELECT * FROM pg_index i WHERE i.indisvalid IS FALSE;Example 3 (SQL):
CREATE INDEX ON conditions(time, device_id)
    WITH (timescaledb.transaction_per_chunk);
Example 4 (SQL):
CREATE INDEX ON conditions USING brin(time, location)
    WITH (timescaledb.transaction_per_chunk);
set_replication_factor()
URL: llms-txt#set_replication_factor()
Contents:
- Required arguments
- Errors
- Sample usage
[Multi-node support is sunsetted][multi-node-deprecation].
TimescaleDB v2.13 is the last release that includes multi-node support for Postgres versions 13, 14, and 15.
Sets the replication factor of a distributed hypertable to the given value. Changing the replication factor does not affect the number of replicas for existing chunks. Chunks created after changing the replication factor are replicated in accordance with new value of the replication factor. If the replication factor cannot be satisfied, since the amount of attached data nodes is less than new replication factor, the command aborts with an error.
If existing chunks have less replicas than new value of the replication factor, the function prints a warning.
Required arguments
| Name | Type | Description |
|---|---|---|
hypertable | REGCLASS | Distributed hypertable to update the replication factor for. |
replication_factor | INTEGER | The new value of the replication factor. Must be greater than 0, and smaller than or equal to the number of attached data nodes. |
An error is given if:
hypertableis not a distributed hypertable.replication_factoris less than1, which cannot be set on a distributed hypertable.replication_factoris bigger than the number of attached data nodes.
If a bigger replication factor is desired, it is necessary to attach more data nodes by using [attach_data_node][attach_data_node].
Update the replication factor for a distributed hypertable to 2:
Example of the warning if any existing chunk of the distributed hypertable has less than 2 replicas:
Example of providing too big of a replication factor for a hypertable with 2 attached data nodes:
===== PAGE: https://docs.tigerdata.com/api/distributed-hypertables/delete_data_node/ =====
Examples:
Example 1 (sql):
SELECT set_replication_factor('conditions', 2);Example 2 (unknown):
WARNING:  hypertable "conditions" is under-replicated
DETAIL:  Some chunks have less than 2 replicas.
Example 3 (sql):
SELECT set_replication_factor('conditions', 3);
ERROR:  too big replication factor for hypertable "conditions"
DETAIL:  The hypertable has 2 data nodes attached, while the replication factor is 3.
HINT:  Decrease the replication factor or attach more data nodes to the hypertable.
About indexes
URL: llms-txt#about-indexes
Because looking up data can take a long time, especially if you have a lot of data in your hypertable, you can use an index to speed up read operations from non-compressed chunks in the rowstore (which use their [own columnar indexes][about-compression]).
You can create an index on any combination of columns. To define an index as a UNIQUE or PRIMARY KEY index, it must include the partitioning column (this is usually the time column).
Which column you choose to create your index on depends on what kind of data you have stored. When you create a hypertable, set the datatype for the time column as timestamptz and not timestamp. For more information, see [Postgres timestamp][postgresql-timestamp].
While it is possible to add an index that does not include the time column, doing so results in very slow ingest speeds. For time-series data, indexing on the time column allows one index to be created per chunk.
Consider a simple example with temperatures collected from two locations named office and garage:
An index on (location, time DESC) is organized like this:
An index on (time DESC, location) is organized like this:
A good rule of thumb with indexes is to think in layers. Start by choosing the columns that you typically want to run equality operators on, such as location = garage. Then finish by choosing columns you want to use range operators on, such as time > 0930.
As a more complex example, imagine you have a number of devices tracking 1,000 different retail stores. You have 100 devices per store, and 5 different types of devices. All of these devices report metrics as float values, and you decide to store all the metrics in the same table, like this:
When you create this table, an index is automatically generated on the time column, making it faster to query your data based on time.
If you want to query your data on something other than time, you can create different indexes. For example, you might want to query data from the last month for just a given device_id. Or you could query all data for a single store_id for the last three months.
You want to keep the index on time so that you can quickly filter for a given time range, and add another index on device_id and store_id. This creates a composite index. A composite index on (store_id, device_id, time) orders by store_id first. Each unique store_id, will then be sorted by device_id in order. And each entry with the same store_id and device_id are then ordered by time. To create this index, use this command:
When you have this composite index on your hypertable, you can run a range of different queries. Here are some examples:
This queries the portion of the list with a specific store_id. The index is effective for this query, but could be a bit bloated; an index on just store_id would probably be more efficient.
This query is not effective, because it would need to scan multiple sections of the list. This is because the part of the list that contains data for time > 10 for one device would be located in a different section than for a different device. In this case, consider building an index on (store_id, time) instead.
The index in the example is useless for this query, because the data for device M is located in a completely different section of the list for each store_id.
This is an accurate query for this index. It narrows down the list to a very specific portion.
===== PAGE: https://docs.tigerdata.com/use-timescale/schema-management/json/ =====
Examples:
Example 1 (sql):
garage-0940
garage-0930
garage-0920
garage-0910
office-0930
office-0920
office-0910
Example 2 (sql):
0940-garage
0930-garage
0930-office
0920-garage
0920-office
0910-garage
0910-office
Example 3 (sql):
CREATE TABLE devices (
     time timestamptz,
     device_id int,
     device_type int,
     store_id int,
     value float
);
Example 4 (sql):
CREATE INDEX ON devices (store_id, device_id, time DESC);User permissions do not allow chunks to be converted to columnstore or rowstore
URL: llms-txt#user-permissions-do-not-allow-chunks-to-be-converted-to-columnstore-or-rowstore
You might get this error if you attempt to compress a chunk into the columnstore, or decompress it back into rowstore with a non-privileged user account. To compress or decompress a chunk, your user account must have permissions that allow it to perform CREATE INDEX on the chunk. You can check the permissions of the current user with this command at the psql command prompt:
To resolve this problem, grant your user account the appropriate privileges with this command:
For more information about the GRANT command, see the [Postgres documentation][pg-grant].
===== PAGE: https://docs.tigerdata.com/_troubleshooting/compression-inefficient-chunk-interval/ =====
Examples:
Example 1 (sql):
\dn+ <USERNAME>Example 2 (sql):
GRANT PRIVILEGES
    ON TABLE
    TO <ROLE_TYPE>;
Query data in distributed hypertables
URL: llms-txt#query-data-in-distributed-hypertables
[Multi-node support is sunsetted][multi-node-deprecation].
TimescaleDB v2.13 is the last release that includes multi-node support for Postgres versions 13, 14, and 15.
You can query a distributed hypertable just as you would query a standard hypertable or Postgres table. For more information, see the section on [writing data][write].
Queries perform best when the access node can push transactions down to the data nodes. To ensure that the access node can push down transactions, check that the [enable_partitionwise_aggregate][enable_partitionwise_aggregate] setting is set to on for the access node. By default, it is off.
If you want to use continuous aggregates on your distributed hypertable, see the [continuous aggregates][caggs] section for more information.
===== PAGE: https://docs.tigerdata.com/self-hosted/distributed-hypertables/about-distributed-hypertables/ =====
convert_to_columnstore()
URL: llms-txt#convert_to_columnstore()
Contents:
- Samples
- Arguments
- Returns
Manually convert a specific chunk in the hypertable rowstore to the columnstore.
Although convert_to_columnstore gives you more fine-grained control, best practice is to use [add_columnstore_policy][add_columnstore_policy]. You can also add chunks to the columnstore at a specific time [running the job associated with your columnstore policy][run-job] manually.
To move a chunk from the columnstore back to the rowstore, use [convert_to_rowstore][convert_to_rowstore].
Since TimescaleDB v2.18.0
To convert a single chunk to columnstore:
| Name | Type | Default | Required | Description |
|---|---|---|---|---|
chunk | REGCLASS | - | ✔ | Name of the chunk to add to the columnstore. |
if_not_columnstore | BOOLEAN | true | ✖ | Set to false so this job fails with an error rather than a warning if chunk is already in the columnstore. |
recompress | BOOLEAN | false | ✖ | Set to true to add a chunk that had more data inserted after being added to the columnstore. |
Calls to convert_to_columnstore return:
| Column | Type | Description |
|---|---|---|
chunk name or table | REGCLASS or String | The name of the chunk added to the columnstore, or a table-like result set with zero or more rows. |
===== PAGE: https://docs.tigerdata.com/api/compression/decompress_chunk/ =====
attach_chunk()
URL: llms-txt#attach_chunk()
Contents:
- Samples
- Arguments
- Returns
Attach a hypertable as a chunk in another [hypertable][hypertables-section] at a given slice in a dimension.
The schema, name, existing constraints, and indexes of chunk do not change, even if a constraint conflicts with a chunk constraint in hypertable.
The hypertable you attach chunk to does not need to have the same dimension columns as the hypertable you previously [detached chunk][hypertable-detach-chunk] from.
While attaching chunk to hypertable:
- Dimension columns in
chunkare set asNOT NULL. - Any foreign keys in
hypertableare created inchunk.
You cannot:
- Attaching a chunk that is still attached to another hypertable. First call [detach_chunk][hypertable-detach-chunk].
- Attaching foreign tables are not supported.
Since TimescaleDB v2.21.0
Attach a hypertable as a chunk in another hypertable for a specific slice in a dimension:
| Name | Type | Description |
|---|---|---|
hypertable | REGCLASS | Name of the hypertable to attach chunk to. |
chunk | REGCLASS | Name of the chunk to attach. |
slices | JSONB | The slice chunk will occupy in hypertable. slices cannot clash with the slice already occupied by an existing chunk in hypertable. |
This function returns void.
===== PAGE: https://docs.tigerdata.com/api/hypertable/detach_tablespaces/ =====
Examples:
Example 1 (sql):
CALL attach_chunk('ht', '_timescaledb_internal._hyper_1_2_chunk', '{"device_id": [0, 1000]}');compress_chunk()
URL: llms-txt#compress_chunk()
Contents:
- Samples
- Required arguments
- Optional arguments
- Returns
Old API since TimescaleDB v2.18.0 Replaced by <a href="https://docs.tigerdata.com/api/latest/hypercore/convert_to_columnstore/">convert_to_columnstore()</a>.
The compress_chunk function is used for synchronous compression (or recompression, if necessary) of a specific chunk. This is most often used instead of the [add_compression_policy][add_compression_policy] function, when a user wants more control over the scheduling of compression. For most users, we suggest using the policy framework instead.
You can also compress chunks by [running the job associated with your compression policy][run-job]. compress_chunk gives you more fine-grained control by allowing you to target a specific chunk that needs compressing.
You can get a list of chunks belonging to a hypertable using the show_chunks function.
Compress a single chunk.
Required arguments
| Name | Type | Description |
|---|---|---|
chunk_name | REGCLASS | Name of the chunk to be compressed |
Optional arguments
| Name | Type | Description |
|---|---|---|
if_not_compressed | BOOLEAN | Disabling this will make the function error out on chunks that are already compressed. Defaults to true. |
| Column | Type | Description |
|---|---|---|
compress_chunk | REGCLASS | Name of the chunk that was compressed |
===== PAGE: https://docs.tigerdata.com/api/compression/chunk_compression_stats/ =====
About distributed hypertables
URL: llms-txt#about-distributed-hypertables
Contents:
- Architecture of a distributed hypertable
- Space partitioning
- Closed and open dimensions for space partitioning
- Repartitioning distributed hypertables
- Replicating distributed hypertables
- Performance of distributed hypertables
- Query push down
- Full push down
- Partial push down
- Limitations of query push down
[Multi-node support is sunsetted][multi-node-deprecation].
TimescaleDB v2.13 is the last release that includes multi-node support for Postgres versions 13, 14, and 15.
Distributed hypertables are hypertables that span multiple nodes. With distributed hypertables, you can scale your data storage across multiple machines. The database can also parallelize some inserts and queries.
A distributed hypertable still acts as if it were a single table. You can work with one in the same way as working with a standard hypertable. To learn more about hypertables, see the [hypertables section][hypertables].
Certain nuances can affect distributed hypertable performance. This section explains how distributed hypertables work, and what you need to consider before adopting one.
Architecture of a distributed hypertable
Distributed hypertables are used with multi-node clusters. Each cluster has an access node and multiple data nodes. You connect to your database using the access node, and the data is stored on the data nodes. For more information about multi-node, see the [multi-node section][multi-node].
You create a distributed hypertable on your access node. Its chunks are stored on the data nodes. When you insert data or run a query, the access node communicates with the relevant data nodes and pushes down any processing if it can.
Space partitioning
Distributed hypertables are always partitioned by time, just like standard hypertables. But unlike standard hypertables, distributed hypertables should also be partitioned by space. This allows you to balance inserts and queries between data nodes, similar to traditional sharding. Without space partitioning, all data in the same time range would write to the same chunk on a single node.
By default, TimescaleDB creates as many space partitions as there are data nodes. You can change this number, but having too many space partitions degrades performance. It increases planning time for some queries, and leads to poorer balancing when mapping items to partitions.
Data is assigned to space partitions by hashing. Each hash bucket in the space dimension corresponds to a data node. One data node may hold many buckets, but each bucket may belong to only one node for each time interval.
When space partitioning is on, 2 dimensions are used to divide data into chunks: the time dimension and the space dimension. You can specify the number of partitions along the space dimension. Data is assigned to a partition by hashing its value on that dimension.
For example, say you use device_id as a space partitioning column. For each row, the value of the device_id column is hashed. Then the row is inserted into the correct partition for that hash value.
<img class="main-content__illustration" width={1375} height={944} src="https://assets.timescale.com/docs/images/hypertable-time-space-partition.webp" alt="A hypertable visualized as a rectangular plane carved into smaller rectangles, which are chunks. One dimension of the rectangular plane is time and the other is space. Data enters the hypertable and flows to a chunk based on its time and space values." />