Websocket arguments
This argument needs to be a function that is invoked whenever there's a new data record is received from the websocket:
This is where you want to implement the ingestion logic so whenever there's new data available you insert it into the database.
This argument needs to be a list of stock ticker symbols (for example, MSFT) or crypto trading pairs (for example, BTC/USD). When using a websocket connection you always need to subscribe to the events you want to receive. You can do this by using the symbols argument or if your connection is already created you can also use the subscribe() function to get data for additional symbols.
Connect to the websocket server
Create a new Python file called
websocket_test.pyand connect to the Twelve Data servers using the<YOUR_API_KEY>:Run the Python script:
When you run the script, you receive a response from the server about the status of your connection:
When you have established a connection to the websocket server, wait a few seconds, and you can see data records, like this:
Each price event gives you multiple data points about the given trading pair such as the name of the exchange, and the current price. You can also occasionally see heartbeat events in the response; these events signal the health of the connection over time. At this point the websocket connection is working successfully to pass data.
Optimize time-series data in a hypertable
Hypertables are Postgres tables in TimescaleDB that automatically partition your time-series data by time. Time-series data represents the way a system, process, or behavior changes over time. Hypertables enable TimescaleDB to work efficiently with time-series data. Each hypertable is made up of child tables called chunks. Each chunk is assigned a range of time, and only contains data from that range. When you run a query, TimescaleDB identifies the correct chunk and runs the query on it, instead of going through the entire table.
[Hypercore][hypercore] is the hybrid row-columnar storage engine in TimescaleDB used by hypertables. Traditional databases force a trade-off between fast inserts (row-based storage) and efficient analytics (columnar storage). Hypercore eliminates this trade-off, allowing real-time analytics without sacrificing transactional capabilities.
Hypercore dynamically stores data in the most efficient format for its lifecycle:
- Row-based storage for recent data: the most recent chunk (and possibly more) is always stored in the rowstore, ensuring fast inserts, updates, and low-latency single record queries. Additionally, row-based storage is used as a writethrough for inserts and updates to columnar storage.
- Columnar storage for analytical performance: chunks are automatically compressed into the columnstore, optimizing storage efficiency and accelerating analytical queries.
Unlike traditional columnar databases, hypercore allows data to be inserted or modified at any stage, making it a flexible solution for both high-ingest transactional workloads and real-time analytics—within a single database.
Because TimescaleDB is 100% Postgres, you can use all the standard Postgres tables, indexes, stored procedures, and other objects alongside your hypertables. This makes creating and working with hypertables similar to standard Postgres.
- Connect to your Tiger Cloud service
In [Tiger Cloud Console][services-portal] open an [SQL editor][in-console-editors]. You can also connect to your service using [psql][connect-using-psql].
- Create a hypertable to store the real-time cryptocurrency data
Create a [hypertable][hypertables-section] for your time-series data using [CREATE TABLE][hypertable-create-table]. For [efficient queries][secondary-indexes] on data in the columnstore, remember to segmentby the column you will use most often to filter your data:
If you are self-hosting TimescaleDB v2.19.3 and below, create a [Postgres relational table][pg-create-table], then convert it using [create_hypertable][create_hypertable]. You then enable hypercore with a call to [ALTER TABLE][alter_table_hypercore].
Create a standard Postgres table for relational data
When you have relational data that enhances your time-series data, store that data in standard Postgres relational tables.
- Add a table to store the asset symbol and name in a relational table
You now have two tables within your Tiger Cloud service. A hypertable named crypto_ticks, and a normal Postgres table named crypto_assets.
When you ingest data into a transactional database like Timescale, it is more efficient to insert data in batches rather than inserting data row-by-row. Using one transaction to insert multiple rows can significantly increase the overall ingest capacity and speed of your Tiger Cloud service.
Batching in memory
A common practice to implement batching is to store new records in memory first, then after the batch reaches a certain size, insert all the records from memory into the database in one transaction. The perfect batch size isn't universal, but you can experiment with different batch sizes (for example, 100, 1000, 10000, and so on) and see which one fits your use case better. Using batching is a fairly common pattern when ingesting data into TimescaleDB from Kafka, Kinesis, or websocket connections.
To ingest the data into your Tiger Cloud service, you need to implement the on_event function.
After the websocket connection is set up, you can use the on_event function to ingest data into the database. This is a data pipeline that ingests real-time financial data into your Tiger Cloud service.
You can implement a batching solution in Python with Psycopg2. You can implement the ingestion logic within the on_event function that you can then pass over to the websocket object.
This function needs to:
- Check if the item is a data item, and not websocket metadata.
- Adjust the data so that it fits the database schema, including the data types, and order of columns.
- Add it to the in-memory batch, which is a list in Python.
- If the batch reaches a certain size, insert the data, and reset or empty the list.
Ingest data in real-time
- Update the Python script that prints out the current batch size, so you can follow when data gets ingested from memory into your database. Use the
<HOST>,<PASSWORD>, and<PORT>details for the Tiger Cloud service where you want to ingest the data and your API key from Twelve Data:
You can even create separate Python scripts to start multiple websocket connections for different types of symbols, for example, one for stock, and another one for cryptocurrency prices.
If you see an error message similar to this:
Then check that you use a proper API key received from Twelve Data.
Connect Grafana to Tiger Cloud
To visualize the results of your queries, enable Grafana to read the data in your service:
- Log in to Grafana
In your browser, log in to either: - Self-hosted Grafana: at http://localhost:3000/. The default credentials are admin, admin. - Grafana Cloud: use the URL and credentials you set when you created your account.
- Add your service as a data source
- Open
Connections>Data sources, then clickAdd new data source. - Select
PostgreSQLfrom the list. - Configure the connection:
Host URL,Database name,Username, andPassword
- Open
Configure using your [connection details][connection-info]. Host URL is in the format <host>:<port>. - TLS/SSL Mode: select require. - PostgreSQL options: enable TimescaleDB. - Leave the default setting for all other fields.
- Click
Save & test.
Grafana checks that your details are set correctly.
===== PAGE: https://docs.tigerdata.com/tutorials/financial-ingest-real-time/financial-ingest-query/ =====
Examples:
Example 1 (bash):
virtualenv env
    source env/bin/activate
Example 2 (bash):
pip install twelvedata websocket-clientExample 3 (bash):
pip install psycopg2-binaryExample 4 (python):
def on_event(event):
        print(event) # prints out the data record (dictionary)
About security in Tiger Cloud
URL: llms-txt#about-security-in-tiger-cloud
Contents:
- Role-based access
- Data encryption
- Networking security
- Networking with Virtual Private Cloud (VPC) peering
- IP address allow lists
- Operator access
- GDPR compliance
- HIPAA compliance
- SOC 2 compliance
Protecting data starts with secure software engineering. At Tiger Data, we embed security into every stage of development, from static code analysis and automated dependency scanning to rigorous code security reviews. To go even further, we developed pgspot, an open-source extension to identify security issues with Postgres extensions, which strengthens the broader ecosystem as well as our own platform. Tiger Data products do not have any identified weaknesses.

This page lists the additional things we do to ensure operational security and to lock down Tiger Cloud services. To see our security features at a glance, see [Tiger Data Security][security-at-timescale].
Tiger Cloud provides role-based access for you to:
- Administer your Tiger Cloud project In Tiger Cloud Console, users with the Owner, Admin, and Viewer roles have different permissions to manage users and services in the project.
- Manage data in each service To restrict access to your data on the database level, you can create other roles on top of the default tsdbadmin role.
Your data on Tiger Cloud is encrypted both in transit and at rest. Both active databases and backups are encrypted.
Tiger Cloud uses AWS as its cloud provider, with all the security that AWS provides. Data encryption uses the industry-standard AES-256 algorithm. Cryptographic keys are managed by [AWS Key Management Service (AWS KMS)][aws-kms]. Keys are never stored in plaintext.
For more information about AWS security, see the AWS documentation on security in [Amazon Elastic Compute Cloud][ec2-security] and [Elastic Block Storage][ebs-security].
Networking security
Customer access to Tiger Cloud services is only provided over TLS-encrypted connections. There is no option to use unencrypted plaintext connections.
Networking with Virtual Private Cloud (VPC) peering
When using VPC peering, no public Internet-based access is provided to the service. Service addresses are published in public DNS, but they can only be connected to from the customer's peered VPC using private network addresses.
VPC peering only enables communication to be initiated from your Customer VPC to Tiger Cloud services running in the Tiger Cloud VPC. Tiger Cloud cannot initiate communication with your VPC. To learn how to set up VPC Peering, see [Secure your Tiger Cloud services with VPC Peering and AWS PrivateLink][vpc-peering].
IP address allow lists
You can allow only trusted IP addresses to access your Tiger Cloud services. You do this by creating [IP address allow lists][ip-allowlist] and attaching them to your services.
Normally all the resources required for providing Tiger Cloud services are automatically created, maintained and terminated by the Tiger Cloud infrastructure. No manual operator intervention is required.
However, the Tiger Data operations team has the capability to securely log in to the service virtual machines for troubleshooting purposes. These accesses are audit logged.
No customer access to the virtual machine level is provided.
Tiger Data complies with the European Union's General Data Protection Regulation (GDPR), and all practices are covered by our [Privacy Policy][timescale-privacy-policy] and the [Terms of Service][tsc-tos]. All customer data is processed in accordance with Tiger Data's GDPR-compliant [Data Processor Addendum][tsc-data-processor-addendum], which applies to all Tiger Data customers.
Tiger Data operators never access customer data, unless explicitly requested by the customer to troubleshoot a technical issue. The Tiger Data operations team has mandatory recurring training regarding the applicable policies.
The Tiger Cloud [Enterprise plan][pricing-plan-features] is Health Insurance Portability and Accountability Act (HIPAA) compliant. This allows organizations to securely manage and analyze sensitive healthcare data, ensuring they meet regulatory requirements while building compliant applications.
Tiger Cloud is SOC 2 Type 2 compliant. This ensures that organizations can securely manage customer data in alignment with industry standards for security, availability, processing integrity, confidentiality, and privacy. It helps businesses meet trust requirements while confidently building applications that handle sensitive information. The annual SOC 2 report is available to customers on the Scale or Enterprise pricing plans. Open a [support ticket][open-support-ticket] to get access to it.
===== PAGE: https://docs.tigerdata.com/use-timescale/security/strict-ssl/ =====
Query the Bitcoin blockchain
URL: llms-txt#query-the-bitcoin-blockchain
Contents:
- Steps in this tutorial
The financial industry is extremely data-heavy and relies on real-time and historical data for decision-making, risk assessment, fraud detection, and market analysis. Tiger Data simplifies management of these large volumes of data, while also providing you with meaningful analytical insights and optimizing storage costs.
In this tutorial, you use Tiger Cloud to ingest, store, and analyze transactions on the Bitcoin blockchain.
[Blockchains][blockchain-def] are, at their essence, a distributed database. The [transactions][transactions-def] in a blockchain are an example of time-series data. You can use TimescaleDB to query transactions on a blockchain, in exactly the same way as you might query time-series transactions in any other database.
Steps in this tutorial
This tutorial covers:
- [Ingest data into a service][blockchain-dataset]: set up and connect to a Tiger Cloud service, create tables and hypertables, and ingest data.
- [Query your data][blockchain-query]: obtain information, including finding the most recent transactions on the blockchain, and gathering information about the transactions using aggregation functions.
- [Compress your data using hypercore][blockchain-compress]: compress data that is no longer needed for highest performance queries, but is still accessed regularly for real-time analytics.
When you've completed this tutorial, you can use the same dataset to [Analyze the Bitcoin data][analyze-blockchain], using TimescaleDB hyperfunctions.
===== PAGE: https://docs.tigerdata.com/tutorials/blockchain-analyze/ =====
JDBC authentication type is not supported
URL: llms-txt#jdbc-authentication-type-is-not-supported
When connecting to Tiger Cloud with a Java Database Connectivity (JDBC) driver, you might get this error message.
Your Tiger Cloud authentication type doesn't match your JDBC driver's supported authentication types. The recommended approach is to upgrade your JDBC driver to a version that supports scram-sha-256 encryption. If that isn't an option, you can change the authentication type for your Tiger Cloud service to md5. Note that md5 is less secure, and is provided solely for compatibility with older clients.
For information on changing your authentication type, see the documentation on [resetting your service password][password-reset].
===== PAGE: https://docs.tigerdata.com/_troubleshooting/chunk-temp-file-limit/ =====
Live migration
URL: llms-txt#live-migration
Contents:
- Prerequisites
- Migrate to Tiger Cloud
- Set your connection strings
- Align the version of TimescaleDB on the source and target
- Tune your source database
- Migrate your data, then start downtime
- Validate your data, then restart your app
- Set your connection strings
- Align the extensions on the source and target
- Tune your source database
Live migration is an end-to-end solution that copies the database schema and data to your target Tiger Cloud service, then replicates the database activity in your source database to the target service in real time. Live migration uses the Postgres logical decoding functionality and leverages [pgcopydb].
You use the live migration Docker image to move 100GB-10TB+ of data to a Tiger Cloud service seamlessly with only a few minutes downtime.
If you want to migrate more than 400GB of data, create a Tiger Cloud Console support request, or send us an email at support@tigerdata.com saying how much data you want to migrate. We pre-provision your Tiger Cloud service for you.
Best practice is to use live migration when:
- Modifying your application logic to perform dual writes is a significant effort.
- The insert workload does not exceed 20,000 rows per second, and inserts are batched.
Use [Dual write and backfill][dual-write-and-backfill] for greater workloads.
- Your source database:
- Uses
UPDATEandDELETEstatements on uncompressed time-series data.
- Uses
Live-migration does not support replicating INSERT/UPDATE/DELETE statements on compressed data.
- Has large, busy tables with primary keys.
- Does not have many
UPDATEorDELETEstatements.
This page shows you how to move your data from a self-hosted database to a Tiger Cloud service using the live-migration Docker image.
Best practice is to use an [Ubuntu EC2 instance][create-ec2-instance] hosted in the same region as your Tiger Cloud service to move data. That is, the machine you run the commands on to move your data from your source database to your target Tiger Cloud service.
Before you move your data:
- Create a target [Tiger Cloud service][created-a-database-service-in-timescale].
Each Tiger Cloud service has a single Postgres instance that supports the [most popular extensions][all-available-extensions]. Tiger Cloud services do not support tablespaces, and there is no superuser associated with a service. Best practice is to create a Tiger Cloud service with at least 8 CPUs for a smoother experience. A higher-spec instance can significantly reduce the overall migration window.
To ensure that maintenance does not run while migration is in progress, best practice is to [adjust the maintenance window][adjust-maintenance-window].
[Install Docker][install-docker] on your migration machine.
This machine needs sufficient space to store the buffered changes that occur while your data is being copied. This space is proportional to the amount of new uncompressed data being written to the Tiger Cloud service during migration. A general rule of thumb is between 100GB and 500GB. The CPU specifications of this EC2 instance should match those of your Tiger Cloud service for optimal performance. For example, if your service has an 8-CPU configuration, then your EC2 instance should also have 8 CPUs.
- Before starting live migration, read the [Frequently Asked Questions][FAQ].
Migrate to Tiger Cloud
To move your data from a self-hosted database to a Tiger Cloud service:
This section shows you how to move your data from self-hosted TimescaleDB to a Tiger Cloud service using live migration from Terminal.
Set your connection strings
These variables hold the connection information for the source database and target Tiger Cloud service. In Terminal on your migration machine, set the following:
You find the connection information for your Tiger Cloud service in the configuration file you downloaded when you created the service.
Avoid using connection strings that route through connection poolers like PgBouncer or similar tools. This tool requires a direct connection to the database to function properly.
Align the version of TimescaleDB on the source and target
Ensure that the source and target databases are running the same version of TimescaleDB.
Check the version of TimescaleDB running on your Tiger Cloud service:
Update the TimescaleDB extension in your source database to match the target service:
If the TimescaleDB extension is the same version on the source database and target service, you do not need to do this.
For more information and guidance, see Upgrade TimescaleDB.
Ensure that the Tiger Cloud service is running the Postgres extensions used in your source database.
Check the extensions on the source database:
- For each extension, enable it on your target Tiger Cloud service:
Tune your source database
You need admin rights to to update the configuration on your source database. If you are using a managed service, follow the instructions in the From MST tab on this page.
- Install the
wal2jsonextension on your source database
[Install wal2json][install-wal2json] on your source database.
- Prevent Postgres from treating the data in a snapshot as outdated
This is not applicable if the source database is Postgres 17 or later.
Set the write-Ahead Log (WAL) to record the information needed for logical decoding
Restart the source database
Your configuration changes are now active. However, verify that the settings are live in your database.
- Enable live-migration to replicate
DELETEandUPDATEoperations
Replica identity assists data replication by identifying the rows being modified. Your options are that each table and hypertable in the source database should either have:
- A primary key: data replication defaults to the primary key of the table being replicated. Nothing to do.
- A viable unique index: each table has a unique, non-partial, non-deferrable index that includes only columns marked as
NOT NULL. If a UNIQUE index does not exist, create one to assist the migration. You can delete if after migration.
For each table, set REPLICA IDENTITY to the viable unique index:
- No primary key or viable unique index: use brute force.
For each table, set REPLICA IDENTITY to FULL:
For each UPDATE or DELETE statement, Postgres reads the whole table to find all matching rows. This results in significantly slower replication. If you are expecting a large number of UPDATE or DELETE operations on the table, best practice is to not use FULL.
Migrate your data, then start downtime
- Pull the live-migration docker image to you migration machine
To list the available commands, run:
To see the available flags for each command, run --help for that command. For example:
- Create a snapshot image of your source database in your Tiger Cloud service
This process checks that you have tuned your source database and target service correctly for replication, then creates a snapshot of your data on the migration machine:
Live-migration supplies information about updates you need to make to the source database and target service. For example:
If you have warnings, stop live-migration, make the suggested changes and start again.
- Synchronize data between your source database and your Tiger Cloud service
This command migrates data from the snapshot to your Tiger Cloud service, then streams transactions from the source to the target.
If the source Postgres version is 17 or later, you need to pass additional flag -e PGVERSION=17 to the migrate command.
During this process, you see the migration process:
If migrate stops add --resume to start from where it left off.
Once the data in your target Tiger Cloud service has almost caught up with the source database, you see the following message:
Wait until replay_lag is down to a few kilobytes before you move to the next step. Otherwise, data replication may not have finished.
Start app downtime
Stop your app writing to the source database, then let the the remaining transactions finish to fully sync with the target. You can use tools like the
pg_topCLI orpg_stat_activityto view the current transaction on the source database.Stop Live-migration.
Live-migration continues the remaining work. This includes copying TimescaleDB metadata, sequences, and run policies. When the migration completes, you see the following message:
Validate your data, then restart your app
- Validate the migrated data
The contents of both databases should be the same. To check this you could compare the number of rows, or an aggregate of columns. However, the best validation method depends on your app.
- Stop app downtime
Once you are confident that your data is successfully replicated, configure your apps to use your Tiger Cloud service.
- Cleanup resources associated with live-migration from your migration machine
This command removes all resources and temporary files used in the migration process. When you run this command, you can no longer resume live-migration.
This section shows you how to move your data from self-hosted Postgres to a Tiger Cloud service using live migration from Terminal.
Set your connection strings
These variables hold the connection information for the source database and target Tiger Cloud service. In Terminal on your migration machine, set the following:
You find the connection information for your Tiger Cloud service in the configuration file you downloaded when you created the service.
Avoid using connection strings that route through connection poolers like PgBouncer or similar tools. This tool requires a direct connection to the database to function properly.
Align the extensions on the source and target
Ensure that the Tiger Cloud service is running the Postgres extensions used in your source database.
Check the extensions on the source database:
- For each extension, enable it on your target Tiger Cloud service:
Tune your source database
You need admin rights to to update the configuration on your source database. If you are using a managed service, follow the instructions in the From AWS RDS/Aurora tab on this page.
- Install the
wal2jsonextension on your source database
[Install wal2json][install-wal2json] on your source database.
- Prevent Postgres from treating the data in a snapshot as outdated
This is not applicable if the source database is Postgres 17 or later.
Set the write-Ahead Log (WAL) to record the information needed for logical decoding
Restart the source database
Your configuration changes are now active. However, verify that the settings are live in your database.
- Enable live-migration to replicate
DELETEandUPDATEoperations
Replica identity assists data replication by identifying the rows being modified. Your options are that each table and hypertable in the source database should either have:
- A primary key: data replication defaults to the primary key of the table being replicated. Nothing to do.
- A viable unique index: each table has a unique, non-partial, non-deferrable index that includes only columns marked as
NOT NULL. If a UNIQUE index does not exist, create one to assist the migration. You can delete if after migration.
For each table, set REPLICA IDENTITY to the viable unique index:
- No primary key or viable unique index: use brute force.
For each table, set REPLICA IDENTITY to FULL:
For each UPDATE or DELETE statement, Postgres reads the whole table to find all matching rows. This results in significantly slower replication. If you are expecting a large number of UPDATE or DELETE operations on the table, best practice is to not use FULL.
Migrate your data, then start downtime
- Pull the live-migration docker image to you migration machine
To list the available commands, run:
To see the available flags for each command, run --help for that command. For example:
- Create a snapshot image of your source database in your Tiger Cloud service
This process checks that you have tuned your source database and target service correctly for replication, then creates a snapshot of your data on the migration machine:
Live-migration supplies information about updates you need to make to the source database and target service. For example:
If you have warnings, stop live-migration, make the suggested changes and start again.
- Synchronize data between your source database and your Tiger Cloud service
This command migrates data from the snapshot to your Tiger Cloud service, then streams transactions from the source to the target.
If the source Postgres version is 17 or later, you need to pass additional flag -e PGVERSION=17 to the migrate command.
After migrating the schema, live-migration prompts you to create hypertables for tables that contain time-series data in your Tiger Cloud service. Run create_hypertable() to convert these table. For more information, see the [Hypertable docs][Hypertable docs].
During this process, you see the migration process:
If migrate stops add --resume to start from where it left off.
Once the data in your target Tiger Cloud service has almost caught up with the source database, you see the following message:
Wait until replay_lag is down to a few kilobytes before you move to the next step. Otherwise, data replication may not have finished.
Start app downtime
Stop your app writing to the source database, then let the the remaining transactions finish to fully sync with the target. You can use tools like the
pg_topCLI orpg_stat_activityto view the current transaction on the source database.Stop Live-migration.
Live-migration continues the remaining work. This includes copying TimescaleDB metadata, sequences, and run policies. When the migration completes, you see the following message:
Validate your data, then restart your app
- Validate the migrated data
The contents of both databases should be the same. To check this you could compare the number of rows, or an aggregate of columns. However, the best validation method depends on your app.
- Stop app downtime
Once you are confident that your data is successfully replicated, configure your apps to use your Tiger Cloud service.
- Cleanup resources associated with live-migration from your migration machine
This command removes all resources and temporary files used in the migration process. When you run this command, you can no longer resume live-migration.
To migrate your data from an Amazon RDS/Aurora Postgres instance to a Tiger Cloud service, you extract the data to an intermediary EC2 Ubuntu instance in the same AWS region as your RDS/Aurora instance. You then upload your data to a Tiger Cloud service. To make this process as painless as possible, ensure that the intermediary machine has enough CPU and disk space to rapidly extract and store your data before uploading to Tiger Cloud.
Migration from RDS/Aurora gives you the opportunity to create [hypertables][about-hypertables] before copying the data. Once the migration is complete, you can manually enable Tiger Cloud features like [data compression][data-compression] or [data retention][data-retention].
This section shows you how to move your data from an Amazon RDS/Aurora instance to a Tiger Cloud service using live migration.
Create an intermediary EC2 Ubuntu instance
- In [https://console.aws.amazon.com/rds/home#databases:][databases], select the RDS/Aurora Postgres instance to migrate.
- Click
Actions>Set up EC2 connection. PressCreate EC2 instanceand use the following settings:- AMI: Ubuntu Server.
- Key pair: use an existing pair or create a new one that you will use to access the intermediary machine.
- VPC: by default, this is the same as the database instance.
- Configure Storage: adjust the volume to at least the size of RDS/Aurora Postgres instance you are migrating from. You can reduce the space used by your data on Tiger Cloud using [Hypercore][hypercore].
- Click
Lauch instance. AWS creates your EC2 instance, then clickConnect to instance>SSH client. Follow the instructions to create the connection to your intermediary EC2 instance.
Install the psql client tools on the intermediary instance
Connect to your intermediary EC2 instance. For example:
On your intermediary EC2 instance, install the Postgres client.
Keep this terminal open, you need it to connect to the RDS/Aurora Postgres instance for migration.
Set up secure connectivity between your RDS/Aurora Postgres and EC2 instances
- In [https://console.aws.amazon.com/rds/home#databases:][databases], select the RDS/Aurora Postgres instance to migrate.
- Scroll down to
Security group rules (1)and select theEC2 Security Group - Inboundgroup. TheSecurity Groups (1)window opens. Click theSecurity group ID, then clickEdit inbound rules

On your intermediary EC2 instance, get your local IP address:
Bear with me on this one, you need this IP address to enable access to your RDS/Aurora Postgres instance.
In
Edit inbound rules, clickAdd rule, then create aPostgreSQL,TCPrule granting access to the local IP address for your EC2 instance (told you 😃). Then clickSave rules.

Test the connection between your RDS/Aurora Postgres and EC2 instances
- In [https://console.aws.amazon.com/rds/home#databases:][databases], select the RDS/Aurora Postgres instance to migrate.
- On your intermediary EC2 instance, use the values of
Endpoint,Port,Master username, andDB nameto create the postgres connectivity string to theSOURCEvariable.

The value of Master password was supplied when this RDS/Aurora Postgres instance was created.
Test your connection:
You are connected to your RDS/Aurora Postgres instance from your intermediary EC2 instance.
Set your connection strings
These variables hold the connection information for the source database and target Tiger Cloud service. In Terminal on your migration machine, set the following:
You find the connection information for your Tiger Cloud service in the configuration file you downloaded when you created the service.
Avoid using connection strings that route through connection poolers like PgBouncer or similar tools. This tool requires a direct connection to the database to function properly.
Align the extensions on the source and target
Ensure that the Tiger Cloud service is running the Postgres extensions used in your source database.
Check the extensions on the source database:
- For each extension, enable it on your target Tiger Cloud service:
Tune your source database
Updating parameters on a Postgres instance will cause an outage. Choose a time that will cause the least issues to tune this database.
Update the DB instance parameter group for your source database
In [https://console.aws.amazon.com/rds/home#databases:][databases], select the RDS instance to migrate.
Click
Configuration, scroll down and note theDB instance parameter group, then clickParameter groups
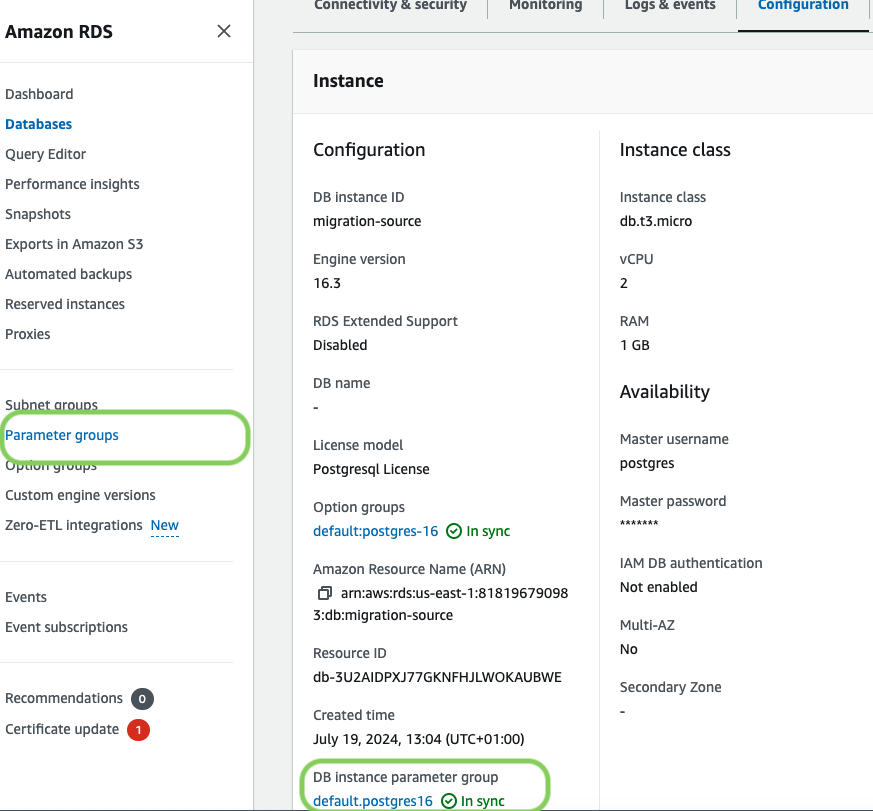
Click
Create parameter group, fill in the form with the following values, then clickCreate.- Parameter group name - whatever suits your fancy.
- Description - knock yourself out with this one.
- Engine type -
PostgreSQL - Parameter group family - the same as
DB instance parameter groupin yourConfiguration.
- In
Parameter groups, select the parameter group you created, then clickEdit. - Update the following parameters, then click
Save changes.rds.logical_replicationset to1: record the information needed for logical decoding.wal_sender_timeoutset to0: disable the timeout for the sender process.
In RDS, navigate back to your [databases][databases], select the RDS instance to migrate, and click
Modify.Scroll down to
Database options, select your new parameter group, and clickContinue.- Click
Apply immediatelyor choose a maintenance window, then clickModify DB instance.
- Click
Changing parameters will cause an outage. Wait for the database instance to reboot before continuing.
Verify that the settings are live in your database.
Enable replication
DELETEandUPDATEoperations
Replica identity assists data replication by identifying the rows being modified. Your options are that each table and hypertable in the source database should either have:
- A primary key: data replication defaults to the primary key of the table being replicated. Nothing to do.
- A viable unique index: each table has a unique, non-partial, non-deferrable index that includes only columns marked as
NOT NULL. If a UNIQUE index does not exist, create one to assist the migration. You can delete if after migration.
For each table, set REPLICA IDENTITY to the viable unique index:
- No primary key or viable unique index: use brute force.
For each table, set REPLICA IDENTITY to FULL:
For each UPDATE or DELETE statement, Postgres reads the whole table to find all matching rows. This results in significantly slower replication. If you are expecting a large number of UPDATE or DELETE operations on the table, best practice is to not use FULL.
Migrate your data, then start downtime
- Pull the live-migration docker image to you migration machine
To list the available commands, run:
To see the available flags for each command, run --help for that command. For example:
- Create a snapshot image of your source database in your Tiger Cloud service
This process checks that you have tuned your source database and target service correctly for replication, then creates a snapshot of your data on the migration machine:
Live-migration supplies information about updates you need to make to the source database and target service. For example:
If you have warnings, stop live-migration, make the suggested changes and start again.
- Synchronize data between your source database and your Tiger Cloud service
This command migrates data from the snapshot to your Tiger Cloud service, then streams transactions from the source to the target.
If the source Postgres version is 17 or later, you need to pass additional flag -e PGVERSION=17 to the migrate command.
After migrating the schema, live-migration prompts you to create hypertables for tables that contain time-series data in your Tiger Cloud service. Run create_hypertable() to convert these table. For more information, see the [Hypertable docs][Hypertable docs].
During this process, you see the migration process:
If migrate stops add --resume to start from where it left off.
Once the data in your target Tiger Cloud service has almost caught up with the source database, you see the following message:
Wait until replay_lag is down to a few kilobytes before you move to the next step. Otherwise, data replication may not have finished.
Start app downtime
Stop your app writing to the source database, then let the the remaining transactions finish to fully sync with the target. You can use tools like the
pg_topCLI orpg_stat_activityto view the current transaction on the source database.Stop Live-migration.
Live-migration continues the remaining work. This includes copying TimescaleDB metadata, sequences, and run policies. When the migration completes, you see the following message:
Validate your data, then restart your app
- Validate the migrated data
The contents of both databases should be the same. To check this you could compare the number of rows, or an aggregate of columns. However, the best validation method depends on your app.
- Stop app downtime
Once you are confident that your data is successfully replicated, configure your apps to use your Tiger Cloud service.
- Cleanup resources associated with live-migration from your migration machine
This command removes all resources and temporary files used in the migration process. When you run this command, you can no longer resume live-migration.
This section shows you how to move your data from a MST instance to a Tiger Cloud service using live migration from Terminal.
Set your connection strings
These variables hold the connection information for the source database and target Tiger Cloud service. In Terminal on your migration machine, set the following:
You find the connection information for your Tiger Cloud service in the configuration file you downloaded when you created the service.
Avoid using connection strings that route through connection poolers like PgBouncer or similar tools. This tool requires a direct connection to the database to function properly.
Align the version of TimescaleDB on the source and target
Ensure that the source and target databases are running the same version of TimescaleDB.
Check the version of TimescaleDB running on your Tiger Cloud service:
Update the TimescaleDB extension in your source database to match the target service:
If the TimescaleDB extension is the same version on the source database and target service, you do not need to do this.
For more information and guidance, see Upgrade TimescaleDB.
Ensure that the Tiger Cloud service is running the Postgres extensions used in your source database.
Check the extensions on the source database:
- For each extension, enable it on your target Tiger Cloud service:
Tune your source database
- Enable live-migration to replicate
DELETEandUPDATEoperations
Replica identity assists data replication by identifying the rows being modified. Your options are that each table and hypertable in the source database should either have:
- A primary key: data replication defaults to the primary key of the table being replicated. Nothing to do.
- A viable unique index: each table has a unique, non-partial, non-deferrable index that includes only columns marked as
NOT NULL. If a UNIQUE index does not exist, create one to assist the migration. You can delete if after migration.
For each table, set REPLICA IDENTITY to the viable unique index:
- No primary key or viable unique index: use brute force.
For each table, set REPLICA IDENTITY to FULL:
For each UPDATE or DELETE statement, Postgres reads the whole table to find all matching rows. This results in significantly slower replication. If you are expecting a large number of UPDATE or DELETE operations on the table, best practice is to not use FULL.
Migrate your data, then start downtime
- Pull the live-migration docker image to you migration machine
To list the available commands, run:
To see the available flags for each command, run --help for that command. For example:
- Create a snapshot image of your source database in your Tiger Cloud service
This process checks that you have tuned your source database and target service correctly for replication, then creates a snapshot of your data on the migration machine:
Live-migration supplies information about updates you need to make to the source database and target service. For example:
If you have warnings, stop live-migration, make the suggested changes and start again.
- Synchronize data between your source database and your Tiger Cloud service
This command migrates data from the snapshot to your Tiger Cloud service, then streams transactions from the source to the target.
If the source Postgres version is 17 or later, you need to pass additional flag -e PGVERSION=17 to the migrate command.
During this process, you see the migration process:
If migrate stops add --resume to start from where it left off.
Once the data in your target Tiger Cloud service has almost caught up with the source database, you see the following message:
Wait until replay_lag is down to a few kilobytes before you move to the next step. Otherwise, data replication may not have finished.
Start app downtime
Stop your app writing to the source database, then let the the remaining transactions finish to fully sync with the target. You can use tools like the
pg_topCLI orpg_stat_activityto view the current transaction on the source database.Stop Live-migration.
Live-migration continues the remaining work. This includes copying TimescaleDB metadata, sequences, and run policies. When the migration completes, you see the following message:
Validate your data, then restart your app
- Validate the migrated data
The contents of both databases should be the same. To check this you could compare the number of rows, or an aggregate of columns. However, the best validation method depends on your app.
- Stop app downtime
Once you are confident that your data is successfully replicated, configure your apps to use your Tiger Cloud service.
- Cleanup resources associated with live-migration from your migration machine
This command removes all resources and temporary files used in the migration process. When you run this command, you can no longer resume live-migration.
And you are done, your data is now in your Tiger Cloud service.
This section shows you how to work around frequently seen issues when using live migration.
ERROR: relation "xxx.yy" does not exist
This may happen when a relation is removed after executing the snapshot command. A relation can be a table, index, view, or materialized view. When you see you this error:
Do not perform any explicit DDL operation on the source database during the course of migration.
If you are migrating from self-hosted TimescaleDB or MST, disable the chunk retention policy on your source database until you have finished migration.
FATAL: remaining connection slots are reserved for non-replication superuser connections
This may happen when the number of connections exhaust max_connections defined in your target Tiger Cloud service. By default, live-migration needs around ~6 connections on the source and ~12 connections on the target.
Migration seems to be stuck with “x GB copied to Target DB (Source DB is y GB)”
When you are migrating a lot of data involved in aggregation, or there are many materialized views taking time to complete the materialization, this may be due to REFRESH MATERIALIZED VIEWS happening at the end of initial data migration.
To resolve this issue:
See what is happening on the target Tiger Cloud service:
When you run the
migrate, add the following flags to exclude specific materialized views being materialized:When
migratehas finished, manually refresh the materialized views you excluded.
Restart migration from scratch after a non-resumable failure
If the migration halts due to a failure, such as a misconfiguration of the source or target database, you may need to restart the migration from scratch. In such cases, you can reuse the original target Tiger Cloud service created for the migration by utilizing the --drop-if-exists flag with the migrate command.
This flag ensures that the existing target objects created by the previous migration are dropped, allowing the migration to proceed without trouble.
Note: This flag also requires you to manually recreate the TimescaleDB extension on the target.
Here’s an example command sequence to restart the migration:
This approach provides a clean slate for the migration process while reusing the existing target instance.
Inactive or lagging replication slots
If you encounter an “Inactive or lagging replication slots” warning on your cloud provider console after using live-migration, it might be due to lingering replication slots created by the live-migration tool on your source database.
To clean up resources associated with live migration, use the following command:
The --prune flag is used to delete temporary files in the ~/live-migration directory that were needed for the migration process. It's important to note that executing the clean command means you cannot resume the interrupted live migration.
Because of issues dumping passwords from various managed service providers, Live-migration migrates roles without passwords. You have to migrate passwords manually.
Live-migration does not migrate table privileges. After completing Live-migration:
Grant all roles to
tsdbadmin.On your migration machine, edit
/tmp/grants.psqlto match table privileges on your source database.Run
grants.psqlon your target Tiger Cloud service.
Postgres to Tiger Cloud: “live-replay not keeping up with source load”
- Go to Tiger Cloud Console ->
Monitoring->Insightstab and find the query which takes significant time - If the query is either UPDATE/DELETE, make sure the columns used on the WHERE clause have necessary indexes.
- If the query is either UPDATE/DELETE on the tables which are converted as hypertables, make sure the REPLIDA IDENTITY(defaults to primary key) on the source is compatible with the target primary key. If not, create an UNIQUE index source database by including the hypertable partition column and make it as a REPLICA IDENTITY. Also, create the same UNIQUE index on target.
ERROR: out of memory (or) Failed on request of size xxx in memory context "yyy" on a Tiger Cloud service
This error occurs when the Out of Memory (OOM) guard is triggered due to memory allocations exceeding safe limits. It typically happens when multiple concurrent connections to the TimescaleDB instance are performing memory-intensive operations. For example, during live migrations, this error can occur when large indexes are being created simultaneously.
The live-migration tool includes a retry mechanism to handle such errors. However, frequent OOM crashes may significantly delay the migration process.
One of the following can be used to avoid the OOM errors:
Upgrade to Higher Memory Spec Instances: To mitigate memory constraints, consider using a TimescaleDB instance with higher specifications, such as an instance with 8 CPUs and 32 GB RAM (or more). Higher memory capacity can handle larger workloads and reduce the likelihood of OOM errors.
Reduce Concurrency: If upgrading your instance is not feasible, you can reduce the concurrency of the index migration process using the
--index-jobs=<value>flag in the migration command. By default, the value of--index-jobsmatches the GUC max_parallel_workers. Lowering this value reduces the memory usage during migration but may increase the total migration time.
By taking these steps, you can prevent OOM errors and ensure a smoother migration experience with TimescaleDB.
===== PAGE: https://docs.tigerdata.com/migrate/dual-write-and-backfill/ =====
Examples:
Example 1 (bash):
export SOURCE="postgres://<user>:<password>@<source host>:<source port>/<db_name>"
export TARGET="postgres://tsdbadmin:<PASSWORD>@<HOST>:<PORT>/tsdb?sslmode=require"
Example 2 (bash):
psql target -c "SELECT extversion FROM pg_extension WHERE extname = 'timescaledb';"Example 3 (bash):
psql source -c "ALTER EXTENSION timescaledb UPDATE TO '<version here>';"Example 4 (bash):
psql source -c "SELECT * FROM pg_extension;"Set up Transit Gateway on AWS
URL: llms-txt#set-up-transit-gateway-on-aws
Contents:
- Before you begin
- Attaching a VPC to an AWS Transit Gateway
AWS Transit Gateway (TGW) enables transitive routing from on-premises networks through VPN and from other VPC. By creating a Transit Gateway VPC attachment, services in an MST Project VPC can route traffic to all other networks attached - directly or indirectly - to the Transit Gateway.
- Set up a [VPC peering for your project in MST][vpc-peering].
- In your AWS console, go to
My Accountand make a note of youraccount ID. - In your AWS console, go to
Transit Gateways, find the transit gateway that you want to attach, and make a note of the ID.
Attaching a VPC to an AWS Transit Gateway
To set up VPC peering for your project:
In [MST Console][mst-login], click
VPCand select the VPC connection that you created.In the
VPC Peering connectionspage selectTransit Gateway VPC Attachment.Type the account ID of your AWS account in
AWS Account ID.Type the ID of the Transit Gateway of AWS in
Transit Gateway ID.Type the IP range in the
Network cidrsfield.
Each Transit Gateway has a route table of its own, and by default routes traffic to each attached network directly to attached VPCs or indirectly through VPN attachments. The attached VPCs' route tables need to be updated to include the TGW as a target for any IP range (CIDR) that should be routed using the VPC attachment. These IP ranges must be configured when creating the attachment for an MST Project VPC.
- Click
Add peering connection.
A new connection with a status of Pending Acceptance is listed in your AWS console. Verify that the account ID and transit gateway ID match those listed in MST Console.
- In the AWS console, go to
Actionsand selectAccept Request. Update your AWS route tables to match your Managed Service for TimescaleDB CIDR settings.
After you accept the request in AWS Console, the peering connection is active in the MST Console.
===== PAGE: https://docs.tigerdata.com/mst/vpc-peering/vpc-peering-aws/ =====
Troubleshooting TimescaleDB
URL: llms-txt#troubleshooting-timescaledb
Contents:
- Common errors
- Error updating TimescaleDB when using a third-party Postgres administration tool
- Log error: could not access file "timescaledb"
- ERROR: could not access file "timescaledb-<version>": No such file or directory
- Scheduled jobs stop running
- Failed to start a background worker
- Cannot compress chunk
- Getting more information
- EXPLAINing query performance
- Dump TimescaleDB meta data
If you run into problems when using TimescaleDB, there are a few things that you can do. There are some solutions to common errors in this section as well as ways to output diagnostic information about your setup. If you need more guidance, you can join the community [Slack group][slack] or post an issue on the TimescaleDB [GitHub][github].
Error updating TimescaleDB when using a third-party Postgres administration tool
The ALTER EXTENSION timescaledb UPDATE command must be the first command executed upon connection to a database. Some administration tools execute commands before this, which can disrupt the process. You might need to manually update the database with psql. See the [update docs][update-db] for details.
Log error: could not access file "timescaledb"
If your Postgres logs have this error preventing it from starting up, you should double-check that the TimescaleDB files have been installed to the correct location. The installation methods use pg_config to get Postgres's location. However, if you have multiple versions of Postgres installed on the same machine, the location pg_config points to may not be for the version you expect. To check which version of TimescaleDB is used:
If that is the correct version, double-check that the installation path is the one you'd expect. For example, for Postgres 11.0 installed via Homebrew on macOS it should be /usr/local/Cellar/postgresql/11.0/bin:
If either of those steps is not the version you are expecting, you need to either uninstall the incorrect version of Postgres if you can, or update your PATH environmental variable to have the correct path of pg_config listed first, that is, by prepending the full path:
Then, reinstall TimescaleDB and it should find the correct installation path.
ERROR: could not access file "timescaledb-<version>": No such file or directory
If the error occurs immediately after updating your version of TimescaleDB and the file mentioned is from the previous version, it is probably due to an incomplete update process. Within the greater Postgres server instance, each database that has TimescaleDB installed needs to be updated with the SQL command ALTER EXTENSION timescaledb UPDATE; while connected to that database. Otherwise, the database looks for the previous version of the timescaledb files.
See [our update docs][update-db] for more info.
Scheduled jobs stop running
Your scheduled jobs might stop running for various reasons. On self-hosted TimescaleDB, you can fix this by restarting background workers:
On Tiger Cloud and Managed Service for TimescaleDB, restart background workers by doing one of the following:
- Run
SELECT timescaledb_pre_restore(), followed bySELECT timescaledb_post_restore(). - Power the service off and on again. This might cause a downtime of a few minutes while the service restores from backup and replays the write-ahead log.
Failed to start a background worker
You might see this error message in the logs if background workers aren't properly configured:
To fix this error, make sure that max_worker_processes, max_parallel_workers, and timescaledb.max_background_workers are properly set. timescaledb.max_background_workers should equal the number of databases plus the number of concurrent background workers. max_worker_processes should equal the sum of timescaledb.max_background_workers and max_parallel_workers.
For more information, see the [worker configuration docs][worker-config].
Cannot compress chunk
You might see this error message when trying to compress a chunk if the permissions for the compressed hypertable are corrupt.
This can be caused if you dropped a user for the hypertable before TimescaleDB 2.5. For this case, the user would be removed from pg_authid but not revoked from the compressed table.
As a result, the compressed table contains permission items that refer to numerical values rather than existing users (see below for how to find the compressed hypertable from a normal hypertable):
This means that the relacl column of pg_class needs to be updated and the offending user removed, but it is not possible to drop a user by numerical value. Instead, you can use the internal function repair_relation_acls in the _timescaledb_function schema:
This requires superuser privileges (since you're modifying the pg_class table) and that it removes any user not present in pg_authid from all tables, so use with caution.
The permissions are usually corrupted for the hypertable as well, but not always, so it is better to look at the compressed hypertable to see if the problem is present. To find the compressed hypertable for an associated hypertable (readings in this case):
Getting more information
EXPLAINing query performance
Postgres's EXPLAIN feature allows users to understand the underlying query plan that Postgres uses to execute a query. There are multiple ways that Postgres can execute a query: for example, a query might be fulfilled using a slow sequence scan or a much more efficient index scan. The choice of plan depends on what indexes are created on the table, the statistics that Postgres has about your data, and various planner settings. The EXPLAIN output let's you know which plan Postgres is choosing for a particular query. Postgres has a [in-depth explanation][using explain] of this feature.
To understand the query performance on a hypertable, we suggest first making sure that the planner statistics and table maintenance is up-to-date on the hypertable