pgvector ivfflat index
Pgvector provides a clustering-based indexing algorithm. The blog post describes how it works in detail. It provides the fastest index-build speed but the slowest query speeds of any indexing algorithm.
To create this index, run:
Note: ivfflat should never be created on empty tables because it needs to cluster data, and that only happens when an index is first created, not when new rows are inserted or modified. Also, if your table undergoes a lot of modifications, you need to rebuild this index occasionally to maintain good accuracy. See the blog post for details.
Pgvector ivfflat has a lists index parameter that is automatically set with a smart default based on the number of rows in your table. If you know that you'll have a different table size, you can specify the number of records to use for calculating the lists parameter as follows:
You can also set the lists parameter directly:
You can also set a parameter to control the accuracy vs. query speed trade-off at query time. The parameter is set in the search() function using the query_params argument. You can set the probes. This parameter specifies the number of clusters searched during a query. It is recommended to set this parameter to sqrt(lists) where lists is the num_list parameter used above during index creation. Higher values improve query accuracy while making the query slower.
You can specify this value during search as follows:
To drop the index, run:
Time partitioning
In many use cases where you have many embeddings, time is an important component associated with the embeddings. For example, when embedding news stories, you often search by time as well as similarity (for example, stories related to Bitcoin in the past week or stories about Clinton in November 2016).
Yet, traditionally, searching by two components "similarity" and "time" is challenging for Approximate Nearest Neighbor (ANN) indexes and makes the similarity-search index less effective.
One approach to solving this is partitioning the data by time and creating ANN indexes on each partition individually. Then, during search, you can:
- Step 1: filter partitions that don't match the time predicate.
- Step 2: perform the similarity search on all matching partitions.
- Step 3: combine all the results from each partition in step 2, re-rank, and filter out results by time.
Step 1 makes the search a lot more efficient by filtering out whole swaths of data in one go.
Timescale-vector supports time partitioning using TimescaleDB's hypertables. To use this feature, simply indicate the length of time for each partition when creating the client:
Then, insert data where the IDs use UUIDs v1 and the time component of the UUIDspecifies the time of the embedding. For example, to create an embedding for the current time, simply do:
To insert data for a specific time in the past, create the UUID using the uuid_from_time function
You can then query the data by specifying a uuid_time_filter in the search call:
Cosine distance is used by default to measure how similarly an embedding is to a given query. In addition to cosine distance, Euclidean/L2 distance is also supported. The distance type is set when creating the client using the distance_type parameter. For example, to use the Euclidean distance metric, you can create the client with:
Valid values for distance_type are cosine and euclidean.
It is important to note that you should use consistent distance types on clients that create indexes and perform queries. That is because an index is only valid for one particular type of distance measure.
Note that the StreamingDiskANN index only supports cosine distance at this time.
===== PAGE: https://docs.tigerdata.com/ai/langchain-integration-for-pgvector-and-timescale-vector/ =====
Examples:
Example 1 (bash):
pip install timescale_vectorExample 2 (bash):
pip install python-dotenvExample 3 (unknown):
Load up your Postgres credentials, the safest way is with a `.env` file:Example 4 (unknown):
Next, create the client. This tutorial, uses the sync client. But the library has an async client as well (with an identical interface that
uses async functions).

The client constructor takes three required arguments:

| name           | description                                                                               |
|----------------|-------------------------------------------------------------------------------------------|
| `service_url`    | Tiger Cloud service URL / connection string                                                     |
| `table_name`     | Name of the table to use for storing the embeddings. Think of this as the collection name |
| `num_dimensions` | Number of dimensions in the vector                                                        |
Create a chatbot using pgvector
URL: llms-txt#create-a-chatbot-using-pgvector
Contents:
- Use the
pgvectorextension to create achatbot- Prerequisites
- Using the
pgvectorextension to create a chatbot
The pgvector Postgres extension helps you to store and search over machine learning-generated embeddings. It provides different capabilities that allows you to identify both exact and approximate nearest neighbors. It is designed to work seamlessly with other Postgres features, including indexing and querying.
For more information about these functions and the options available, see the [pgvector][pgvector-repo] repository.
Use the pgvector extension to create a chatbot
The pgvector Postgres extension allows you to create, store, and query OpenAI [vector embeddings][vector-embeddings] in a Postgres database instance. This page shows you how to use [retrieval augmented generation (RAG)][rag-docs] to create a chatbot that combines your data with ChatGPT using OpenAI and pgvector. RAG provides a solution to the problem that a foundational model such as GPT-3 or GPT-4 could be missing some information needed to give a good answer, because that information was not in the dataset used to train the model. This can happen if the information is stored in private documents or only became available recently.
In this example, you create embeddings, insert the embeddings into a Tiger Cloud service and query the embeddings using pgvector. The content for the embeddings is from the Tiger Data blog, specifically from the [Developer Q&A][developer-qa] section, which features posts by Tiger Data users talking about their real-world use cases.
Before you begin, make sure you have:
- Installed Python.
- Created a [Tiger Cloud service][cloud-login].
- Downloaded the cheatsheet when you created the service. This sheet contains the connection details for the database you want to use as a vector database.
- Cloned the [pgvector repository][timescale-pgvector].
- Signed up for an [OpenAI developer account][openai-signup].
- Created an API key and made a note of your OpenAI [API key][api-key].
If you are on a free plan there may be rate limiting for your API requests.
Using the pgvector extension to create a chatbot
Create and activate a Python virtual environment:
Set the environment variables for
OPENAI_API_KEYandTIMESCALE_CONNECTION_STRING. In this example, to set the environment variables in macOS, open thezshrcprofile. Replace<OPENAI_API>, and<SERVICE_URL>with your OpenAI API key and the URL of your Tiger Cloud service:
bash echo $OPENAI_API_KEY echo $TIMESCALE_CONNECTION_STRING bash pip install -r requirements.txt python ############################################################################### ############################################################################### import openai import os import pandas as pd import numpy as np import json import tiktoken
from dotenv import load_dotenv, find_dotenv _ = load_dotenv(find_dotenv()) openai.api_key = os.environ['OPENAI_API_KEY']
df = pd.read_csv('blog_posts_data.csv') df.head()
############################################################################### ############################################################################### def num_tokens_from_string(string: str, encoding_name = "cl100k_base") -> int: if not string: return 0 encoding = tiktoken.get_encoding(encoding_name) num_tokens = len(encoding.encode(string)) return num_tokens
def get_embedding_cost(num_tokens): return num_tokens/1000*0.0001
def get_total_embeddings_cost(): total_tokens = 0 for i in range(len(df.index)): text = df['content'][i] token_len = num_tokens_from_string(text) total_tokens = total_tokens + token_len total_cost = get_embedding_cost(total_tokens) return total_cost ###############################################################################
total_cost = get_total_embeddings_cost() print("Estimated price to embed this content = $" + str(total_cost))
############################################################################### ############################################################################### new_list = [] for i in range(len(df.index)): text = df['content'][i] token_len = num_tokens_from_string(text) if token_len <= 512: new_list.append([df['title'][i], df['content'][i], df['url'][i], token_len]) else: start = 0 ideal_token_size = 512 ideal_size = int(ideal_token_size // (4/3)) end = ideal_size #split text by spaces into words words = text.split()
#remove empty spaces words = [x for x in words if x != ' ']
total_words = len(words)
#calculate iterations chunks = total_words // ideal_size if total_words % ideal_size != 0: chunks += 1
new_content = [] for j in range(chunks): if end > total_words: end = total_words new_content = words[start:end] new_content_string = ' '.join(new_content) new_content_token_len = num_tokens_from_string(new_content_string) if new_content_token_len > 0: new_list.append([df['title'][i], new_content_string, df['url'][i], new_content_token_len]) start += ideal_size end += ideal_size
def get_embeddings(text): response = openai.Embedding.create( model="text-embedding-ada-002", input = text.replace("\n"," ") ) embedding = response['data'][0]['embedding'] return embedding
for i in range(len(new_list)): text = new_list[i][1] embedding = get_embeddings(text) new_list[i].append(embedding)
df_new = pd.DataFrame(new_list, columns=['title', 'content', 'url', 'tokens', 'embeddings']) df_new.head()
df_new.to_csv('blog_data_and_embeddings.csv', index=False)
print("Done! Check the file blog_data_and_embeddings.csv for your results.") bash Estimated price to embed this content = $0.0060178 Done! Check the file blog_data_and_embeddings.csv for your results. python ############################################################################### ############################################################################### import openai import os import pandas as pd import numpy as np import psycopg2 import ast import pgvector import math from psycopg2.extras import execute_values from pgvector.psycopg2 import register_vector
############################################################################### ############################################################################### connection_string = os.environ['TIMESCALE_CONNECTION_STRING']
conn = psycopg2.connect(connection_string) cur = conn.cursor()
#install pgvector in your database cur.execute("CREATE EXTENSION IF NOT EXISTS vector;"); conn.commit()
register_vector(conn) table_create_command = """ CREATE TABLE embeddings ( id bigserial primary key, title text, url text, content text, tokens integer, embedding vector(1536) ); """
cur.execute(table_create_command) cur.close() conn.commit() ###############################################################################
df = pd.read_csv('blog_data_and_embeddings.csv') titles = df['title'] urls = df['url'] contents = df['content'] tokens = df['tokens'] embeds = [list(map(float, ast.literal_eval(embed_str))) for embed_str in df['embeddings']]
df_new = pd.DataFrame({ 'title': titles, 'url': urls, 'content': contents, 'tokens': tokens, 'embeddings': embeds })
############################################################################### ############################################################################### register_vector(conn) cur = conn.cursor()
data_list = [(row['title'], row['url'], row['content'], int(row['tokens']), np.array(row['embeddings'])) for index, row in df_new.iterrows()] execute_values(cur, "INSERT INTO embeddings (title, url, content, tokens, embedding) VALUES %s", data_list) conn.commit()
cur.execute("SELECT COUNT(*) as cnt FROM embeddings;") num_records = cur.fetchone()[0] print("Number of vector records in table: ", num_records,"\n")
cur.execute("SELECT * FROM embeddings LIMIT 1;") records = cur.fetchall() print("First record in table: ", records)
#calculate the index parameters according to best practices num_lists = num_records / 1000 if num_lists < 10: num_lists = 10 if num_records > 1000000: num_lists = math.sqrt(num_records)
#use the cosine distance measure, which is what we'll later use for querying cur.execute(f'CREATE INDEX ON embeddings USING ivfflat (embedding vector_cosine_ops) WITH (lists = {num_lists});') conn.commit() print("Index created on embeddings table") bash 0 How to Build a Weather Station With Elixir, Ne... ... [0.021399984136223793, 0.021850213408470154, -... 1 How to Build a Weather Station With Elixir, Ne... ... [0.01620873250067234, 0.011362895369529724, 0.... 2 How to Build a Weather Station With Elixir, Ne... ... [0.022517921403050423, -0.0019158280920237303,... 3 CloudQuery on Using Postgres for Cloud Asset... ... [0.008915113285183907, -0.004873732570558786, ... 4 CloudQuery on Using PostgreSQL for Cloud Asset... ... [0.0204352755099535, 0.010087345726788044, 0.0...
[5 rows x 5 columns] Number of vector records in table: 129
First record in table: [(1, 'How to Build a Weather Station With Elixir, Nerves, and TimescaleDB', 'https://www.timescale.com/blog/how-to-build-a-weather-station-with-elixir-nerves-and-timescaledb/', 'This is an installment of our “Community Member Spotlight” series, where we invite our customers to share their work, shining a light on their success and inspiring others with new ways to use technology to solve problems.In this edition,Alexander Koutmos, author of the Build a Weather Station with Elixir and Nerves book, joins us to share how he uses Grafana and TimescaleDB to store and visualize weather data collected from IoT sensors.About the teamThe bookBuild a Weather Station with Elixir and Nerveswas a joint effort between Bruce Tate, Frank Hunleth, and me.I have been writing software professionally for almost a decade and have been working primarily with Elixir since 2016. I currently maintain a few Elixir libraries onHexand also runStagira, a software consultancy company.Bruce Tateis a kayaker, programmer, and father of two from Chattanooga, Tennessee. He is the author of more than ten books and has been around Elixir from the beginning. He is the founder ofGroxio, a company that trains Elixir developers.Frank Hunlethis an embedded systems programmer, OSS maintainer, and Nerves core team member. When not in front of a computer, he loves running and spending time with his family.About the projectIn the Pragmatic Bookshelf book,Build a Weather Station with Elixir and Nerves, we take a project-based approach and guide the reader to create a Nerves-powered IoT weather station.For those unfamiliar with the Elixir ecosystem,Nervesis an IoT framework that allows you to build and deploy IoT applications on a wide array of embedded devices. At a high level, Nerves allows you to focus on building your project and takes care of a lot of the boilerplate associated with running Elixir on embedded devices.The goal of the book is to guide the reader through the process of building an end-to-end IoT solution for capturing, persisting, and visualizing weather data.Assembled weather station hooked up to development machine.One of the motivating factors for this book was to create a real-world project where readers could get hands-on experience with hardware without worrying too much about the nitty-gritty of soldering components together. Experimenting with hardware can often feel intimidating and confusing, but with Elixir and Nerves, we feel confident that even beginners get comfortable and productive quickly. As a result, in the book, we leverage a Raspberry Pi Zero W along with a few I2C enabled sensors to', 501, array([ 0.02139998, 0.02185021, -0.00537814, ..., -0.01257126, -0.02165324, -0.03714396], dtype=float32))] Index created on embeddings table python ############################################################################### ############################################################################### import openai import os import pandas as pd import numpy as np import json import tiktoken import psycopg2 import ast import pgvector import math from psycopg2.extras import execute_values from pgvector.psycopg2 import register_vector
from dotenv import load_dotenv, find_dotenv _ = load_dotenv(find_dotenv()) openai.api_key = os.environ['OPENAI_API_KEY']
connection_string = os.environ['TIMESCALE_CONNECTION_STRING']
conn = psycopg2.connect(connection_string)
############################################################################### ############################################################################### def get_top3_similar_docs(query_embedding, conn): embedding_array = np.array(query_embedding) register_vector(conn) cur = conn.cursor() cur.execute("SELECT content FROM embeddings ORDER BY embedding <=> %s LIMIT 3", (embedding_array,)) top3_docs = cur.fetchall() return top3_docs
def get_completion_from_messages(messages, model="gpt-3.5-turbo-0613", temperature=0, max_tokens=1000): response = openai.ChatCompletion.create( model=model, messages=messages, temperature=temperature, max_tokens=max_tokens, ) return response.choices[0].message["content"]
def get_embeddings(text): response = openai.Embedding.create( model="text-embedding-ada-002", input = text.replace("\n"," ") ) embedding = response['data'][0]['embedding'] return embedding ###############################################################################
############################################################################### ############################################################################### def process_input_with_retrieval(user_input): delimiter = "
- Run the script using the
python query_embeddings.pycommand. You should see an output that looks a bit like this:
===== PAGE: https://docs.tigerdata.com/use-timescale/extensions/pgcrypto/ =====
Examples:
Example 1 (bash):
virtualenv pgvectorenv
    source pgvectorenv/bin/activate
Example 2 (bash):
nano ~/.zshrc
    export OPENAI_API_KEY='<OPENAI_API>'
    export TIMESCALE_CONNECTION_STRING='<SERVICE_URL>'

    Update the shell with the new variables using `source ~/.zshrc`

1.  Confirm that you have set the environment variables using:
Example 3 (unknown):
1.  Install the required modules and packages using the `requirements.txt`. This
    file is located in the `vector-cookbook\openai_pgvector_helloworld`
    directory:
Example 4 (unknown):
1.  To create embeddings for your data using the OpenAI API, open an editor of
    your choice and create the `create_embeddings.py` file.
generate_uuidv7()
URL: llms-txt#generate_uuidv7()
Contents:
- Samples
Generate a UUIDv7 object based on the current time.
The UUID contains a a UNIX timestamp split into millisecond and sub-millisecond parts, followed by random bits.
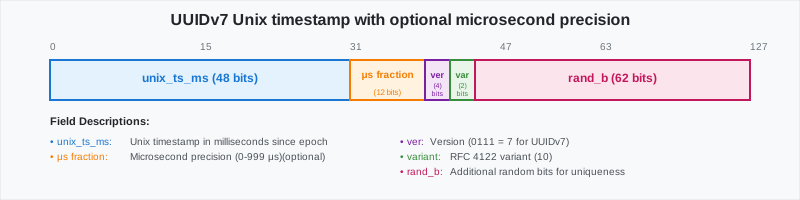
You can use this function to generate a time-ordered series of UUIDs suitable for use in a time-partitioned column in TimescaleDB.
Generate a UUIDv7 object based on the current time
Insert a generated UUIDv7 object
===== PAGE: https://docs.tigerdata.com/api/uuid-functions/to_uuidv7/ =====
Examples:
Example 1 (sql):
postgres=# SELECT generate_uuidv7();
               generate_uuidv7
    --------------------------------------
     019913ce-f124-7835-96c7-a2df691caa98
Example 2 (sql):
INSERT INTO alerts VALUES (generate_uuidv7(), 'high CPU');Encrypt data using pgcrypto
URL: llms-txt#encrypt-data-using-pgcrypto
Contents:
- Use the
pgcryptoextension to encrypt inserted data- Using the
pgcryptoextension to encrypt inserted data
- Using the
The pgcrypto Postgres extension provides cryptographic functions such as:
- General hashing
- Password hashing
- PGP encryption
- Raw encryption
- Random-data
For more information about these functions and the options available, see the [pgcrypto documentation][pgcrypto-docs].
Use the pgcrypto extension to encrypt inserted data
The pgcrypto extension allows you to encrypt, decrypt, hash, and create digital signatures within your database. Tiger Data understands how precious your data is and safeguards sensitive information.
Using the pgcrypto extension to encrypt inserted data
Install the
pgcryptoextension:You can confirm if the extension is installed using the
\dxcommand. The installed extensions are listed:Create a table named
user_passwords:Insert the values in the
user_passwordstable and replace<Password_Key>with a password key of your choice:You can confirm that the password is encrypted using the command:
The encrypted passwords are listed:
- To view the decrypted passwords, replace
<Password_Key>with the password key that you created:
The decrypted passwords are listed:
===== PAGE: https://docs.tigerdata.com/use-timescale/extensions/postgis/ =====
Examples:
Example 1 (sql):
CREATE EXTENSION IF NOT EXISTS pgcrypto;Example 2 (sql):
List of installed extensions
            Name         | Version |   Schema   |                                      Description
    ---------------------+---------+------------+---------------------------------------------------------------------------------------
     pg_stat_statements  | 1.10    | public     | track planning and execution statistics of all SQL statements executed
     pgcrypto            | 1.3     | public     | cryptographic functions
     plpgsql             | 1.0     | pg_catalog | PL/pgSQL procedural language
     timescaledb         | 2.11.0  | public     | Enables scalable inserts and complex queries for time-series data (Community Edition)
     timescaledb_toolkit | 1.16.0  | public     | Library of analytical hyperfunctions, time-series pipelining, and other SQL utilities
Example 3 (sql):
CREATE TABLE user_passwords (username varchar(100) PRIMARY KEY, crypttext text);Example 4 (sql):
INSERT INTO tbl_sym_crypt (username, crypttext)
        VALUES ('user1', pgp_sym_encrypt('user1_password','<Password_Key>')),
           ('user2', pgp_sym_encrypt('user2_password','<Password_Key>'));
Counter and gauge aggregation
URL: llms-txt#counter-and-gauge-aggregation
This section contains functions related to counter and gauge aggregation. Counter aggregation functions are used to accumulate monotonically increasing data by treating any decrements as resets. Gauge aggregates are similar, but are used to track data which can decrease as well as increase. For more information about counter aggregation functions, see the [hyperfunctions documentation][hyperfunctions-counter-agg].
Some hyperfunctions are included in the default TimescaleDB product. For additional hyperfunctions, you need to install the [TimescaleDB Toolkit][install-toolkit] Postgres extension.
<HyperfunctionTable hyperfunctionFamily='metric aggregation' includeExperimental sortByType />
All accessors can be used with CounterSummary, and all but num_resets with GaugeSummary.
===== PAGE: https://docs.tigerdata.com/api/gapfilling-interpolation/ =====
Storage in Tiger
URL: llms-txt#storage-in-tiger
Tiered storage is a [hierarchical storage management architecture][hierarchical-storage] for [real-time analytics][create-service] services you create in Tiger Cloud.
Engineered for infinite low-cost scalability, tiered storage consists of the following:
High-performance storage tier: stores the most recent and frequently queried data. This tier comes in two types, standard and enhanced, and provides you with up to 64 TB of storage and 32,000 IOPS.
Object storage tier: stores data that is rarely accessed and has lower performance requirements. For example, old data for auditing or reporting purposes over long periods of time, even forever. The object storage tier is low-cost and bottomless.
No matter the tier your data is stored in, you can [query it when you need it][querying-tiered-data]. Tiger Cloud seamlessly accesses the correct storage tier and generates the response.
You [define tiering policies][creating-data-tiering-policy] that automatically migrate data from the high-performance storage tier to the object tier as it ages. You use [retention policies][add-retention-policies] to remove very old data from the object storage tier.
With tiered storage you don't need an ETL process, infrastructure changes, or custom-built, bespoke solutions to offload data to secondary storage and fetch it back in when needed. Kick back and relax, we do the work for you.
In this section, you:
- [Learn more about storage tiers][about-data-tiering]: understand how the tiers are built and how they differ.
- [Manage storage and tiering][enabling-data-tiering]: configure high-performance storage, object storage, and data tiering.
- [Query tiered data][querying-tiered-data]: query the data in the object storage.
- [Learn about replicas and forks with tiered data][replicas-and-forks]: understand how tiered storage works with forks and replicas of your service.
===== PAGE: https://docs.tigerdata.com/use-timescale/metrics-logging/ =====
add_job()
URL: llms-txt#add_job()
Contents:
- Samples
- Required arguments
- Optional arguments
- Returns
Register a job for scheduling by the automation framework. For more information about scheduling, including example jobs, see the [jobs documentation section][using-jobs].
Register the user_defined_action procedure to run every hour:
Register the user_defined_action procedure to run at midnight every Sunday. The initial_start provided must satisfy these requirements, so it must be a Sunday midnight:
Required arguments
| Name | Type | Description |
|---|---|---|
proc | REGPROC | Name of the function or procedure to register as a job. |
schedule_interval | INTERVAL | Interval between executions of this job. Defaults to 24 hours |
Optional arguments
| Name | Type | Description |
|---|---|---|
config | JSONB | Jobs-specific configuration, passed to the function when it runs |
initial_start | TIMESTAMPTZ | Time the job is first run. In the case of fixed schedules, this also serves as the origin on which job executions are aligned. If omitted, the current time is used as origin in the case of fixed schedules. |
scheduled | BOOLEAN | Set to FALSE to exclude this job from scheduling. Defaults to TRUE. |
check_config | REGPROC | A function that takes a single argument, the JSONB config structure. The function is expected to raise an error if the configuration is not valid, and return nothing otherwise. Can be used to validate the configuration when adding a job. Only functions, not procedures, are allowed as values for check_config. |
fixed_schedule | BOOLEAN | Set to FALSE if you want the next start of a job to be determined as its last finish time plus the schedule interval. Set to TRUE if you want the next start of a job to begin schedule_interval after the last start. Defaults to TRUE |
timezone | TEXT | A valid time zone. If fixed_schedule is TRUE, subsequent executions of the job are aligned on its initial start. However, daylight savings time (DST) changes may shift this alignment. Set to a valid time zone if you want to mitigate this issue. Defaults to NULL. |
| Column | Type | Description |
|---|---|---|
job_id | INTEGER | TimescaleDB background job ID |
===== PAGE: https://docs.tigerdata.com/api/data-retention/add_retention_policy/ =====
Examples:
Example 1 (sql):
CREATE OR REPLACE PROCEDURE user_defined_action(job_id int, config jsonb) LANGUAGE PLPGSQL AS
$$
BEGIN
  RAISE NOTICE 'Executing action % with config %', job_id, config;
END
$$;

SELECT add_job('user_defined_action','1h');
SELECT add_job('user_defined_action','1h', fixed_schedule => false);
Example 2 (sql):
-- December 4, 2022 is a Sunday
SELECT add_job('user_defined_action','1 week', initial_start => '2022-12-04 00:00:00+00'::timestamptz);
-- if subject to DST
SELECT add_job('user_defined_action','1 week', initial_start => '2022-12-04 00:00:00+00'::timestamptz, timezone => 'Europe/Berlin');
Permission denied for table job_errors when running pg_dump
URL: llms-txt#permission-denied-for-table-job_errors-when-running-pg_dump
When the pg_dump tool tries to acquire a lock on the job_errors table, if the user doesn't have the required SELECT permission, it results in this error.
To resolve this issue, use a superuser account to grant the necessary permissions to the user requiring the pg_dump tool. Use this command to grant permissions to <TEST_USER>:
===== PAGE: https://docs.tigerdata.com/_troubleshooting/self-hosted/update-timescaledb-could-not-access-file/ =====
Examples:
Example 1 (sql):
GRANT SELECT ON TABLE _timescaledb_internal.job_errors TO <TEST_USER>;Viewing service logs
URL: llms-txt#viewing-service-logs
Occasionally there is a need to inspect logs from Managed Service for TimescaleDB. For example, to debug query performance or inspecting errors caused by a specific workload.
There are different built-in ways to inspect service logs at Managed Service for TimescaleDB:
When you select a specific service, navigate to the
Logstab to see recent events. Logs can be browsed back in time.Download logs using the [command-line client][command-line-client] by running:
[REST API][] endpoint is available for fetching the same information two above methods output, in case programmatic access is needed.
Service logs included on the normal service price are stored only for a few days. Unless you are using logs integration to another service, older logs are not accessible.
===== PAGE: https://docs.tigerdata.com/mst/vpc-peering/ =====
Examples:
Example 1 (bash):
avn service logs -S desc -f --project <PROJECT_NAME> <SERVICE_NAME>Queries using locf() don't treat NULL values as missing
URL: llms-txt#queries-using-locf()-don't-treat-null-values-as-missing
When you have a query that uses a last observation carried forward (locf) function, the query carries forward NULL values by default. If you want the function to ignore NULL values instead, you can set treat_null_as_missing=TRUE as the second parameter in the query. For example:
===== PAGE: https://docs.tigerdata.com/_troubleshooting/cagg-watermark-in-future/ =====
Examples:
Example 1 (sql):
dev=# select * FROM (select time_bucket_gapfill(4, time,-5,13), locf(avg(v)::int,treat_null_as_missing:=true) FROM (VALUES (0,0),(8,NULL)) v(time, v) WHERE time BETWEEN 0 AND 10 GROUP BY 1) i ORDER BY 1 DESC;
 time_bucket_gapfill | locf
---------------------+------
                  12 |    0
                   8 |    0
                   4 |    0
                   0 |    0
                  -4 |
                  -8 |
(6 rows)
Upgrading fails with an error saying "old version has already been loaded"
URL: llms-txt#upgrading-fails-with-an-error-saying-"old-version-has-already-been-loaded"
When you use the ALTER EXTENSION timescaledb UPDATE command to upgrade, this error might appear.
This occurs if you don't run ALTER EXTENSION timescaledb UPDATE command as the first command after starting a new session using psql or if you use tab completion when running the command. Tab completion triggers metadata queries in the background which prevents the alter extension from being the first command.
To correct the problem, execute the ALTER EXTENSION command like this:
===== PAGE: https://docs.tigerdata.com/_troubleshooting/self-hosted/migration-errors-perms/ =====
Examples:
Example 1 (sql):
psql -X -c 'ALTER EXTENSION timescaledb UPDATE;'Failover
URL: llms-txt#failover
Contents:
- Uncontrolled master or replica fail
- Controlled failover during upgrades
One standby read-only replica server is configured, for each service on a Pro plan. You can query a read-only replica server, but cannot write to a read-only replica server. When a master server fails, the standby replica server is automatically promoted as master. If you manually created a read-only replica service, then if a master server fails, the read-only replica services are not promoted as master servers.
The two distinct cases during which failovers occur are:
- When the master or replica fails unexpectedly, for example because the hardware hosting the virtual machine fails.
- When controlled failover happens because of upgrades.
Uncontrolled master or replica fail
When a replica server fails unexpectedly, there is no way to know whether the server really failed, or whether there is a temporary network glitch with the cloud provider's network.
There is a 300 second timeout before Managed Service for TimescaleDB automatically decides the server is gone and spins up a new replica server. During these 300 seconds, replica.servicename.timescaledb.io points to a server that may not serve queries anymore. The DNS record pointing to the master server servicename.timescaledb.io continues to serve the queries. If the replica server does not come back up within 300 seconds, replica.servicename.timescaledb.io points to the master server, until a new replica server is built.
When the master server fails, a replica server waits for 60 seconds before promoting itself as master. During this 60-second timeout, the master server servicename.timescaledb.io remains unavailable and does not respond. However, replica.servicename.timescaledb.io works in read-only mode. After the replica server promotes itself as master, servicename.timescaledb.io points to the new master server, and replica.servicename.timescaledb.io continues to point to the new master server. A new replica server is built automatically, and after it is in sync, replica.servicename.timescaledb.io points to the new replica server.
Controlled failover during upgrades
When applying upgrades or plan changes on business or premium plans, the standby server is replaced:
A new server is started, the backup is restored, and the new server starts following the old master server. After the new server is up and running, replica.servicename.timescaledb.io is updated, and the old replica server is deleted.
For premium plans, this step is executed for both replica servers before the master server is replaced. Two new servers are started, a backup is restored, and one new server is synced up to the old master server. When it is time to switch the master to a new server, the old master is terminated and one of the new replica servers is immediately promoted as a master. At this point, servicename.timescaledb.io is updated to point at the new master server. Similarly, the new master is removed from the replica.servicename.timescaledb.io record.
===== PAGE: https://docs.tigerdata.com/mst/manage-backups/ =====
Migrate from non-Postgres using dual-write and backfill
URL: llms-txt#migrate-from-non-postgres-using-dual-write-and-backfill
Contents:
- Set up a target database instance in Tiger Cloud
- Modify the application to write to the target database
- Set up schema and migrate relational data to target database
- Start application in dual-write mode
- Determine the completion point
T
- Missing writes
- Late-arriving data
- Consistency range
- Completion point
- Determine the completion point
- Backfill data from source to target
This document provides detailed step-by-step instructions to migrate data using the [dual-write and backfill][dual-write-and-backfill] migration method from a source database which is not using Postgres to Tiger Cloud.
In the context of migrations, your existing production database is referred to as the SOURCE database, the Tiger Cloud service that you are migrating your data to is the TARGET.
In detail, the migration process consists of the following steps:
- Set up a target Tiger Cloud service.
- Modify the application to write to a secondary database.
- Set up schema and migrate relational data to target database.
- Start the application in dual-write mode.
- Determine the completion point
T. - Backfill time-series data from source to target.
- Enable background jobs (policies) in the target database.
- Validate that all data is present in target database.
- Validate that target database can handle production load.
- Switch application to treat target database as primary (potentially continuing to write into source database, as a backup).
If you get stuck, you can get help by either opening a support request, or take your issue to the #migration channel in the community slack, where the developers of this migration method are there to help.
You can open a support request directly from [Tiger Cloud Console][support-link], or by email to support@tigerdata.com.
1. Set up a target database instance in Tiger Cloud
[Create a Tiger Cloud service][create-service].
If you intend on migrating more than 400 GB, open a support request to ensure that enough disk is pre-provisioned on your Tiger Cloud service.
You can open a support request directly from [Tiger Cloud Console][support-link], or by email to support@tigerdata.com.
2. Modify the application to write to the target database
How exactly to do this is dependent on the language that your application is written in, and on how exactly your ingestion and application function. In the simplest case, you simply execute two inserts in parallel. In the general case, you must think about how to handle the failure to write to either the source or target database, and what mechanism you want to or can build to recover from such a failure.
Should your time-series data have foreign-key references into a plain table, you must ensure that your application correctly maintains the foreign key relations. If the referenced column is a *SERIAL type, the same row inserted into the source and target may not obtain the same autogenerated id. If this happens, the data backfilled from the source to the target is internally inconsistent. In the best case it causes a foreign key violation, in the worst case, the foreign key constraint is maintained, but the data references the wrong foreign key. To avoid these issues, best practice is to follow [live migration].
You may also want to execute the same read queries on the source and target database to evaluate the correctness and performance of the results which the queries deliver. Bear in mind that the target database spends a certain amount of time without all data being present, so you should expect that the results are not the same for some period (potentially a number of days).
3. Set up schema and migrate relational data to target database
Describing exactly how to migrate your data from every possible source is not feasible, instead we tell you what needs to be done, and hope that you find resources to support you.
In this step, you need to prepare the database to receive time-series data which is dual-written from your application. If you're migrating from another time-series database then you only need to worry about setting up the schema for the hypertables which will contain time-series data. For some background on what hypertables are, consult the [tables and hypertables] section of the getting started guide.
If you're migrating from a relational database containing both relational and time-series data, you also need to set up the schema for the relational data, and copy it over in this step, excluding any of the time-series data. The time-series data is backfilled in a subsequent step.
Our assumption in the dual-write and backfill scenario is that the volume of relational data is either very small in relation to the time-series data, so that it is not problematic to briefly stop your production application while you copy the relational data, or that it changes infrequently, so you can get a snapshot of the relational metadata without stopping your application. If this is not the case for your application, you should reconsider using the dual-write and backfill method.
If you're planning on experimenting with continuous aggregates, we recommend that you first complete the dual-write and backfill migration, and only then create continuous aggregates on the data. If you create continuous aggregates on a hypertable before backfilling data into it, you must refresh the continuous aggregate over the whole time range to ensure that there are no holes in the aggregated data.
4. Start application in dual-write mode
With the target database set up, your application can now be started in dual-write mode.
5. Determine the completion point T
After dual-writes have been executing for a while, the target hypertable contains data in three time ranges: missing writes, late-arriving data, and the "consistency" range
class="main-content__illustration" width={1375} height={944} src="https://assets.timescale.com/docs/images/hypertable_backfill_consistency.png" alt="Hypertable dual-write ranges" />
If the application is made up of multiple writers, and these writers did not all simultaneously start writing into the target hypertable, there is a period of time in which not all writes have made it into the target hypertable. This period starts when the first writer begins dual-writing, and ends when the last writer begins dual-writing.
Late-arriving data
Some applications have late-arriving data: measurements which have a timestamp in the past, but which weren't written yet (for example from devices which had intermittent connectivity issues). The window of late-arriving data is between the present moment, and the maximum lateness.
Consistency range
The consistency range is the range in which there are no missing writes, and in which all data has arrived, that is between the end of the missing writes range and the beginning of the late-arriving data range.
The length of these ranges is defined by the properties of the application, there is no one-size-fits-all way to determine what they are.
The completion point T is an arbitrarily chosen time in the consistency range. It is the point in time to which data can safely be backfilled, ensuring that there is no data loss.
The completion point should be expressed as the type of the time column of the hypertables to be backfilled. For instance, if you're using a TIMESTAMPTZtime column, then the completion point may be 2023-08-10T12:00:00.00Z. If you're using a BIGINT column it may be 1695036737000.
If you are using a mix of types for the time columns of your hypertables, you must determine the completion point for each type individually, and backfill each set of hypertables with the same type independently from those of other types.
6. Backfill data from source to target
Dump the data from your source database on a per-table basis into CSV format, and restore those CSVs into the target database using the timescaledb-parallel-copy tool.
6a. Determine the time range of data to be copied
Determine the window of data that to be copied from the source database to the target. Depending on the volume of data in the source table, it may be sensible to split the source table into multiple chunks of data to move independently. In the following steps, this time range is called <start> and <end>.
Usually the time column is of type timestamp with time zone, so the values of <start> and <end> must be something like 2023-08-01T00:00:00Z. If the time column is not a timestamp with time zone then the values of <start> and <end> must be the correct type for the column.
If you intend to copy all historic data from the source table, then the value of <start> can be '-infinity', and the <end> value is the value of the completion point T that you determined.
6b. Remove overlapping data in the target
The dual-write process may have already written data into the target database in the time range that you want to move. In this case, the dual-written data must be removed. This can be achieved with a DELETE statement, as follows:
The BETWEEN operator is inclusive of both the start and end ranges, so it is not recommended to use it.
6d. Copy the data
Refer to the documentation for your source database in order to determine how to dump a table into a CSV. You must ensure the CSV contains only data before the completion point. You should apply this filter when dumping the data from the source database.
You can load a CSV file into a hypertable using timescaledb-parallel-copy as follows. Set the number of workers equal to the number of CPU cores in your target database:
The above command is not transactional. If there is a connection issue, or some other issue which causes it to stop copying, the partially copied rows must be removed from the target (using the instructions in step 6b above), and then the copy can be restarted.
6e. Enable policies that compress data in the target hypertable
In the following command, replace <hypertable> with the fully qualified table name of the target hypertable, for example public.metrics:
7. Validate that all data is present in target database
Now that all data has been backfilled, and the application is writing data to both databases, the contents of both databases should be the same. How exactly this should best be validated is dependent on your application.
If you are reading from both databases in parallel for every production query, you could consider adding an application-level validation that both databases are returning the same data.
Another option is to compare the number of rows in the source and target tables, although this reads all data in the table which may have an impact on your production workload.
8. Validate that target database can handle production load
Now that dual-writes have been in place for a while, the target database should be holding up to production write traffic. Now would be the right time to determine if the target database can serve all production traffic (both reads and writes). How exactly this is done is application-specific and up to you to determine.
9. Switch production workload to target database
Once you've validated that all the data is present, and that the target database can handle the production workload, the final step is to switch to the target database as your primary. You may want to continue writing to the source database for a period, until you are certain that the target database is holding up to all production traffic.
===== PAGE: https://docs.tigerdata.com/migrate/dual-write-and-backfill/dual-write-from-postgres/ =====
Examples:
Example 1 (bash):
psql target -c "DELETE FROM <hypertable> WHERE time >= <start> AND time < <end>);"Example 2 (unknown):
timescaledb-parallel-copy \
  --connection target \
  --table <target_hypertable> \
  --workers 8 \
  --file
Example 3 (bash):
psql -d target -f -v hypertable=<hypertable> - <<'EOF'
SELECT public.alter_job(j.id, scheduled=>true)
FROM _timescaledb_config.bgw_job j
JOIN _timescaledb_catalog.hypertable h ON h.id = j.hypertable_id
WHERE j.proc_schema IN ('_timescaledb_internal', '_timescaledb_functions')
  AND j.proc_name = 'policy_compression'
  AND j.id >= 1000
  AND format('%I.%I', h.schema_name, h.table_name)::text::regclass = :'hypertable'::text::regclass;
EOF
Can't access file "timescaledb-VERSION" after update
URL: llms-txt#can't-access-file-"timescaledb-version"-after-update
If the error occurs immediately after updating your version of TimescaleDB and the file mentioned is from the previous version, it is probably due to an incomplete update process. Within the greater Postgres server instance, each database that has TimescaleDB installed needs to be updated with the SQL command ALTER EXTENSION timescaledb UPDATE; while connected to that database. Otherwise, the database looks for the previous version of the TimescaleDB files.
See [our update docs][update-db] for more info.
===== PAGE: https://docs.tigerdata.com/_troubleshooting/self-hosted/migration-errors/ =====
Foreign data wrappers
URL: llms-txt#foreign-data-wrappers
Contents:
- Prerequisites
- Query another data source
You use Postgres foreign data wrappers (FDWs) to query external data sources from a Tiger Cloud service. These external data sources can be one of the following:
- Other Tiger Cloud services
- Postgres databases outside of Tiger Cloud
If you are using VPC peering, you can create FDWs in your Customer VPC to query a service in your Tiger Cloud project. However, you can't create FDWs in your Tiger Cloud services to query a data source in your Customer VPC. This is because Tiger Cloud VPC peering uses AWS PrivateLink for increased security. See [VPC peering documentation][vpc-peering] for additional details.
Postgres FDWs are particularly useful if you manage multiple Tiger Cloud services with different capabilities, and need to seamlessly access and merge regular and time-series data.
To follow the steps on this page:
- Create a target [Tiger Cloud service][create-service] with the Real-time analytics capability.
You need [your connection details][connection-info]. This procedure also works for [self-hosted TimescaleDB][enable-timescaledb].
Query another data source
To query another data source:
You create Postgres FDWs with the postgres_fdw extension, which is enabled by default in Tiger Cloud.
- Connect to your service
See [how to connect][connect].
- Create a server
Run the following command using your [connection details][connection-info]:
- Create user mapping
Run the following command using your [connection details][connection-info]:
- Import a foreign schema (recommended) or create a foreign table
Import the whole schema:
Alternatively, import a limited number of tables:
Create a foreign table. Skip if you are importing a schema:
A user with the tsdbadmin role assigned already has the required USAGE permission to create Postgres FDWs. You can enable another user, without the tsdbadmin role assigned, to query foreign data. To do so, explicitly grant the permission. For example, for a new grafana user:
You create Postgres FDWs with the postgres_fdw extension. See [documenation][enable-fdw-docs] on how to enable it.
- Connect to your database
Use [psql][psql] to connect to your database.
- Create a server
Run the following command using your [connection details][connection-info]:
- Create user mapping
Run the following command using your [connection details][connection-info]:
- Import a foreign schema (recommended) or create a foreign table
Import the whole schema:
Alternatively, import a limited number of tables:
Create a foreign table. Skip if you are importing a schema:
===== PAGE: https://docs.tigerdata.com/use-timescale/write-data/insert/ =====
Examples:
Example 1 (sql):
CREATE SERVER myserver
   FOREIGN DATA WRAPPER postgres_fdw
   OPTIONS (host '<host>', dbname 'tsdb', port '<port>');
Example 2 (sql):
CREATE USER MAPPING FOR tsdbadmin
   SERVER myserver
   OPTIONS (user 'tsdbadmin', password '<password>');
Example 3 (sql):
CREATE SCHEMA foreign_stuff;

      IMPORT FOREIGN SCHEMA public
      FROM SERVER myserver
      INTO foreign_stuff ;
Example 4 (sql):
CREATE SCHEMA foreign_stuff;

      IMPORT FOREIGN SCHEMA public
      LIMIT TO (table1, table2)
      FROM SERVER myserver
      INTO foreign_stuff;
run_job()
URL: llms-txt#run_job()
Contents:
- Samples
- Required arguments
Run a previously registered job in the current session. This works for job as well as policies. Since run_job is implemented as stored procedure it cannot be executed inside a SELECT query but has to be executed with CALL.
Any background worker job can be run in the foreground when executed with run_job. You can use this with an increased log level to help debug problems.
Set log level shown to client to DEBUG1 and run the job with the job ID 1000:
Required arguments
| Name | Description |
|---|---|
job_id | (INTEGER) TimescaleDB background job ID |
===== PAGE: https://docs.tigerdata.com/api/jobs-automation/add_job/ =====
Examples:
Example 1 (sql):
SET client_min_messages TO DEBUG1;
CALL run_job(1000);
Integrate Power BI with Tiger
URL: llms-txt#integrate-power-bi-with-tiger
Contents:
- Prerequisites
- Add your Tiger Cloud service as an ODBC data source
- Import the data from your your Tiger Cloud service into Power BI
[Power BI][power-bi] is a business analytics tool for visualizing data, creating interactive reports, and sharing insights across an organization.
This page explains how to integrate Power BI with Tiger Cloud using the Postgres ODBC driver, so that you can build interactive reports based on the data in your Tiger Cloud service.
To follow the steps on this page:
- Create a target [Tiger Cloud service][create-service] with the Real-time analytics capability.
You need [your connection details][connection-info]. This procedure also works for [self-hosted TimescaleDB][enable-timescaledb].
- Download [Power BI Desktop][power-bi-install] on your Microsoft Windows machine.
- Install the [PostgreSQL ODBC driver][postgresql-odbc-driver].
Add your Tiger Cloud service as an ODBC data source
Use the PostgreSQL ODBC driver to connect Power BI to Tiger Cloud.
- Open the ODBC data sources
On your Windows machine, search for and select ODBC Data Sources.
Connect to your Tiger Cloud service
Under
User DSN, clickAdd.- Choose
PostgreSQL Unicodeand clickFinish. - Use your [connection details][connection-info] to configure the data source.
- Click
Testto ensure the connection works, then clickSave.
- Choose
Import the data from your your Tiger Cloud service into Power BI
Establish a connection and import data from your Tiger Cloud service into Power BI:
Connect Power BI to your Tiger Cloud service
Open Power BI, then click
Get data from other sources.- Search for and select
ODBC, then clickConnect. - In
Data source name (DSN), select the Tiger Cloud data source and clickOK. - Use your [connection details][connection-info] to enter your
User NameandPassword, then clickConnect.
- Search for and select
After connecting, Navigator displays the available tables and schemas.
Import your data into Power BI
Select the tables to import and click
Load.
The Data pane shows your imported tables.
- To visualize your data and build reports, drag fields from the tables onto the canvas.
You have successfully integrated Power BI with Tiger Cloud.
===== PAGE: https://docs.tigerdata.com/integrations/tableau/ =====
Manage data security in your Tiger Cloud service
URL: llms-txt#manage-data-security-in-your-tiger-cloud-service
Contents:
- Create a read-only user
When you create a service, Tiger Cloud assigns you the tsdmadmin role. This role has full permissions to modify data in your service. However, Tiger Cloud does not provide superuser access. tsdmadmin is not a superuser.
As tsdmadmin, you can use standard Postgres means to create other roles or assign individual permissions. This page shows you how to create a read-only role for your database. Adding a read-only role does not provide resource isolation. To restrict the access of a read-only user, as well as isolate resources, create a [read replica][read-scaling] instead.
The database-level roles for the individual services in your project do not overlap with the Tiger Cloud project user roles. This page describes the database-level roles. For user roles available in Console, see [Control user access to Tiger Cloud projects][console-rbac].
Create a read-only user
You can create a read-only user to provide limited access to your database.
Connect to your service as the tsdbadmin user.
Create the new role:
Grant the appropriate permissions for the role, as required. For example, to grant
SELECTpermissions to a specific table, use:
To grant SELECT permissions to all tables in a specific schema, use:
Create a new user:
Assign the role to the new user:
===== PAGE: https://docs.tigerdata.com/use-timescale/security/saml/ =====
Examples:
Example 1 (sql):
CREATE ROLE readaccess;Example 2 (sql):
GRANT SELECT ON TO readaccess;Example 3 (sql):
GRANT SELECT ON ALL TABLES IN SCHEMA <SCHEMA_NAME> TO readaccess;Example 4 (sql):
CREATE USER read_user WITH PASSWORD 'read_password';Sync, import, and migrate your data to Tiger
URL: llms-txt#sync,-import,-and-migrate-your-data-to-tiger
Contents:
- Sync from Postgres or S3
- Import individual files
- Migrate your data
In Tiger Cloud, you can easily add and sync data to your service from other sources.
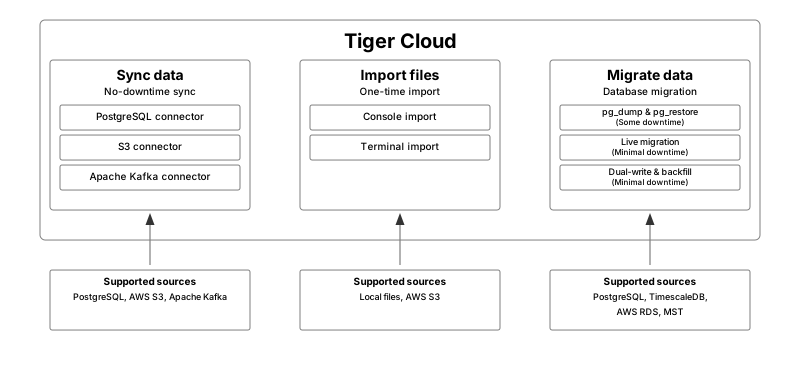
- Sync or stream directly, so data from another source is continuously updated in your service.
- Import individual files using Tiger Cloud Console or the command line.
- Migrate data from other databases.
Sync from Postgres or S3
Tiger Cloud provides source connectors for Postgres, S3, and Kafka. You use them to synchronize all or some of your data to your Tiger Cloud service in real time. You run the connectors continuously, using your data as a primary database and your Tiger Cloud service as a logical replica. This enables you to leverage Tiger Cloud’s real-time analytics capabilities on your replica data.
| Connector options | Downtime requirements |
|---|---|
| [Source Postgres connector][livesync-postgres] | None |
| [Source S3 connector][livesync-s3] | None |
| [Source Kafka connector][livesync-kafka] | None |
Import individual files
You can [import individual files using Console][import-console], from your local machine or S3. This includes CSV, Parquet, TXT, and MD files. Alternatively, [import files using the terminal][import-terminal].
Depending on the amount of data you need to migrate, and the amount of downtime you can afford, Tiger Data offers the following migration options:
| Migration strategy | Use when | Downtime requirements |
|---|---|---|
| [Migrate with downtime][pg-dump-restore] | Use pg_dump and pg_restore to migrate when you can afford downtime. | Some downtime |
| [Live migration][live-migration] | Simplified end-to-end migration with almost zero downtime. | Minimal downtime |
| [Dual-write and backfill][dual-write] | Append-only data, heavy insert workload (~20,000 inserts per second) when modifying your ingestion pipeline is not an issue. | Minimal downtime |
All strategies work to migrate from Postgres, TimescaleDB, AWS RDS, and Managed Service for TimescaleDB. Migration assistance is included with Tiger Cloud support. If you encounter any difficulties while migrating your data, consult the [troubleshooting] page, open a support request, or take your issue to the #migration channel in the community slack, the developers of this migration method are there to help.
You can open a support request directly from [Tiger Cloud Console][support-link], or by email to support@tigerdata.com.
If you're migrating your data from another source database type, best practice is export the data from your source database as a CSV file, then import to your Tiger Cloud service using [timescaledb-parallel-copy][import-terminal].
===== PAGE: https://docs.tigerdata.com/migrate/dual-write-and-backfill/ =====
Ingest real-time financial websocket data - Set up the dataset
URL: llms-txt#ingest-real-time-financial-websocket-data---set-up-the-dataset
Contents:
- Prerequisites
- Connect to the websocket server
- Set up a new Python environment
- Create the websocket connection
- Connect to the websocket server
- Optimize time-series data in a hypertable
- Create a standard Postgres table for relational data
- Batching in memory
- Ingest data in real-time
- Troubleshooting
This tutorial uses a dataset that contains second-by-second stock-trade data for the top 100 most-traded symbols, in a hypertable named stocks_real_time. It also includes a separate table of company symbols and company names, in a regular Postgres table named company.
To follow the steps on this page:
- Create a target [Tiger Cloud service][create-service] with the Real-time analytics capability.
You need [your connection details][connection-info]. This procedure also works for [self-hosted TimescaleDB][enable-timescaledb].
Connect to the websocket server
When you connect to the Twelve Data API through a websocket, you create a persistent connection between your computer and the websocket server. You set up a Python environment, and pass two arguments to create a websocket object and establish the connection.
Set up a new Python environment
Create a new Python virtual environment for this project and activate it. All the packages you need to complete for this tutorial are installed in this environment.
Create and activate a Python virtual environment:
Install the Twelve Data Python [wrapper library][twelve-wrapper] with websocket support. This library allows you to make requests to the API and maintain a stable websocket connection.
Install [Psycopg2][psycopg2] so that you can connect the TimescaleDB from your Python script:
Create the websocket connection
A persistent connection between your computer and the websocket server is used to receive data for as long as the connection is maintained. You need to pass two arguments to create a websocket object and establish connection.