Billing and account management
As we enhance our offerings and align them with your evolving needs, pricing plans provide more value, flexibility, and efficiency for your business. Whether you're a growing startup or a well-established enterprise, our plans are structured to support your journey towards greater success.

This page explains pricing plans for Tiger Cloud, and how to easily manage your Tiger Data account.
Pricing plans give you:
- Enhanced performance: with increased CPU and storage capacities, your apps run smoother and more efficiently, even under heavy loads.
- Improved scalability: as your business grows, so do your demands. Pricing plans scale with you, they provide the resources and support you need at each stage of your growth. Scale up or down based on your current needs, ensuring that you only pay for what you use.
- Better support: access to enhanced support options, including production support and dedicated account management, ensures you have the help you need when you need it.
- Greater flexibility: we know that one size doesn't fit all. Pricing plans give you the flexibility to choose the features and support levels that best match your business and engineering requirements. The ability to add features like I/O boost and customize your pricing plan means you can tailor Tiger Cloud services to fit your specific needs.
- Cost efficiency: by aligning our pricing with the value delivered, we ensure that you get the most out of every dollar spent. Our goal is to help you achieve more with less.
It’s that simple! You don't pay for automated backups or networking costs, such as data ingest or egress. There are no per-query fees, nor additional costs to read or write data. It's all completely transparent, easily understood, and up to you.
Using self-hosted TimescaleDB and our open-source products is still free.
If you create a Tiger Data account from AWS Marketplace, the pricing options are pay-as-you-go and annual commit. See [AWS pricing][aws-pricing] for details.
Disaggregated, consumption-based compute and storage
With Tiger Cloud, you are not limited to pre-set compute and storage. Get as much as you need when provisioning your services or later, as your needs grow.
Compute: pay only for the compute resources you run. Compute is metered on an hourly basis, and you can [scale it up to 64,000 IOPS][change-compute] at any time. You can also [scale out using replicas][read-replication] as your application grows. We also provide services to help you lower your compute needs while improving query performance. Tiger Cloud is very efficient and generally needs less compute than other databases to deliver the same performance. The best way to size your needs is to sign up for a free trial and test with a realistic workload.
Storage: pay only for the storage you consume. You have high-performance storage for more-accessed data, and [low-cost bottomless storage in S3][data-tiering] for other data. The high-performance storage offers you up to 64 TB of compressed (typically 80-100 TB uncompressed) data and is metered on your average GB consumption per hour. We can help you compress your data by up to 98% so you pay even less. For low-cost storage, Tiger Data charges only for the size of your data in S3 in the Apache Parquet format, regardless of whether it was compressed in Tiger Cloud before tiering. There are no additional expenses, such as data transfer or compute. For easy upgrades, each service stores the TimescaleDB binaries. This contributes up to 900 MB to overall storage, which amounts to less than $.80/month in additional storage costs.
Use Tiger Cloud for free
Are you just starting out with Tiger Cloud? On our Free pricing plan, you can create up to 2 zero-cost services with [limited resources][plan-features]. When a free service reaches the resource limit, it converts to a read-only state.
The Free pricing plan and services are currently in beta.
Ready to try a more feature-rich paid plan? Activate a 30-day free trial of our Performance (no credit card required) or Scale plan. After your trial ends, we may remove your data unless you’ve added a payment method.
After you have completed your 30-day trial period, choose the [pricing plan][plan-features] that suits your business and engineering needs. And even when you upgrade from the Free pricing plan, you can still have up to 2 zero-cost services—or convert the ones you already have into standard ones, to have more resources.
If you want to try out features in a higher pricing plan before upgrading, contact us.
Upgrade or downgrade your pricing plans at any time
You can upgrade or downgrade between the Free, Performance, and Scale plans whenever you want using [Tiger Cloud Console][cloud-login]. To downgrade to the Free plan, you must only have free services running in your project.
If you switch your pricing plan mid-month, your prices are prorated to when you switch. Your services are not interrupted when you switch, so you can keep working without any hassle. To move to Enterprise, [get in touch with Tiger Data][contact-company].
Monitor usage and costs
You keep track of your monthly usage in [Tiger Cloud Console][cloud-billing]. Console shows your resource usage and dashboards with performance insights. This allows you to closely monitor your services’ performance, and any need to scale your services or upgrade your pricing plan.
Console also shows your month-to-date accrued charges, as well as a forecast of your expected month-end bill. Your previous invoices are also available as PDFs for download.
You are charged for all active services in your account, even if you are not actively using them. To reduce costs, pause or delete your unused services.
Tiger Data support
Tiger Data runs a global support organization with Customer Satisfaction (CSAT) scores above 99%. Support covers all timezones, and is fully staffed at weekend hours.
All paid pricing plans have free Developer Support through email with a target response time of 1 business day; we are often faster. If you need 24x7 responsiveness, talk to us about [Production Support][production-support].
Charging for HA and read replicas
HA and read replicas are both charged at the same rate as your primary services, based on the compute and primary storage consumed by your replicas. Data tiered to our bottomless storage tier is shared by all database replicas; replicas accessing tiered storage do not add to your bill.
Charging over regions
Storage is priced the same across all regions. However, compute prices vary depending on the region. This is because our cloud provider (AWS) prices infrastructure differently based on region.
Features included in each pricing plan
The available pricing plans are:
- Free: for small non-production projects.
- Performance: for cost-focused, smaller projects. No credit card required to start.
- Scale: for developers handling critical and demanding apps.
- Enterprise: for enterprises with mission-critical apps.
The Free pricing plan and services are currently in beta.
The features included in each [pricing plan][pricing-plans] are:
| Feature | Free | Performance | Scale | Enterprise |
|---|---|---|---|---|
| Compute and storage | ||||
| Number of services | Up to 2 free services | Up to 2 free and 4 standard services | Up to 2 free and and unlimited standard services | Up to 2 free and and unlimited standard services |
| CPU limit per service | Shared | Up to 8 CPU | Up to 32 CPU | Up to 64 CPU |
| Memory limit per service | Shared | Up to 32 GB | Up to 128 GB | Up to 256 GB |
| Storage limit per service | 750 MB | Up to 16 TB | Up to 16 TB | Up to 64 TB |
| Bottomless storage on S3 | Unlimited | Unlimited | ||
| Independently scale compute and storage | Standard services only | Standard services only | Standard services only | |
| Data services and workloads | ||||
| Relational | ✓ | ✓ | ✓ | ✓ |
| Time-series | ✓ | ✓ | ✓ | ✓ |
| Vector search | ✓ | ✓ | ✓ | ✓ |
| AI workflows (coming soon) | ✓ | ✓ | ✓ | ✓ |
| Cloud SQL editor | 3 seats | 3 seats | 10 seats | 20 seats |
| Charts | ✓ | ✓ | ✓ | ✓ |
| Dashboards | 2 | Unlimited | Unlimited | |
| Storage and performance | ||||
| IOPS | Shared | 3,000 - 5,000 | 5,000 - 8,000 | 5,000 - 8,000 |
| Bandwidth (autoscales) | Shared | 125 - 250 Mbps | 250 - 500 Mbps | Up to 500 mbps |
| I/O boost | Add-on: Up to 16K IOPS, 1000 Mbps BW | Add-on: Up to 32K IOPS, 4000 Mbps BW | ||
| Availability and monitoring | ||||
| High-availability replicas (Automated multi-AZ failover) | ✓ | ✓ | ✓ | |
| Read replicas | ✓ | ✓ | ||
| Cross-region backup | ✓ | |||
| Backup reports | 14 days | 14 days | ||
| Point-in-time recovery and forking | 1 day | 3 days | 14 days | 14 days |
| Performance insights | Limited | ✓ | ✓ | ✓ |
| Metrics and log exporters | ✓ | ✓ | ||
| Security and compliance | ||||
| Role-based access | ✓ | ✓ | ✓ | ✓ |
| End-to-end encryption | ✓ | ✓ | ✓ | ✓ |
| Private Networking (VPC) | 1 multi-attach VPC | Unlimited multi-attach VPCs | Unlimited multi-attach VPCs | |
| AWS Transit Gateway | ✓ | ✓ | ||
| [HIPAA compliance][hipaa-compliance] | ✓ | |||
| IP address allow list | 1 list with up to 10 IP addresses | 1 list with up to 10 IP addresses | Up to 10 lists with up to 10 IP addresses each | Up to 10 lists with up to 100 IP addresses each |
| Multi-factor authentication | ✓ | ✓ | ✓ | ✓ |
| Federated authentication (SAML) | ✓ | |||
| SOC 2 Type 2 report | ✓ | ✓ | ||
| Penetration testing report | ✓ | |||
| Security questionnaire and review | ✓ | |||
| Pay by invoice | Available at minimum spend | Available at minimum spend | ✓ | |
| [Uptime SLAs][commercial-sla] | Standard | Standard | Enterprise | |
| Support and technical services | ||||
| Community support | ✓ | ✓ | ✓ | ✓ |
| Email support | ✓ | ✓ | ✓ | |
| Production support | Add-on | Add-on | ✓ | |
| Named account manager | ✓ | |||
| JOIN services (Jumpstart Onboarding and INtegration) | Available at minimum spend | ✓ |
For a personalized quote, [get in touch with Tiger Data][contact-company].
Example billing calculation
You are billed at the end of each month in arrears, based on your actual usage that month. Your monthly invoice includes an itemized cost accounting for each Tiger Cloud service and any additional charges.
Tiger Cloud charges are based on consumption:
- Compute: metered on an hourly basis. You can scale compute up and down at any time.
- Storage: metered based on your average GB consumption per hour. Storage grows and shrinks automatically with your data.
Your monthly price for compute and storage is computed similarly. For example, over the last month your Tiger Cloud service has been running compute for 500 hours total:
- 375 hours with 2 CPU
- 125 hours 4 CPU
Compute cost = (375 x hourly price for 2 CPU) + (125 x hourly price for 4 CPU)
Some add-ons such as tiered storage, HA replicas, and connection pooling may incur additional charges. These charges are clearly marked in your billing snapshot in Tiger Cloud Console.
Manage your Tiger Cloud pricing plan
You handle all details about your Tiger Cloud project including updates to your pricing plan, payment methods, and add-ons in the [billing section in Tiger Cloud Console][cloud-billing]:
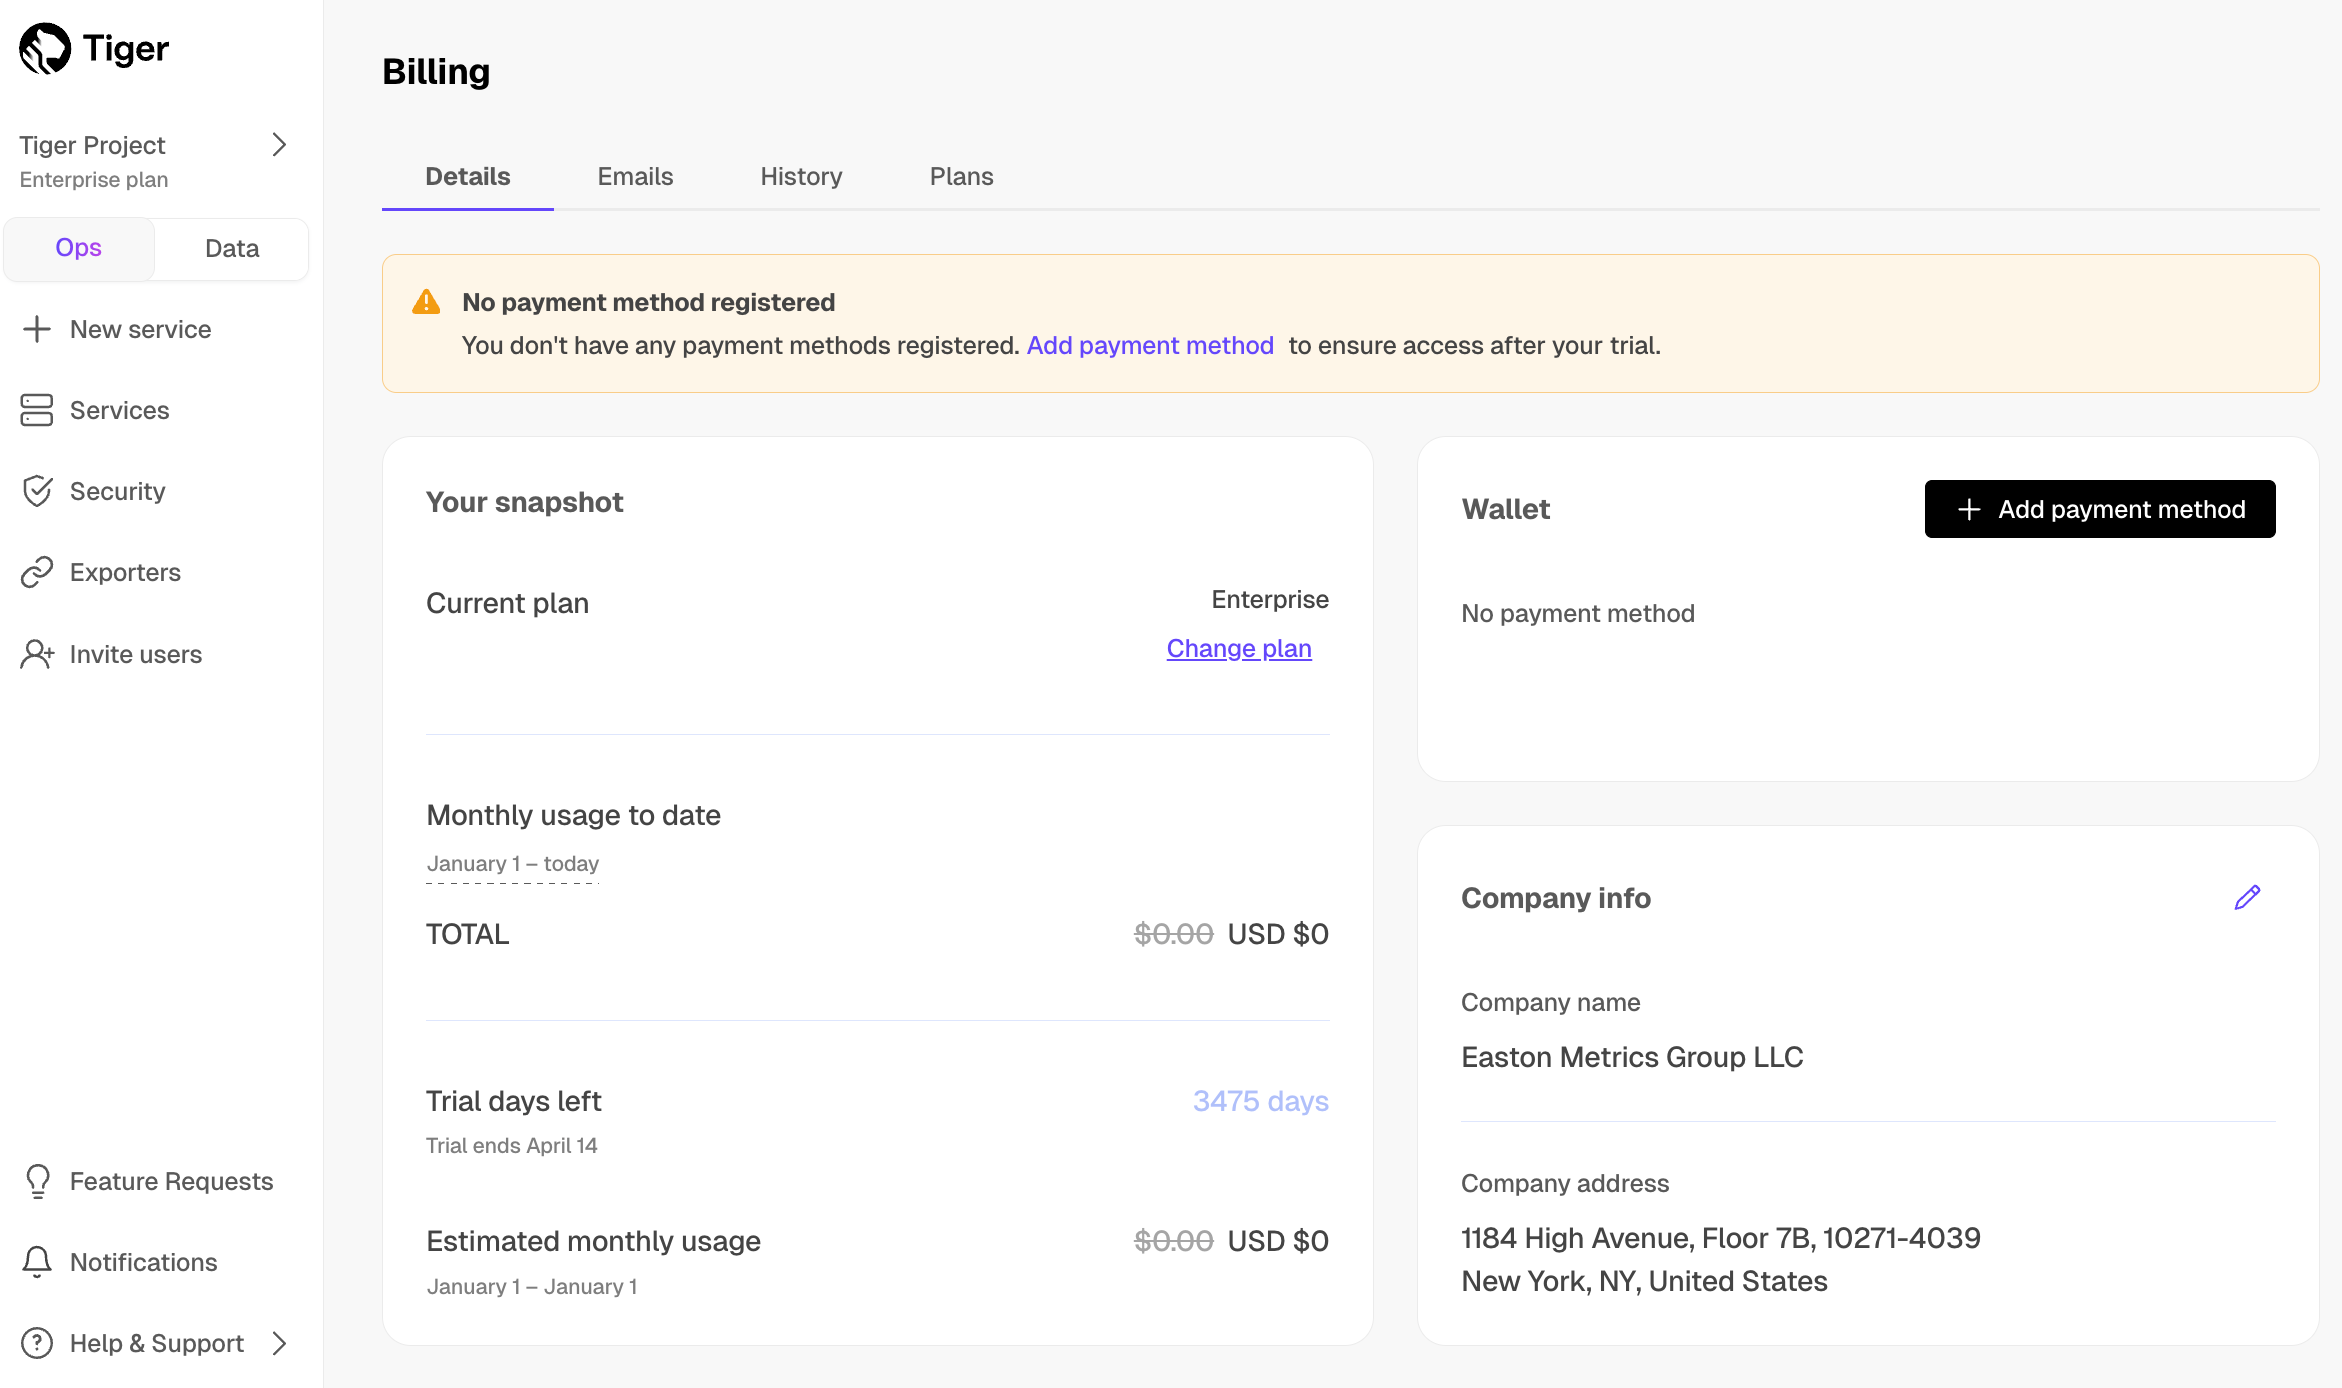
Details: an overview of your pricing plan, usage, and payment details. You can add up to three credit cards to your
Wallet. If you prefer to pay by invoice, [contact Tiger Data][contact-company] and ask to change to corporate billing.History: the list of your downloadable Tiger Cloud invoices.
Emails: the addresses Tiger Data uses to communicate with you. Payment confirmations and alerts are sent to the email address you signed up with. Add another address to send details to other departments in your organization.
Pricing plan: choose the pricing plan supplying the [features][plan-features] that suit your business and engineering needs.
Add-ons: add
Production supportand improved database performance for mission-critical workloads.
AWS Marketplace pricing
When you get Tiger Cloud at AWS Marketplace, the following pricing options are available:
- Pay-as-you-go: your consumption is calculated at the end of the month and included in your AWS invoice. No upfront costs, standard Tiger Cloud rates apply.
- Annual commit: your consumption is calculated at the end of the month ensuring predictable pricing and seamless billing through your AWS account. We confirm the contract terms with you before finalizing the commitment.
===== PAGE: https://docs.tigerdata.com/about/changelog/ =====
Changelog
All the latest features and updates to Tiger Cloud.
TimescaleDB 2.22.1 – configurable indexing, enhanced partitioning, and faster queries
TimescaleDB 2.22.1 introduces major performance and flexibility improvements across indexing, compression, and query execution. TimescaleDB 2.22.1 was released on September 30th and is now available to all users of Tiger.
Highlighted features
Configurable sparse indexes: manually configure sparse indexes (min-max or bloom) on one or more columns of compressed hypertables, optimizing query performance for specific workloads and reducing I/O. In previous versions, these were automatically created based on heuristics and could not be modified.
UUIDv7 support: native support for UUIDv7 for both compression and partitioning. UUIDv7 embeds a time component, improving insert locality and enabling efficient time-based range queries while maintaining global uniqueness.
Vectorized UUID compression: new vectorized compression for UUIDv7 columns doubles query performance and improves storage efficiency by up to 30%.
UUIDv7 partitioning: hypertables can now be partitioned on UUIDv7 columns, combining time-based chunking with globally unique IDs—ideal for large-scale event and log data.
Multi-column SkipScan: expands SkipScan to support multiple distinct keys, delivering millisecond-fast deduplication and
DISTINCT ONqueries across billions of rows. Learn more in our blog post and documentation.Compression improvements: default
segmentbyandorderbysettings are now applied at compression time for each chunk, automatically adapting to evolving data patterns for better performance. This was previously set at the hypertable level and fixed across all chunks.
Deprecations
The experimental Hypercore Table Access Method (TAM) has been removed in this release following advancements in the columnstore architecture.
For a comprehensive list of changes, refer to the TimescaleDB 2.22 & 2.22.1 release notes.
Kafka Source Connector (beta)
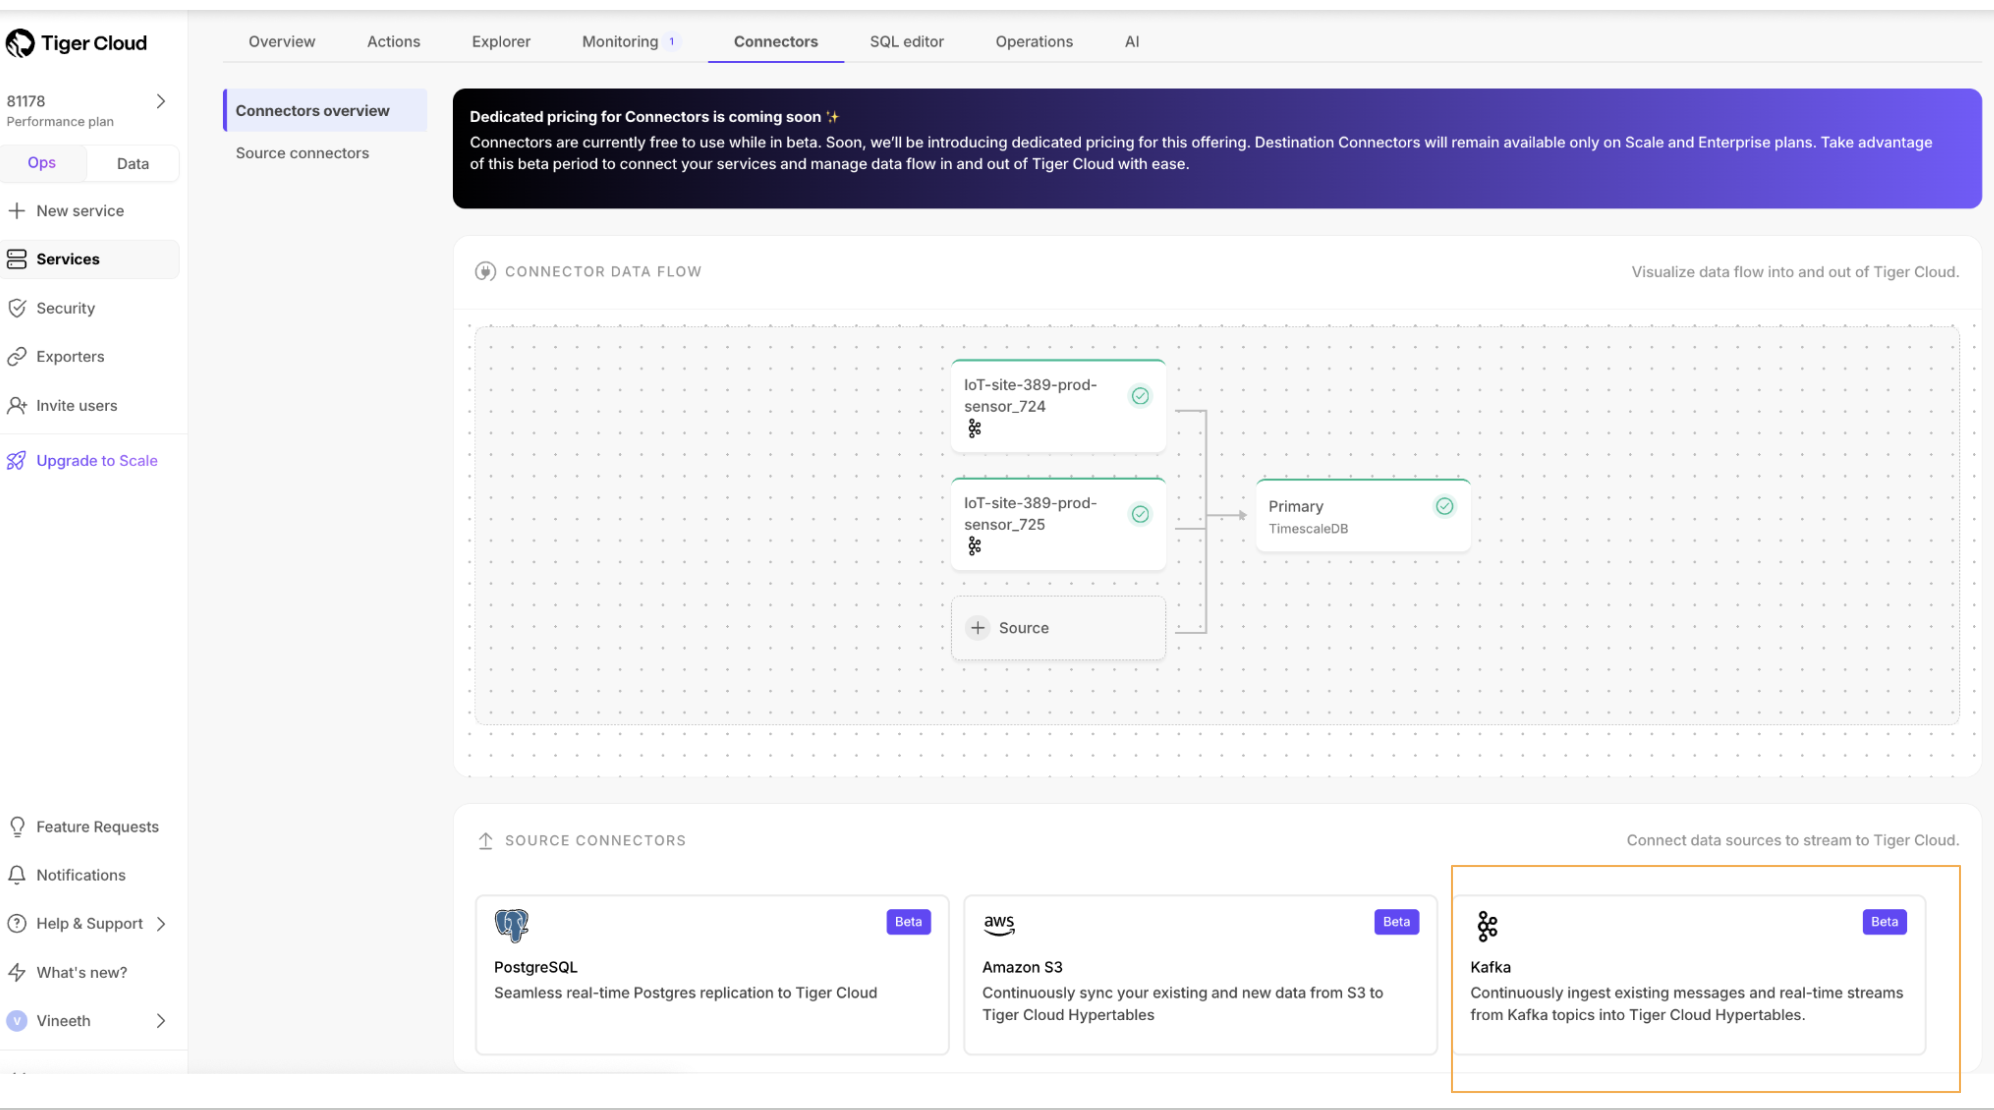
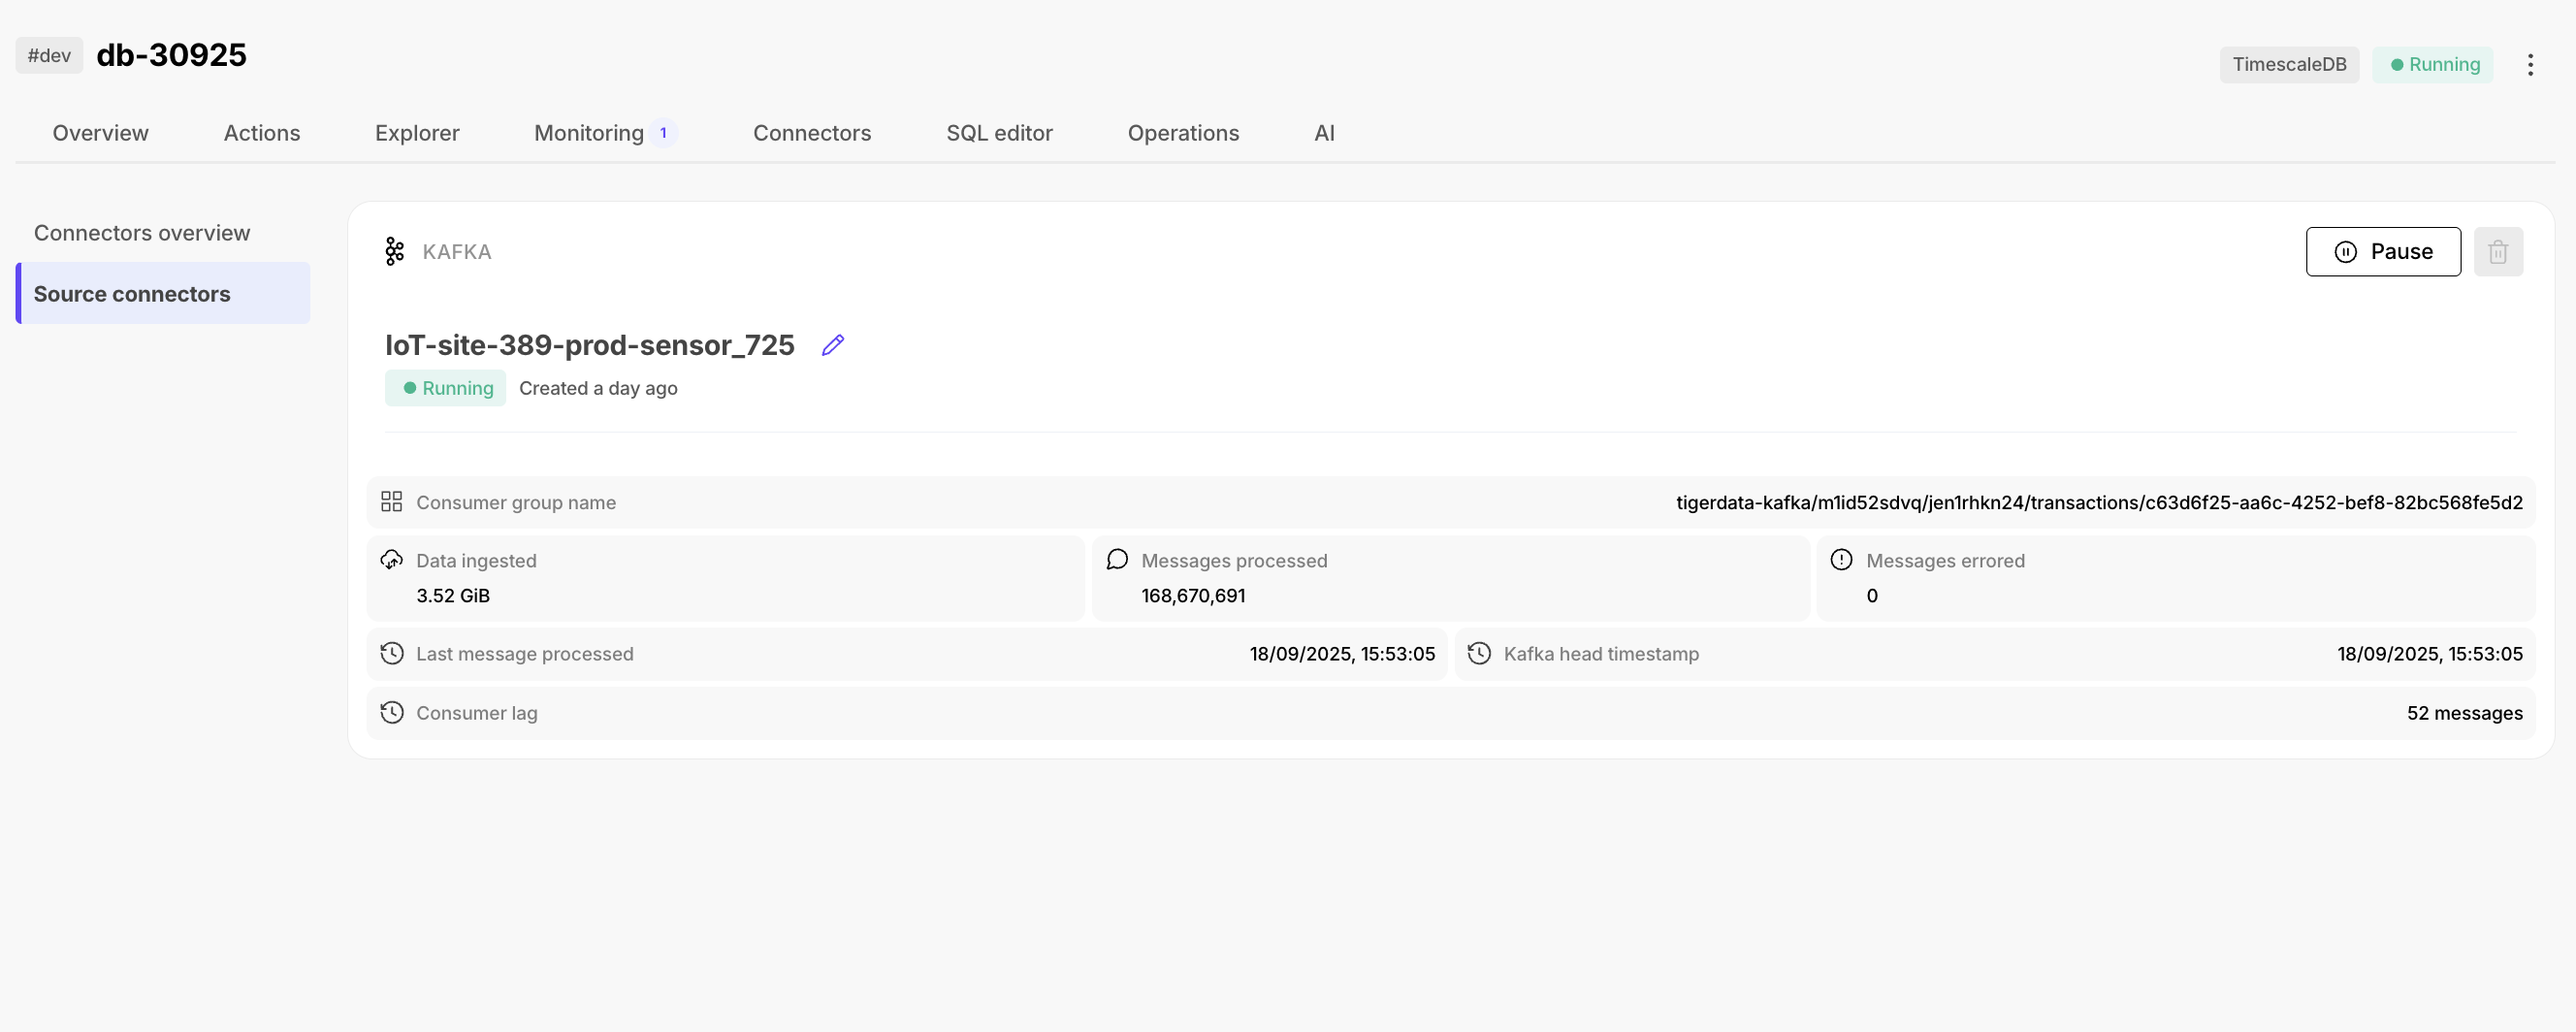
The new Kafka Source Connector enables you to connect your existing Kafka clusters directly to Tiger Cloud and ingest data from Kafka topics into hypertables. Developers often build proxies or run JDBC Sink Connectors to bridge Kafka and Tiger Cloud, which is error-prone and time-consuming. With the Kafka Source Connector, you can seamlessly start ingesting your Kafka data natively without additional middleware.
- Supported formats: AVRO
- Supported platforms: Confluent Cloud and Amazon Managed Streaming for Apache Kafka
Phased update rollouts, pg_cron, larger compute options, and backup reports
🛡️ Phased rollouts for TimescaleDB minor releases
Starting with TimescaleDB 2.22.0, minor releases will now roll out in phases. Services tagged #dev will get upgraded first, followed by #prod after 21 days. This gives you time to validate upgrades in #dev before they reach #prod services. Subscribe to get an email notification before your #prod service is upgraded. See Maintenance and upgrades for details.
⏰ pg_cron extension
pg_cron is now available on Tiger Cloud! With pg_cron, you can:
- Schedule SQL commands to run automatically—like generating weekly sales reports or cleaning up old log entries every night at 2 AM.
- Automate routine maintenance tasks such as refreshing materialized views hourly to keep dashboards current.
- Eliminate external cron jobs and task schedulers, keeping all your automation logic within PostgreSQL.
To enable pg_cron on your service, contact our support team. We're working on making this self-service in future updates.
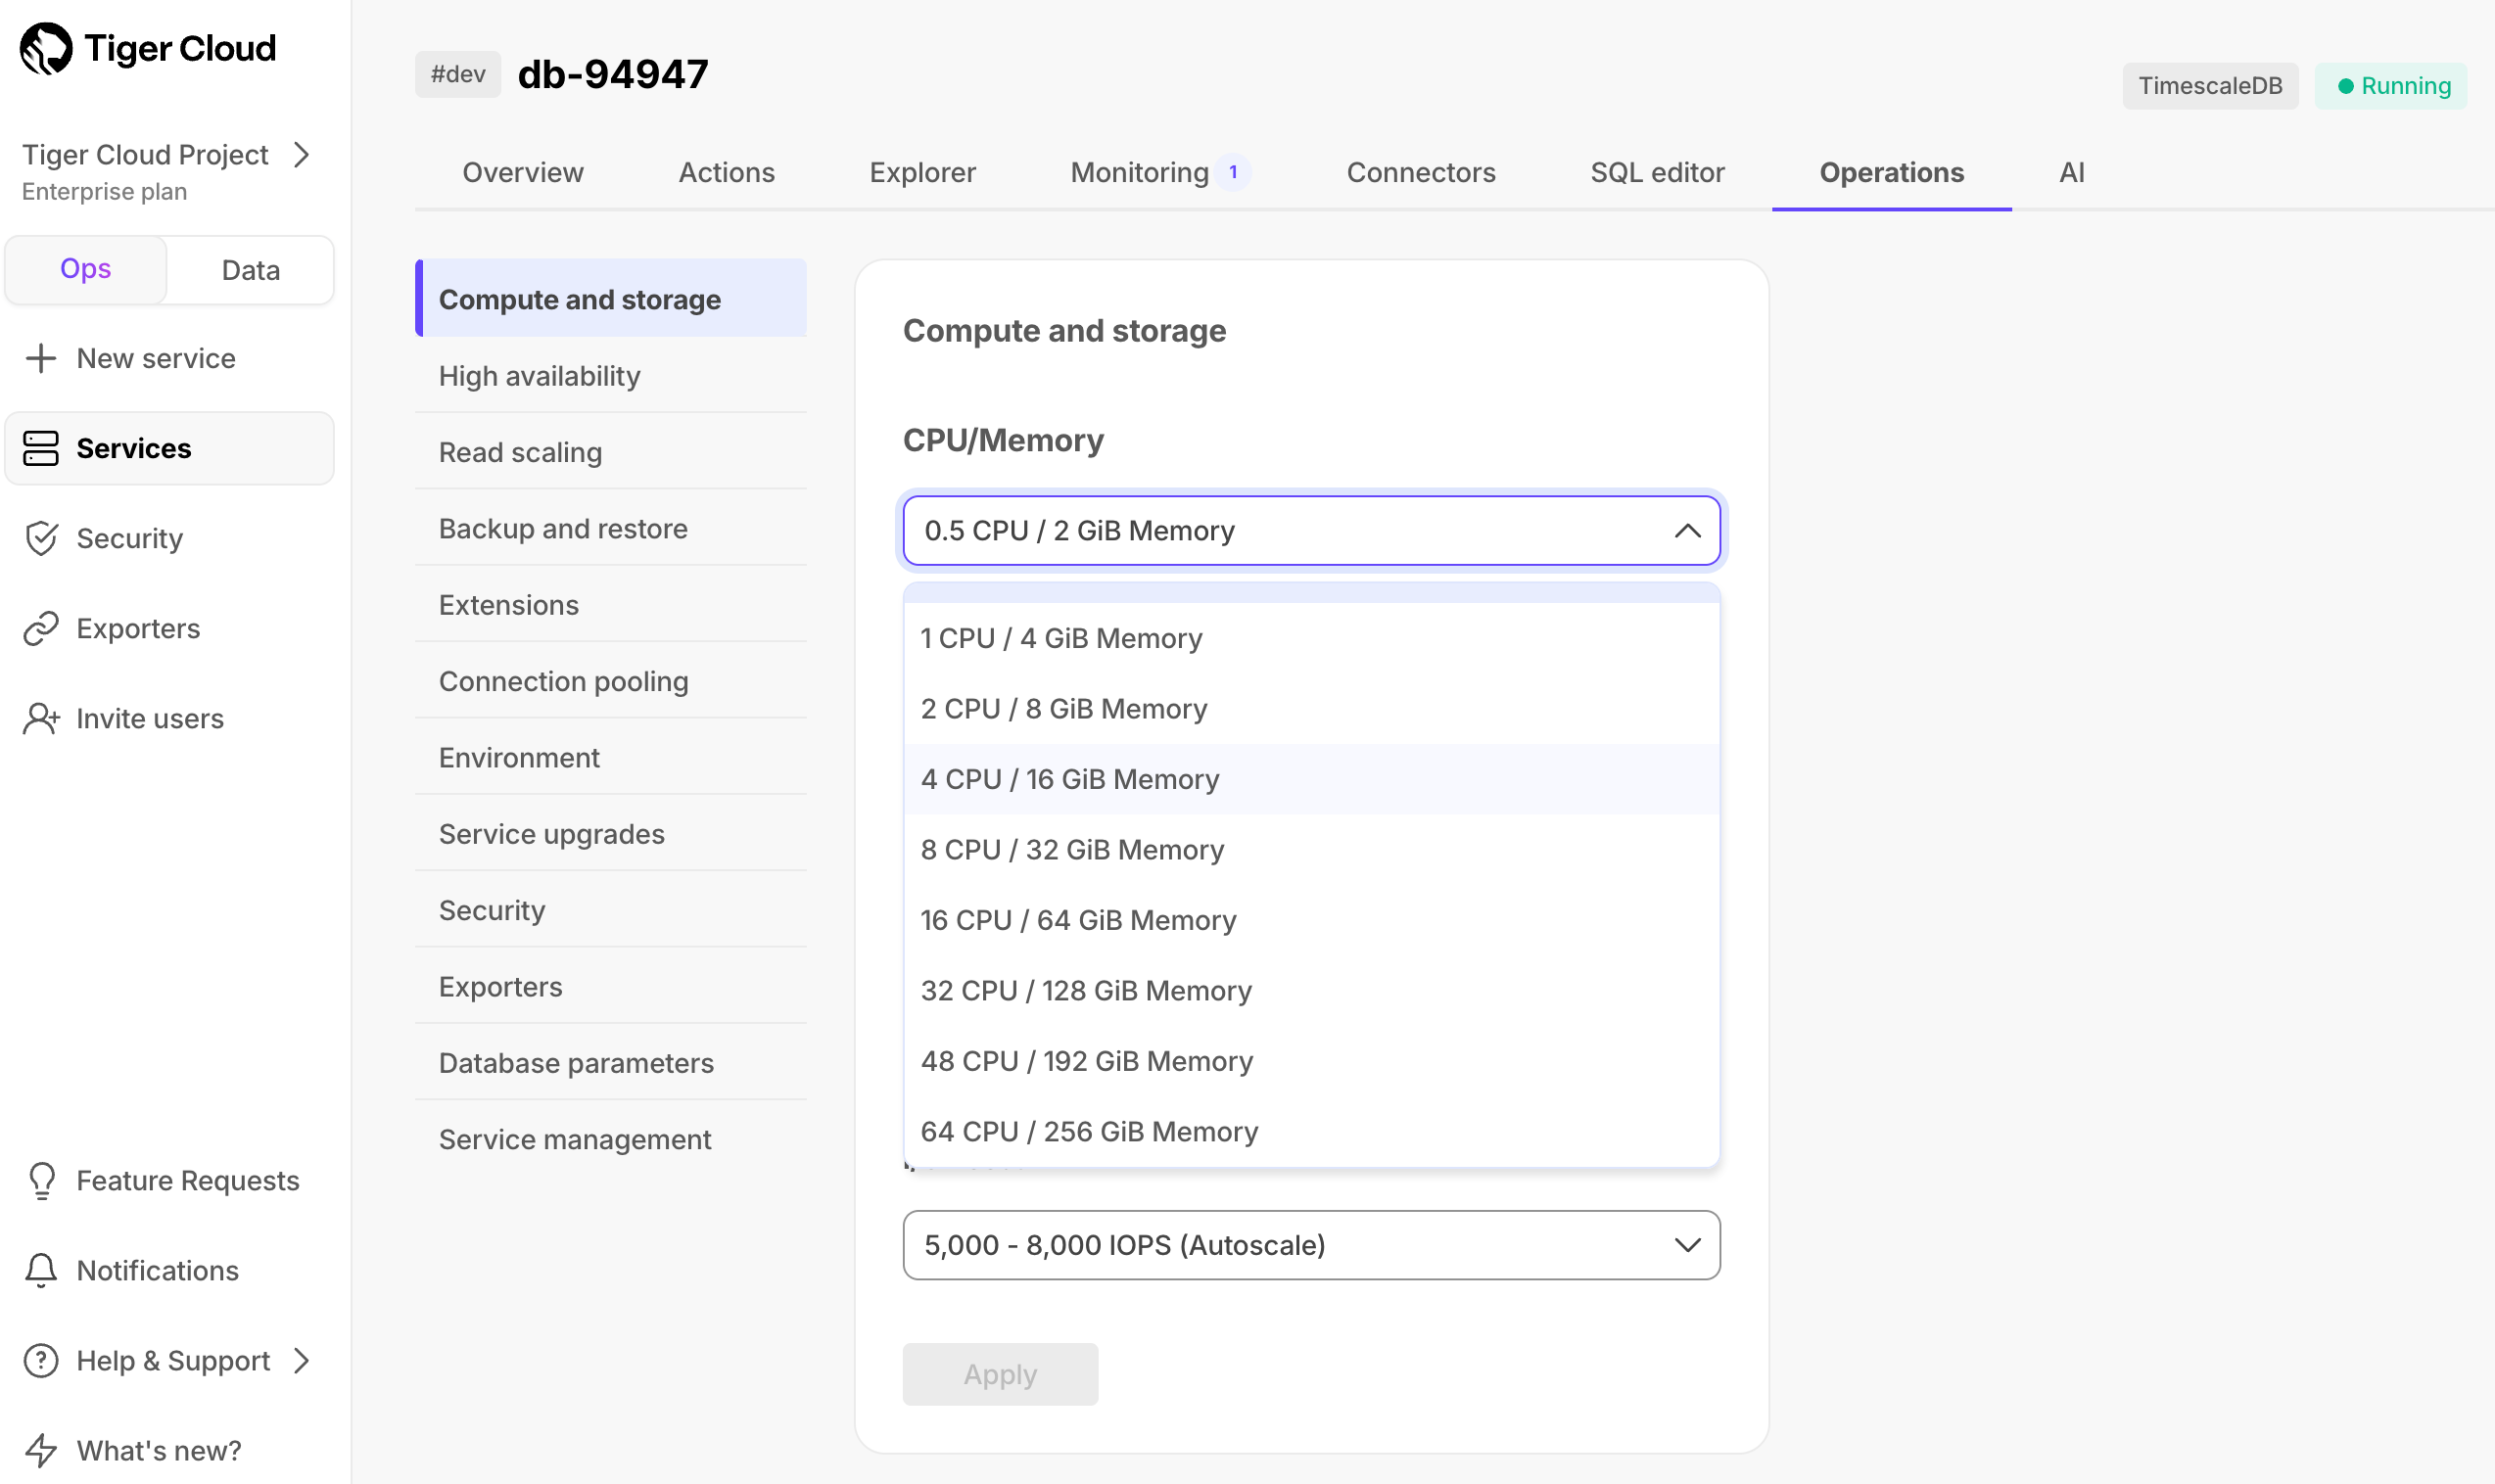
⚡️ Larger compute options: 48 and 64 CPU
For the most demanding workloads, you can now create services with 48 and 64 CPUs. These options are only available on our Enterprise plan, and they're dedicated instances that are not shared with other customers.
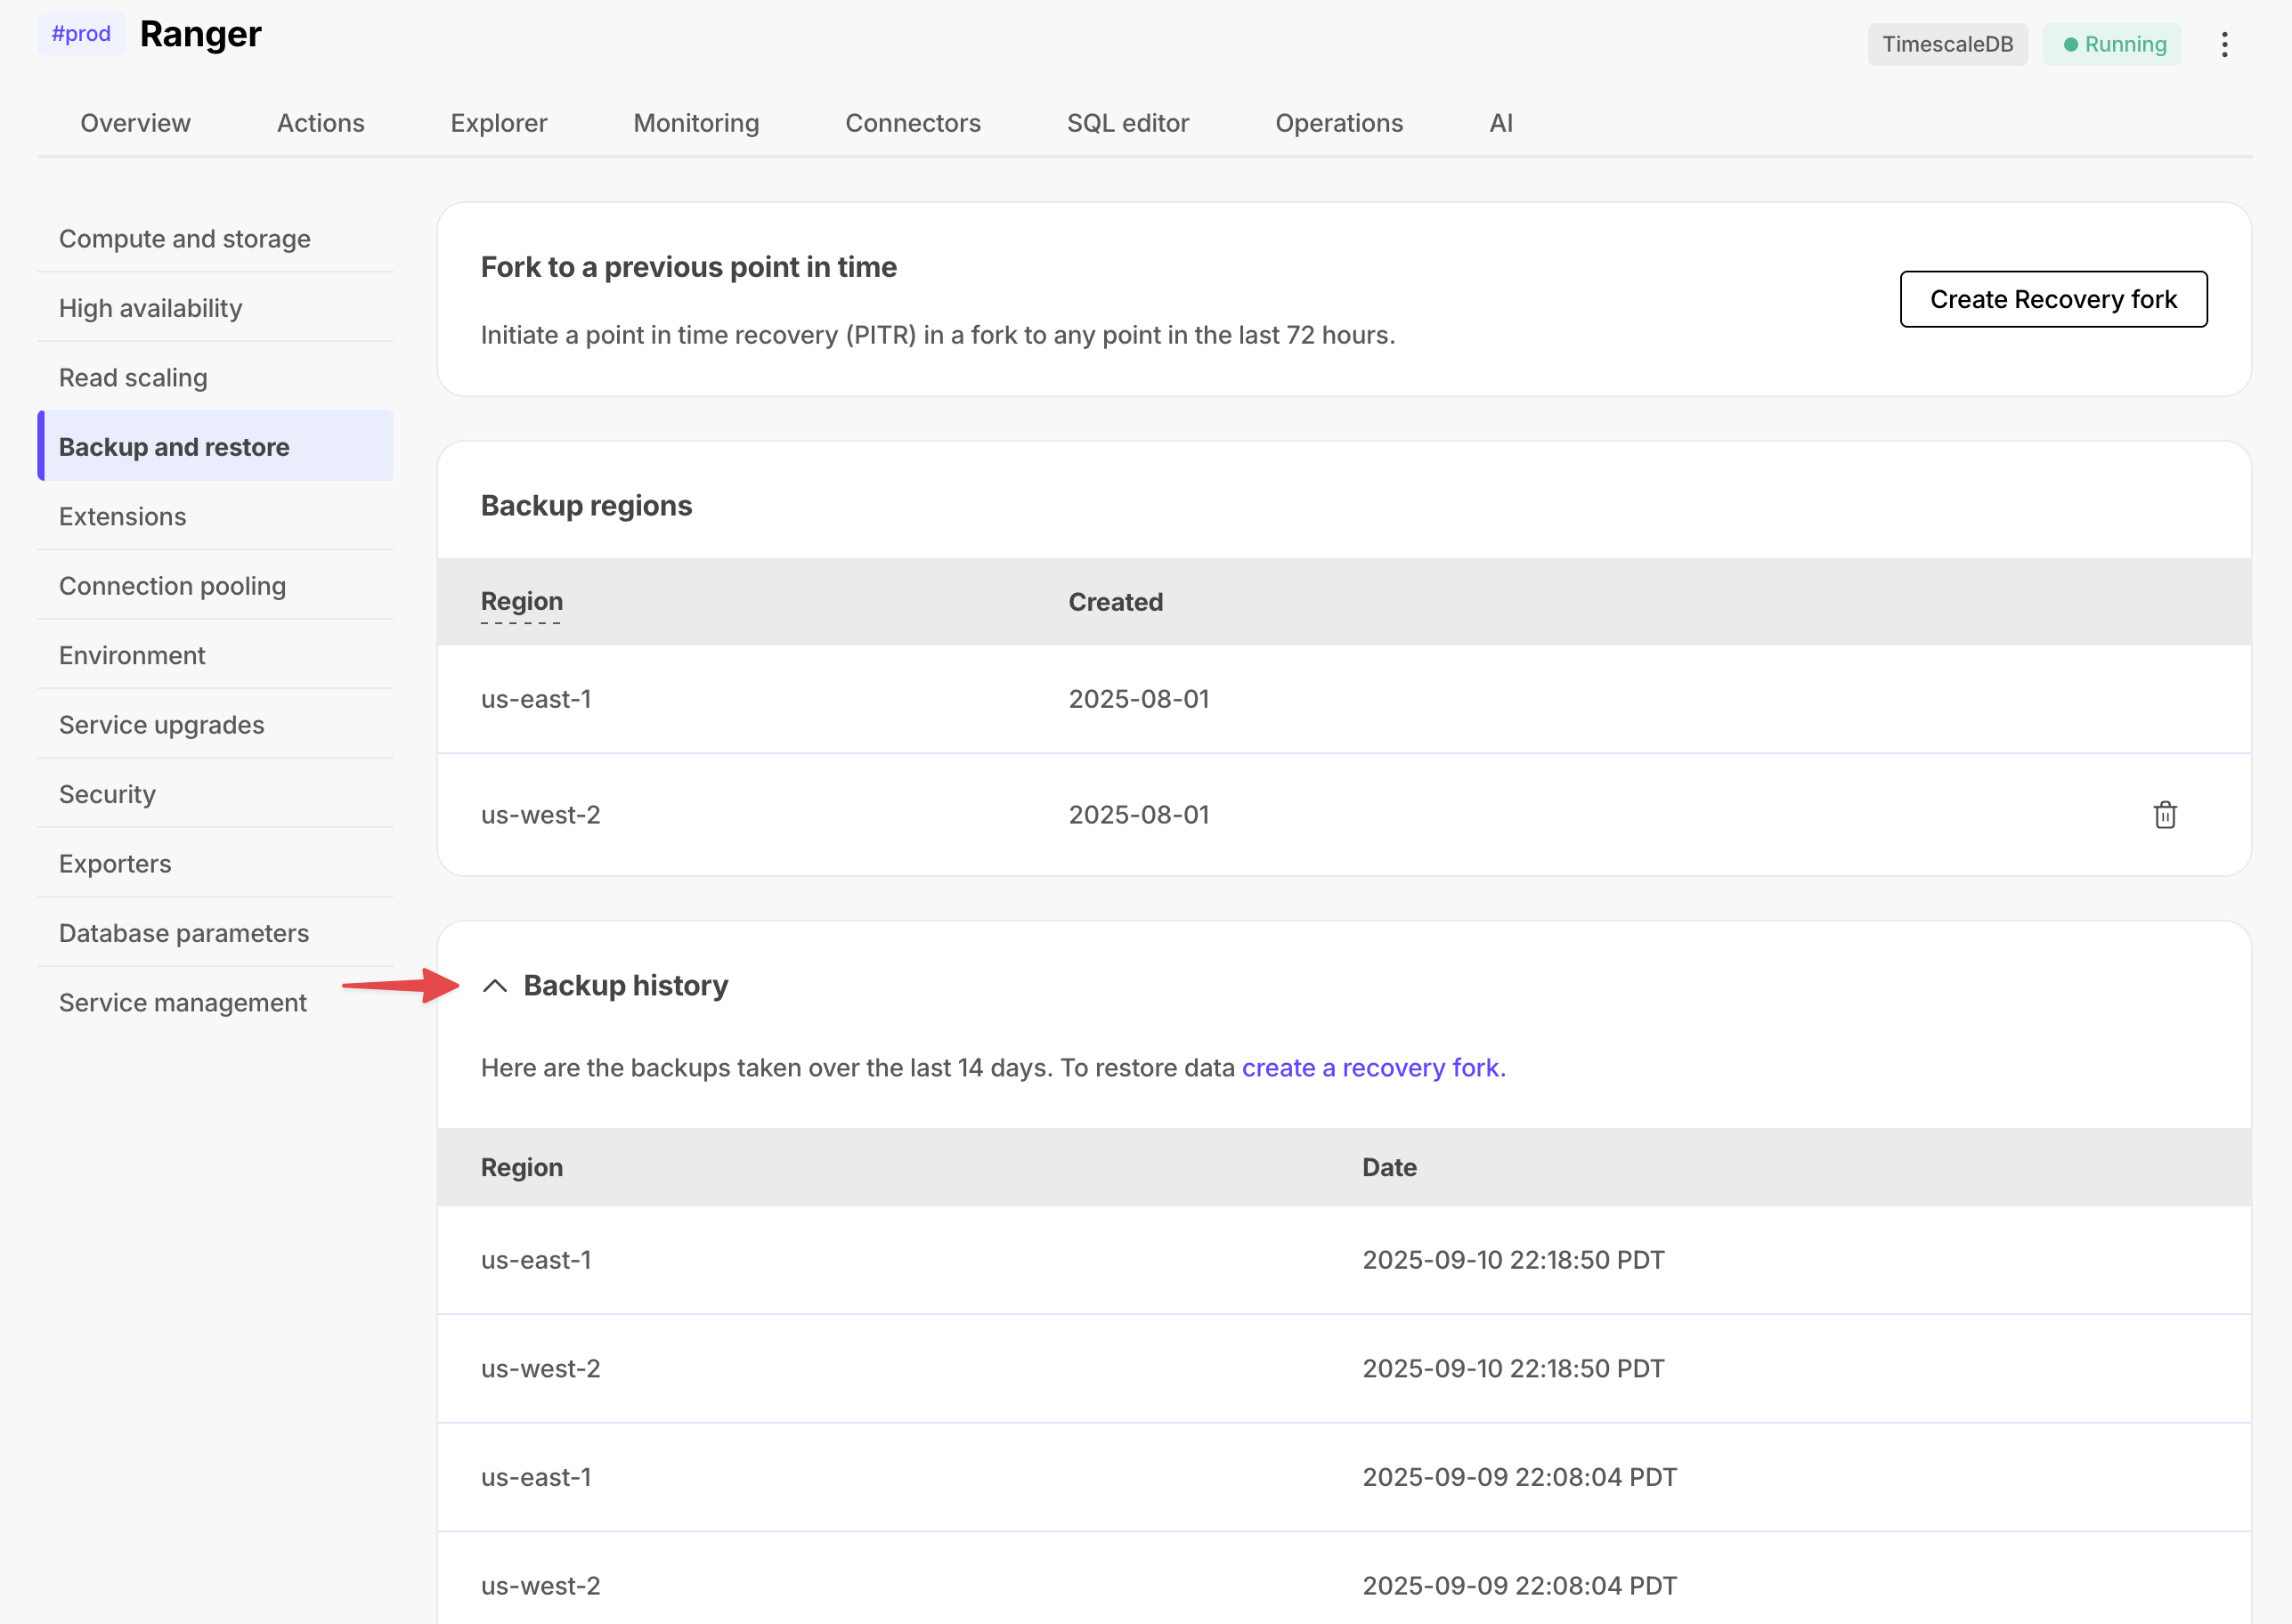
📋 Backup report for compliance
Scale and Enterprise customers can now see a list of their backups in Tiger Cloud Console. For customers with SOC 2 or other compliance needs, this serves as auditable proof of backups.
🗺️ New router for Tiger Cloud Console
The UI just got snappier and easier to navigate with improved interlinking. For example, click an object in the Jobs page to see what hypertable the job is associated with.
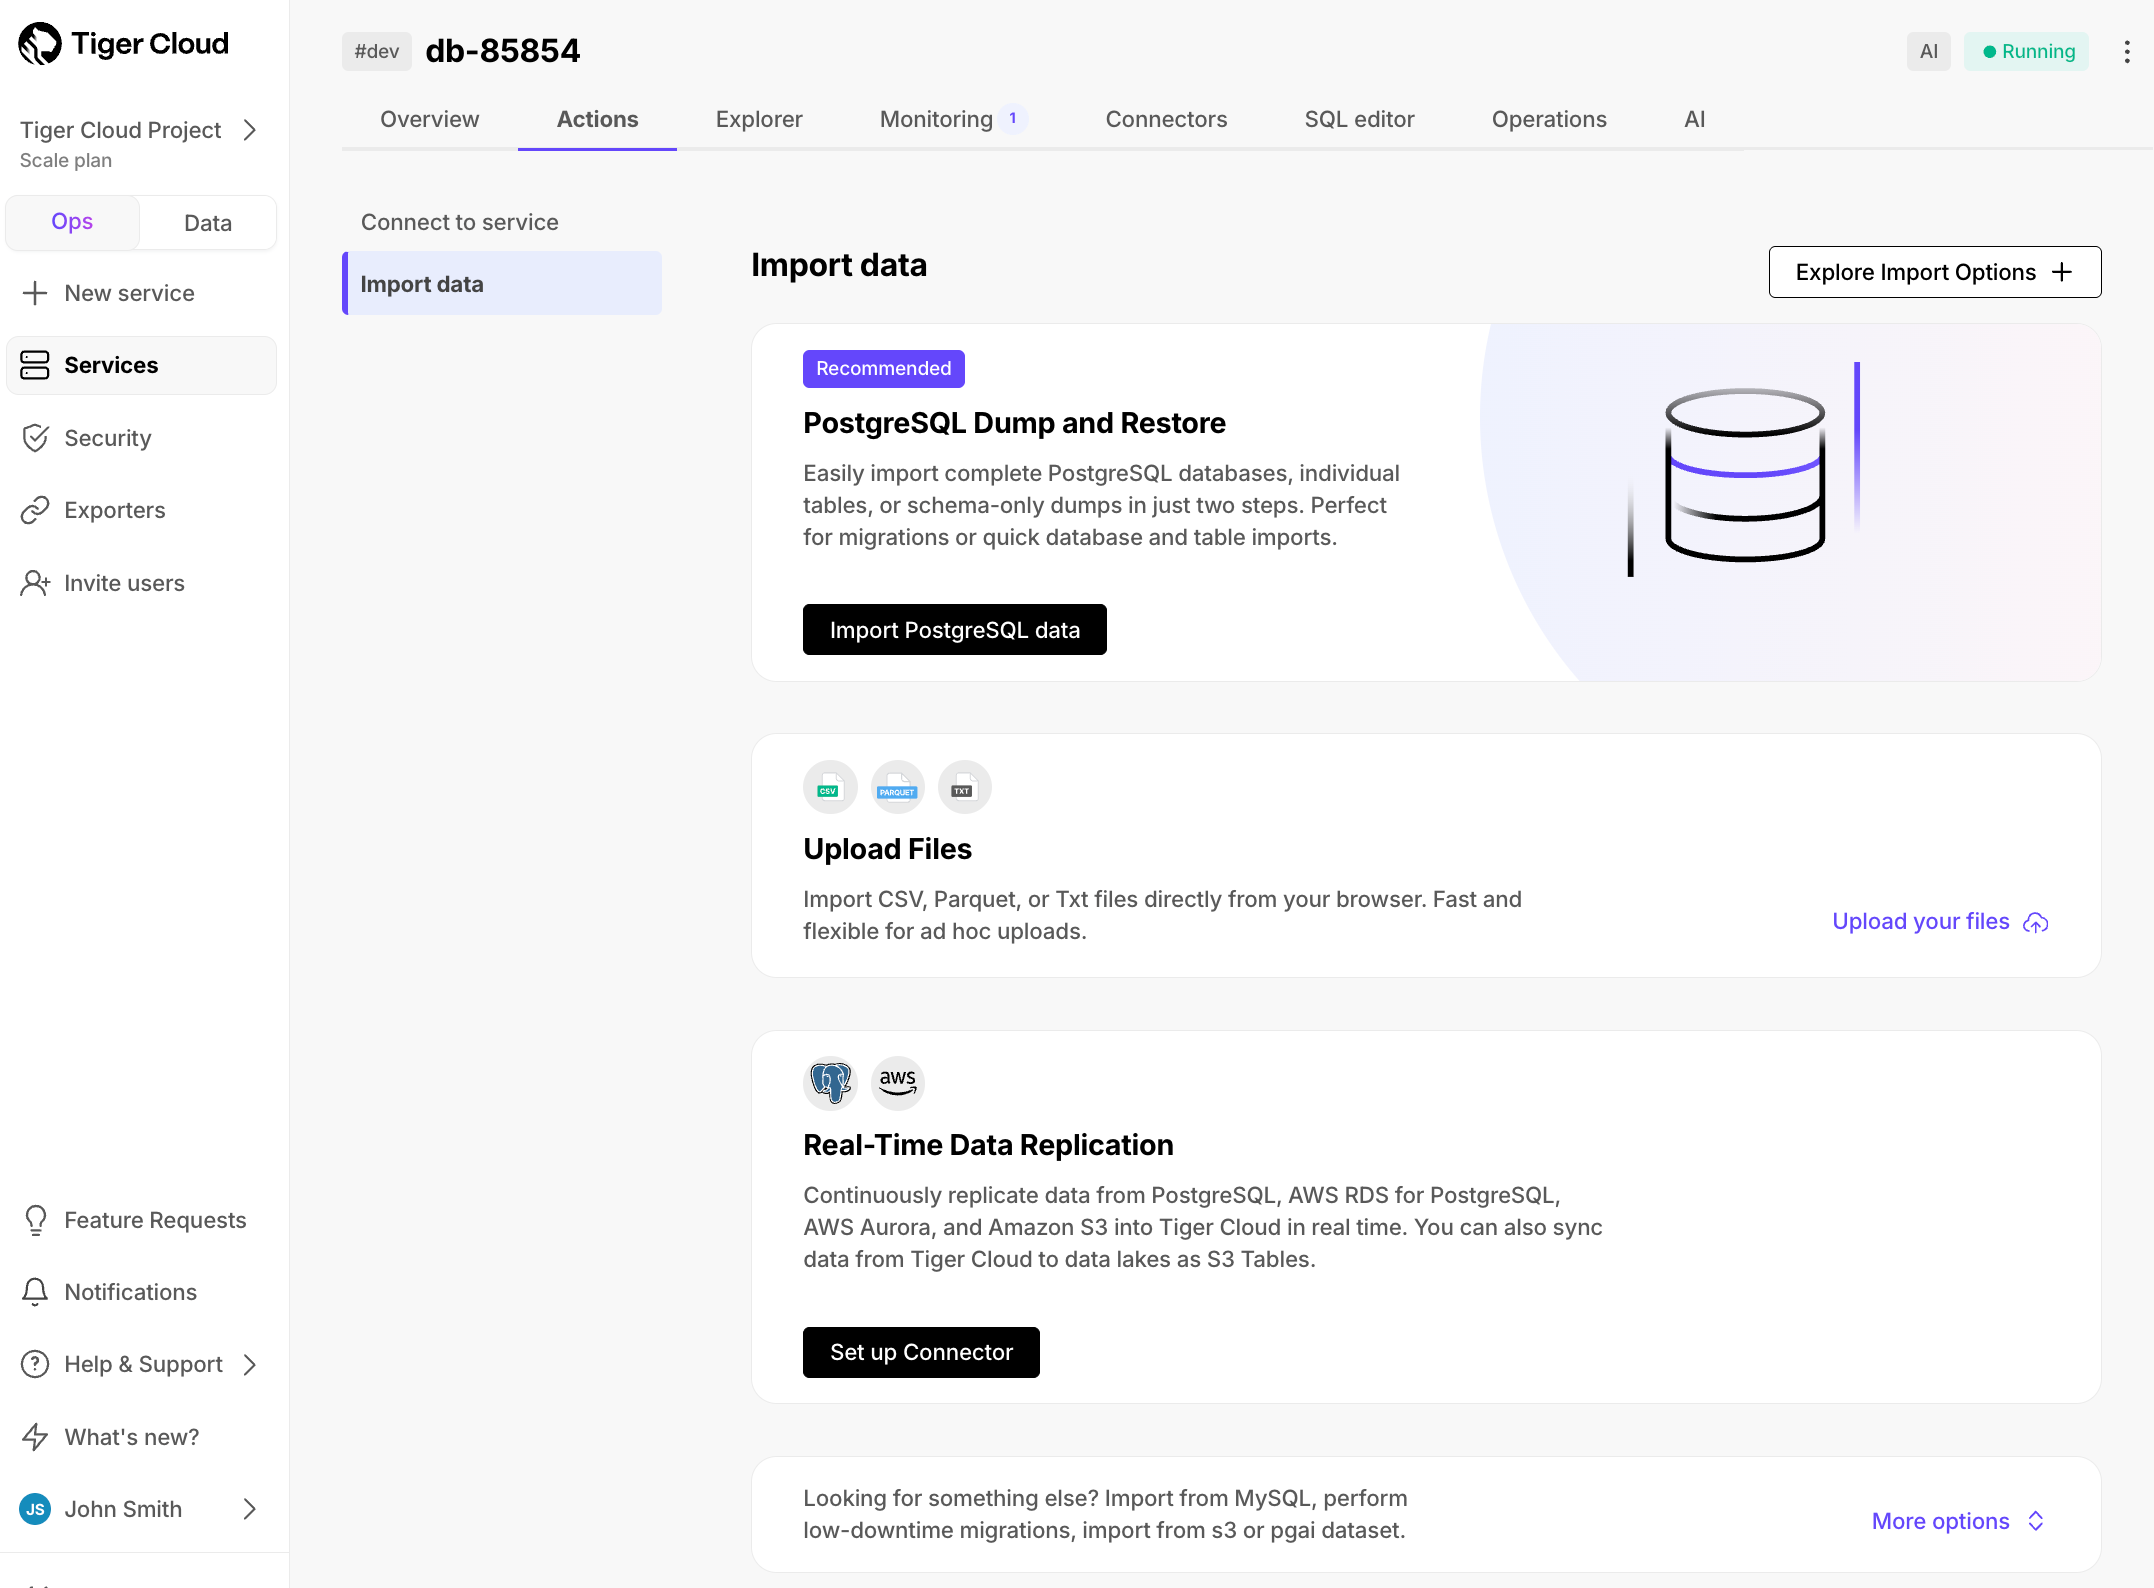
New data import wizard
To make navigation easier, we’ve introduced a cleaner, more intuitive UI for data import. It highlights the most common and recommended option, PostgreSQL Dump & Restore, while organizing all import options into clear categories, to make navigation easier.
The new categories include:
PostgreSQL Dump & Restore
Upload Files: CSV, Parquet, TXT
Real-time Data Replication: source connectors
Migrations & Other Options
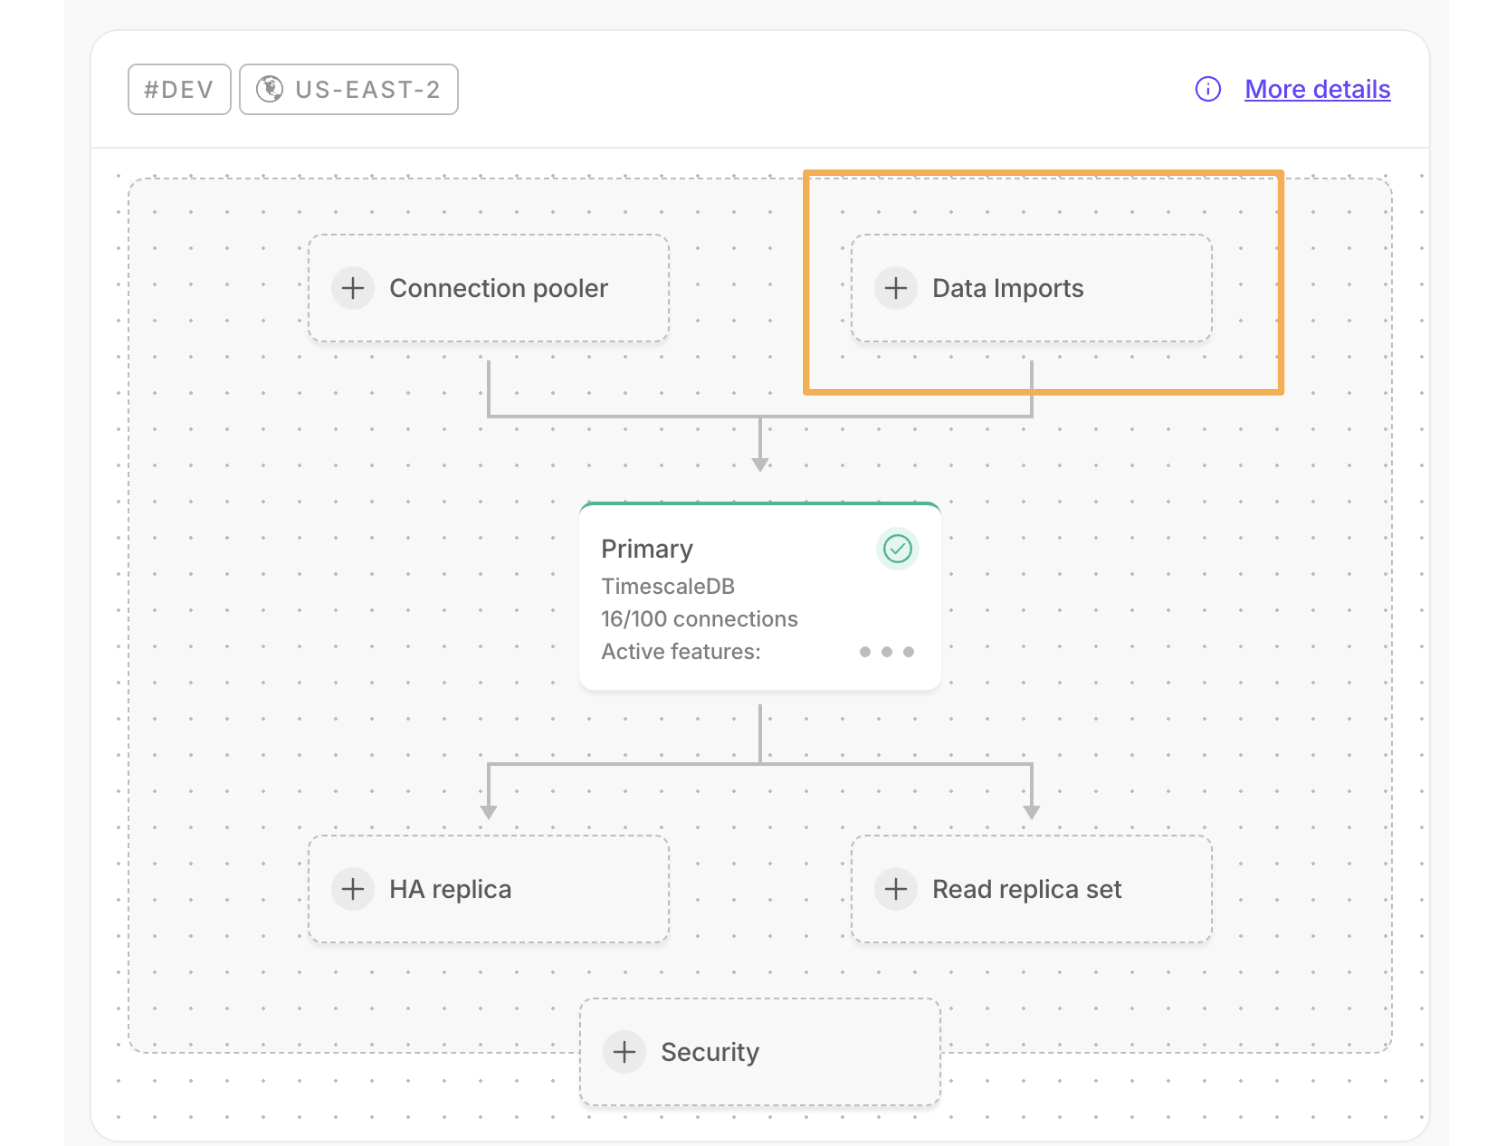
A new data import component has been added to the overview dashboard, providing a clear view of your imports. This includes quick start, in-progress status, and completed imports:
🚁 Enhancements to the Postgres source connector
Easy table selection: You can now sync the complete source schema in one go. Select multiple tables from the drop-down menu and start the connector.
Sync metadata: Connectors now display the following detailed metadata:
Initial data copy: The number of rows copied at any given point in time.Change data capture: The replication lag represented in time and data size.
Improved UX design: In-progress syncs with separate sections showing the tables and metadata for
initial data copyandchange data capture, plus a dedicated tab where you can add more tables to the connector.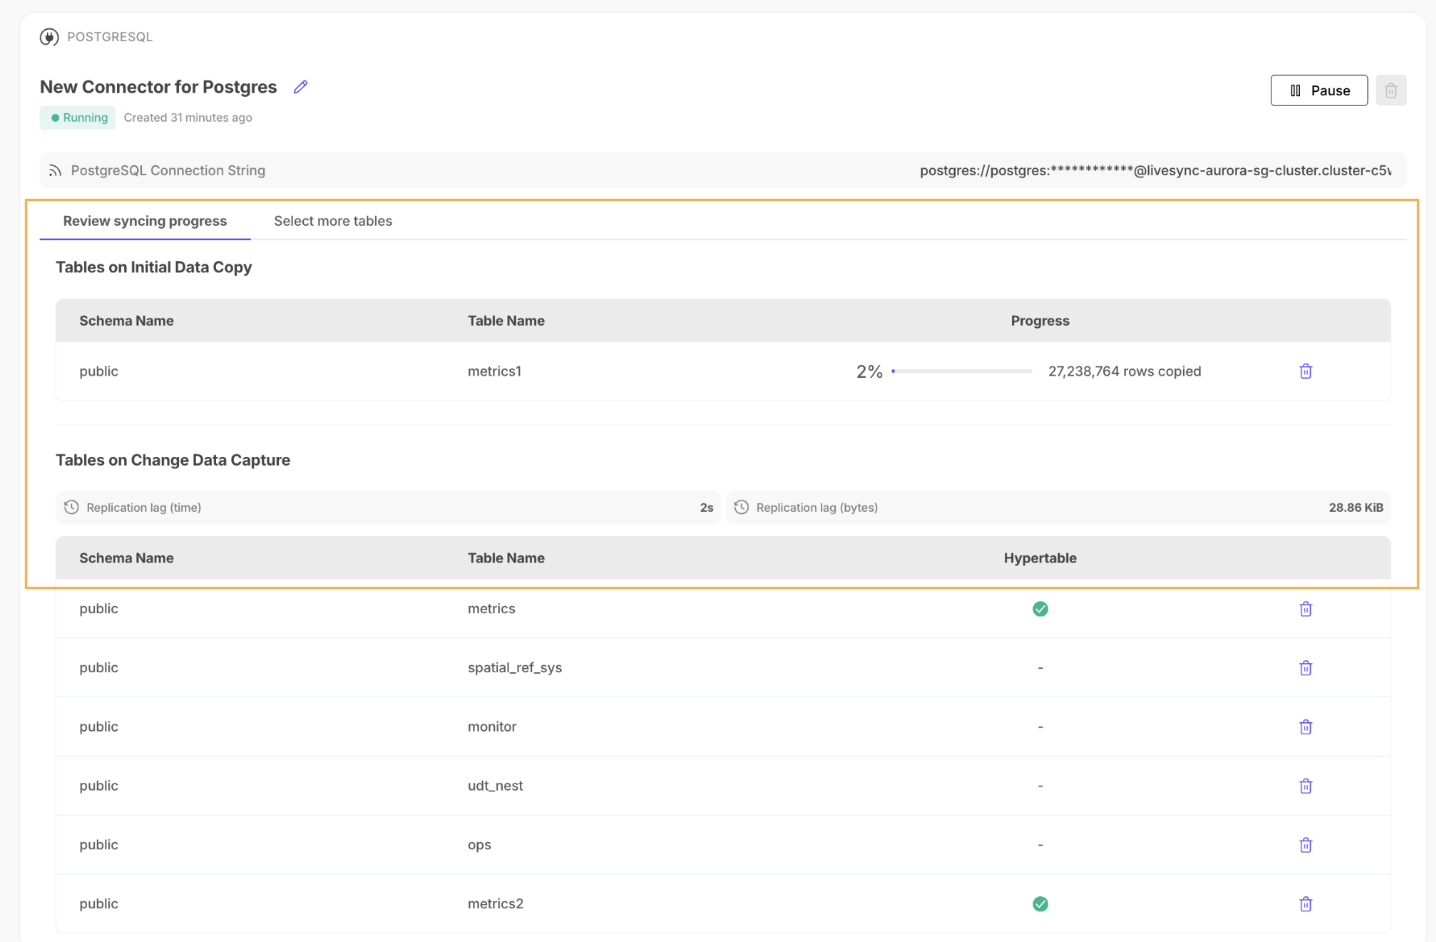
🦋 Developer role GA and hypertable transformation in Console
Developer role (GA)
The Developer role in Tiger Cloud is now generally available. It’s a project‑scoped permission set that lets technical users build and operate services, create or modify resources, run queries, and use observability—without admin or billing access. This enforces least‑privilege by default, reducing risk and audit noise, while keeping governance with Admins/Owners and billing with Finance. This means faster delivery (fewer access escalations), protected sensitive settings, and clear boundaries, so the right users can ship changes safely, while compliance and cost control remain intact.
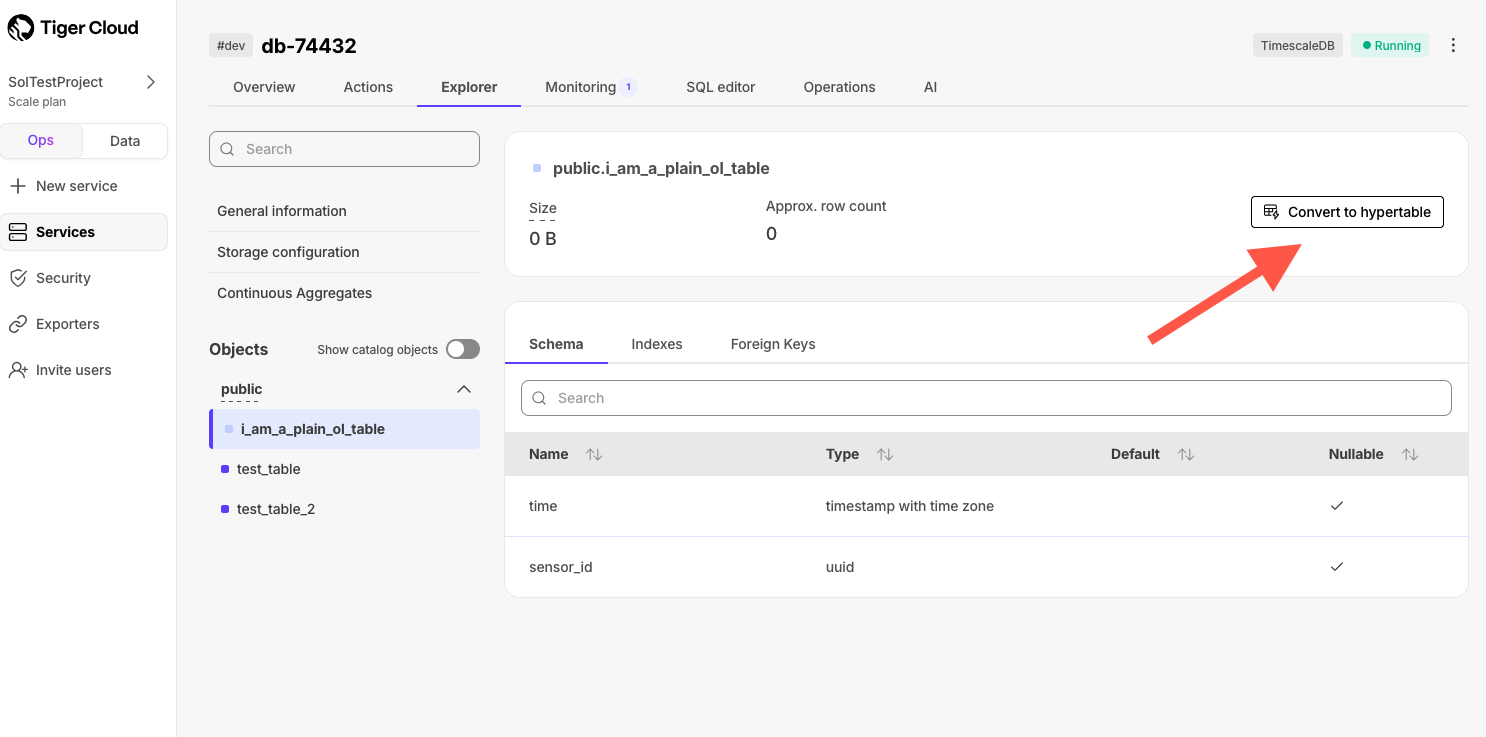
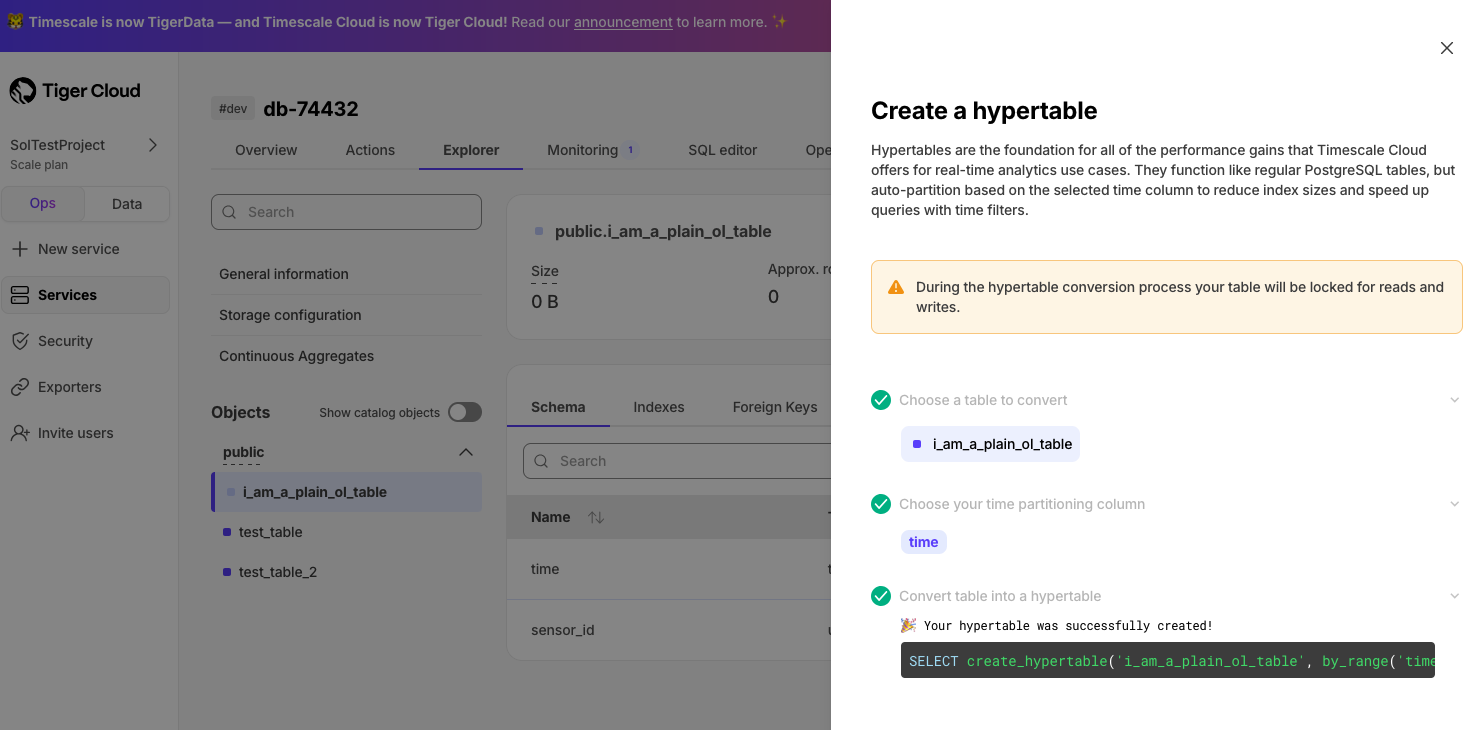
Transform a table to a hypertable from the Explorer
In Console, you can now easily create hypertables from your regular Postgres tables directly from the Explorer. Clicking on any Postgres table shows an option to open up the hypertable action. Follow the simple steps to set up your partition key and transform the table to a hypertable.
Cross-region backups, Postgres options, and onboarding
Cross-region backups
You can now store backups in a different region than your service, which improves resilience and helps meet enterprise compliance requirements. Cross‑region backups are available on our Enterprise plan for free at launch; usage‑based billing may be introduced later. For full details, please see the docs.
Standard Postgres instructions for onboarding
We have added basic instructions for INSERT, UPDATE, DELETE commands to the Tiger Cloud console. It's now shown as an option in the Import Data page.
Postgres-only service type
In Tiger Cloud, you now have an option to choose Postgres-only in the service creation flow. Just click Looking for plan PostgreSQL? on the Service Type screen.
Viewer role GA, EXPLAIN plans, and chunk index sizes in Explorer
GA release of the viewer role in role-based access
The viewer role is now generally available for all projects and organizations. It provides read-only access to services, metrics, and logs without modify permissions. Viewers cannot create, update, or delete resources, nor manage users or billing. It's ideal for auditors, analysts, and cross-functional collaborators who need visibility but not control.
EXPLAIN plans in Insights
You can now find automatically generated EXPLAIN plans on queries that take longer than 10 seconds within Insights. EXPLAIN plans can be very useful to determine how you may be able to increase the performance of your queries.
Chunk index size in Explorer
Find the index size of hypertable chunks in the Explorer. This information can be very valuable to determine if a hypertable's chunk size is properly configured.
TimescaleDB v2.21 and catalog objects in the Console Explorer
🏎️ TimescaleDB v2.21—ingest millions of rows/second and faster columnstore UPSERTs and DELETEs
TimescaleDB v2.21 was released on July 8 and is now available to all developers on Tiger Cloud.
Highlighted features in TimescaleDB v2.21 include:
- High-scale ingestion performance (tech preview): introducing a new approach that compresses data directly into the columnstore during ingestion, demonstrating over 1.2M rows/second in tests with bursts over 50M rows/second. We are actively seeking design partners for this feature.
- Faster data updates (UPSERTs): columnstore UPSERTs are now 2.5x faster for heavily constrained tables, building on the 10x improvement from v2.20.
- Faster data deletion: DELETE operations on non-segmentby columns are 42x faster, reducing I/O and bloat.
- Reduced bloat after recompression: optimized recompression processes lead to less bloat and more efficient storage.
- Enhanced continuous aggregates:
- Concurrent refresh policies enable multiple continuous aggregates to update concurrently.
- Batched refreshes are now enabled by default for more efficient processing.
- Complete chunk management: full support for splitting columnstore chunks, complementing the existing merge capabilities.
For a comprehensive list of changes, refer to the TimescaleDB v2.21 release notes.
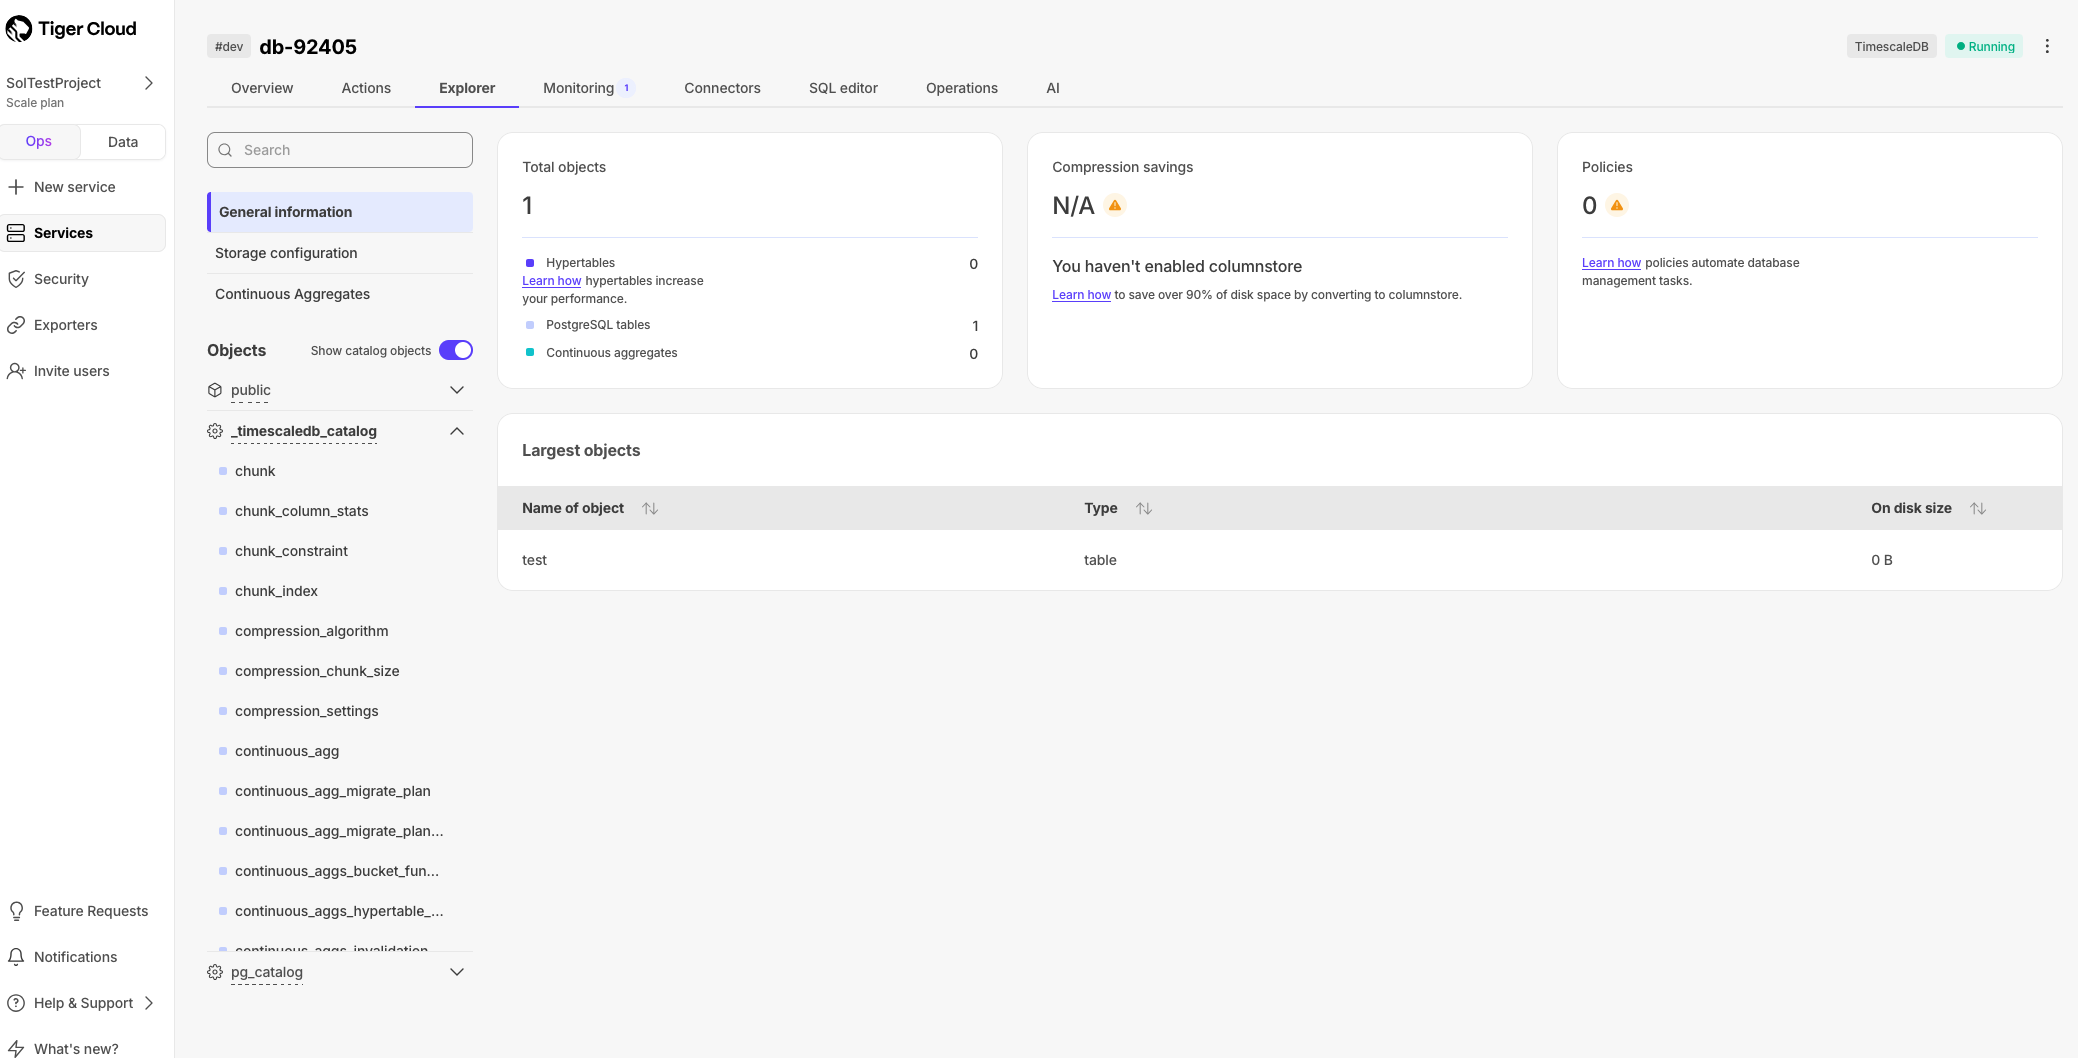
🔬 Catalog objects available in the Console Explorer
You can now view catalog objects in the Console Explorer. Check out the internal schemas for PostgreSQL and TimescaleDB to better understand the inner workings of your database. To turn on/off visibility, select your service in Tiger Cloud Console, then click Explorer and toggle Show catalog objects.
Iceberg Destination Connector (Tiger Lake)
We have released a beta Iceberg destination connector that enables Scale and Enterprise users to integrate Tiger Cloud services with Amazon S3 tables. This enables you to connect Tiger Cloud to data lakes seamlessly. We are actively developing several improvements that will make the overall data lake integration process even smoother.
To use this feature, select your service in Tiger Cloud Console, then navigate to Connectors and select the Amazon S3 Tables destination connector. Integrate the connector to your S3 table bucket by providing the ARN roles, then simply select the tables that you want to sync into S3 tables. See the documentation for details.
🔆Console just got better
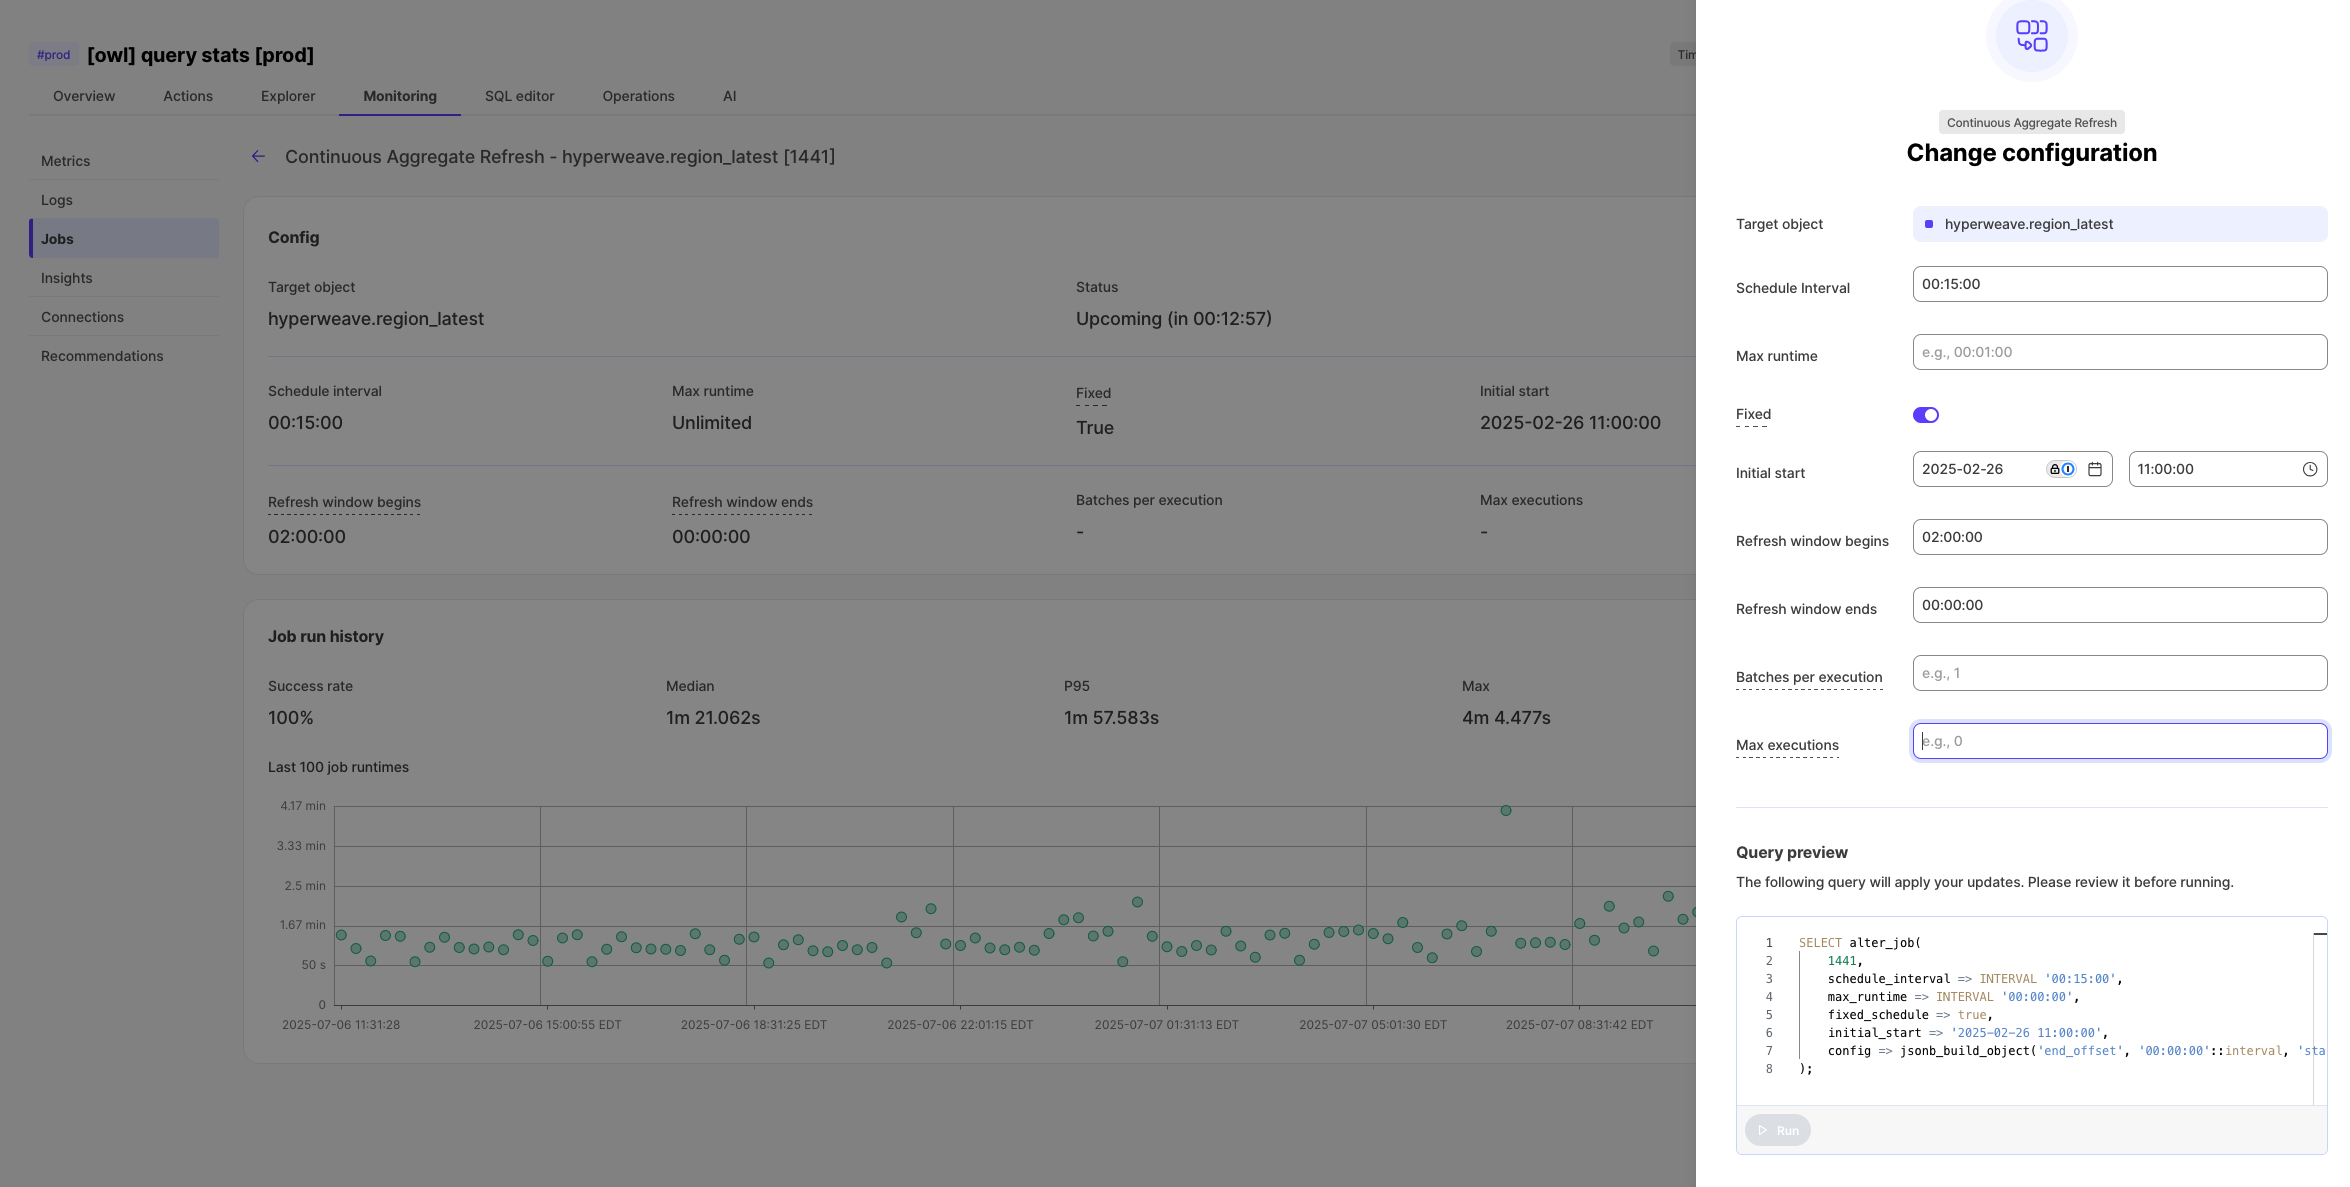
✏️ Editable jobs in Console
You can now edit jobs directly in Console! We've added the handy pencil icon in the top right corner of any job view. Click a job, hit the edit button, then make your changes. This works for all jobs, even user-defined ones. Tiger Cloud jobs come with custom wizards to guide you through the right inputs. This means you can spot and fix issues without leaving the UI - a small change that makes a big difference!
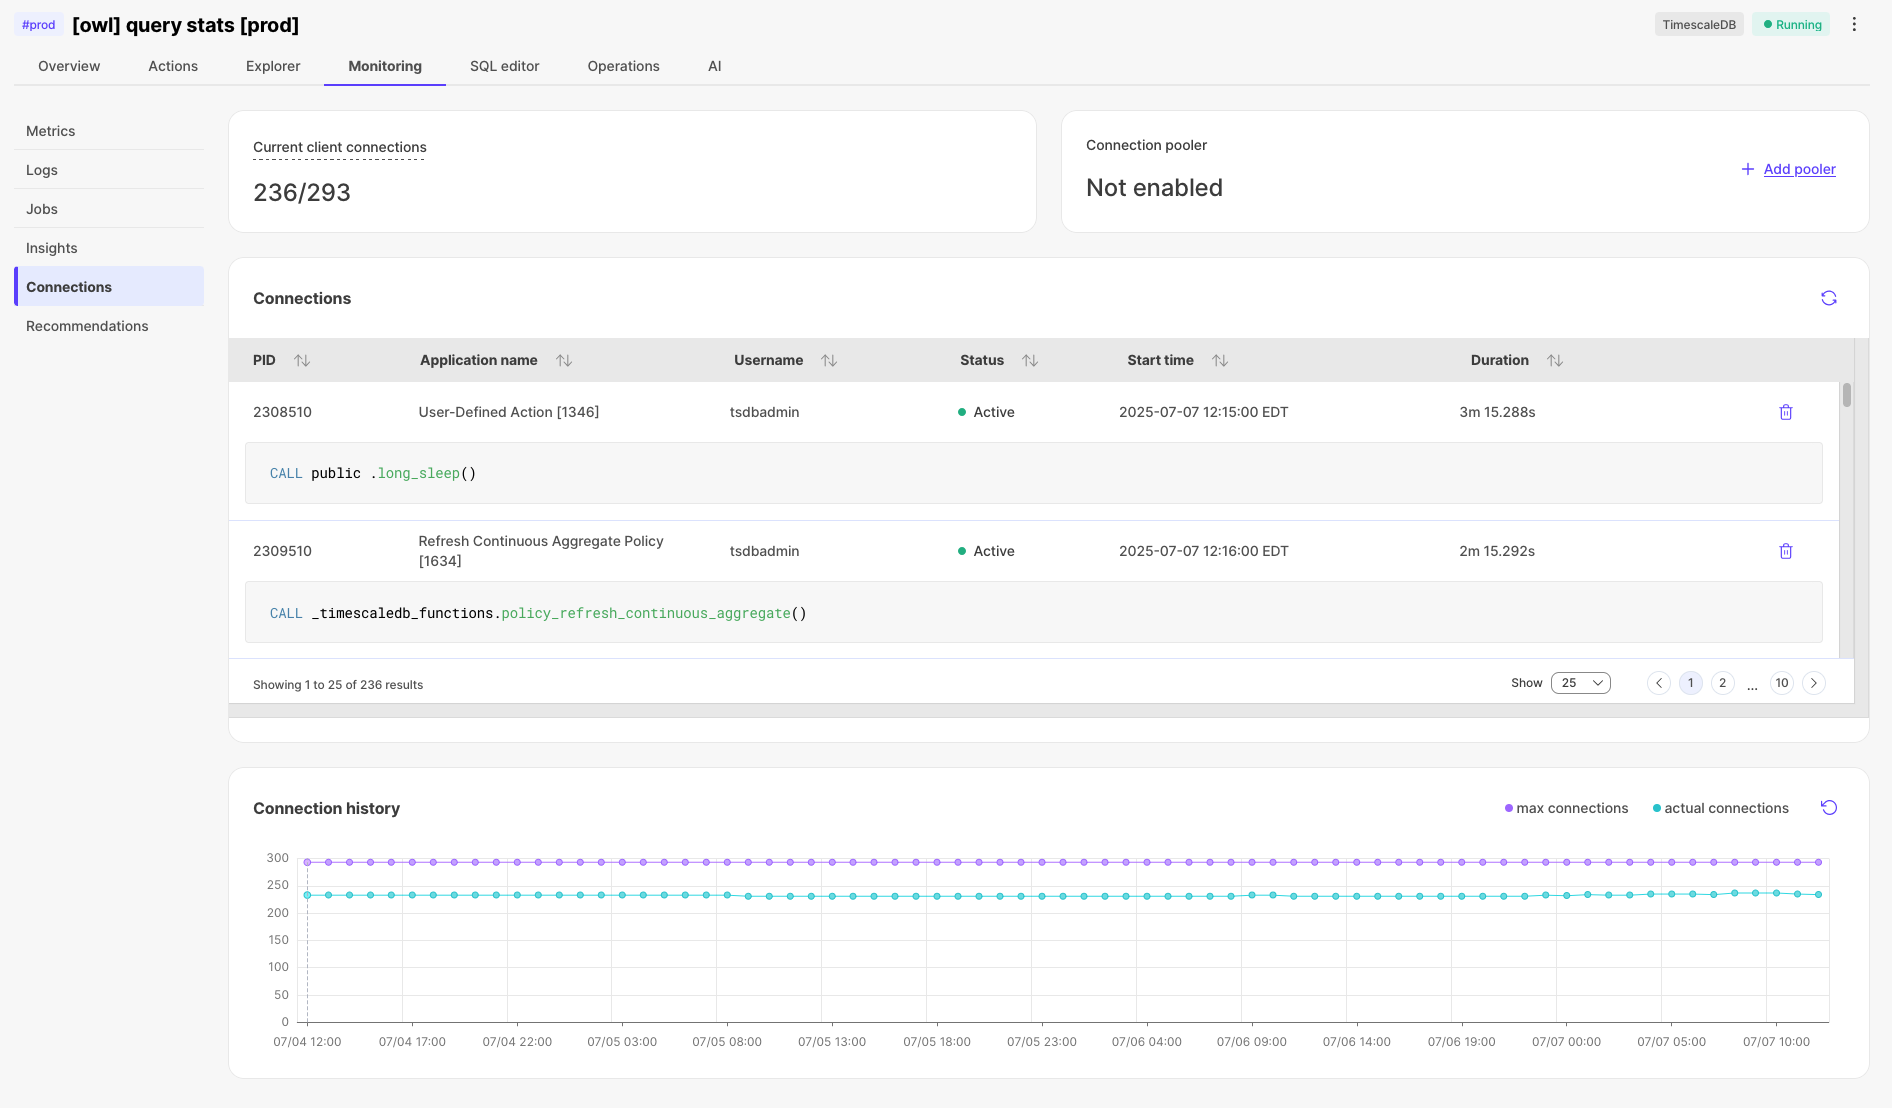
📊 Connection history
Now you can see your historical connection counts right in the Connections tab! This helps spot those pesky connection management bugs before they impact your app. We're logging max connections every hour (sampled every 5 mins) and might adjust based on your feedback. Just another way we're making the Console more powerful for troubleshooting.
🔐 New in Public Beta: Read-Only Access through RBAC
We’ve just launched Read/Viewer-only access for Tiger Cloud projects into public beta!
You can now invite users with view-only permissions — perfect for folks who need to see dashboards, metrics, and query results, without the ability to make changes.
This has been one of our most requested RBAC features, and it's a big step forward in making Tiger Cloud more secure and collaborative.
No write access. No config changes. Just visibility.
In Console, Go to Project Settings > Users & Roles to try it out, and let us know what you think!
👀 Super useful doc updates
Updates to instructions for livesync
In the Console UI, we have clarified the step-by-step procedure for setting up your livesync from self-hosted installations by:
- Adding definitions for some flags when running your Docker container.
- Including more detailed examples of the output from the table synchronization list.
New optional argument for add_continuous_aggregate_policy API
Added the new refresh_newest_first optional argument that controls the order of incremental refreshes.
🚀 Multi-command queries in SQL editor, improved job page experience, multiple AWS Transit Gateways, and a new service creation flow
Run multiple statements in SQL editor
Execute complex queries with multiple commands in a single run—perfect for data transformations, table setup, and batch operations.
Branch conversations in SQL assistant
Start new discussion threads from any point in your SQL assistant chat to explore different approaches to your data questions more easily.
Smarter results table
- Expand JSON data instantly: turn complex JSON objects into readable columns with one click—no more digging through nested data structures.
- Filter with precision: use a new smart filter to pick exactly what you want from a dropdown of all available values.
Jobs page improvements
Individual job pages now display their corresponding configuration for TimescaleDB job types—for example, columnstore, retention, CAgg refreshes, tiering, and others.
Multiple AWS Transit Gateways
You can now connect multiple AWS Transit Gateways, when those gateways use overlapping CIDRs. Ideal for teams with zero-trust policies, this lets you keep each network path isolated.
How it works: when you create a new peering connection, Tiger Cloud reuses the existing Transit Gateway if you supply the same ID—otherwise it automatically creates a new, isolated Transit Gateway.
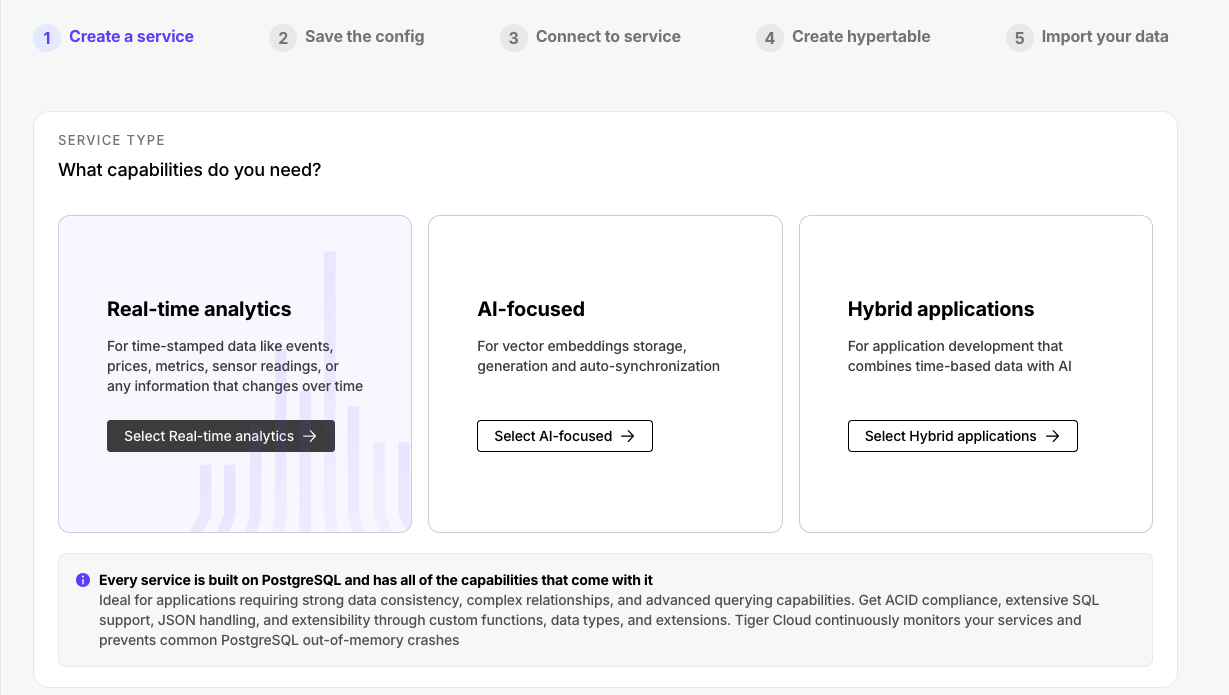
Updated service creation flow
The new service creation flow makes the choice of service type clearer. You can now create distinct types with Postgres extensions for real-time analytics (TimescaleDB), AI (pgvectorscale, pgai), and RTA/AI hybrid applications.
⚙️ Improved Terraform support and TimescaleDB v2.20.3
Terraform support for Exporters and AWS Transit Gateway
The latest version of the Timescale Terraform provider (2.3.0) adds support for:
- Creating and attaching observability exporters to your services.
- Securing the connections to your Timescale Cloud services with AWS Transit Gateway.
- Configuring CIDRs for VPC and AWS Transit Gateway connections.
Check the Timescale Terraform provider documentation for more details.
TimescaleDB v2.20.3
This patch release for TimescaleDB v2.20 includes several bug fixes and minor improvements. Notable bug fixes include:
- Adjustments to SkipScan costing for queries that require a full scan of indexed data.
- A fix for issues encountered during dump and restore operations when chunk skipping is enabled.
- Resolution of a bug related to dropped "quals" (qualifications/conditions) in SkipScan.
For a comprehensive list of changes, refer to the TimescaleDB 2.20.3 release notes.
🧘 Read replica sets, faster tables, new anthropic models, and VPC support in data mode
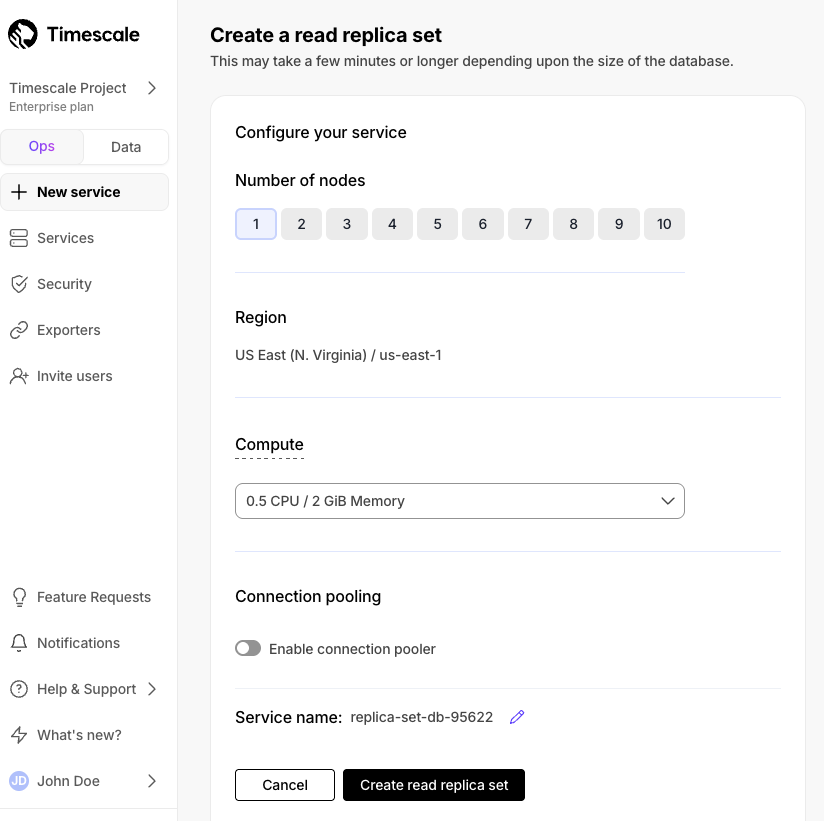
Horizontal read scaling with read replica sets
Read replica sets are an improved version of read replicas. They let you scale reads horizontally by creating up to 10 replica nodes behind a single read endpoint. Just point your read queries to the endpoint and configure the number of replicas you need without changing your application logic. You can increase or decrease the number of replicas in the set dynamically, with no impact on the endpoint.
Read replica sets are used to:
- Scale reads for read-heavy workloads and dashboards.
- Isolate internal analytics and reporting from customer-facing applications.
- Provide high availability and fault tolerance for read traffic.
All existing read replicas have been automatically upgraded to a replica set with one node—no action required. Billing remains the same.
Read replica sets are available for all Scale and Enterprise customers.
Faster, smarter results tables in data mode
We've completely rebuilt how query results are displayed in the data mode to give you a faster, more powerful way to work with your data. The new results table can handle millions of rows with smooth scrolling and instant responses when you sort, filter, or format your data. You'll find it today in notebooks and presentation pages, with more areas coming soon.
What's new:
- Your settings stick around: when you customize how your table looks—applying filters, sorting columns, or formatting data—those settings are automatically saved. Switch to another tab and come back, and everything stays exactly how you left it.
- Better ways to find what you need: filter your results by any column value, with search terms highlighted so you can quickly spot what you're looking for. The search box is now available everywhere you work with data.
- Export exactly what you want: download your entire table or just select the specific rows and columns you need. Both CSV and Excel formats are supported.
- See patterns in your data: highlight cells based on their values to quickly spot trends, outliers, or important thresholds in your results.
- Smoother navigation: click any row number to see the full details in an expanded view. Columns automatically resize to show your data clearly, and web links in your results are now clickable.
As a result, working with large datasets is now faster and more intuitive. Whether you're exploring millions of rows or sharing results with your team, the new table keeps up with how you actually work with data.
Latest anthropic models added to SQL assistant
Data mode's SQL assistant now supports Anthropic's latest models:
- Sonnet 4
- Sonnet 4 (extended thinking)
- Opus 4
- Opus 4 (extended thinking)
VPC support for passwordless data mode connections
We previously made it much easier to connect newly created services to Timescale’s data mode. We have now expanded this functionality to services using a VPC.
🕵🏻️ Enhanced service monitoring, TimescaleDB v2.20, and livesync for Postgres
Updated top-level navigation - Monitoring tab
In Timescale Console, we have consolidated multiple top-level service information tabs into the single Monitoring tab. This tab houses information previously displayed in the Recommendations, Jobs, Connections, Metrics, Logs, and Insights tabs.
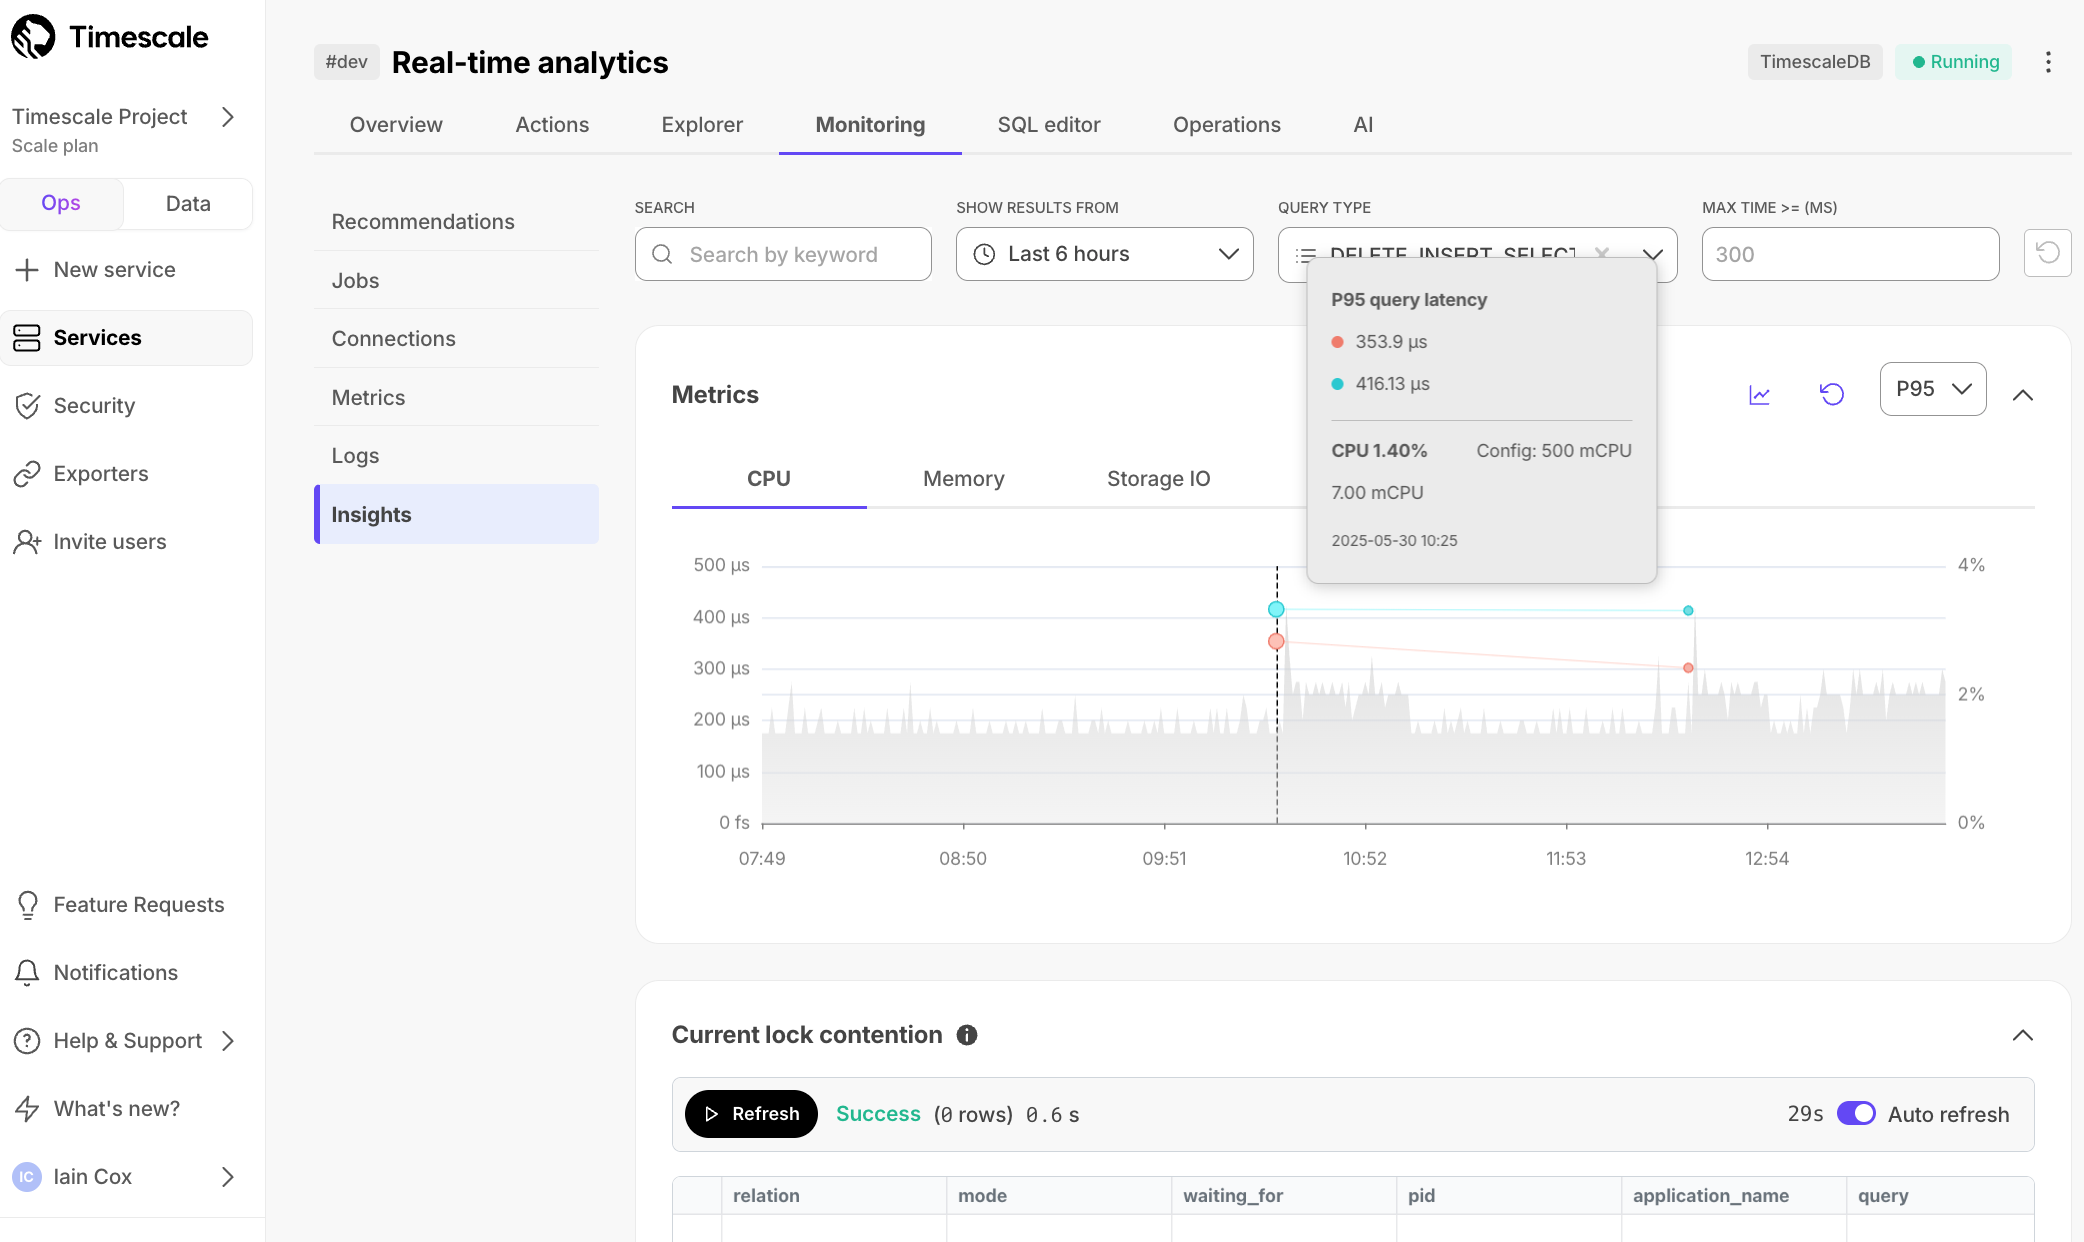
Monitor active connections
In the Connections section under Monitoring, you can now see information like the query being run, the application name, and duration for all current connections to a service.
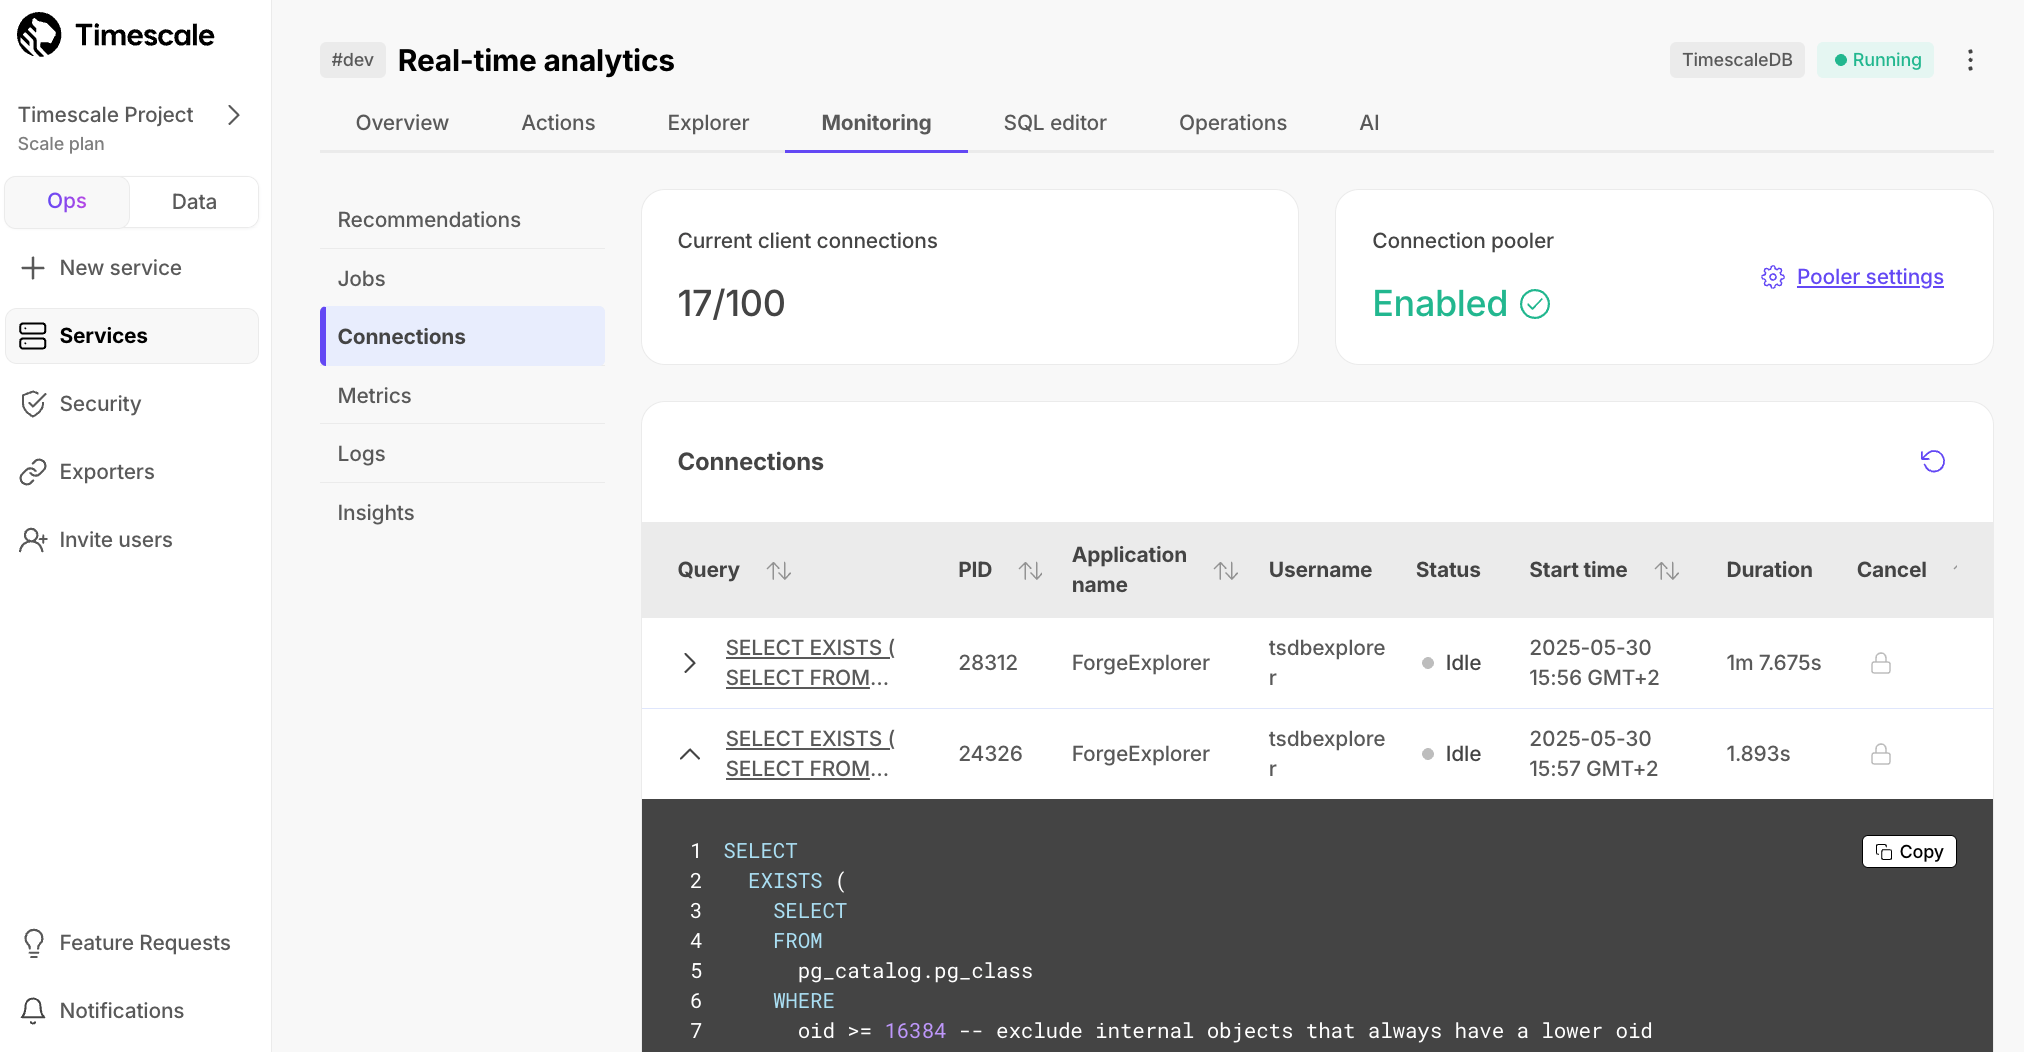
The information in Connections enables you to debug misconfigured applications, or cancel problematic queries to free up other connections to your database.
TimescaleDB v2.20 - query performance and faster data updates
All new services created on Timescale Cloud are created using TimescaleDB v2.20. Existing services will be automatically upgraded during their maintenance window.
Highlighted features in TimescaleDB v2.20 include:
- Efficiently handle data updates and upserts (including backfills, that are now up to 10x faster).
- Up to 6x faster point queries on high-cardinality columns using new bloom filters.
- Up to 2500x faster DISTINCT operations with SkipScan, perfect for quickly getting a unique list or the latest reading from any device, event, or transaction.
- 8x more efficient Boolean column storage with vectorized processing, resulting in 30-45% faster queries.
- Enhanced developer flexibility with continuous aggregates now supporting window and mutable functions, plus customizable refresh orders.
Postgres 13 and 14 deprecated on Tiger Cloud
TimescaleDB version 2.20 is not compatible with Postgres versions v14 and below. TimescaleDB 2.19.3 is the last bug-fix release for Postgres 14. Future fixes are for Postgres 15+ only. To continue receiving critical fixes and security patches, and to take advantage of the latest TimescaleDB features, you must upgrade to Postgres 15 or newer. This deprecation affects all Tiger Cloud services currently running Postgres 13 or Postgres 14.
The timeline for the Postgres 13 and 14 deprecation is as follows:
- Deprecation notice period begins: starting in early June 2025, you will receive email communication.
- Customer self-service upgrade window: June 2025 through September 14, 2025. We strongly encourage you to manually upgrade Postgres during this period.
- Automatic upgrade deadline: your service will be automatically upgraded from September 15, 2025.
Enhancements to livesync for Postgres
You now can:
Edit a running livesync to add and drop tables from an existing configuration:
- For existing tables, Timescale Console stops the livesync while keeping the target table intact.
- Newly added tables sync their existing data and transition into the Change Data Capture (CDC) state.
Create multiple livesync instances for Postgres per service. This is an upgrade from our initial launch which limited users to one LiveSync per service.
This enables you to sync data from multiple Postgres source databases into a single Timescale Cloud service.
No more hassle looking up schema and table names for livesync configuration from the source. Starting today, all schema and table names are available in a dropdown menu for seamless source table selection.
➕ More storage types and IOPS
🚀 Enhanced storage: scale to 64 TB and 32,000 IOPS
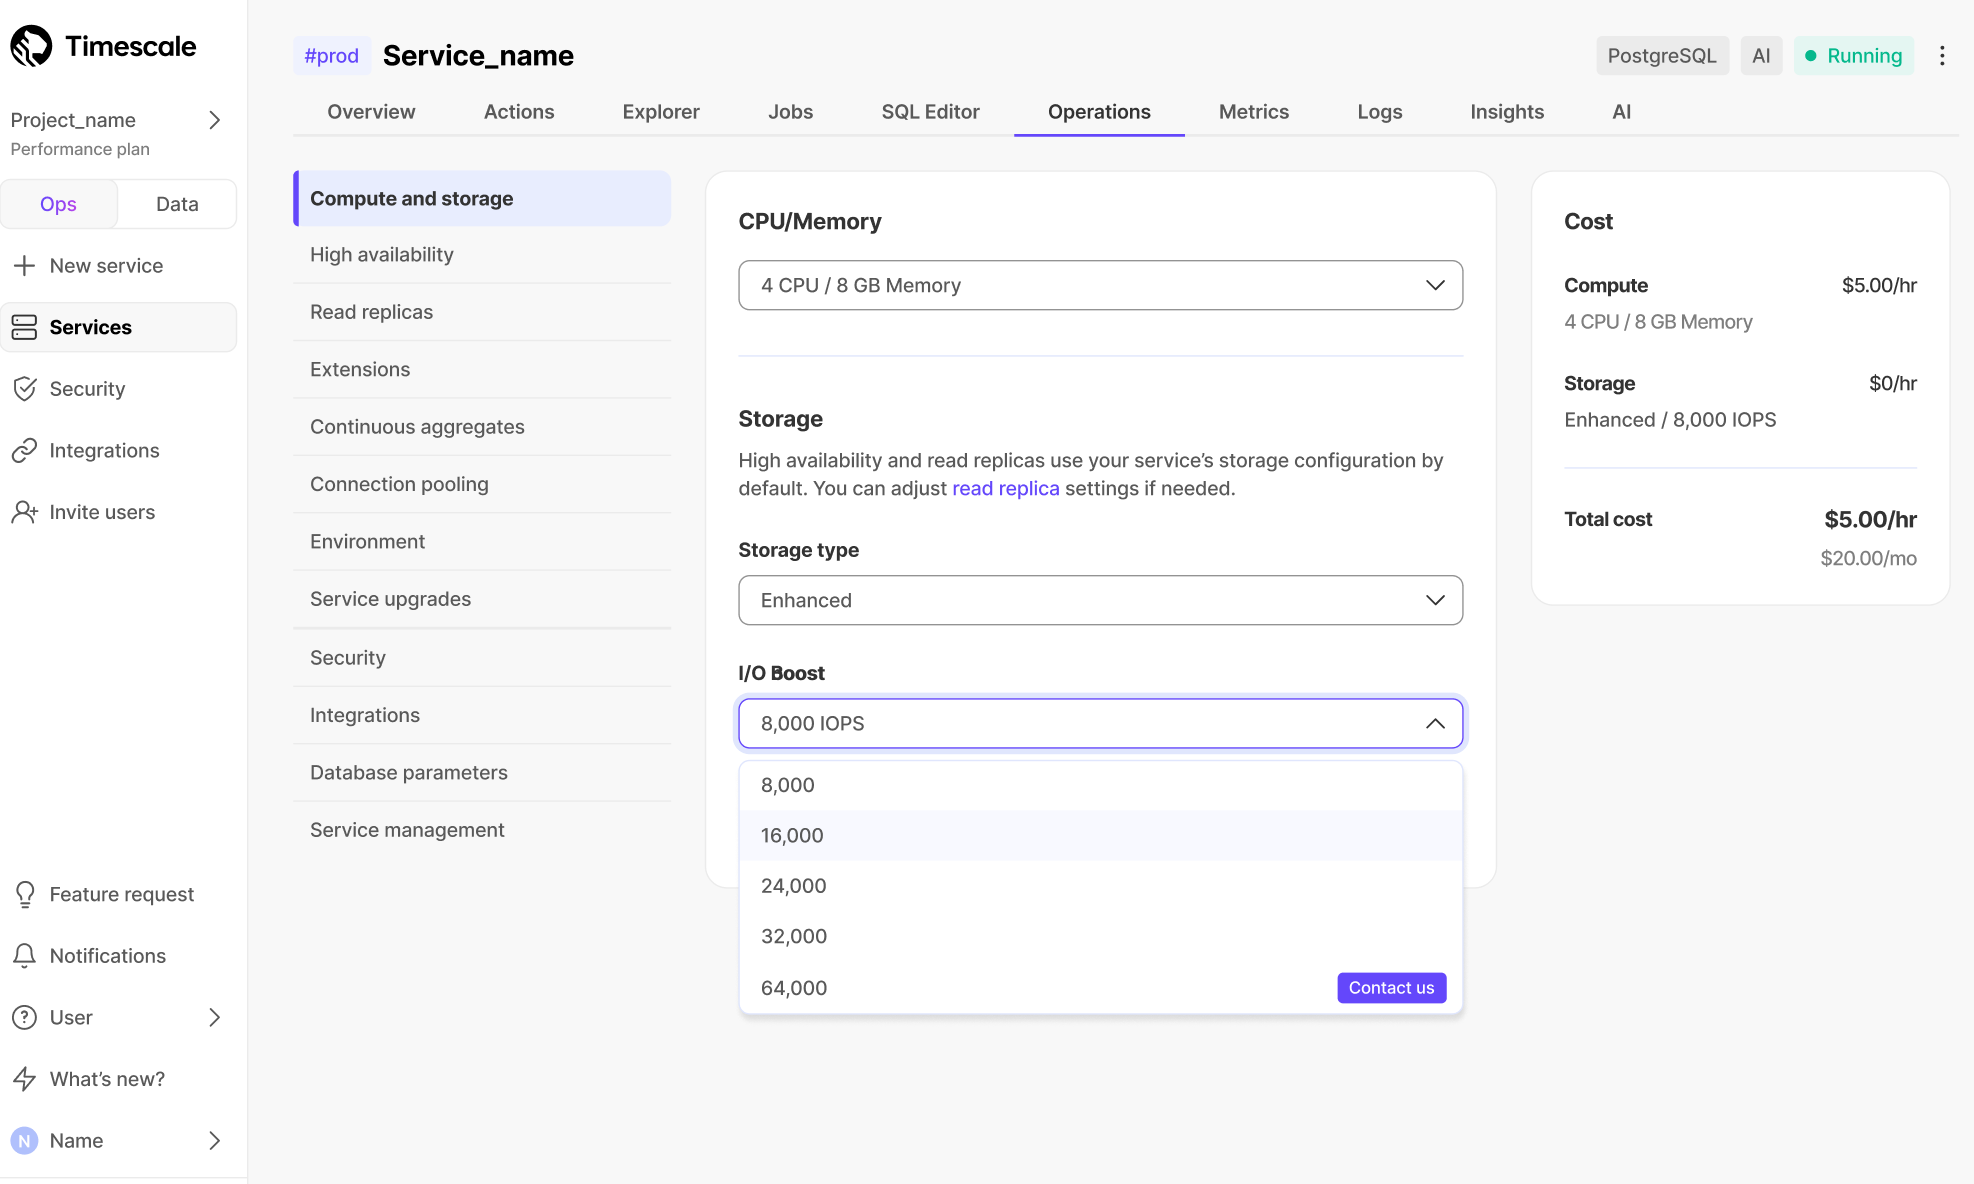
We're excited to introduce enhanced storage, a new storage type in Timescale Cloud that significantly boosts both capacity and performance. Designed for customers with mission-critical workloads.
With enhanced storage, Timescale Cloud now supports:
- Up to 64 TB of storage per Timescale Cloud service (4x increase from the previous limit)
- Up to 32,000 IOPS, enabling high-throughput ingest and low-latency queries
Powered by AWS io2 volumes, enhanced storage gives your workloads the headroom they need—whether you're building financial data pipelines, developing IoT platforms, or processing billions of rows of telemetry. No more worrying about storage ceilings or IOPS bottlenecks. Enable enhanced storage in Timescale Console under Operations → Compute & Storage. Enhanced storage is currently available on the Enterprise pricing plan only. Learn more here.
↔️ New export and import options
🔥 Ship TimescaleDB metrics to Prometheus
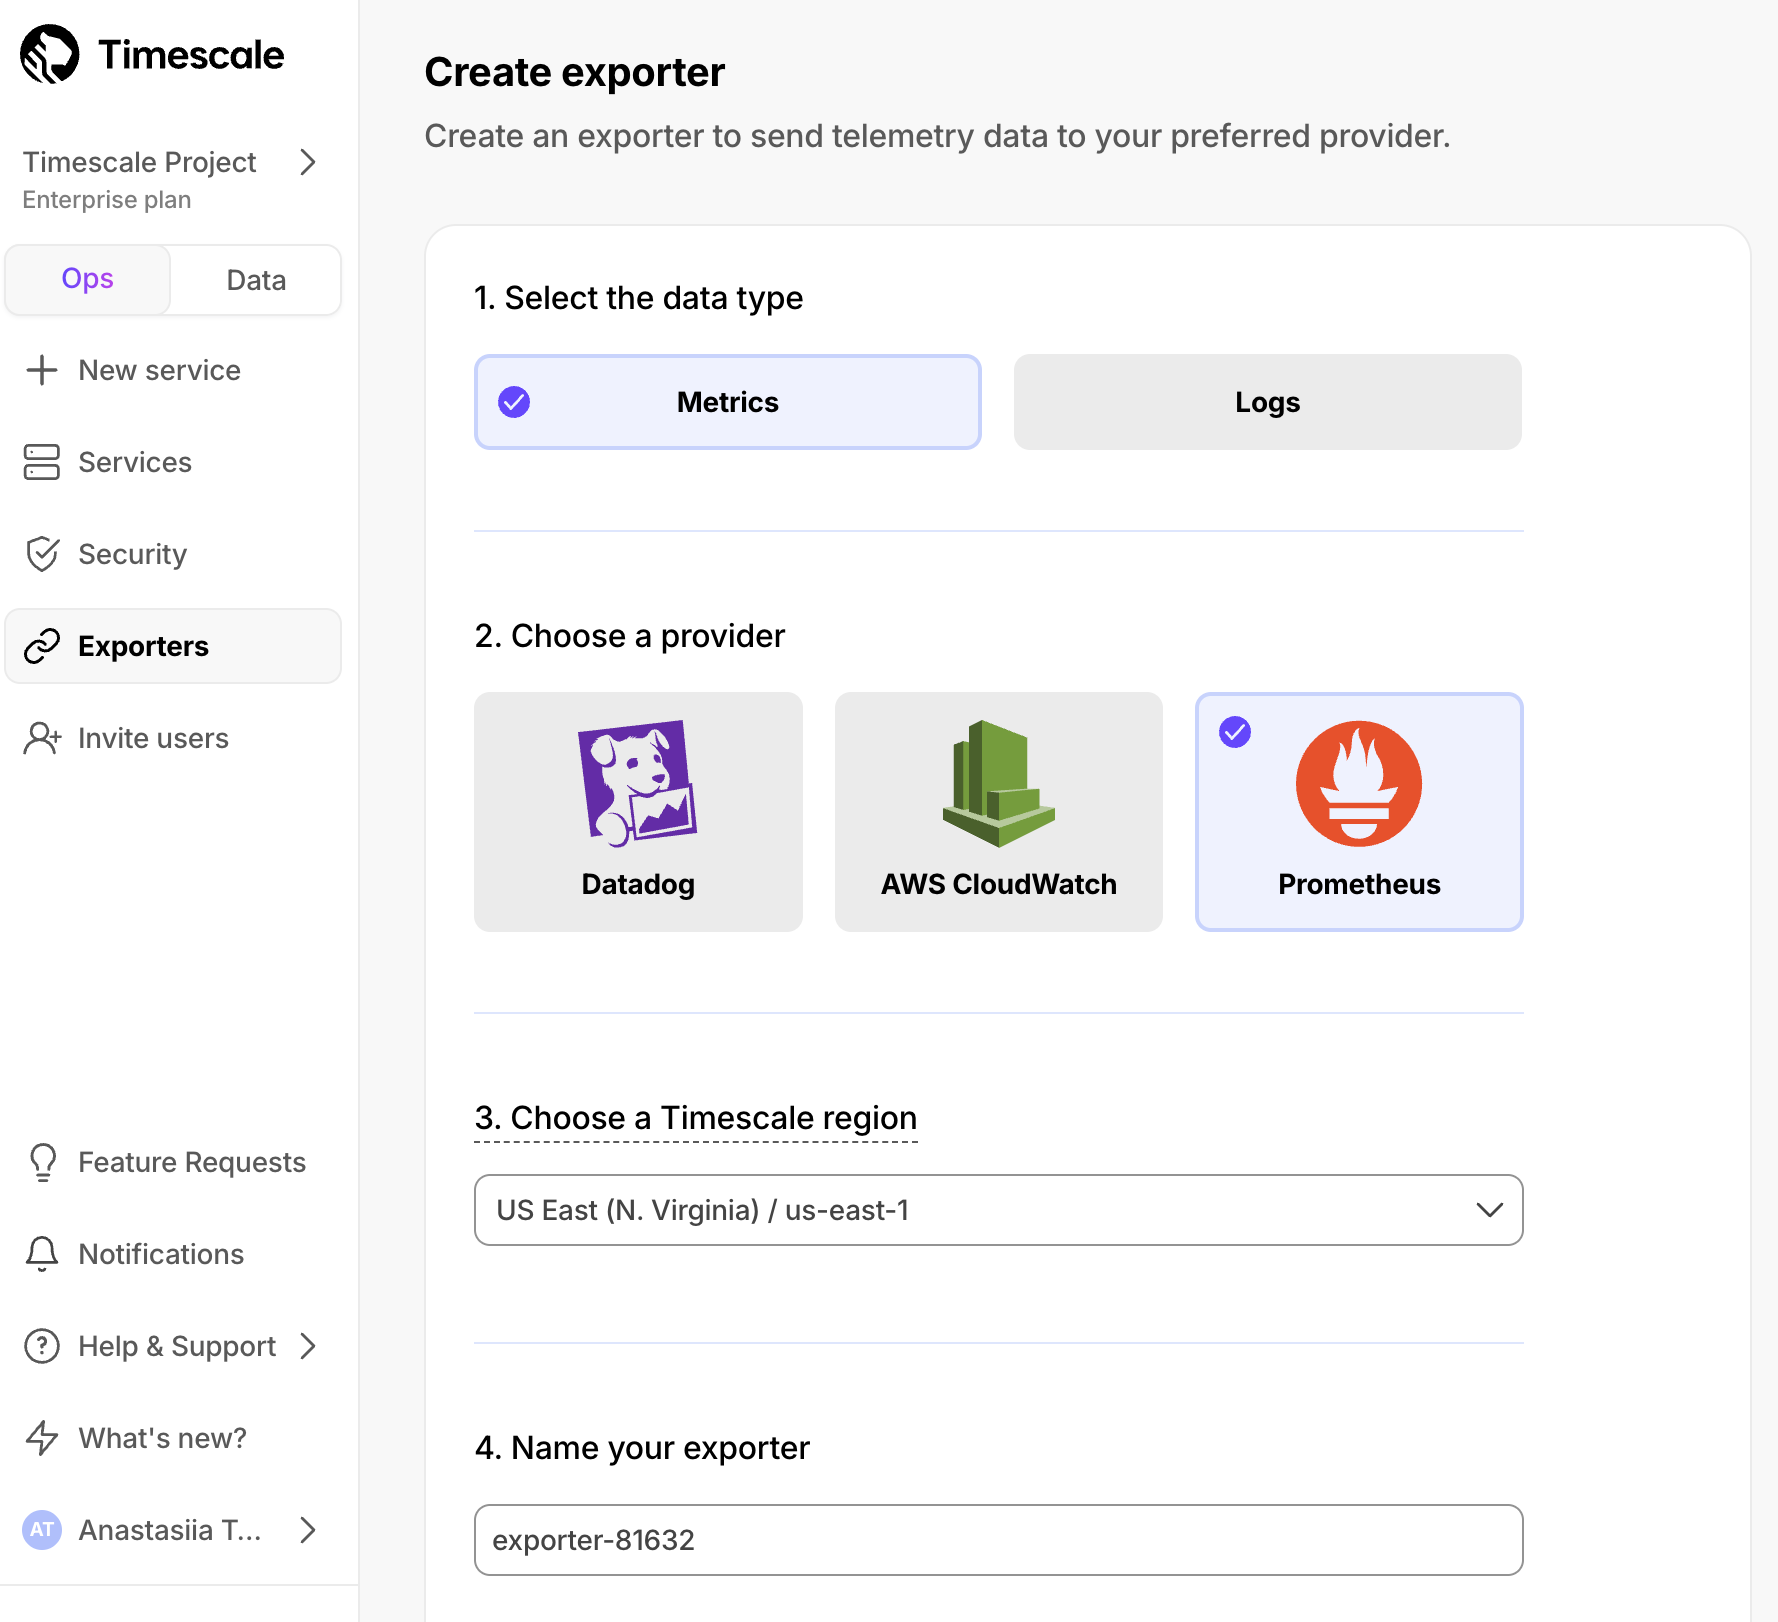
We’re excited to release the Prometheus Exporter for Timescale Cloud, making it easy to ship TimescaleDB metrics to your Prometheus instance. With the Prometheus Exporter, you can:
- Export TimescaleDB metrics like CPU, memory, and storage
- Visualize usage trends with your own Grafana dashboards
- Set alerts for high CPU load, low memory, or storage nearing capacity
To get started, create a Prometheus Exporter in the Timescale Console, attach it to your service, and configure Prometheus to scrape from the exposed URL. Metrics are secured with basic auth. Available on Scale and Enterprise plans. Learn more here.
📥 Import text files into Postgres tables
Our import options in Timescale Console have expanded to include local text files. You can add the content of multiple text files (one file per row) into a Postgres table for use with Vectorizers while creating embeddings for evaluation and development. This new option is located in Service > Actions > Import Data.
🤖 Automatic document embeddings from S3 and a sample dataset for AI testing
Automatic document embeddings from S3
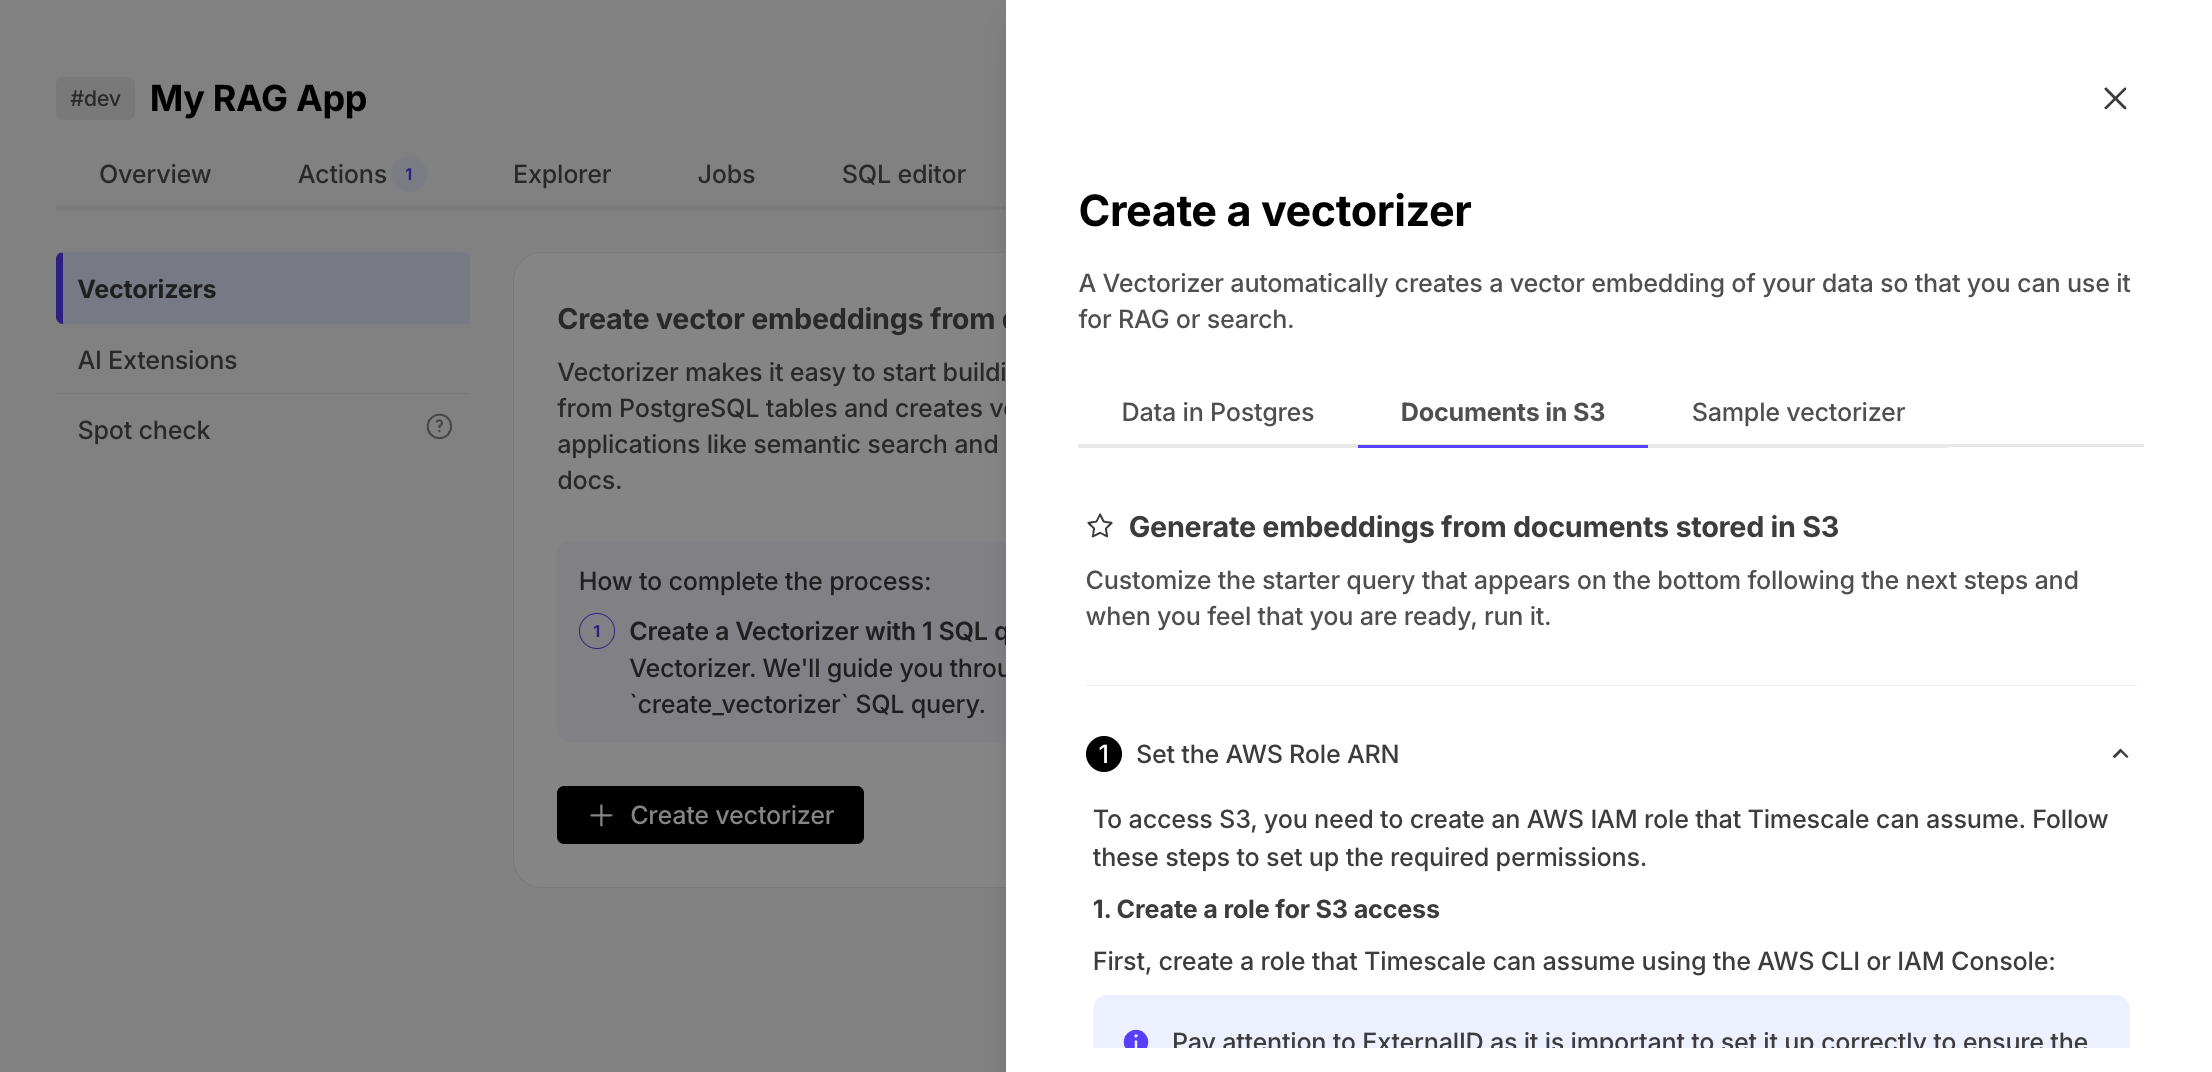
pgai vectorizer now supports automatic document vectorization. This makes it dramatically easier to build RAG and semantic search applications on top of unstructured data stored in Amazon S3. With just a SQL command, developers can create, update, and synchronize vector embeddings from a wide range of document formats—including PDFs, DOCX, XLSX, HTML, and more—without building or maintaining complex ETL pipelines.
Instead of juggling multiple systems and syncing metadata, vectorizer handles the entire process: downloading documents from S3, parsing them, chunking text, and generating vector embeddings stored right in Postgres using pgvector. As documents change, embeddings stay up-to-date automatically—keeping your Postgres database the single source of truth for both structured and semantic data.
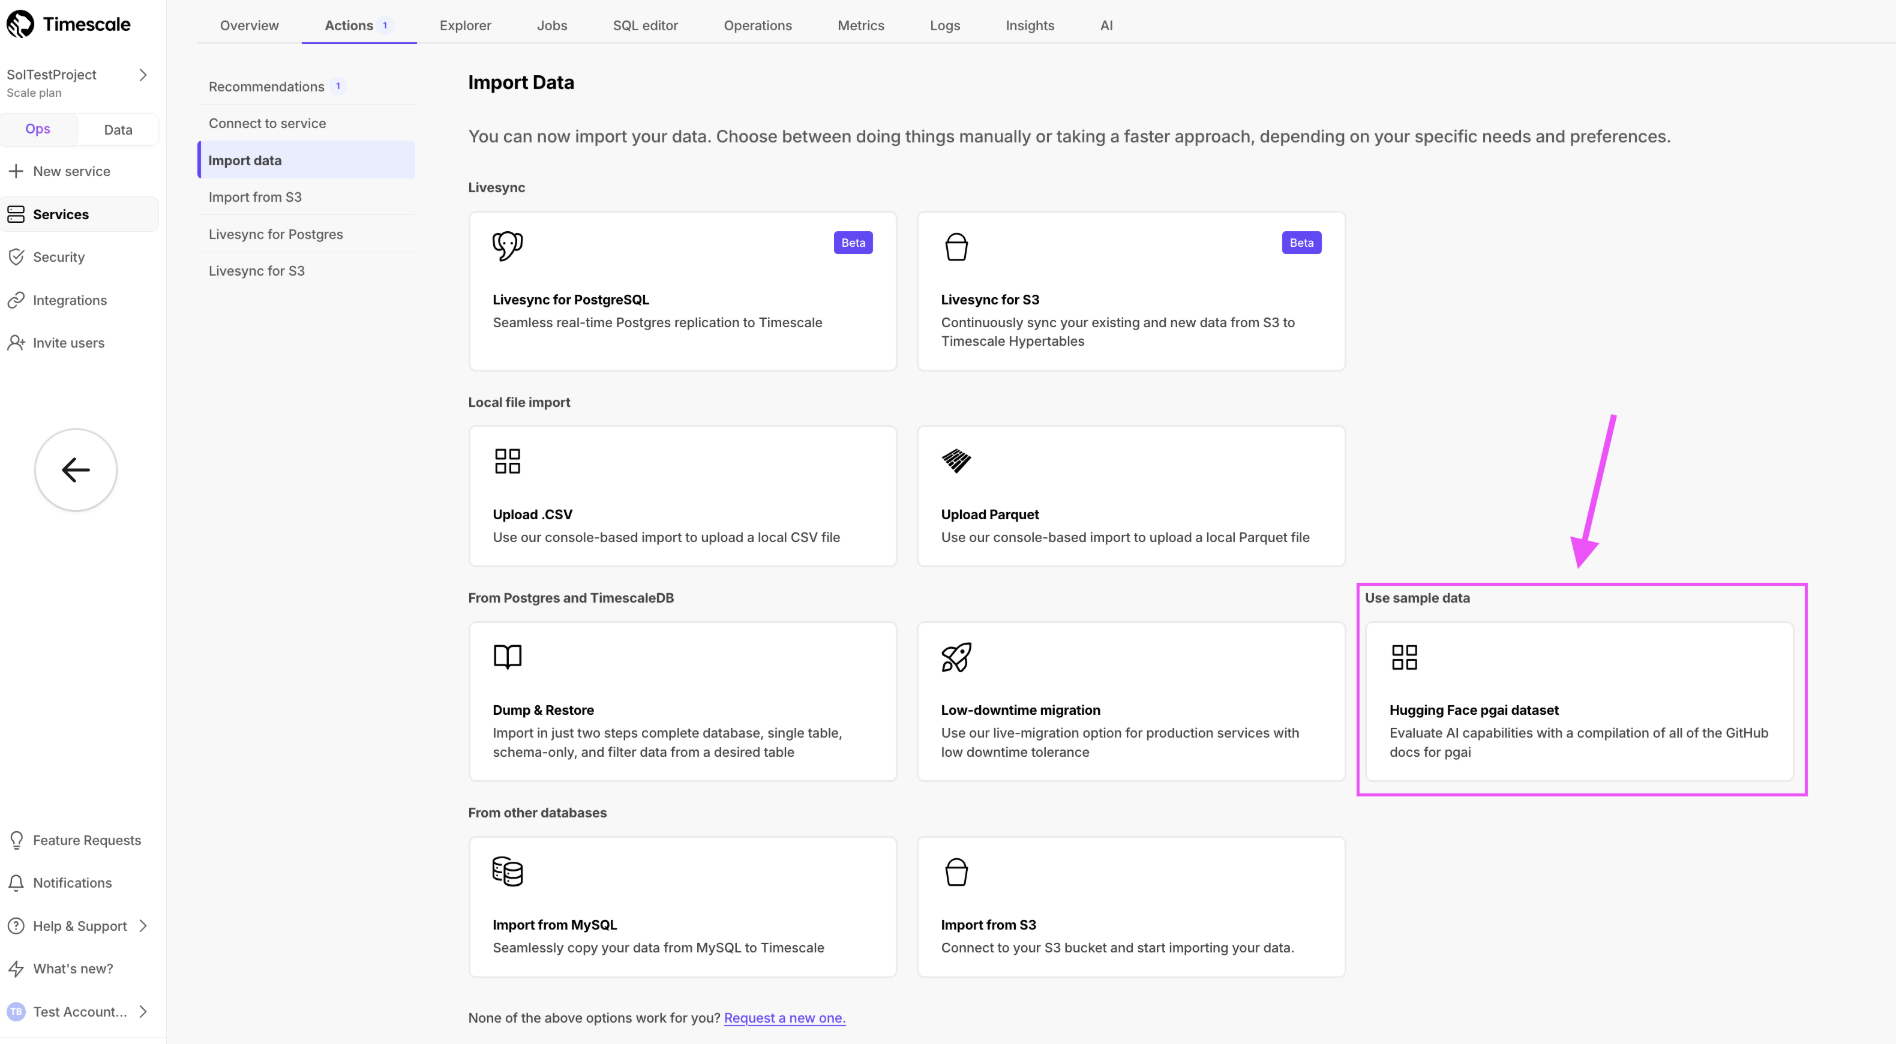
Sample dataset for AI testing
You can now import a dataset directly from Hugging Face using Timescale Console. This dataset is ideal for testing vectorizers, you find it in the Import Data page under the Service > Actions tab.
🔁 Livesync for S3 and passwordless connections for data mode
Livesync for S3 (beta)
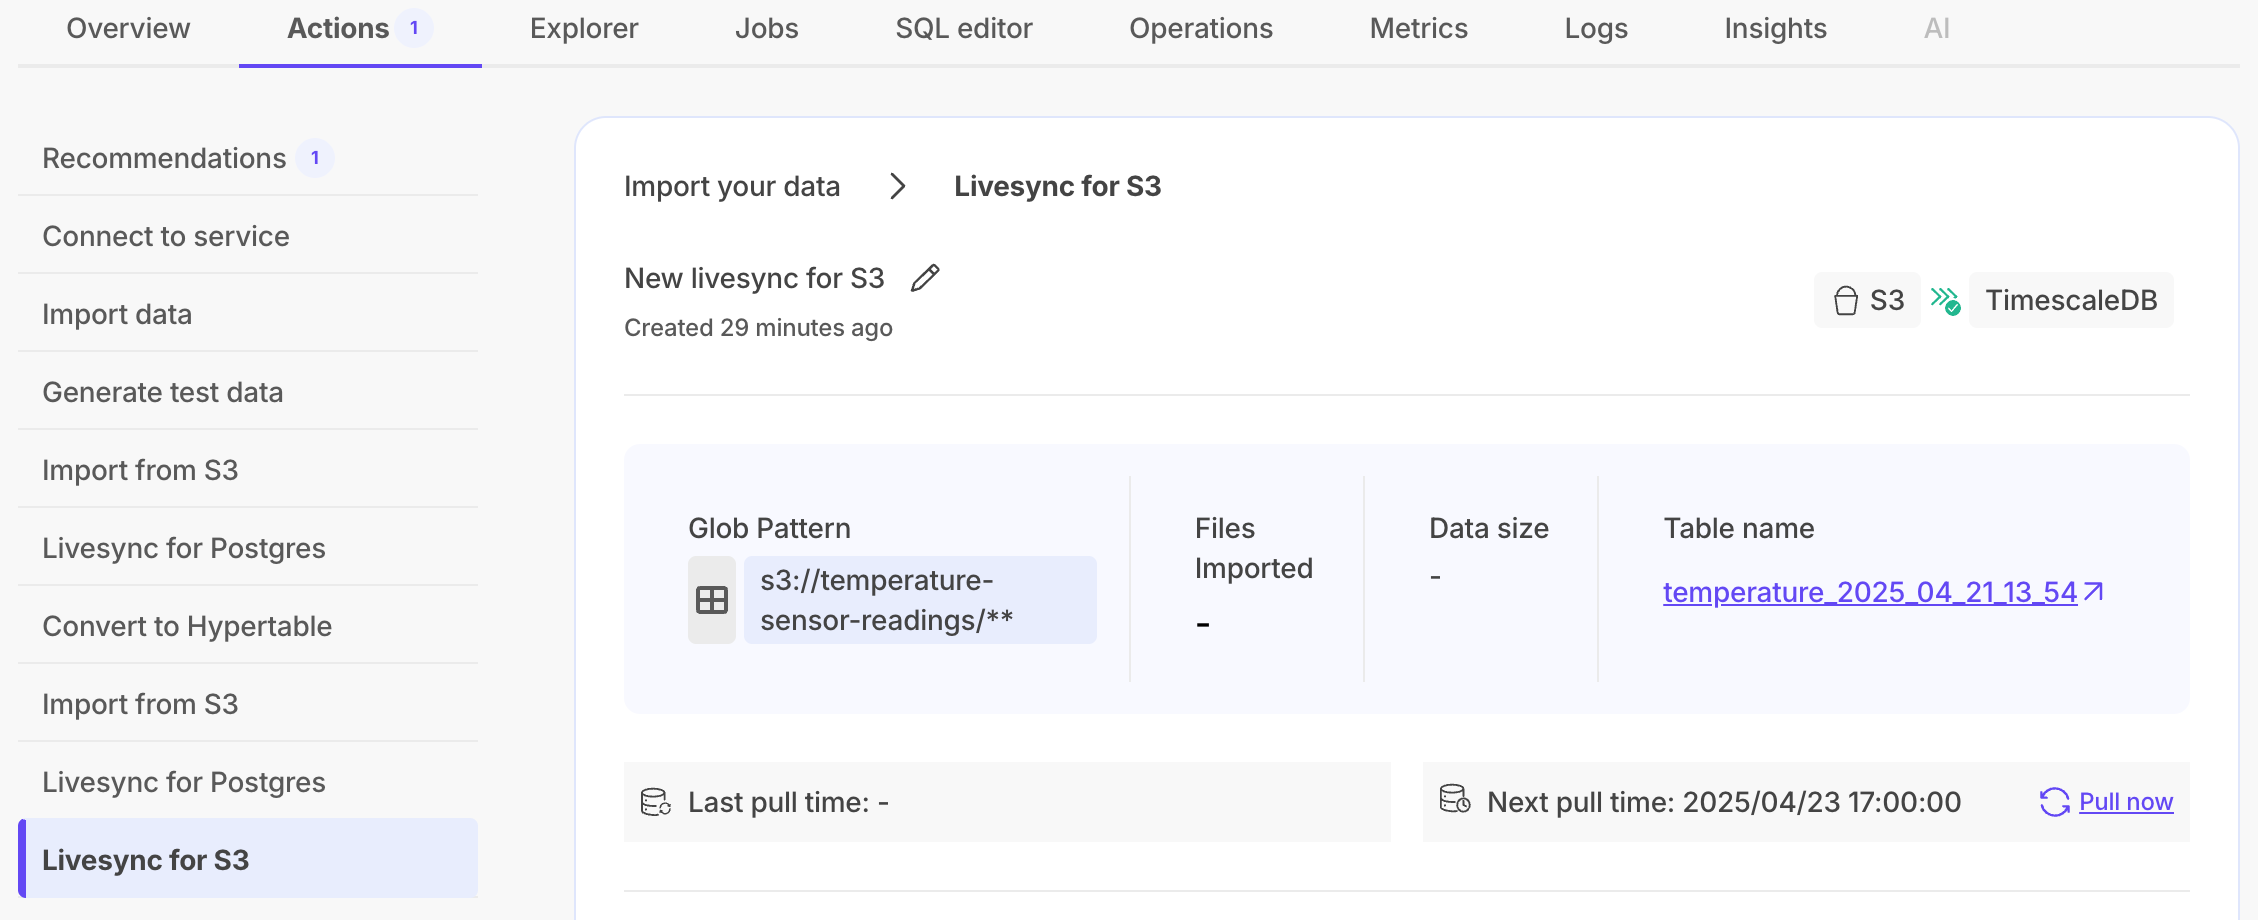
Livesync for S3 is our second livesync offering in Timescale Console, following livesync for Postgres. This feature helps users sync data in their S3 buckets to a Timescale Cloud service, and simplifies data importing. Livesync handles both existing and new data in real time, automatically syncing everything into a Timescale Cloud service. Users can integrate Timescale Cloud alongside S3, where S3 stores data in raw form as the source for multiple destinations.

With livesync, users can connect Timescale Cloud with S3 in minutes, rather than spending days setting up and maintaining an ingestion layer.
UX improvements to livesync for Postgres
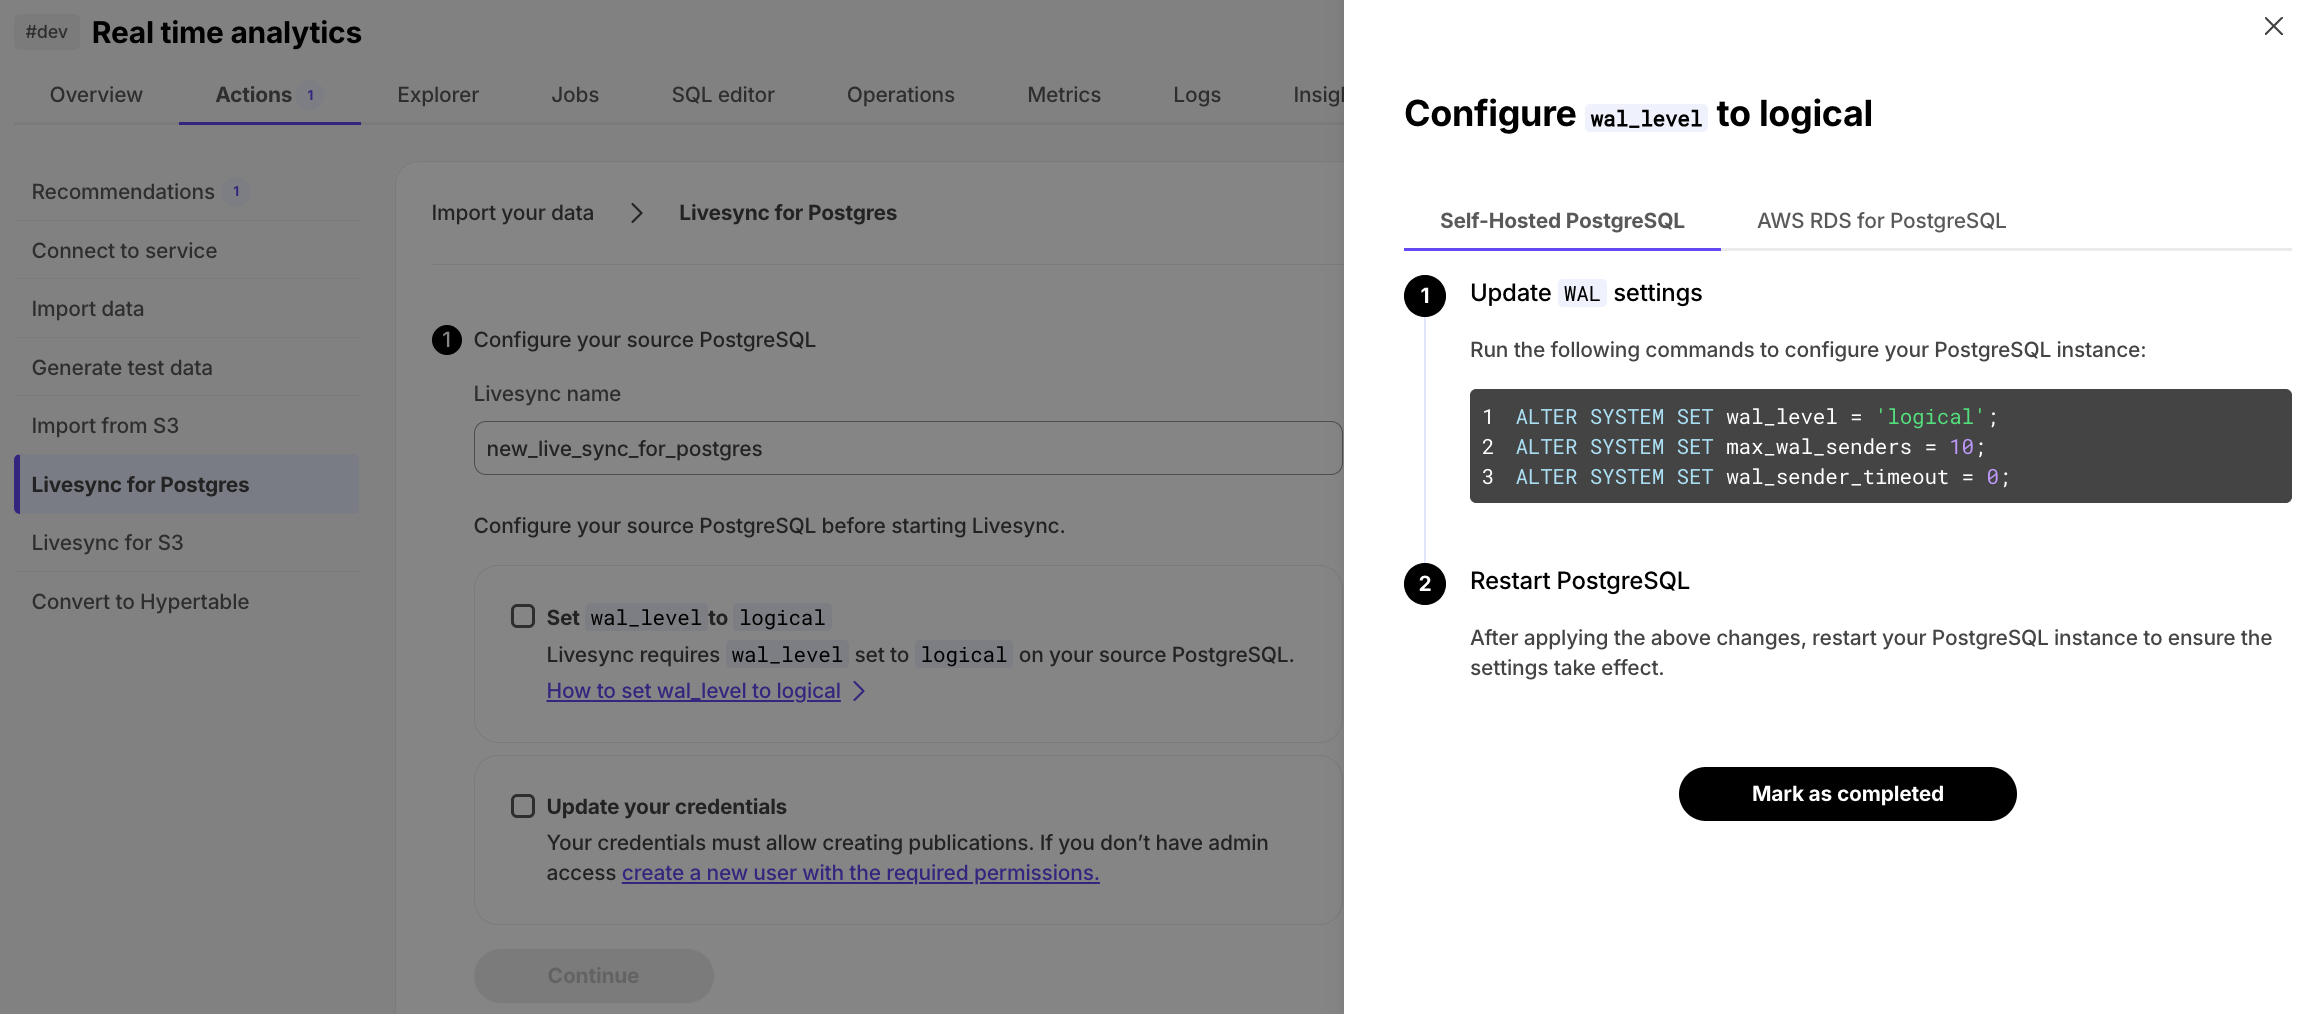
In livesync for Postgres, getting started requires setting the WAL_LEVEL to logical, and granting specific permissions to start a publication on the source database. To simplify this setup process, we have added a detailed two-step checklist with comprehensive configuration instructions to Timescale Console.
Passwordless data mode connections
We’ve made connecting to your Timescale Cloud services from data mode in Timescale Console even easier! All new services created in Timescale Cloud are now automatically accessible from data mode without requiring you to enter your service credentials. Just open data mode, select your service, and start querying.
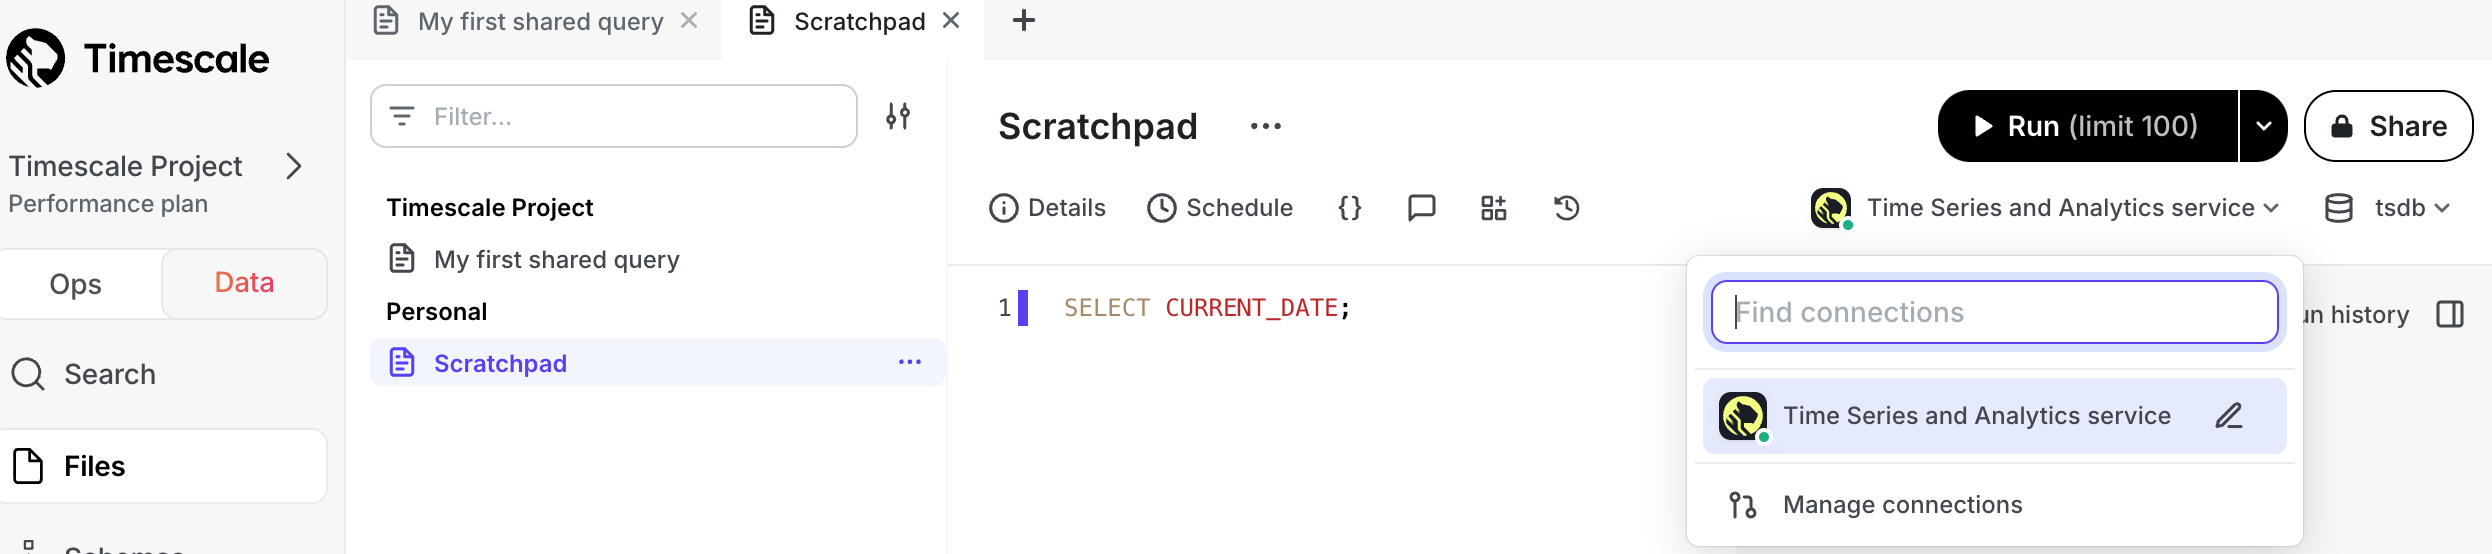
We will be expanding this functionality to existing services in the coming weeks (including services using VPC peering), so stay tuned.
☑️ Embeddings spot checks, TimescaleDB v2.19.3, and new models in SQL Assistant
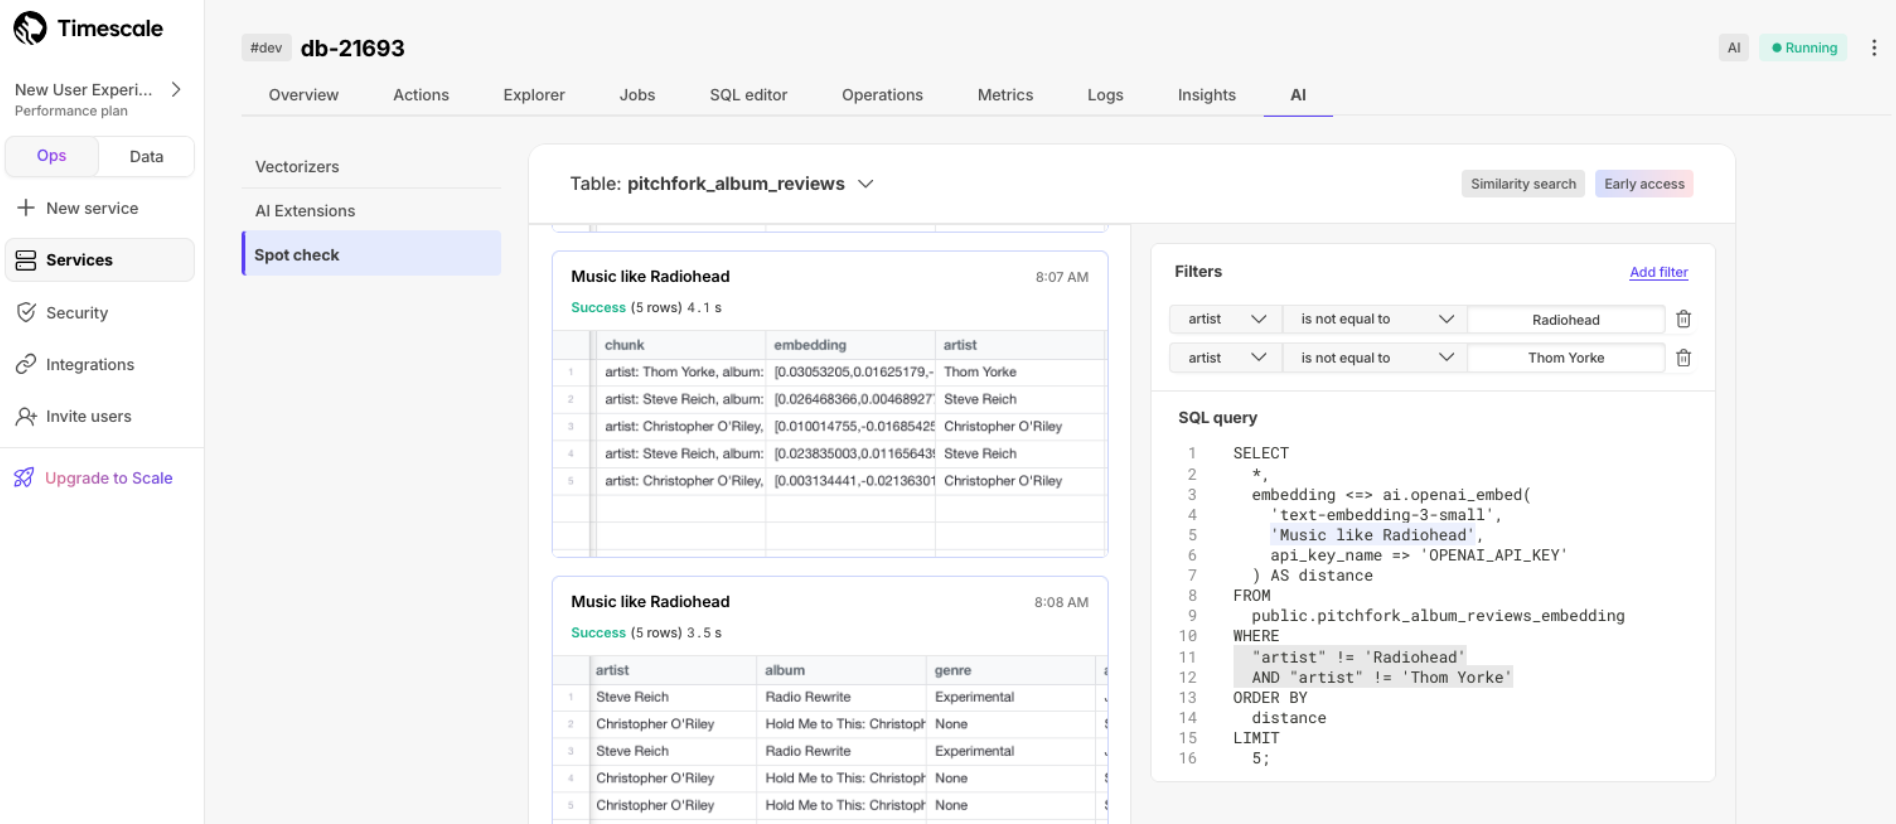
Embeddings spot checks
In Timescale Cloud, you can now quickly check the quality of the embeddings from the vectorizers' outputs. Construct a similarity search query with additional filters on source metadata using a simple UI. Run the query right away, or copy it to the SQL editor or data mode and further customize it to your needs. Run the check in Timescale Console > Services > AI:
TimescaleDB v2.19.3
New services created in Timescale Cloud now use TimescaleDB v2.19.3. Existing services are in the process of being automatically upgraded to this version.
This release adds a number of bug fixes including:
- Fix segfault when running a query against columnstore chunks that group by multiple columns, including UUID segmentby columns.
- Fix hypercore table access method segfault on DELETE operations using a segmentby column.
New OpenAI, Llama, and Gemini models in SQL Assistant
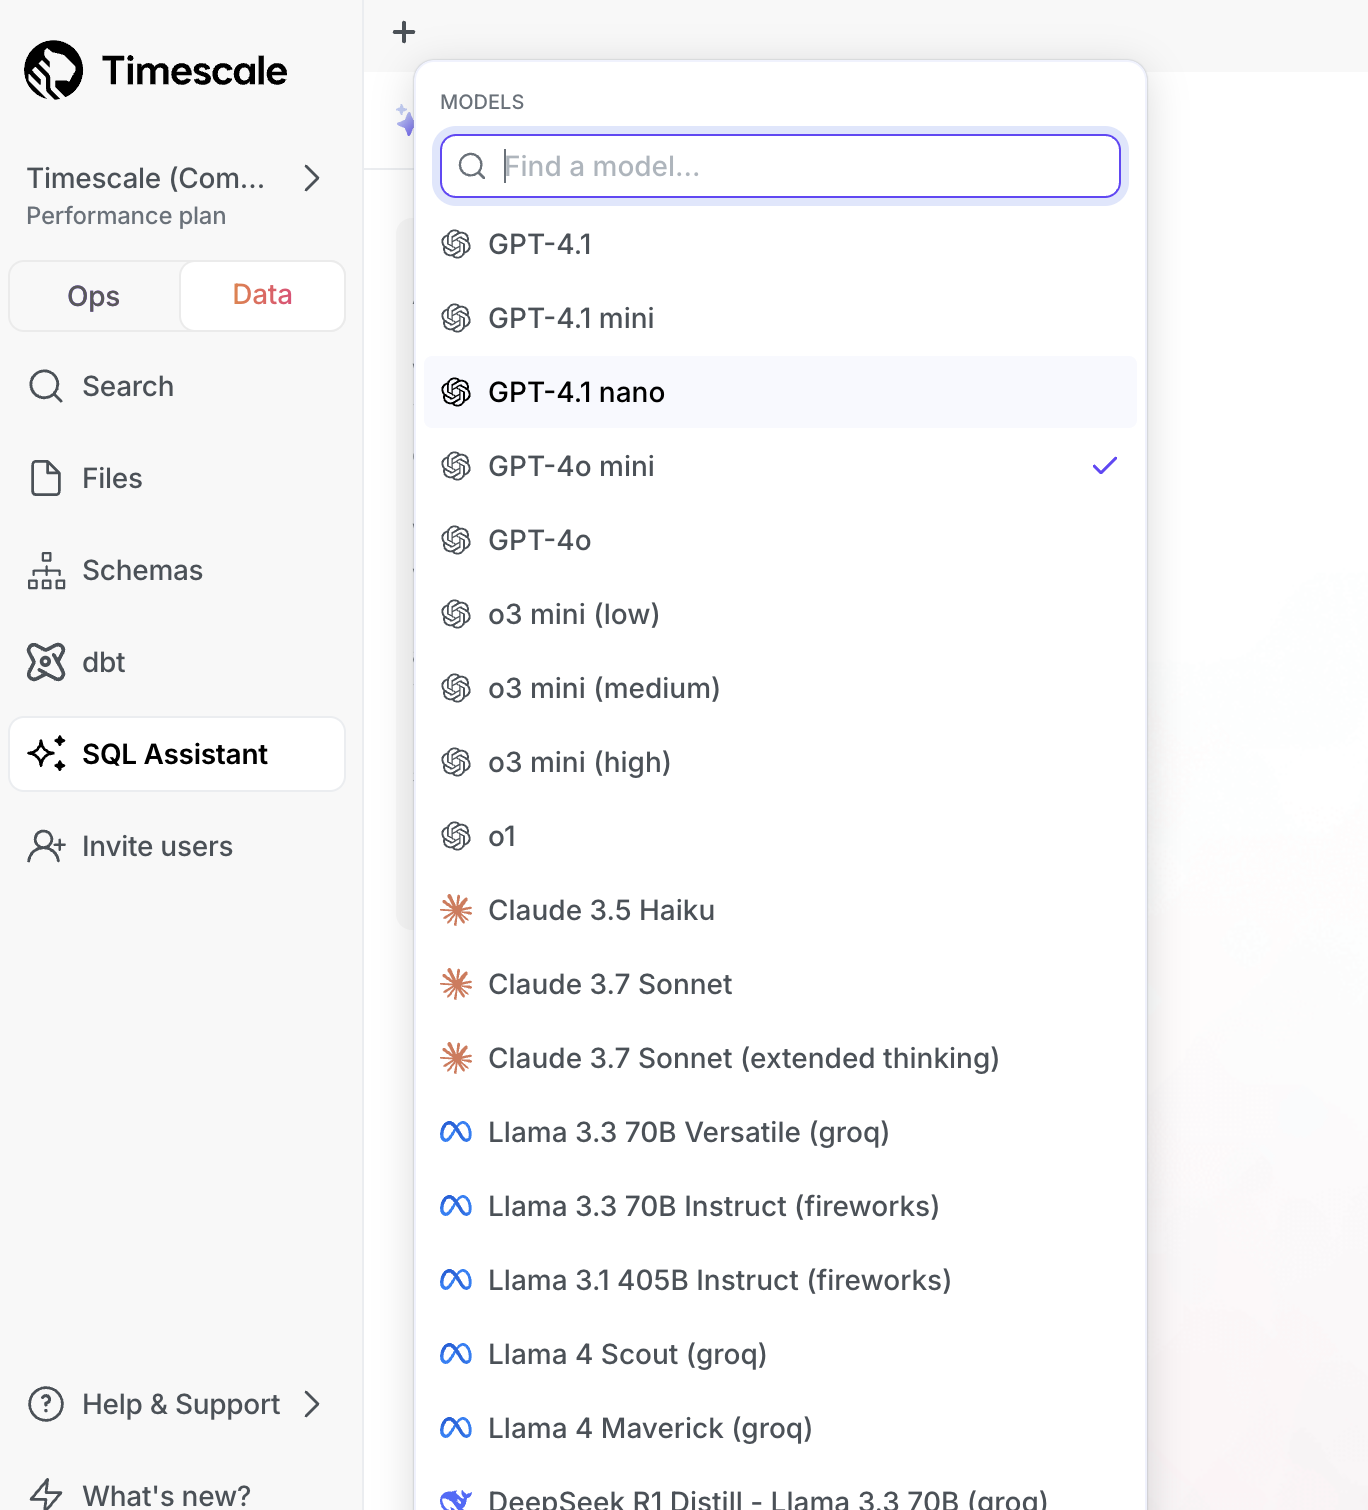
The data mode's SQL Assistant now includes support for the latest models from OpenAI and Llama: GPT-4.1 (including mini and nano) and Llama 4 (Scout and Maverick). Additionally, we've added support for Gemini models, in particular Gemini 2.0 Nano and 2.5 Pro (experimental and preview). With the new additions, SQL Assistant supports more than 20 language models so you can select the one best suited to your needs.
🪵 TimescaleDB v2.19, new service overview page, and log improvements
TimescaleDB v2.19—query performance and concurrency improvements
Starting this week, all new services created on Timescale Cloud use TimescaleDB v2.19. Existing services will be upgraded gradually during their maintenance window.
Highlighted features in TimescaleDB v2.19 include:
- Improved concurrency of
INSERT,UPDATE, andDELETEoperations on the columnstore by no longer blocking DML statements during the recompression of a chunk. - Improved system performance during continuous aggregate refreshes by breaking them into smaller batches. This reduces systems pressure and minimizes the risk of spilling to disk.
- Faster and more up-to-date results for queries against continuous aggregates by materializing the most recent data first, as opposed to old data first in prior versions.
- Faster analytical queries with SIMD vectorization of aggregations over text columns and
GROUP BYover multiple columns. - Enable chunk size optimization for better query performance in the columnstore by merging them with
merge_chunk.
New service overview page
The service overview page in Timescale Console has been overhauled to make it simpler and easier to use. Navigate to the Overview tab for any of your services and you will find an architecture diagram and general information pertaining to it. You may also see recommendations at the top, for how to optimize your service.
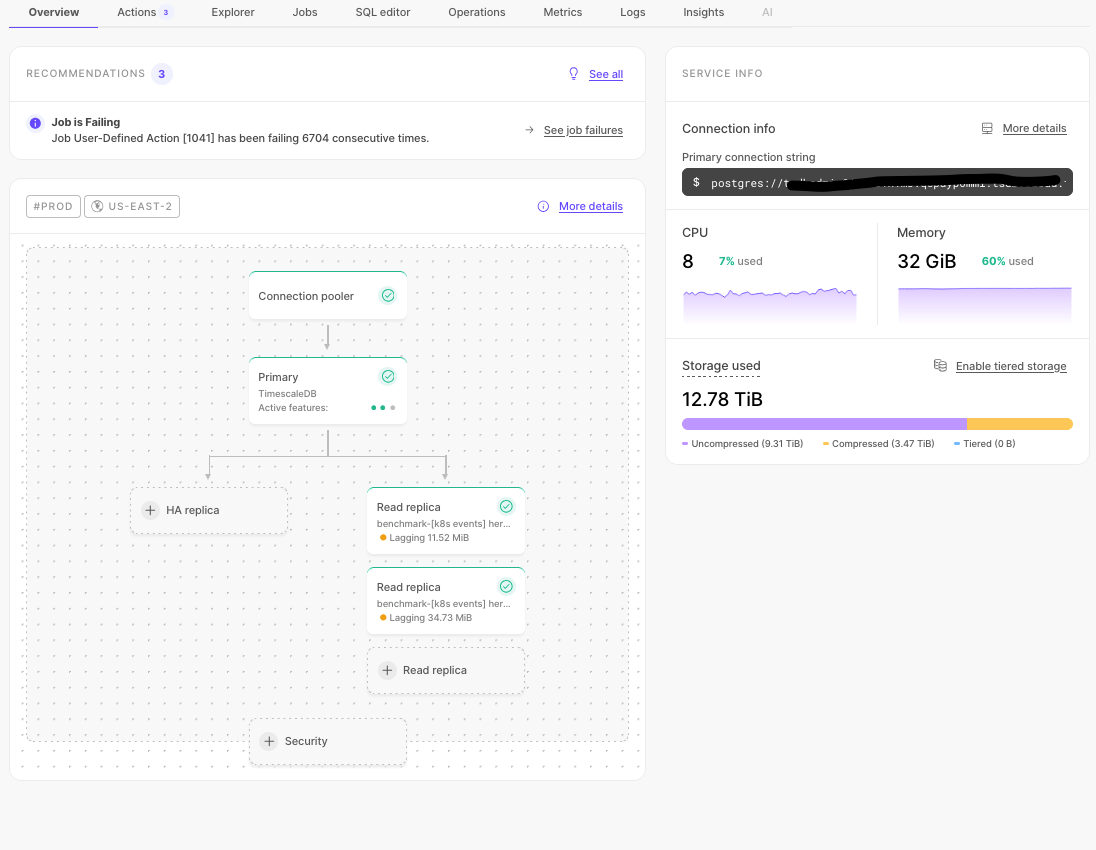
To leave the product team your feedback, open Help & Support on the left and select Send feedback to the product team.
Find logs faster
Finding logs just got easier! We've added a date, time, and timezone picker, so you can jump straight to the exact moment you're interested in—no more endless scrolling.

📒Faster vector search and improved job information
pgvectorscale 0.7.0: faster filtered filtered vector search with filtered indexes
This pgvectorscale release adds label-based filtered vector search to the StreamingDiskANN index. This enables you to return more precise and efficient results by combining vector similarity search with label filtering while still uitilizing the ANN index. This is a common need for large-scale RAG and Agentic applications that rely on vector searches with metadata filters to return relevant results. Filtered indexes add even more capabilities for filtered search at scale, complementing the high accuracy streaming filtering already present in pgvectorscale. The implementation is inspired by Microsoft's Filtered DiskANN research. For more information, see the [pgvectorscale release notes][log-28032025-pgvectorscale-rn] and a [usage example][log-28032025-pgvectorscale-example].
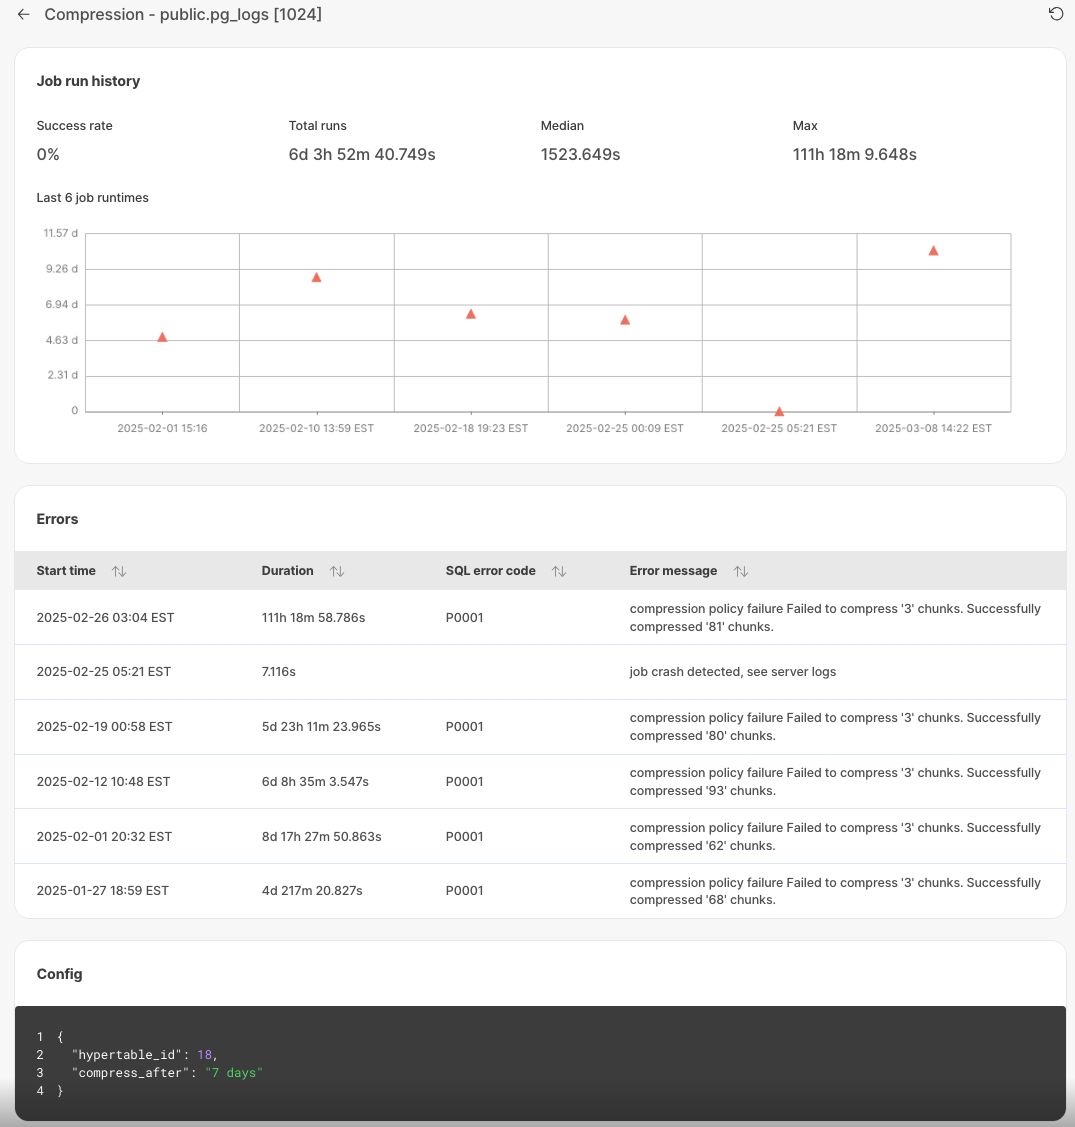
Job errors and individual job pages
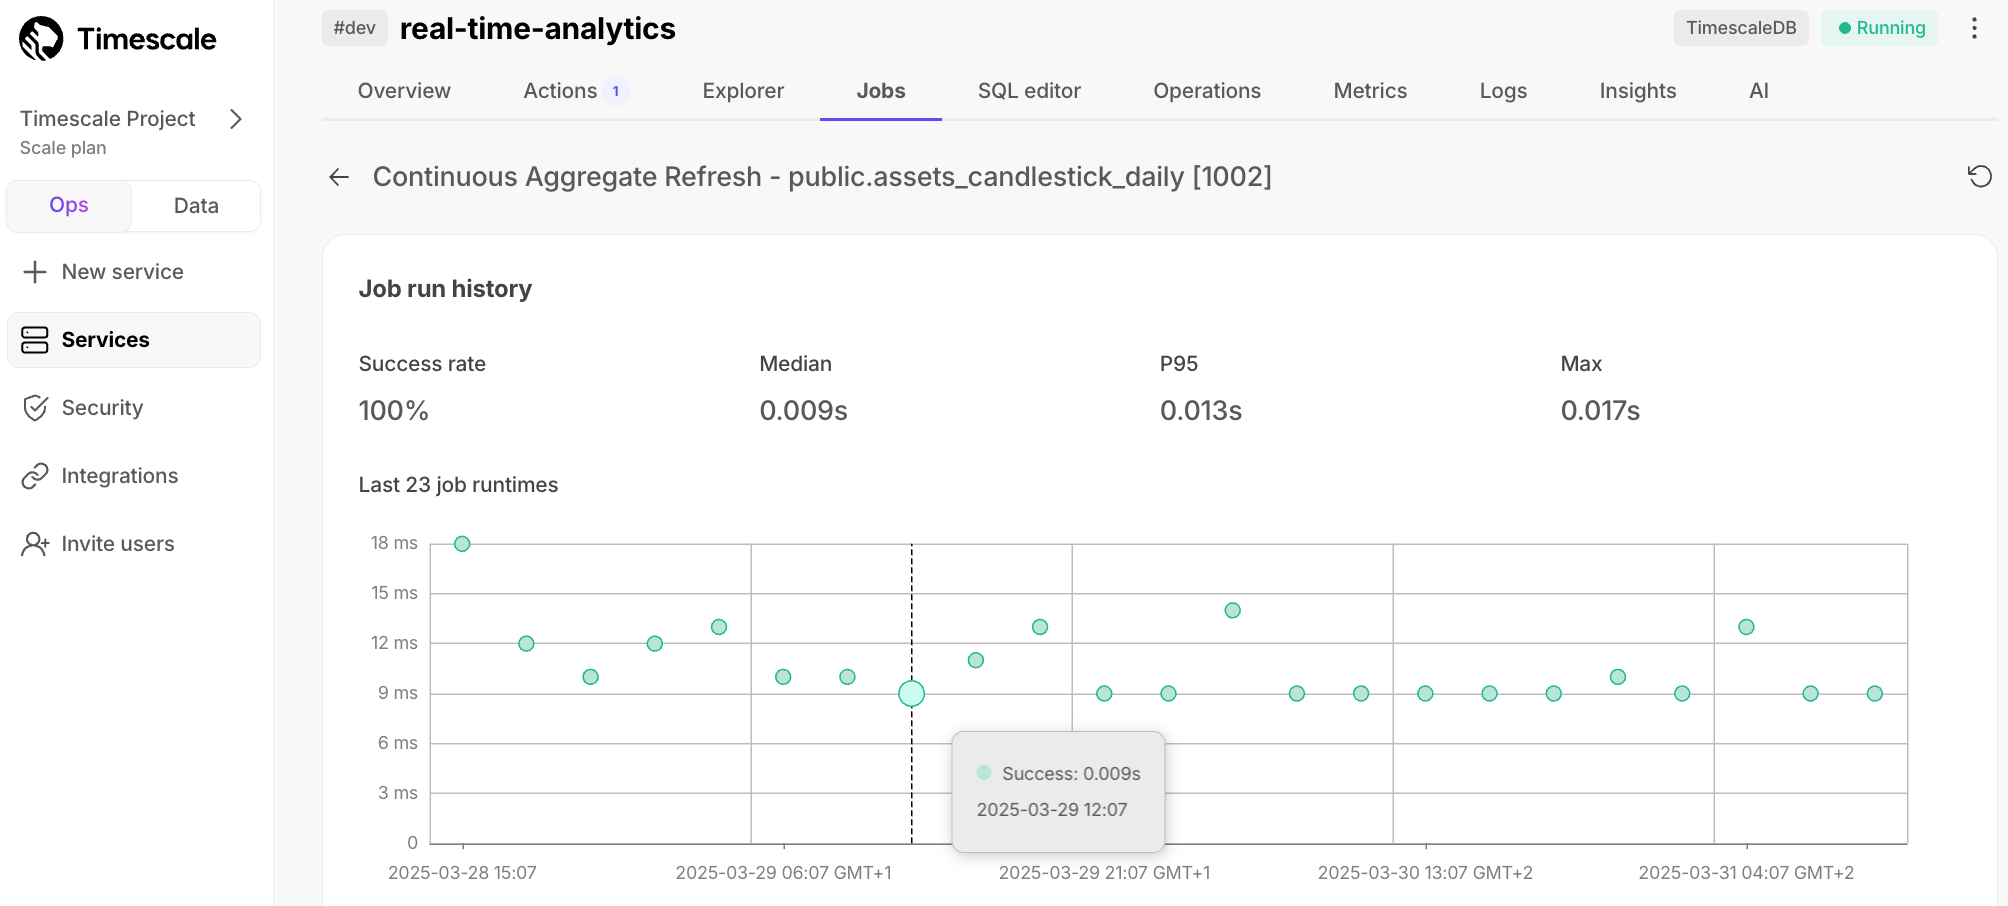
Each job now has an individual page in Timescale Console, and displays additional details about job errors. You use this information to debug failing jobs.
To see the job information page, in [Timescale Console][console], select the service to check, then click Jobs > job ID to investigate.
Successful jobs:
Unsuccessful jobs with errors:
🤩 In-Console Livesync for Postgres
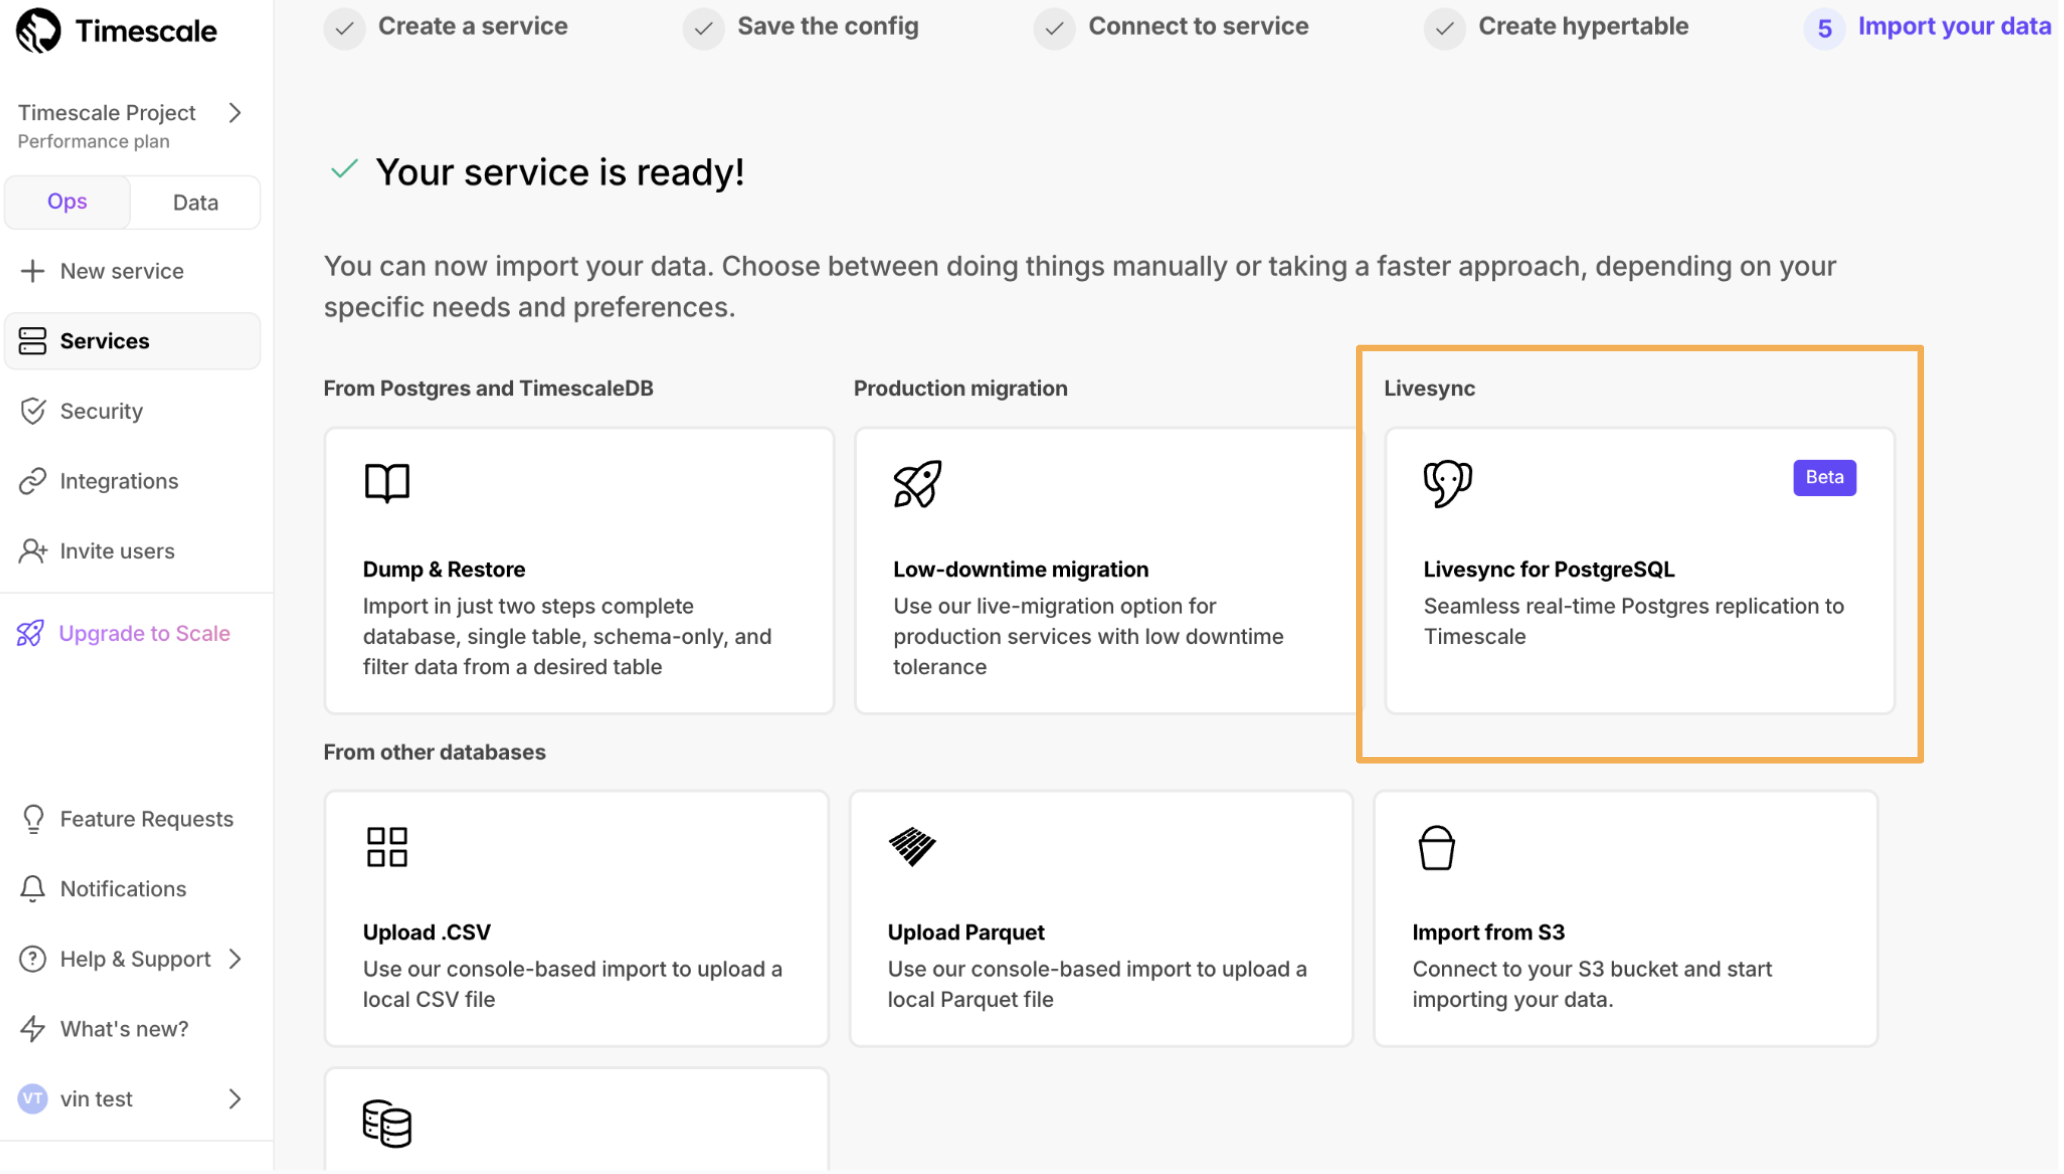
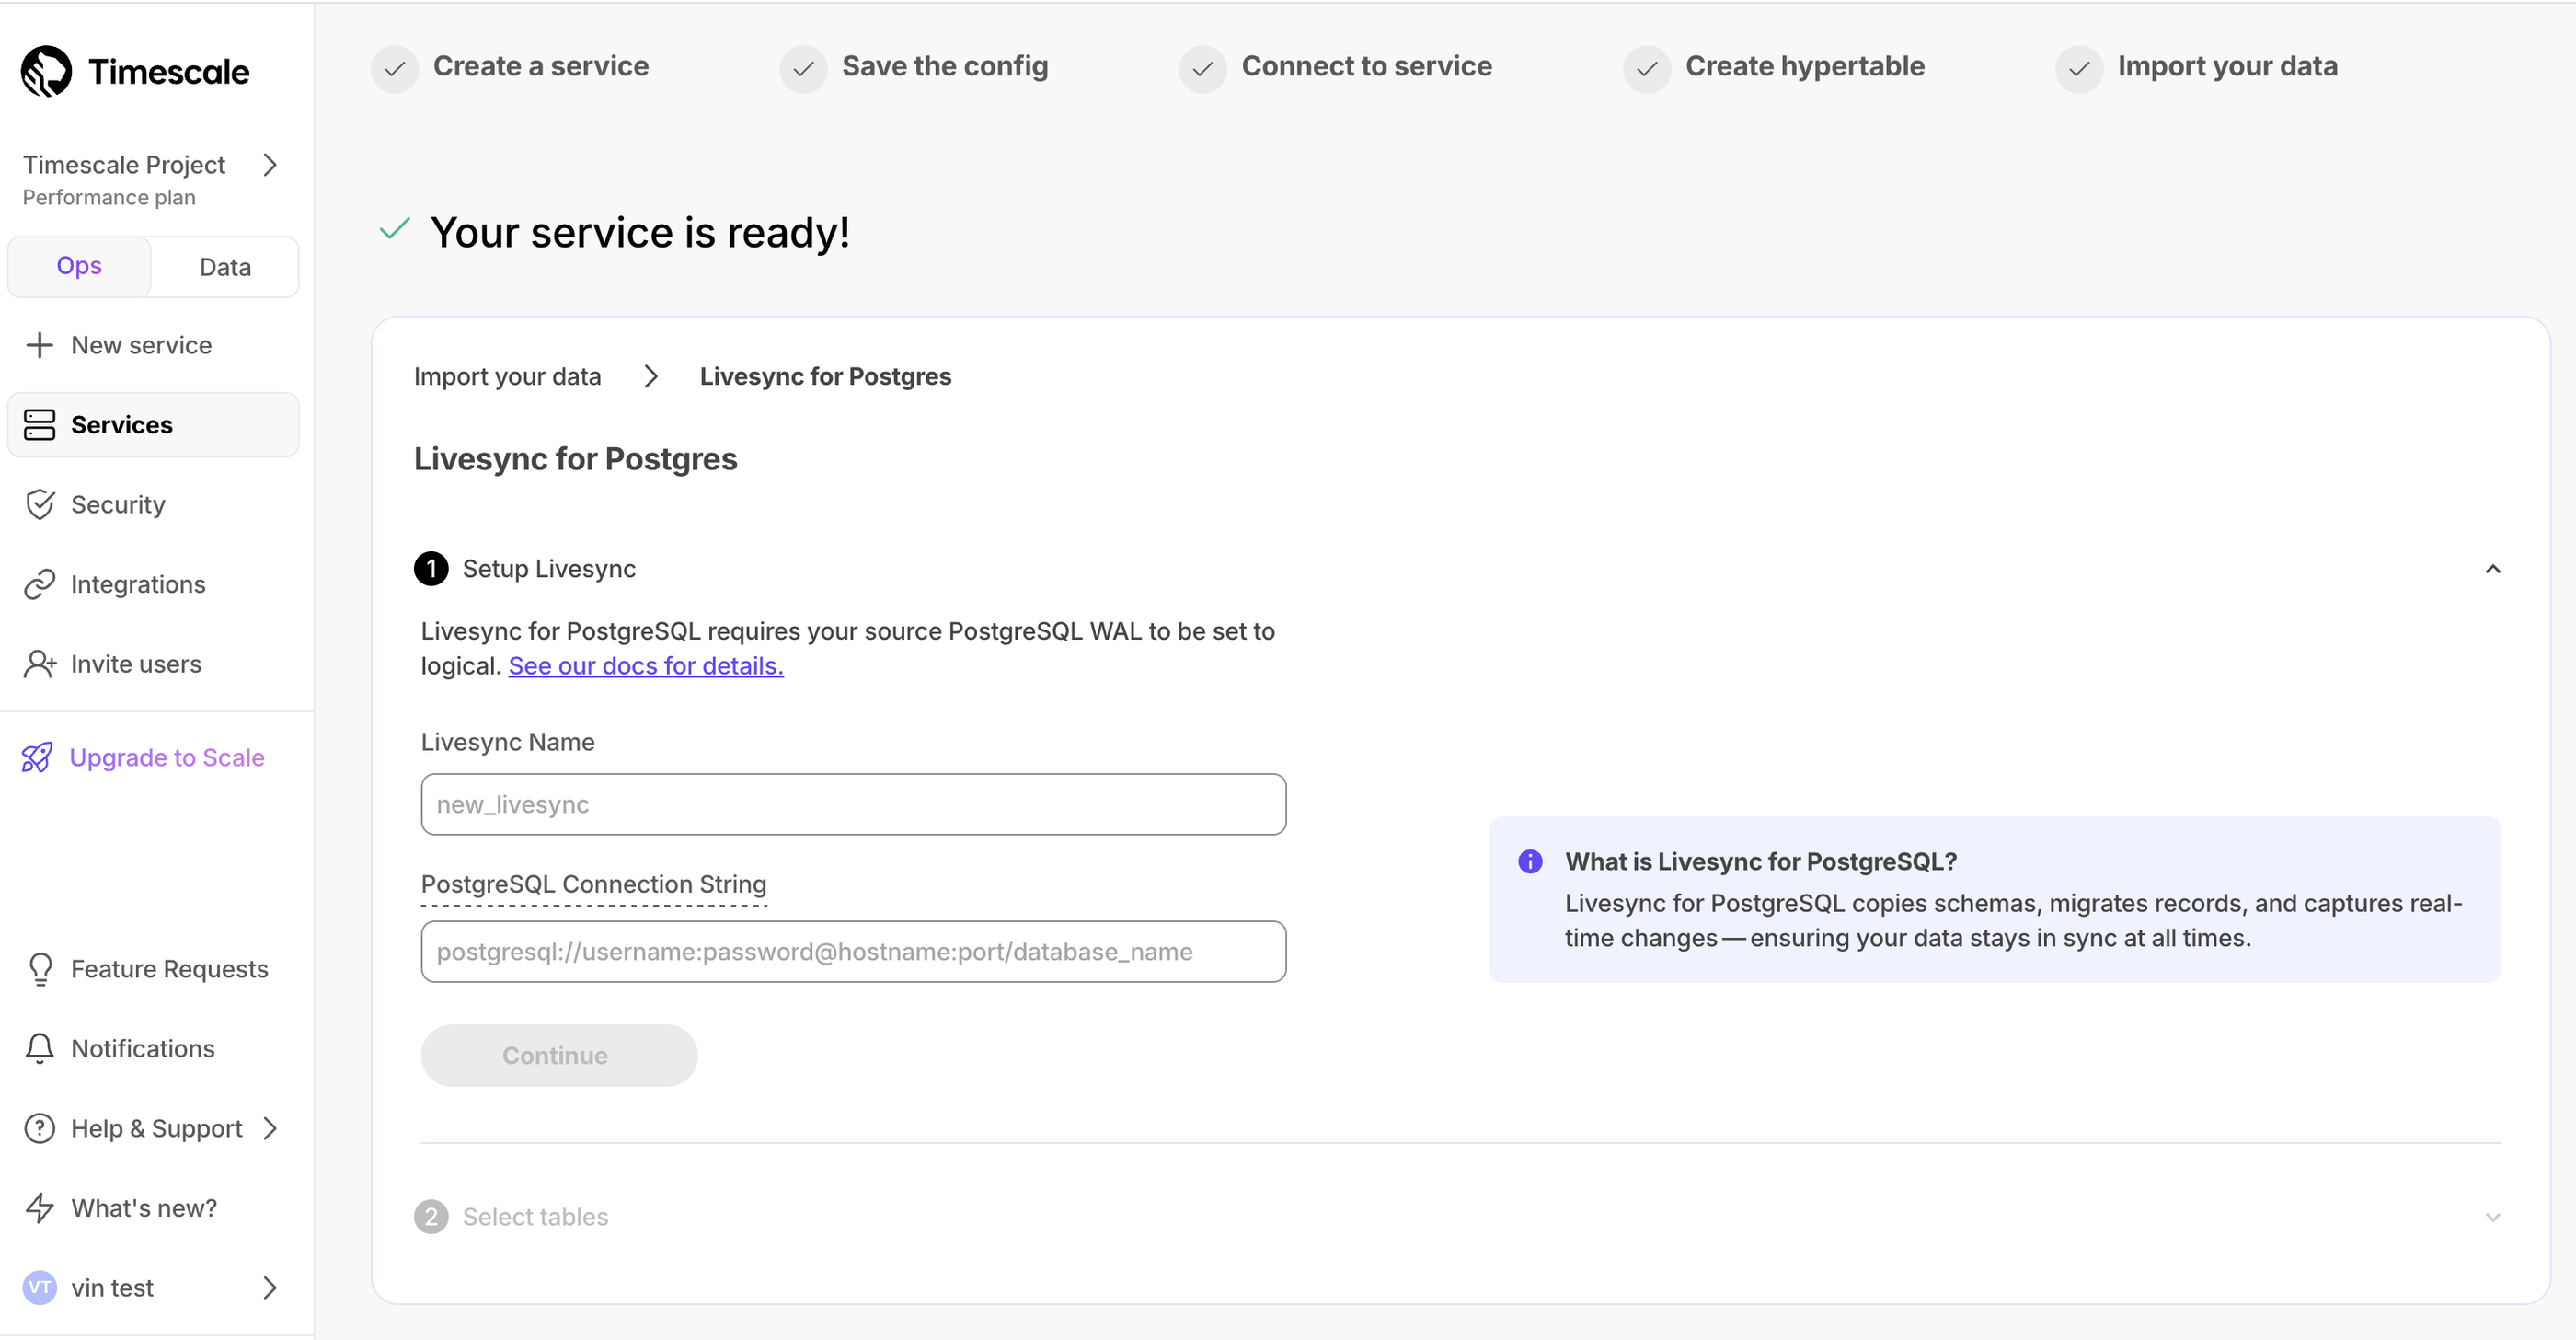
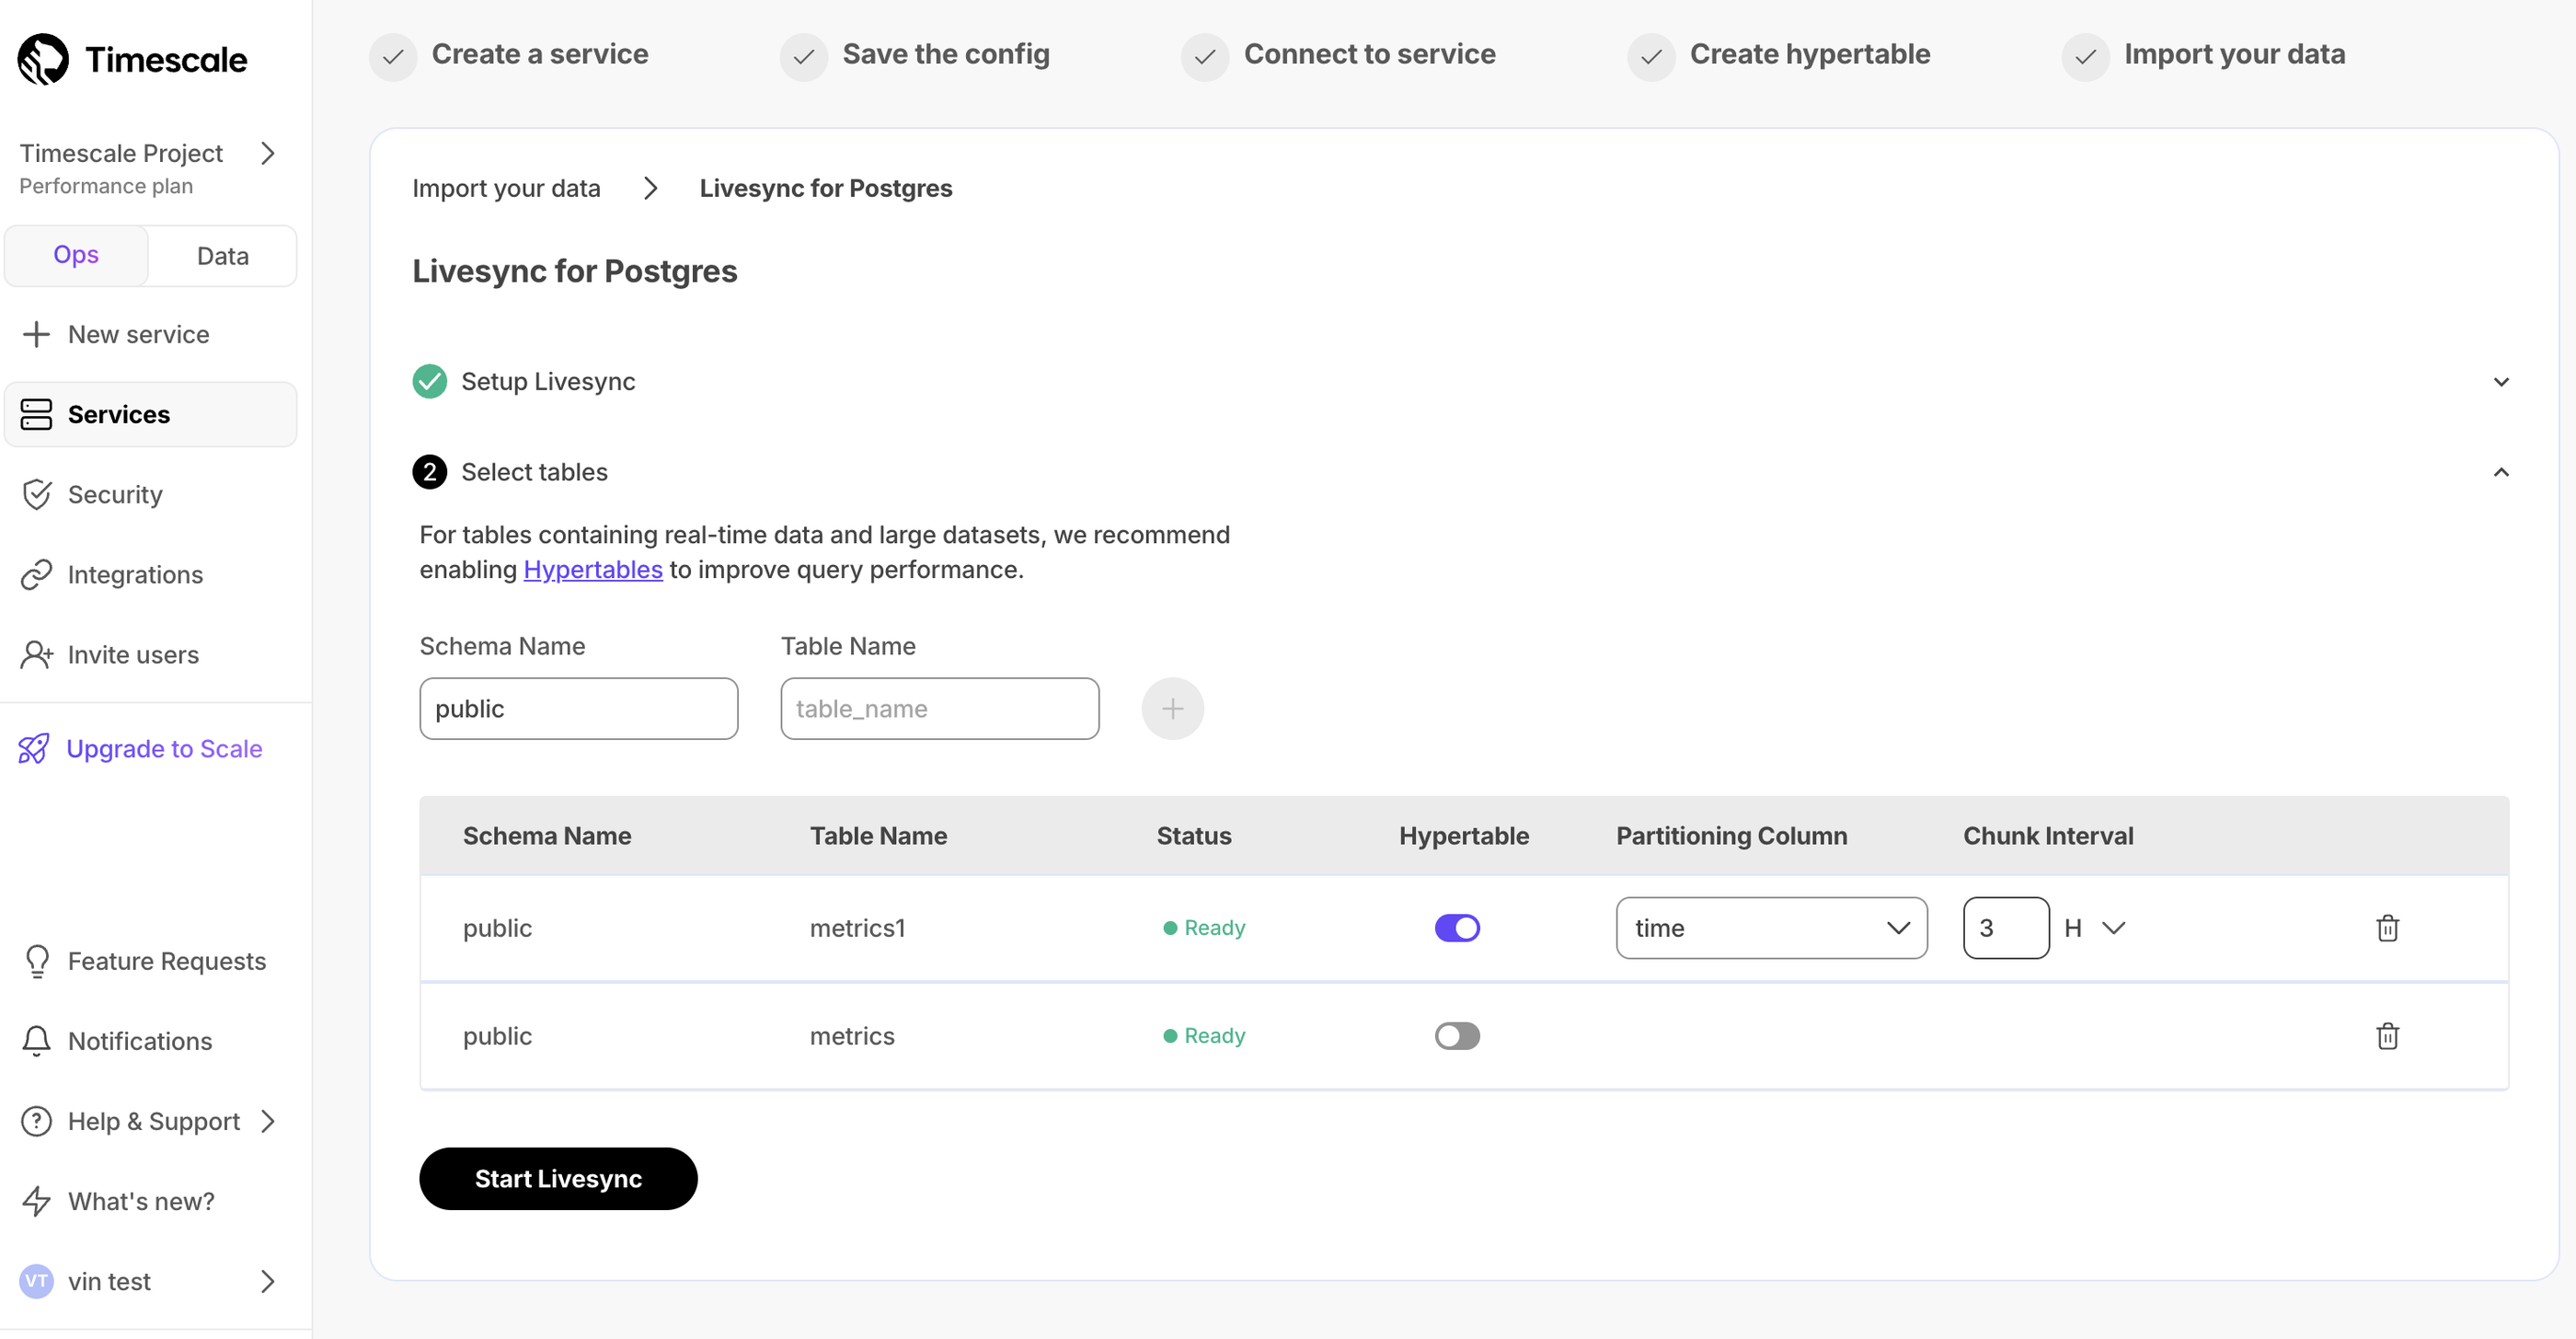
You can now set up an active data ingestion pipeline with livesync for Postgres in Timescale Console. This tool enables you to replicate your source database tables into Timescale's hypertables indefinitely. Yes, you heard that right—keep livesync running for as long as you need, ensuring that your existing source Postgres tables stay in sync with Timescale Cloud. Read more about setting up and using Livesync for Postgres.
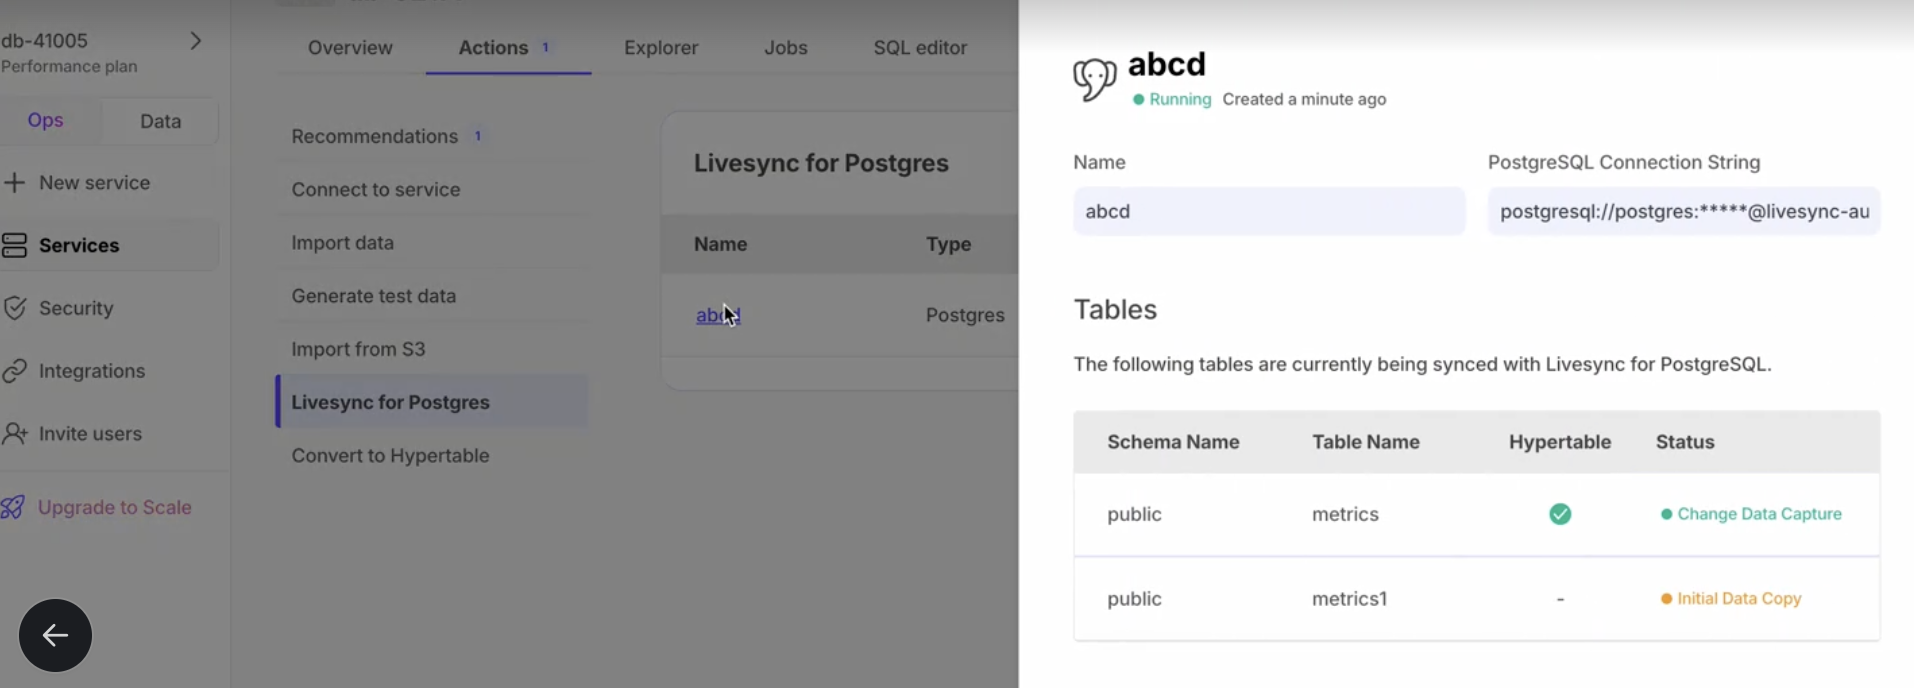
💾 16K dimensions on pgvectorscale plus new pgai Vectorizer support
pgvectorscale 0.6 — store up to 16K dimension embeddings
pgvectorscale 0.6.0 now supports storing vectors with up to 16,000 dimensions, removing the previous limitation of 2,000 from pgvector. This lets you use larger embedding models like OpenAI's text-embedding-3-large (3072 dim) with Postgres as your vector database. This release also includes key performance and capability enhancements, including NEON support for SIMD distance calculations on aarch64 processors, improved inner product distance metric implementation, and improved index statistics. See the release details here.
pgai Vectorizer supports models from AWS Bedrock, Azure AI, Google Vertex via LiteLLM
Access embedding models from popular cloud model hubs like AWS Bedrock, Azure AI Foundry, Google Vertex, as well as HuggingFace and Cohere as part of the LiteLLM integration with pgai Vectorizer. To use these models with pgai Vectorizer on Timescale Cloud, select Other when adding the API key in the credentials section of Timescale Console.
🤖 Agent Mode for PopSQL and more
Agent Mode for PopSQL
Introducing Agent Mode, a new feature in Timescale Console SQL Assistant. SQL Assistant lets you query your database using natural language. However, if you ran into errors, you have to approve the implementation of the Assistant's suggestions.
With Agent Mode on, SQL Assistant automatically adjusts and executes your query without intervention. It runs, diagnoses, and fixes any errors that it runs into until you get your desired results.
Below you can see SQL Assistant run into an error, identify the resolution, execute the fixed query, display results, and even change the title of the query:
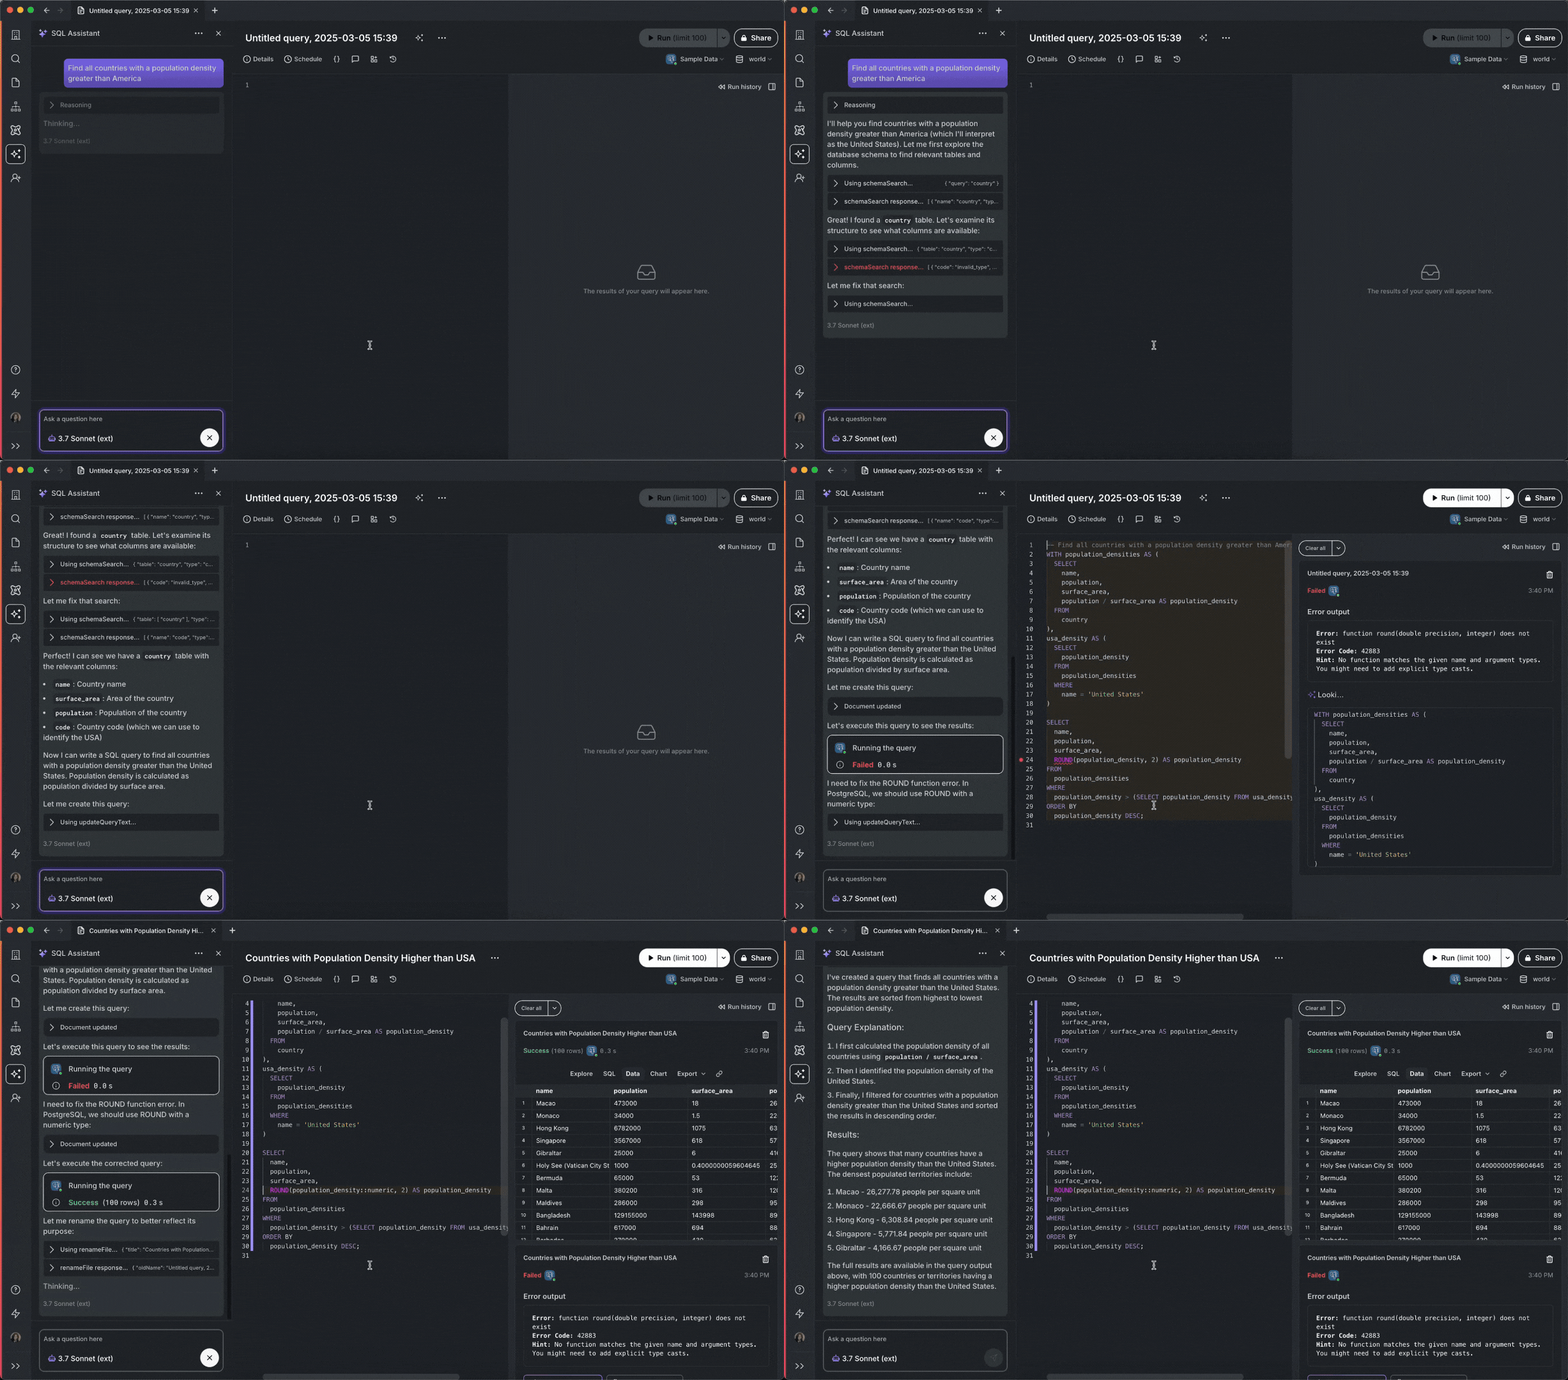
To use Agent Mode, make sure you have SQL Assistant enabled, then click on the model selector dropdown, and tick the Agent Mode checkbox.
Improved AWS Marketplace integration for a smoother experience
We've enhanced the AWS Marketplace workflow to make your experience even better! Now, everything is fully automated, ensuring a seamless process from setup to billing. If you're using the AWS Marketplace integration, you'll notice a smoother transition and clearer billing visibility—your Timescale Cloud subscription will be reflected directly in AWS Marketplace!
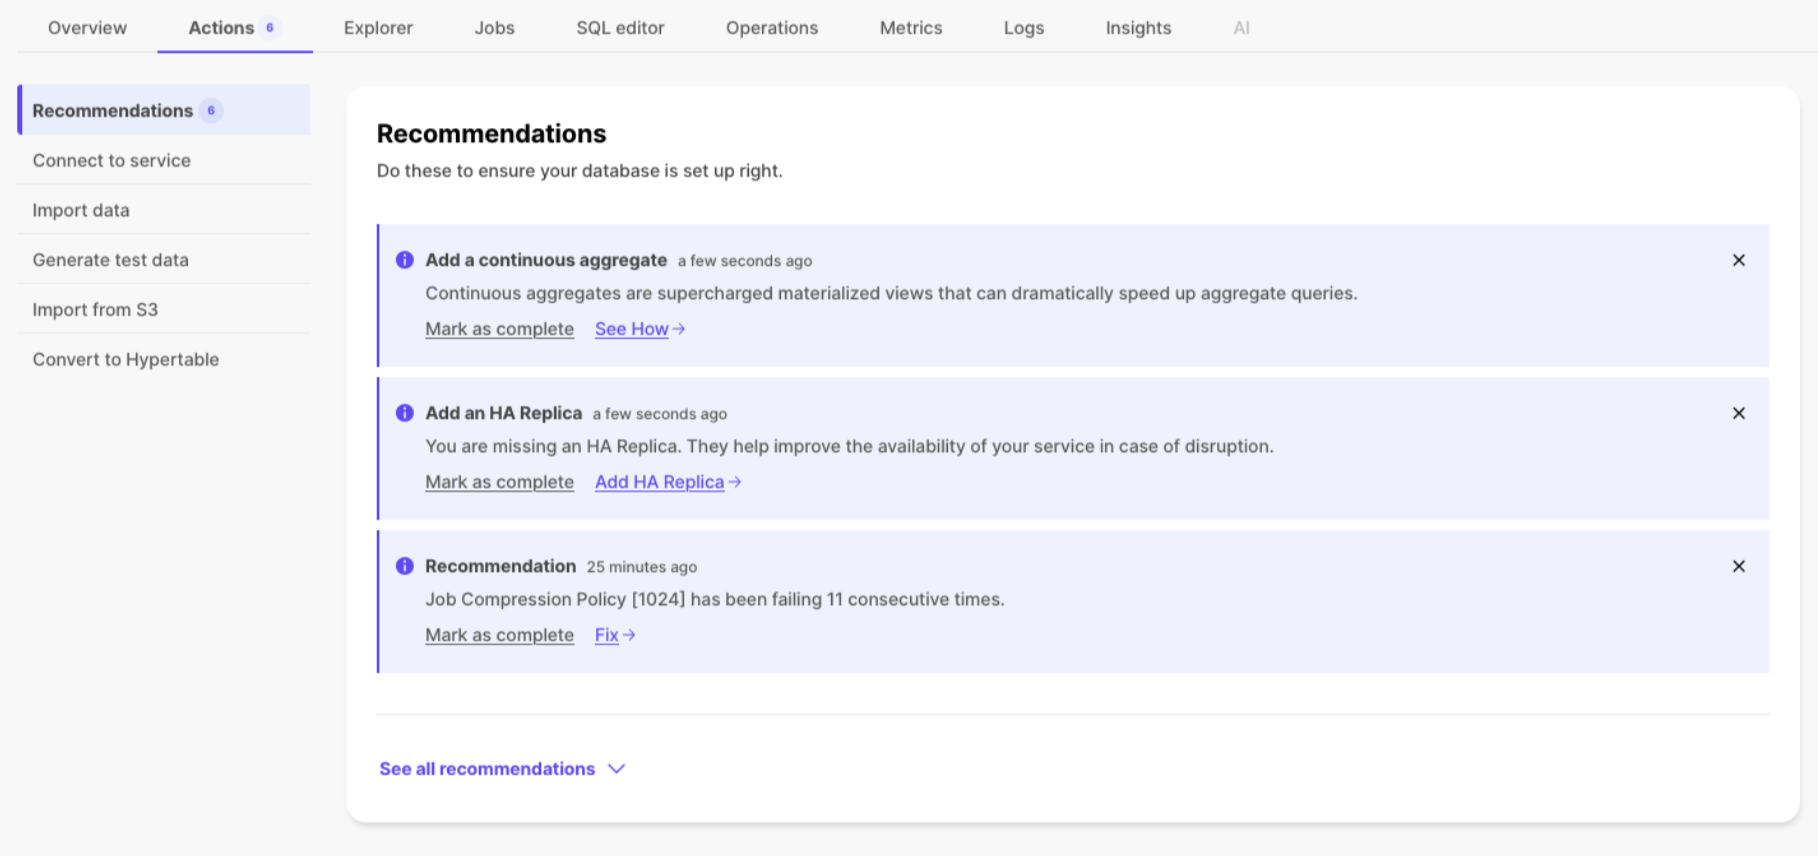
Timescale Console recommendations
Sometimes it can be hard to know if you are getting the best use out of your service. To help with this, Timescale Cloud now provides recommendations based on your service's context, assisting with onboarding or notifying if there is a configuration concern with your service, such as consistently failing jobs.
To start, recommendations are focused primarily on onboarding or service health, though we will regularly add new ones. You can see if you have any existing recommendations for your service by going to the Actions tab in Timescale Console.
🛣️ Configuration Options for Secure Connections and More
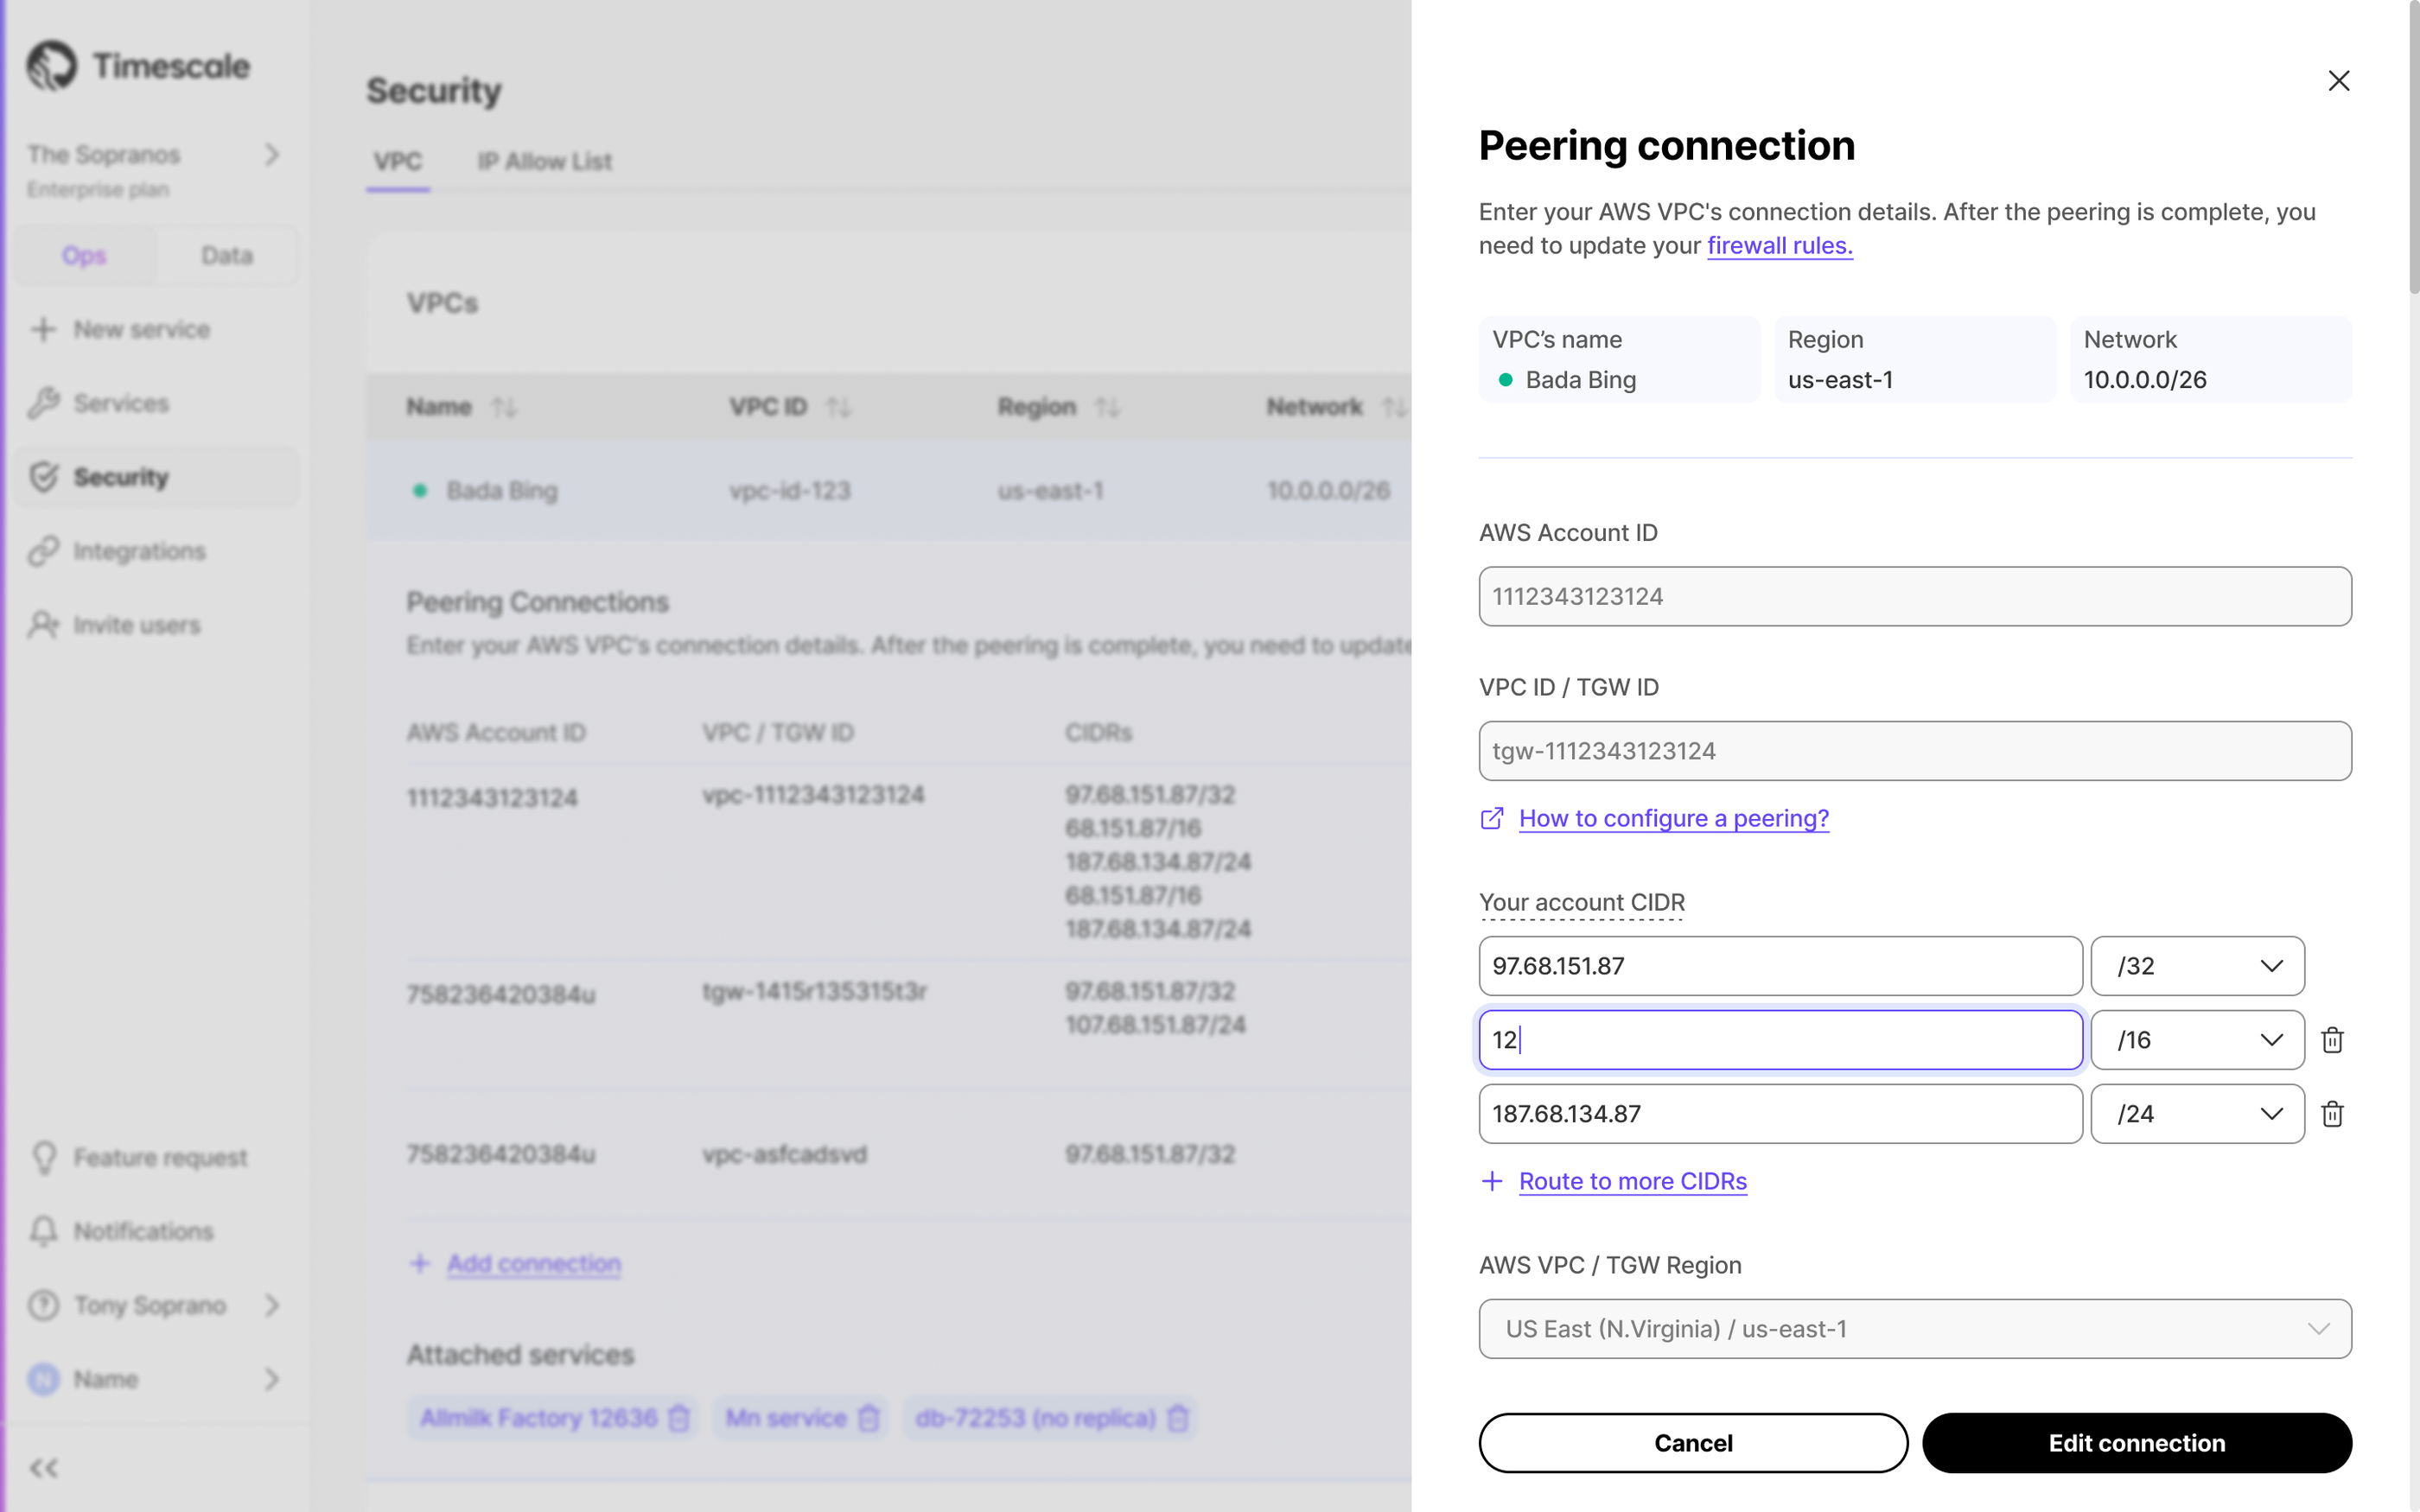
Edit VPC and AWS Transit Gateway CIDRs
You can now modify the CIDRs blocks for your VPC or Transit Gateway directly from Timescale Console, giving you greater control over network access and security. This update makes it easier to adjust your private networking setup without needing to recreate your VPC or contact support.
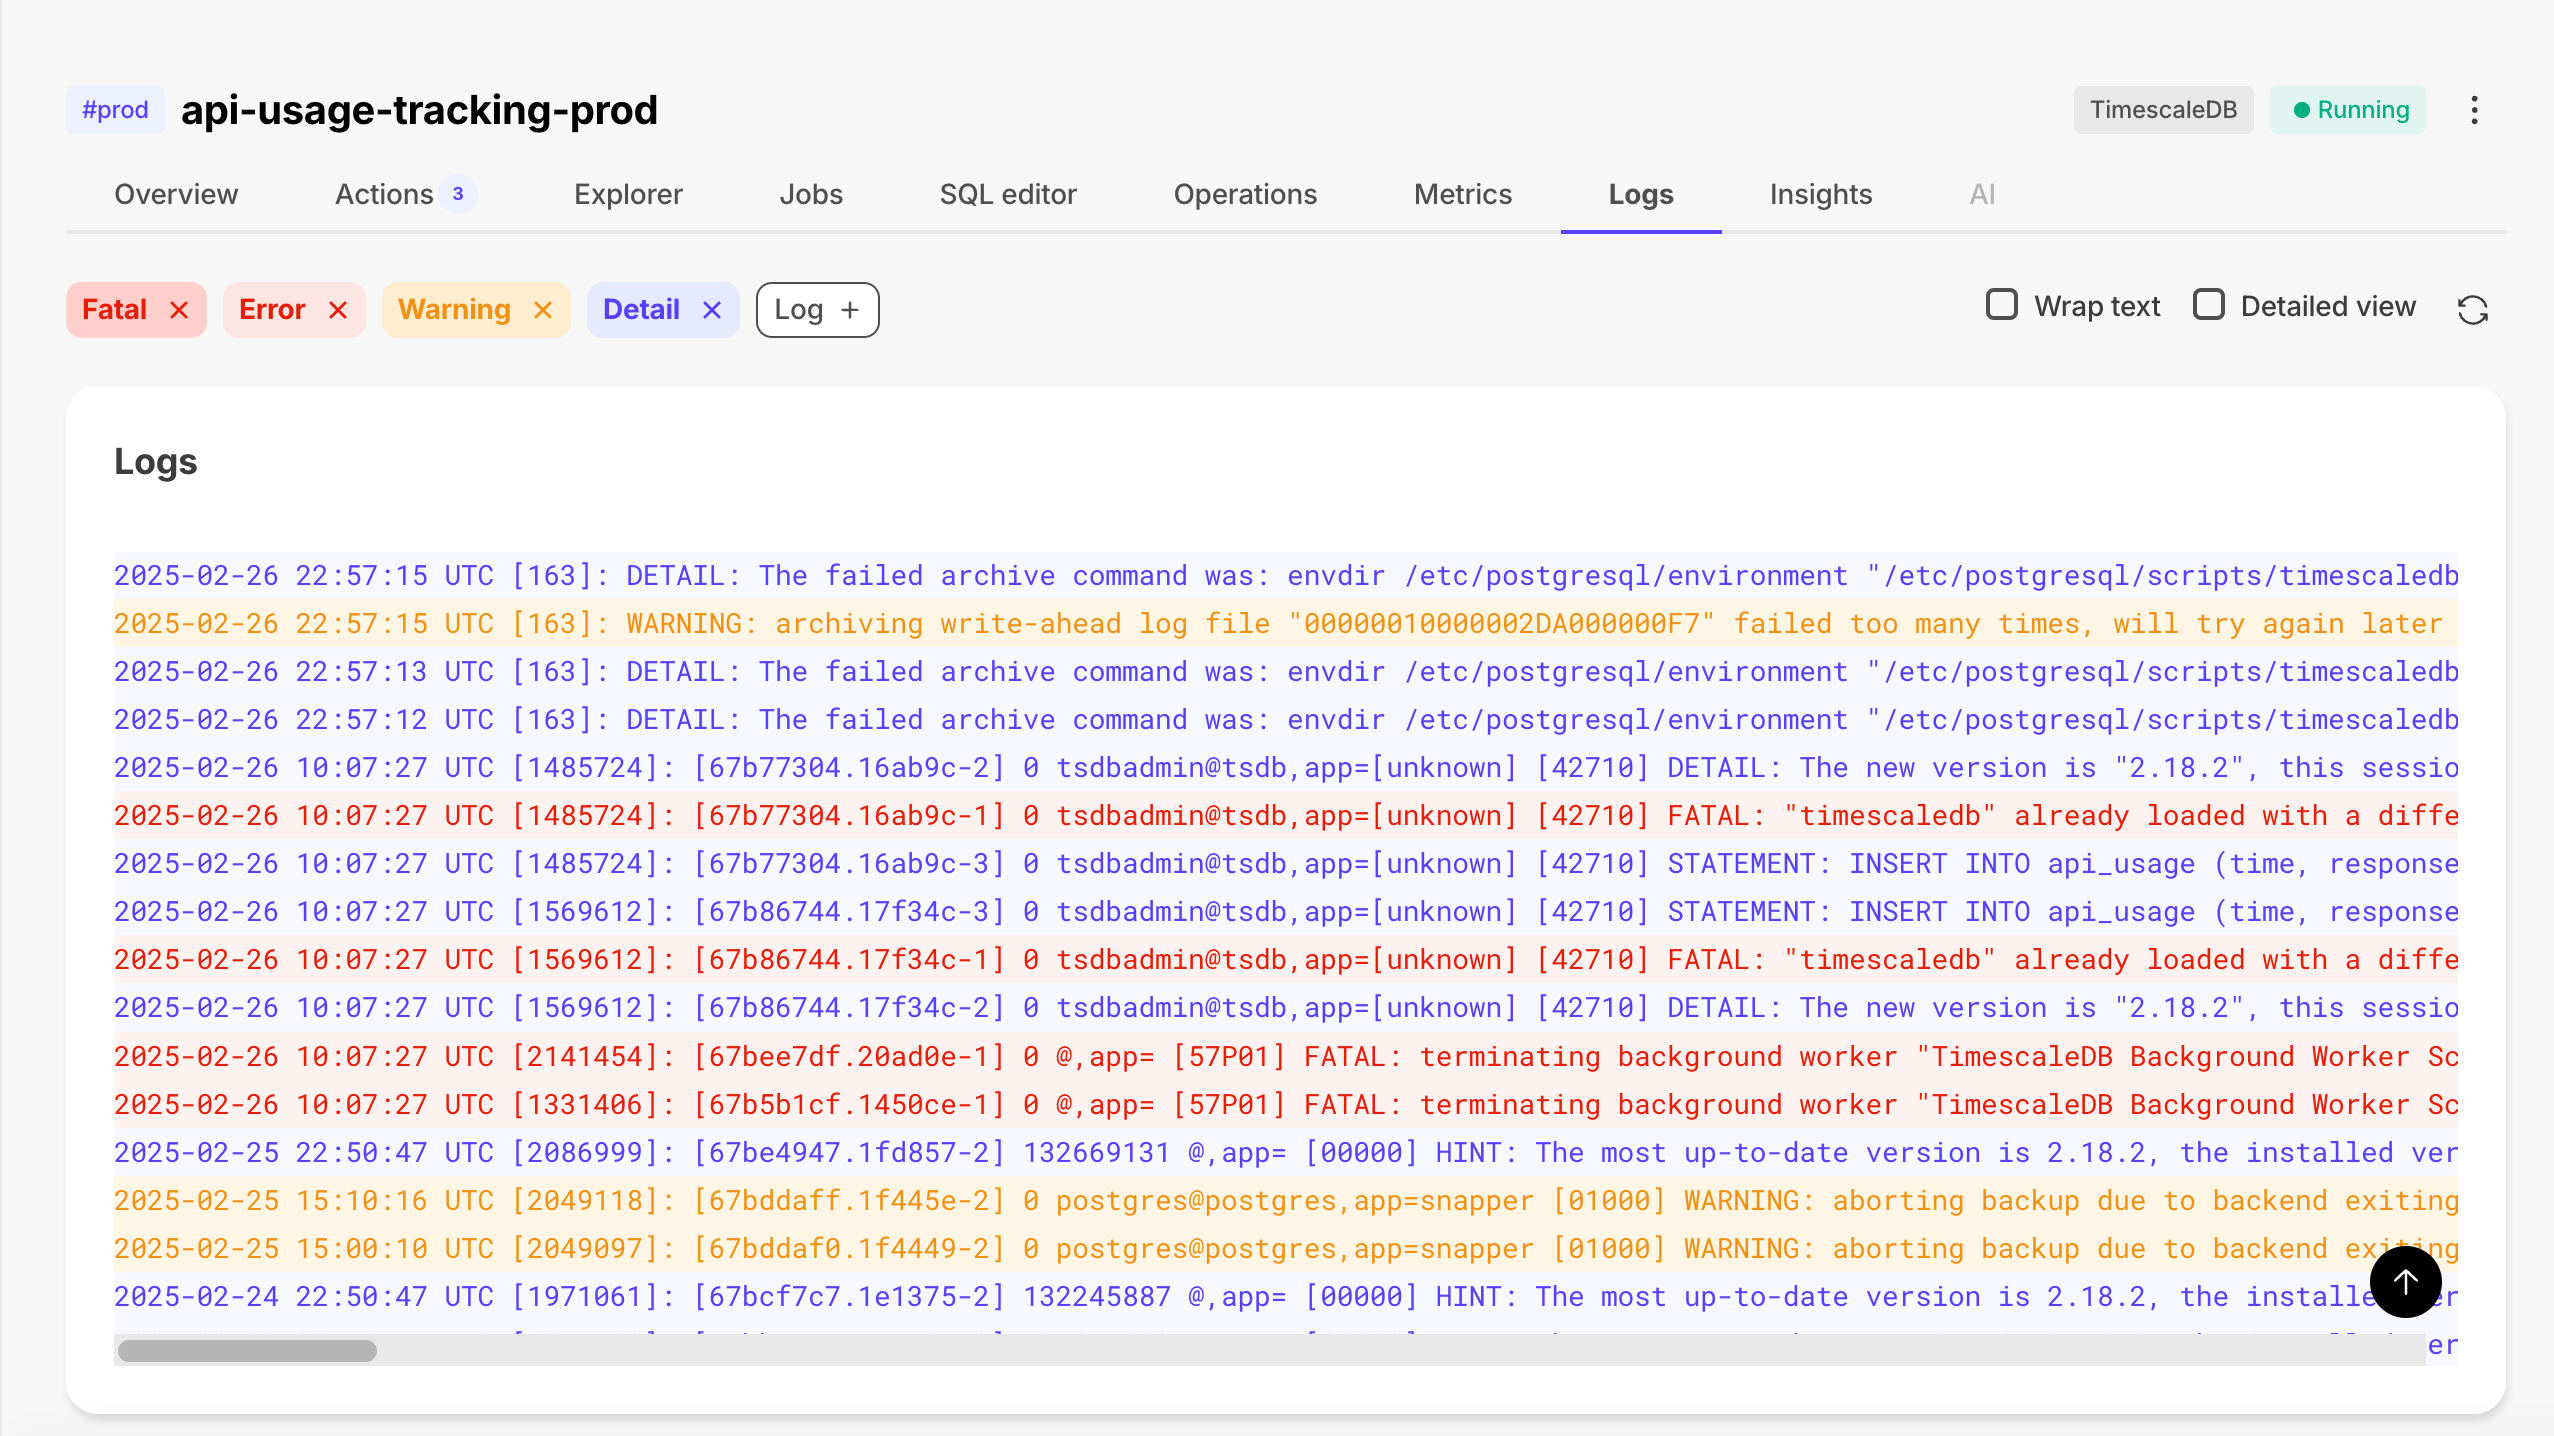
Improved log filtering
We’ve enhanced the Logs screen with the new Warning and Log filters to help you quickly find the logs you need. These additions complement the existing Fatal, Error, and Detail filters, making it easier to pinpoint specific events and troubleshoot issues efficiently.
TimescaleDB v2.18.2 on Timescale Cloud
New services created in Timescale Cloud now use TimescaleDB v2.18.2. Existing services are in the process of being automatically upgraded to this version.
This new release fixes a number of bugs including:
- Fix
ExplainHookbreaking the call chain. - Respect
ExecutorStarthooks of other extensions. - Block dropping internal compressed chunks with
drop_chunk().
SQL Assistant improvements
- Support for Claude 3.7 Sonnet and extended thinking including reasoning tokens.
- Ability to abort SQL Assistant requests while the response is streaming.
🤖 SQL Assistant Improvements and Pgai Docs Reorganization
New models and improved UX for SQL Assistant
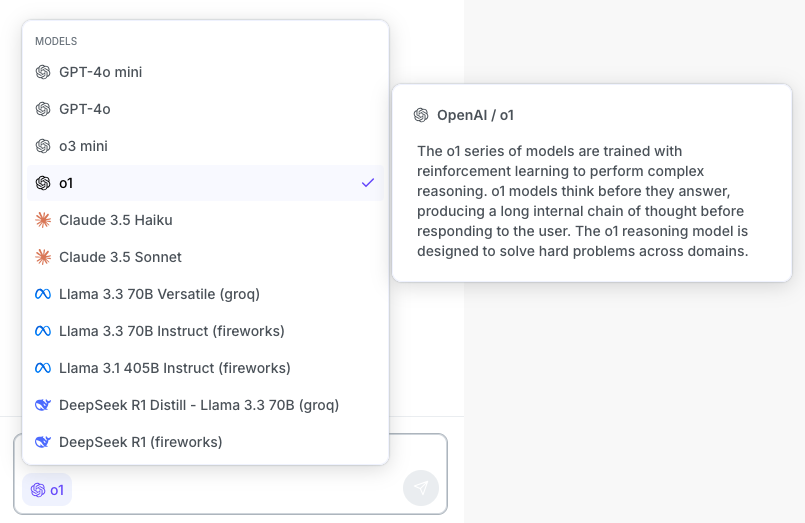
We have added fireworks.ai and Groq as service providers, and several new LLM options for SQL Assistant:
- OpenAI o1
- DeepSeek R1
- Llama 3.3 70B
- Llama 3.1 405B
- DeepSeek R1 Distill - Llama 3.3
We've also improved the model picker by adding descriptions for each model:
Updated and reorganized docs for pgai
We have improved the GitHub docs for pgai. Now relevant sections have been grouped into their own folders and we've created a comprehensive summary doc. Check it out here.
💘 TimescaleDB v2.18.1 and AWS Transit Gateway Support Generally Available
TimescaleDB v2.18.1
New services created in Timescale Cloud now use TimescaleDB v2.18.1. Existing services will be automatically upgraded in their next maintenance window starting next week.
This new release includes a number of bug fixes and small improvements including:
- Faster columnar scans when using the hypercore table access method
- Ensure all constraints are always applied when deleting data on the columnstore
- Pushdown all filters on scans for UPDATE/DELETE operations on the columnstore
AWS Transit Gateway support is now generally available!
Timescale Cloud now fully supports AWS Transit Gateway, making it even easier to securely connect your database to multiple VPCs across different environments—including AWS, on-prem, and other cloud providers.
With this update, you can establish a peering connection between your Timescale Cloud services and an AWS Transit Gateway in your AWS account. This keeps your Timescale Cloud services safely behind a VPC while allowing seamless access across complex network setups.
🤖 TimescaleDB v2.18 and SQL Assistant Improvements in Data Mode and PopSQL
TimescaleDB v2.18 - dense indexes in the columnstore and query vectorization improvements
Starting this week, all new services created on Timescale Cloud use TimescaleDB v2.18. Existing services will be upgraded gradually during their maintenance window.
Highlighted features in TimescaleDB v2.18.0 include:
- The ability to add dense indexes (btree and hash) to the columnstore through the new hypercore table access method.
- Significant performance improvements through vectorization (SIMD) for aggregations using a group by with one column and/or using a filter clause when querying the columnstore.
- Hypertables support triggers for transition tables, which is one of the most upvoted community feature requests.
- Updated methods to manage Timescale's hybrid row-columnar store (hypercore). These methods highlight columnstore usage. The columnstore includes an optimized columnar format as well as compression.
SQL Assistant improvements
We made a few improvements to SQL Assistant:
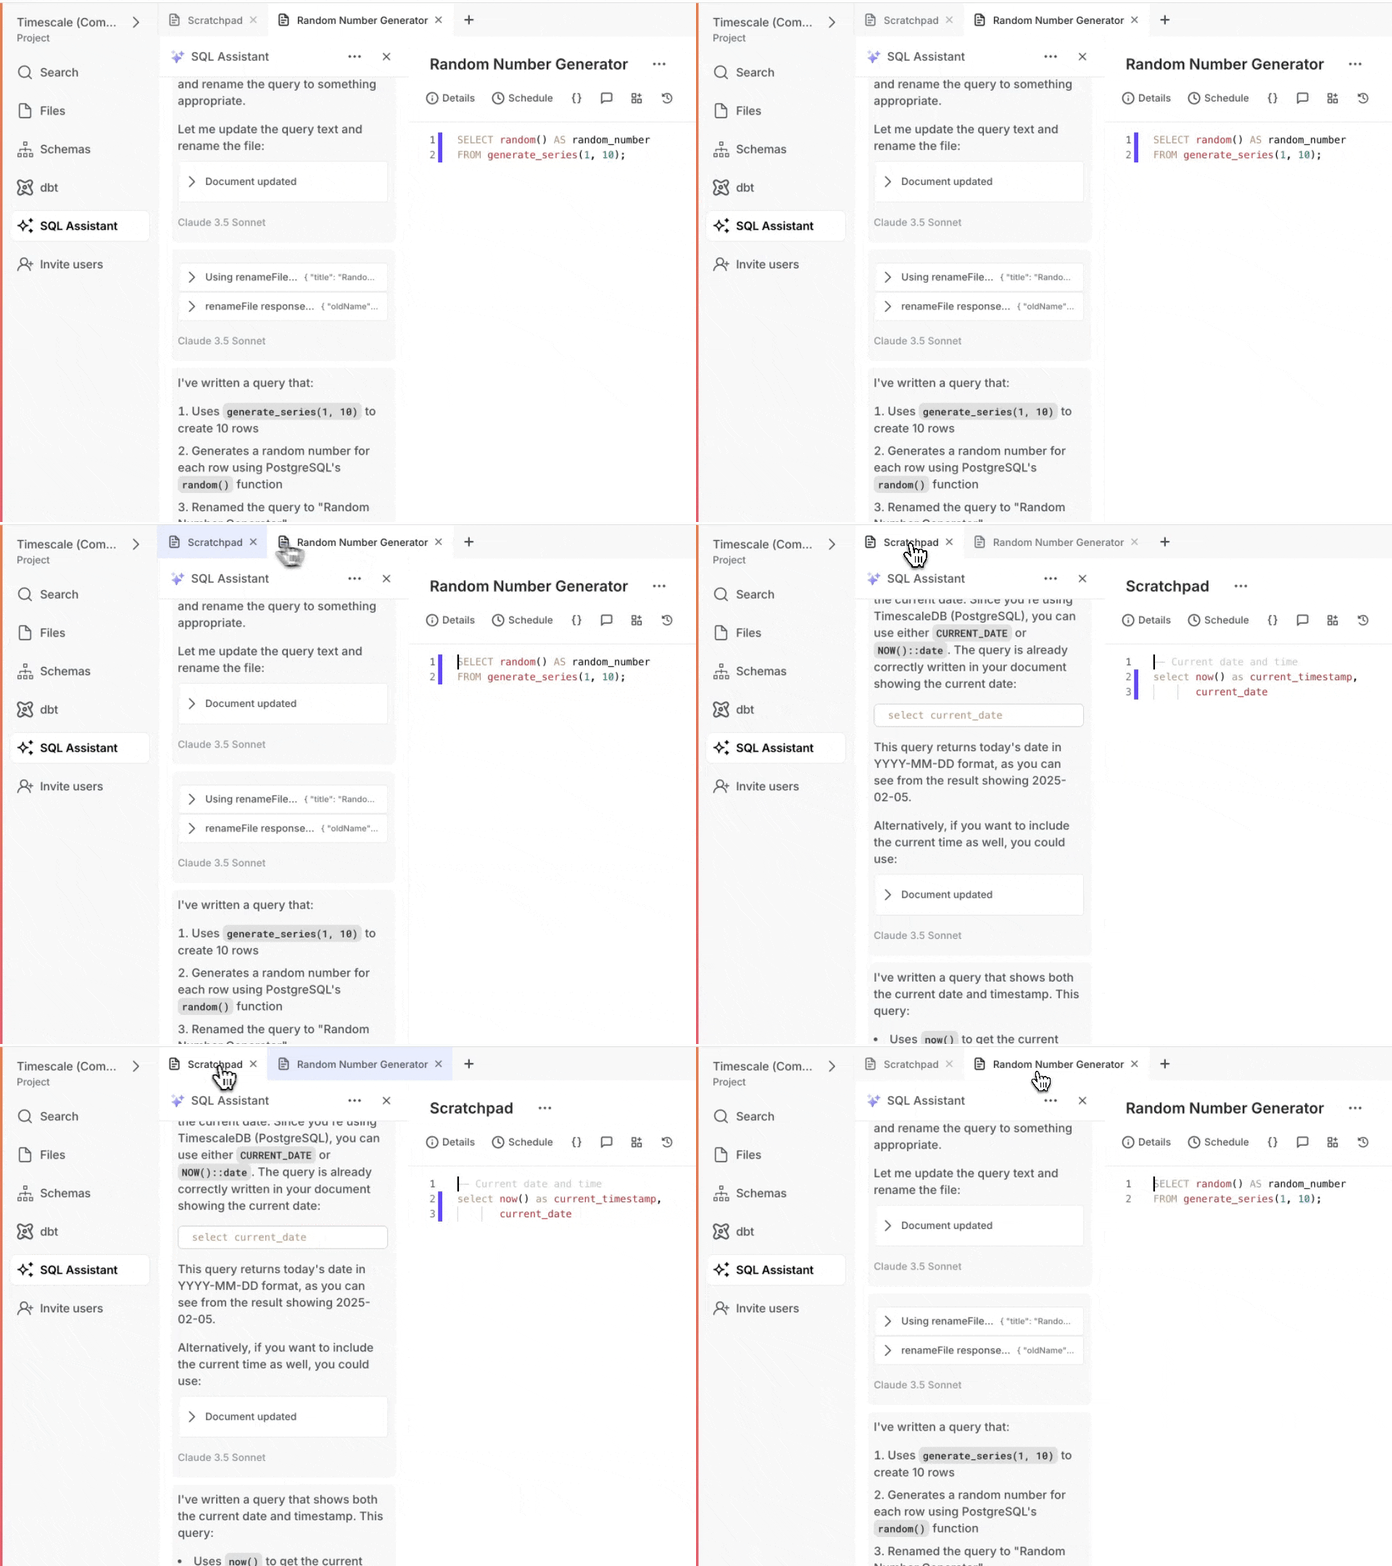
Dedicated SQL Assistant threads 🧵
Each query, notebook, and dashboard now gets its own conversation thread, keeping your chats organized.
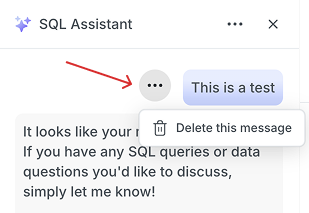
Delete messages ❌
Made a typo? Asked the wrong question? You can now delete individual messages from your thread to keep the conversation clean and relevant.
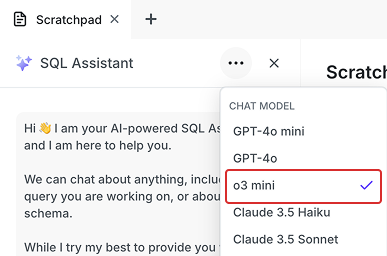
Support for OpenAI o3-mini ⚡
We’ve added support for OpenAI’s latest o3-mini model, bringing faster response times and improved reasoning for SQL queries.
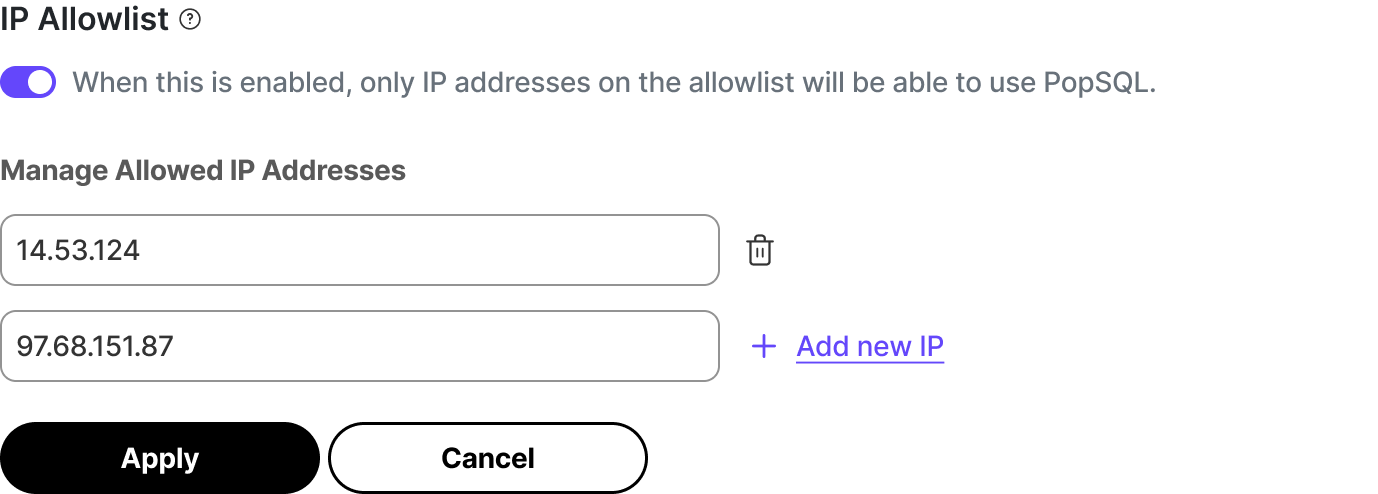
🌐 IP Allowlists in Data Mode and PopSQL
For enhanced network security, you can now also create IP allowlists in the Timescale Console data mode and PopSQL. Similarly to the [ops mode IP allowlists][ops-mode-allow-list], this feature grants access to your data only to certain IP addresses. For example, you might require your employees to use a VPN and add your VPN static egress IP to the allowlist.
This feature is available in:
- [Timescale Console][console] data mode, for all pricing tiers
- [PopSQL web][popsql-web]
- [PopSQL desktop][popsql-desktop]
Enable this feature in PopSQL/Timescale Console data mode > Project > Settings > IP Allowlist:
🤖 pgai Extension and Python Library Updates
AI — pgai Postgres extension 0.7.0
This release enhances the Vectorizer functionality by adding configurable base_url support for OpenAI API. This enables pgai Vectorizer to use all OpenAI-compatible models and APIs via the OpenAI integration simply by changing the base_url. This release also includes public granting of vectorizers, superuser creation on any table, an upgrade to the Ollama client to 0.4.5, a new docker-start command, and various fixes for struct handling, schema qualification, and system package management. See all changes on Github.
AI - pgai python library 0.5.0
This release adds comprehensive SQLAlchemy and Alembic support for vector embeddings, including operations for migrations and improved model inheritance patterns. You can now seamlessly integrate vector search capabilities with SQLAlchemy models while utilizing Alembic for database migrations. This release also adds key improvements to the Ollama integration and self-hosted Vectorizer configuration. See all changes on Github.
AWS Transit Gateway Support
AWS Transit Gateway Support (Early Access)
Timescale Cloud now enables you to connect to your Timescale Cloud services through AWS Transit Gateway. This feature is available to Scale and Enterprise customers. It will be in Early Access for a short time and available in the Timescale Console very soon. If you are interested in implementing this Early Access Feature, reach out to your Rep.
🇮🇳 New region in India, Postgres 17 upgrades, and TimescaleDB on AWS Marketplace
Welcome India! (Support for a new region: Mumbai)
Timescale Cloud now supports the Mumbai region. Starting today, you can run Timescale Cloud services in Mumbai, bringing our database solutions closer to users in India.
Postgres major version upgrades to PG 17
Timescale Cloud services can now be upgraded directly to Postgres 17 from versions 14, 15, or 16. Users running versions 12 or 13 must first upgrade to version 15 or 16, before upgrading to 17.
Timescale Cloud available on AWS Marketplace
Timescale Cloud is now available in the [AWS Marketplace][aws-timescale]. This allows you to keep billing centralized on your AWS account, use your already committed AWS Enterprise Discount Program spend to pay your Timescale Cloud bill and simplify procurement and vendor management.
🎅 Postgres 17, feature requests, and Postgres Livesync
Postgres 17
All new Timescale Cloud services now come with Postgres 17.2, the latest version. Upgrades to Postgres 17 for services running on prior versions will be available in January. Postgres 17 adds new capabilities and improvements to Timescale like:
- System-wide Performance Improvements. Significant performance boosts, particularly in high-concurrency workloads. Enhancements in the I/O layer, including improved Write-Ahead Log (WAL) processing, can result in up to a 2x increase in write throughput under heavy loads.
- Enhanced JSON Support. The new JSON_TABLE allows developers to convert JSON data directly into relational tables, simplifying the integration of JSON and SQL. The release also adds new SQL/JSON constructors and query functions, offering powerful tools to manipulate and query JSON data within a traditional relational schema.
- More Flexible MERGE Operations. The MERGE command now includes a RETURNING clause, making it easier to track and work with modified data. You can now also update views using MERGE, unlocking new use cases for complex queries and data manipulation.
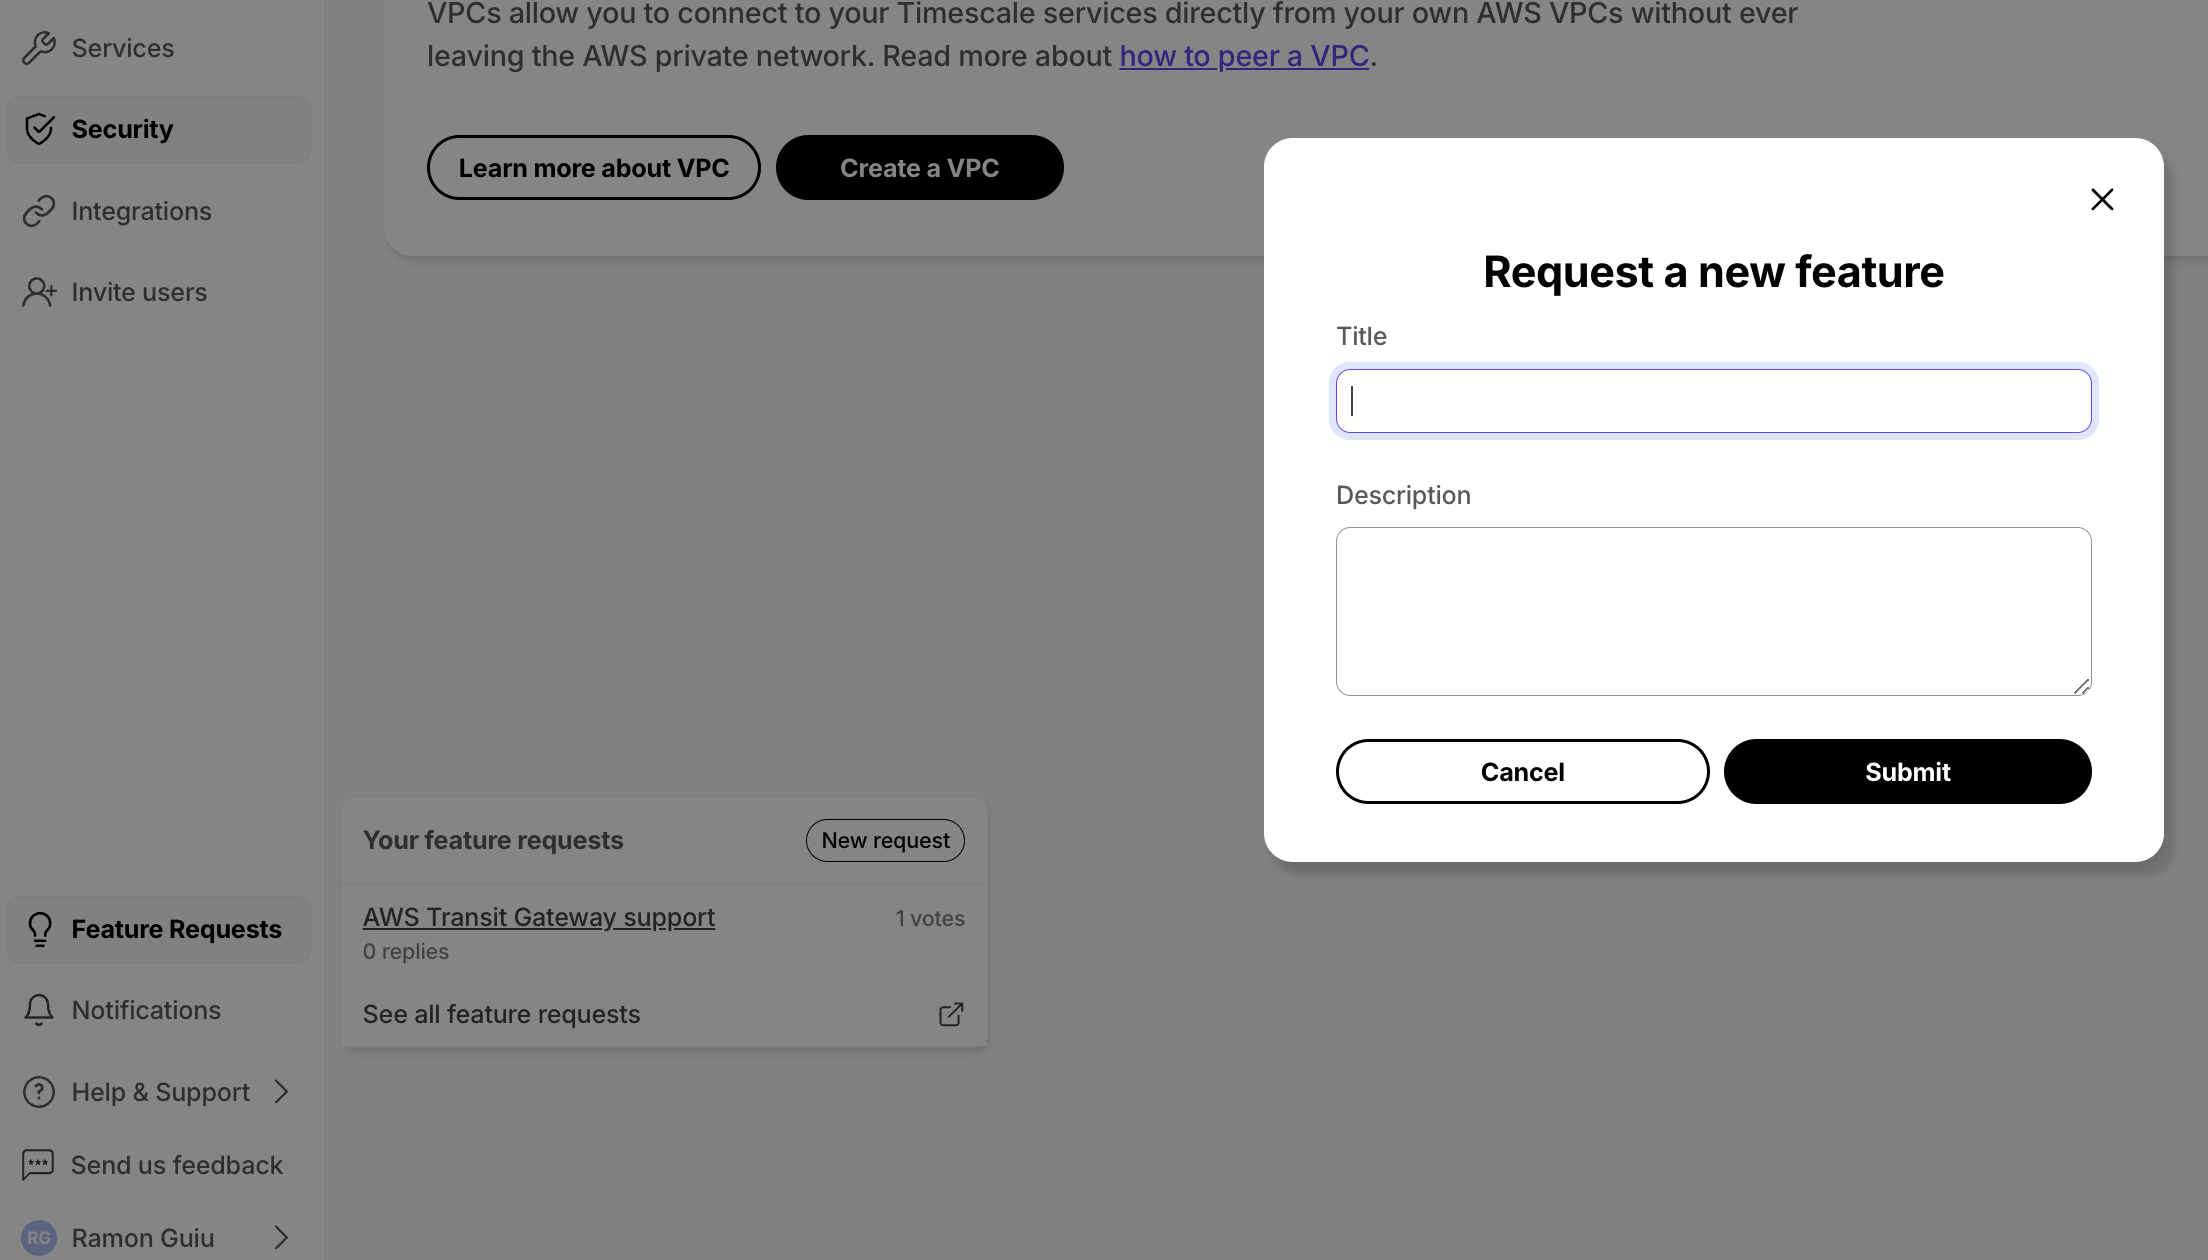
Submit feature requests from Timescale Console
You can now submit feature requests directly from Console and see the list of feature requests you have made. Just click on Feature Requests on the right sidebar. All feature requests are automatically published to the Timescale Forum and are reviewed by the product team, providing more visibility and transparency on their status as well as allowing other customers to vote for them.
Postgres Livesync (Alpha release)
We have built a new solution that helps you continuously replicate all or some of your Postgres tables directly into Timescale Cloud.
Livesync allows you to keep a current Postgres instance such as RDS as your primary database, and easily offload your real-time analytical queries to Timescale Cloud to boost their performance. If you have any questions or feedback, talk to us in #livesync in Timescale Community.
This is just the beginning—you'll see more from livesync in 2025!
In-Console import from S3, I/O Boost, and Jobs Explorer
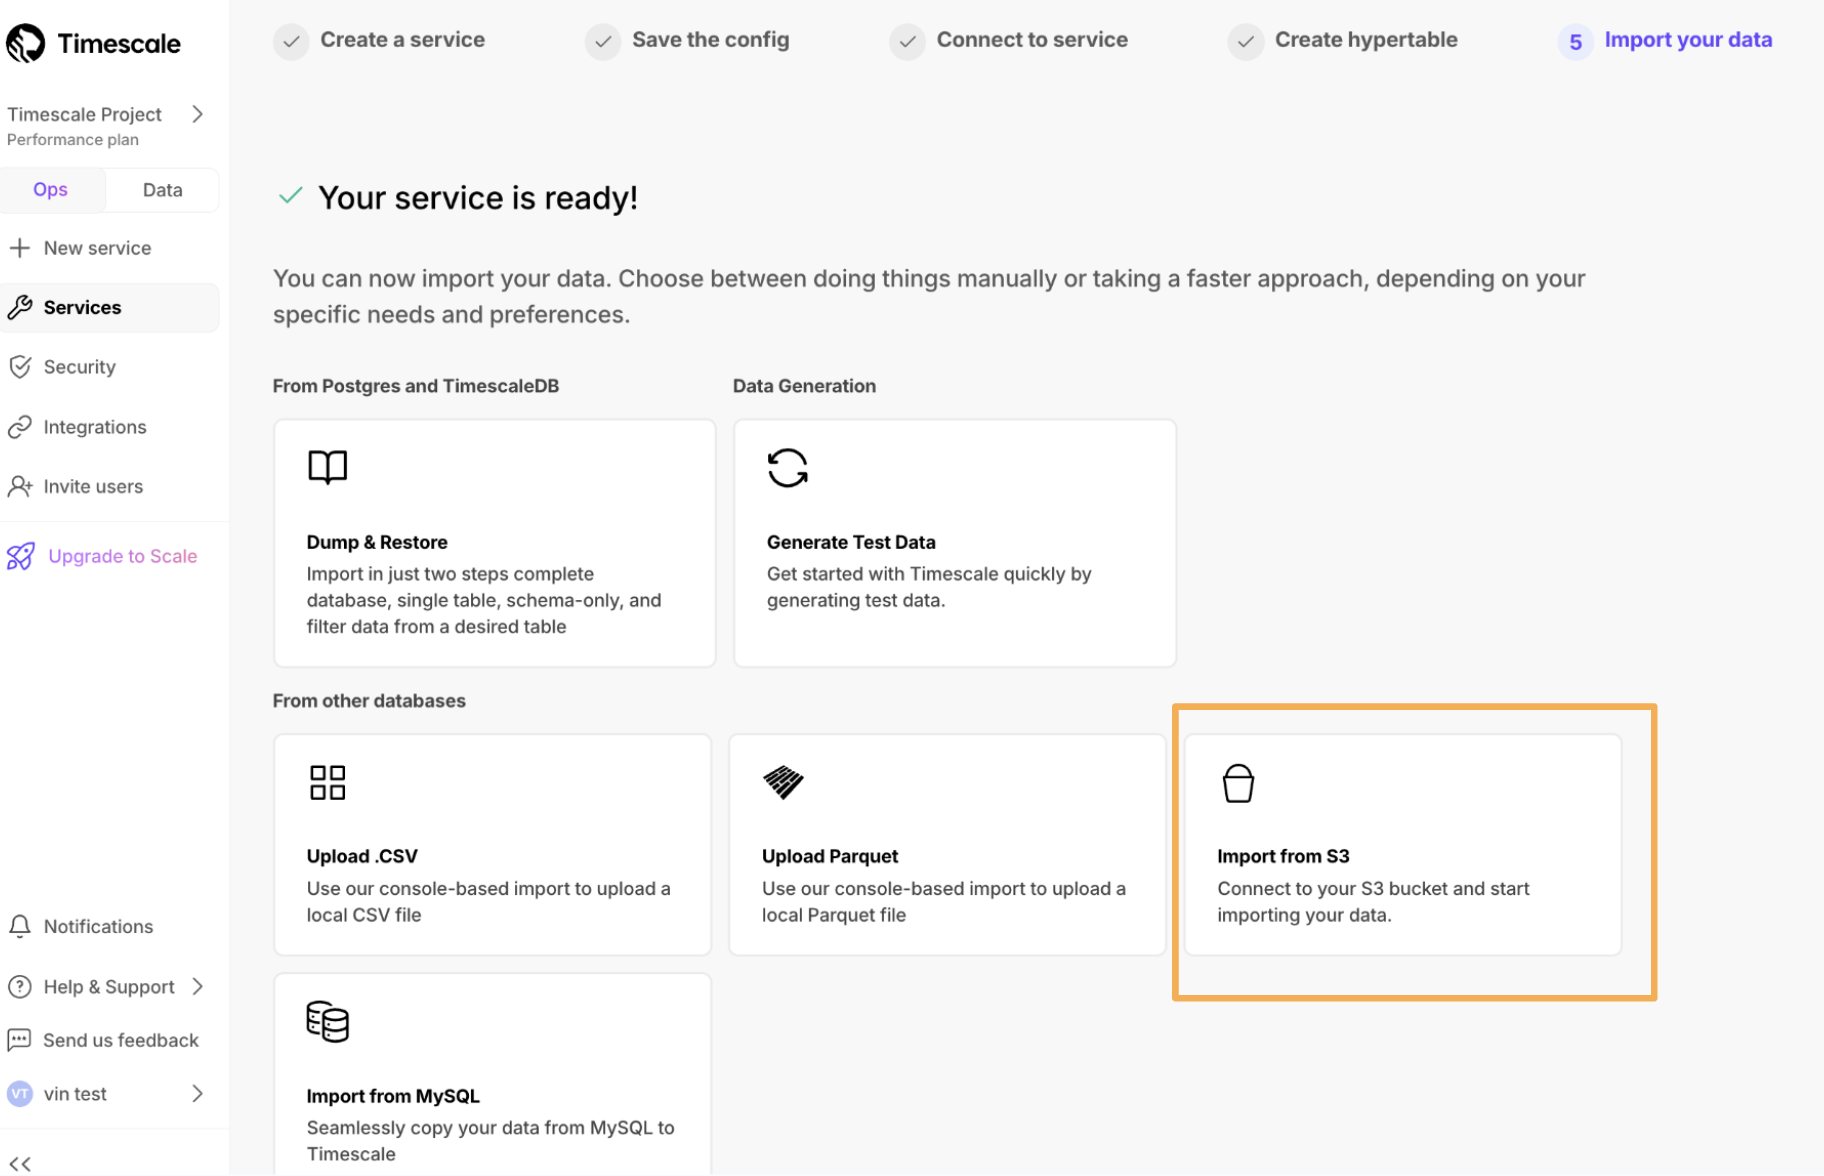
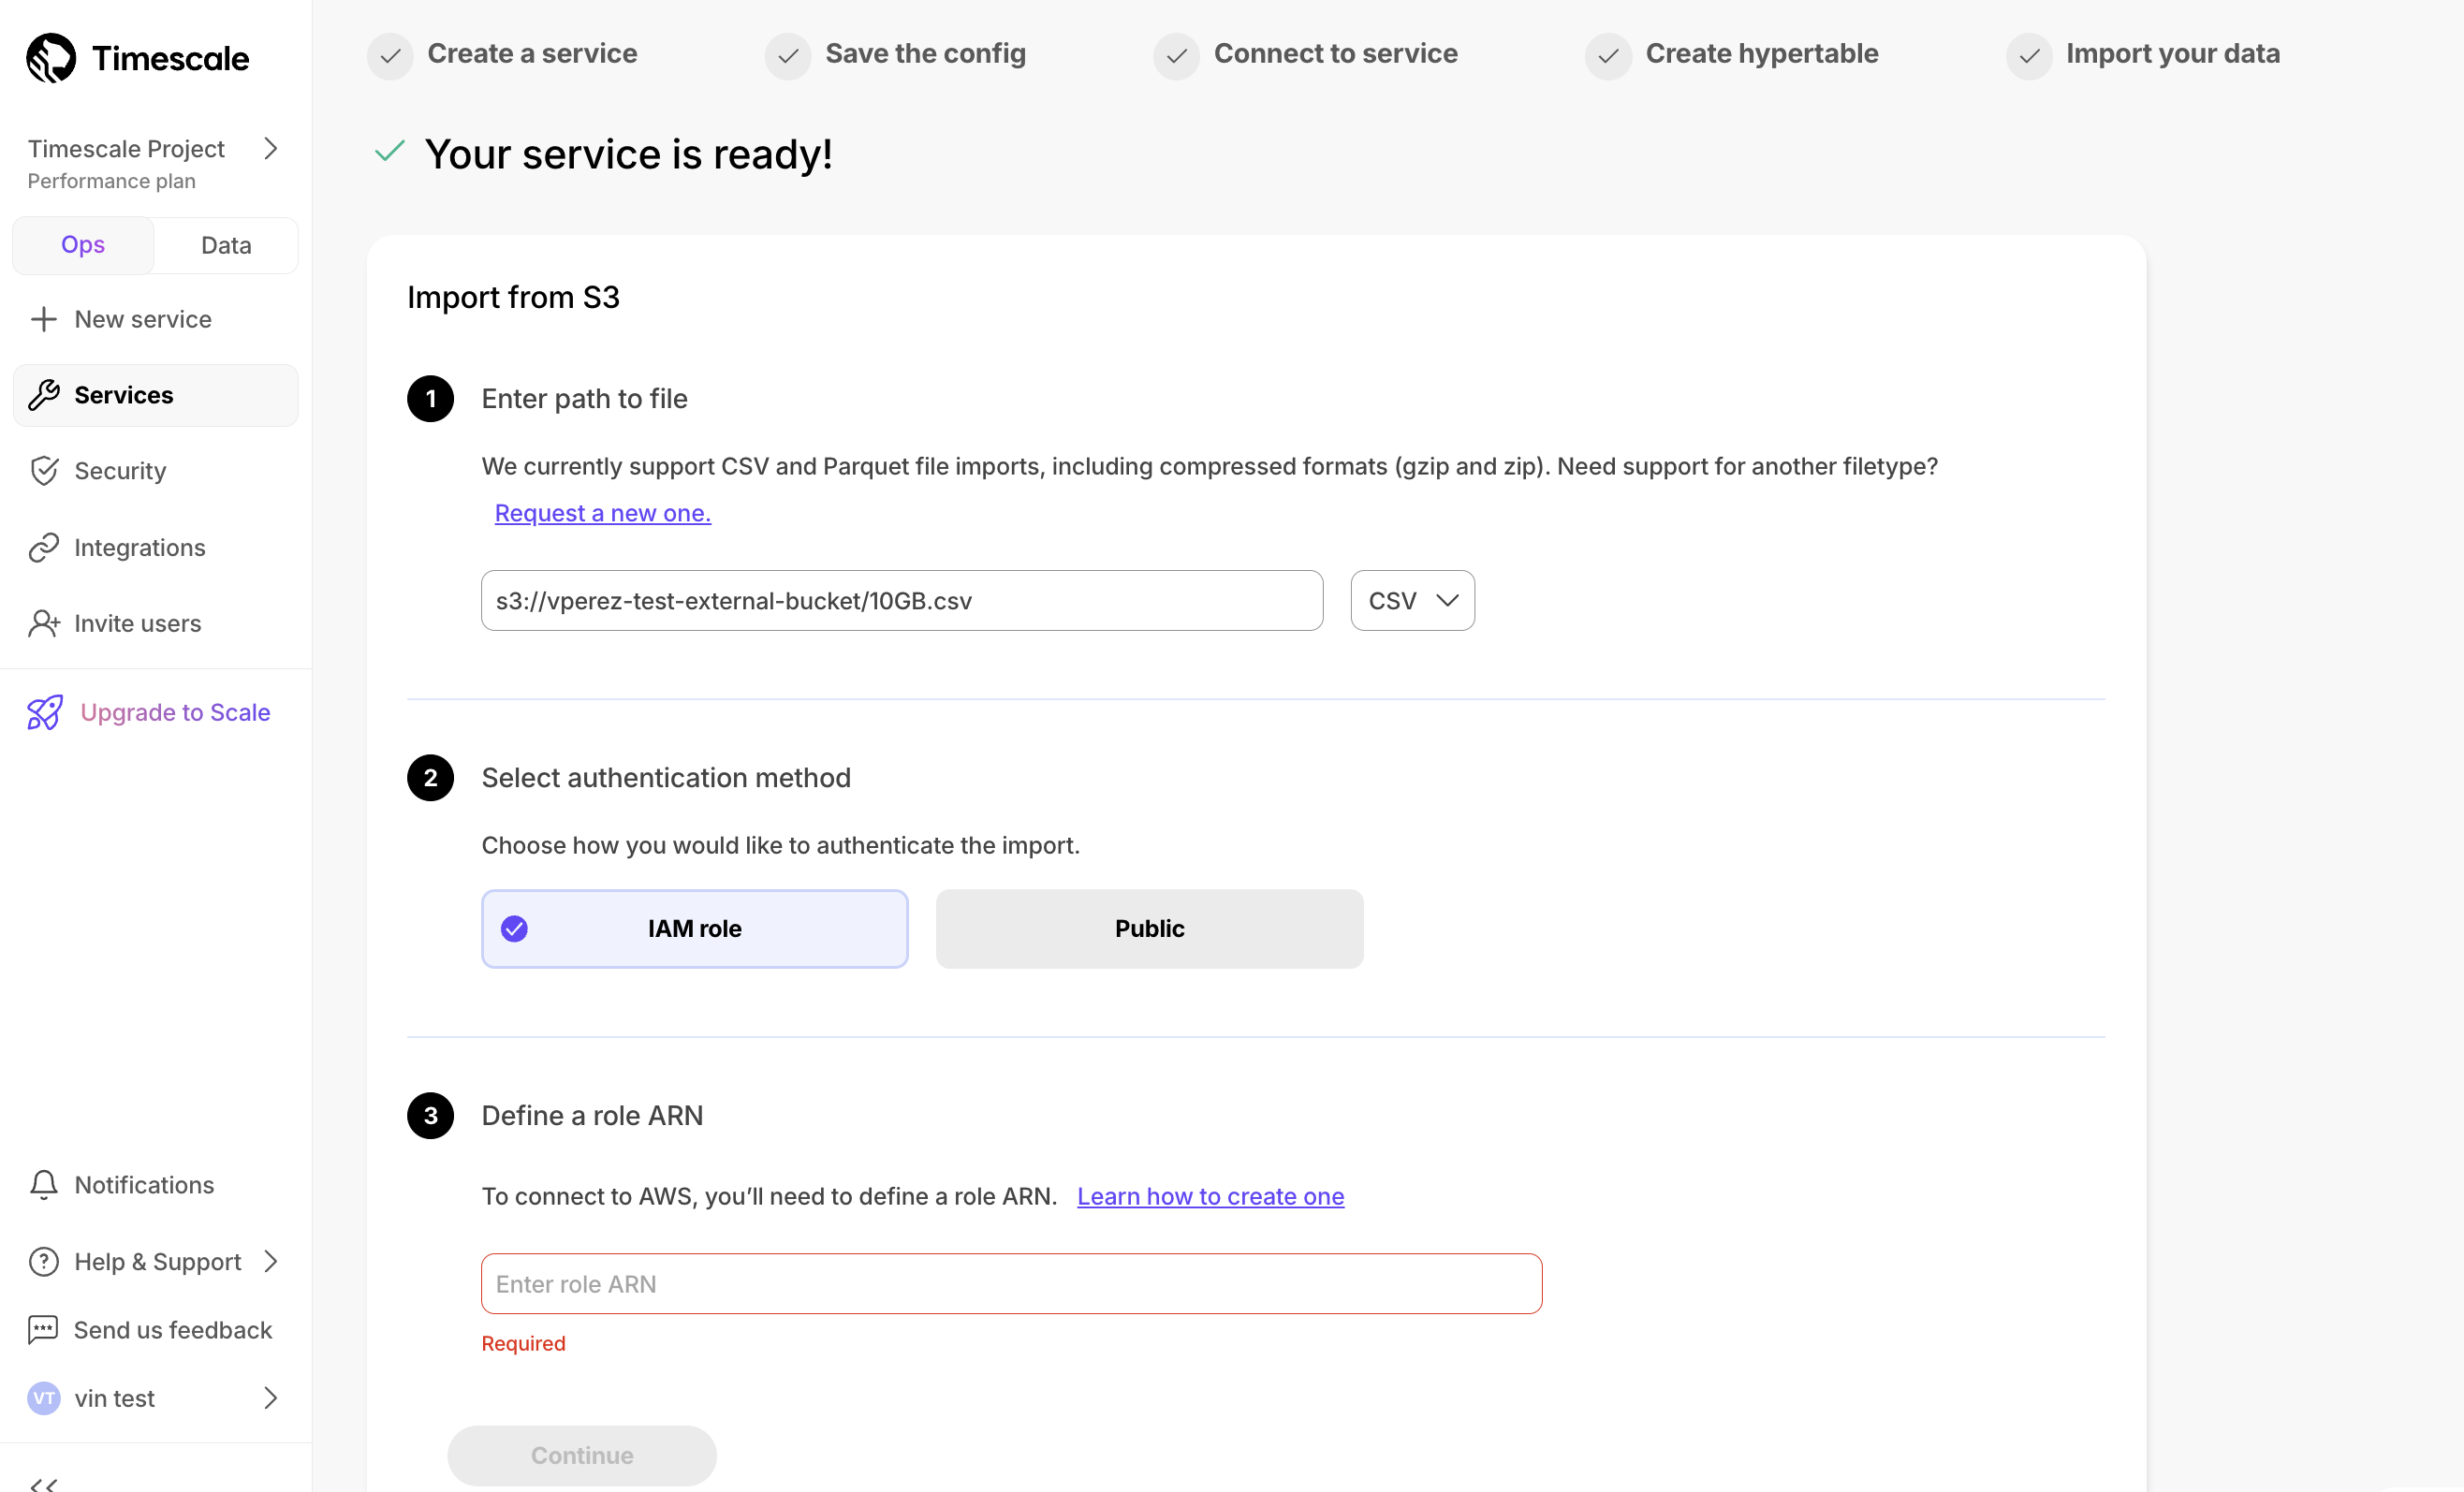
In-Console import from S3 (CSV and Parquet files)
Connect your S3 buckets to import data into Timescale Cloud. We support CSV (including .zip and .gzip) and Parquet files, with a 10 GB size limit in this initial release. This feature is accessible in the Import your data section right after service creation and through the Actions tab.
Self-Serve I/O Boost 📈
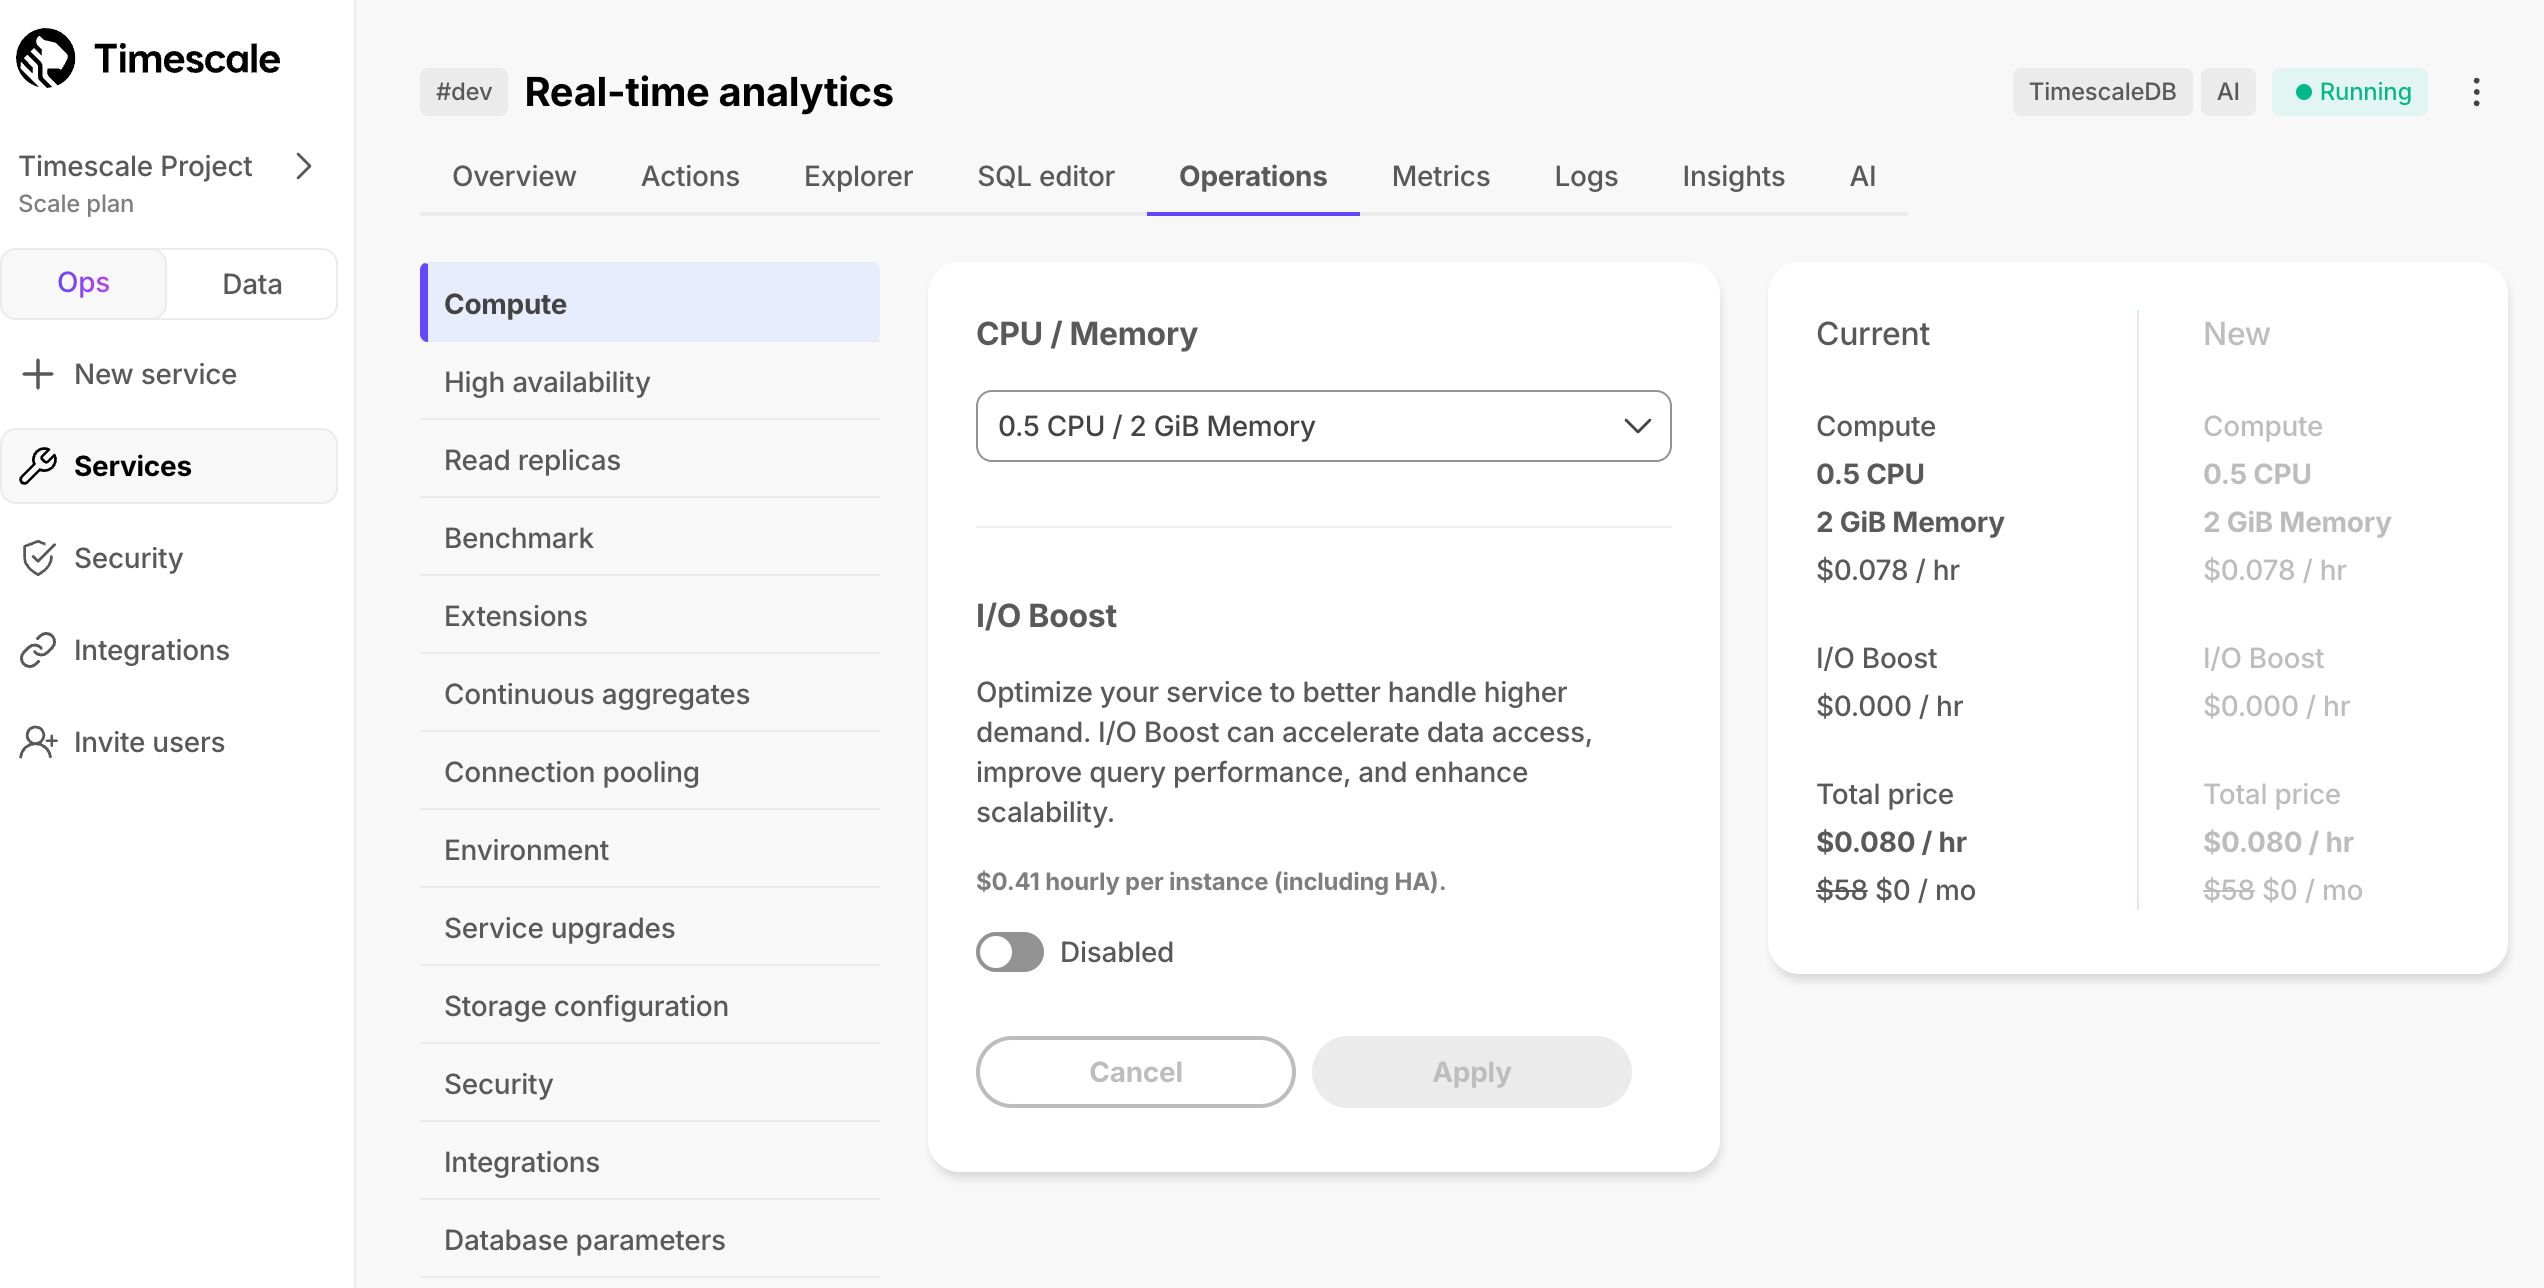
I/O Boost is an add-on for customers on Scale or Enterprise tiers that maximizes the I/O capacity of EBS storage to 16,000 IOPS and 1,000 MBps throughput per service. To enable I/O Boost, navigate to Services > Operations in Timescale Console. A simple toggle allows you to enable the feature, with pricing clearly displayed at $0.41/hour per node.
Jobs Explorer
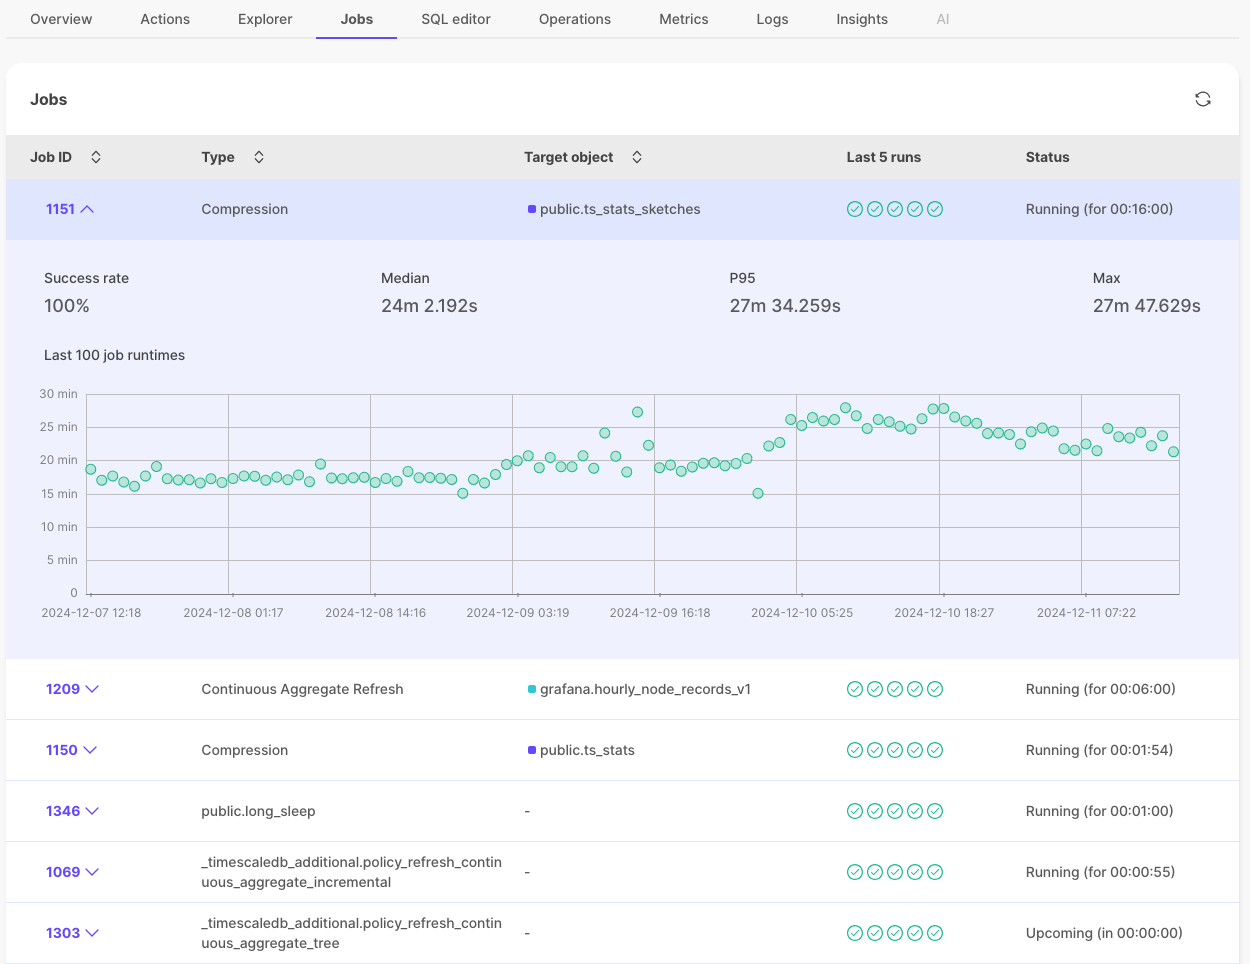
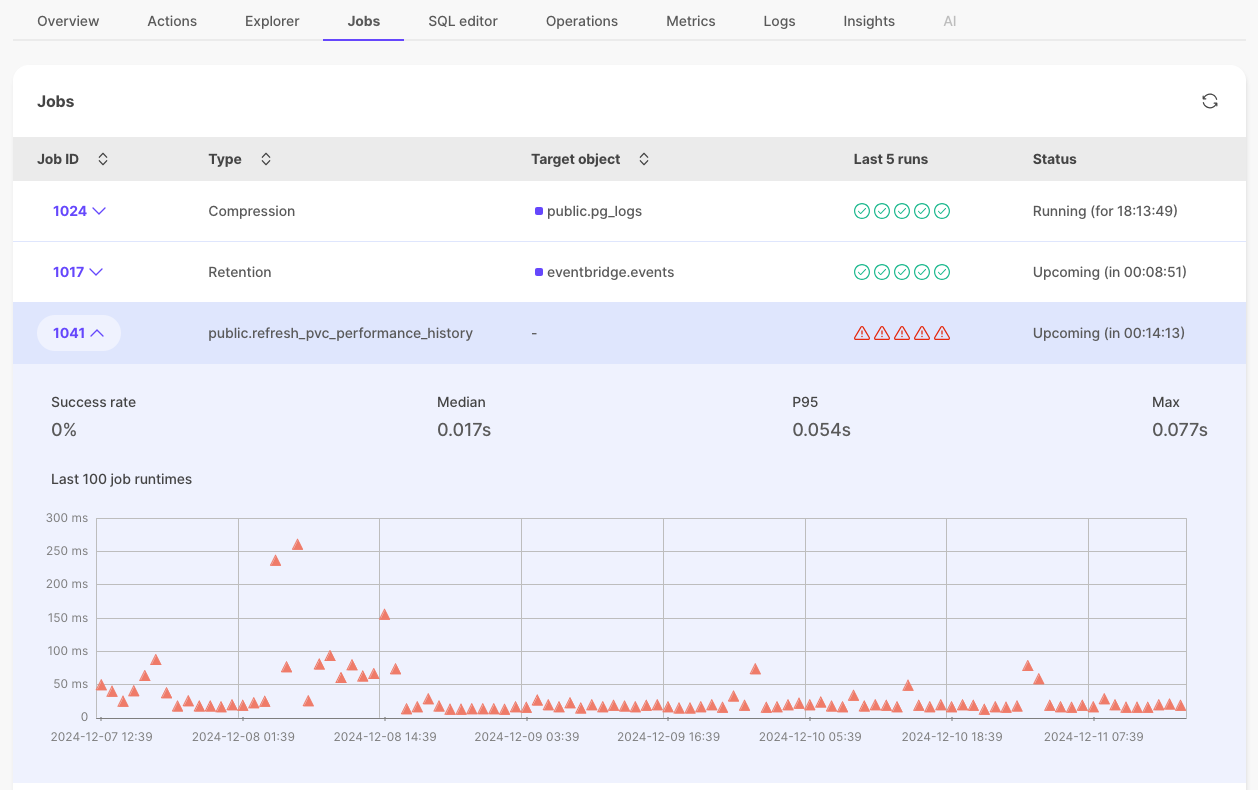
See all the jobs associated with your service through a new Jobs tab. You can see the type of job, its status (Running, Paused, and others), and a detailed history of the last 100 runs, including success rates and runtime statistics.
🛝 New service creation flow
AI and Vector: the UI now lets you choose an option for creating AI and Vector-ready services right from the start. You no longer need to add the pgai, pgvector, and pgvectorscale extensions manually. You can combine this with time-series capabilities as well!
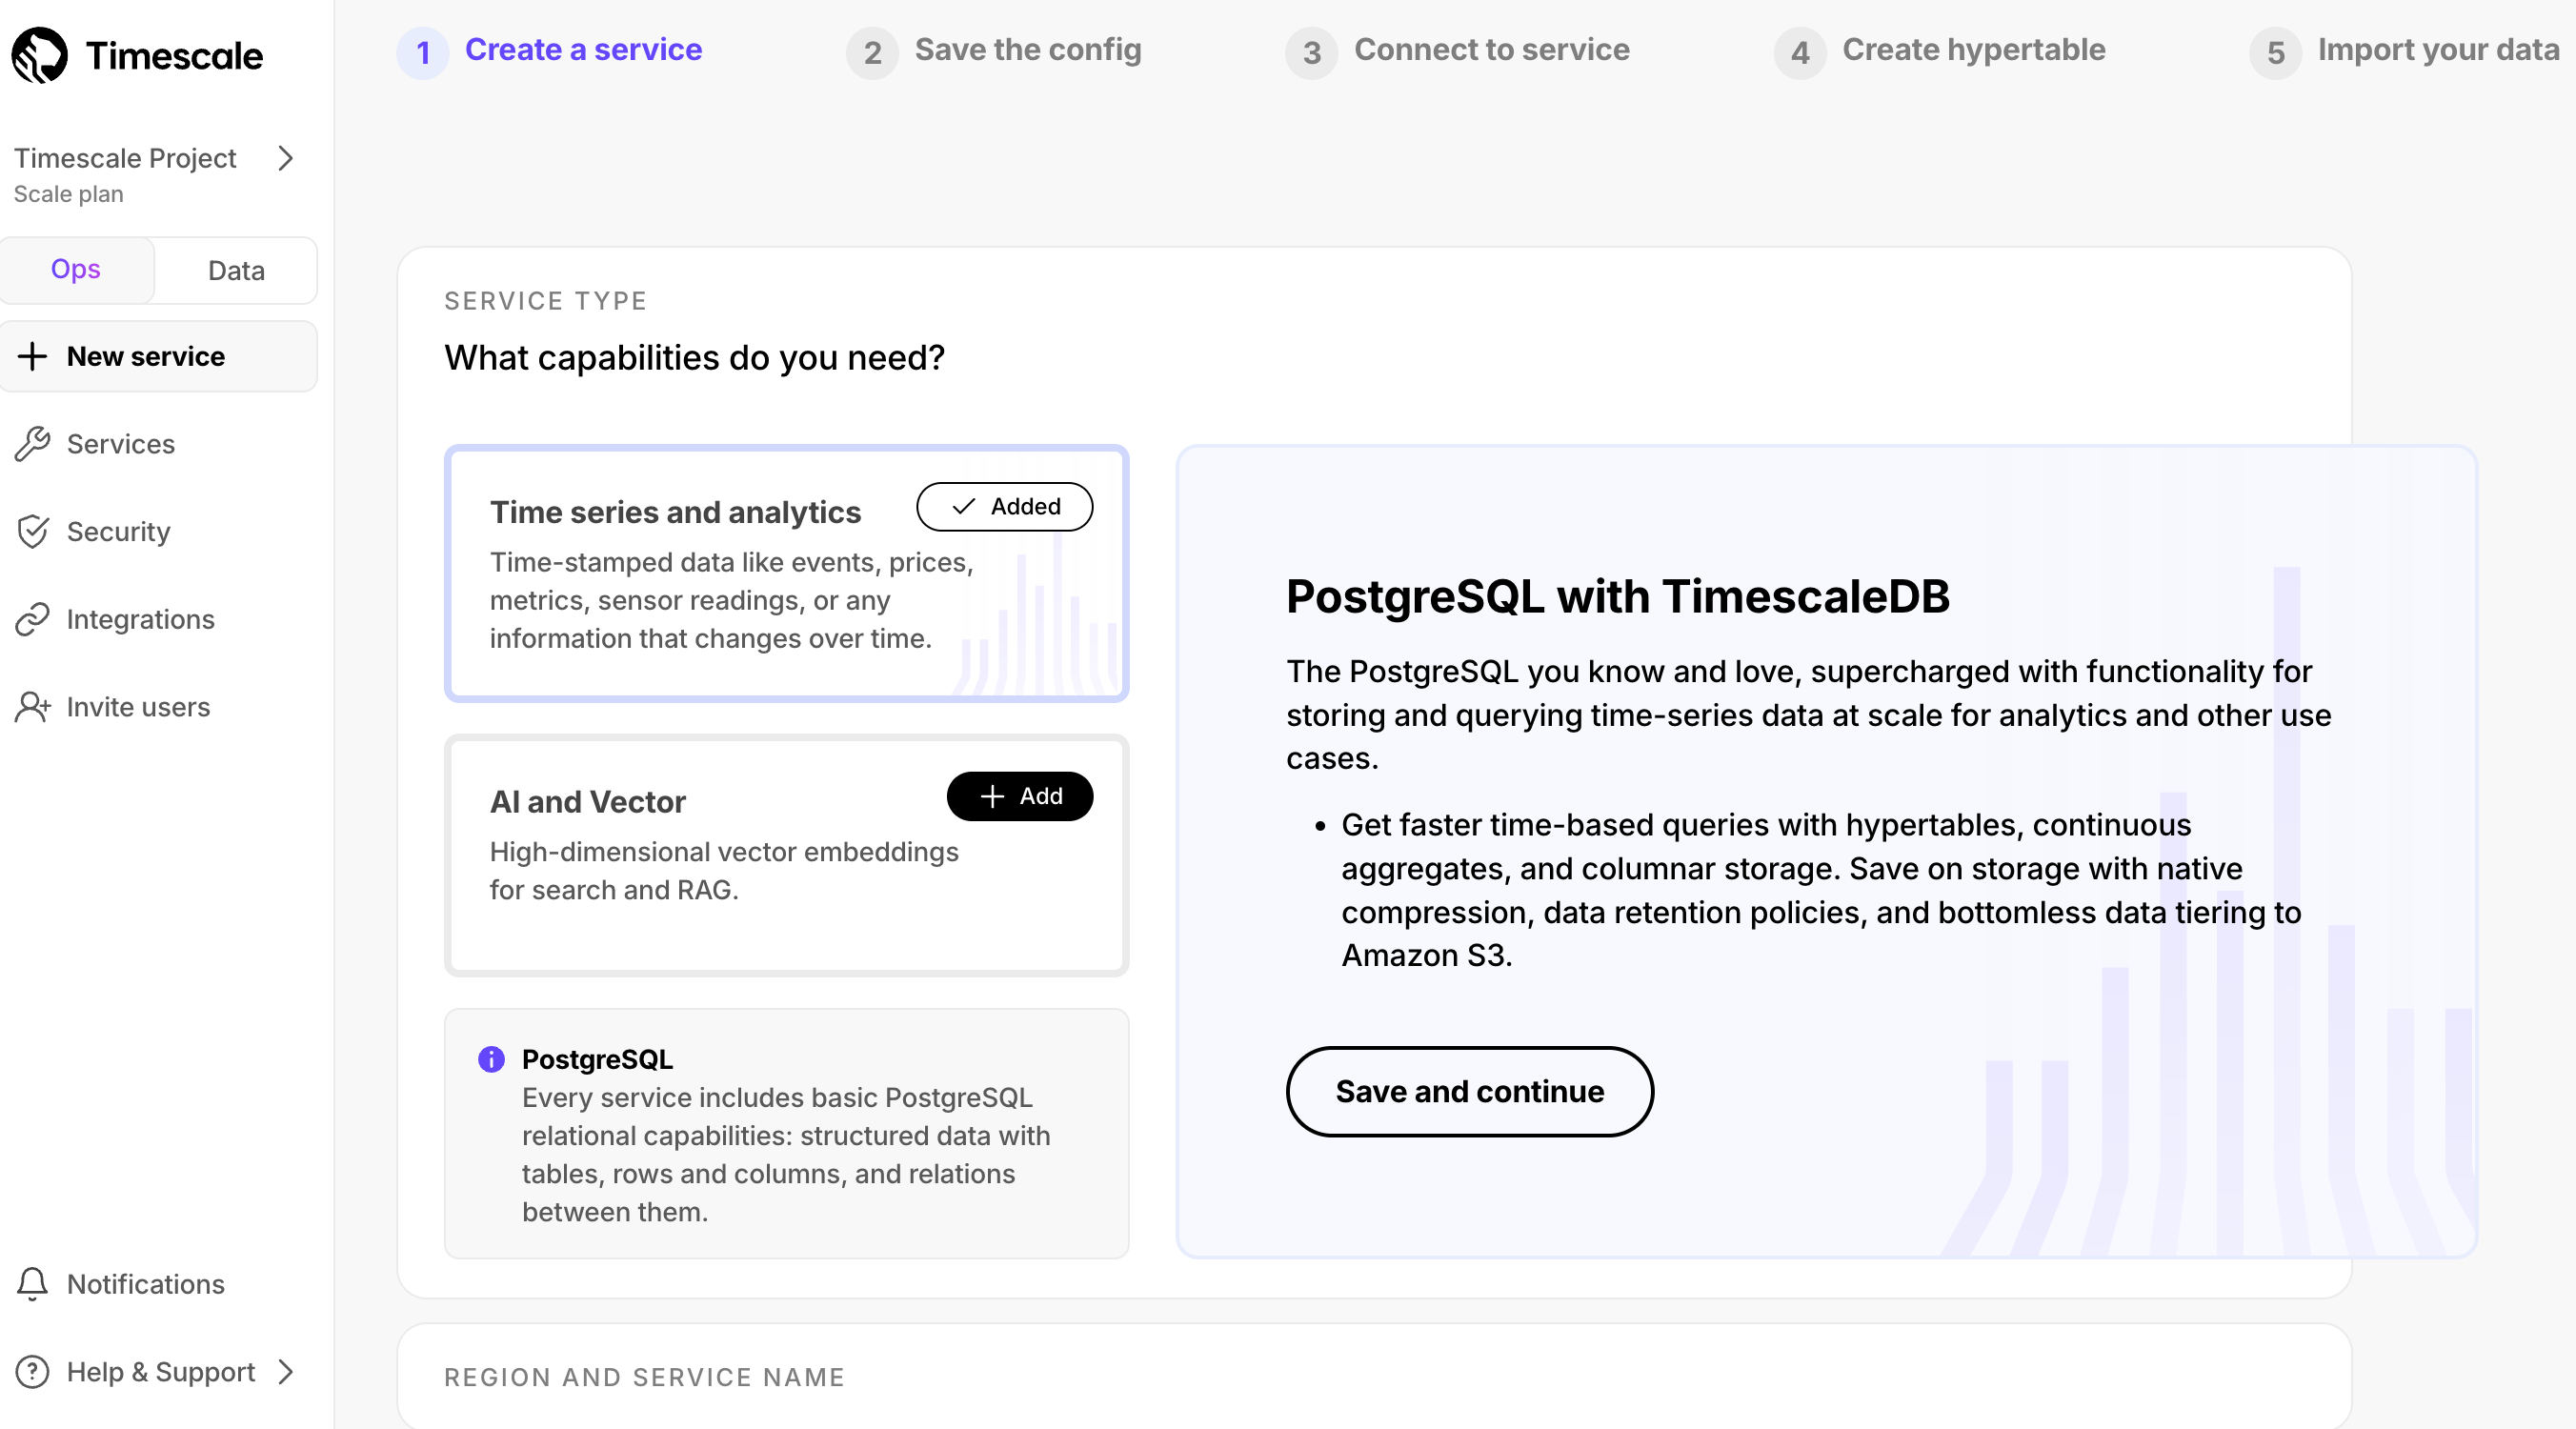
Compute size recommendations: new (and old) users were sometimes unsure about what compute size to use for their workload. We now offer compute size recommendations based on how much data you plan to have in your service.
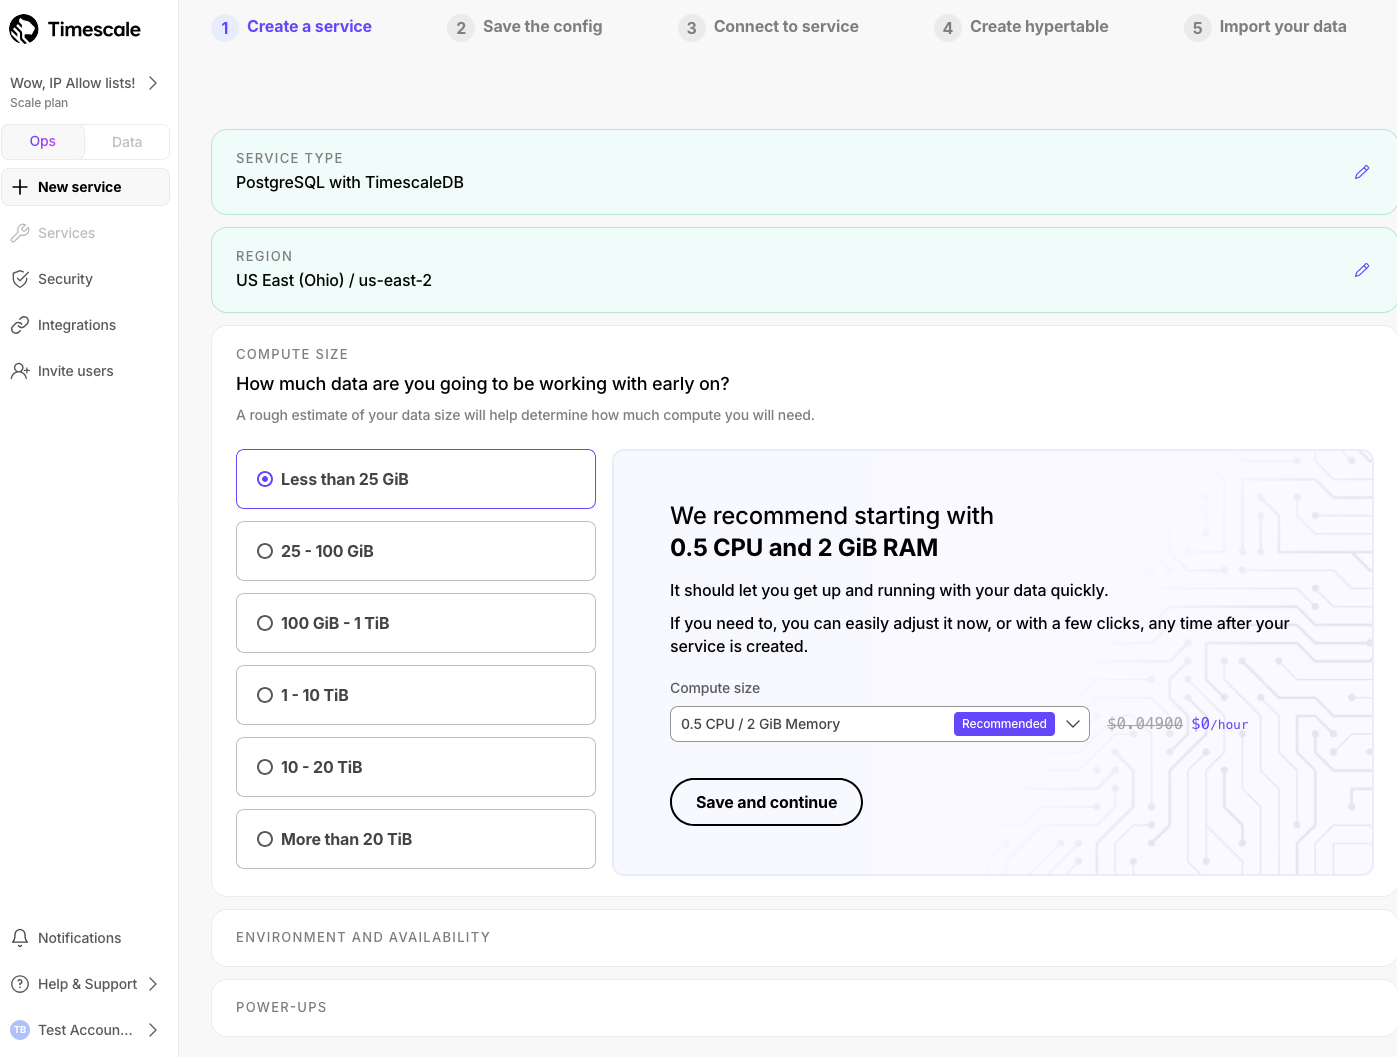
More information about configuration options: we've made it clearer what each configuration option does, so that you can make more informed choices about how you want your service to be set up.
🗝️ IP Allow Lists!
IP Allow Lists let you specify a list of IP addresses that have access to your Timescale Cloud services and block any others. IP Allow Lists are a lightweight but effective solution for customers concerned with security and compliance. They enable you to prevent unauthorized connections without the need for a Virtual Private Cloud (VPC).
To get started, in Timescale Console, select a service, then click Operations > Security > IP Allow List, then create an IP Allow List.
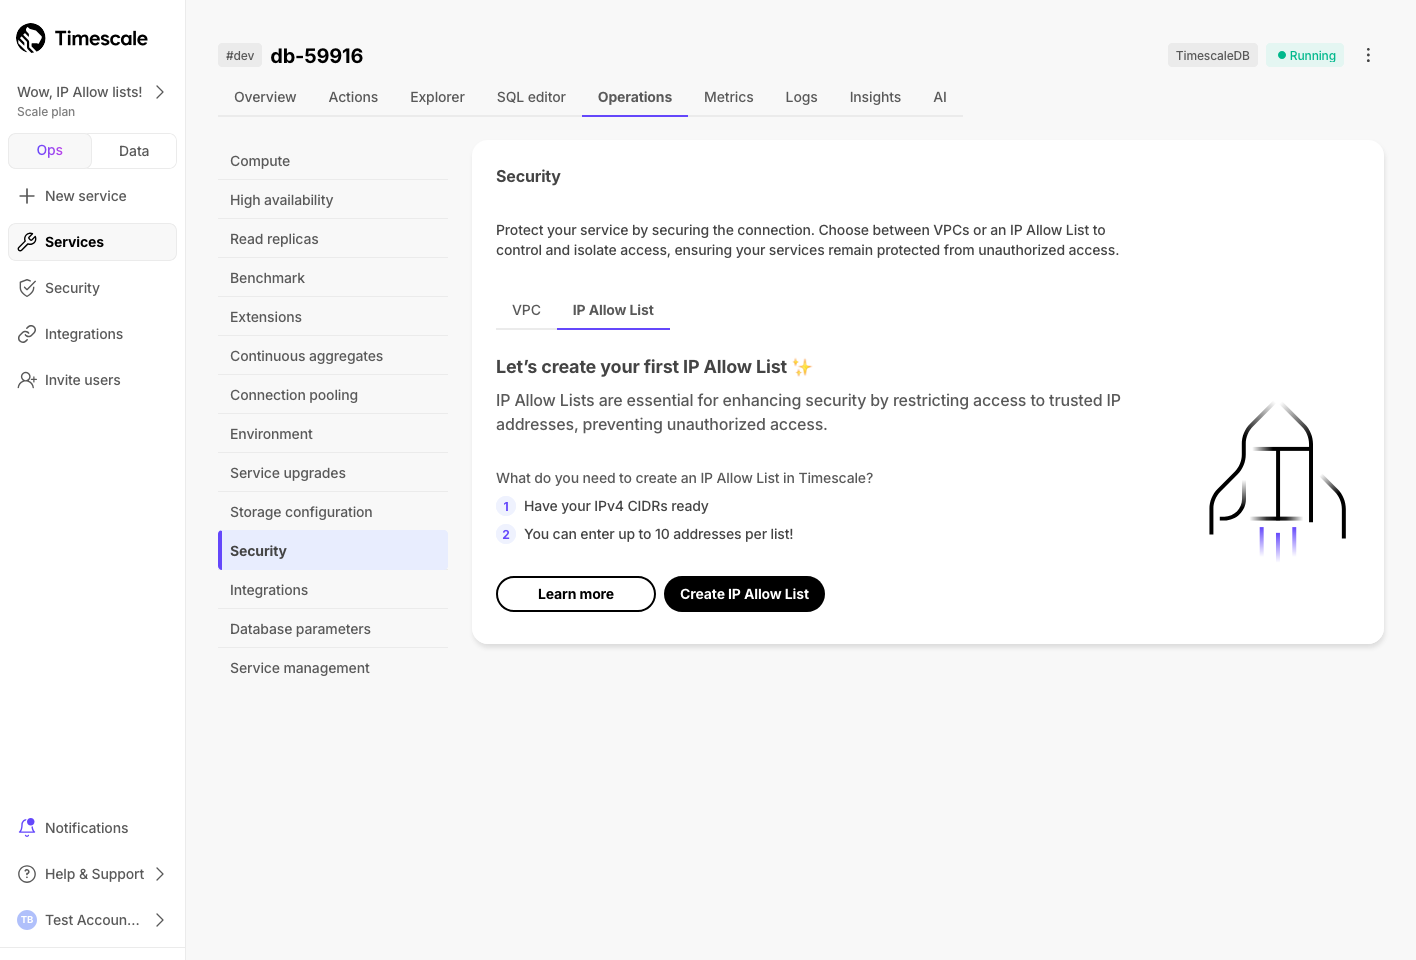
For more information, see our docs.
🤩 SQL Assistant, TimescaleDB v2.17, HIPAA compliance, and better logging
🤖 New AI companion: SQL Assistant
SQL Assistant uses AI to help you write SQL faster and more accurately.
Real-time help: chat with models like OpenAI 4o and Claude 3.5 Sonnet to get help writing SQL. Describe what you want in natural language and have AI write the SQL for you.
<div class="relative w-fit mx-auto"><iframe width="1120" height="630" style="max-width:100%" src="https://www.youtube.com/embed/3Droej_E0cQ?si=9IFB1Pk8Cl1bVKtD" title="YouTube video player" frameborder="0" allow="accelerometer; autoplay; clipboard-write; encrypted-media; gyroscope; picture-in-picture; web-share" referrerpolicy="strict-origin-when-cross-origin" allowfullscreen>
</div>Error resolution: when you run into an error, SQL Assistant proposes a recommended fix that you can choose to accept.
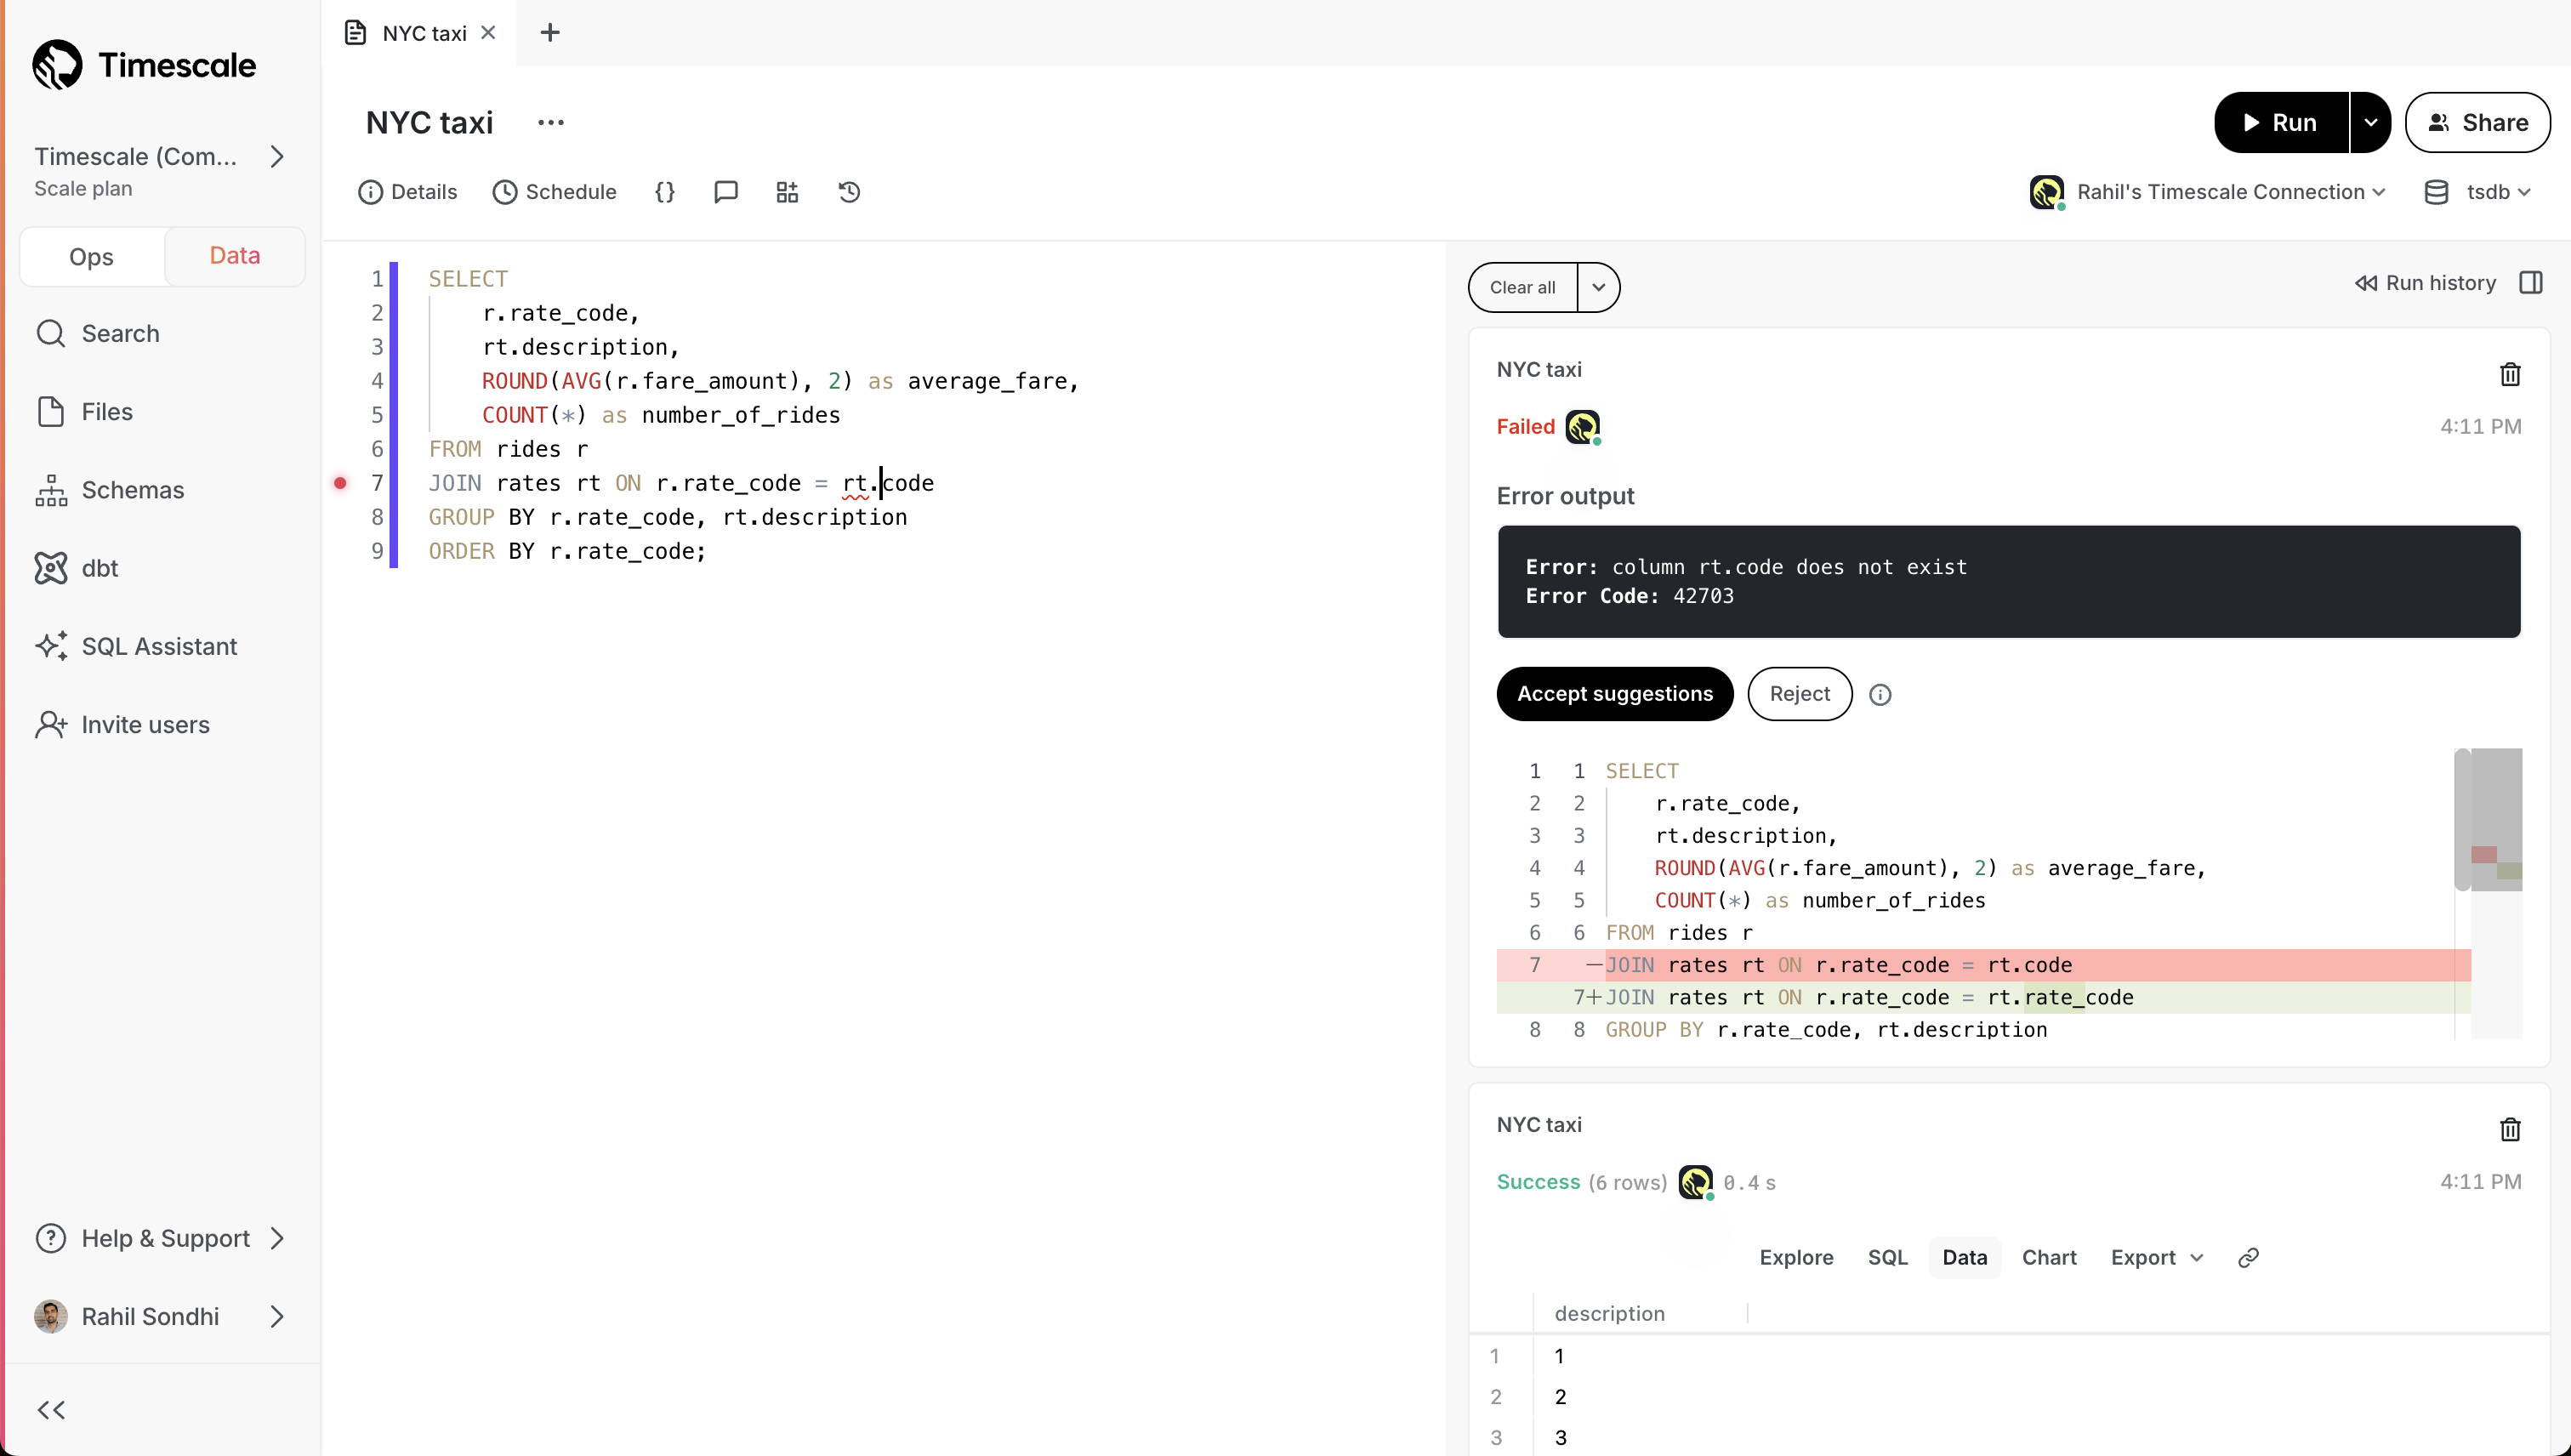
Generate titles and descriptions: click a button and SQL Assistant generates a title and description for your query. No more untitled queries!
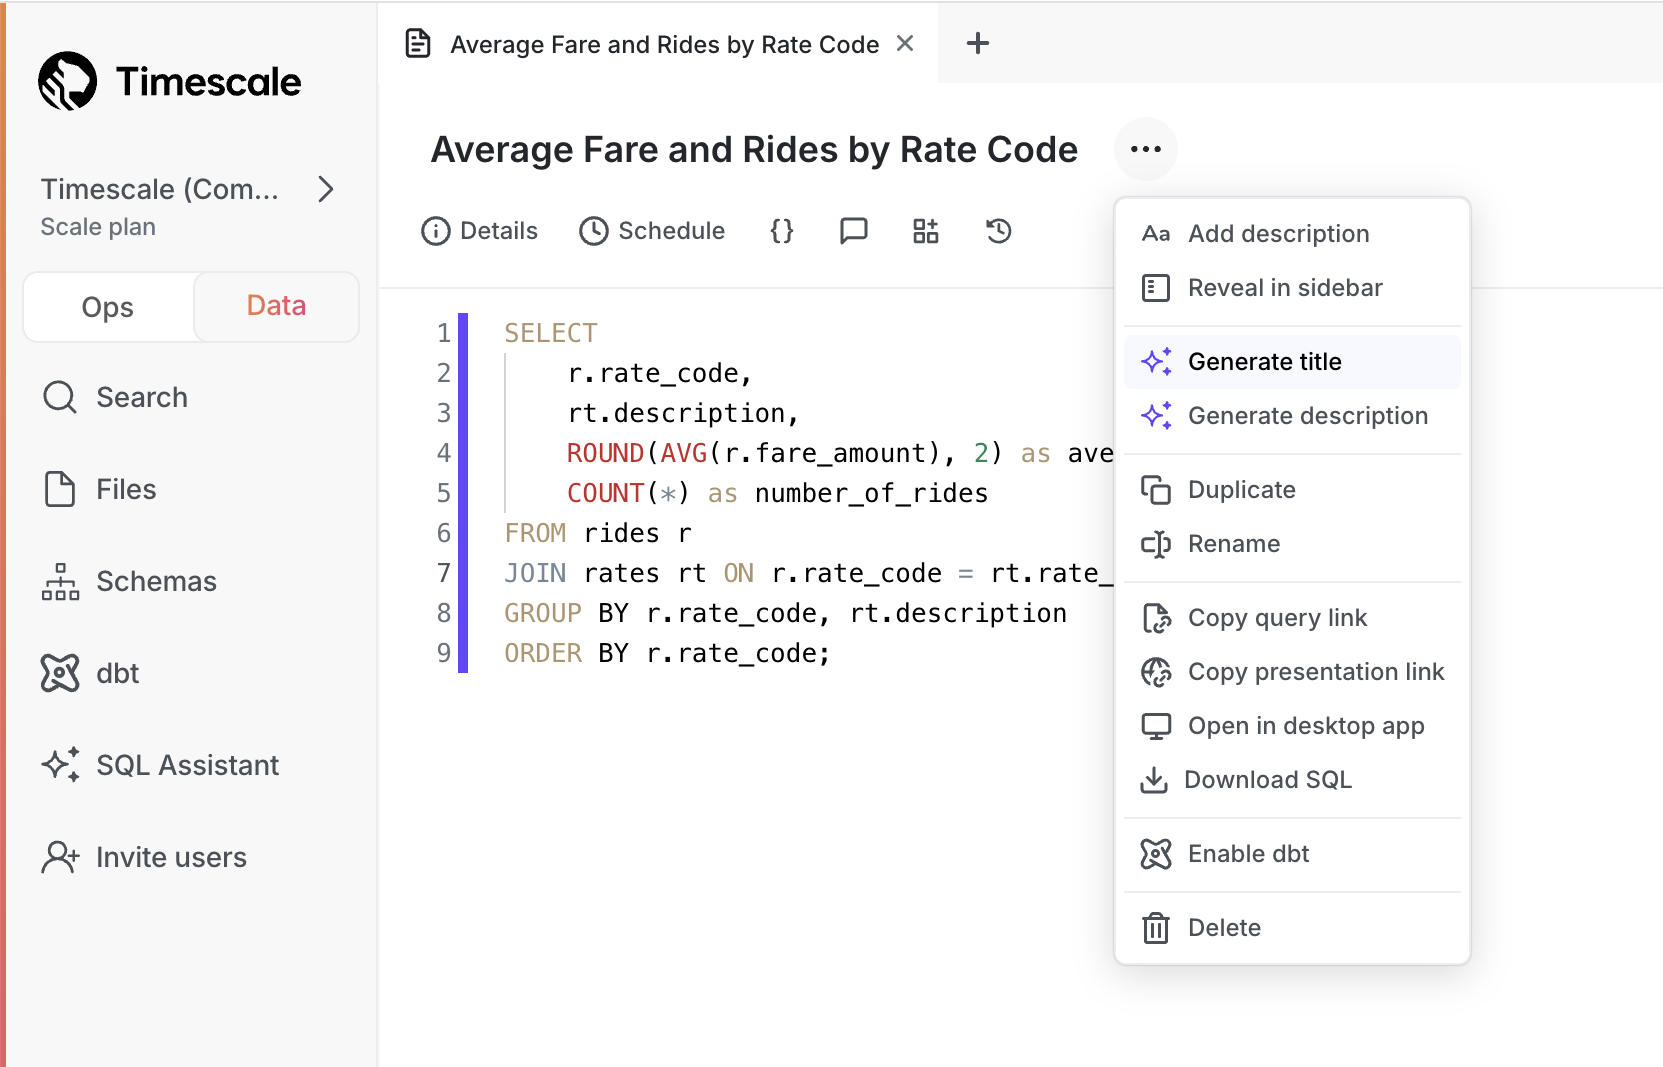
See our blog post or docs for full details!
🏄 TimescaleDB v2.17 - performance improvements for analytical queries and continuous aggregate refreshes
Starting this week, all new services created on Timescale Cloud use TimescaleDB v2.17. Existing services are upgraded gradually during their maintenance windows.
TimescaleDB v2.17 significantly improves the performance of continuous aggregate refreshes, and contains performance improvements for analytical queries and delete operations over compressed hypertables.
Best practice is to upgrade at the next available opportunity.
Highlighted features in TimescaleDB v2.17 are:
Significant performance improvements for continuous aggregate policies:
Continuous aggregate refresh now uses
mergeinstead of deleting old materialized data and re-inserting.Continuous aggregate policies are now more lightweight, use less system resources, and complete faster. This update:
- Decreases dramatically the amount of data that must be written on the continuous aggregate in the presence of a small number of changes
- Reduces the i/o cost of refreshing a continuous aggregate
- Generates fewer Write-Ahead Logs (
WAL)
Increased performance for real-time analytical queries over compressed hypertables:
We are excited to introduce additional Single Instruction, Multiple Data (SIMD) vectorization optimization to TimescaleDB. This release supports vectorized execution for queries that group by using the
segment_bycolumn(s), and aggregate using thesum,count,avg,min, andmaxbasic aggregate functions.Stay tuned for more to come in follow-up releases! Support for grouping on additional columns, filtered aggregation, vectorized expressions, and
time_bucketis coming soon.Improved performance of deletes on compressed hypertables when a large amount of data is affected.
This improvement speeds up operations that delete whole segments by skipping the decompression step. It is enabled for all deletes that filter by the
segment_bycolumn(s).
HIPAA compliance
Timescale Cloud's Enterprise plan is now HIPAA (Health Insurance Portability and Accountability Act) compliant. This allows organizations to securely manage and analyze sensitive healthcare data, ensuring they meet regulatory requirements while building compliant applications.
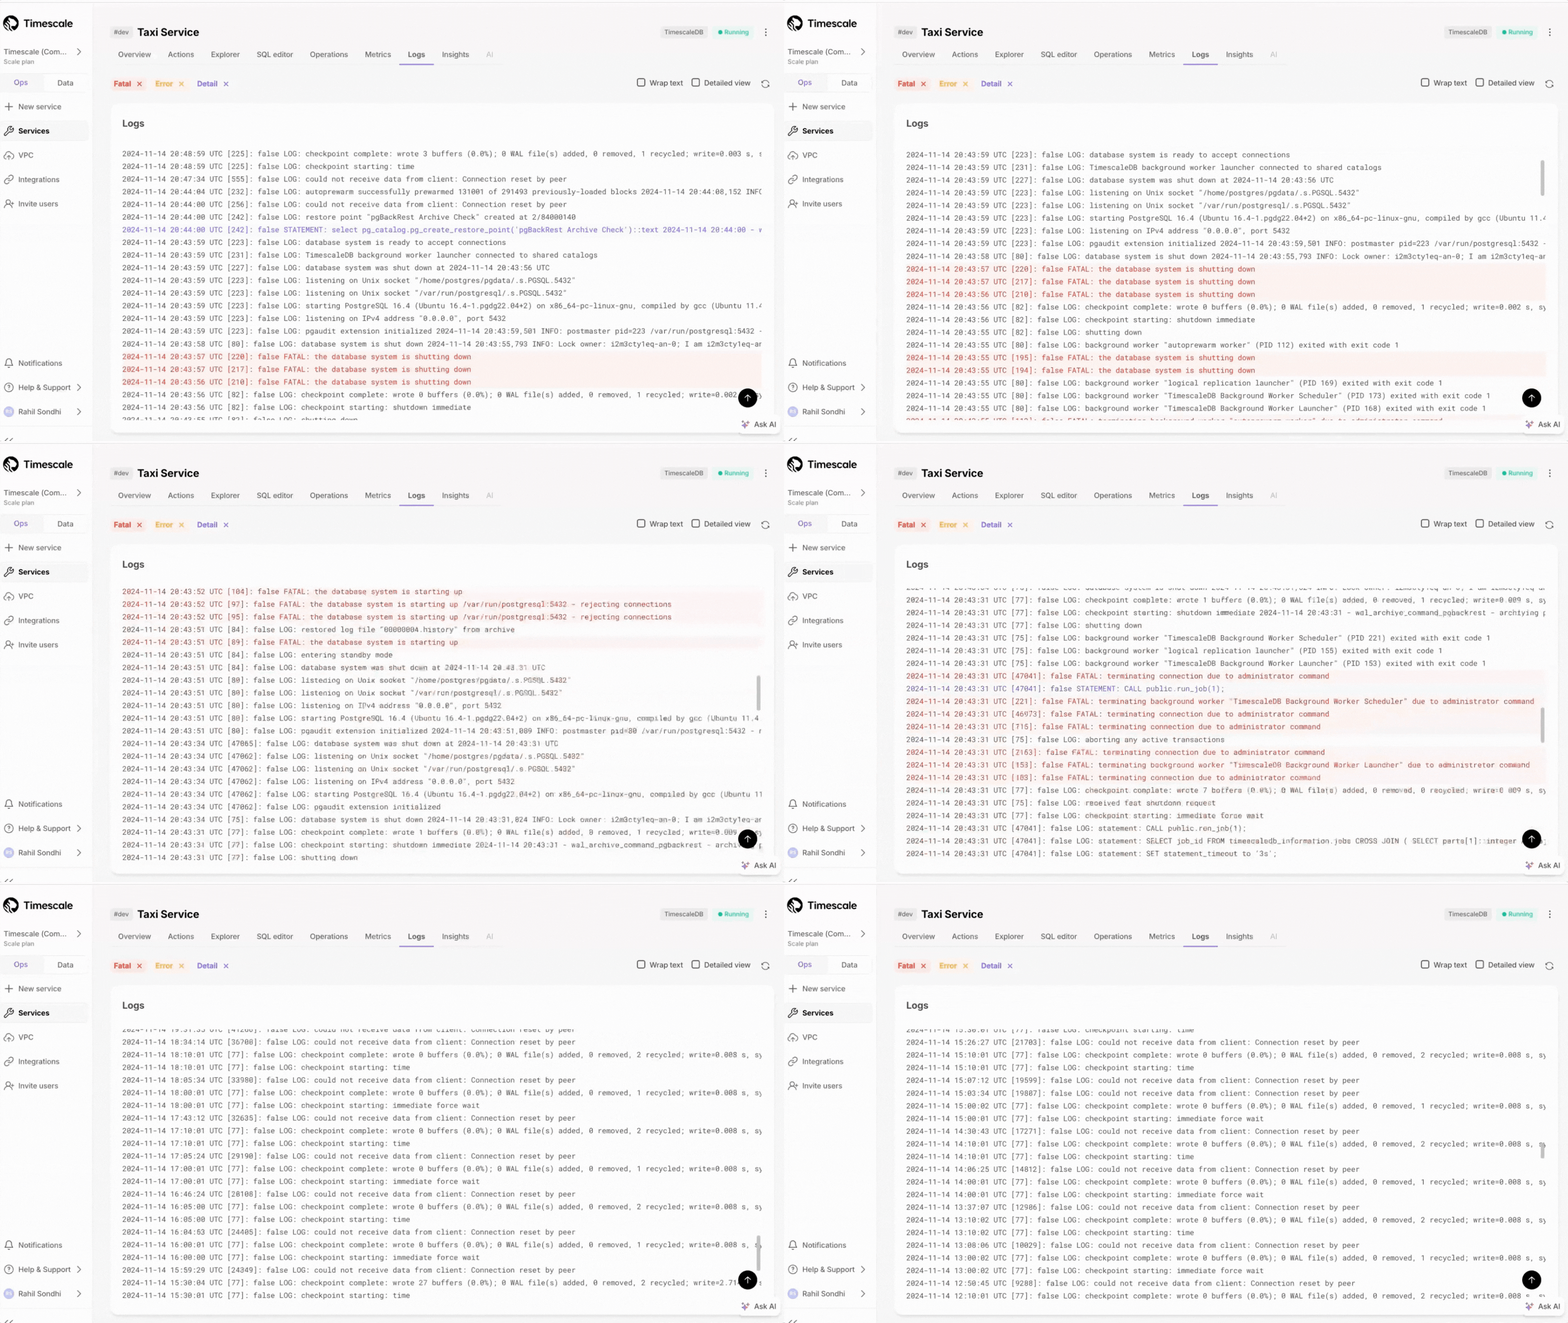
Expanded logging within Timescale Console
Customers can now access more than just the most recent 500 logs within the Timescale Console. We've updated the user experience, including scrollbar with infinite scrolling capabilities.
✨ Connect to Timescale from .NET Stack and check status of recent jobs
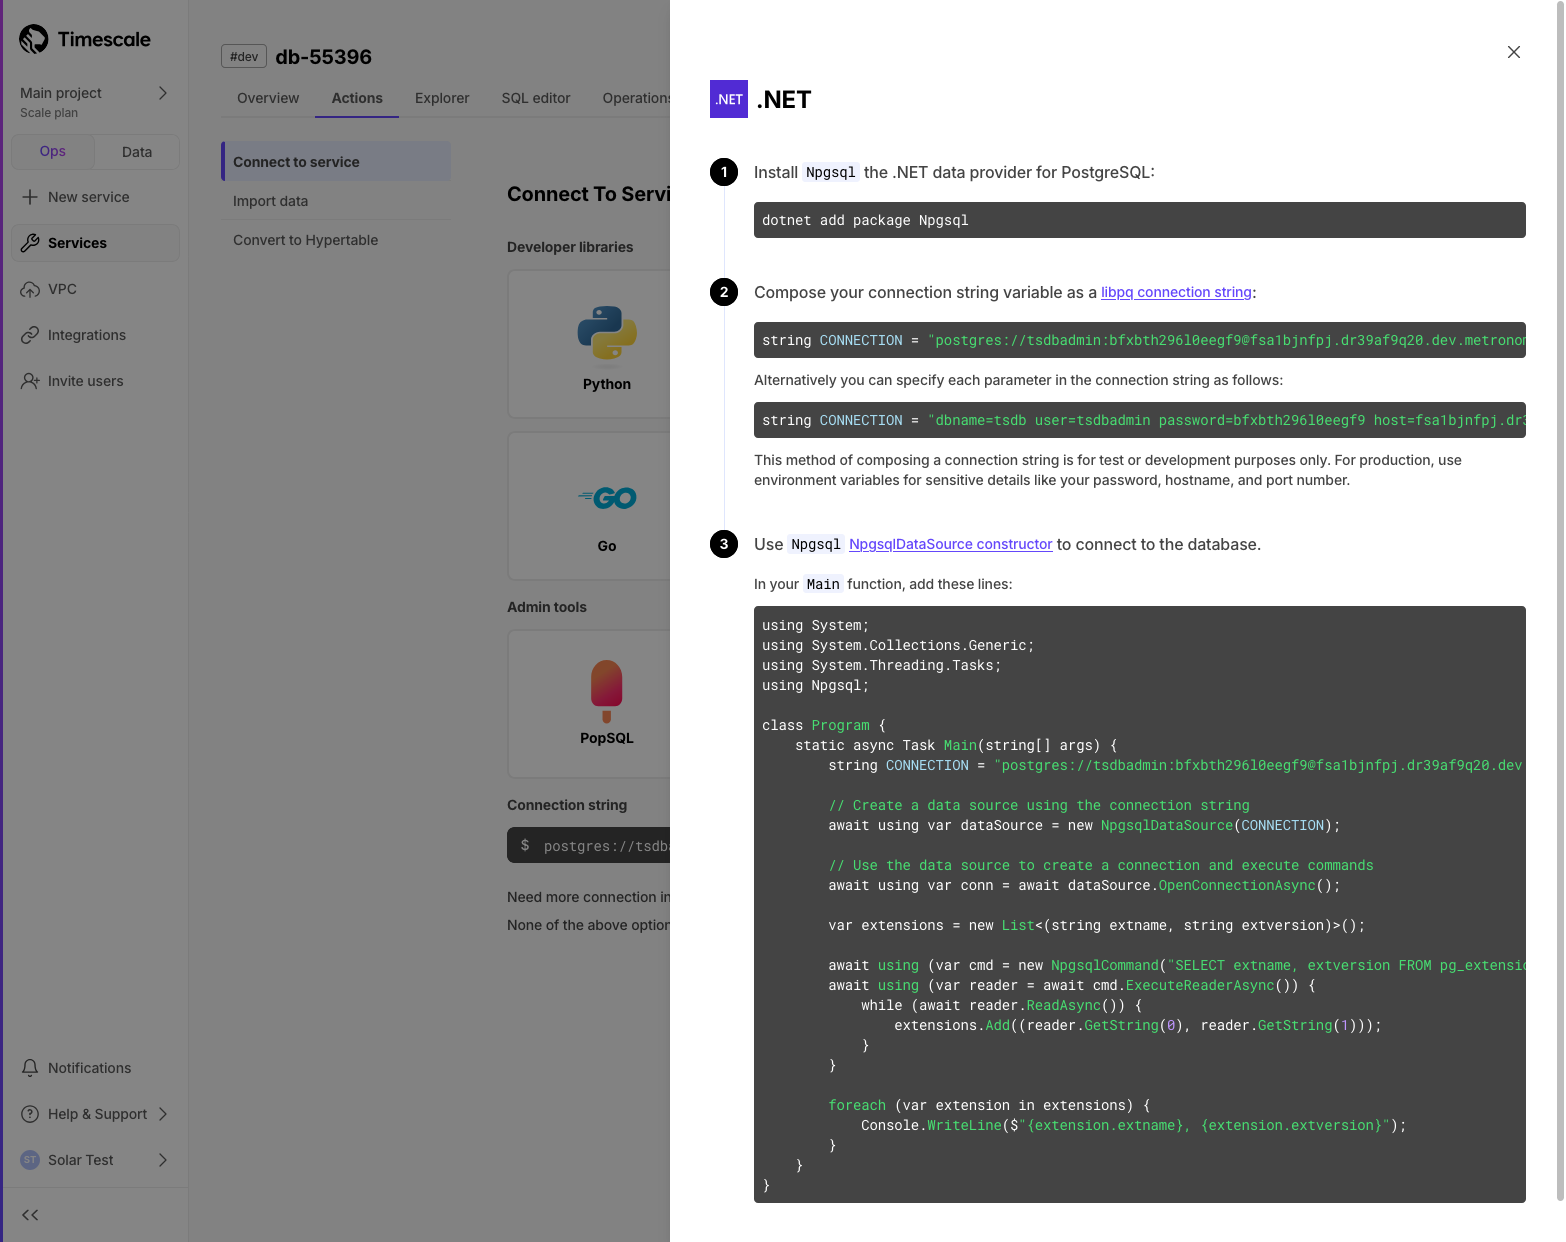
Connect to Timescale with your .NET stack
We've added instructions for connecting to Timescale using your .NET workflow. In Console after service creation, or in the Actions tab, you can now select .NET from the developer library list. The guide demonstrates how to use Npgsql to integrate Timescale with your existing software stack.
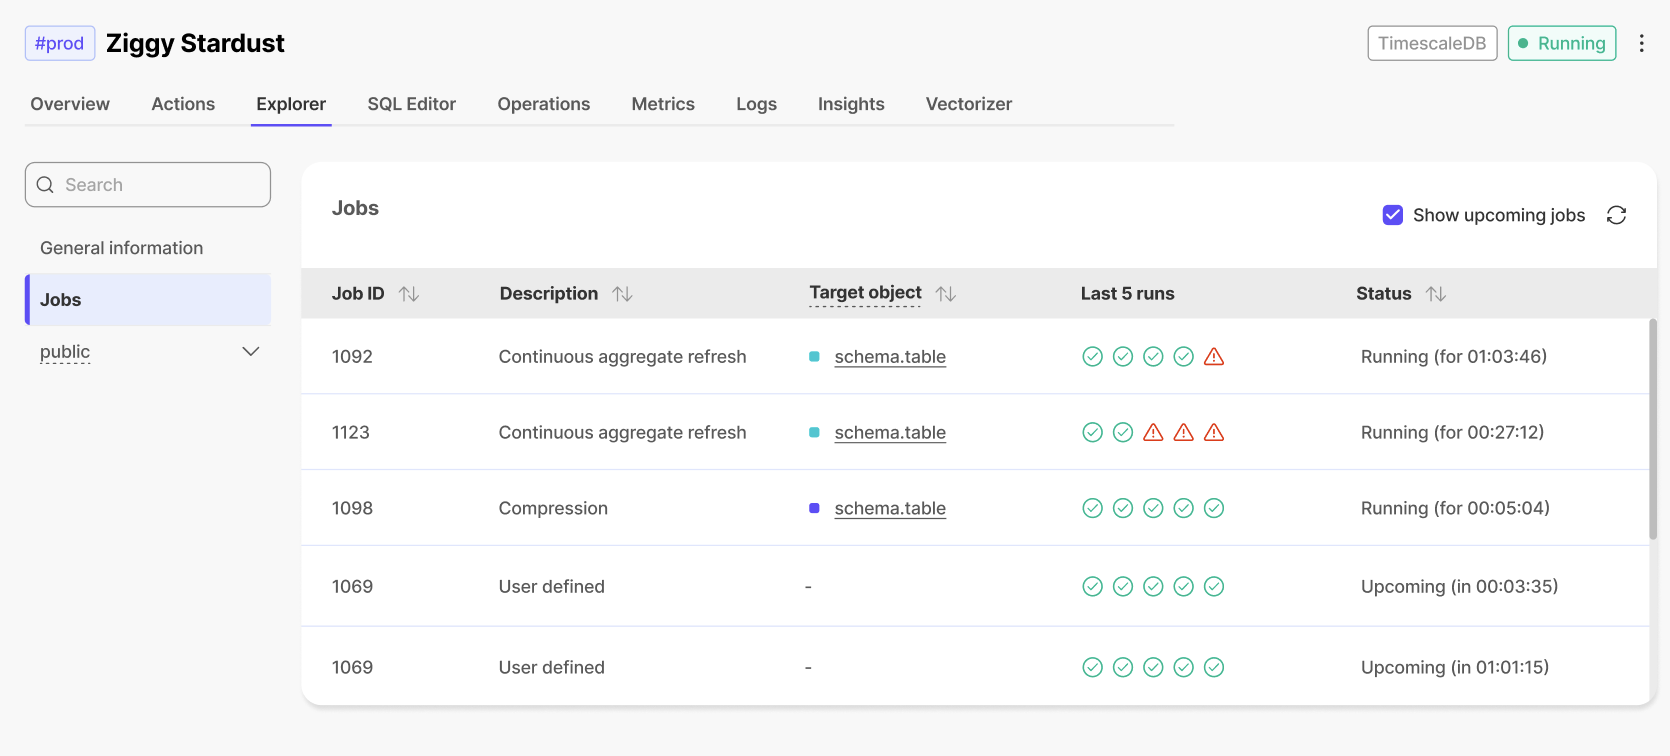
✅ Last 5 jobs status
In the Jobs section of the Explorer, users can now see the status (completed/failed) of the last 5 runs of each job.
🎃 New AI, data integration, and performance enhancements
Pgai Vectorizer: vector embeddings as database indexes (early access)
This early access feature enables you to automatically create, update, and maintain embeddings as your data changes. Just like an index, Timescale handles all the complexity: syncing, versioning, and cleanup happen automatically. This means no manual tracking, zero maintenance burden, and the freedom to rapidly experiment with different embedding models and chunking strategies without building new pipelines. Navigate to the AI tab in your service overview and follow the instructions to add your OpenAI API key and set up your first vectorizer or read our guide to automate embedding generation with pgai Vectorizer for more details.

Postgres-to-Postgres foreign data wrappers:
Fetch and query data from multiple Postgres databases, including time-series data in hypertables, directly within Timescale Cloud using foreign data wrappers (FDW). No more complicated ETL processes or external tools—just seamless integration right within your SQL editor. This feature is ideal for developers who manage multiple Postgres and time-series instances and need quick, easy access to data across databases.
Faster queries over tiered data
This release adds support for runtime chunk exclusion for queries that need to access tiered storage. Chunk exclusion now works with queries that use stable expressions in the WHERE clause. The most common form of this type of query is:
SELECT * FROM hypertable WHERE timestamp_col > now() - '100 days'::intervalFor more info on queries with immutable/stable/volatile filters, check our blog post on Implementing constraint exclusion for faster query performance.
If you no longer want to use tiered storage for a particular hypertable, you can now disable tiering and drop the associated tiering metadata on the hypertable with a call to disable_tiering function.
Chunk interval recommendations
Timescale Console now shows recommendations for services with too many small chunks in their hypertables. Recommendations for new intervals that improve service performance are displayed for each underperforming service and hypertable. Users can then change their chunk interval and boost performance within Timescale Console.

💡 Help with hypertables and faster notebooks
🧙Hypertable creation wizard
After creating a service, users can now create a hypertable directly in Timescale Console by first creating a table, then converting it into a hypertable. This is possible using the in-console SQL editor. All standard hypertable configuration options are supported, along with any customization of the underlying table schema. 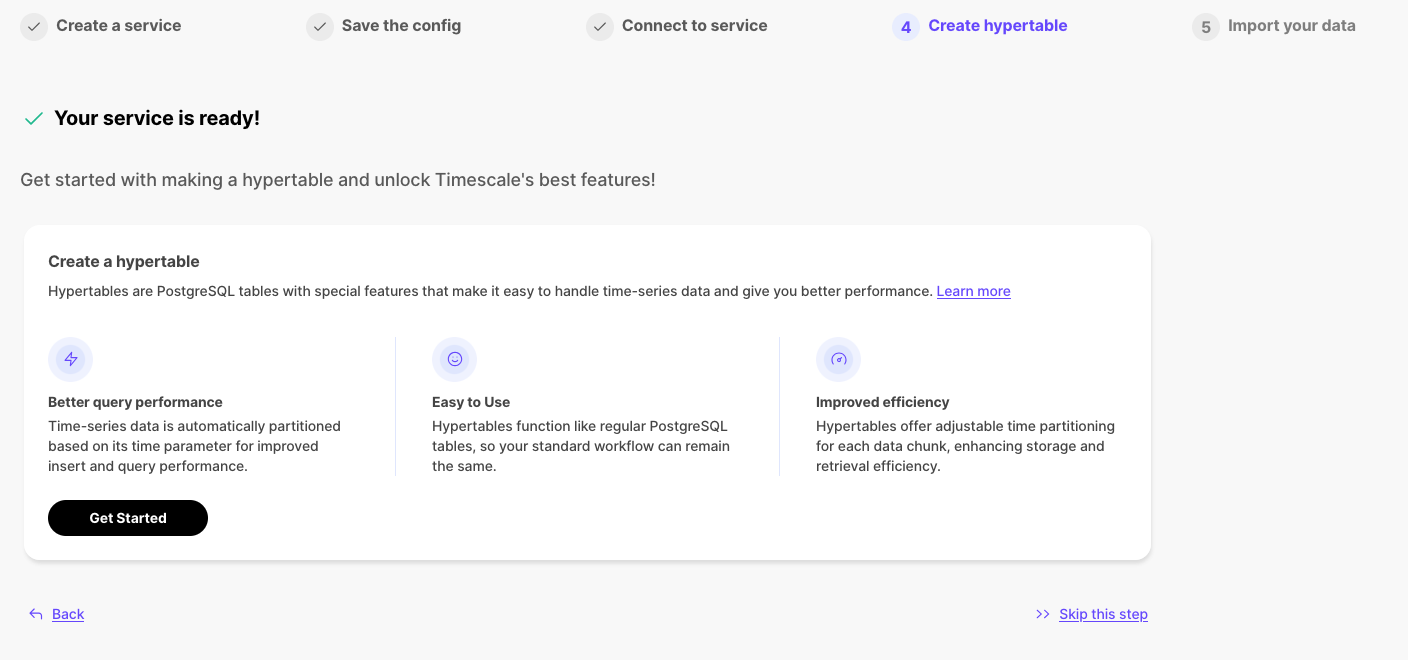
🍭 PopSQL Notebooks
The newest version of Data Mode Notebooks is now waaaay faster. Why? We've incorporated the newly developed v3 of our query engine that currently powers Timescale Console's SQL Editor. Check out the difference in query response times.
✨ Production-Ready Low-Downtime Migrations, MySQL Import, Actions Tab, and Current Lock Contention Visibility in SQL Editor
🏗️ Live Migrations v1.0 Release
Last year, we began developing a solution for low-downtime migration from Postgres and TimescaleDB. Since then, this solution has evolved significantly, featuring enhanced functionality, improved reliability, and performance optimizations. We're now proud to announce that live migration is production-ready with the release of version 1.0.
Many of our customers have successfully migrated databases to Timescale using live migration, with some databases as large as a few terabytes in size.
🔁 Actions Tab
As part of the service creation flow, we offer the following:
- Connect to services from different sources
- Import and migrate data from various sources
- Create hypertables
Previously, these actions were only visible during the service creation process and couldn't be accessed later. Now, these actions are persisted within the service, allowing users to leverage them on-demand whenever they're ready to perform these tasks.
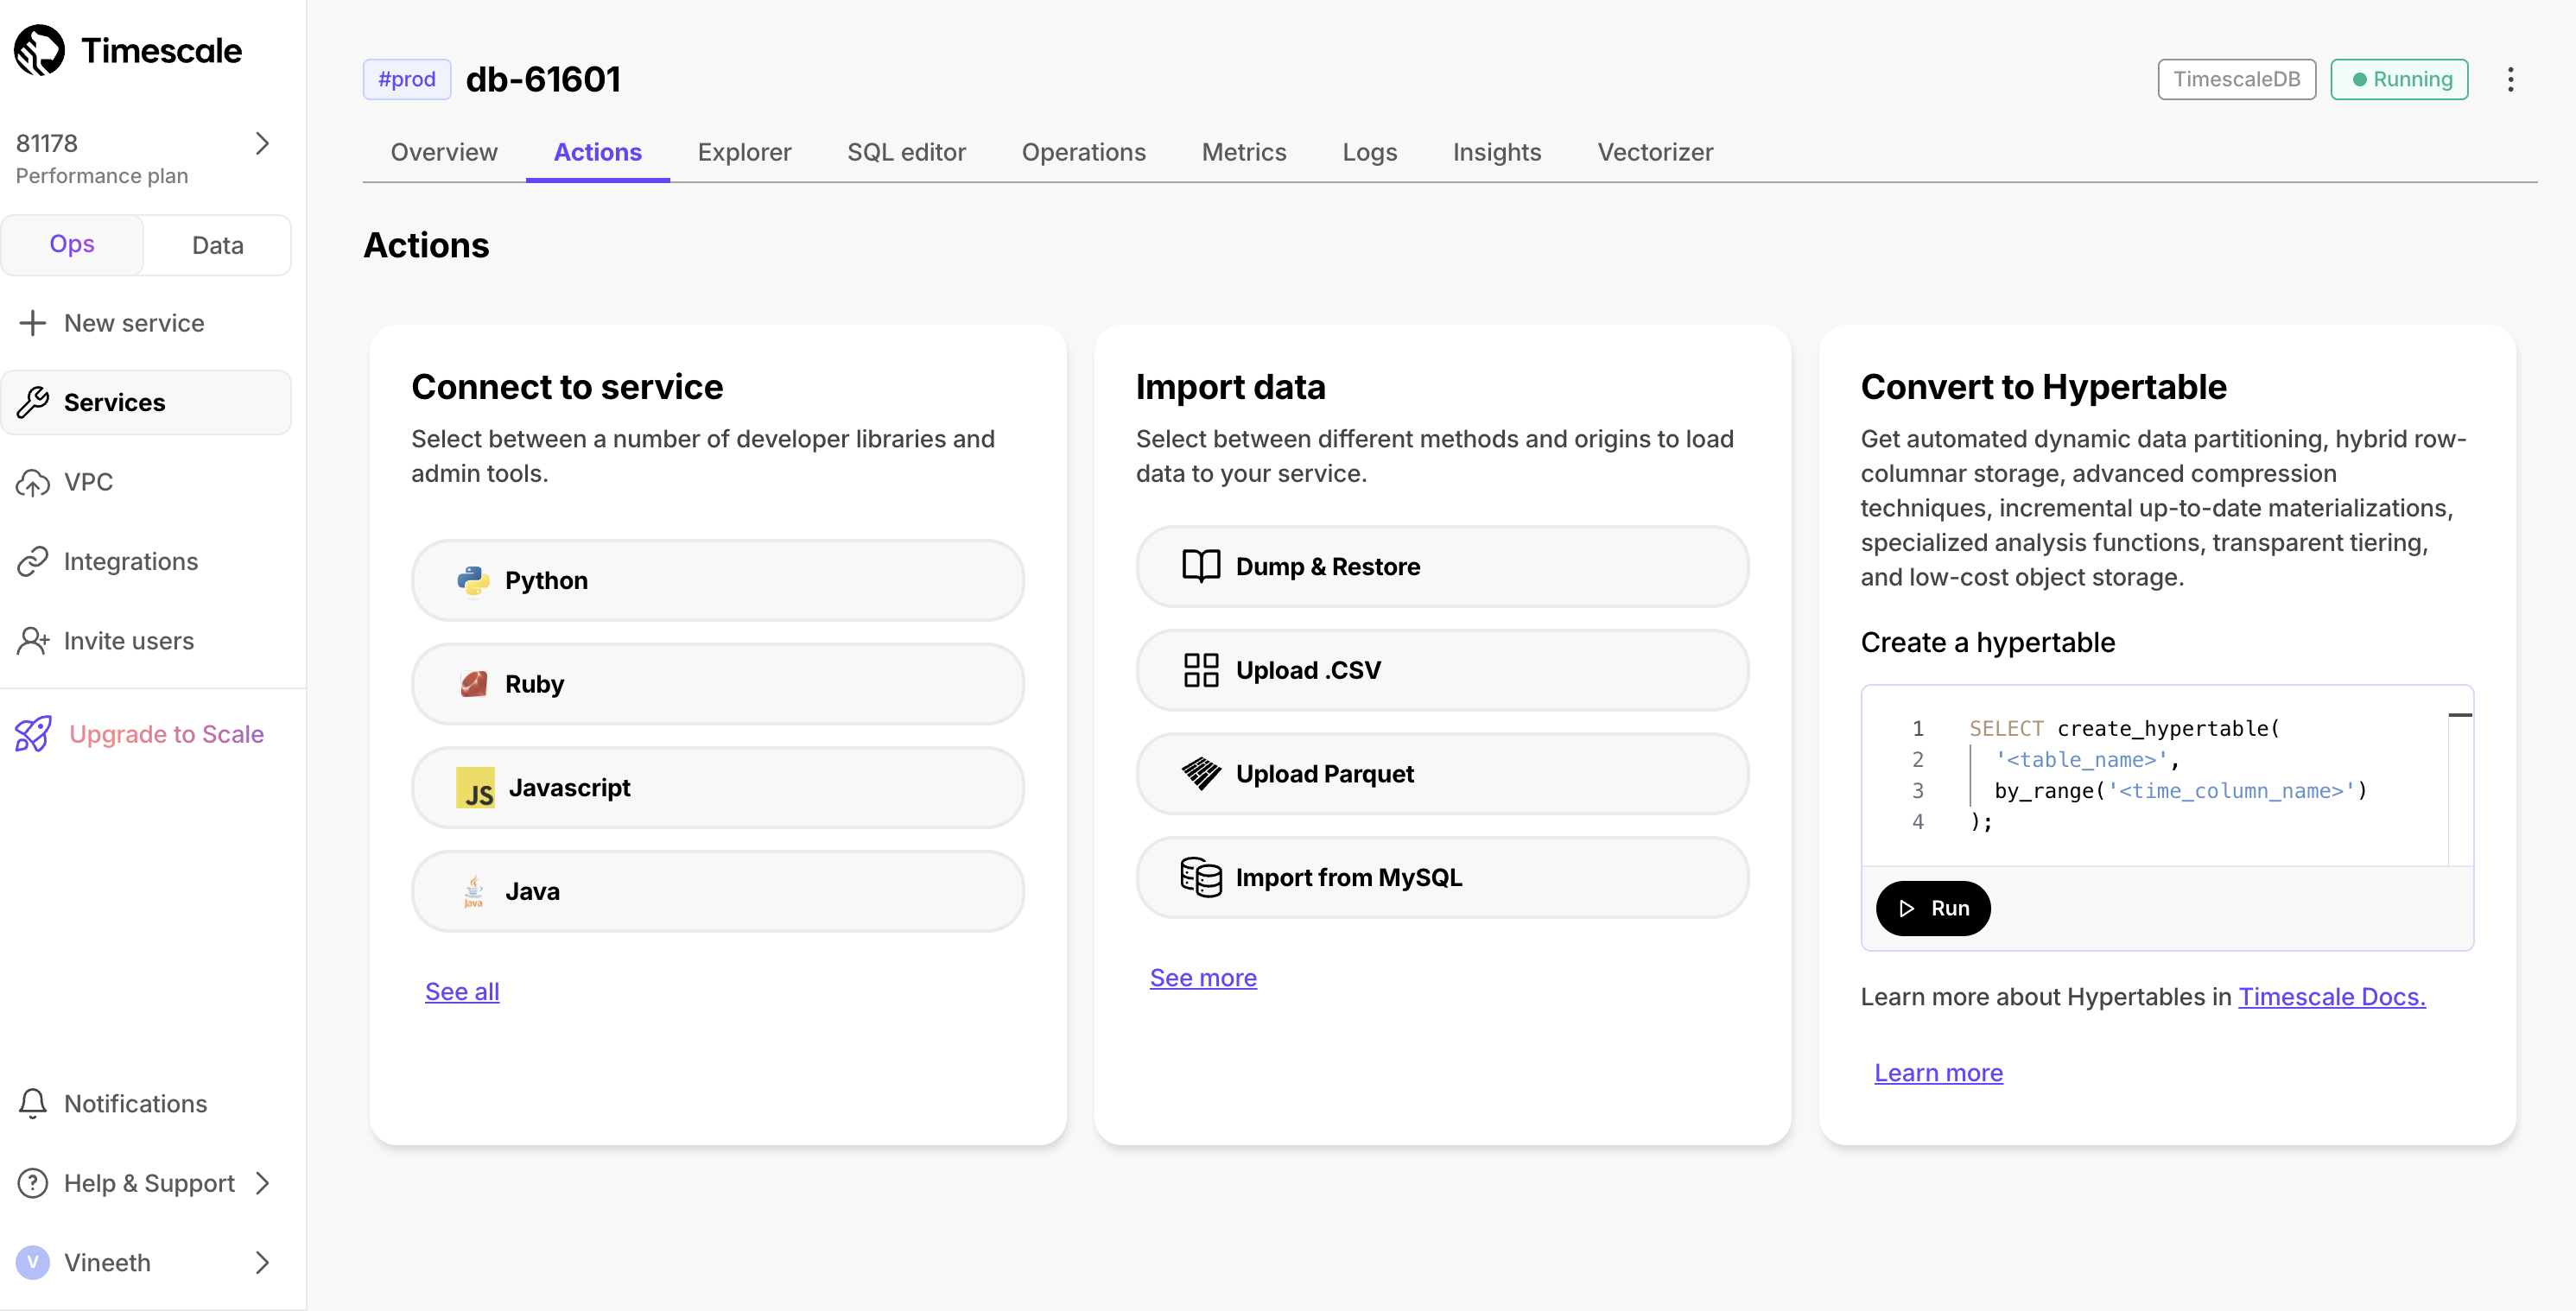
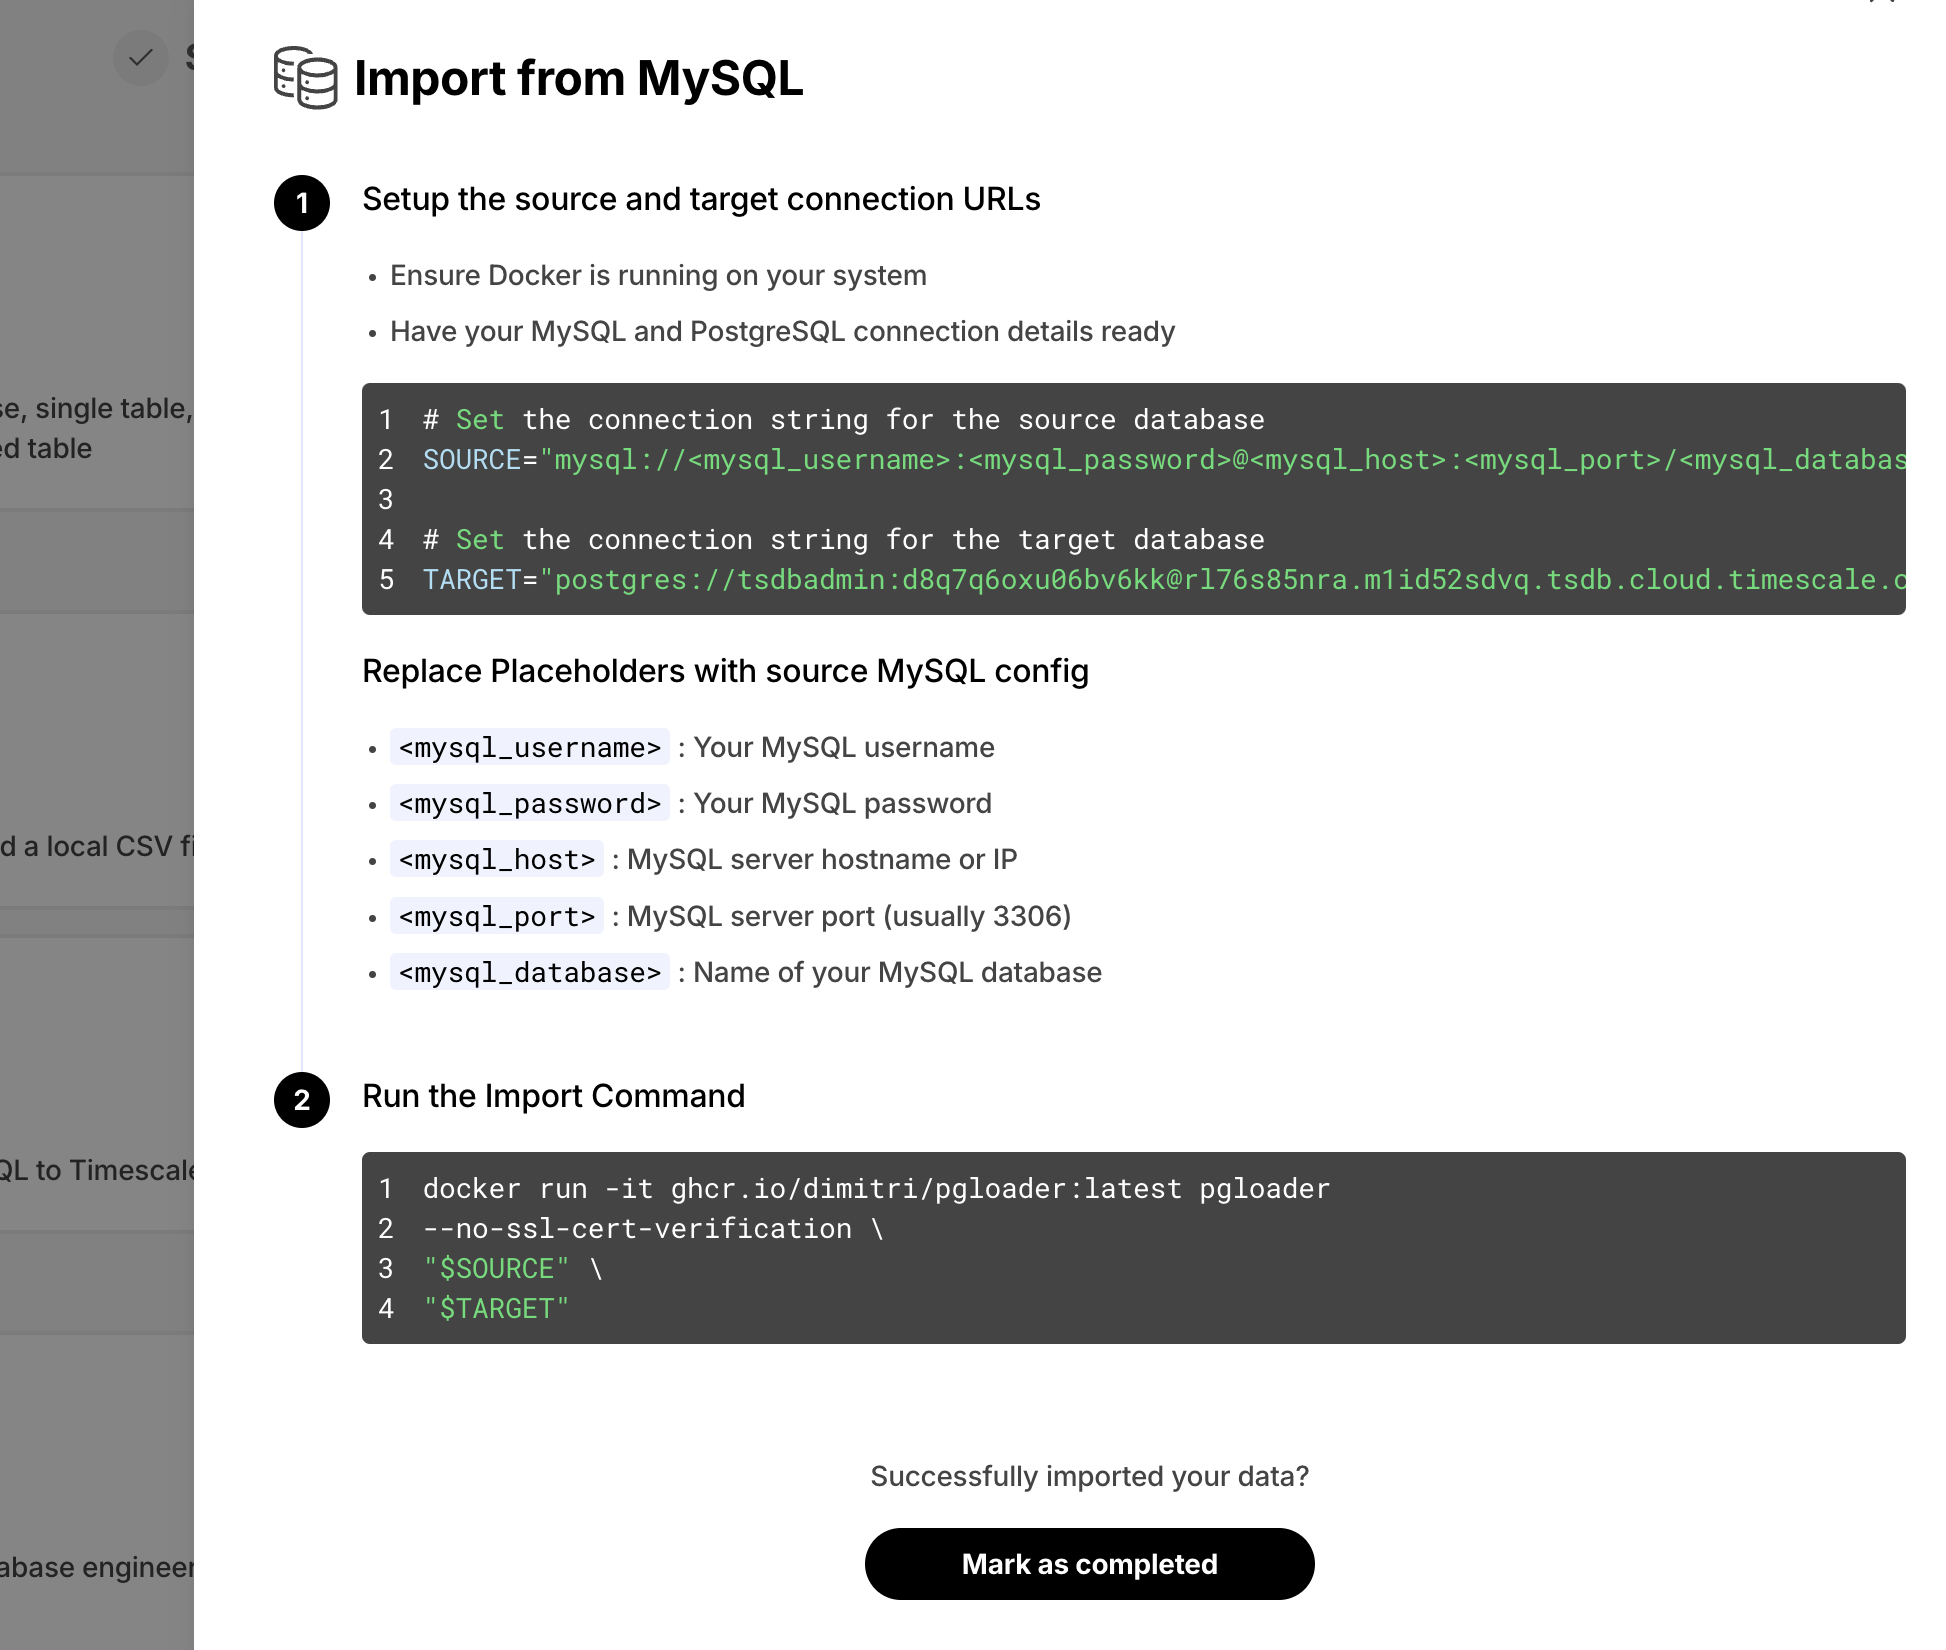
🧭 Import Data from MySQL
We've noticed users struggling to convert their MySQL schema and data into their Timescale Cloud services. This was due to the semantic differences between MySQL and Postgres. To simplify this process, we now offer easy-to-follow instructions to import data from MySQL to Timescale Cloud. This feature is available as part of the data import wizard, under the Import from MySQL option.
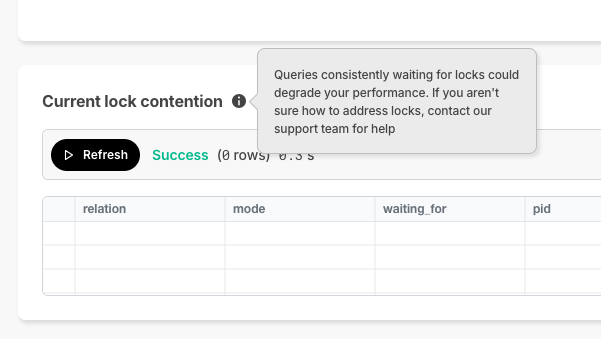
🔐 Current Lock Contention
In Timescale Console, we offer the SQL editor so you can directly querying your service. As a new improvement, if a query is waiting on locks and can't complete execution, Timescale Console now displays the current lock contention in the results section .
CIDR & VPC Updates
Timescale now supports multiple CIDRs on the customer VPC. Customers who want to take advantage of multiple CIDRs will need to recreate their peering.
🤝 New modes in Timescale Console: Ops and Data mode, and Console based Parquet File Import
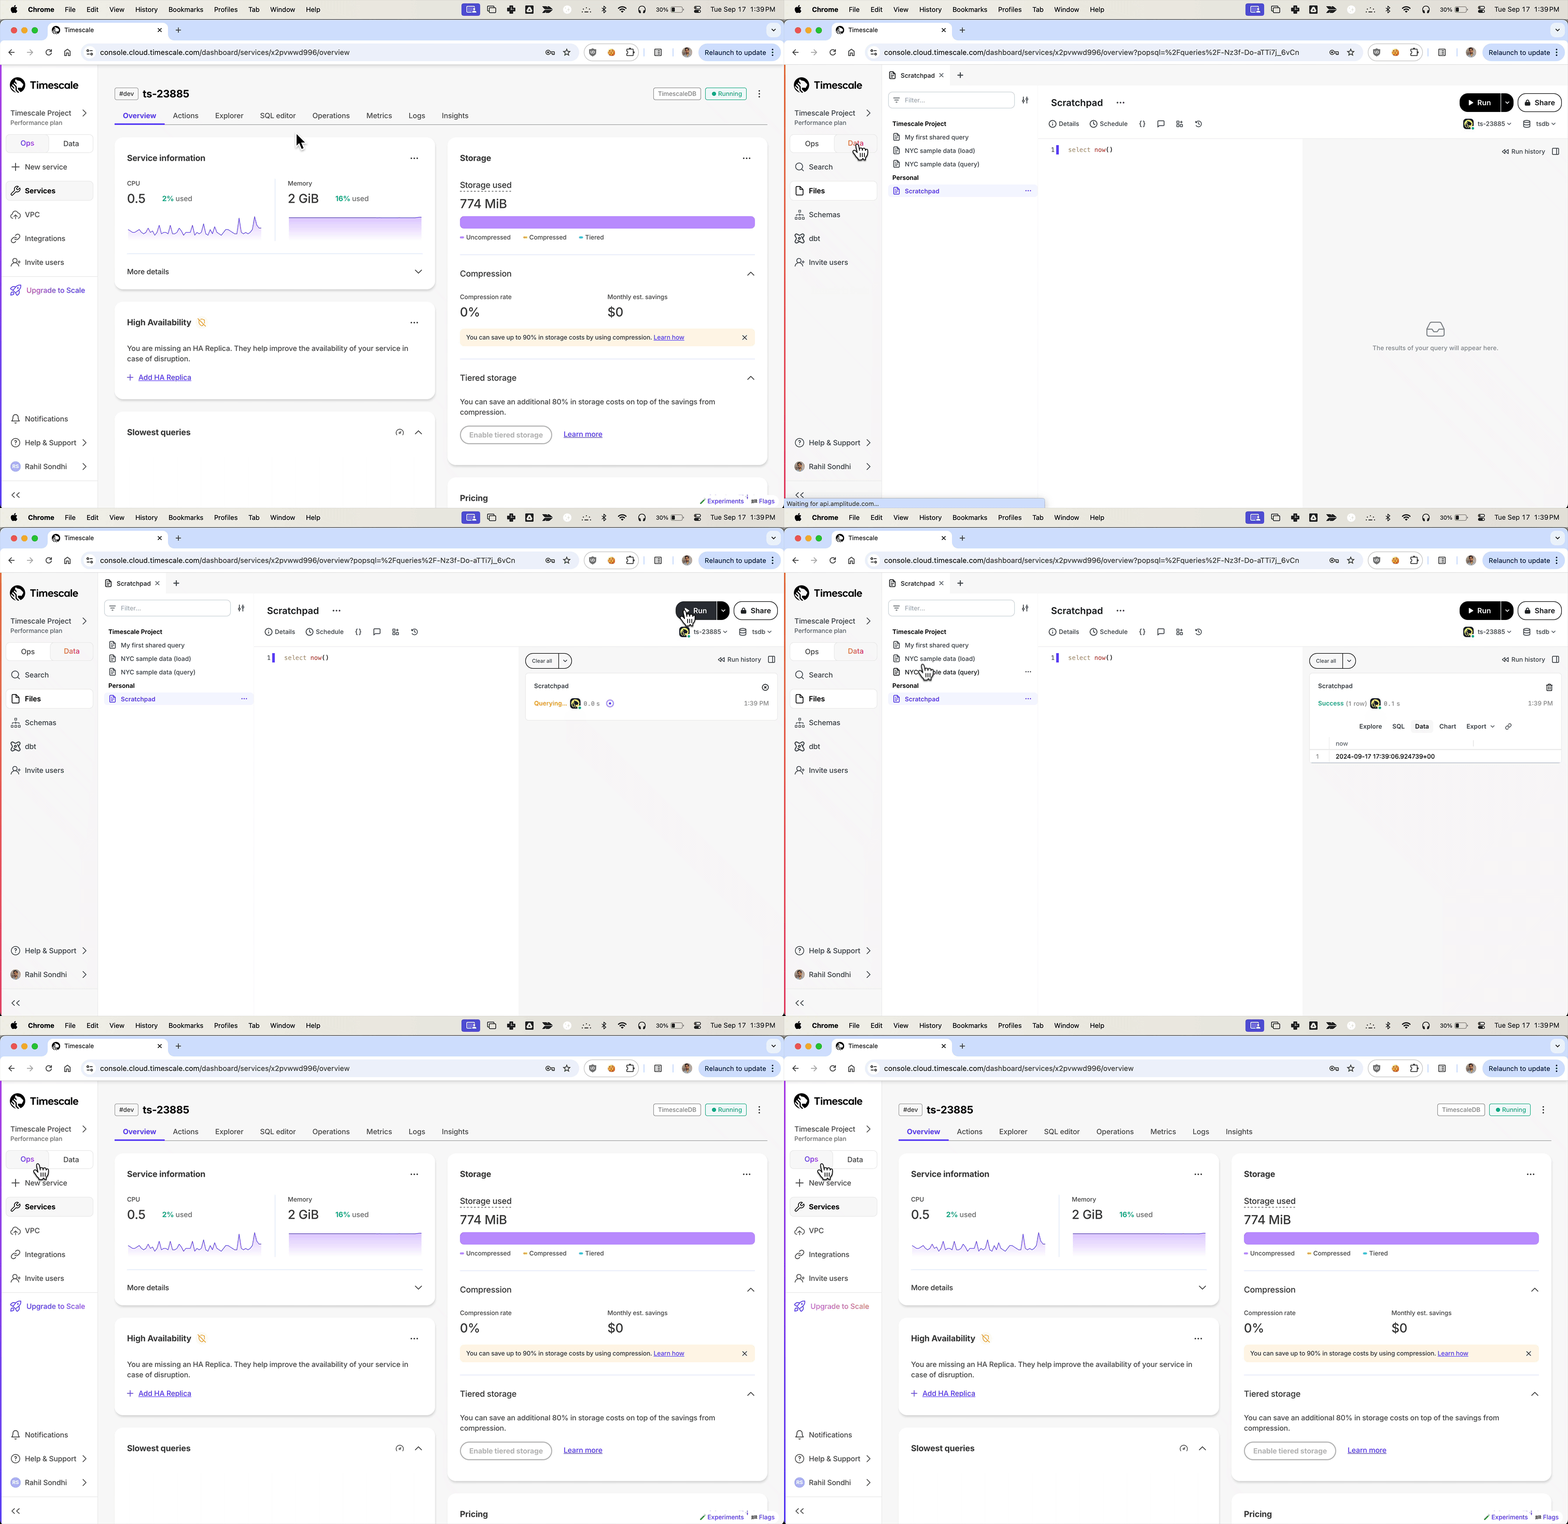
We've been listening to your feedback and noticed that Timescale Console users have diverse needs. Some of you are focused on operational tasks like adding replicas or changing parameters, while others are diving deep into data analysis to gather insights.
To better serve you, we've introduced new modes to the Timescale Console UI—tailoring the experience based on what you're trying to accomplish.
Ops mode is where you can manage your services, add replicas, configure compression, change parameters, and so on.
Data mode is the full PopSQL experience: write queries with autocomplete, visualize data with charts and dashboards, schedule queries and dashboards to create alerts or recurring reports, share queries and dashboards, and more.
Try it today and let us know what you think!
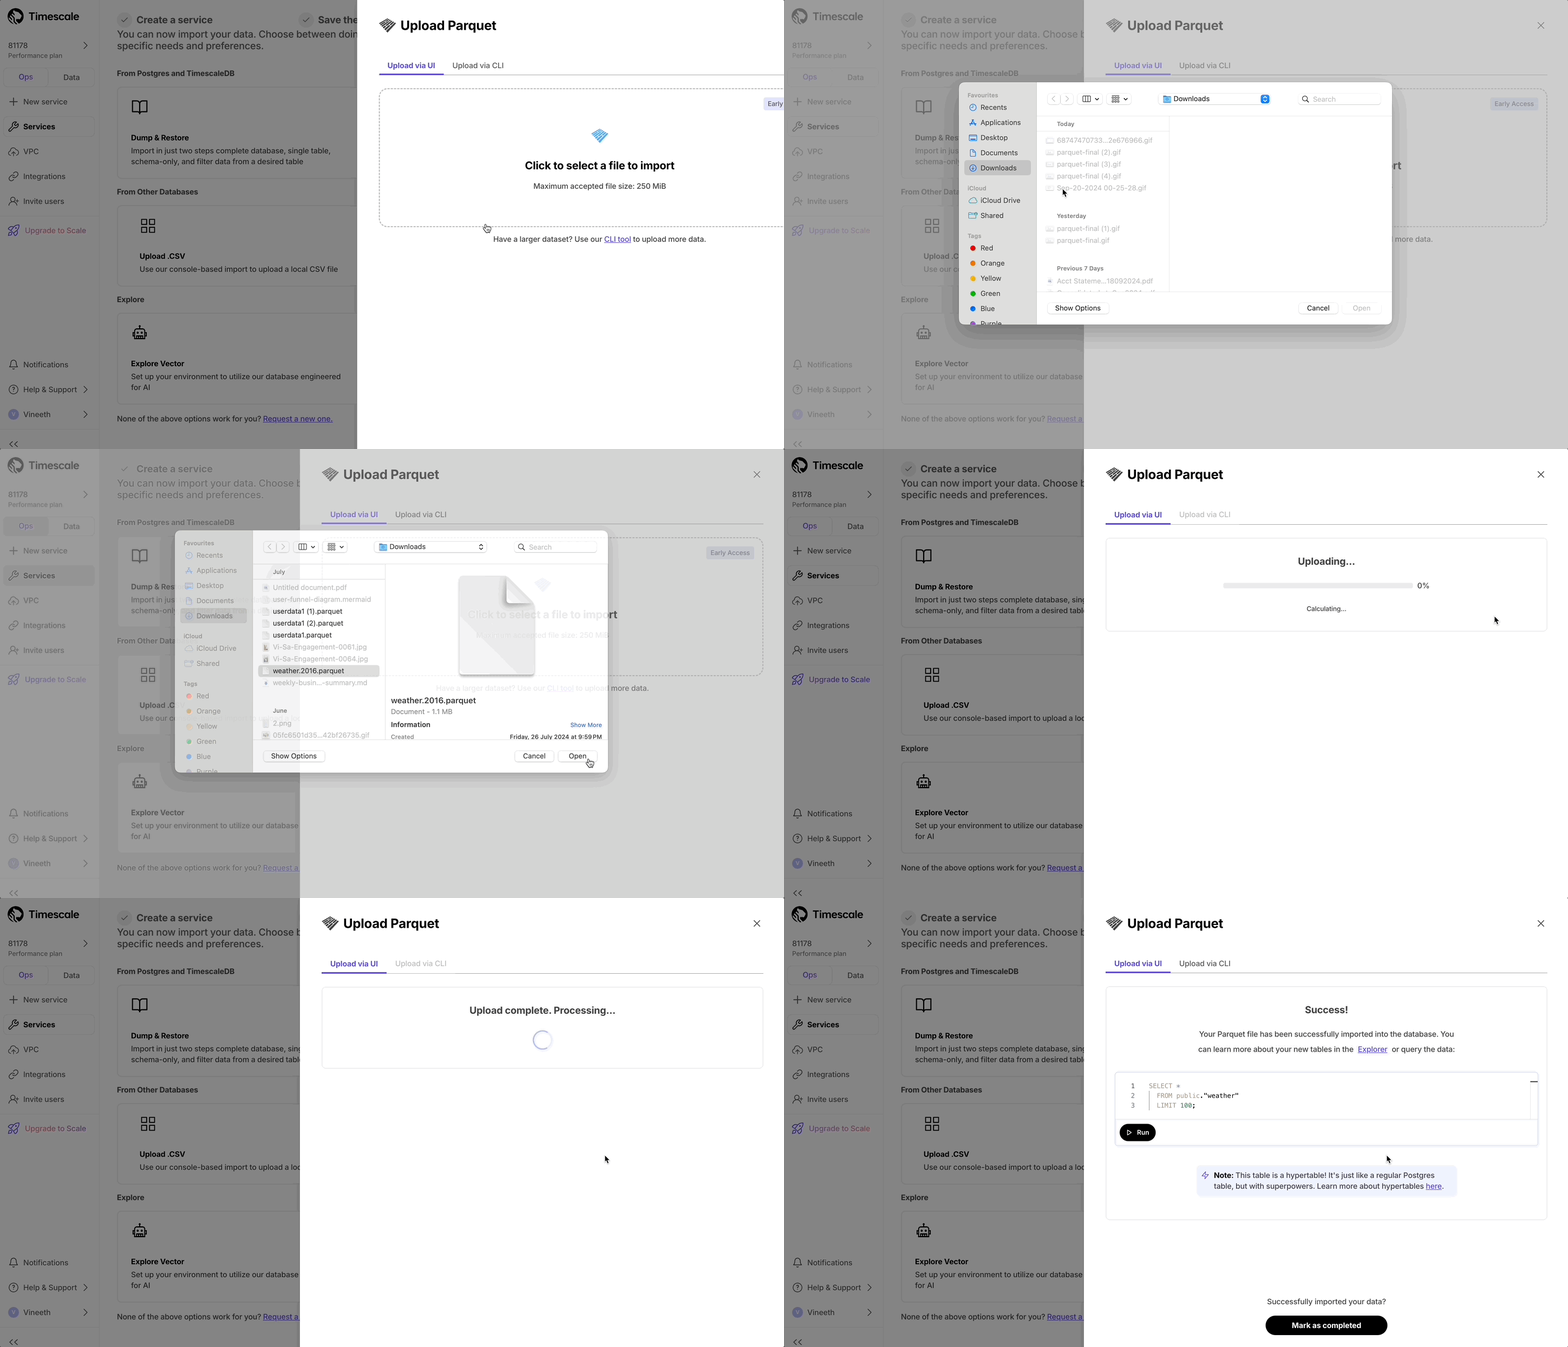
Console based Parquet File Import
Now users can upload from Parquet to Timescale Cloud by uploading the file from their local file system. For files larger than 250 MB, or if you want to do it yourself, follow the three-step process to upload Parquet files to Timescale.
SQL editor improvements
- In the Ops mode SQL editor, you can now highlight a statement to run a specific statement.
High availability, usability, and migrations improvements
Multiple HA replicas
Scale and Enterprise customers can now configure two new multiple high availability (HA) replica options directly through Timescale Console:
- Two HA replicas (both asynchronous) - our highest availability configuration.
- Two HA replicas (one asynchronous, one synchronous) - our highest data integrity configuration.
Previously, Timescale offered only a single synchronous replica for customers seeking high availability. The single HA option is still available.


For more details on multiple HA replicas, see Manage high availability.
Other improvements
In the Console SQL editor, we now indicate if your database session is healthy or has been disconnected. If it's been disconnected, the session will reconnect on your next query execution.

Released live-migration v0.0.26 and then v0.0.27 which includes multiple performance improvements and bugfixes as well as better support for Postgres 12.
One-click SQL statement execution from Timescale Console, and session support in the SQL editor
One-click SQL statement execution from Timescale Console
Now you can simply click to run SQL statements in various places in the Console. This requires that the [SQL Editor][sql-editor] is enabled for the service.
Enable Continuous Aggregates from the CAGGs wizard by clicking Run below the SQL statement.

Enable database extensions by clicking Run below the SQL statement.

Query data instantly with a single click in the Console after successfully uploading a CSV file.

Session support in the SQL editor
Last week we announced the new in-console SQL editor. However, there was a limitation where a new database session was created for each query execution.
Today we removed that limitation and added support for keeping one database session for each user logged in, which means you can do things like start transactions:
begin;
insert into users (name, email) values ('john doe', 'john@example.com');
abort; -- nothing inserted
Or work with temporary tables:
create temporary table temp_users (email text);
insert into temp_sales (email) values ('john@example.com');
-- table will automatically disappear after your session ends
Or use the set command:
set search_path to 'myschema', 'public';😎 Query your database directly from the Console and enhanced data import and migration options
SQL Editor in Timescale Console
We've added a new tab to the service screen that allows users to query their database directly, without having to leave the console interface.
- For existing services on Timescale, this is an opt-in feature. For all newly created services, the SQL Editor will be enabled by default.
- Users can disable the SQL Editor at any time by toggling the option under the Operations tab.
- The editor supports all DML and DDL operations (any single-statement SQL query), but doesn't support multiple SQL statements in a single query.

Enhanced Data Import Options for Quick Evaluation
After service creation, we now offer a dedicated section for data import, including options to import from Postgres as a source or from CSV files.
The enhanced Postgres import instructions now offer several options: single table import, schema-only import, partial data import (allowing selection of a specific time range), and complete database import. Users can execute any of these data imports with just one or two simple commands provided in the data import section.

Improvements to Live migration
We've released v0.0.25 of Live migration that includes the following improvements:
- Support migrating tsdb on non public schema to public schema
- Pre-migration compatibility checks
- Docker compose build fixes
🛠️ Improved tooling in Timescale Cloud and new AI and Vector extension releases
CSV import
We have added a CSV import tool to the Timescale Console. For all TimescaleDB services, after service creation you can:
- Choose a local file
- Select the name of the data collection to be uploaded (default is file name)
- Choose data types for each column
- Upload the file as a new hypertable within your service Look for the
Import data from .csvtile in theImport your datastep of service creation.

Replica lag
Customers now have more visibility into the state of replicas running on Timescale Cloud. We’ve released a new parameter called Replica Lag within the Service Overview for both Read and High Availability Replicas. Replica lag is measured in bytes against the current state of the primary database. For questions or concerns about the relative lag state of your replica, reach out to Customer Support.

Adjust chunk interval
Customers can now adjust their chunk interval for their hypertables and continuous aggregates through the Timescale UI. In the Explorer, select the corresponding hypertable you would like to adjust the chunk interval for. Under Chunk information, you can change the chunk interval. Note that this only changes the chunk interval going forward, and does not retroactively change existing chunks.

CloudWatch permissions via role assumption
We've released permission granting via role assumption to CloudWatch. Role assumption is both more secure and more convenient for customers who no longer need to rotate credentials and update their exporter config.
For more details take a look at [our documentation][integrations].

Two-factor authentication (2FA) indicator
We’ve added a 2FA status column to the Members page, allowing customers to easily see whether each project member has 2FA enabled or disabled.

Anthropic and Cohere integrations in pgai
The pgai extension v0.3.0 now supports embedding creation and LLM reasoning using models from Anthropic and Cohere. For details and examples, see this post for pgai and Cohere, and this post for pgai and Anthropic.
pgvectorscale extension: ARM builds and improved recall for low dimensional vectors
pgvectorscale extension v0.3.0 adds support for ARM processors and improves recall when using StreamingDiskANN indexes with low dimensionality vectors. We recommend updating to this version if you are self-hosting.
🏄 Optimizations for compressed data and extended join support in continuous aggregates
TimescaleDB v2.16.0 contains significant performance improvements when working with compressed data, extended join support in continuous aggregates, and the ability to define foreign keys from regular tables towards hypertables. We recommend upgrading at the next available opportunity.
Any new service created on Timescale Cloud starting today uses TimescaleDB v2.16.0.
In TimescaleDB v2.16.0 we:
Introduced multiple performance focused optimizations for data manipulation operations (DML) over compressed chunks.
Improved upsert performance by more than 100x in some cases and more than 500x in some update/delete scenarios.
Added the ability to define chunk skipping indexes on non-partitioning columns of compressed hypertables.
TimescaleDB v2.16.0 extends chunk exclusion to use these skipping (sparse) indexes when queries filter on the relevant columns, and prune chunks that do not include any relevant data for calculating the query response.
Offered new options for use cases that require foreign keys defined.
You can now add foreign keys from regular tables towards hypertables. We have also removed some really annoying locks in the reverse direction that blocked access to referenced tables while compression was running.
Extended Continuous Aggregates to support more types of analytical queries.
More types of joins are supported, additional equality operators on join clauses, and support for joins between multiple regular tables.
Highlighted features in this release
Improved query performance through chunk exclusion on compressed hypertables.
You can now define chunk skipping indexes on compressed chunks for any column with one of the following integer data types:
smallint,int,bigint,serial,bigserial,date,timestamp,timestamptz.After calling
enable_chunk_skippingon a column, TimescaleDB tracks the min and max values for that column, using this information to exclude chunks for queries filtering on that column, where no data would be found.Improved upsert performance on compressed hypertables.
By using index scans to verify constraints during inserts on compressed chunks, TimescaleDB speeds up some ON CONFLICT clauses by more than 100x.
Improved performance of updates, deletes, and inserts on compressed hypertables.
By filtering data while accessing the compressed data and before decompressing, TimescaleDB has improved performance for updates and deletes on all types of compressed chunks, as well as inserts into compressed chunks with unique constraints.
By signaling constraint violations without decompressing, or decompressing only when matching records are found in the case of updates, deletes and upserts, TimescaleDB v2.16.0 speeds up those operations more than 1000x in some update/delete scenarios, and 10x for upserts.
You can add foreign keys from regular tables to hypertables, with support for all types of cascading options. This is useful for hypertables that partition using sequential IDs, and need to reference these IDs from other tables.
Lower locking requirements during compression for hypertables with foreign keys
Advanced foreign key handling removes the need for locking referenced tables when new chunks are compressed. DML is no longer blocked on referenced tables while compression runs on a hypertable.
Improved support for queries on Continuous Aggregates
INNER/LEFTandLATERALjoins are now supported. Plus, you can now join with multiple regular tables, and have more than one equality operator on join clauses.
Postgres 13 support removal announcement
Following the deprecation announcement for Postgres 13 in TimescaleDB v2.13, Postgres 13 is no longer supported in TimescaleDB v2.16.
The currently supported Postgres major versions are 14, 15, and 16.
📦 Performance, packaging and stability improvements for Timescale Cloud
New plans
To support evolving customer needs, Timescale Cloud now offers three plans to provide more value, flexibility, and efficiency.
- Performance: for cost-focused, smaller projects. No credit card required to start.
- Scale: for developers handling critical and demanding apps.
- Enterprise: for enterprises with mission-critical apps.
Each plan continues to bill based on hourly usage, primarily for compute you run and storage you consume. You can upgrade or downgrade between Performance and Scale plans via the Console UI at any time. More information about the specifics and differences between these pricing plans can be found here in the docs. 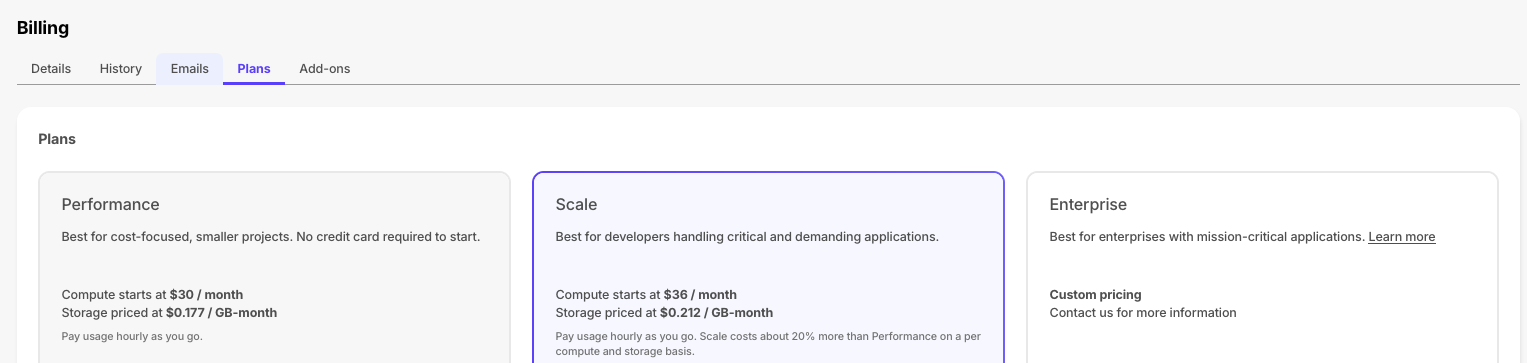
Improvements to the Timescale Console
The individual tiles on the services page have been enhanced with new information, including high-availability status. This will let you better assess the state of your services at a glance. 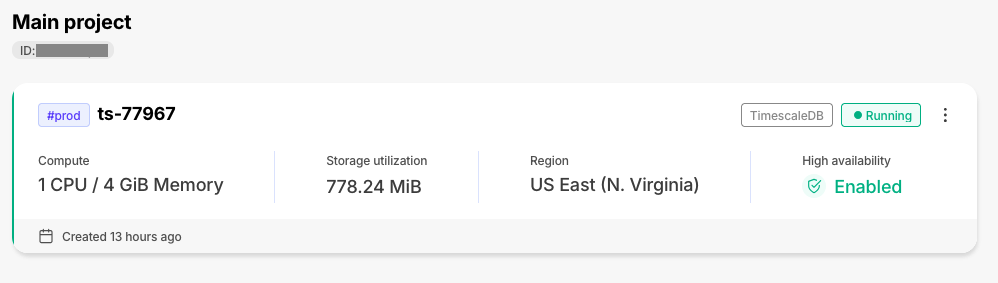
Live migration release v0.0.24
Improvements:
- Automatic retries are now available for the initial data copy of the migration
- Now uses pgcopydb for initial data copy for PG to TSDB migrations also (already did for TS to TS) which has a significant performance boost.
- Fixes issues with TimescaleDB v2.13.x migrations
- Support for chunk mapping for hypertables with custom schema and table prefixes
⚡ Performance and stability improvements for Timescale Cloud and TimescaleDB
The following improvements have been made to Timescale products:
Timescale Cloud:
- The connection pooler has been updated and now avoids multiple reloads
- The tsdbadmin user can now grant the following roles to other users:
pg_checkpoint,pg_monitor,pg_signal_backend,pg_read_all_stats,pg_stat_scan_tables - Timescale Console is far more reliable.
TimescaleDB
- The TimescaleDB v2.15.3 patch release improves handling of multiple unique indexes in a compressed INSERT, removes the recheck of ORDER when querying compressed data, improves memory management in DML functions, improves the tuple lock acquisition for tiered chunks on replicas, and fixes an issue with ORDER BY/GROUP BY in our HashAggregate optimization on PG16. For more information, see the release note.
- The TimescaleDB v2.15.2 patch release improves sort pushdown for partially compressed chunks, and compress_chunk with a primary space partition. The metadata function is removed from the update script, and hash partitioning on a primary column is disallowed. For more information, see the release note.
⚡ Performance improvements for live migration to Timescale Cloud
The following improvements have been made to the Timescale live-migration docker image:
- Table-based filtering is now available during live migration.
- Improvements to pbcopydb increase performance and remove unhelpful warning messages.
- The user notification log enables you to always select the most recent release for a migration run.
For improved stability and new features, update to the latest timescale/live-migration docker image. To learn more, see the live migration docs.
🦙Ollama integration in pgai
Ollama is now integrated with pgai.
Ollama is the easiest and most popular way to get up and running with open-source language models. Think of Ollama as Docker for LLMs, enabling easy access and usage of a variety of open-source models like Llama 3, Mistral, Phi 3, Gemma, and more.
With the pgai extension integrated in your database, embed Ollama AI into your app using SQL. For example:
select ollama_generate
( 'llava:7b'
, 'Please describe this image.'
, _images=> array[pg_read_binary_file('/pgai/tests/postgresql-vs-pinecone.jpg')]
, _system=>'you are a helpful assistant'
, _options=> jsonb_build_object
  ( 'seed', 42
  , 'temperature', 0.9
  )
)->>'response'
;
To learn more, see the pgai Ollama documentation.
🧙 Compression Wizard
The compression wizard is now available on Timescale Cloud. Select a hypertable and be guided through enabling compression through the UI!
To access the compression wizard, navigate to Explorer, and select the hypertable you would like to compress. In the top right corner, hover where it says Compression off, and open the wizard. You will then be guided through the process of configuring compression for your hypertable, and can compress it directly through the UI.

🏎️💨 High Performance AI Apps With pgvectorscale
The [vectorscale extension][pgvectorscale] is now available on [Timescale Cloud][signup].
pgvectorscale complements pgvector, the open-source vector data extension for Postgres, and introduces the following key innovations for pgvector data:
- A new index type called StreamingDiskANN, inspired by the DiskANN algorithm, based on research from Microsoft.
- Statistical Binary Quantization: developed by Timescale researchers, This compression method improves on standard Binary Quantization.
On benchmark dataset of 50 million Cohere embeddings (768 dimensions each), Postgres with pgvector and pgvectorscale achieves 28x lower p95 latency and 16x higher query throughput compared to Pinecone's storage optimized (s1) index for approximate nearest neighbor queries at 99% recall, all at 75% less cost when self-hosted on AWS EC2.
To learn more, see the [pgvectorscale documentation][pgvectorscale].
🧐Integrate AI Into Your Database Using pgai
The [pgai extension][pgai] is now available on [Timescale Cloud][signup].
pgai brings embedding and generation AI models closer to the database. With pgai, you can now do the following directly from within Postgres in a SQL query:
- Create embeddings for your data.
- Retrieve LLM chat completions from models like OpenAI GPT4o.
- Reason over your data and facilitate use cases like classification, summarization, and data enrichment on your existing relational data in Postgres.
To learn more, see the [pgai documentation][pgai].
🐅Continuous Aggregate and Hypertable Improvements for TimescaleDB
The 2.15.x releases contains performance improvements and bug fixes. Highlights in these releases are:
- Continuous Aggregate now supports
time_bucketwith origin and/or offset. - Hypertable compression has the following improvements:
- Recommend optimized defaults for segment by and order by when configuring compression through analysis of table configuration and statistics.
- Added planner support to check more kinds of WHERE conditions before decompression. This reduces the number of rows that have to be decompressed.
- You can now use minmax sparse indexes when you compress columns with btree indexes.
- Vectorize filters in the WHERE clause that contain text equality operators and LIKE expressions.
To learn more, see the TimescaleDB release notes.
🔍 Database Audit Logging with pgaudit
The Postgres Audit extension(pgaudit) is now available on [Timescale Cloud][signup]. pgaudit provides detailed database session and object audit logging in the Timescale Cloud logs.
If you have strict security and compliance requirements and need to log all operations on the database level, pgaudit can help. You can also export these audit logs to Amazon CloudWatch.
To learn more, see the pgaudit documentation.
🌡 International System of Unit Support with postgresql-unit
The SI Units for Postgres extension(unit) provides support for the ISU in [Timescale Cloud][signup].
You can use Timescale Cloud to solve day-to-day questions. For example, to see what 50°C is in °F, run the following query in your Timescale Cloud service:
SELECT '50°C'::unit @ '°F' as temp;
  temp
--------
 122 °F
(1 row)
To learn more, see the postgresql-unit documentation.
===== PAGE: https://docs.tigerdata.com/about/timescaledb-editions/ =====
Compare TimescaleDB editions
The following versions of TimescaleDB are available:
- TimescaleDB Apache 2 Edition
- TimescaleDB Community Edition
TimescaleDB Apache 2 Edition
TimescaleDB Apache 2 Edition is available under the [Apache 2.0 license][apache-license]. This is a classic open source license, meaning that it is completely unrestricted - anyone can take this code and offer it as a service.
You can install TimescaleDB Apache 2 Edition on your own on-premises or cloud infrastructure and run it for free.
You can sell TimescaleDB Apache 2 Edition as a service, even if you're not the main contributor.
You can modify the TimescaleDB Apache 2 Edition source code and run it for production use.
TimescaleDB Community Edition
TimescaleDB Community Edition is the advanced, best, and most feature complete version of TimescaleDB, available under the terms of the [Tiger Data License (TSL)][timescale-license].
For more information about the Tiger Data license, see [this blog post][license-blog].
Many of the most recent features of TimescaleDB are only available in TimescaleDB Community Edition.
You can install TimescaleDB Community Edition in your own on-premises or cloud infrastructure and run it for free. TimescaleDB Community Edition is completely free if you manage your own service.
You cannot sell TimescaleDB Community Edition as a service, even if you are the main contributor.
You can modify the TimescaleDB Community Edition source code and run it for production use. Developers using TimescaleDB Community Edition have the "right to repair" and make modifications to the source code and run it in their own on-premises or cloud infrastructure. However, you cannot make modifications to the TimescaleDB Community Edition source code and offer it as a service.
You can access a hosted version of TimescaleDB Community Edition through [Tiger Cloud][timescale-cloud], a cloud-native platform for time-series and real-time analytics.
Feature comparison
===== PAGE: https://docs.tigerdata.com/about/supported-platforms/ =====
Supported platforms
This page lists the platforms and systems that Tiger Data products have been tested on for the following options:
- Tiger Cloud: all the latest features that just work. A reliable and worry-free Postgres cloud for all your workloads.
- Self-hosted products: create your best app from the comfort of your own developer environment.
Tiger Cloud
Tiger Cloud always runs the latest version of all Tiger Data products. With Tiger Cloud you:
- Build everything on one service, and each service hosts one database
- Get faster queries using less compute
- Compress data without sacrificing performance
- View insights on performance, queries, and more
- Reduce storage with automated retention policies
See the available [service capabilities][service-types] and [regions][regions].
Available service capabilities
Tiger Cloud services run optimized Tiger Data extensions on latest Postgres, in a highly secure cloud environment. Each service is a specialized database instance tuned for your workload. Available capabilities are:
<thead>
    <tr>
        <th>Capability</th>
        <th>Extensions</th>
    </tr>
</thead>
<tbody>
    <tr>
        <td><strong>Real-time analytics</strong> <p>Lightning-fast ingest and querying of time-based and event data.</p></td>
        <td><ul><li>TimescaleDB</li><li>TimescaleDB Toolkit</li></ul>   </td>
    </tr>
    <tr>
        <td ><strong>AI and vector </strong><p>Seamlessly build RAG, search, and AI agents.</p></td>
        <td><ul><li>TimescaleDB</li><li>pgvector</li><li>pgvectorscale</li><li>pgai</li></ul></td>
    </tr>
    <tr>
        <td ><strong>Hybrid</strong><p>Everything for real-time analytics and AI workloads, combined.</p></td>
        <td><ul><li>TimescaleDB</li><li>TimescaleDB Toolkit</li><li>pgvector</li><li>pgvectorscale</li><li>pgai</li></ul></td>
    </tr>
    <tr>
        <td ><strong>Support</strong></td>
        <td><ul><li>24/7 support no matter where you are.</li><li> Continuous incremental backup/recovery. </li><li>Point-in-time forking/branching.</li><li>Zero-downtime upgrades. </li><li>Multi-AZ high availability. </li><li>An experienced global ops and support team that can build and manage Postgres at scale.</li></ul></td>
    </tr>
</tbody>
Available regions
Tiger Cloud services run in the following Amazon Web Services (AWS) regions:
| Region | Zone | Location |
|---|---|---|
ap-south-1 | Asia Pacific | Mumbai |
ap-southeast-1 | Asia Pacific | Singapore |
ap-southeast-2 | Asia Pacific | Sydney |
ap-northeast-1 | Asia Pacific | Tokyo |
ca-central-1 | Canada | Central |
eu-central-1 | Europe | Frankfurt |
eu-west-1 | Europe | Ireland |
eu-west-2 | Europe | London |
sa-east-1 | South America | São Paulo |
us-east-1 | United States | North Virginia |
us-east-2 | United States | Ohio |
us-west-2 | United States | Oregon |
Self-hosted products
You use Tiger Data's open-source products to create your best app from the comfort of your own developer environment.
See the [available services][available-services] and [supported systems][supported-systems].
Available services
Tiger Data offers the following services for your self-hosted installations:
<thead>
    <tr>
        <th>Service type</th>
        <th>Description</th>
    </tr>
</thead>
<tbody>
    <tr>
        <td><strong>Self-hosted support</strong></td>
        <td><ul><li>24/7 support no matter where you are.</li><li>An experienced global ops and support team that
        can build and manage Postgres at scale.</li></ul>
        Want to try it out? <a href="https://www.tigerdata.com/self-managed-support">See how we can help</a>.
        </td>
    </tr>
</tbody>
Postgres, TimescaleDB support matrix
TimescaleDB and TimescaleDB Toolkit run on Postgres v10, v11, v12, v13, v14, v15, v16, and v17. Currently Postgres 15 and higher are supported.
| TimescaleDB version | Postgres 17 | Postgres 16 | Postgres 15 | Postgres 14 | Postgres 13 | Postgres 12 | Postgres 11 | Postgres 10 |
|---|---|---|---|---|---|---|---|---|
| 2.22.x | ✅ | ✅ | ✅ | ❌ | ❌ | ❌ | ❌ | ❌ |
| 2.21.x | ✅ | ✅ | ✅ | ❌ | ❌ | ❌ | ❌ | ❌ |
| 2.20.x | ✅ | ✅ | ✅ | ❌ | ❌ | ❌ | ❌ | ❌ |
| 2.17 - 2.19 | ✅ | ✅ | ✅ | ✅ | ❌ | ❌ | ❌ | ❌ |
| 2.16.x | ❌ | ✅ | ✅ | ✅ | ❌ | ❌ | ❌ | ❌ |
| 2.13 - 2.15 | ❌ | ✅ | ✅ | ✅ | ✅ | ❌ | ❌ | ❌ |
| 2.12.x | ❌ | ❌ | ✅ | ✅ | ✅ | ❌ | ❌ | ❌ |
| 2.10.x | ❌ | ❌ | ✅ | ✅ | ✅ | ✅ | ❌ | ❌ |
| 2.5 - 2.9 | ❌ | ❌ | ❌ | ✅ | ✅ | ✅ | ❌ | ❌ |
| 2.4 | ❌ | ❌ | ❌ | ❌ | ✅ | ✅ | ❌ | ❌ |
| 2.1 - 2.3 | ❌ | ❌ | ❌ | ❌ | ✅ | ✅ | ✅ | ❌ |
| 2.0 | ❌ | ❌ | ❌ | ❌ | ❌ | ✅ | ✅ | ❌ |
| 1.7 | ❌ | ❌ | ❌ | ❌ | ❌ | ✅ | ✅ | ✅ |
We recommend not using TimescaleDB with Postgres 17.1, 16.5, 15.9, 14.14, 13.17, 12.21. These minor versions [introduced a breaking binary interface change][postgres-breaking-change] that, once identified, was reverted in subsequent minor Postgres versions 17.2, 16.6, 15.10, 14.15, 13.18, and 12.22. When you build from source, best practice is to build with Postgres 17.2, 16.6, etc and higher. Users of Tiger Cloud and platform packages for Linux, Windows, MacOS, Docker, and Kubernetes are unaffected.
Supported operating system
You can deploy TimescaleDB and TimescaleDB Toolkit on the following systems:
| Operation system | Version |
|---|---|
| Debian | 13 Trixe, 12 Bookworm, 11 Bullseye |
| Ubuntu | 24.04 Noble Numbat, 22.04 LTS Jammy Jellyfish |
| Red Hat Enterprise | Linux 9, Linux 8 |
| Fedora | Fedora 35, Fedora 34, Fedora 33 |
| Rocky Linux | Rocky Linux 9 (x86_64), Rocky Linux 8 |
| ArchLinux (community-supported) | Check the [available packages][archlinux-packages] |
| Operation system | Version |
|---|---|
| Microsoft Windows | 10, 11 |
| Microsoft Windows Server | 2019, 2020 |
| Operation system | Version |
|---|---|
| macOS | From 10.15 Catalina to 14 Sonoma |
===== PAGE: https://docs.tigerdata.com/about/contribute-to-timescale/ =====
Contribute to Tiger Data
TimescaleDB, pgai, pgvectorscale, TimescaleDB Toolkit, and the Tiger Data documentation are all open source. They are available in GitHub for you to use, review, and update. This page shows you where you can add to Tiger Data products.
Contribute to the code for Tiger Data products
Tiger Data appreciates any help the community can provide to make its products better! You can:
- Open an issue with a bug report, build issue, feature request or suggestion.
- Fork a corresponding repository and submit a pull request.
Head over to the Tiger Data source repositories to learn, review, and help improve our products!
- [TimescaleDB][timescaledb]: a Postgres extension for high-performance real-time analytics on time-series and event data.
- [pgai][pgai]: a suite of tools to develop RAG, semantic search, and other AI applications more easily with Postgres.
- [pgvectorscale][pgvectorscale]: a complement to pgvector for higher performance embedding search and cost-efficient storage for AI applications.
- [TimescaleDB Toolkit][toolkit]: all things analytics when using TimescaleDB, with a particular focus on developer ergonomics and performance.
Contribute to Tiger Data documentation
Tiger Data documentation is hosted in the [docs GitHub repository][github-docs] and open for contribution from all community members.
See the [README][readme] and [contribution guide][contribution-guide] for details.
===== PAGE: https://docs.tigerdata.com/about/release-notes/ =====
Release notes
For information about new updates and improvement to Tiger Data products, see the [Changelog][changelog]. For release notes about our downloadable products, see:
- TimescaleDB - an open-source database that makes SQL scalable for time-series data, packaged as a Postgres extension.
- TimescaleDB Toolkit - additional functions to ease all things analytics when using TimescaleDB.
- pgai - brings AI workflows to your Postgres database.
- pgvectorscale - higher performance embedding search and cost-efficient storage for AI applications on Postgres.
- pgspot - spot vulnerabilities in Postgres extension scripts.
- live-migration - a Docker image to migrate data to a Tiger Cloud service.
Want to stay up-to-date with new releases? On the main page for each repository click Watch, select Custom and then check Releases.
===== PAGE: https://docs.tigerdata.com/migrate/livesync-for-postgresql/ =====
Sync data from Postgres to your service
You use the source Postgres connector in Tiger Cloud to synchronize all data or specific tables from a Postgres database instance to your service, in real time. You run the connector continuously, turning Postgres into a primary database with your service as a logical replica. This enables you to leverage Tiger Cloud’s real-time analytics capabilities on your replica data.
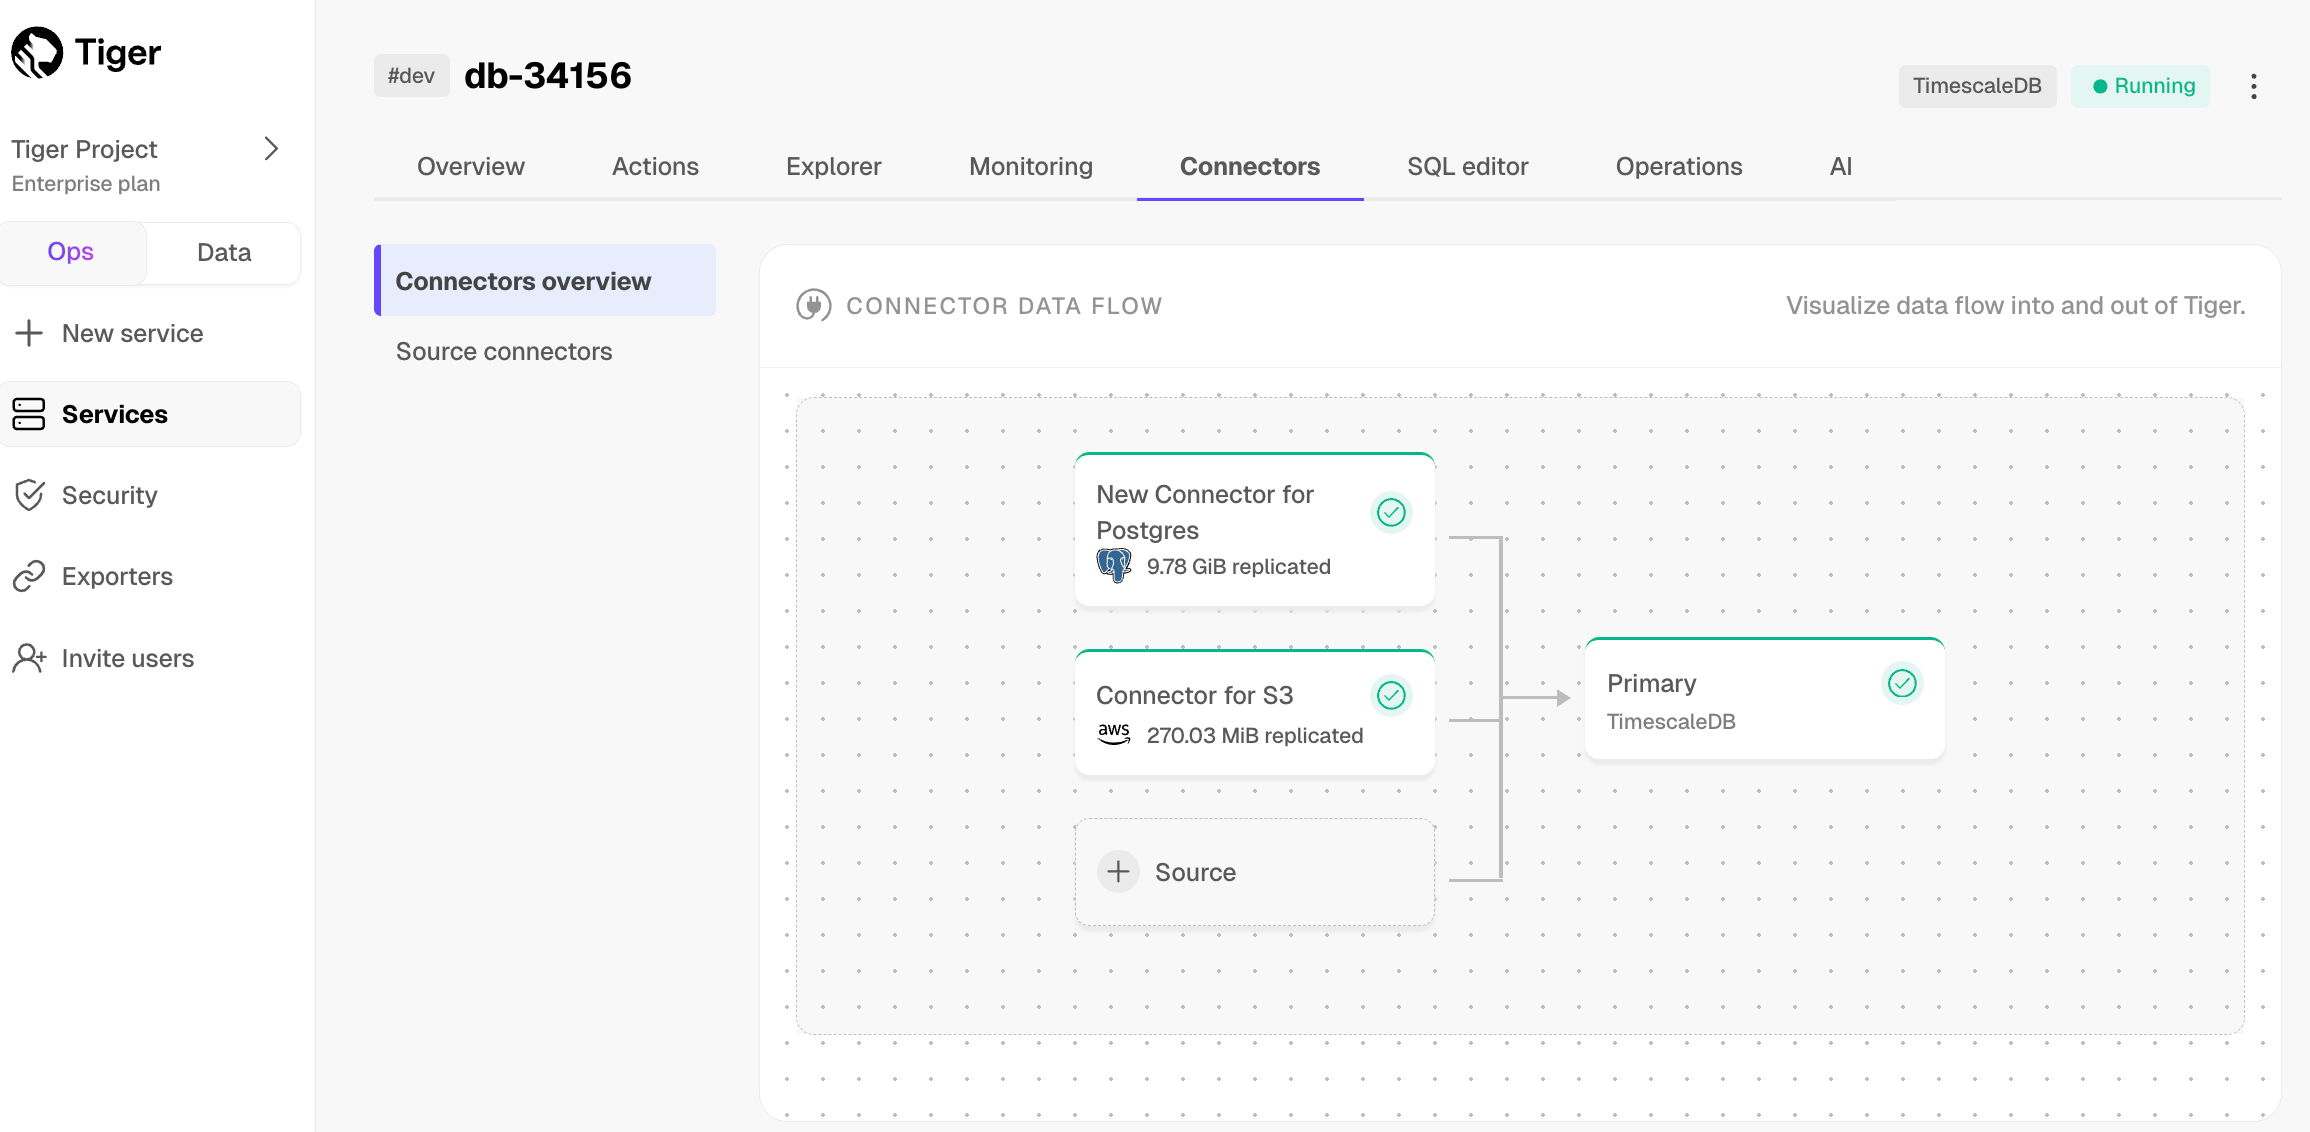
The source Postgres connector in Tiger Cloud leverages the well-established Postgres logical replication protocol. By relying on this protocol, Tiger Cloud ensures compatibility, familiarity, and a broader knowledge base—making it easier for you to adopt the connector and integrate your data.
You use the source Postgres connector for data synchronization, rather than migration. This includes:
Copy existing data from a Postgres instance to a Tiger Cloud service:
Copy data at up to 150 GB/hr.
You need at least a 4 CPU/16 GB source database, and a 4 CPU/16 GB target service.
Copy the publication tables in parallel.
Large tables are still copied using a single connection. Parallel copying is in the backlog.
Forget foreign key relationships.
The connector disables foreign key validation during the sync. For example, if a
metricstable refers to theidcolumn on thetagstable, you can still sync only themetricstable without worrying about their foreign key relationships.Track progress.
Postgres exposes
COPYprogress underpg_stat_progress_copy.
Synchronize real-time changes from a Postgres instance to a Tiger Cloud service.
Add and remove tables on demand using the [Postgres PUBLICATION interface][postgres-publication-interface].
Enable features such as [hypertables][about-hypertables], [columnstore][compression], and [continuous aggregates][caggs] on your logical replica.
Early access: this source Postgres connector is not yet supported for production use. If you have any questions or feedback, talk to us in <a href="https://app.slack.com/client/T4GT3N2JK/C086NU9EZ88">#livesync in the Tiger Community</a>.
Prerequisites
To follow the steps on this page:
Create a target [Tiger Cloud service][create-service] with real-time analytics enabled.
You need your [connection details][connection-info].
Install the [Postgres client tools][install-psql] on your sync machine.
Ensure that the source Postgres instance and the target Tiger Cloud service have the same extensions installed.
The source Postgres connector does not create extensions on the target. If the table uses column types from an extension, first create the extension on the target Tiger Cloud service before syncing the table.
Limitations
The source Postgres instance must be accessible from the Internet.
Services hosted behind a firewall or VPC are not supported. This functionality is on the roadmap.
Indexes, including the primary key and unique constraints, are not migrated to the target Tiger Cloud service.
We recommend that, depending on your query patterns, you create only the necessary indexes on the target Tiger Cloud service.
This works for Postgres databases only as source. TimescaleDB is not yet supported.
The source must be running Postgres 13 or later.
Schema changes must be co-ordinated.
Make compatible changes to the schema in your Tiger Cloud service first, then make the same changes to the source Postgres instance.
Ensure that the source Postgres instance and the target Tiger Cloud service have the same extensions installed.
The source Postgres connector does not create extensions on the target. If the table uses column types from an extension, first create the extension on the target Tiger Cloud service before syncing the table.
There is WAL volume growth on the source Postgres instance during large table copy.
Continuous aggregate invalidation
The connector uses
session_replication_role=replicaduring data replication, which prevents table triggers from firing. This includes the internal triggers that mark continuous aggregates as invalid when underlying data changes.If you have continuous aggregates on your target database, they do not automatically refresh for data inserted during the migration. This limitation only applies to data below the continuous aggregate's materialization watermark. For example, backfilled data. New rows synced above the continuous aggregate watermark are used correctly when refreshing.
This can lead to:
- Missing data in continuous aggregates for the migration period.
- Stale aggregate data.
- Queries returning incomplete results.
If the continuous aggregate exists in the source database, best practice is to add it to the Postgres connector publication. If it only exists on the target database, manually refresh the continuous aggregate using the
forceoption of [refresh_continuous_aggregate][refresh-caggs].
Set your connection string
This variable holds the connection information for the source database. In the terminal on your migration machine, set the following:
export SOURCE="postgres://<user>:<password>@<source host>:<source port>/<db_name>"Avoid using connection strings that route through connection poolers like PgBouncer or similar tools. This tool requires a direct connection to the database to function properly.
Tune your source database
Updating parameters on a Postgres instance will cause an outage. Choose a time that will cause the least issues to tune this database.
Tune the Write Ahead Log (WAL) on the RDS/Aurora Postgres source database
In [https://console.aws.amazon.com/rds/home#databases:][databases], select the RDS instance to migrate.
Click
Configuration, scroll down and note theDB instance parameter group, then clickParameter Groups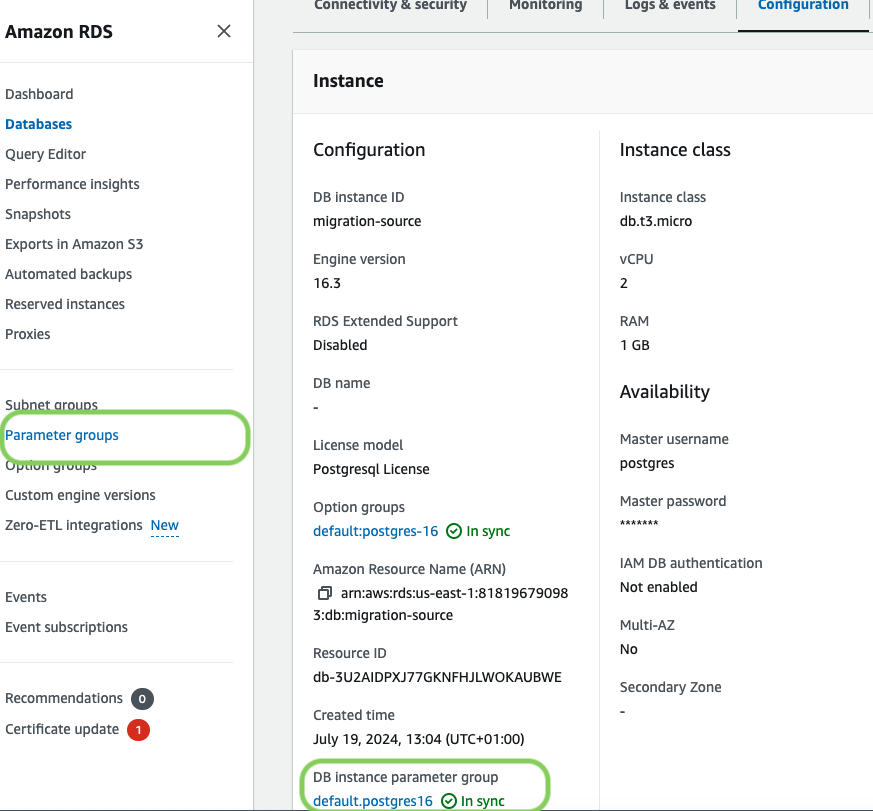
Click
Create parameter group, fill in the form with the following values, then clickCreate.- Parameter group name - whatever suits your fancy.
- Description - knock yourself out with this one.
- Engine type -
PostgreSQL - Parameter group family - the same as
DB instance parameter groupin yourConfiguration.
In
Parameter groups, select the parameter group you created, then clickEdit.Update the following parameters, then click
Save changes.rds.logical_replicationset to1: record the information needed for logical decoding.wal_sender_timeoutset to0: disable the timeout for the sender process.
In RDS, navigate back to your [databases][databases], select the RDS instance to migrate, and click
Modify.Scroll down to
Database options, select your new parameter group, and clickContinue.Click
Apply immediatelyor choose a maintenance window, then clickModify DB instance.Changing parameters will cause an outage. Wait for the database instance to reboot before continuing.
Verify that the settings are live in your database.
Create a user for the source Postgres connector and assign permissions
Create
<pg connector username>:sqlpsql source -c "CREATE USER <pg connector username> PASSWORD '<password>'"You can use an existing user. However, you must ensure that the user has the following permissions.
Grant permissions to create a replication slot:
sqlpsql source -c "GRANT rds_replication TO <pg connector username>"Grant permissions to create a publication:
sqlpsql source -c "GRANT CREATE ON DATABASE <database name> TO <pg connector username>"Assign the user permissions on the source database:
sqlpsql source <<EOF GRANT USAGE ON SCHEMA "public" TO <pg connector username>; GRANT SELECT ON ALL TABLES IN SCHEMA "public" TO <pg connector username>; ALTER DEFAULT PRIVILEGES IN SCHEMA "public" GRANT SELECT ON TABLES TO <pg connector username>; EOFIf the tables you are syncing are not in the
publicschema, grant the user permissions for each schema you are syncing:sqlpsql source <<EOF GRANT USAGE ON SCHEMA <schema> TO <pg connector username>; GRANT SELECT ON ALL TABLES IN SCHEMA <schema> TO <pg connector username>; ALTER DEFAULT PRIVILEGES IN SCHEMA <schema> GRANT SELECT ON TABLES TO <pg connector username>; EOFOn each table you want to sync, make
<pg connector username>the owner:sqlpsql source -c 'ALTER TABLE OWNER TO <pg connector username>;'You can skip this step if the replicating user is already the owner of the tables.
Enable replication
DELETEandUPDATEoperationsReplica identity assists data replication by identifying the rows being modified. Your options are that each table and hypertable in the source database should either have:
A primary key: data replication defaults to the primary key of the table being replicated. Nothing to do.
A viable unique index: each table has a unique, non-partial, non-deferrable index that includes only columns marked as
NOT NULL. If a UNIQUE index does not exist, create one to assist the migration. You can delete if after migration.For each table, set
REPLICA IDENTITYto the viable unique index:shellpsql -X -d source -c 'ALTER TABLE REPLICA IDENTITY USING INDEX <_index_name>'No primary key or viable unique index: use brute force.
For each table, set
REPLICA IDENTITYtoFULL:shellpsql -X -d source -c 'ALTER TABLE {table_name} REPLICA IDENTITY FULL'For each
UPDATEorDELETEstatement, Postgres reads the whole table to find all matching rows. This results in significantly slower replication. If you are expecting a large number ofUPDATEorDELETEoperations on the table, best practice is to not useFULL.
Tune the Write Ahead Log (WAL) on the Postgres source database
sqlpsql source <<EOF ALTER SYSTEM SET wal_level='logical'; ALTER SYSTEM SET max_wal_senders=10; ALTER SYSTEM SET wal_sender_timeout=0; EOFThis will require a restart of the Postgres source database.
Create a user for the connector and assign permissions
Create
<pg connector username>:sqlpsql source -c "CREATE USER <pg connector username> PASSWORD '<password>'"You can use an existing user. However, you must ensure that the user has the following permissions.
Grant permissions to create a replication slot:
sqlpsql source -c "ALTER ROLE <pg connector username> REPLICATION"Grant permissions to create a publication:
sqlpsql source -c "GRANT CREATE ON DATABASE <database name> TO <pg connector username>"Assign the user permissions on the source database:
sqlpsql source <<EOF GRANT USAGE ON SCHEMA "public" TO <pg connector username>; GRANT SELECT ON ALL TABLES IN SCHEMA "public" TO <pg connector username>; ALTER DEFAULT PRIVILEGES IN SCHEMA "public" GRANT SELECT ON TABLES TO <pg connector username>; EOFIf the tables you are syncing are not in the
publicschema, grant the user permissions for each schema you are syncing:sqlpsql source <<EOF GRANT USAGE ON SCHEMA <schema> TO <pg connector username>; GRANT SELECT ON ALL TABLES IN SCHEMA <schema> TO <pg connector username>; ALTER DEFAULT PRIVILEGES IN SCHEMA <schema> GRANT SELECT ON TABLES TO <pg connector username>; EOFOn each table you want to sync, make
<pg connector username>the owner:sqlpsql source -c 'ALTER TABLE OWNER TO <pg connector username>;'You can skip this step if the replicating user is already the owner of the tables.
Enable replication
DELETEandUPDATEoperationsReplica identity assists data replication by identifying the rows being modified. Your options are that each table and hypertable in the source database should either have:
A primary key: data replication defaults to the primary key of the table being replicated. Nothing to do.
A viable unique index: each table has a unique, non-partial, non-deferrable index that includes only columns marked as
NOT NULL. If a UNIQUE index does not exist, create one to assist the migration. You can delete if after migration.For each table, set
REPLICA IDENTITYto the viable unique index:shellpsql -X -d source -c 'ALTER TABLE REPLICA IDENTITY USING INDEX <_index_name>'No primary key or viable unique index: use brute force.
For each table, set
REPLICA IDENTITYtoFULL:shellpsql -X -d source -c 'ALTER TABLE {table_name} REPLICA IDENTITY FULL'For each
UPDATEorDELETEstatement, Postgres reads the whole table to find all matching rows. This results in significantly slower replication. If you are expecting a large number ofUPDATEorDELETEoperations on the table, best practice is to not useFULL.
Synchronize data to your Tiger Cloud service
To sync data from your Postgres database to your Tiger Cloud service using Tiger Cloud Console:
Connect to your Tiger Cloud service
In [Tiger Cloud Console][portal-ops-mode], select the service to sync live data to.
Connect the source database and the target service
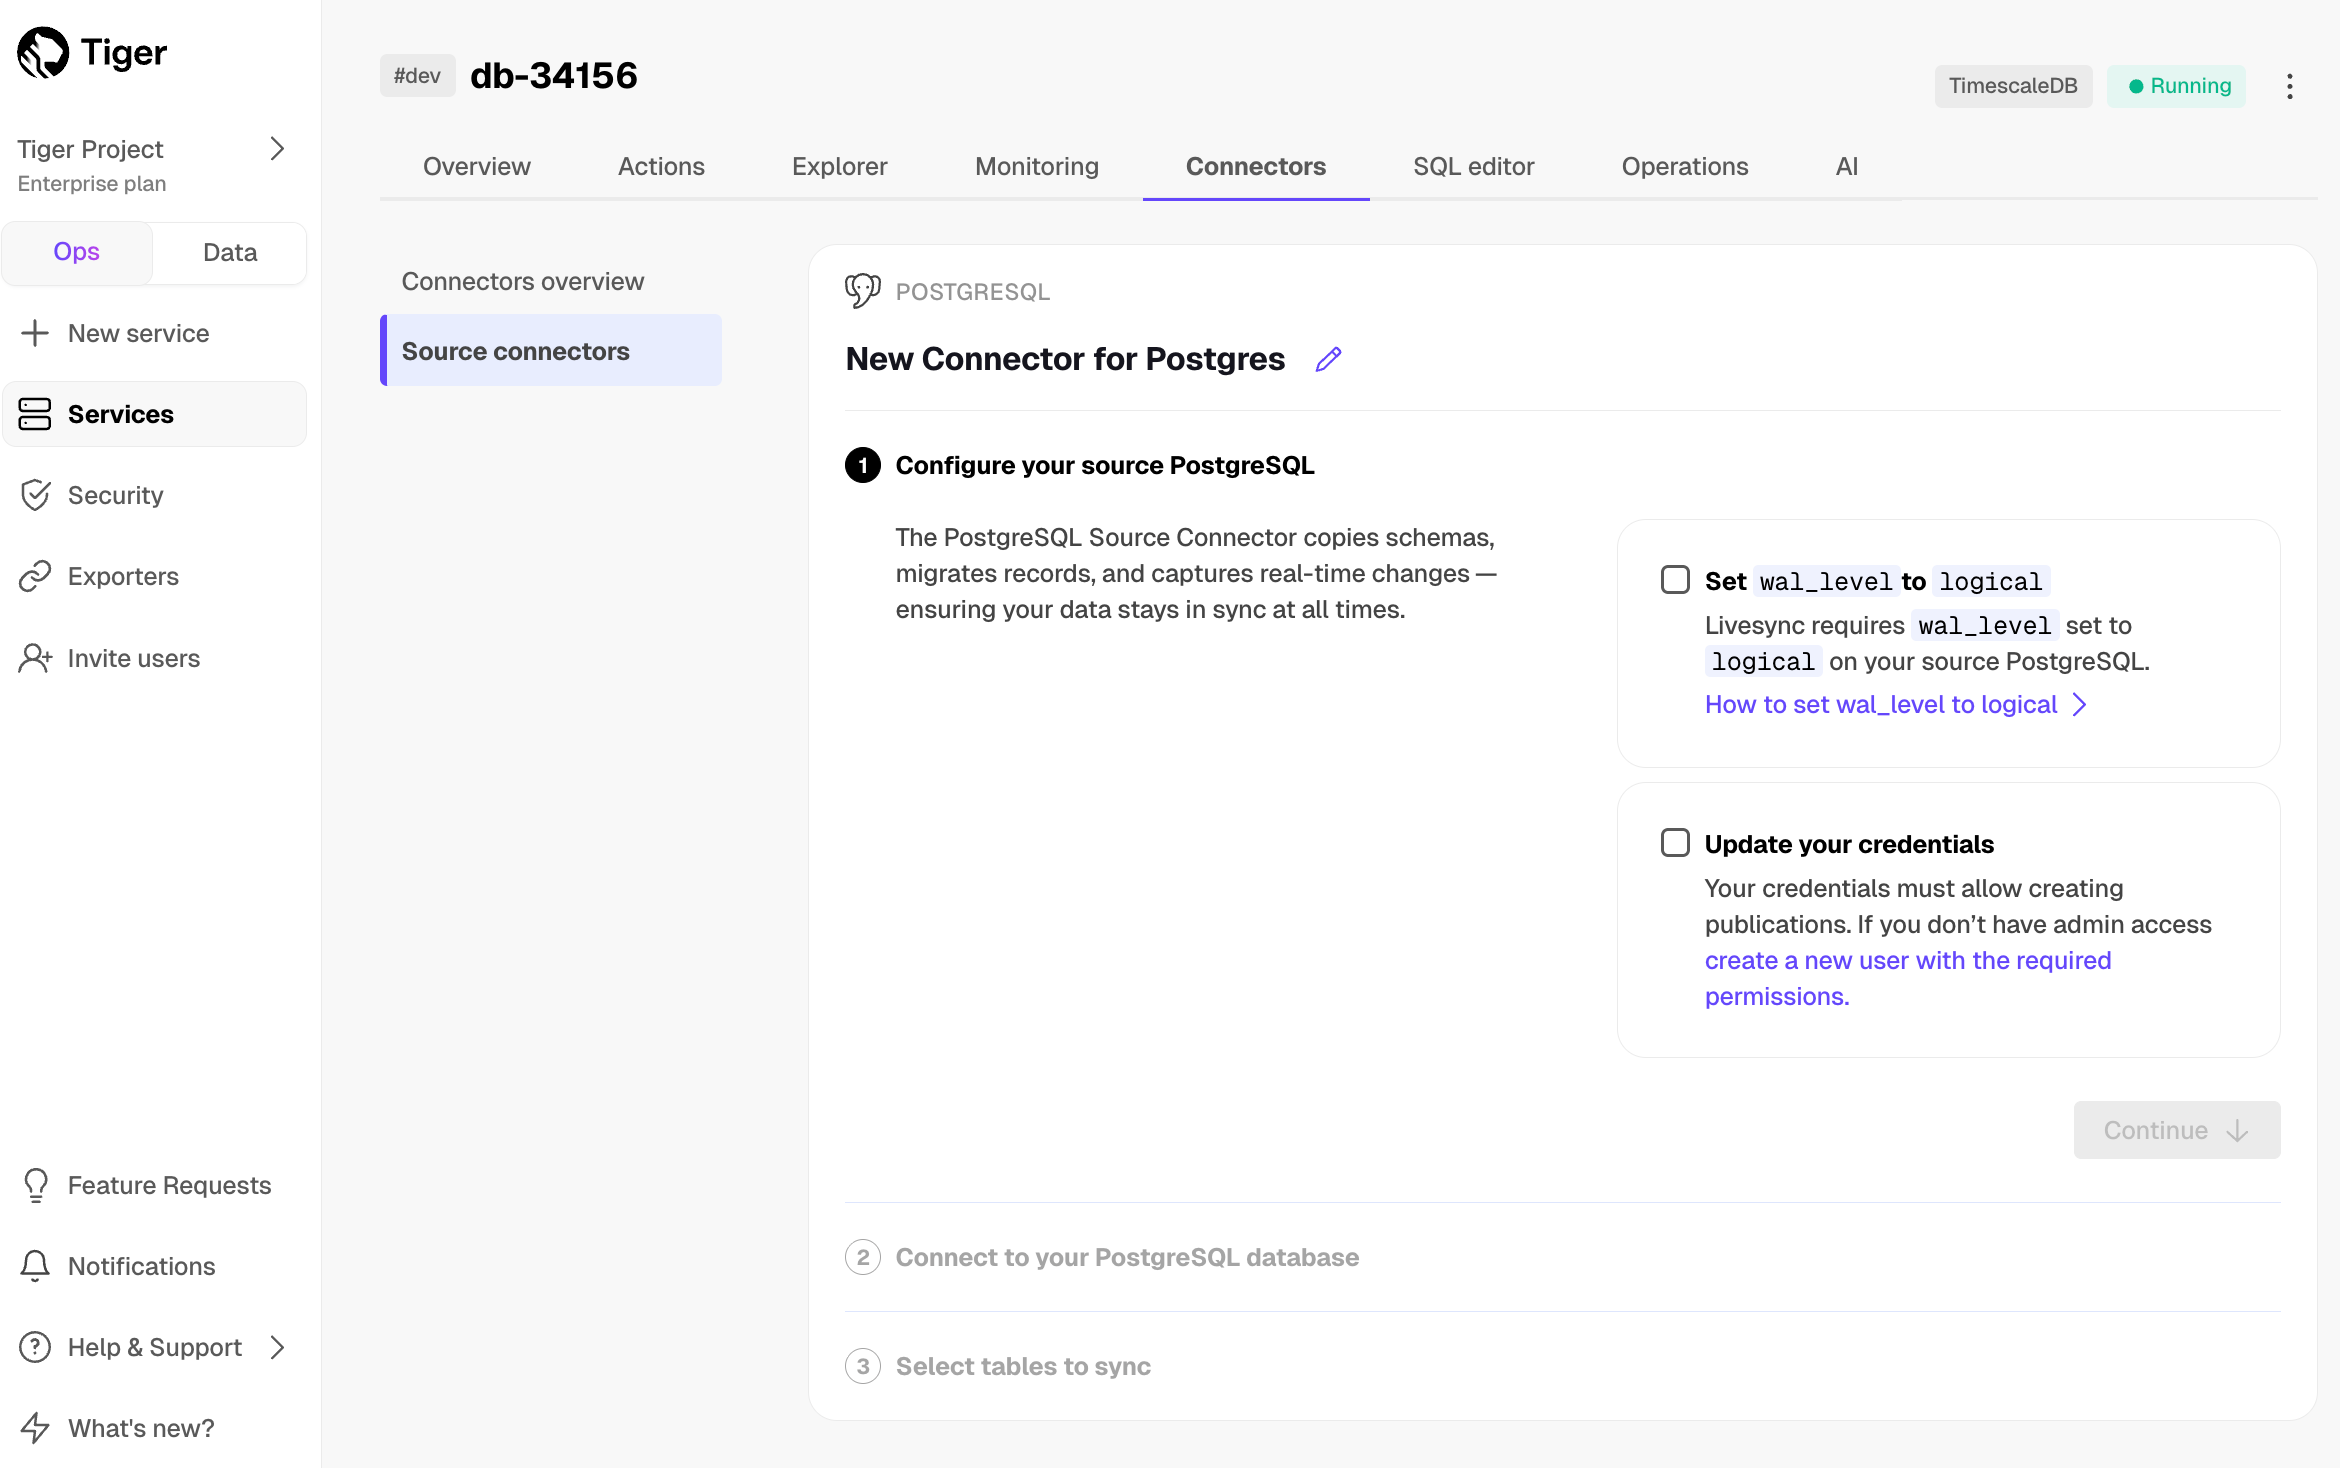
- Click
Connectors>PostgreSQL. - Set the name for the new connector by clicking the pencil icon.
- Check the boxes for
Set wal_level to logicalandUpdate your credentials, then clickContinue. - Enter your database credentials or a Postgres connection string, then click
Connect to database. This is the connection string for [<pg connector username>][livesync-tune-source-db]. Tiger Cloud Console connects to the source database and retrieves the schema information.
- Click
Optimize the data to synchronize in hypertables
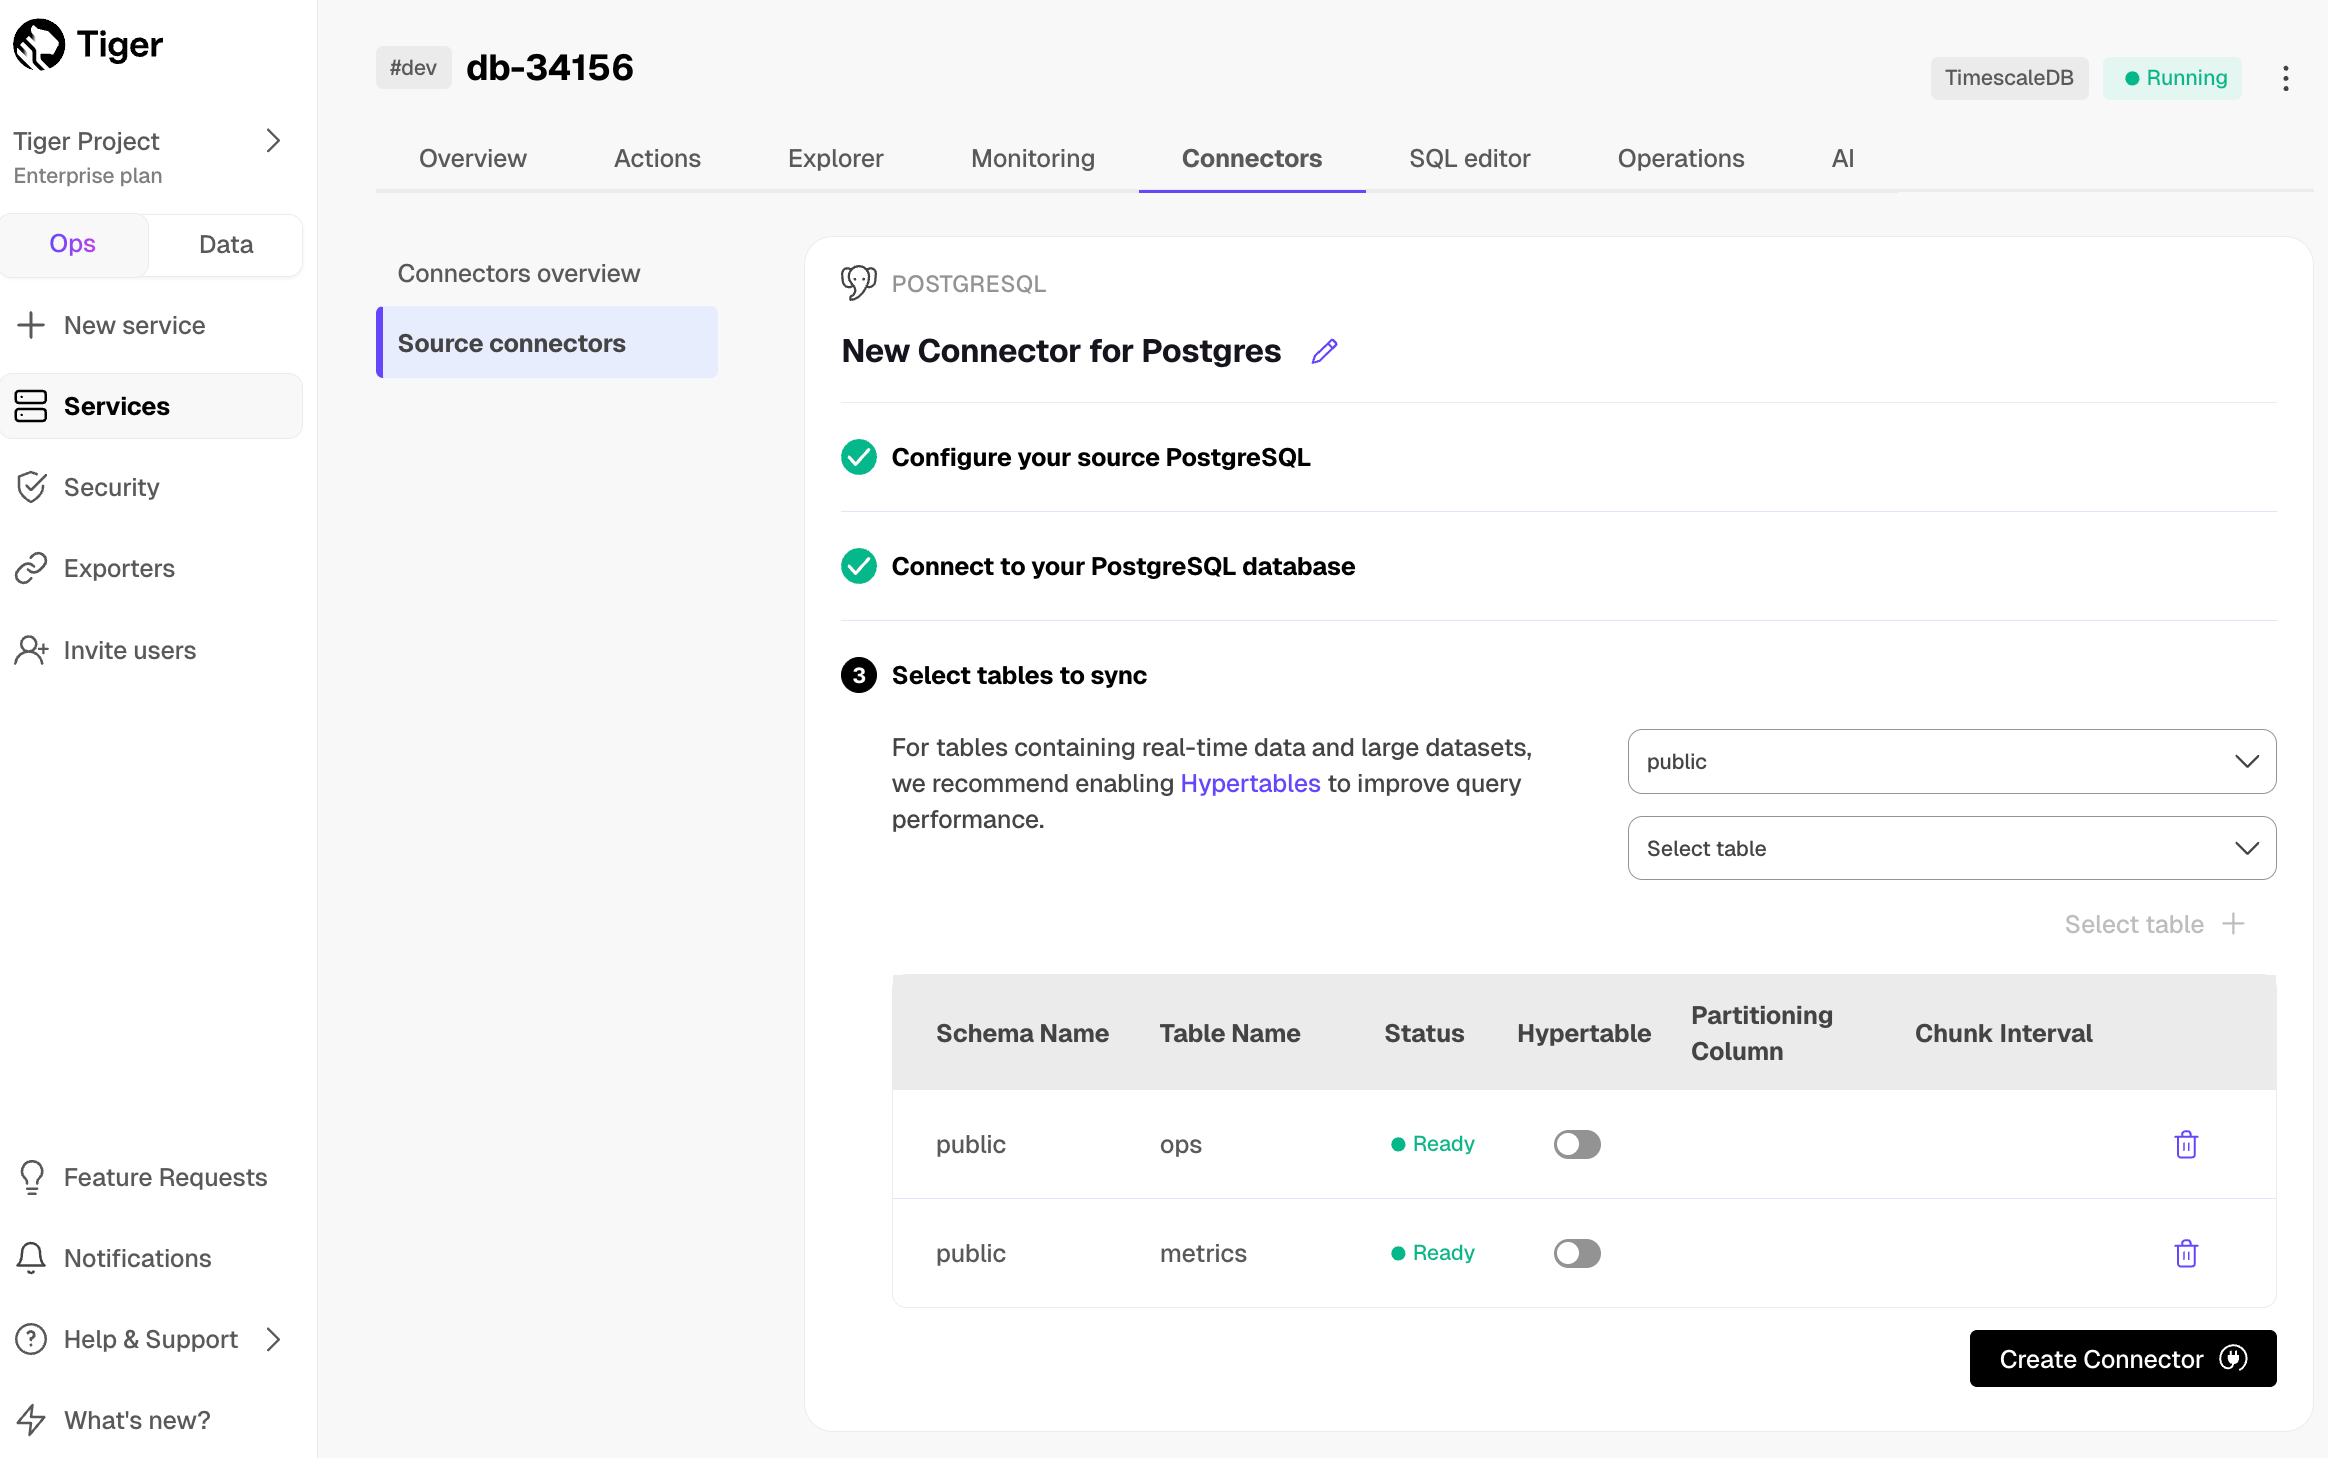
In the
Select tabledropdown, select the tables to sync.Click
Select tables +.Tiger Cloud Console checks the table schema and, if possible, suggests the column to use as the time dimension in a hypertable.
Click
Create Connector.Tiger Cloud Console starts source Postgres connector between the source database and the target service and displays the progress.
Monitor synchronization
To view the amount of data replicated, click
Connectors. The diagram inConnector data flowgives you an overview of the connectors you have created, their status, and how much data has been replicated.To review the syncing progress for each table, click
Connectors>Source connectors, then select the name of your connector in the table.
Manage the connector
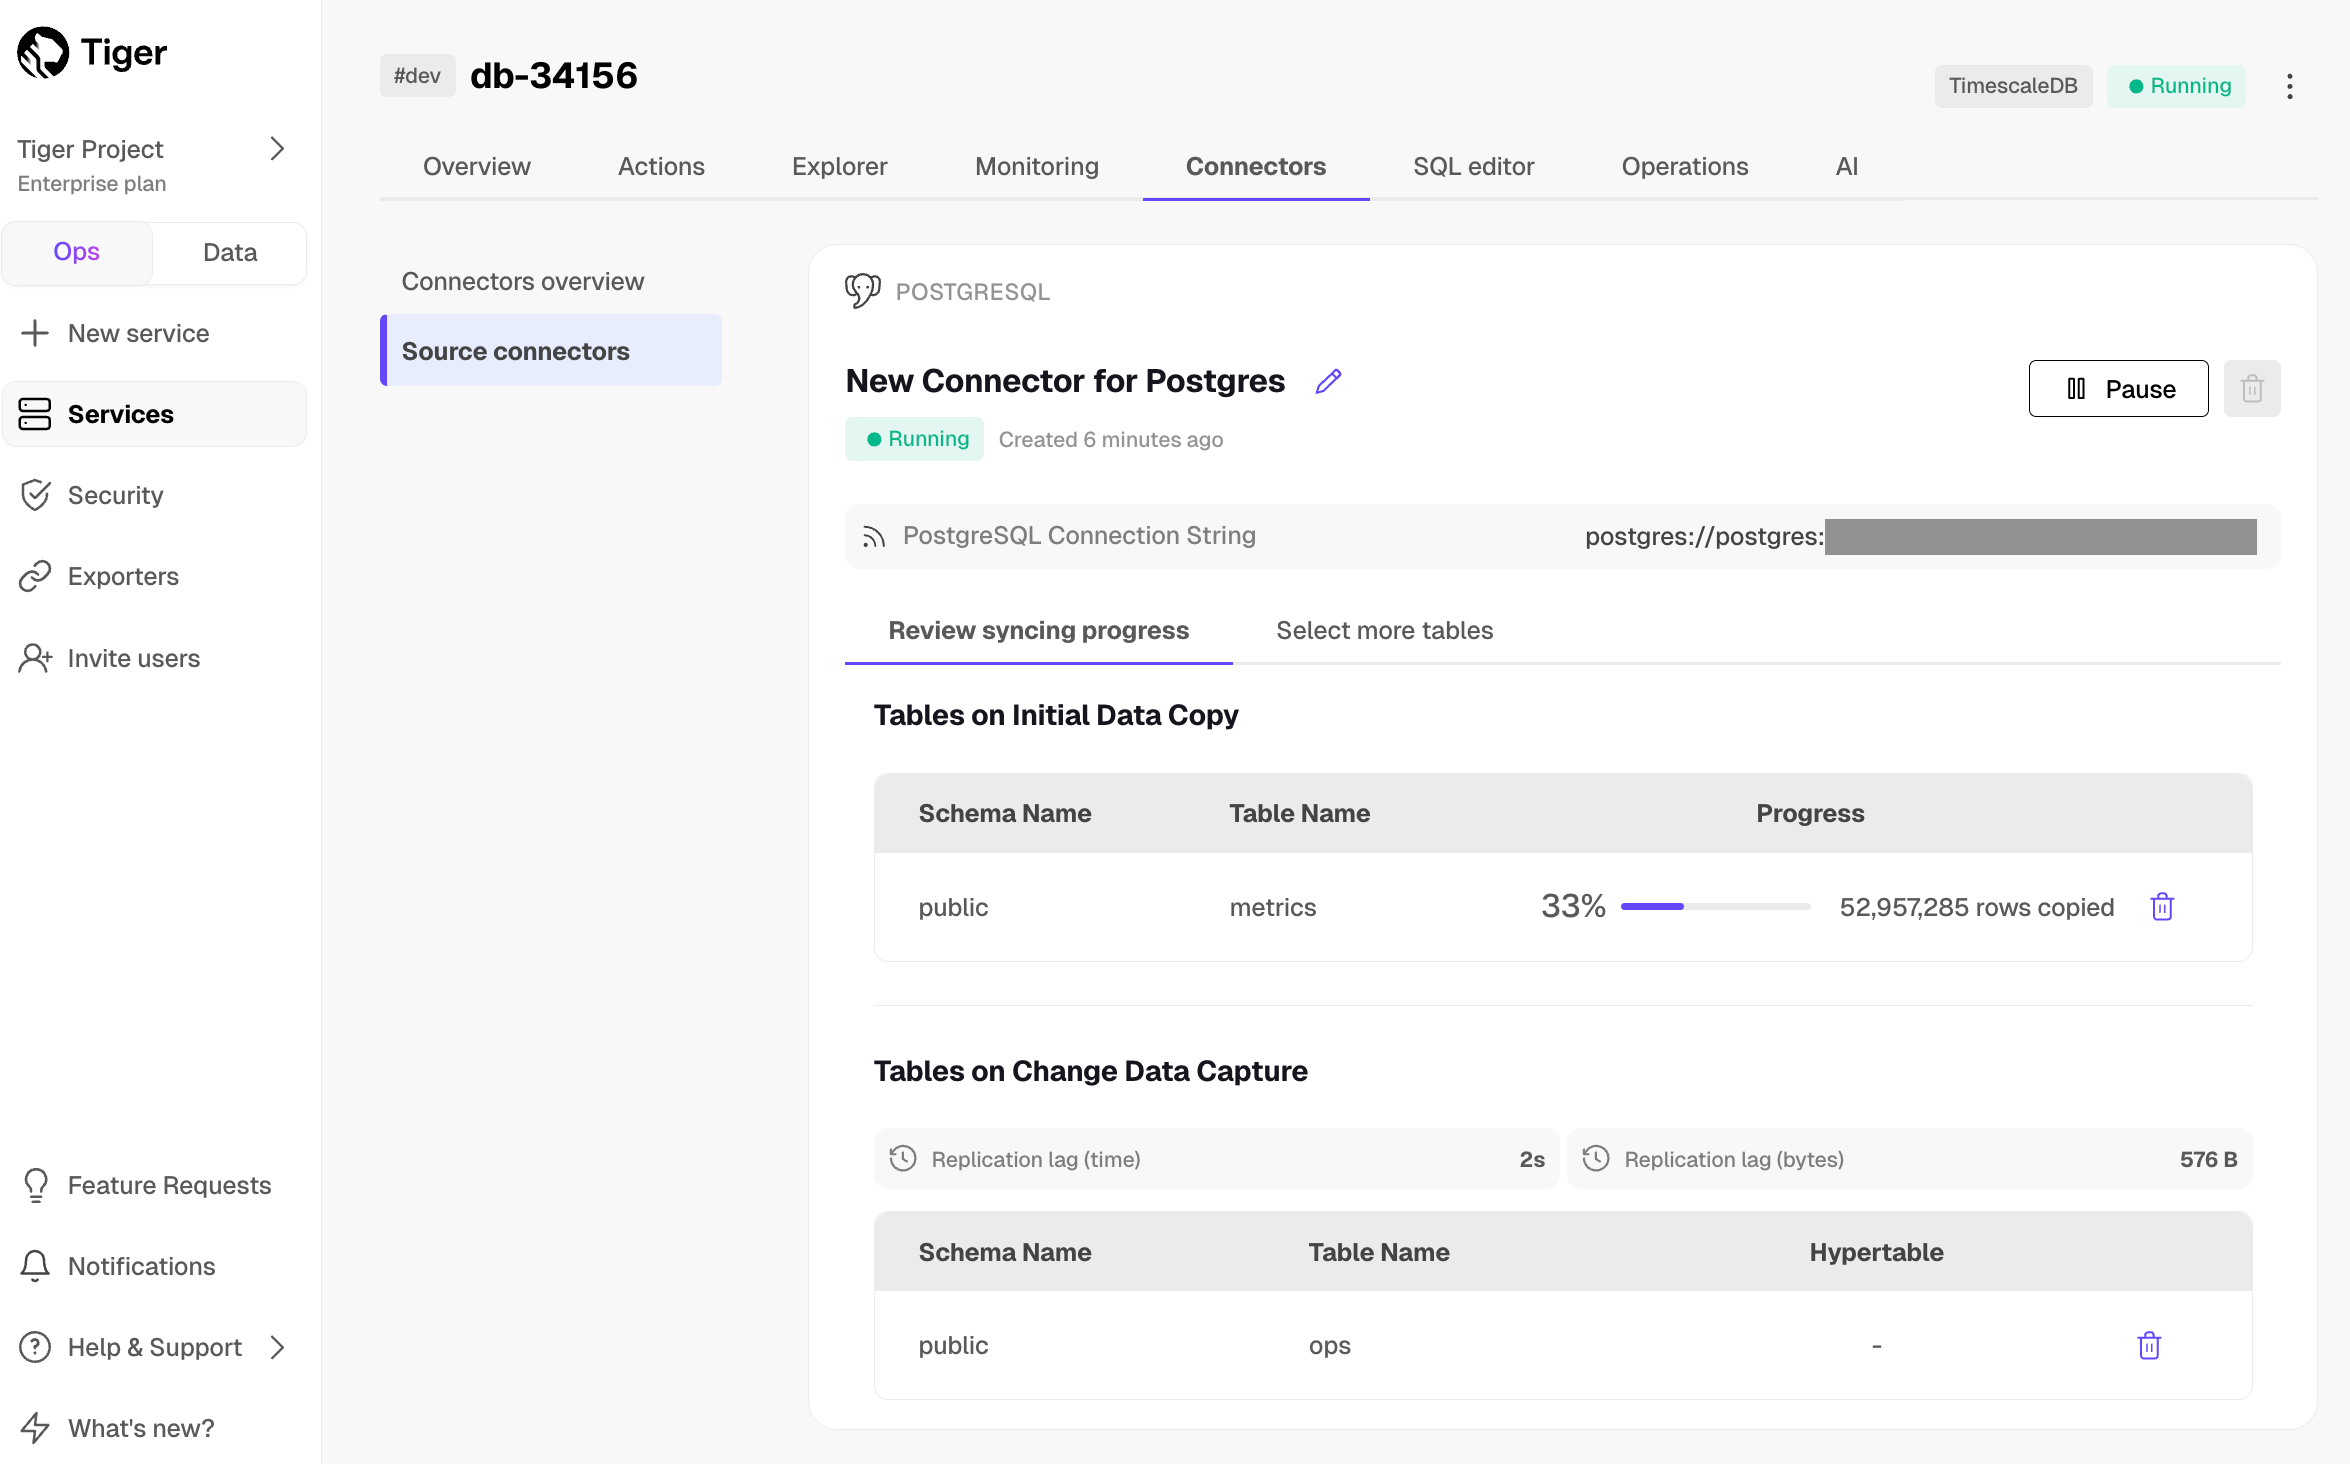
To edit the connector, click
Connectors>Source connectors, then select the name of your connector in the table. You can rename the connector, delete or add new tables for syncing.To pause a connector, click
Connectors>Source connectors, then open the three-dot menu on the right and selectPause.To delete a connector, click
Connectors>Source connectors, then open the three-dot menu on the right and selectDelete. You must pause the connector before deleting it.
And that is it, you are using the source Postgres connector to synchronize all the data, or specific tables, from a Postgres database instance to your Tiger Cloud service, in real time.
Prerequisites
Best practice is to use an [Ubuntu EC2 instance][create-ec2-instance] hosted in the same region as your Tiger Cloud service to move data. That is, the machine you run the commands on to move your data from your source database to your target Tiger Cloud service.
Before you move your data:
Create a target [Tiger Cloud service][created-a-database-service-in-timescale].
Each Tiger Cloud service has a single Postgres instance that supports the [most popular extensions][all-available-extensions]. Tiger Cloud services do not support tablespaces, and there is no superuser associated with a service. Best practice is to create a Tiger Cloud service with at least 8 CPUs for a smoother experience. A higher-spec instance can significantly reduce the overall migration window.
To ensure that maintenance does not run while migration is in progress, best practice is to [adjust the maintenance window][adjust-maintenance-window].
Ensure that the source Postgres instance and the target Tiger Cloud service have the same extensions installed.
The source Postgres connector does not create extensions on the target. If the table uses column types from an extension, first create the extension on the target Tiger Cloud service before syncing the table.
[Install Docker][install-docker] on your sync machine.
For a better experience, use a 4 CPU/16GB EC2 instance or greater to run the source Postgres connector.
Install the [Postgres client tools][install-psql] on your sync machine.
This includes
psql,pg_dump,pg_dumpall, andvacuumdbcommands.
Limitations
- The schema is not migrated by the source Postgres connector, you use
pg_dump/pg_restoreto migrate it.
This works for Postgres databases only as source. TimescaleDB is not yet supported.
The source must be running Postgres 13 or later.
Schema changes must be co-ordinated.
Make compatible changes to the schema in your Tiger Cloud service first, then make the same changes to the source Postgres instance.
Ensure that the source Postgres instance and the target Tiger Cloud service have the same extensions installed.
The source Postgres connector does not create extensions on the target. If the table uses column types from an extension, first create the extension on the target Tiger Cloud service before syncing the table.
There is WAL volume growth on the source Postgres instance during large table copy.
Continuous aggregate invalidation
The connector uses
session_replication_role=replicaduring data replication, which prevents table triggers from firing. This includes the internal triggers that mark continuous aggregates as invalid when underlying data changes.If you have continuous aggregates on your target database, they do not automatically refresh for data inserted during the migration. This limitation only applies to data below the continuous aggregate's materialization watermark. For example, backfilled data. New rows synced above the continuous aggregate watermark are used correctly when refreshing.
This can lead to:
- Missing data in continuous aggregates for the migration period.
- Stale aggregate data.
- Queries returning incomplete results.
If the continuous aggregate exists in the source database, best practice is to add it to the Postgres connector publication. If it only exists on the target database, manually refresh the continuous aggregate using the
forceoption of [refresh_continuous_aggregate][refresh-caggs].
Set your connection strings
The <user> in the SOURCE connection must have the replication role granted in order to create a replication slot.
These variables hold the connection information for the source database and target Tiger Cloud service. In Terminal on your migration machine, set the following:
export SOURCE="postgres://<user>:<password>@<source host>:<source port>/<db_name>"
export TARGET="postgres://tsdbadmin:<PASSWORD>@<HOST>:<PORT>/tsdb?sslmode=require"
You find the connection information for your Tiger Cloud service in the configuration file you downloaded when you created the service.
Avoid using connection strings that route through connection poolers like PgBouncer or similar tools. This tool requires a direct connection to the database to function properly.
Tune your source database
Updating parameters on a Postgres instance will cause an outage. Choose a time that will cause the least issues to tune this database.
Update the DB instance parameter group for your source database
In [https://console.aws.amazon.com/rds/home#databases:][databases], select the RDS instance to migrate.
Click
Configuration, scroll down and note theDB instance parameter group, then clickParameter groupsClick
Create parameter group, fill in the form with the following values, then clickCreate.- Parameter group name - whatever suits your fancy.
- Description - knock yourself out with this one.
- Engine type -
PostgreSQL - Parameter group family - the same as
DB instance parameter groupin yourConfiguration.
In
Parameter groups, select the parameter group you created, then clickEdit.Update the following parameters, then click
Save changes.rds.logical_replicationset to1: record the information needed for logical decoding.wal_sender_timeoutset to0: disable the timeout for the sender process.
In RDS, navigate back to your [databases][databases], select the RDS instance to migrate, and click
Modify.Scroll down to
Database options, select your new parameter group, and clickContinue.Click
Apply immediatelyor choose a maintenance window, then clickModify DB instance.Changing parameters will cause an outage. Wait for the database instance to reboot before continuing.
Verify that the settings are live in your database.
Enable replication
DELETEandUPDATEoperationsReplica identity assists data replication by identifying the rows being modified. Your options are that each table and hypertable in the source database should either have:
A primary key: data replication defaults to the primary key of the table being replicated. Nothing to do.
A viable unique index: each table has a unique, non-partial, non-deferrable index that includes only columns marked as
NOT NULL. If a UNIQUE index does not exist, create one to assist the migration. You can delete if after migration.For each table, set
REPLICA IDENTITYto the viable unique index:shellpsql -X -d source -c 'ALTER TABLE REPLICA IDENTITY USING INDEX <_index_name>'No primary key or viable unique index: use brute force.
For each table, set
REPLICA IDENTITYtoFULL:shellpsql -X -d source -c 'ALTER TABLE {table_name} REPLICA IDENTITY FULL'For each
UPDATEorDELETEstatement, Postgres reads the whole table to find all matching rows. This results in significantly slower replication. If you are expecting a large number ofUPDATEorDELETEoperations on the table, best practice is to not useFULL.
Tune the Write Ahead Log (WAL) on the Postgres source database
sqlpsql source <<EOF ALTER SYSTEM SET wal_level='logical'; ALTER SYSTEM SET max_wal_senders=10; ALTER SYSTEM SET wal_sender_timeout=0; EOFThis will require a restart of the Postgres source database.
Create a user for the connector and assign permissions
Create
<pg connector username>:sqlpsql source -c "CREATE USER <pg connector username> PASSWORD '<password>'"You can use an existing user. However, you must ensure that the user has the following permissions.
Grant permissions to create a replication slot:
sqlpsql source -c "ALTER ROLE <pg connector username> REPLICATION"Grant permissions to create a publication:
sqlpsql source -c "GRANT CREATE ON DATABASE <database name> TO <pg connector username>"Assign the user permissions on the source database:
sqlpsql source <<EOF GRANT USAGE ON SCHEMA "public" TO <pg connector username>; GRANT SELECT ON ALL TABLES IN SCHEMA "public" TO <pg connector username>; ALTER DEFAULT PRIVILEGES IN SCHEMA "public" GRANT SELECT ON TABLES TO <pg connector username>; EOFIf the tables you are syncing are not in the
publicschema, grant the user permissions for each schema you are syncing:sqlpsql source <<EOF GRANT USAGE ON SCHEMA <schema> TO <pg connector username>; GRANT SELECT ON ALL TABLES IN SCHEMA <schema> TO <pg connector username>; ALTER DEFAULT PRIVILEGES IN SCHEMA <schema> GRANT SELECT ON TABLES TO <pg connector username>; EOFOn each table you want to sync, make
<pg connector username>the owner:sqlpsql source -c 'ALTER TABLE OWNER TO <pg connector username>;'You can skip this step if the replicating user is already the owner of the tables.
Enable replication
DELETEandUPDATEoperationsReplica identity assists data replication by identifying the rows being modified. Your options are that each table and hypertable in the source database should either have:
A primary key: data replication defaults to the primary key of the table being replicated. Nothing to do.
A viable unique index: each table has a unique, non-partial, non-deferrable index that includes only columns marked as
NOT NULL. If a UNIQUE index does not exist, create one to assist the migration. You can delete if after migration.For each table, set
REPLICA IDENTITYto the viable unique index:shellpsql -X -d source -c 'ALTER TABLE REPLICA IDENTITY USING INDEX <_index_name>'No primary key or viable unique index: use brute force.
For each table, set
REPLICA IDENTITYtoFULL:shellpsql -X -d source -c 'ALTER TABLE {table_name} REPLICA IDENTITY FULL'For each
UPDATEorDELETEstatement, Postgres reads the whole table to find all matching rows. This results in significantly slower replication. If you are expecting a large number ofUPDATEorDELETEoperations on the table, best practice is to not useFULL.
Migrate the table schema to the Tiger Cloud service
Use pg_dump to:
- Download the schema from the source database
pg_dump source \
--no-privileges \
--no-owner \
--no-publications \
--no-subscriptions \
--no-table-access-method \
--no-tablespaces \
--schema-only \
--file=schema.sql- Apply the schema on the target service
psql target -f schema.sqlConvert partitions and tables with time-series data into hypertables
For efficient querying and analysis, you can convert tables which contain time-series or events data, and tables that are already partitioned using Postgres declarative partition into [hypertables][about-hypertables].
Convert tables to hypertables
Run the following on each table in the target Tiger Cloud service to convert it to a hypertable:
shellpsql -X -d target -c "SELECT public.create_hypertable('', by_range('<partition column>', '<chunk interval>'::interval));"For example, to convert the metrics table into a hypertable with time as a partition column and 1 day as a partition interval:
shellpsql -X -d target -c "SELECT public.create_hypertable('public.metrics', by_range('time', '1 day'::interval));"Convert Postgres partitions to hypertables
Rename the partition and create a new regular table with the same name as the partitioned table, then convert to a hypertable:
shellpsql target -f - <<'EOF' BEGIN; ALTER TABLE public.events RENAME TO events_part; CREATE TABLE public.events(LIKE public.events_part INCLUDING ALL); SELECT create_hypertable('public.events', by_range('time', '1 day'::interval)); COMMIT;
EOF
## Specify the tables to synchronize

After the schema is migrated, you [`CREATE PUBLICATION`][create-publication] on the source database that
specifies the tables to synchronize.

1. **Create a publication that specifies the table to synchronize**

A `PUBLICATION` enables you to synchronize some or all the tables in the schema or database.

```sql
CREATE PUBLICATION <publication_name> FOR TABLE , ;
To add tables after to an existing publication, use [ALTER PUBLICATION][alter-publication]**
ALTER PUBLICATION <publication_name> ADD TABLE ;Publish the Postgres declarative partitioned table
sqlALTER PUBLICATION <publication_name> SET(publish_via_partition_root=true);To convert partitioned table to hypertable, follow Convert partitions and tables with time-series data into hypertables.
Stop syncing a table in the
PUBLICATION, useDROP TABLEsqlALTER PUBLICATION <publication_name> DROP TABLE ;
Synchronize data to your Tiger Cloud service
You use the source Postgres connector docker image to synchronize changes in real time from a Postgres database instance to a Tiger Cloud service:
Start the source Postgres connector
As you run the source Postgres connector continuously, best practice is to run it as a Docker daemon.
shelldocker run -d --rm --name livesync timescale/live-sync:v0.1.25 run \ --publication <publication_name> --subscription <subscription_name> \ --source source --target target --table-map--publication: The name of the publication as you created in the previous step. To use multiple publications, repeat the--publicationflag.--subscription: The name that identifies the subscription on the target Tiger Cloud service.--source: The connection string to the source Postgres database.--target: The connection string to the target Tiger Cloud service.--table-map: (Optional) A JSON string that maps source tables to target tables. If not provided, the source and target table names are assumed to be the same. For example, to map the source tablemetricsto the target tablemetrics_data:--table-map '{"source": {"schema": "public", "table": "metrics"}, "target": {"schema": "public", "table": "metrics_data"}}'To map only the schema, use:
--table-map '{"source": {"schema": "public"}, "target": {"schema": "analytics"}}'This flag can be repeated for multiple table mappings.
Capture logs
Once the source Postgres connector is running as a docker daemon, you can also capture the logs:
shelldocker logs -f livesyncView the progress of tables being synchronized
List the tables being synchronized by the source Postgres connector using the
_ts_live_sync.subscription_reltable in the target Tiger Cloud service:bashpsql target -c "SELECT * FROM _ts_live_sync.subscription_rel"You see something like the following:
subname pubname schemaname tablename rrelid state lsn updated_at last_error created_at rows_copied approximate_rows bytes_copied approximate_size target_schema target_table
|livesync | analytics | public | metrics | 20856 | r | 6/1A8CBA48 | 2025-06-24 06:16:21.434898+00 | | 2025-06-24 06:03:58.172946+00 | 18225440 | 18225440 | 1387359359 | 1387359359 | public | metrics |
The state column indicates the current state of the table synchronization. Possible values for state are:
| state | description |
|---|---|
| d | initial table data sync |
| f | initial table data sync completed |
| s | catching up with the latest changes |
| r | table is ready, syncing live changes |
To see the replication lag, run the following against the SOURCE database:
psql source -f - <<'EOF'
SELECT
   slot_name,
   pg_size_pretty(pg_current_wal_flush_lsn() - confirmed_flush_lsn) AS lag
FROM pg_replication_slots
WHERE slot_name LIKE 'live_sync_%' AND slot_type = 'logical'
EOF
Add or remove tables from the publication
To add tables, use [ALTER PUBLICATION .. ADD TABLE][alter-publication]**
sqlALTER PUBLICATION <publication_name> ADD TABLE ;To remove tables, use [ALTER PUBLICATION .. DROP TABLE][alter-publication]**
sqlALTER PUBLICATION <publication_name> DROP TABLE ;Update table statistics
If you have a large table, you can run
ANALYZEon the target Tiger Cloud service to update the table statistics after the initial sync is complete.This helps the query planner make better decisions for query execution plans.
bashvacuumdb --analyze --verbose --dbname=targetStop the source Postgres connector
shelldocker stop live-sync(Optional) Reset sequence nextval on the target Tiger Cloud service
The source Postgres connector does not automatically reset the sequence nextval on the target Tiger Cloud service.
Run the following script to reset the sequence for all tables that have a serial or identity column in the target Tiger Cloud service:
bashpsql target -f - <<'EOF' DO $$ DECLARE rec RECORD; BEGIN FOR rec IN ( SELECT sr.target_schema AS table_schema, sr.target_table AS table_name, col.column_name, pg_get_serial_sequence( sr.target_schema || '.' || sr.target_table, col.column_name ) AS seqname FROM _ts_live_sync.subscription_rel AS sr JOIN information_schema.columns AS col ON col.table_schema = sr.target_schema AND col.table_name = sr.target_table WHERE col.column_default LIKE 'nextval(%' -- only serial/identity columns ) LOOP EXECUTE format( 'SELECT setval(%L, COALESCE((SELECT MAX(%I) FROM %I.%I), 0) + 1, false );', rec.seqname, -- the sequence identifier rec.column_name, -- the column to MAX() rec.table_schema, -- schema for MAX() rec.table_name -- table for MAX() ); END LOOP; END; $$ LANGUAGE plpgsql;
EOF
1. **Clean up**

Use the `--drop` flag to remove the replication slots created by the source Postgres connector on the source database.

```shell
docker run -it --rm --name livesync timescale/live-sync:v0.1.25 run \
   --publication <publication_name> --subscription <subscription_name> \
   --source source --target target \
   --drop
===== PAGE: https://docs.tigerdata.com/migrate/livesync-for-s3/ =====
Sync data from S3 to your service
You use the source S3 connector in Tiger Cloud to synchronize CSV and Parquet files from an S3 bucket to your Tiger Cloud service in real time. The connector runs continuously, enabling you to leverage Tiger Cloud as your analytics database with data constantly synced from S3. This lets you take full advantage of Tiger Cloud's real-time analytics capabilities without having to develop or manage custom ETL solutions between S3 and Tiger Cloud.
You can use the source S3 connector to synchronize your existing and new data. Here's what the connector can do:
Sync data from an S3 bucket instance to a Tiger Cloud service:
- Use glob patterns to identify the objects to sync.
- Watch an S3 bucket for new files and import them automatically. It runs on a configurable schedule and tracks processed files.
- Important: The connector processes files in [lexicographical order][lex-order]. It uses the name of the last file processed as a marker and fetches only files later in the alphabet in subsequent queries. Files added with names earlier in the alphabet than the marker are skipped and never synced. For example, if you add the file Bob when the marker is at Elephant, Bob is never processed.
- For large backlogs, check every minute until caught up.
Sync data from multiple file formats:
- CSV: check for compression in GZ and ZIP format, then process using [timescaledb-parallel-copy][parallel-copy].
- Parquet: convert to CSV, then process using [timescaledb-parallel-copy][parallel-copy].
The source S3 connector offers an option to enable a [hypertable][about-hypertables] during the file-to-table schema mapping setup. You can enable [columnstore][compression] and [continuous aggregates][caggs] through the SQL editor once the connector has started running.
The connector offers a default 1-minute polling interval. This means that Tiger Cloud checks the S3 source every minute for new data. You can customize this interval by setting up a cron expression.
The source S3 connector continuously imports data from an Amazon S3 bucket into your database. It monitors your S3 bucket for new files matching a specified pattern and automatically imports them into your designated database table.
Note: the connector currently only syncs existing and new files—it does not support updating or deleting records based on updates and deletes from S3 to tables in a Tiger Cloud service.
Early access: this source S3 connector is not supported for production use. If you have any questions or feedback, talk to us in <a href="https://app.slack.com/client/T4GT3N2JK/C086NU9EZ88">#livesync in the Tiger Community</a>.
Prerequisites
To follow the steps on this page:
Create a target [Tiger Cloud service][create-service] with real-time analytics enabled.
You need your [connection details][connection-info].
Ensure access to a standard Amazon S3 bucket containing your data files.
Directory buckets are not supported.
Configure access credentials for the S3 bucket. The following credentials are supported:
[IAM Role][credentials-iam].
Configure the trust policy. Set the:
Principal:arn:aws:iam::142548018081:role/timescale-s3-connections.ExternalID: set to the [Tiger Cloud project and Tiger Cloud service ID][connection-project-service-id] of the service you are syncing to in the format<projectId>/<serviceId>.This is to avoid the [confused deputy problem][confused-deputy-problem].
Give the following access permissions:
s3:GetObject.s3:ListBucket.
[Public anonymous user][credentials-public].
Limitations
File naming: Files must follow lexicographical ordering conventions. Files with names that sort earlier than already-processed files are permanently skipped. Example: if
file_2024_01_15.csvhas been processed, a file namedfile_2024_01_10.csvadded later will never be synced. Recommended naming patterns: timestamps (for example,YYYY-MM-DD-HHMMSS), sequential numbers with fixed padding (for example,file_00001,file_00002).CSV:
Maximum file size: 1 GB
To increase this limit, contact sales@tigerdata.com
Maximum row size: 2 MB
Supported compressed formats:
- GZ
- ZIP
Advanced settings:
- Delimiter: the default character is
,, you can choose a different delimiter - Skip header: skip the first row if your file has headers
- Delimiter: the default character is
Parquet:
- Maximum file size: 1 GB
- Maximum row size: 2 MB
Sync iteration:
To prevent system overload, the connector tracks up to 100 files for each sync iteration. Additional checks only fill empty queue slots.
Synchronize data to your Tiger Cloud service
To sync data from your S3 bucket to your Tiger Cloud service using Tiger Cloud Console:
Connect to your Tiger Cloud service
In [Tiger Cloud Console][portal-ops-mode], select the service to sync live data to.
Connect the source S3 bucket to the target service
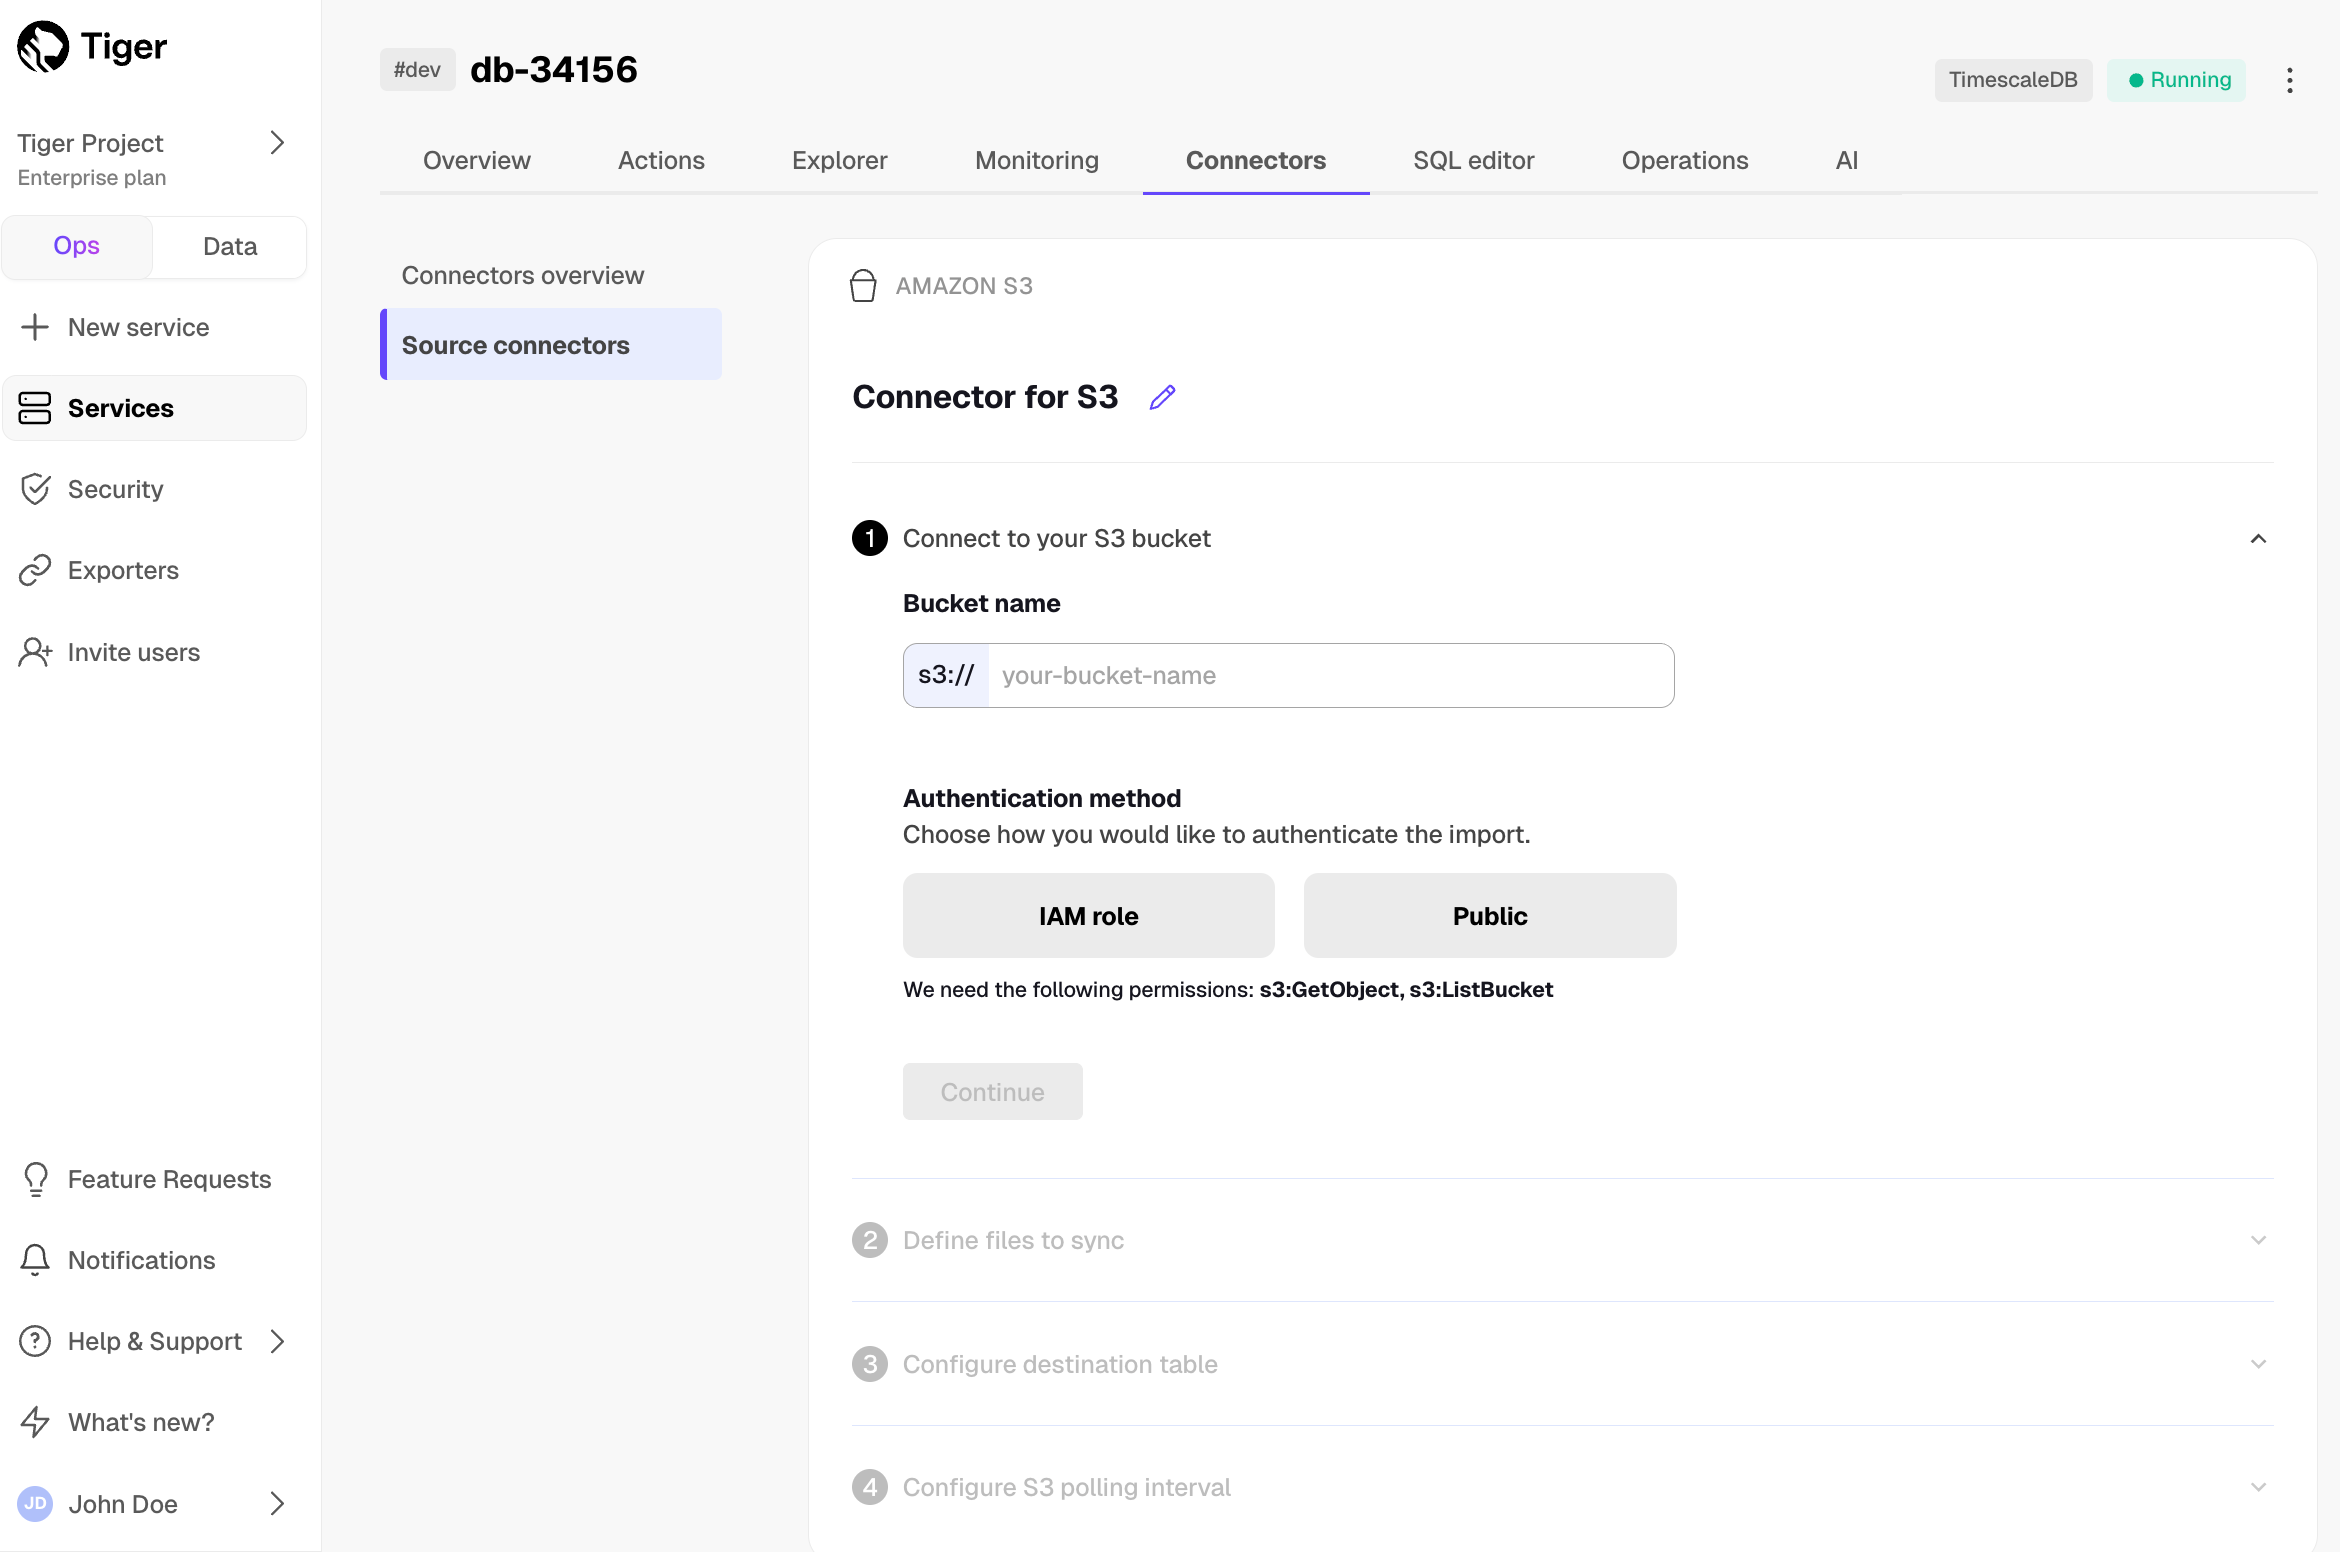
Click
Connectors>Amazon S3.Click the pencil icon, then set the name for the new connector.
Set the
Bucket nameandAuthentication method, then clickContinue.For instruction on creating the IAM role to connect your S3 bucket, click
Learn how. Tiger Cloud Console connects to the source bucket.In
Define files to sync, choose theFile typeand set theGlob pattern.Use the following patterns:
<folder name>/*: match all files in a folder. Also, any pattern ending with/is treated as/*.<folder name>/**: match all recursively.<folder name>/**/*.csv: match a specific file type.
The source S3 connector uses prefix filters where possible, place patterns carefully at the end of your glob expression. AWS S3 doesn't support complex filtering. If your expression filters too many files, the list operation may time out.
Click the search icon. You see the files to sync. Click
Continue.
Optimize the data to synchronize in hypertables
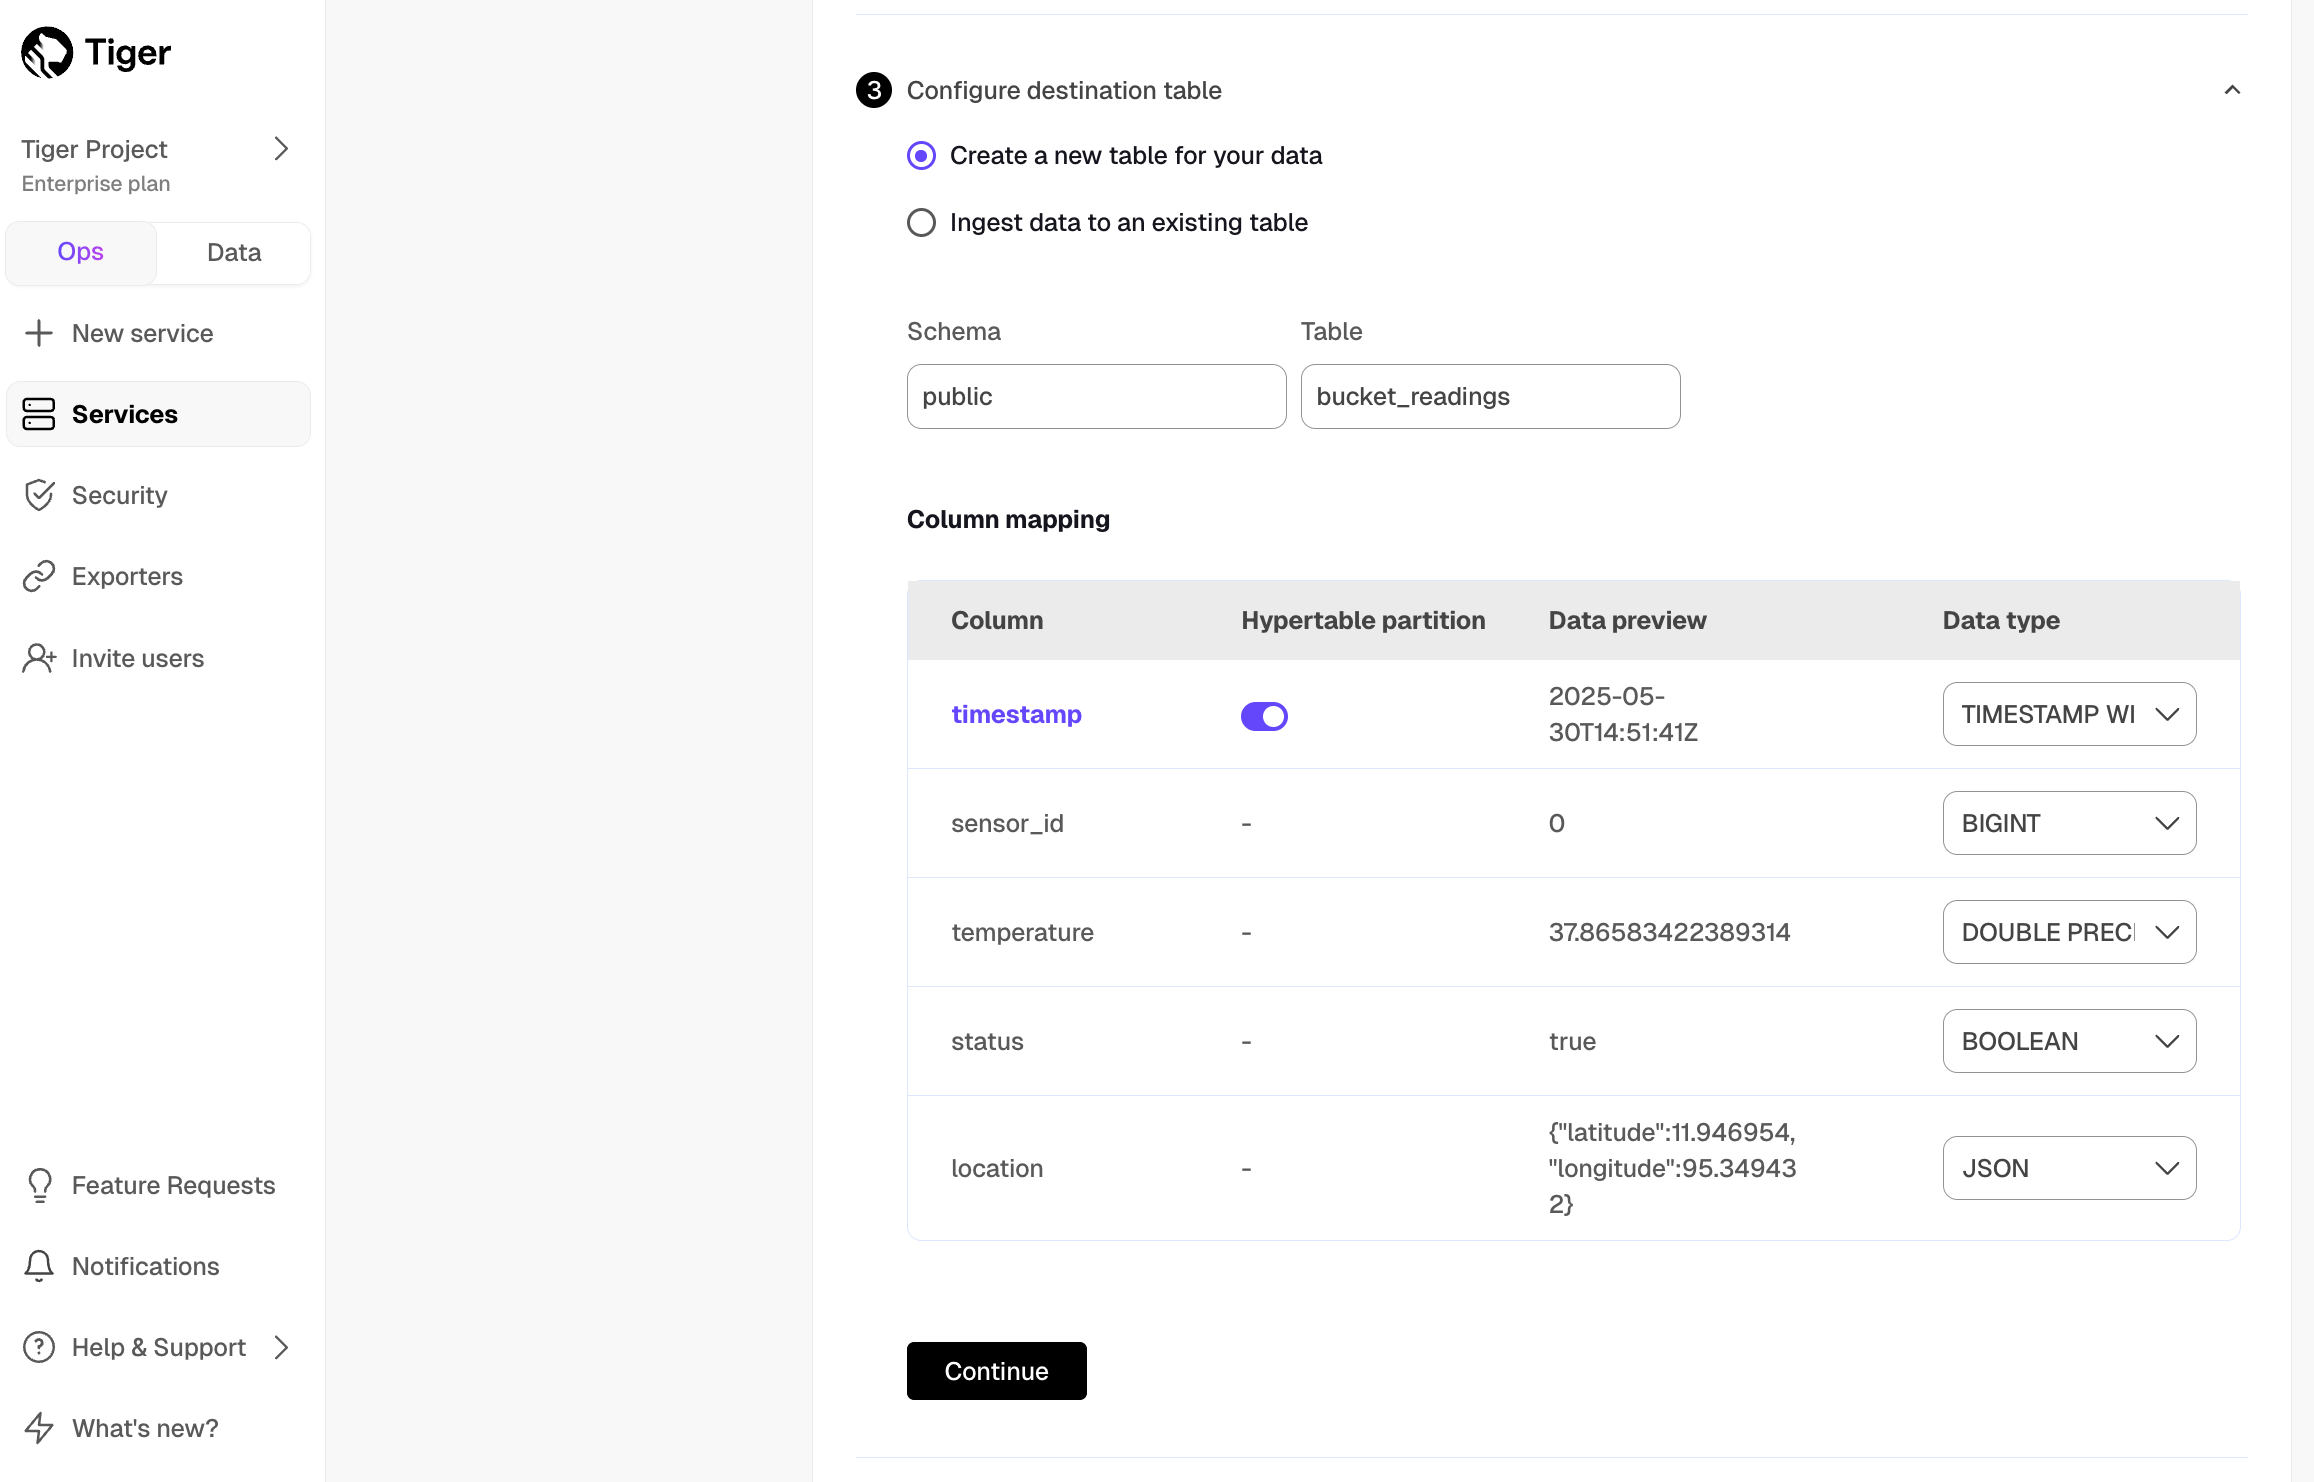
Tiger Cloud Console checks the file schema and, if possible, suggests the column to use as the time dimension in a [hypertable][about-hypertables].
Choose
Create a new table for your dataorIngest data to an existing table.Choose the
Data typefor each column, then clickContinue.Choose the interval. This can be a minute, an hour, or use a [cron expression][cron-expression].
Click
Start Connector.Tiger Cloud Console starts the connection between the source database and the target service and displays the progress.
Monitor synchronization
To view the amount of data replicated, click
Connectors. The diagram inConnector data flowgives you an overview of the connectors you have created, their status, and how much data has been replicated.To view file import statistics and logs, click
Connectors>Source connectors, then select the name of your connector in the table.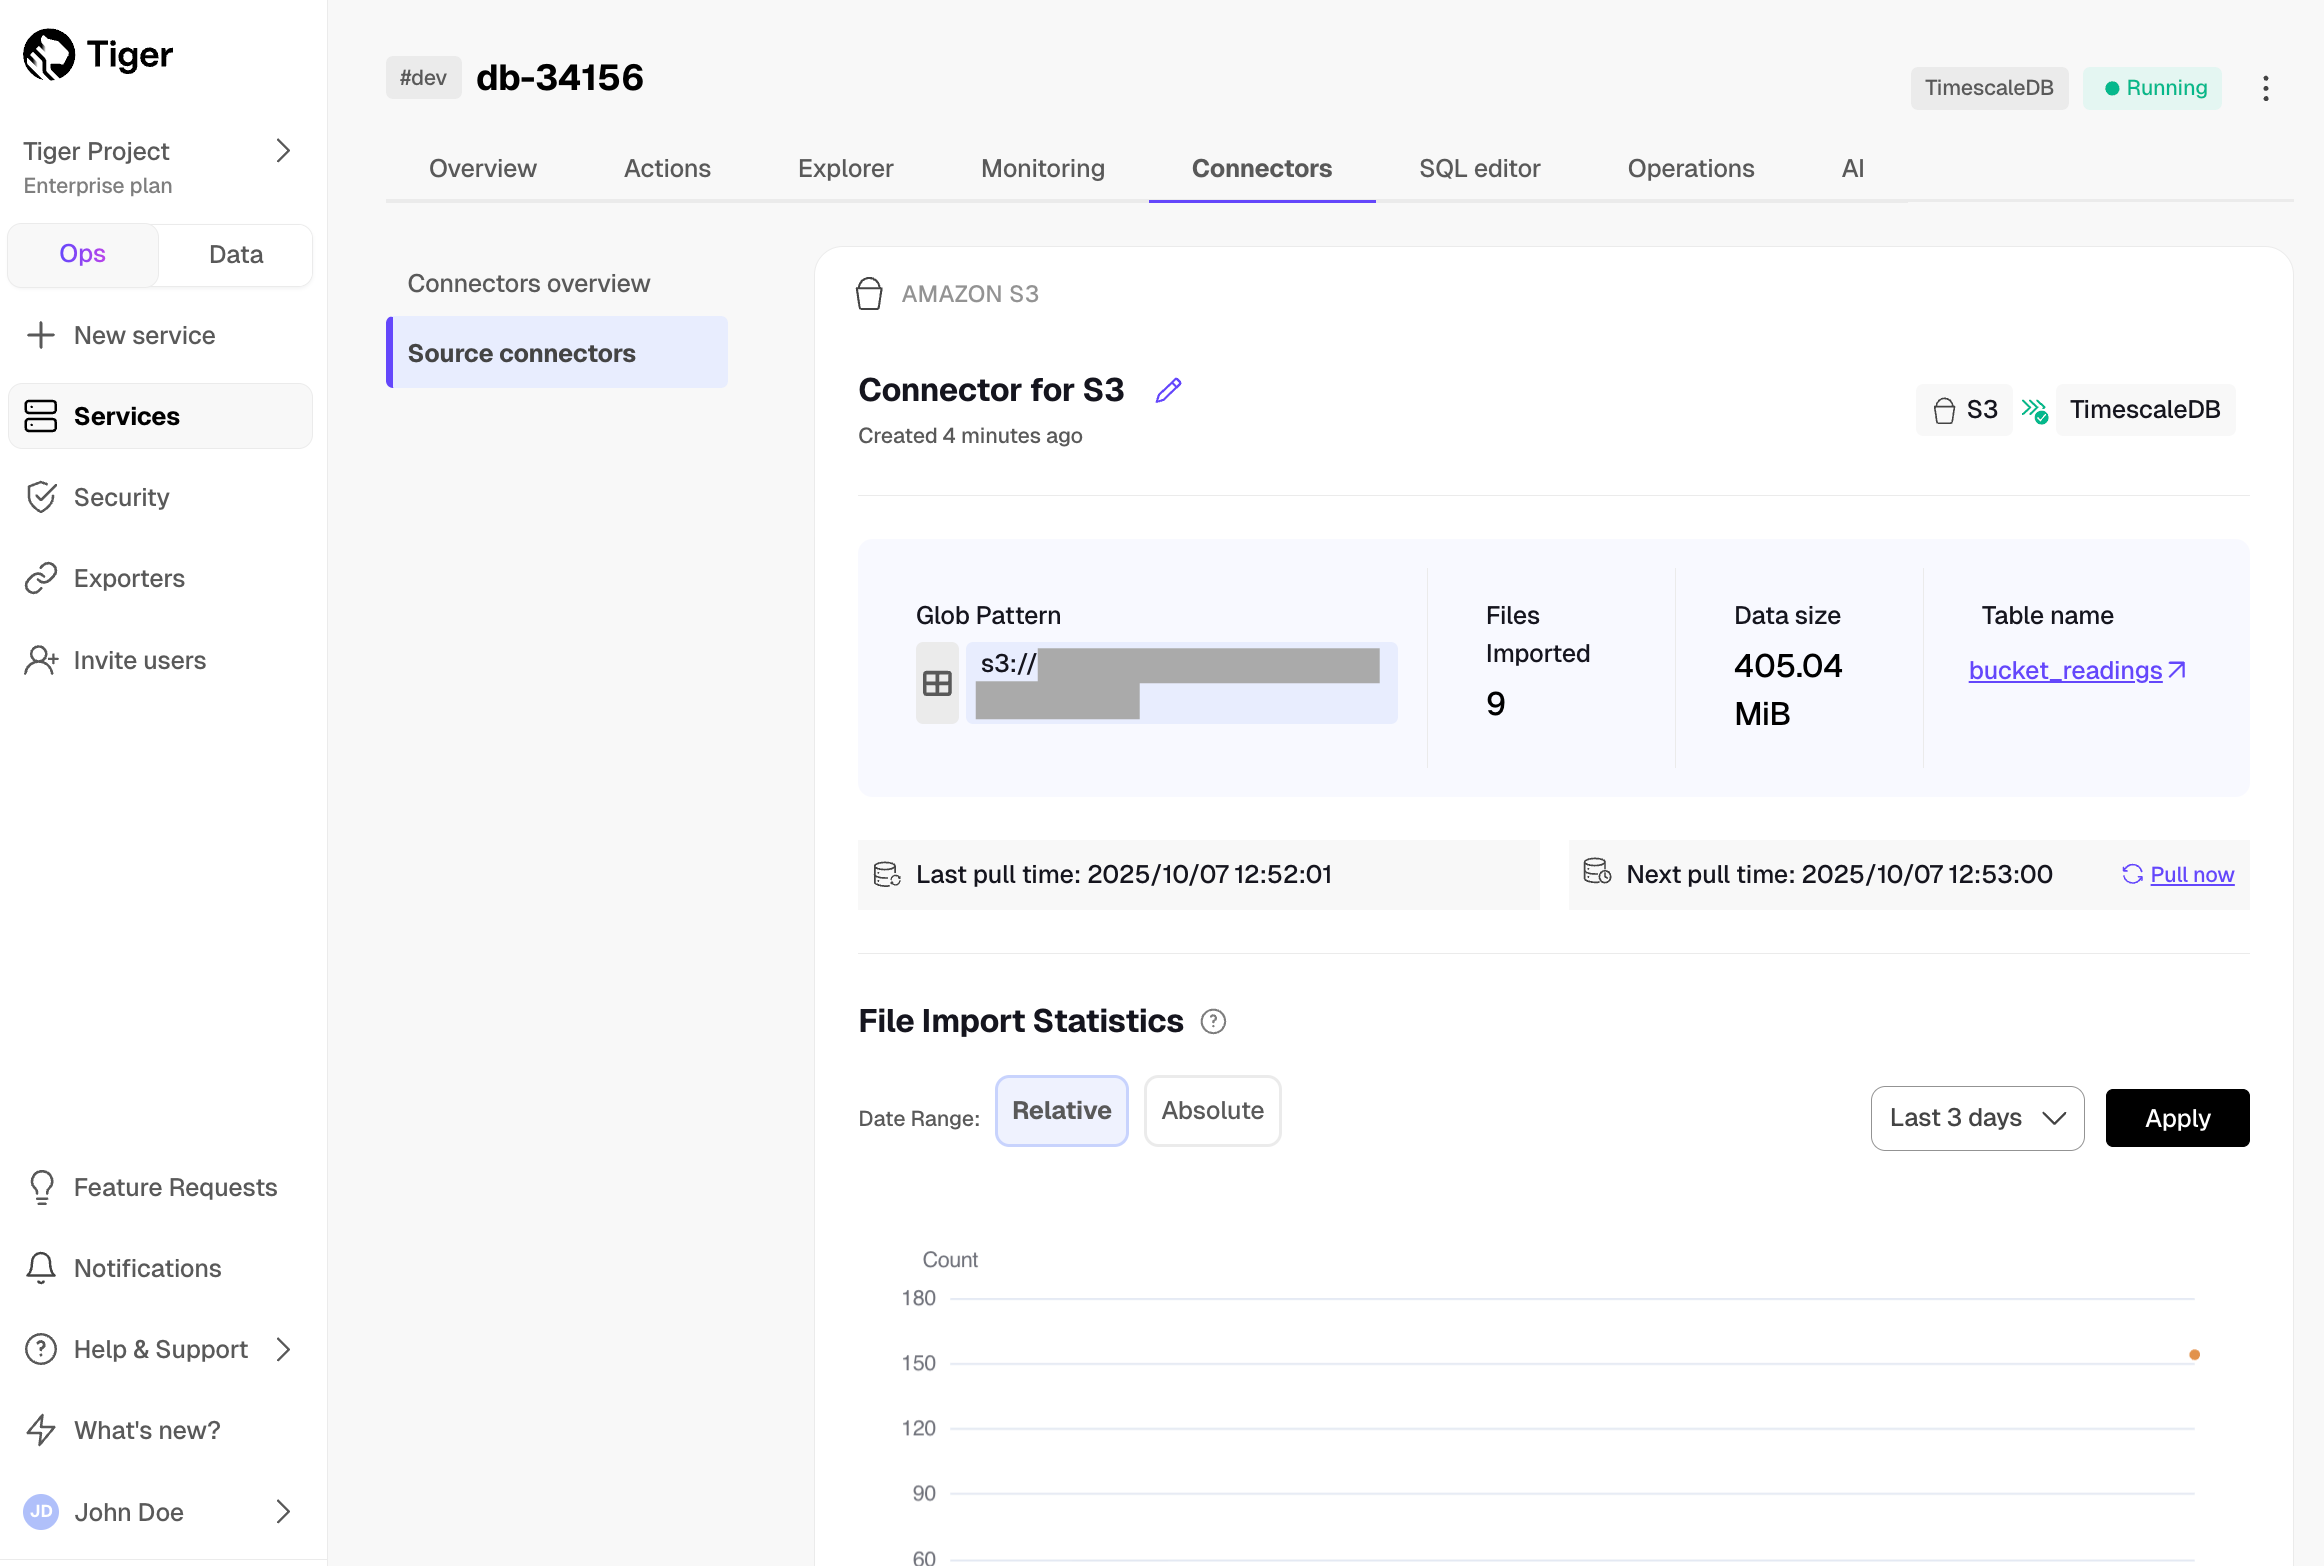
Manage the connector
- To pause the connector, click
Connectors>Source connectors. Open the three-dot menu next to your connector in the table, then clickPause.
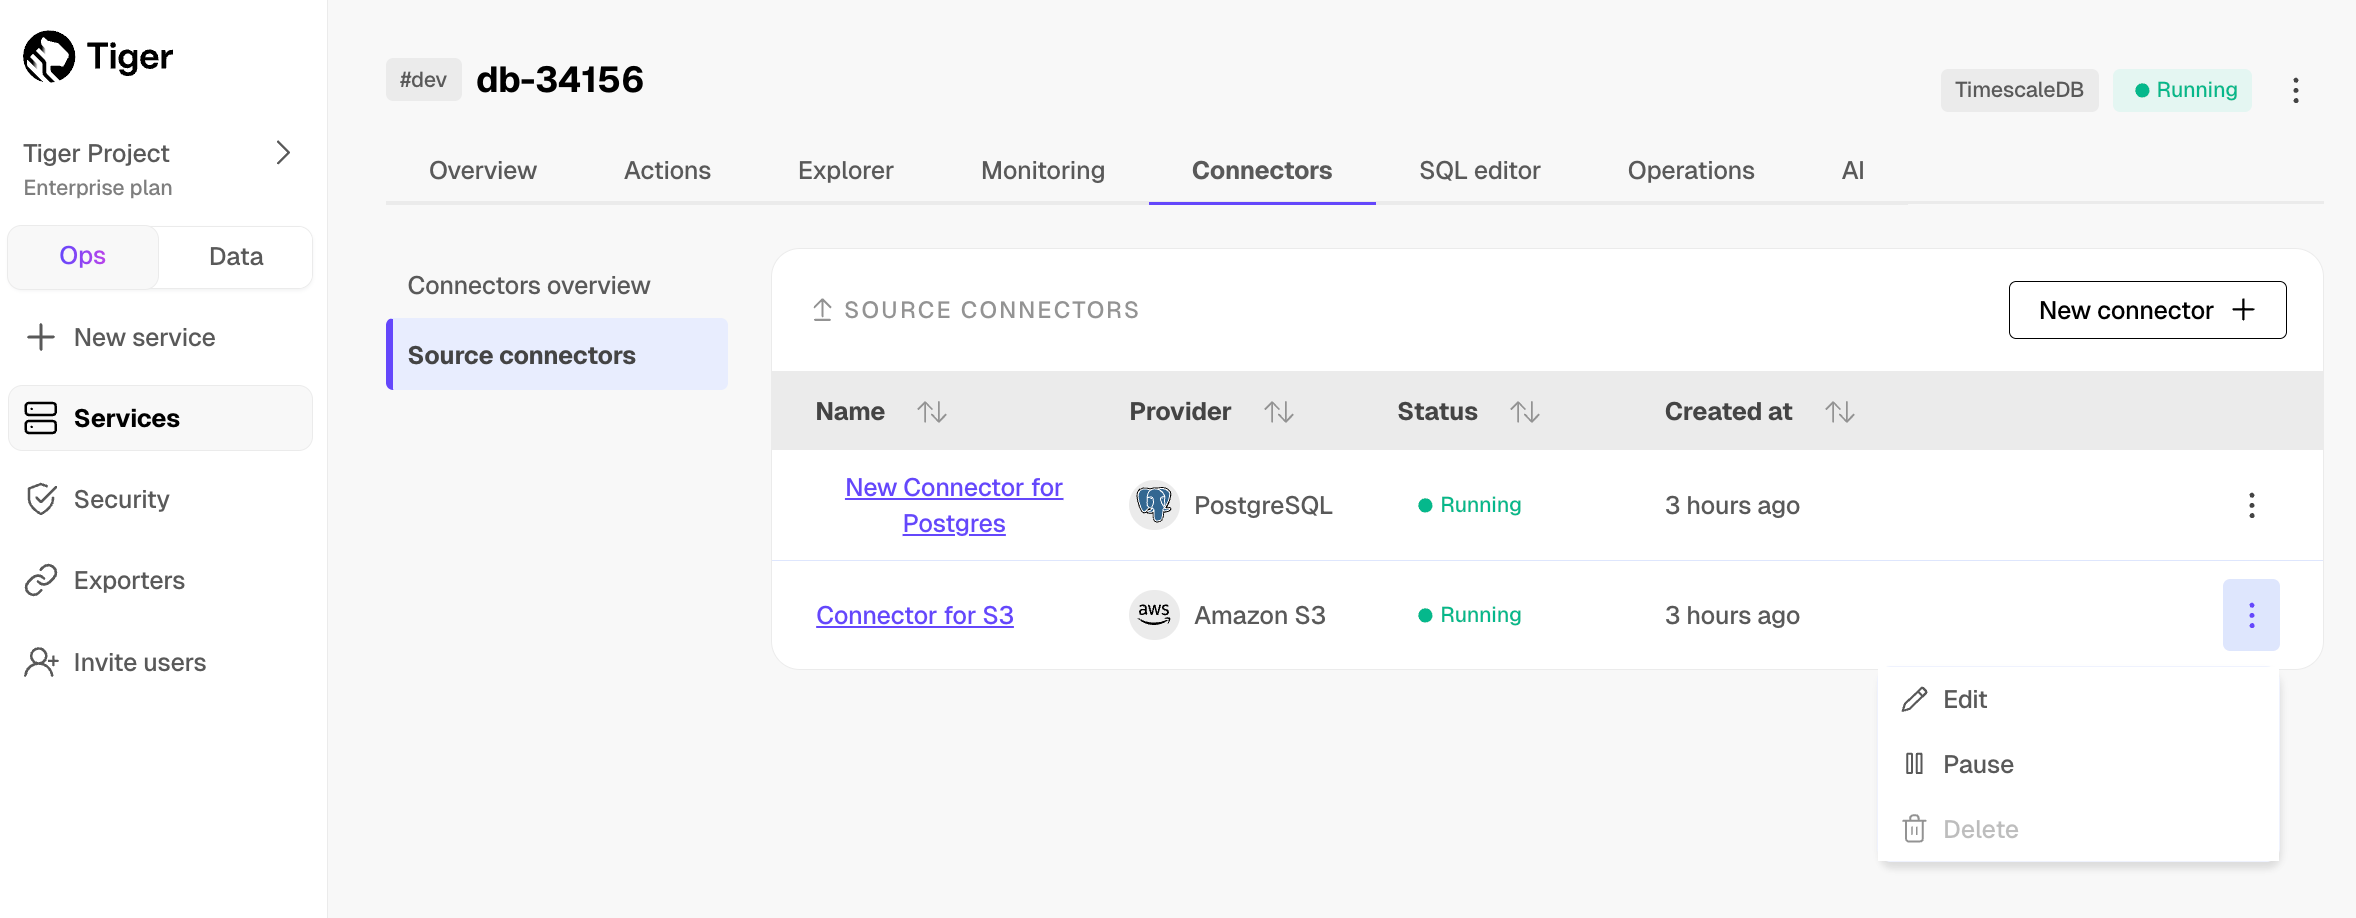
- To edit the connector, click
Connectors>Source connectors. Open the three-dot menu next to your connector in the table, then clickEditand scroll down toModify your Connector. You must pause the connector before editing it.
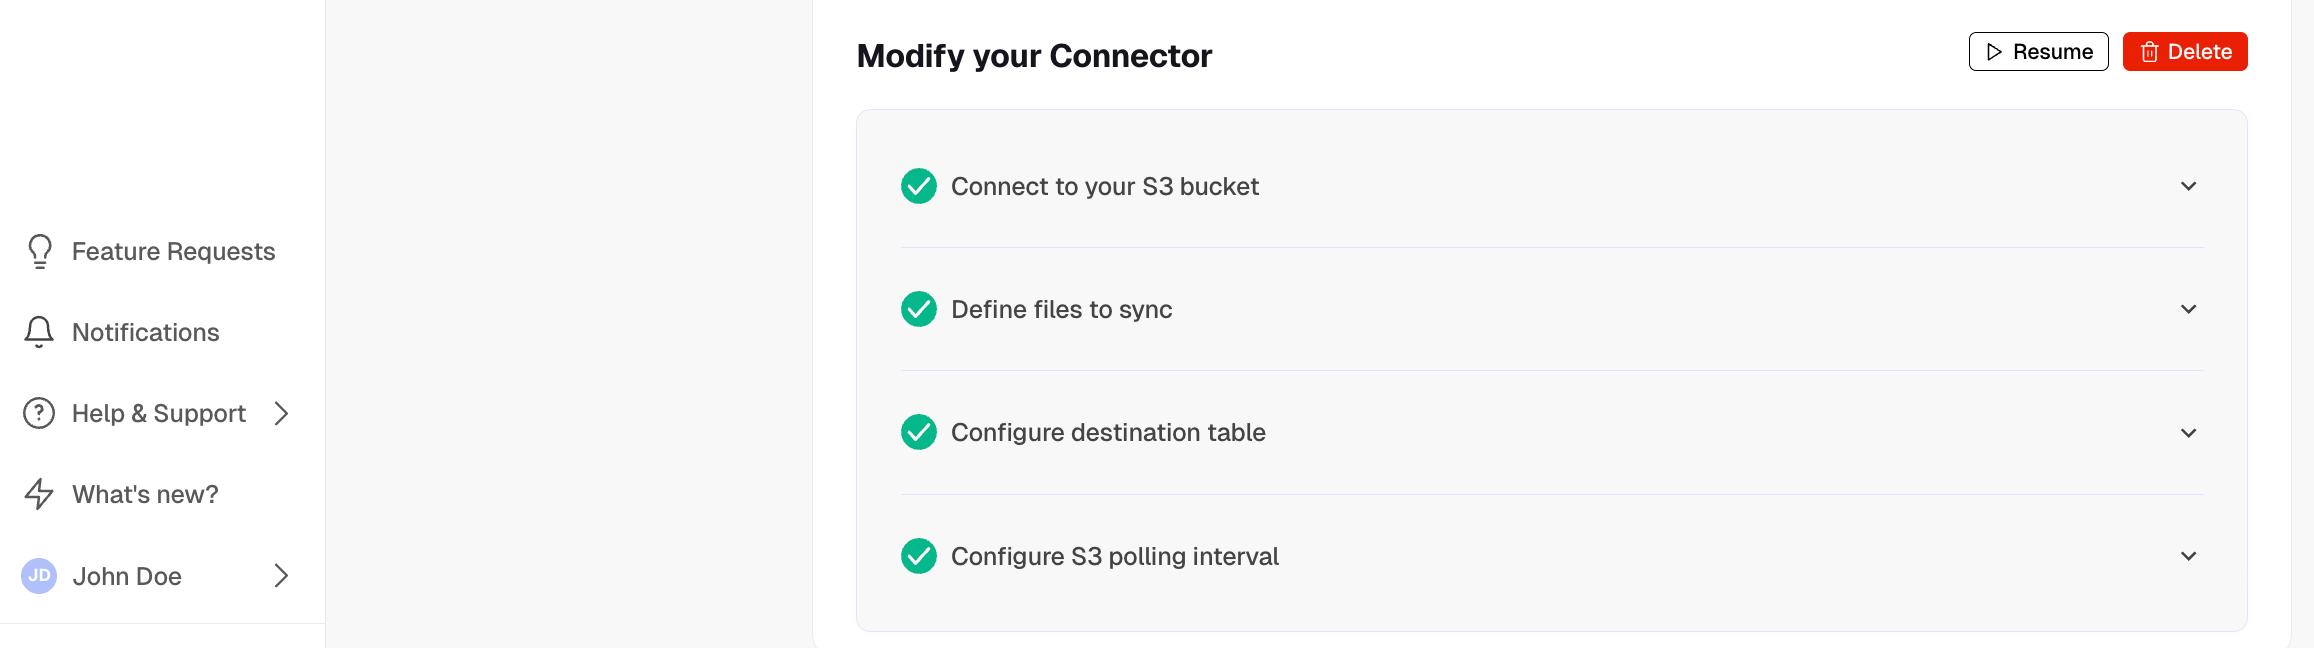
- To pause or delete the connector, click
Connectors>Source connectors, then open the three-dot menu on the right and select an option. You must pause the connector before deleting it.
- To pause the connector, click
And that is it, you are using the source S3 connector to synchronize all the data, or specific files, from an S3 bucket to your Tiger Cloud service in real time.
===== PAGE: https://docs.tigerdata.com/migrate/livesync-for-kafka/ =====
Stream data from Kafka into your service
You use the Kafka source connector in Tiger Cloud to stream events from Kafka into your service. Tiger Cloud connects to your Confluent Cloud Kafka cluster and Schema Registry using SASL/SCRAM authentication and service account–based API keys. Only the Avro format is currently supported [with some limitations][limitations].
This page explains how to connect Tiger Cloud to your Confluence Cloud Kafka cluster.
Early access: the Kafka source connector is not yet supported for production use.
Prerequisites
To follow the steps on this page:
Create a target [Tiger Cloud service][create-service] with real-time analytics enabled.
You need your [connection details][connection-info].
- [Sign up][confluence-signup] for Confluence Cloud.
- [Create][create-kafka-cluster] a Kafka cluster in Confluence Cloud.
Access your Kafka cluster in Confluent Cloud
Take the following steps to prepare your Kafka cluster for connection to Tiger Cloud:
Create a service account
If you already have a service account for Tiger Cloud, you can reuse it.  To create a new service account:

1. Log in to [Confluent Cloud][confluent-cloud].
1. Click the burger menu at the top-right of the pane, then press
   `Access control` > `Service accounts` >`Add service account`.
1. Enter the following details:

   - Name: `tigerdata-access`
   - Description: `Service account for the Tiger Cloud source connector`

1. Add the service account owner role, then click `Next`.

1. Select a role assignment, then click `Add`

1. Click `Next`, then click `Create service account`.
Create API keys
- In Confluent Cloud, click
Home>Environments> Select your environment > Select your cluster. - Under
Cluster overviewin the left sidebar, selectAPI Keys. - Click
Add key, chooseService Accountand clickNext. - Select
tigerdata-access, then clickNext. - For your cluster, choose the
Operationand select the followingPermissions, then clickNext:Resource type:ClusterOperation:DESCRIBEPermission:ALLOW
- Click
Download and continue, then securely store the ACL. - Use the same procedure to add the following keys:
- ACL 2: Topic access
Resource type:TopicTopic name: Select the topics that Tiger Cloud should readPattern type:LITERALOperation:READPermission:ALLOW
- ACL 3: Consumer group access
Resource type:Consumer groupConsumer group ID:tigerdata-kafka/<tiger_cloud_project_id>. See [Find your connection details][connection-info] for where to find your project IDPattern type:PREFIXEDOperation:READPermission:ALLOWYou need these to configure your Kafka source connector in Tiger Cloud.
- ACL 2: Topic access
- In Confluent Cloud, click
Configure Confluent Cloud Schema Registry
Tiger Cloud requires access to the Schema Registry to fetch schemas for Kafka topics. To configure the Schema Registry:
Navigate to Schema Registry
In Confluent Cloud, click
Environmentsand select your environment, then clickStream Governance.Create a Schema Registry API key
Click
API Keys, then clickAdd API Key.Choose
Service Account, selecttigerdata-access, then clickNext.Under
Resource scope, chooseSchema Registry, select thedefaultenvironment, then clickNext.In
Create API Key, add the following, then clickCreate API Key:Name:tigerdata-schema-registry-accessDescription:API key for Tiger Cloud schema registry access
Click
Download API Keyand securely store the API key and secret, then clickComplete.
Assign roles for Schema Registry
Click the burger menu at the top-right of the pane, then press
Access control>Accounts & access>Service accounts.Select the
tigerdata-accessservice account.In the
Accesstab, add the following role assignments forAll schema subjects:ResourceOwneron the service account.DeveloperReadon schema subjects.Choose
All schema subjectsor restrict to specific subjects as required.
Save the role assignments.
Your Confluent Cloud Schema Registry is now accessible to Tiger Cloud using the API key and secret.
Add Kafka source connector in Tiger Cloud
Take the following steps to create a Kafka source connector in Tiger Cloud Console.
In [Console][console], select your service
Go to
Connectors>Source connectors. ClickNew Connector, then selectKafkaClick the pencil icon, then set the connector name
Set up Kafka authentication
Enter the name of your cluster in Confluent Cloud and the information from the first
api-key-*.txtthat you downloaded, then clickAuthenticate.Set up the Schema Registry
Enter the service account ID and the information from the second
api-key-*.txtthat you downloaded, then clickAuthenticate.Select topics to sync
Add the schema and table, map the columns in the table, and click
Create connector.
Your Kafka connector is configured and ready to stream events.
Known limitations and unsupported types
The following Avro schema types are not supported:
Union types
Multi-type non-nullable unions are blocked.
Examples:
Multiple type union:
\{
  "type": "record",
  "name": "Message",
  "fields": [
    \{"name": "content", "type": ["string", "bytes", "null"]\}
  ]
\}
Union as root schema:
["null", "string"]
Reference types (named type references)
Referencing a previously defined named type by name, instead of inline, is not supported.
Examples:
Named type definition:
\{
  "type": "record",
  "name": "Address",
  "fields": [
    \{"name": "street", "type": "string"\},
    \{"name": "city", "type": "string"\}
  ]
\}
Failing reference:
\{
  "type": "record",
  "name": "Person",
  "fields": [
    \{"name": "name", "type": "string"\},
    \{"name": "address", "type": "Address"\}
  ]
\}
Unsupported logical types
Only the logical types in the hardcoded supported list are supported. This includes:
decimal, date, time-millis, time-micros
timestamp-millis, timestamp-micros, timestamp-nanos
local-timestamp-millis, local-timestamp-micros, local-timestamp-nanos
uuid, duration
Unsupported examples:
{
  "type": "int",
  "logicalType": "date-time"
}

{
  "type": "string",
  "logicalType": "json"
}

{
  "type": "bytes",
  "logicalType": "custom-type"
}
===== PAGE: https://docs.tigerdata.com/migrate/upload-file-using-console/ =====
Upload a file into your service using Tiger Cloud Console
You can upload files into your service using Tiger Cloud Console. This page explains how to upload CSV, Parquet, and text files, from your local machine and from an S3 bucket.
Tiger Cloud Console enables you to drag and drop files to upload from your local machine.
Early access
Prerequisites
To follow the steps on this page:
- Create a target [Tiger Cloud service][create-service] with real-time analytics enabled.
To upload a CSV file to your service:
Select your service in [Console][console], then click
Actions>Import data>Upload your files>Upload CSV file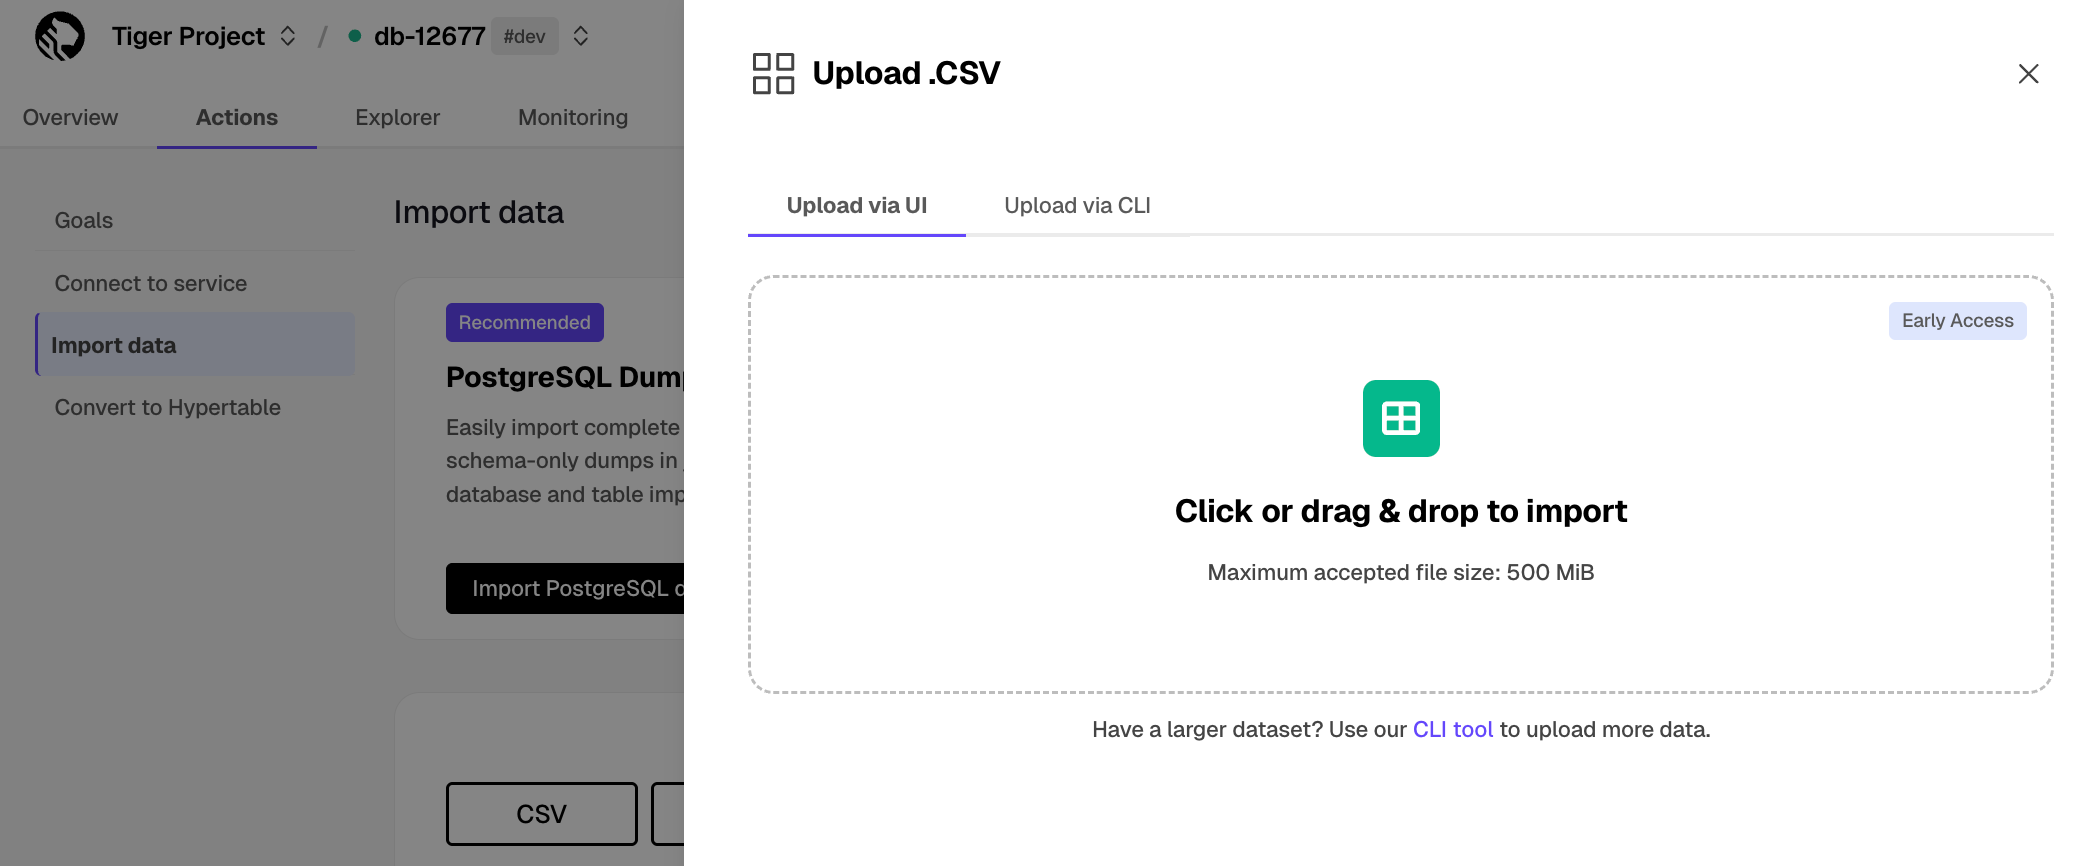
Click to browse, or drag the file to import
Configure the import
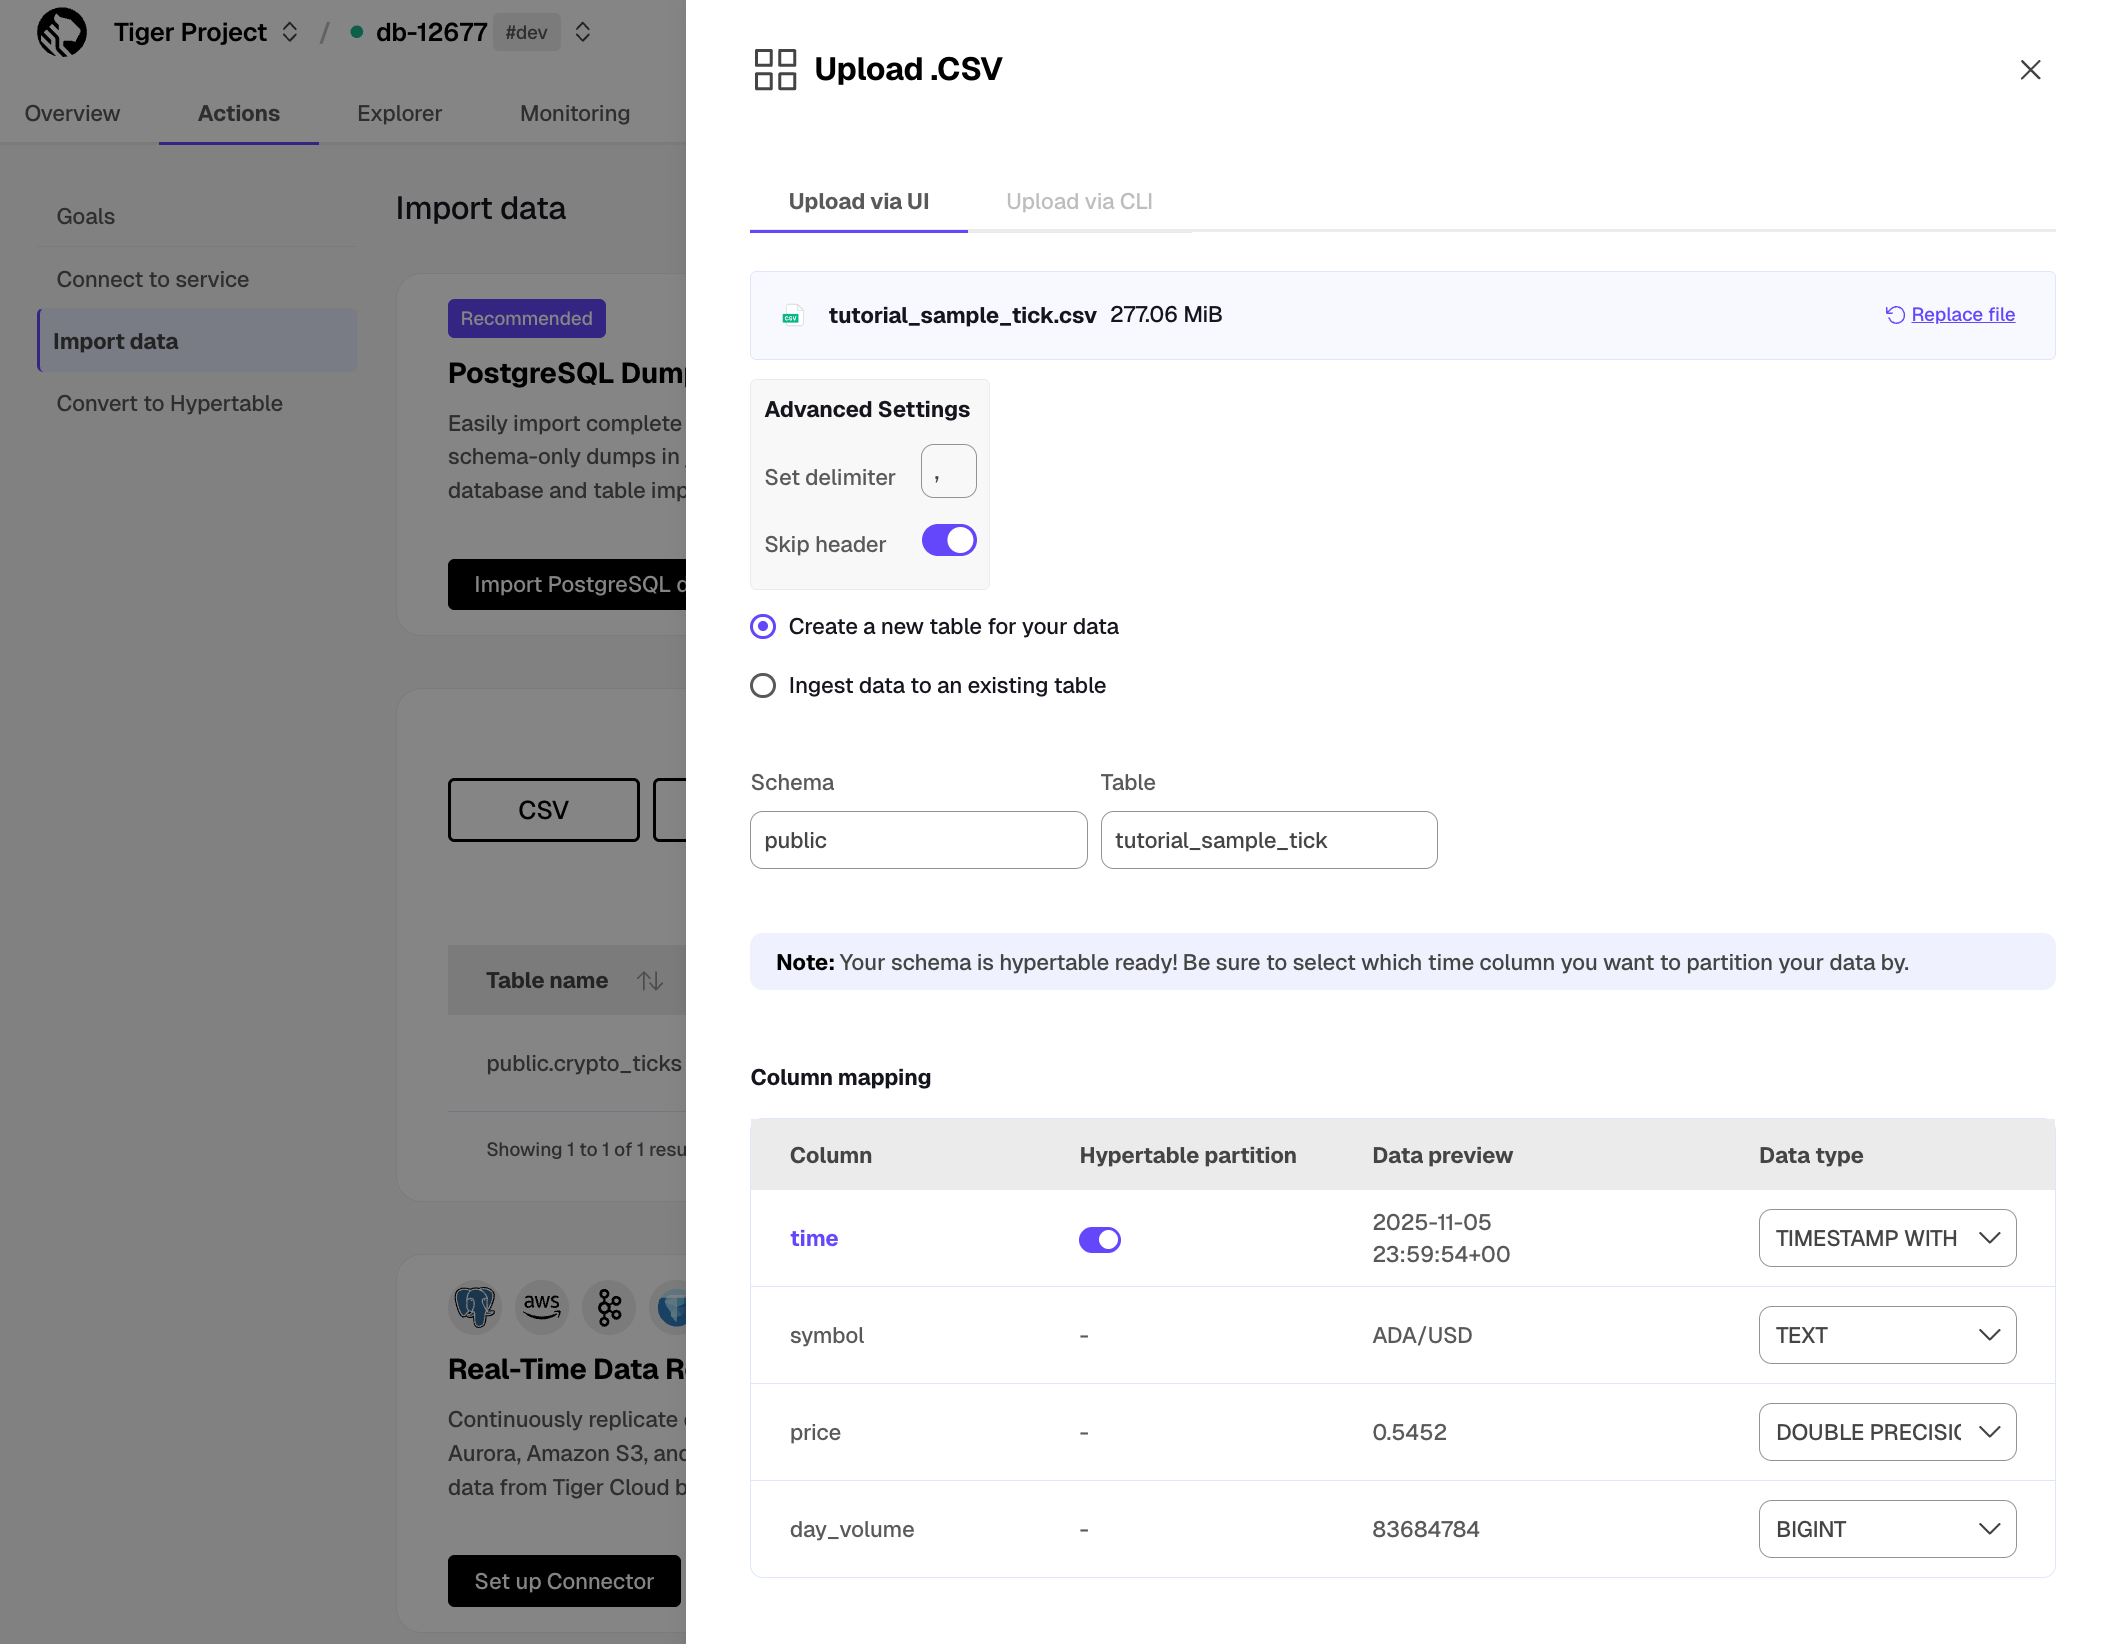
- Set a delimiter.
- Toggle to skip or keep the header.
- Select to ingest the data into an existing table or create a new one.
- Provide the new or existing table name.
- For a new table with a time column, toggle the time column to create a hypertable instead of a regular table.
Click
Process CSV fileWhen the processing is completed, to find the data your imported, click
Explorer.
To upload a Parquet file to your service:
Select your service in [Console][console], then click
Actions>Import data>Upload your files>Upload Parquet file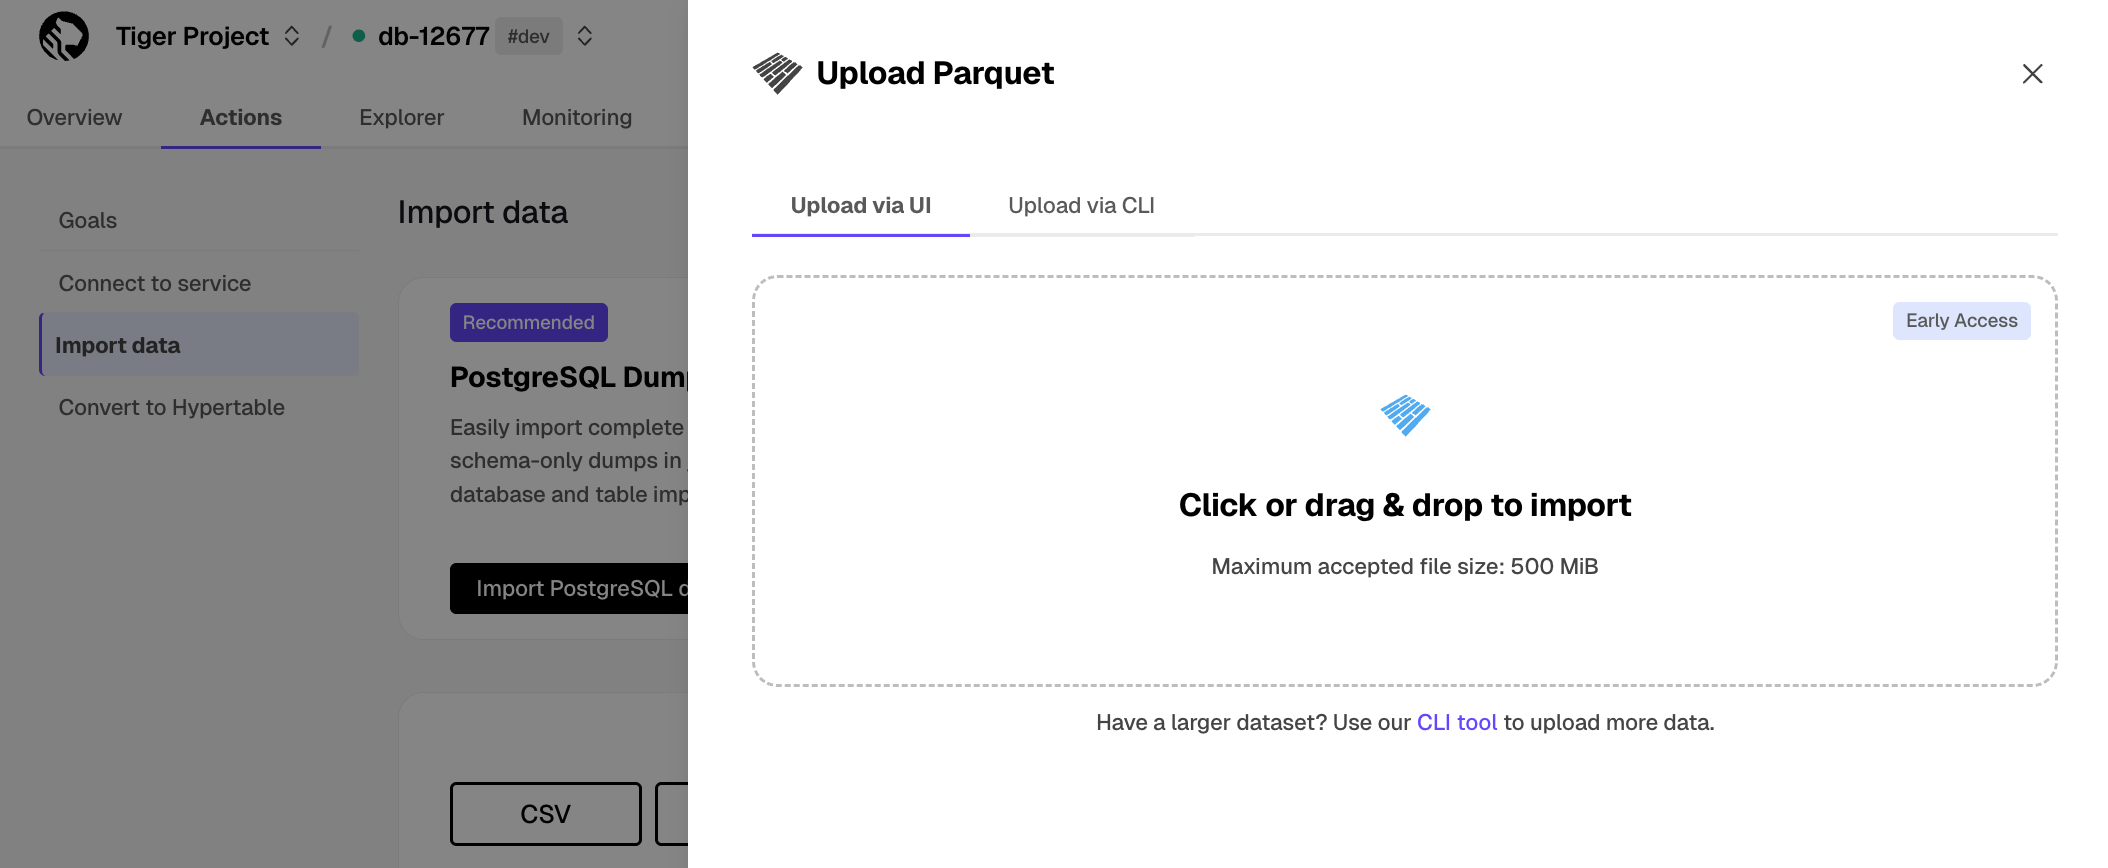
Click to browse, or drag the file to import
Configure the import
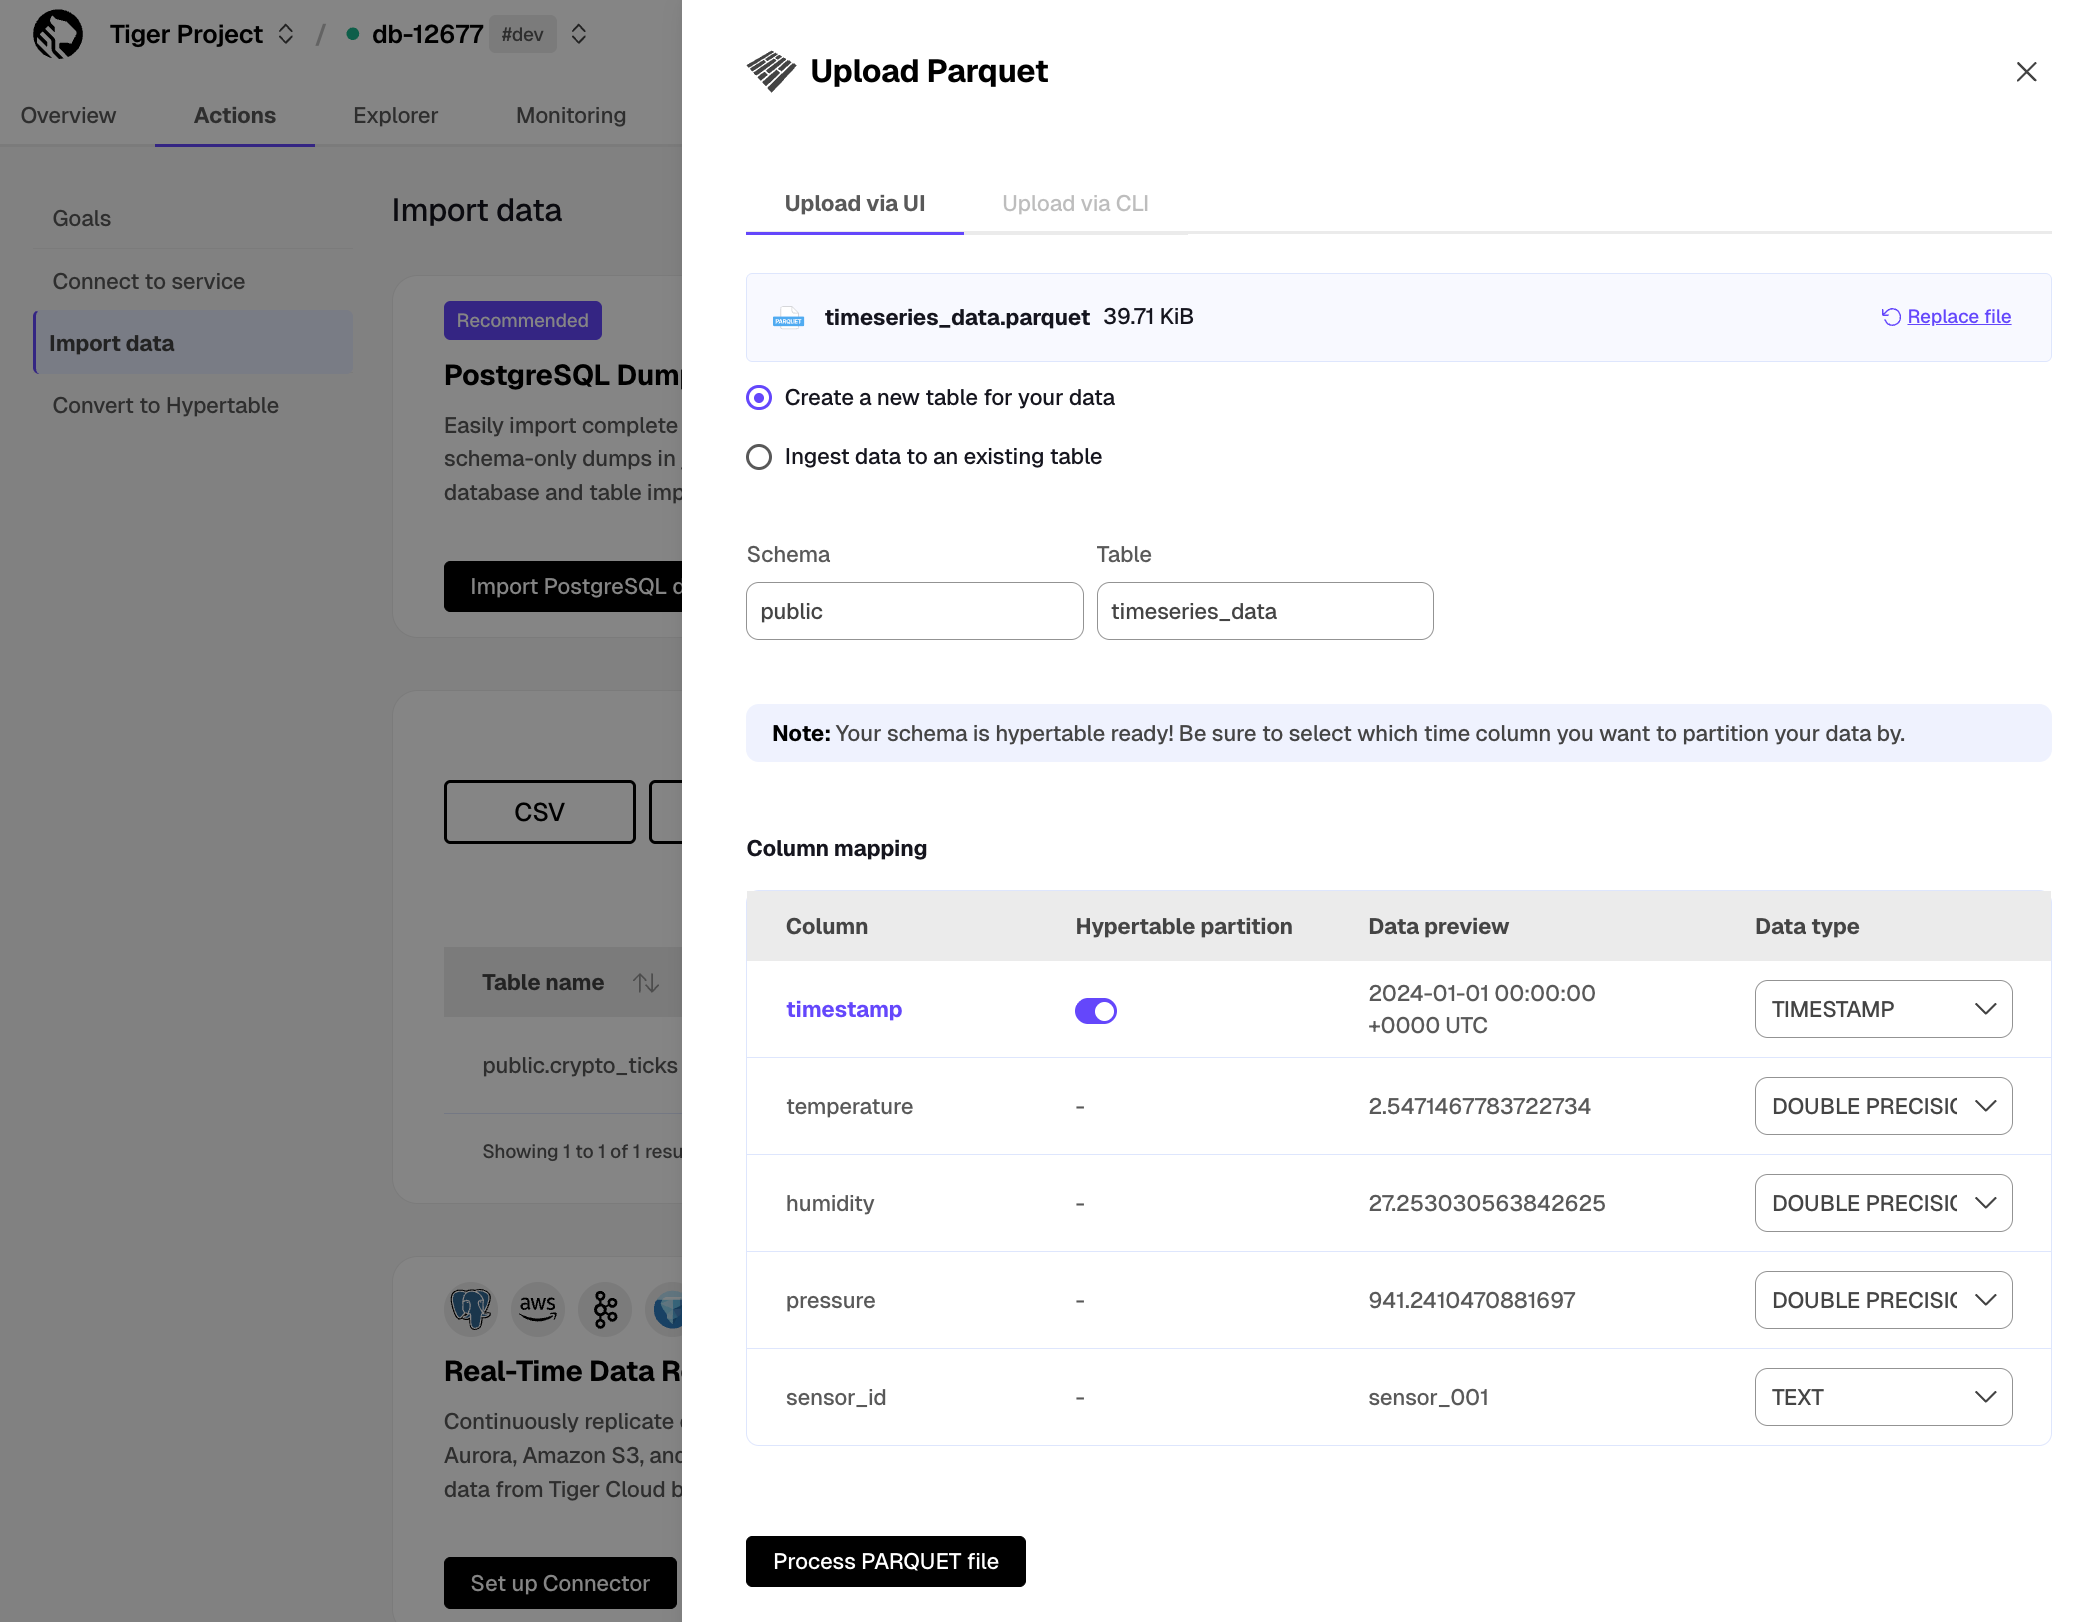
- Select to ingest the data into an existing table or create a new one.
- Provide the new or existing table name.
- For a new table with a time column, toggle the time column to create a hypertable instead of a regular table.
Click
Process Parquet fileWhen the processing is completed, to find the data your imported, click
Explorer.
To upload a TXT or MD file to your service:
Select your service in Console, then click
Actions>Import data>Upload your files>Upload Text file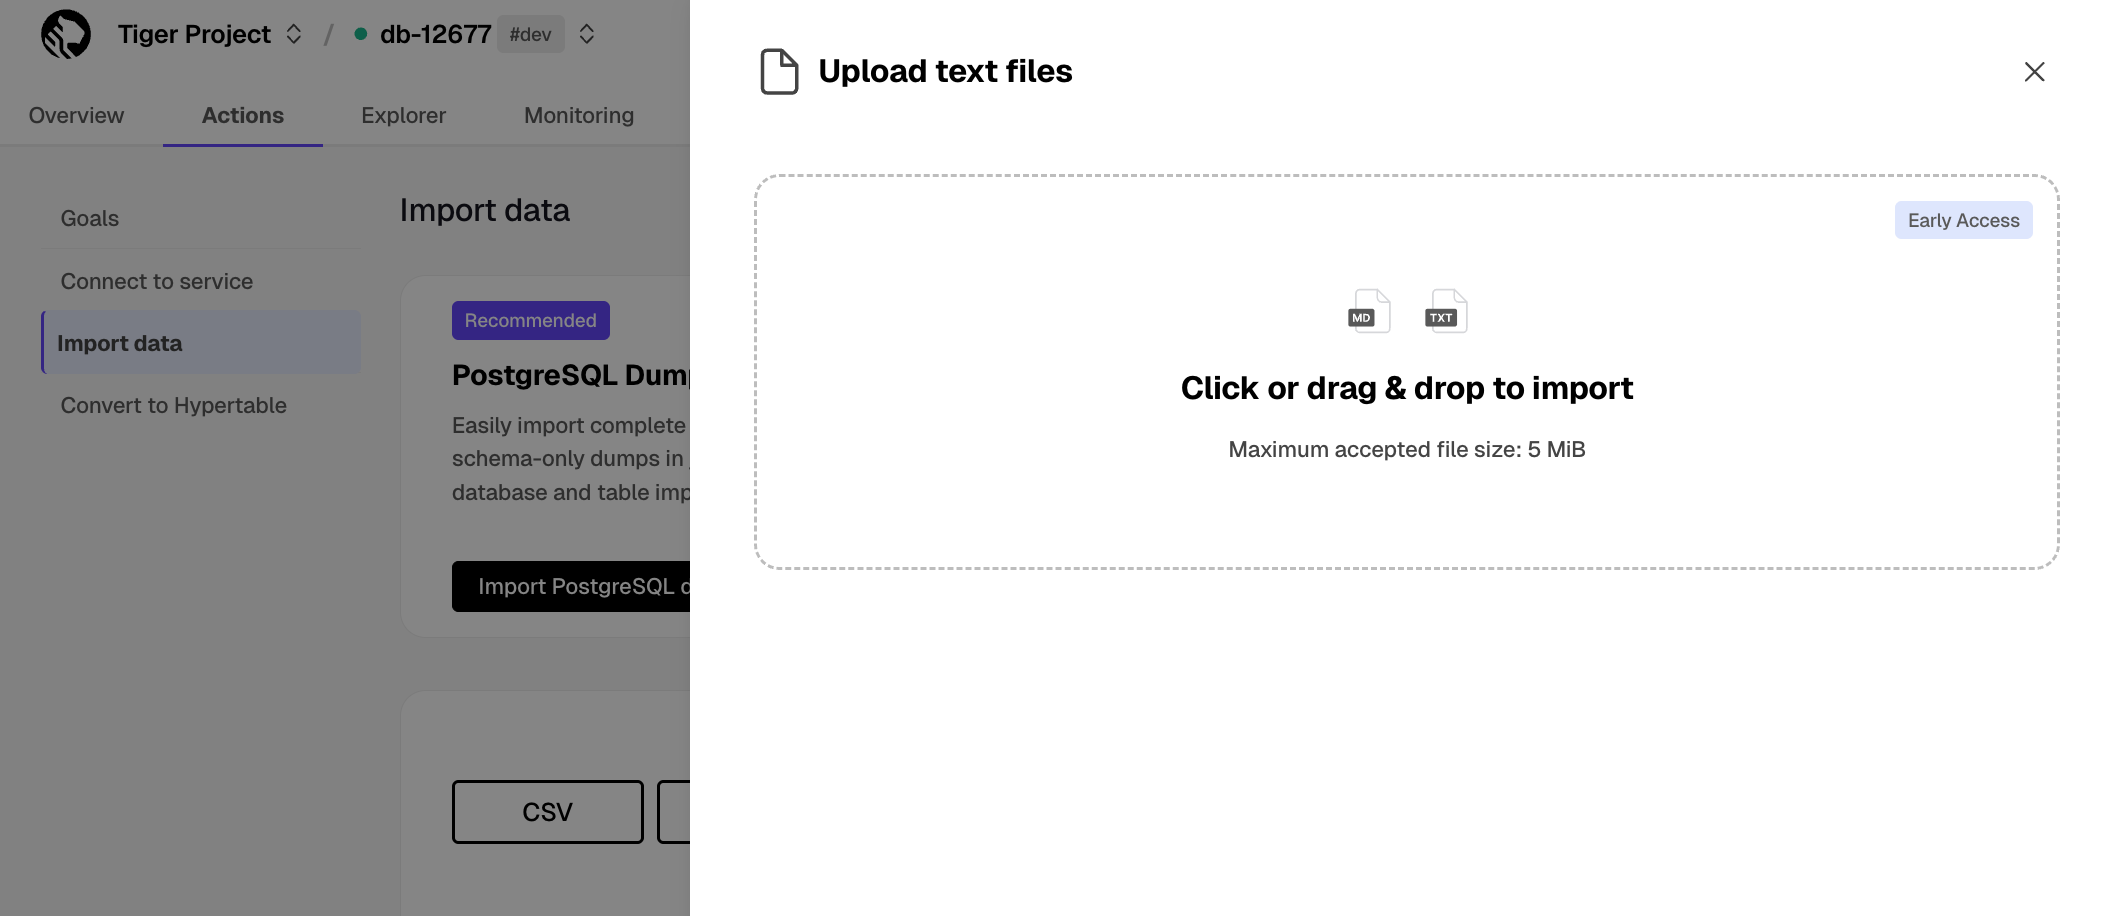
Click to browse, or drag and drop the file to import
Configure the import
Provide a name to create a new table, or select an existing table to add data to.
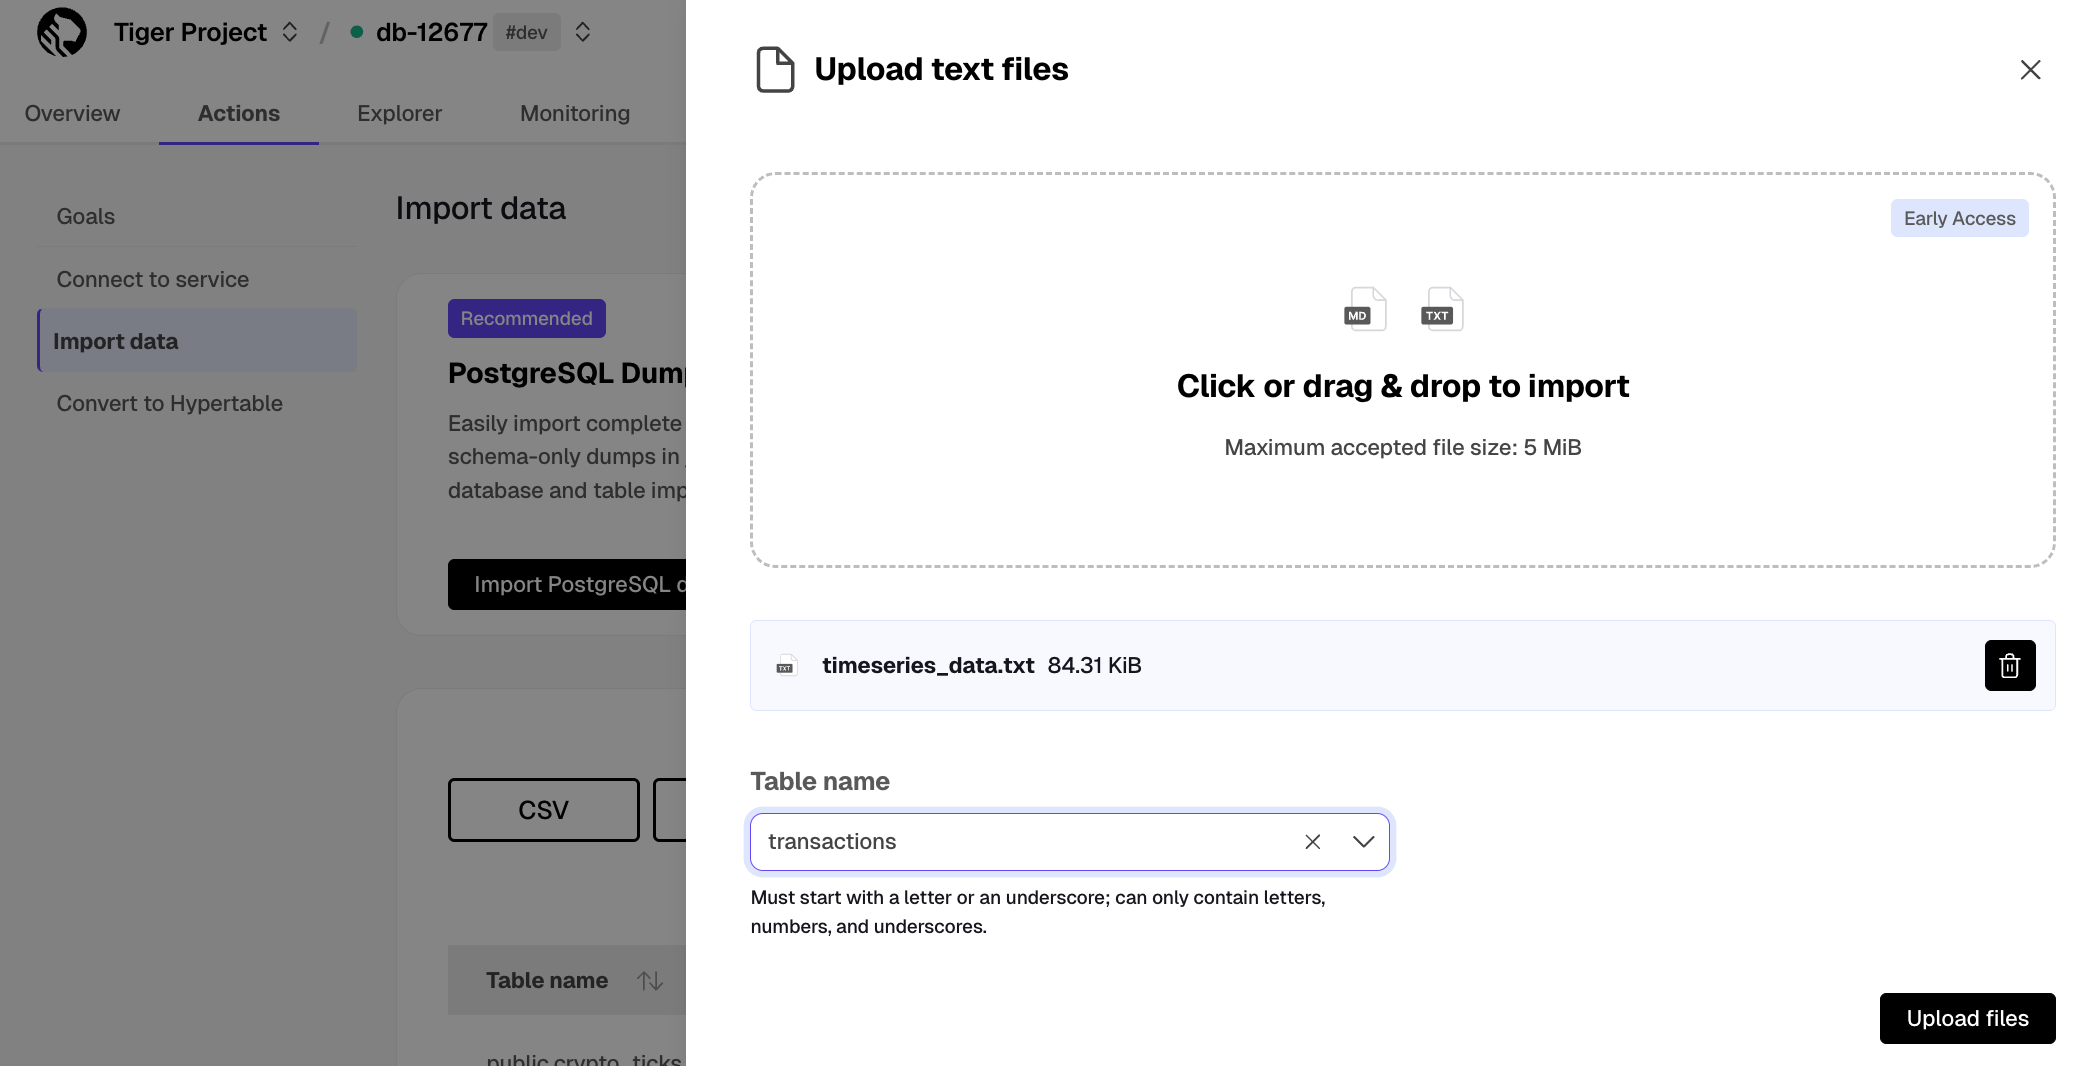
Click
Upload filesWhen the upload is finished, find your data imported to a new or existing table in
Explorer.
Tiger Cloud Console enables you to upload CSV and Parquet files, including archives compressed using GZIP and ZIP, by connecting to an S3 bucket.
This feature is not available under the Free pricing plan.
Prerequisites
To follow the steps on this page:
- Create a target [Tiger Cloud service][create-service] with real-time analytics enabled.
- Ensure access to a standard Amazon S3 bucket containing your data files.
- Configure access credentials for the S3 bucket. The following credentials are supported:
- [IAM Role][credentials-iam].
- [Public anonymous user][credentials-public].
To import a CSV file from an S3 bucket:
Select your service in Console, then click
Actions>Import data>Explore import options>Import from S3Select your file in the S3 bucket
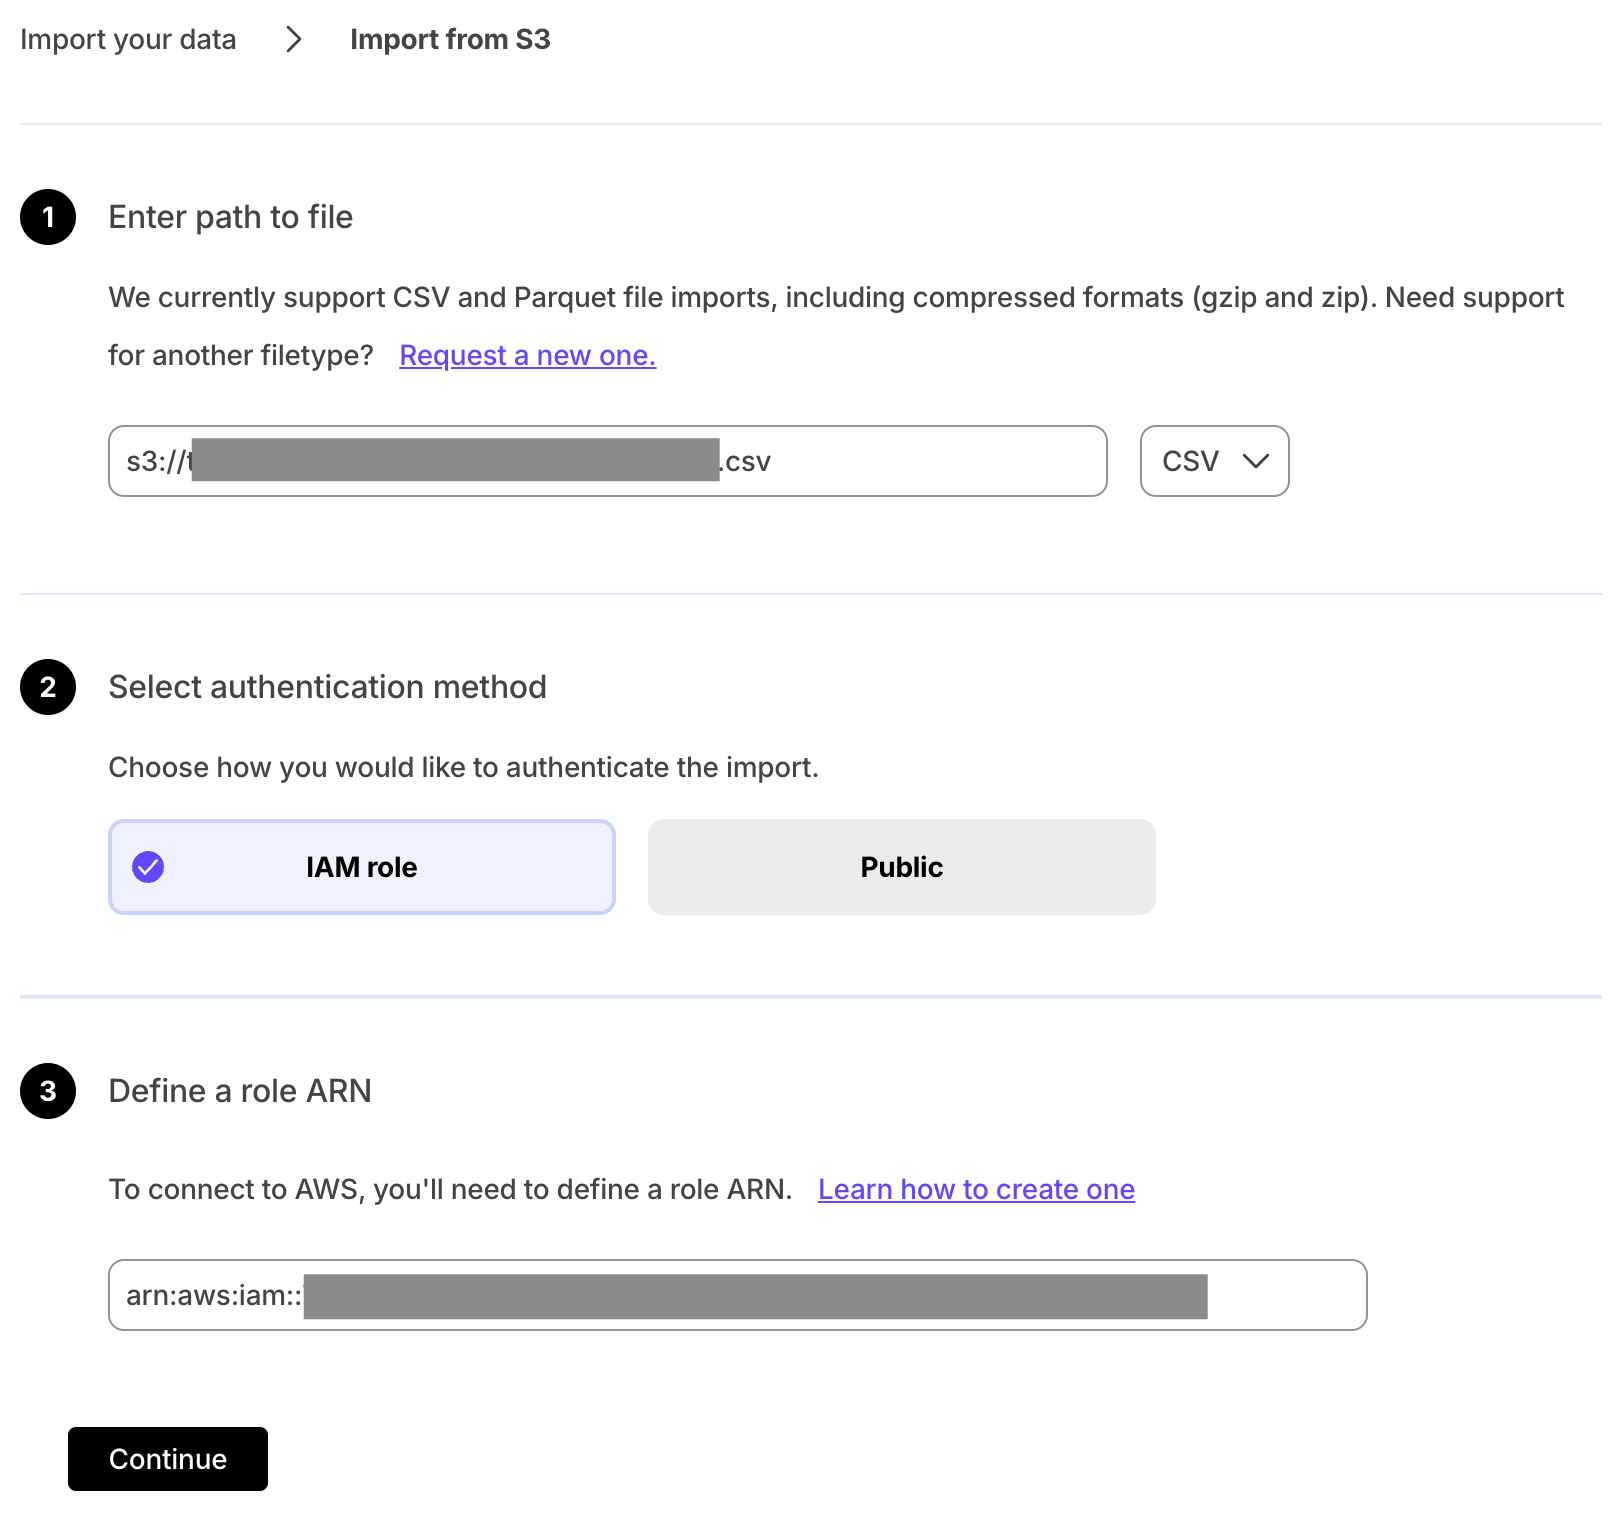
- Provide your file path.
- Select
CSVin the file type dropdown. - Select the authentication method:
IAM roleand provide the role.Public.
- Click
Continue.
Configure the import
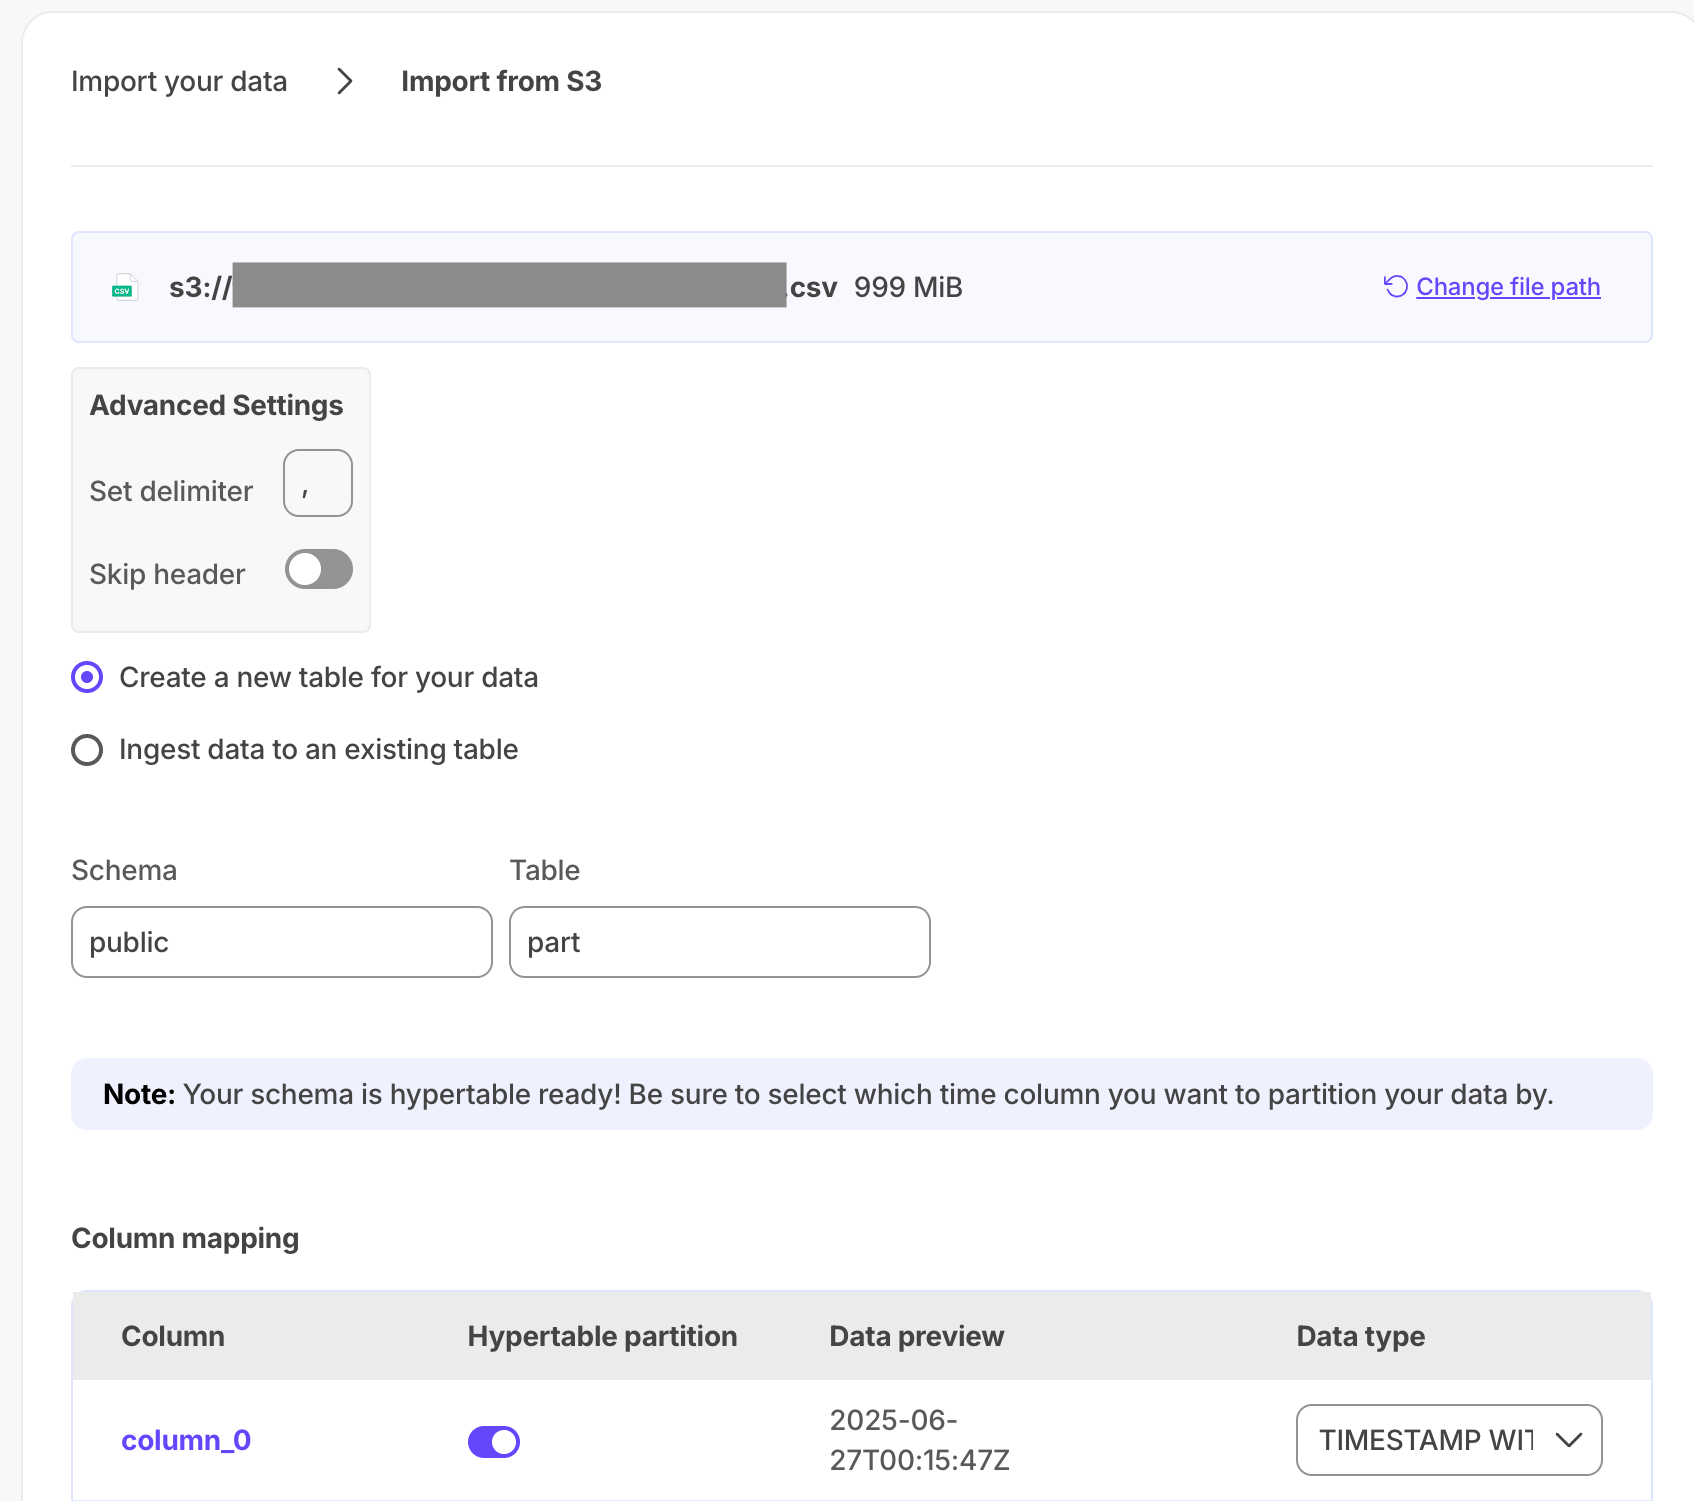
- Set a delimiter.
- Toggle to skip or keep the header.
- Select to ingest the data into an existing table or create a new one.
- Provide the new or existing table name.
- For a new table with a time column, toggle the time column to create a hypertable instead of a regular table.
Click
Process CSV fileWhen the processing is completed, to find the data your imported, click
Explorer.
To import a Parquet file from an S3 bucket:
Select your service in Console, then click
Actions>Import from S3Select your file in the S3 bucket
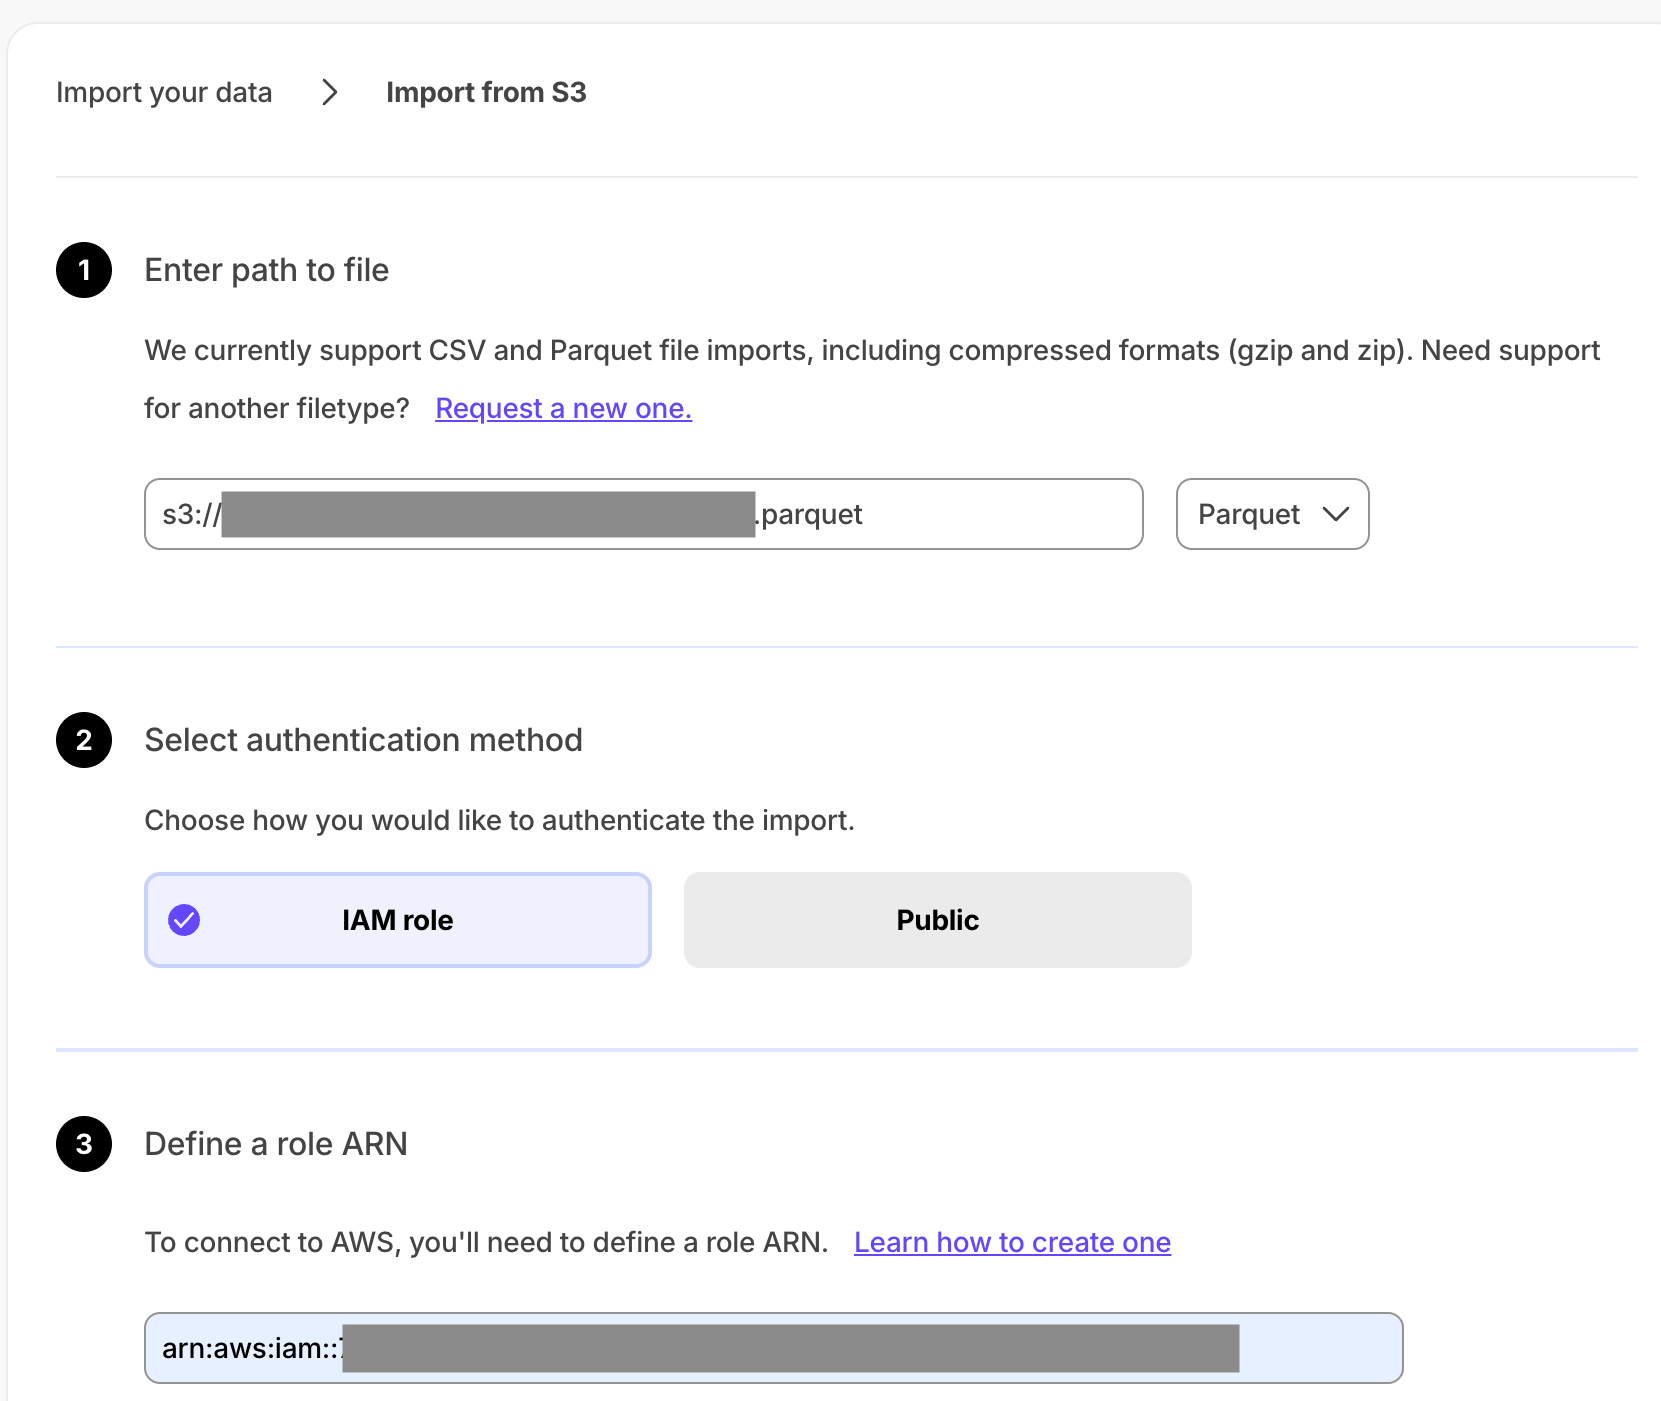
- Provide your file path.
- Select
Parquetin the file type dropdown. - Select the authentication method:
IAM roleand provide the role.Public.
- Click
Continue.
Configure the import
- Select
Create a new table for your dataorIngest data to an existing table. - Provide the new or existing table name.
- For a new table with a time column, toggle the time column to create a hypertable instead of a regular table.
- Select
Click
Process Parquet fileWhen the processing is completed, to find the data your imported, click
Explorer.
And that is it, you have imported your data to your Tiger Cloud service.
===== PAGE: https://docs.tigerdata.com/migrate/upload-file-using-terminal/ =====
Upload a file into your service using the terminal
This page shows you how to upload CSV, MySQL, and Parquet files from a source machine into your service using the terminal.
The CSV file format is widely used for data migration. This page shows you how to import data into your Tiger Cloud service from a CSV file using the terminal.
Prerequisites
To follow the procedure on this page you need to:
Create a [target Tiger Cloud service][create-service].
This procedure also works for [self-hosted TimescaleDB][enable-timescaledb].
Install Go v1.13 or later
Install [timescaledb-parallel-copy][install-parallel-copy]
[timescaledb-parallel-copy][parallel importer] improves performance for large datasets by parallelizing the import process. It also preserves row order and uses a round-robin approach to optimize memory management and disk operations.
To verify your installation, run
timescaledb-parallel-copy --version.Ensure that the time column in the CSV file uses the
TIMESTAMPZdata type.
For faster data transfer, best practice is that your target service and the system running the data import are in the same region.
Import data into your service
To import data from a CSV file:
Set up your service connection string
This variable holds the connection information for the target Tiger Cloud service.
In the terminal on the source machine, set the following:
export TARGET=postgres://tsdbadmin:<PASSWORD>@<HOST>:<PORT>/tsdb?sslmode=requireSee where to [find your connection details][connection-info].
Create a [hypertable][hypertable-docs] to hold your data
Create a hypertable with a schema that is compatible with the data in your parquet file. For example, if your parquet file contains the columns
ts,location, andtemperaturewith typesTIMESTAMP,STRING, andDOUBLE:TimescaleDB v2.20 and above:
sqlpsql target -c "CREATE TABLE ( \ ts TIMESTAMPTZ NOT NULL, \ location TEXT NOT NULL, \ temperature DOUBLE PRECISION NULL \ ) WITH (timescaledb.hypertable, timescaledb.partition_column = 'ts');"TimescaleDB v2.19.3 and below:
Create a new regular table:
sqlpsql target -c "CREATE TABLE ( \ ts TIMESTAMPTZ NOT NULL, \ location TEXT NOT NULL, \ temperature DOUBLE PRECISION NULL \ );"Convert the empty table to a hypertable:
In the following command, replace
with the name of the table you just created, and `<COLUMN_NAME>` with the partitioning column in.sqlpsql target -c "SELECT create_hypertable('', by_range('<COLUMN_NAME>'))"
Import your data
In the folder containing your CSV files, either:
Use [timescaledb-parallel-copy][install-parallel-copy]:
bashtimescaledb-parallel-copy \ --connection target \ --table \ --file <FILE_NAME>.csv \ --workers <NUM_WORKERS> \ --reporting-period 30sFor the best performances while avoiding resource competition, set
<NUM_WORKERS>to twice the number of CPUs in your service, but less than the available CPU cores.For self-hosted TimescaleDB, set
targettohost=localhost user=postgres sslmode=disableUse
psql:bashpsql target \c <DATABASE_NAME> \COPY FROM <FILENAME>.csv CSV"psqlCOPY is single-threaded, and may be slower for large datasets.
Verify the data was imported correctly into your service
And that is it, you have imported your data from a CSV file.
MySQL is an open-source relational database management system (RDBMS). This page shows you how to import data into your Tiger Cloud service from a database running on MySQL version 8 or earlier.
Prerequisites
To follow the procedure on this page you need to:
Create a [target Tiger Cloud service][create-service].
This procedure also works for [self-hosted TimescaleDB][enable-timescaledb].
[Install Docker][install-docker] on your migration machine.
This machine needs sufficient space to store the buffered changes that occur while your data is being copied. This space is proportional to the amount of new uncompressed data being written to the Tiger Cloud service during migration. A general rule of thumb is between 100GB and 500GB.
For faster data transfer, best practice is for your source database, target service, and the system running the data import are in the same region .
Import data into your service
To import data from a MySQL database:
Set up the connection string for your target service
This variable holds the connection information for the target Tiger Cloud service.
In the terminal on the source machine, set the following:
export TARGET=postgres://tsdbadmin:<PASSWORD>@<HOST>:<PORT>/tsdb?sslmode=requireSee where to [find your connection details][connection-info].
Set up the connection string for your source database
bashSOURCE="mysql://<mysql_username>:<mysql_password>@<mysql_host>:<mysql_port>/<mysql_database>?sslmode=require"where:
<mysql_username>: your MySQL username<mysql_password>: your MySQL password<mysql_host>: the MySQL server hostname or IP address<mysql_port>: the MySQL server port, the default is 3306<mysql_database>: the name of your MySQL database
Import your data
On your data import machine, run the following command:
dockerdocker run -it ghcr.io/dimitri/pgloader:latest pgloader --no-ssl-cert-verification \ "source" \ "target"Verify the data was imported correctly into your service
And that is it, you have imported your data from MySQL.
[Apache Parquet][apache-parquet] is a free and open-source column-oriented data storage format in the Apache Hadoop ecosystem. It provides efficient data compression and encoding schemes with enhanced performance to handle complex data in bulk. This page shows you how to import data into your Tiger Cloud service from a Parquet file.
Prerequisites
To follow the procedure on this page you need to:
Create a [target Tiger Cloud service][create-service].
This procedure also works for [self-hosted TimescaleDB][enable-timescaledb].
- [Install DuckDB][install-duckdb] on the source machine where the Parquet file is located.
- Ensure that the time column in the Parquet file uses the
TIMESTAMPdata type.
For faster data transfer, best practice is that your target service and the system running the data import are in the same region.
Import data into your service
To import data from a Parquet file:
Set up your service connection string
This variable holds the connection information for the target Tiger Cloud service.
In the terminal on the source machine, set the following:
export TARGET=postgres://tsdbadmin:<PASSWORD>@<HOST>:<PORT>/tsdb?sslmode=requireSee where to [find your connection details][connection-info].
Create a [hypertable][hypertable-docs] to hold your data
Create a hypertable with a schema that is compatible with the data in your parquet file. For example, if your parquet file contains the columns
ts,location, andtemperaturewith typesTIMESTAMP,STRING, andDOUBLE:TimescaleDB v2.20 and above:
sqlpsql target -c "CREATE TABLE ( \ ts TIMESTAMPTZ NOT NULL, \ location TEXT NOT NULL, \ temperature DOUBLE PRECISION NULL \ ) WITH (timescaledb.hypertable, timescaledb.partition_column = 'ts');"TimescaleDB v2.19.3 and below:
Create a new regular table:
sqlpsql target -c "CREATE TABLE ( \ ts TIMESTAMPTZ NOT NULL, \ location TEXT NOT NULL, \ temperature DOUBLE PRECISION NULL \ );"Convert the empty table to a hypertable:
In the following command, replace
with the name of the table you just created, and `<COLUMN_NAME>` with the partitioning column in.sqlpsql target -c "SELECT create_hypertable('', by_range('<COLUMN_NAME>'))"
Set up a DuckDB connection to your service
In a terminal on the source machine with your Parquet files, start a new DuckDB interactive session:
bashduckdbConnect to your service in your DuckDB session:
bashATTACH '<Paste the value of target here' AS db (type postgres);targetis the connection string you used to connect to your service using psql.
Import data from Parquet to your service
In DuckDB, upload the table data to your service
bashCOPY db. FROM '<FILENAME>.parquet' (FORMAT parquet);Where:
- ``: the hypertable you created to import data to
<FILENAME>: the Parquet file to import data from
Exit the DuckDB session:
bashEXIT;
Verify the data was imported correctly into your service
In your
psqlsession, view the data in ``:sqlSELECT * FROM ;
And that is it, you have imported your data from a Parquet file to your Tiger Cloud service.
===== PAGE: https://docs.tigerdata.com/migrate/pg-dump-and-restore/ =====
Migrate with downtime
You use downtime migration to move less than 100GB of data from a self-hosted database to a Tiger Cloud service.
Downtime migration uses the native Postgres [pg_dump][pg_dump] and [pg_restore][pg_restore] commands. If you are migrating from self-hosted TimescaleDB, this method works for hypertables compressed into the columnstore without having to convert the data back to the rowstore before you begin.
If you want to migrate more than 400GB of data, create a Tiger Cloud Console support request, or send us an email at support@tigerdata.com saying how much data you want to migrate. We pre-provision your Tiger Cloud service for you.
However, downtime migration for large amounts of data takes a large amount of time. For more than 100GB of data, best practice is to follow [live migration].
This page shows you how to move your data from a self-hosted database to a Tiger Cloud service using shell commands.
Prerequisites
Best practice is to use an [Ubuntu EC2 instance][create-ec2-instance] hosted in the same region as your Tiger Cloud service to move data. That is, the machine you run the commands on to move your data from your source database to your target Tiger Cloud service.
Before you move your data:
Create a target [Tiger Cloud service][created-a-database-service-in-timescale].
Each Tiger Cloud service has a single Postgres instance that supports the [most popular extensions][all-available-extensions]. Tiger Cloud services do not support tablespaces, and there is no superuser associated with a service. Best practice is to create a Tiger Cloud service with at least 8 CPUs for a smoother experience. A higher-spec instance can significantly reduce the overall migration window.
To ensure that maintenance does not run while migration is in progress, best practice is to [adjust the maintenance window][adjust-maintenance-window].
Install the Postgres client tools on your migration machine.
This includes
psql,pg_dump, andpg_dumpall.Install the GNU implementation of
sed.Run
sed --versionon your migration machine. GNU sed identifies itself as GNU software, BSD sed returnssed: illegal option -- -.
Migrate to Tiger Cloud
To move your data from a self-hosted database to a Tiger Cloud service:
This section shows you how to move your data from self-hosted TimescaleDB to a Tiger Cloud service using pg_dump and psql from Terminal.
Prepare to migrate
Take the applications that connect to the source database offline
The duration of the migration is proportional to the amount of data stored in your database. By disconnection your app from your database you avoid and possible data loss.
Set your connection strings
These variables hold the connection information for the source database and target Tiger Cloud service:
bashexport SOURCE="postgres://<user>:<password>@<source host>:<source port>/<db_name>" export TARGET="postgres://tsdbadmin:<PASSWORD>@<HOST>:<PORT>/tsdb?sslmode=require"You find the connection information for your Tiger Cloud service in the configuration file you downloaded when you created the service.
Align the version of TimescaleDB on the source and target
Ensure that the source and target databases are running the same version of TimescaleDB.
Check the version of TimescaleDB running on your Tiger Cloud service:
bashpsql target -c "SELECT extversion FROM pg_extension WHERE extname = 'timescaledb';"Update the TimescaleDB extension in your source database to match the target service:
If the TimescaleDB extension is the same version on the source database and target service, you do not need to do this.
bashpsql source -c "ALTER EXTENSION timescaledb UPDATE TO '<version here>';"For more information and guidance, see Upgrade TimescaleDB.
Ensure that the Tiger Cloud service is running the Postgres extensions used in your source database.
- Check the extensions on the source database:bash
psql source -c "SELECT * FROM pg_extension;" - For each extension, enable it on your target Tiger Cloud service:bash
psql target -c "CREATE EXTENSION IF NOT EXISTS <extension name> CASCADE;"
- Check the extensions on the source database:
Migrate the roles from TimescaleDB to your Tiger Cloud service
Roles manage database access permissions. To migrate your role-based security hierarchy to your Tiger Cloud service:
Dump the roles from your source database
Export your role-based security hierarchy.
<db_name>has the same value as<db_name>insource. I know, it confuses me as well.bashpg_dumpall -d "source" \ -l <db_name> --quote-all-identifiers \ --roles-only \ --file=roles.sqlIf you only use the default
postgresrole, this step is not necessary.Remove roles with superuser access
Tiger Cloud service do not support roles with superuser access. Run the following script to remove statements, permissions and clauses that require superuser permissions from
roles.sql:bashsed -i -E \ -e '/CREATE ROLE "postgres";/d' \ -e '/ALTER ROLE "postgres"/d' \ -e '/CREATE ROLE "tsdbadmin";/d' \ -e '/ALTER ROLE "tsdbadmin"/d' \ -e 's/(NO)*SUPERUSER//g' \ -e 's/(NO)*REPLICATION//g' \ -e 's/(NO)*BYPASSRLS//g' \ -e 's/GRANTED BY "[^"]*"//g' \ roles.sqlDump the source database schema and data
The
pg_dumpflags remove superuser access and tablespaces from your data. When you runpgdump, check the run time, [a long-runningpg_dumpcan cause issues][long-running-pgdump].bashpg_dump -d "source" \ --format=plain \ --quote-all-identifiers \ --no-tablespaces \ --no-owner \ --no-privileges \ --file=dump.sqlTo dramatically reduce the time taken to dump the source database, using multiple connections. For more information, see [dumping with concurrency][dumping-with-concurrency] and [restoring with concurrency][restoring-with-concurrency].
Upload your data to the target Tiger Cloud service
This command uses the [timescaledb_pre_restore] and [timescaledb_post_restore] functions to put your database in the correct state.
psql target -v ON_ERROR_STOP=1 --echo-errors \
-f roles.sql \
-c "SELECT timescaledb_pre_restore();" \
-f dump.sql \
-c "SELECT timescaledb_post_restore();"
Validate your Tiger Cloud service and restart your app
Update the table statistics.
bashpsql target -c "ANALYZE;"Verify the data in the target Tiger Cloud service.
Check that your data is correct, and returns the results that you expect,
Enable any Tiger Cloud features you want to use.
Migration from Postgres moves the data only. Now manually enable Tiger Cloud features like [hypertables][about-hypertables], [hypercore][data-compression] or [data retention][data-retention] while your database is offline.
Reconfigure your app to use the target database, then restart it.
And that is it, you have migrated your data from a self-hosted instance running TimescaleDB to a Tiger Cloud service.
This section shows you how to move your data from self-hosted Postgres to a Tiger Cloud service using pg_dump and psql from Terminal.
Migration from Postgres moves the data only. You must manually enable Tiger Cloud features like [hypertables][about-hypertables], [hypercore][data-compression] or [data retention][data-retention] after the migration is complete. You enable Tiger Cloud features while your database is offline.
Prepare to migrate
Take the applications that connect to the source database offline
The duration of the migration is proportional to the amount of data stored in your database. By disconnection your app from your database you avoid and possible data loss.
Set your connection strings
These variables hold the connection information for the source database and target Tiger Cloud service:
bashexport SOURCE="postgres://<user>:<password>@<source host>:<source port>/<db_name>" export TARGET="postgres://tsdbadmin:<PASSWORD>@<HOST>:<PORT>/tsdb?sslmode=require"You find the connection information for your Tiger Cloud service in the configuration file you downloaded when you created the service.
Align the extensions on the source and target
Ensure that the Tiger Cloud service is running the Postgres extensions used in your source database.
- Check the extensions on the source database:bash
psql source -c "SELECT * FROM pg_extension;" - For each extension, enable it on your target Tiger Cloud service:bash
psql target -c "CREATE EXTENSION IF NOT EXISTS <extension name> CASCADE;"
- Check the extensions on the source database:
Migrate the roles from TimescaleDB to your Tiger Cloud service
Roles manage database access permissions. To migrate your role-based security hierarchy to your Tiger Cloud service:
Dump the roles from your source database
Export your role-based security hierarchy.
<db_name>has the same value as<db_name>insource. I know, it confuses me as well.bashpg_dumpall -d "source" \ -l <db_name> --quote-all-identifiers \ --roles-only \ --file=roles.sqlIf you only use the default
postgresrole, this step is not necessary.Remove roles with superuser access
Tiger Cloud service do not support roles with superuser access. Run the following script to remove statements, permissions and clauses that require superuser permissions from
roles.sql:bashsed -i -E \ -e '/CREATE ROLE "postgres";/d' \ -e '/ALTER ROLE "postgres"/d' \ -e '/CREATE ROLE "tsdbadmin";/d' \ -e '/ALTER ROLE "tsdbadmin"/d' \ -e 's/(NO)*SUPERUSER//g' \ -e 's/(NO)*REPLICATION//g' \ -e 's/(NO)*BYPASSRLS//g' \ -e 's/GRANTED BY "[^"]*"//g' \ roles.sqlDump the source database schema and data
The
pg_dumpflags remove superuser access and tablespaces from your data. When you runpgdump, check the run time, [a long-runningpg_dumpcan cause issues][long-running-pgdump].bashpg_dump -d "source" \ --format=plain \ --quote-all-identifiers \ --no-tablespaces \ --no-owner \ --no-privileges \ --file=dump.sqlTo dramatically reduce the time taken to dump the source database, using multiple connections. For more information, see [dumping with concurrency][dumping-with-concurrency] and [restoring with concurrency][restoring-with-concurrency].
Upload your data to the target Tiger Cloud service
psql target -v ON_ERROR_STOP=1 --echo-errors \
-f roles.sql \
-f dump.sql
Validate your Tiger Cloud service and restart your app
Update the table statistics.
bashpsql target -c "ANALYZE;"Verify the data in the target Tiger Cloud service.
Check that your data is correct, and returns the results that you expect,
Enable any Tiger Cloud features you want to use.
Migration from Postgres moves the data only. Now manually enable Tiger Cloud features like [hypertables][about-hypertables], [hypercore][data-compression] or [data retention][data-retention] while your database is offline.
Reconfigure your app to use the target database, then restart it.
And that is it, you have migrated your data from a self-hosted instance running Postgres to a Tiger Cloud service.
To migrate your data from an Amazon RDS/Aurora Postgres instance to a Tiger Cloud service, you extract the data to an intermediary EC2 Ubuntu instance in the same AWS region as your RDS/Aurora Postgres instance. You then upload your data to a Tiger Cloud service. To make this process as painless as possible, ensure that the intermediary machine has enough CPU and disk space to rapidLy extract and store your data before uploading to Tiger Cloud.
Migration from RDS/Aurora Postgres moves the data only. You must manually enable Tiger Cloud features like [hypertables][about-hypertables], [data compression][data-compression] or [data retention][data-retention] after the migration is complete. You enable Tiger Cloud features while your database is offline.
This section shows you how to move your data from a Postgres database running in an Amazon RDS/Aurora Postgres instance to a Tiger Cloud service using pg_dump and psql from Terminal.
Create an intermediary EC2 Ubuntu instance
- In [https://console.aws.amazon.com/rds/home#databases:][databases], select the RDS/Aurora Postgres instance to migrate.
- Click
Actions>Set up EC2 connection. PressCreate EC2 instanceand use the following settings:- AMI: Ubuntu Server.
- Key pair: use an existing pair or create a new one that you will use to access the intermediary machine.
- VPC: by default, this is the same as the database instance.
- Configure Storage: adjust the volume to at least the size of RDS/Aurora Postgres instance you are migrating from. You can reduce the space used by your data on Tiger Cloud using [Hypercore][hypercore].
- Click
Lauch instance. AWS creates your EC2 instance, then clickConnect to instance>SSH client. Follow the instructions to create the connection to your intermediary EC2 instance.
Install the psql client tools on the intermediary instance
- Connect to your intermediary EC2 instance. For example:sh