How to integrate the GitLab authentication plugin
In the Aiven Client, connect to your [MST_SERVICE_LONG][Install and configure the Aiven client].
Switch to the project that contains the Grafana service you want to integrate:
List the services in the project. Note the Grafana service that you want to integrate, listed under
SERVICE_NAMEcolumn in the output.Get the details of the service that you want to integrate:
Integrate the plugin with your service using the
<CLIENT_ID>,<CLIENT_SECRET>, and<GITLAB_GROUPS>from your GitLab OAuth application:Log in to Grafana with your service credentials.
Navigate to
Configuration→Plugins. The Plugins page lists GitLab OAuth application for the Grafana instance.
When you allow sign-ups using the -c auth_gitlab.allow_sign_up=true option, by default each new user is created with viewerpermission and added to their own newly created organizations. To specify different permissions, use -c user_auto_assign_org_role=ROLE_NAME. To add all new users to the main organization, use the -c user_auto_assign_org=true option.
Send Grafana emails
Use the Aiven client to configure the Simple Mail Transfer Protocol (SMTP) server settings and send emails from Managed Service for TimescaleDB for Grafana. This includes invite emails, reset password emails, and alert messages.
Before you begin, make sure you have:
- (Optional): Made a note of these values in the SMTP server:
IP or hostname,SMTP server port,Username,Password,Sender email address, andSender name.
Configuring the SMTP server for Grafana service
In the Aiven client, connect to your [service][Install and configure the Aiven client].
Switch to the project that contains the Grafana service you want to integrate:
List the services in the project. Note the Grafana service that you want to configure, listed under
SERVICE_NAMEcolumn in the output.Get the details of the service that you want to integrate:
Configure the Grafana service using the SMTP values:
You can now send emails for your Grafana service on MST.
Create a read-only replica with Aiven client
Read-only replicas enable you to perform read-only queries against the replica and reduce the load on the primary server. They are also a good way to optimize query response times across different geographical locations. You can achieve this by placing the replicas in different regions or even different cloud providers.
Creating a read-only replica of your service
In the Aiven client, connect to your [service][Install and configure the Aiven client].
Switch to the project that contains the service you want to create a read-only replica for:
List the services in the project. Note the service for which you will create a read-only replica. You can find it listed under the
SERVICE_NAMEcolumn in the output:Get the details of the service that you want to fork:
Create a read-only replica:
To create a fork named replica-fork for a service named timescaledb with these parameters:
- PROJECT_ID:
fork-project - CLOUD_NAME:
timescale-aws-us-east-1 - PLAN_TYPE:
timescale-basic-100-compute-optimized
You can switch to project-fork and view the newly created replica-fork using:
===== PAGE: https://docs.tigerdata.com/mst/migrate-to-mst/ =====
Examples:
Example 1 (bash):
pip install aiven-clientExample 2 (bash):
cd ~/.config/aiven/Example 3 (bash):
{
      "auth_token": "ABC1+123...TOKEN==",
      "user_email": "your.email@timescale.com"
    }
Example 4 (bash):
avn project listError updating TimescaleDB when using a third-party Postgres admin tool
URL: llms-txt#error-updating-timescaledb-when-using-a-third-party-postgres-admin-tool
The update command ALTER EXTENSION timescaledb UPDATE must be the first command executed upon connection to a database. Some admin tools execute commands before this, which can disrupt the process. Try manually updating the database with psql. For instructions, see the [updating guide][update].
===== PAGE: https://docs.tigerdata.com/_troubleshooting/self-hosted/windows-install-library-not-loaded/ =====
Control access to Tiger Cloud projects
URL: llms-txt#control-access-to-tiger-cloud-projects
Contents:
- Add a user to your project
- Join a project
- Resend a project invitation
- Change your current project
- Transfer project ownership
- Leave a project
- Change roles of other users in a project
- Remove users from a project
When you sign up for a [30-day free trial][sign-up], Tiger Cloud creates a project with built-in role-based access.
This includes the following roles:
- Owner: Tiger Cloud assigns this role to you when your project is created. As the Owner, you can add and delete other users, transfer project ownership, administer services, and edit project settings.
- Admin: the Owner assigns this role to other users in the project. A user with the Admin role has the same scope of rights as the Owner but cannot transfer project ownership.
- Developer: the Owner and Admins assign this role to other users in the project. A Developer can build, deploy, and operate services across projects, but does not have administrative privileges over users, roles, or billing. A Developer can invite other users to the project, but only with the Viewer role.
- Viewer: the Owner and Admins assign this role to other users in the project. A Viewer has limited, read-only access to Tiger Cloud Console. This means that a Viewer cannot modify services and their configurations in any way. A Viewer has no access to the data mode and has read-queries-only access to SQL editor.
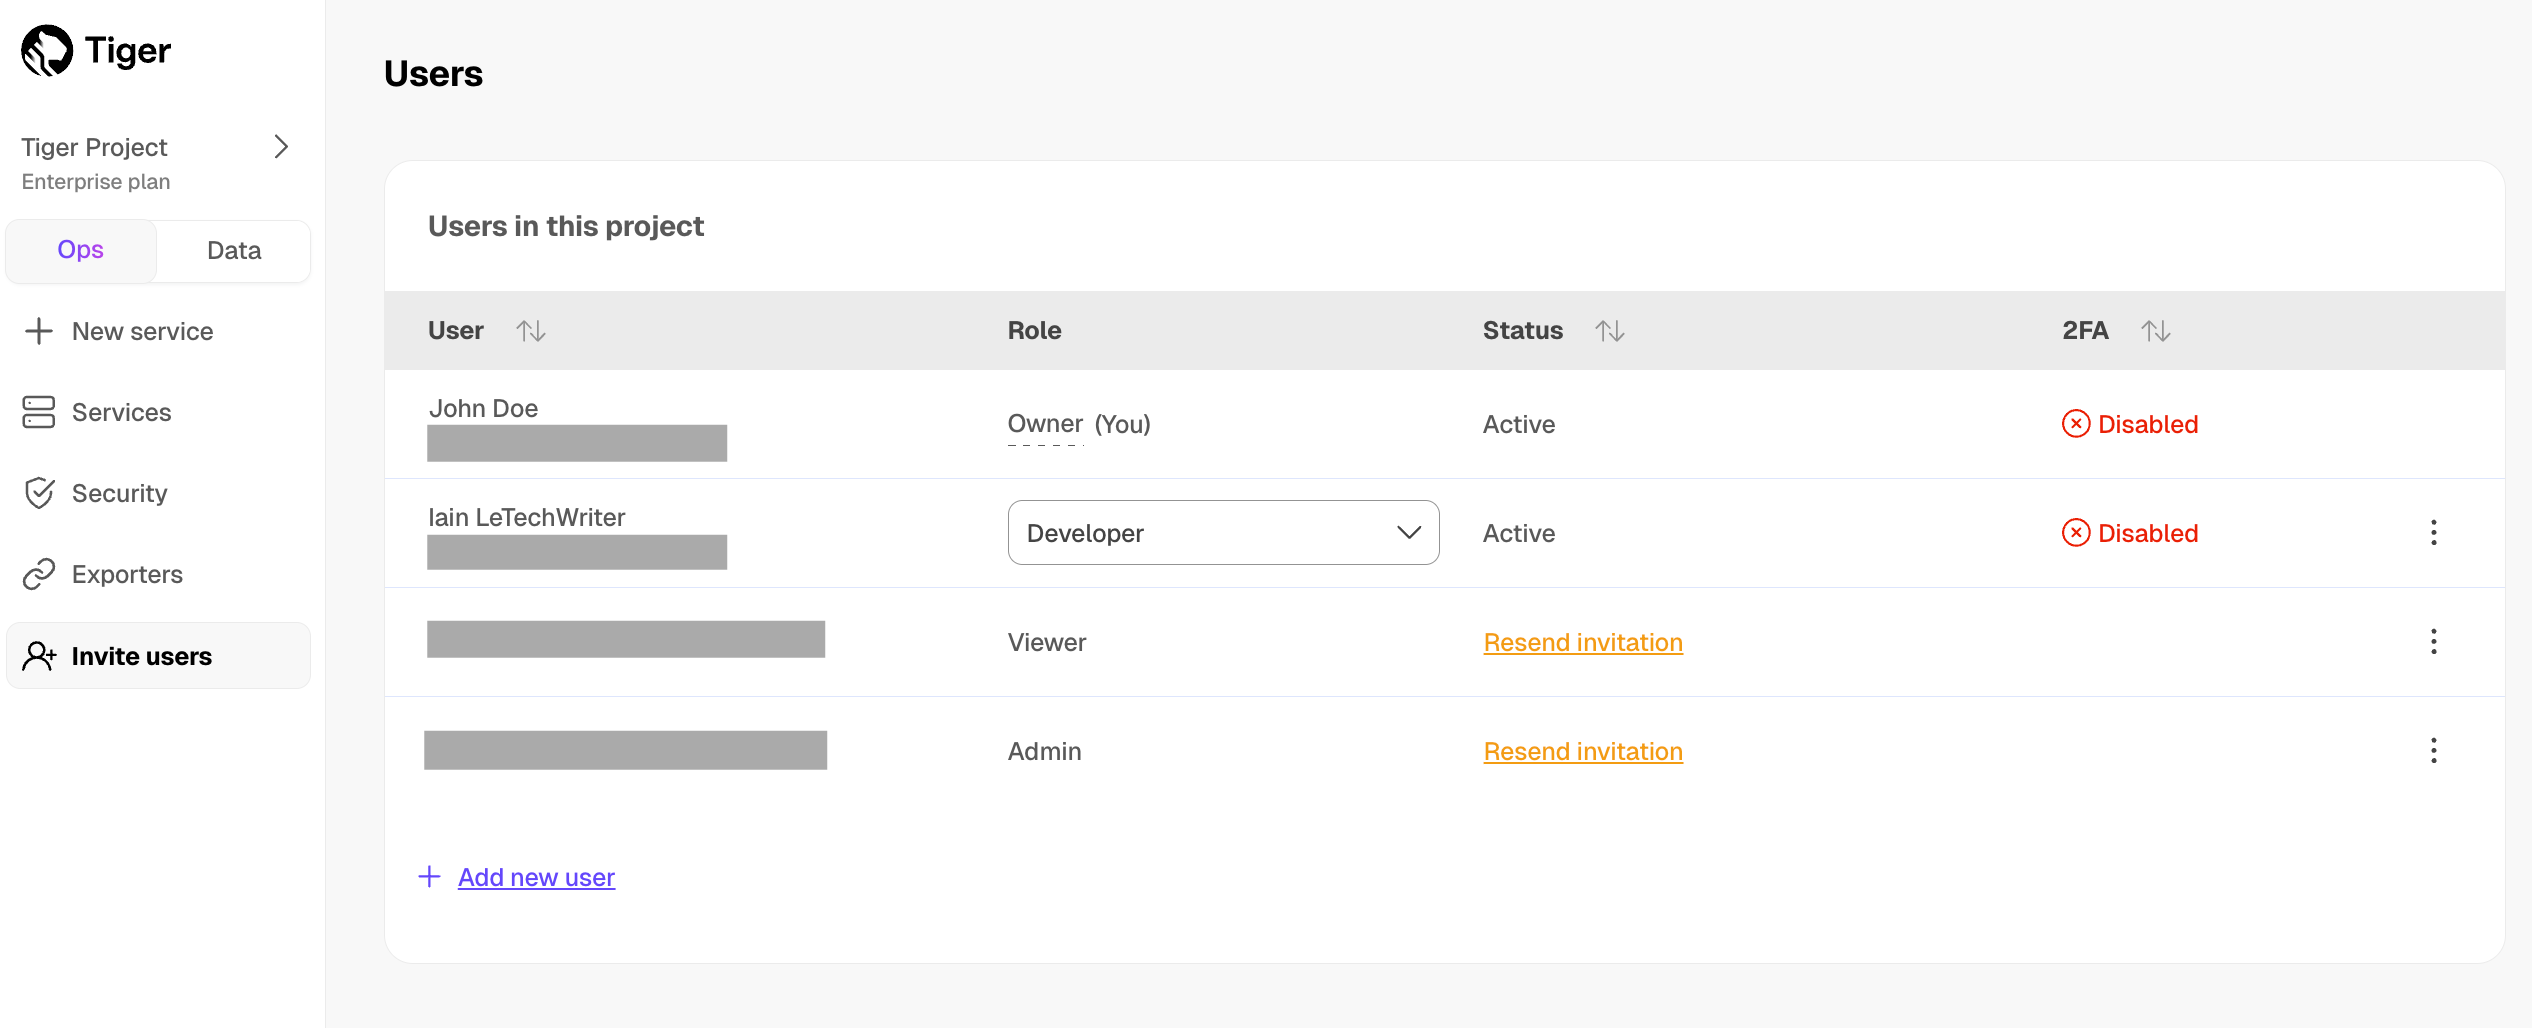
If you have the [Enterprise pricing plan][pricing-plans], you can use your company [SAML][saml] identity provider to log in to Console.
User roles in a Tiger Cloud project do not overlap with the database-level roles for the individual services. This page describes the project roles available in Console. For the database-level user roles, see [Manage data security in your Tiger Cloud service][database-rbac].
Add a user to your project
New users do not need to have a Tiger Data account before you add them, they are prompted to create one when they respond to the confirmation email. Existing users join a project in addition to the other projects they are already members of.
To add a user to a project:
In [Tiger Cloud Console][cloud-login], click
Invite users, then clickAdd new user.Type the email address of the person that you want to add, select their role, and click
Invite user.
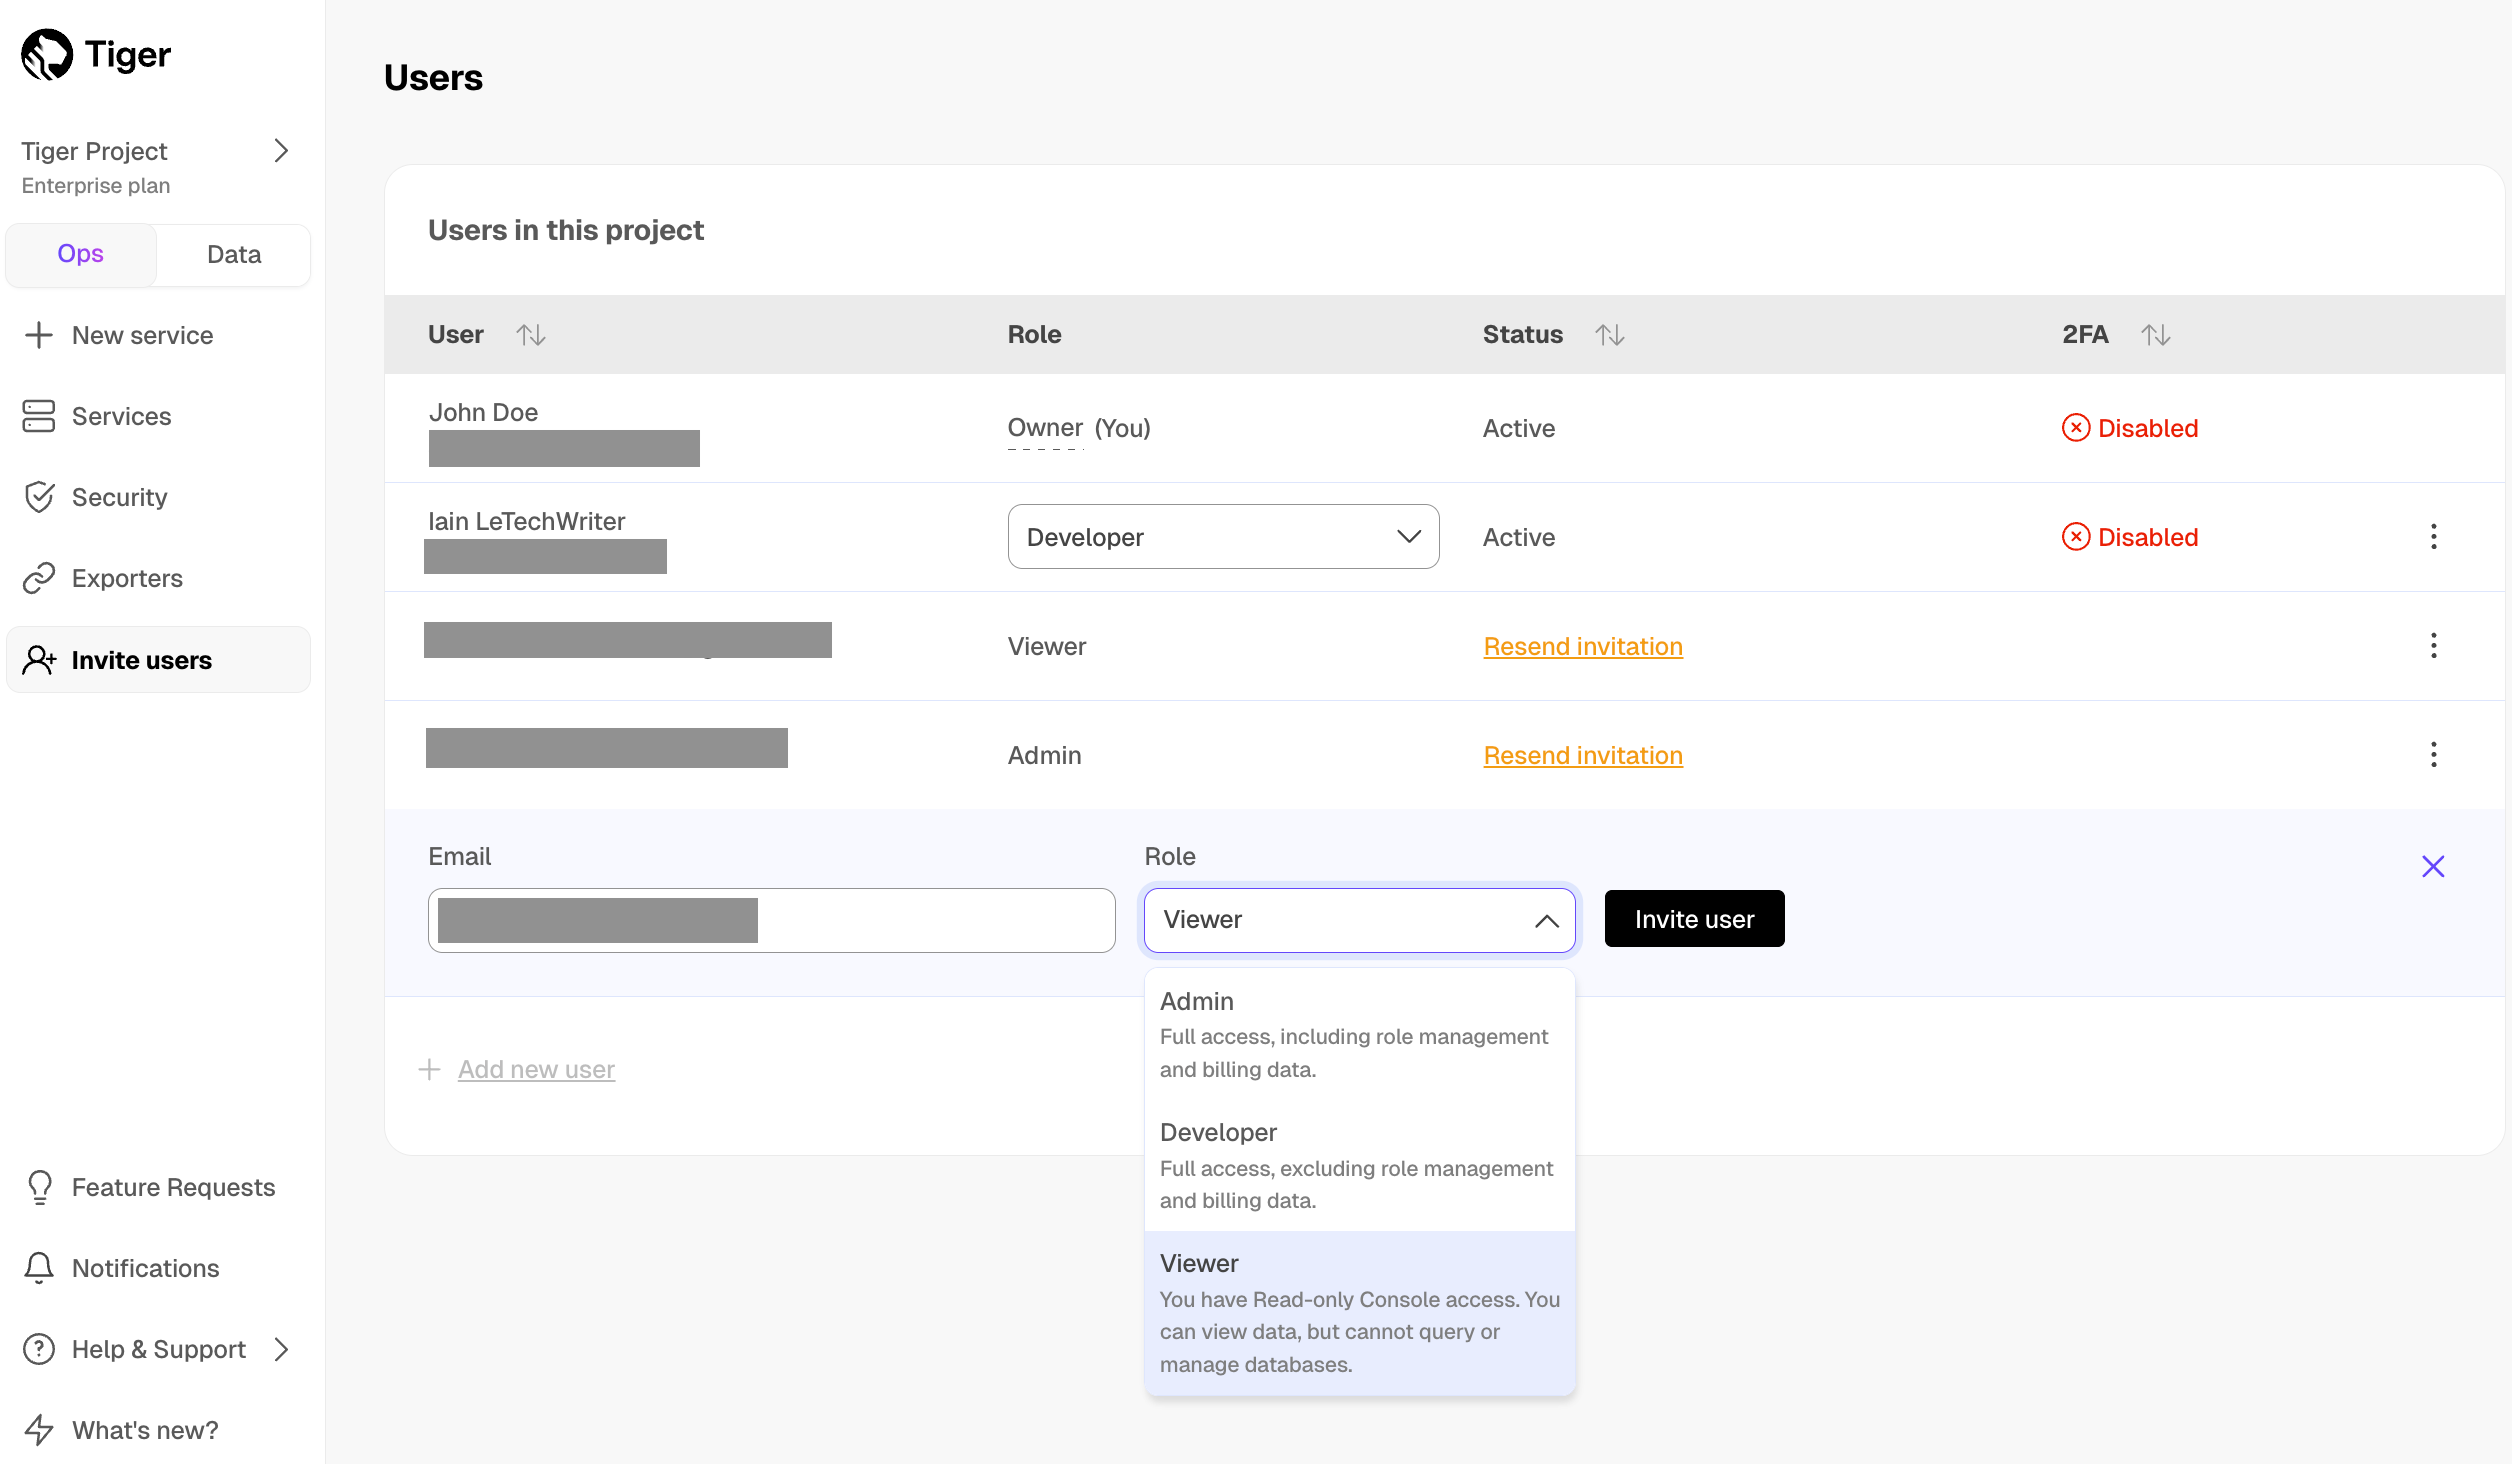
[Enterprise pricing plan][pricing-plans] and SAML users receive a notification in Console. Users in the other pricing plans receive a confirmation email. The new user then [joins the project][join-a-project].
When you are asked to join a project, Tiger Cloud Console sends you an invitation email. Follow the instructions in the invitation email to join the project:
In the invitation email, click
Accept InviteFollow the setup wizard and create a new account
You are added to the project you were invited to.
- In the invitation email, click
Accept Invite
Tiger Cloud Console opens, and you are added to the project.
Log in to Console using your company's identity provider
Click
Notifications, then accept the invitation
Tiger Cloud Console opens, and you are added to the project. As you are now included in more than one project, you can easily [change projects][change-project].
Resend a project invitation
Project invitations are valid for 7 days. To resend a project invitation:
In [Tiger Cloud Console][cloud-login], click
Invite users.Next to the person you want to invite to your project, click
Resend invitation.
Change your current project
To change the project you are currently working in:
- In [Tiger Cloud Console][cloud-login], click the project name >
Current projectin the top left.
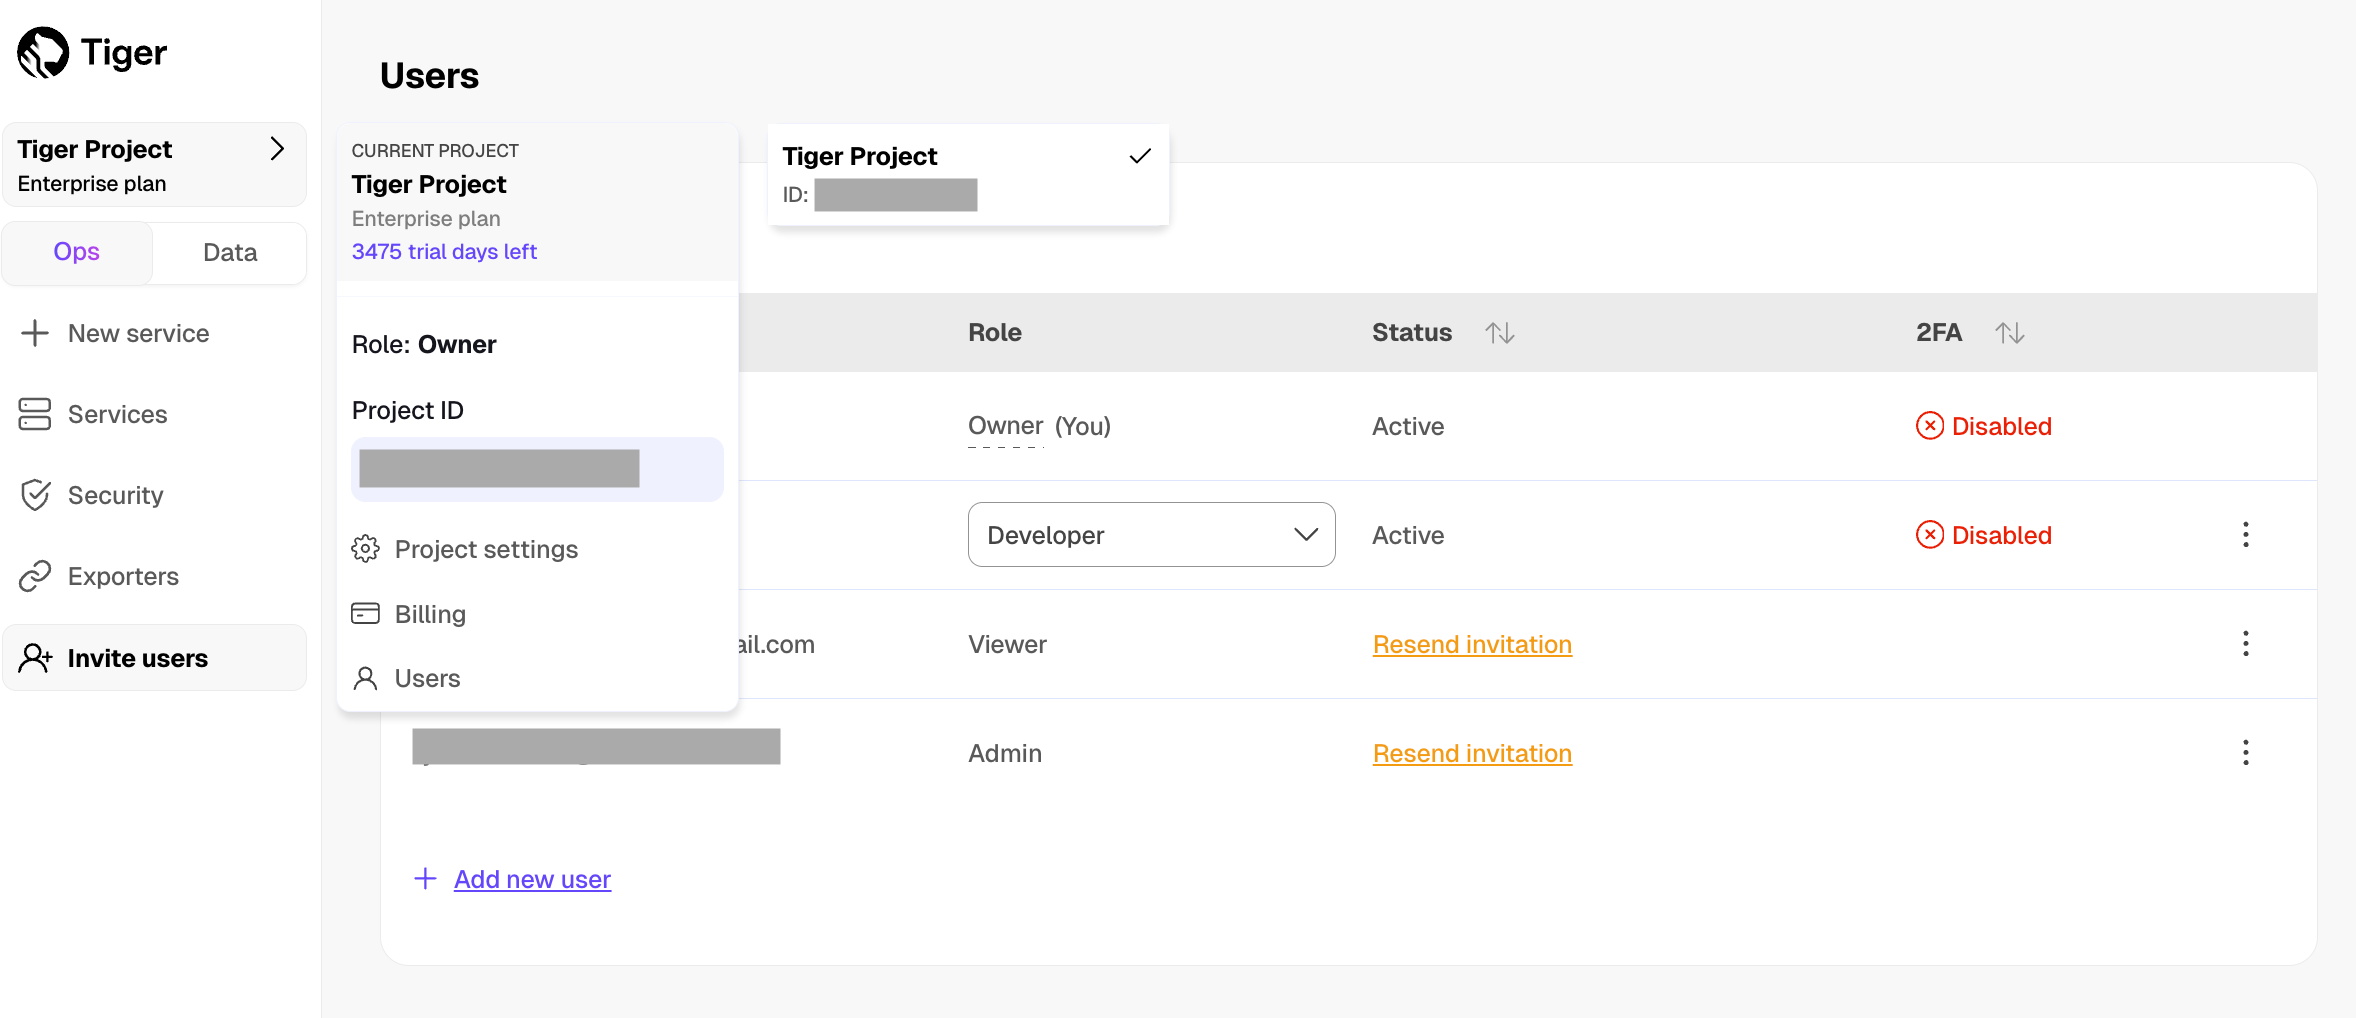
- Select the project you want to use.
Transfer project ownership
Each Tiger Cloud project has one Owner. As the project Owner, you have rights to add and delete users, edit project settings, and transfer the Owner role to another user. When you transfer ownership to another user, you lose your ownership rights.
To transfer project ownership:
In [Tiger Cloud Console][cloud-login], click
Invite users.Next to the person you want to transfer project ownership to, click
⋮>Transfer project ownership.
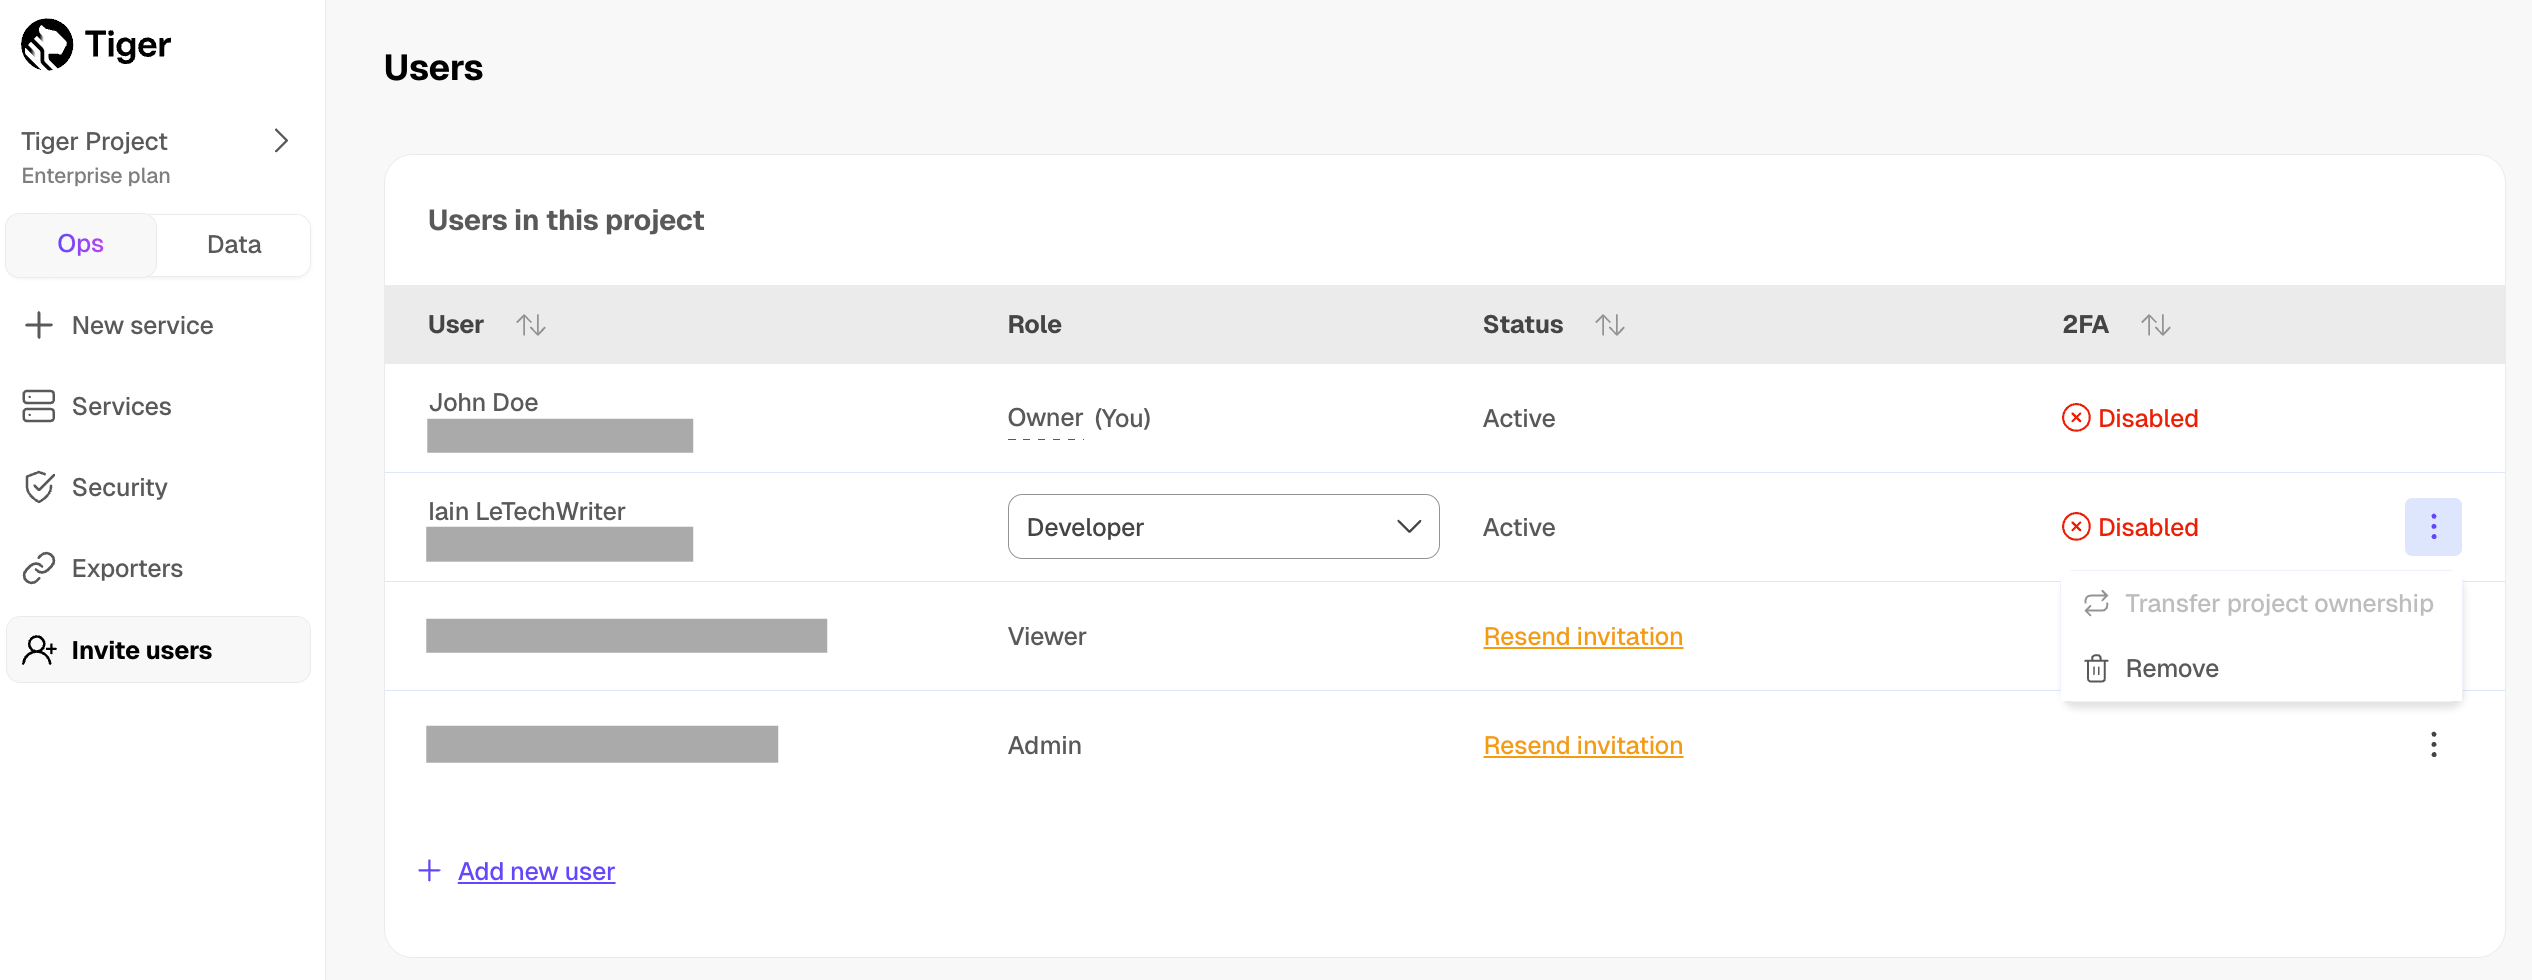
If you are unable to transfer ownership, hover over the greyed out button to see the details.
- Enter your password, and click
Verify. - Complete the two-factor authentication challenge and click
Confirm.
If you have the [Enterprise pricing plan][pricing-plans], and log in to Tiger Cloud using [SAML authentication][saml] or have not enabled [two-factor authentication][2fa], contact support to transfer project ownership.
To stop working in a project:
In [Tiger Cloud Console][cloud-login], click
Invite users.Click
⋮>Leave project, then clickLeave.
Your account is removed from the project immediately, you can no longer access this project.
Change roles of other users in a project
The Owner can change the roles of all users in the project. An Admin can change the roles of all users other than the Owner. Developer and Viewer cannot change the roles of other users.
To change the role for another user:
In [Tiger Cloud Console][cloud-login], click
Invite users.Next to the corresponding user, select another role in the dropdown.
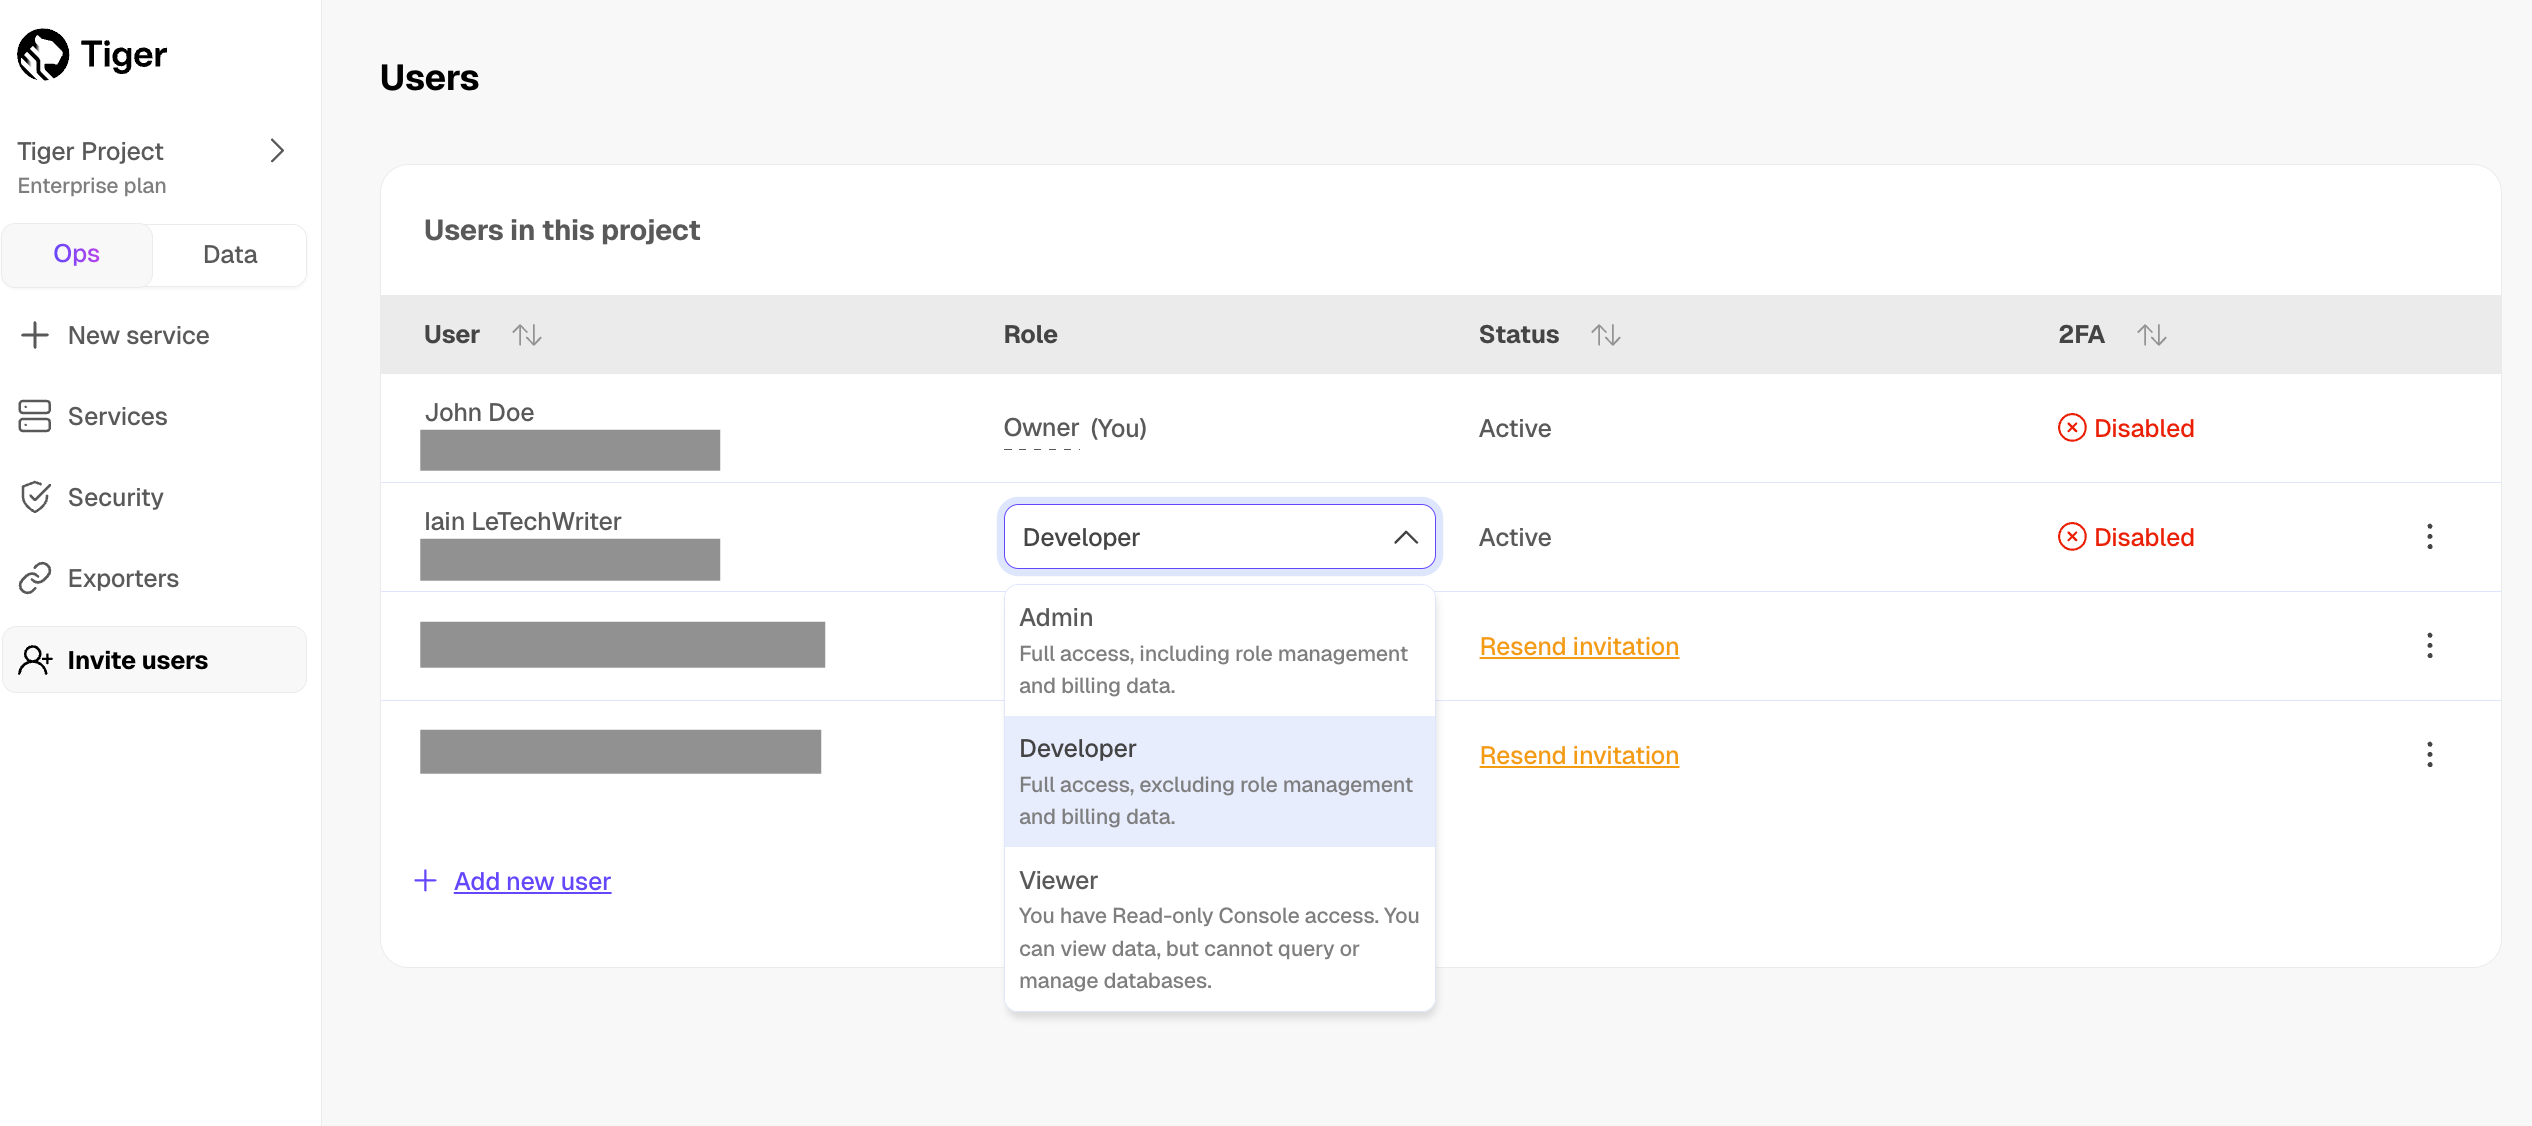
The user role is changed immediately.
Remove users from a project
To remove a user's access to a project:
- In [Tiger Cloud Console][cloud-login], click
Invite users. - Next to the person you want to remove, click
⋮>Remove. - In
Remove user, clickRemove.
The user is deleted immediately, they can no longer access your project.
===== PAGE: https://docs.tigerdata.com/use-timescale/security/vpc/ =====
Embed your Postgres data with PgVectorizer
URL: llms-txt#embed-your-postgres-data-with-pgvectorizer
Contents:
- Embed Postgres data with PgVectorizer
- Contribute to the Tiger Data docs
- Learn about Tiger Data
Embed Postgres data with PgVectorizer
PgVectorizer enables you to create vector embeddings from any data that you already have stored in Postgres. You can get more background information in the blog post announcing this feature, as well as the "how we built it" post going into the details of the design.
To create vector embeddings, simply attach PgVectorizer to any Postgres table to automatically sync that table's data with a set of embeddings stored in Postgres. For example, say you have a blog table defined in the following way:
You can insert some data as follows:
Now, say you want to embed these blogs and store the embeddings in Postgres. First, you need to define an embed_and_write function that takes a set of blog posts, creates the embeddings, and writes them into TigerData Vector. For example, if using LangChain, it could look something like the following.
Then, all you have to do is run the following code in a scheduled job (cron job, Lambda job, etc):
Every time that job runs, it syncs the table with your embeddings. It syncs all inserts, updates, and deletes to an embeddings table called blog_embedding.
Now, you can simply search the embeddings as follows (again, using LangChain in the example):
[(Document(page_content='Author Matvey Arye, title: First Post, contents:some super interesting content about cats.', metadata={'id': '4a784000-4bc4-11eb-855a-06302dbc8ce7', 'author': 'Matvey Arye', 'blog_id': 1, 'category': 'AI', 'published_time': '2021-01-01T00:00:00+00:00'}), 0.12595687795193833)]
===== PAGE: https://docs.tigerdata.com/README/ =====
<source media="(prefers-color-scheme: dark)" srcset="https://assets.timescale.com/docs/images/tigerdata-gradient-white.svg">
<source media="(prefers-color-scheme: light)" srcset="https://assets.timescale.com/docs/images/tigerdata-gradient-black.svg">
<img alt="Tiger Data logo" >
Tiger Cloud is the modern Postgres data platform for all your applications. It enhances Postgres to handle time series, events, real-time analytics, and vector search—all in a single database alongside transactional workloads.
This repository contains the current source for Tiger Data documentation available at https://docs.tigerdata.com/.
We welcome contributions! You can contribute to Tiger Data documentation in the following ways:
- [Create an issue][docs-issues] in this repository and describe the proposed change. Our doc team takes care of it.
- Update the docs yourself and have your change reviewed and published by our doc team.
Contribute to the Tiger Data docs
To make the contribution yourself:
- Get the documentation source:
- No write access? [Fork this repository][github-fork].
- Already have a write access? [Clone this repository][github-clone].
Create a branch from
latest, make your changes, and raise a pull request back tolatest.Sign a Contributor License Agreement (CLA).
You have to sign the CLA only the first time you raise a PR. This helps to ensure that the community is free to use your contributions.
- Review your changes.
The documentation site is generated in a separate private repository using [Gatsby][gatsby]. Once you raise a PR for any branch, GitHub automatically generates a preview for your changes and attaches the link in the comments. Any new commits are visible at the same URL. If you don't see the latest changes, try an incognito browser window. Automated builds are not available for PRs from forked repositories.
See the Contributing guide for style and language guidance.
Learn about Tiger Data
Tiger Data is Postgres made powerful. To learn more about the company and its products, visit tigerdata.com.
===== PAGE: https://docs.tigerdata.com/CONTRIBUTING/ =====
Examples:
Example 1 (unknown):
Example 2 (unknown):
You can insert some data as follows:Example 3 (unknown):
Now, say you want to embed these blogs and store the embeddings in Postgres. First, you
need to define an `embed_and_write` function that takes a set of blog
posts, creates the embeddings, and writes them into TigerData Vector. For
example, if using LangChain, it could look something like the following.
Example 4 (unknown):
Then, all you have to do is run the following code in a scheduled job
(cron job, Lambda job, etc):
Manage storage and tiering
URL: llms-txt#manage-storage-and-tiering
Contents:
- High-performance storage tier
- Standard high-performance storage
- Enhanced high-performance storage
- Low-cost object storage tier
- Enable tiered storage
- Automate tiering with policies
- Manually tier and untier chunks
- Disable tiering
The tiered storage architecture in Tiger Cloud includes a high-performance storage tier and a low-cost object storage tier:
You use [high-performance storage][high-performance-storage] to store and query frequently accessed data.
You use [low-cost object storage][low-cost-storage] to cut costs by migrating rarely used data from the high-performance storage. After you enable tiered storage, you then either [create automated tiering policies][tiering-policies] or [manually tier and untier data][manual-tier].
You can query the data on the object storage tier, but you cannot modify it. Make sure that you are not tiering data that needs to be actively modified.
For low-cost storage, Tiger Data charges only for the size of your data in S3 in the Apache Parquet format, regardless of whether it was compressed in Tiger Cloud before tiering. There are no additional expenses, such as data transfer or compute.
High-performance storage tier
By default, Tiger Cloud stores your service data in the standard high-performance storage. This storage tier comes in the standard and enhanced types. Enhanced storage is available under the [Enterprise pricing plan][pricing-plans] only.
Standard high-performance storage
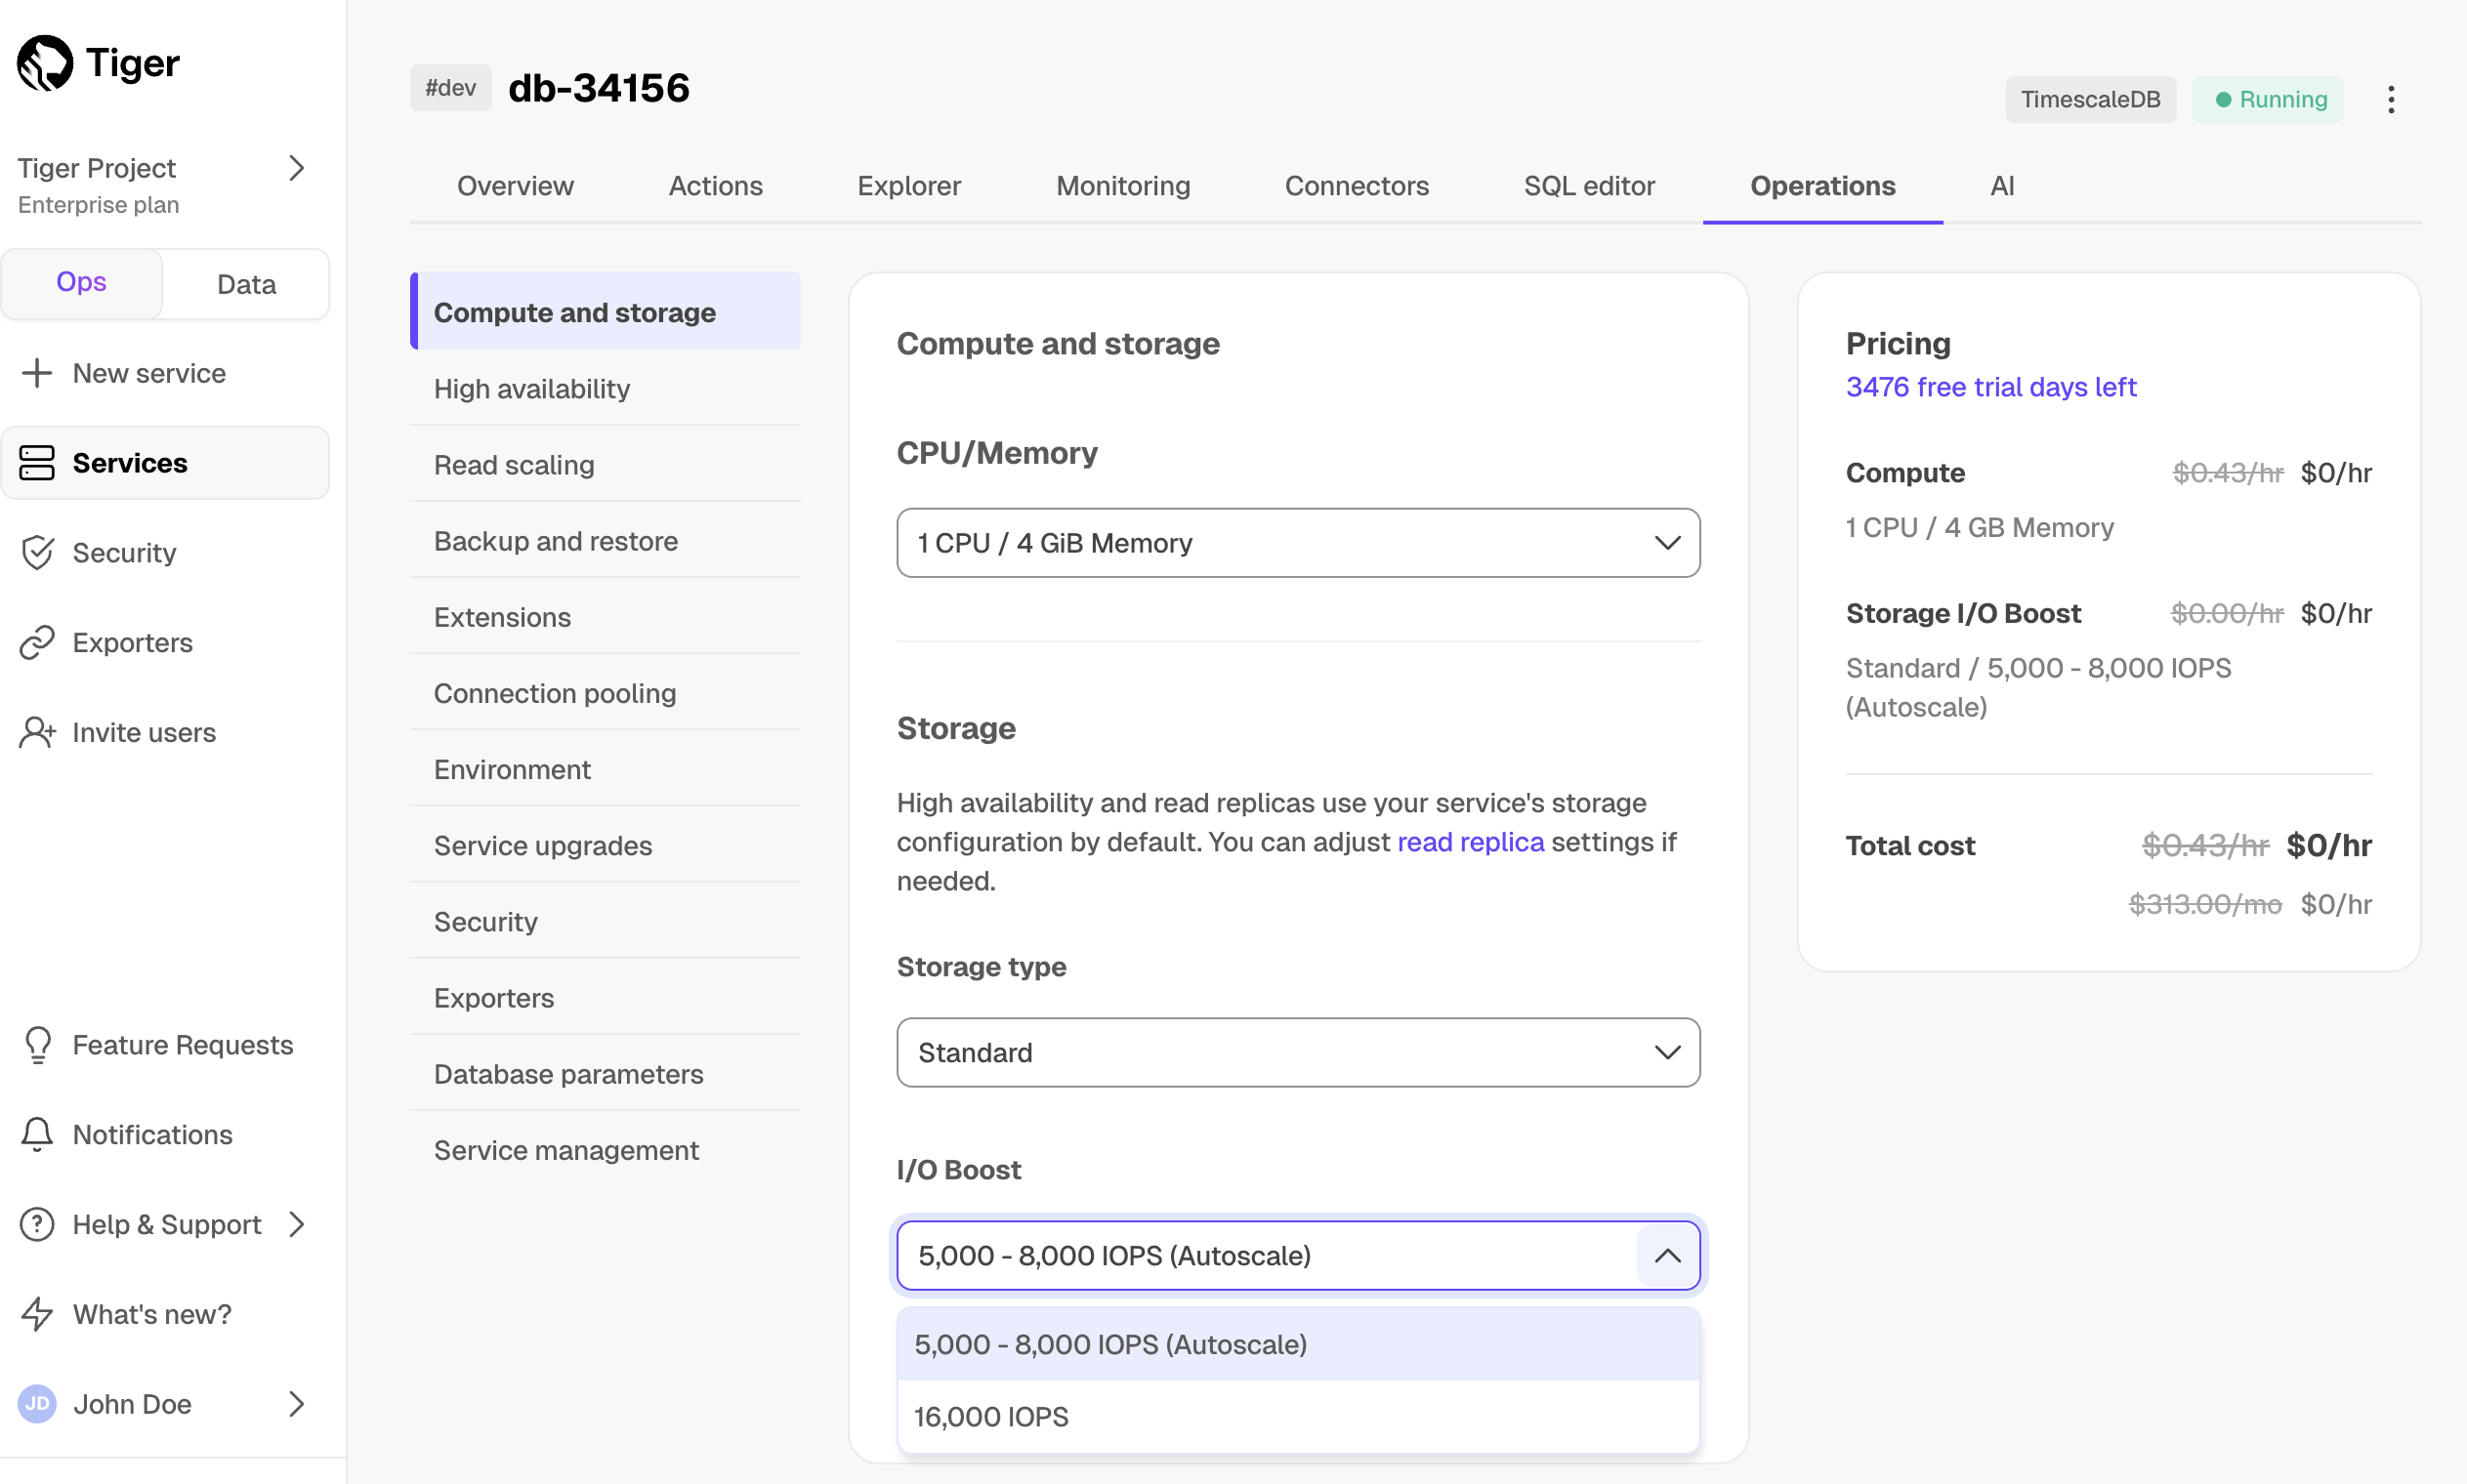
This storage type gives you up to 16 TB of storage and is available under [all pricing plans][pricing-plans]. You change the IOPS value to better suit your needs in Tiger Cloud Console:
- In [Tiger Cloud Console][console], select your service, then click
Operations>Compute and storage
By default, the type of high-performance storage is set to Standard.
- Select the IOPS value in the
I/O boostdropdown
- Under the [Performance pricing plan][pricing-plans], IOPS is set to 3,000 - 5,000 autoscale and cannot be changed.
- Under the [Scale and Enterprise pricing plans][pricing-plans], IOPS is set to 5,000 - 8,000 autoscale and can be upgraded to 16,000 IOPS.
Enhanced high-performance storage
This storage type gives you up to 64 TB and 32,000 IOPS, and is available under the [Enterprise pricing plan][pricing-plans]. To get enhanced storage:
- In [Tiger Cloud Console][console], select your service, then click
Operations>Compute and storage - Select
Enhancedin theStorage typedropdown
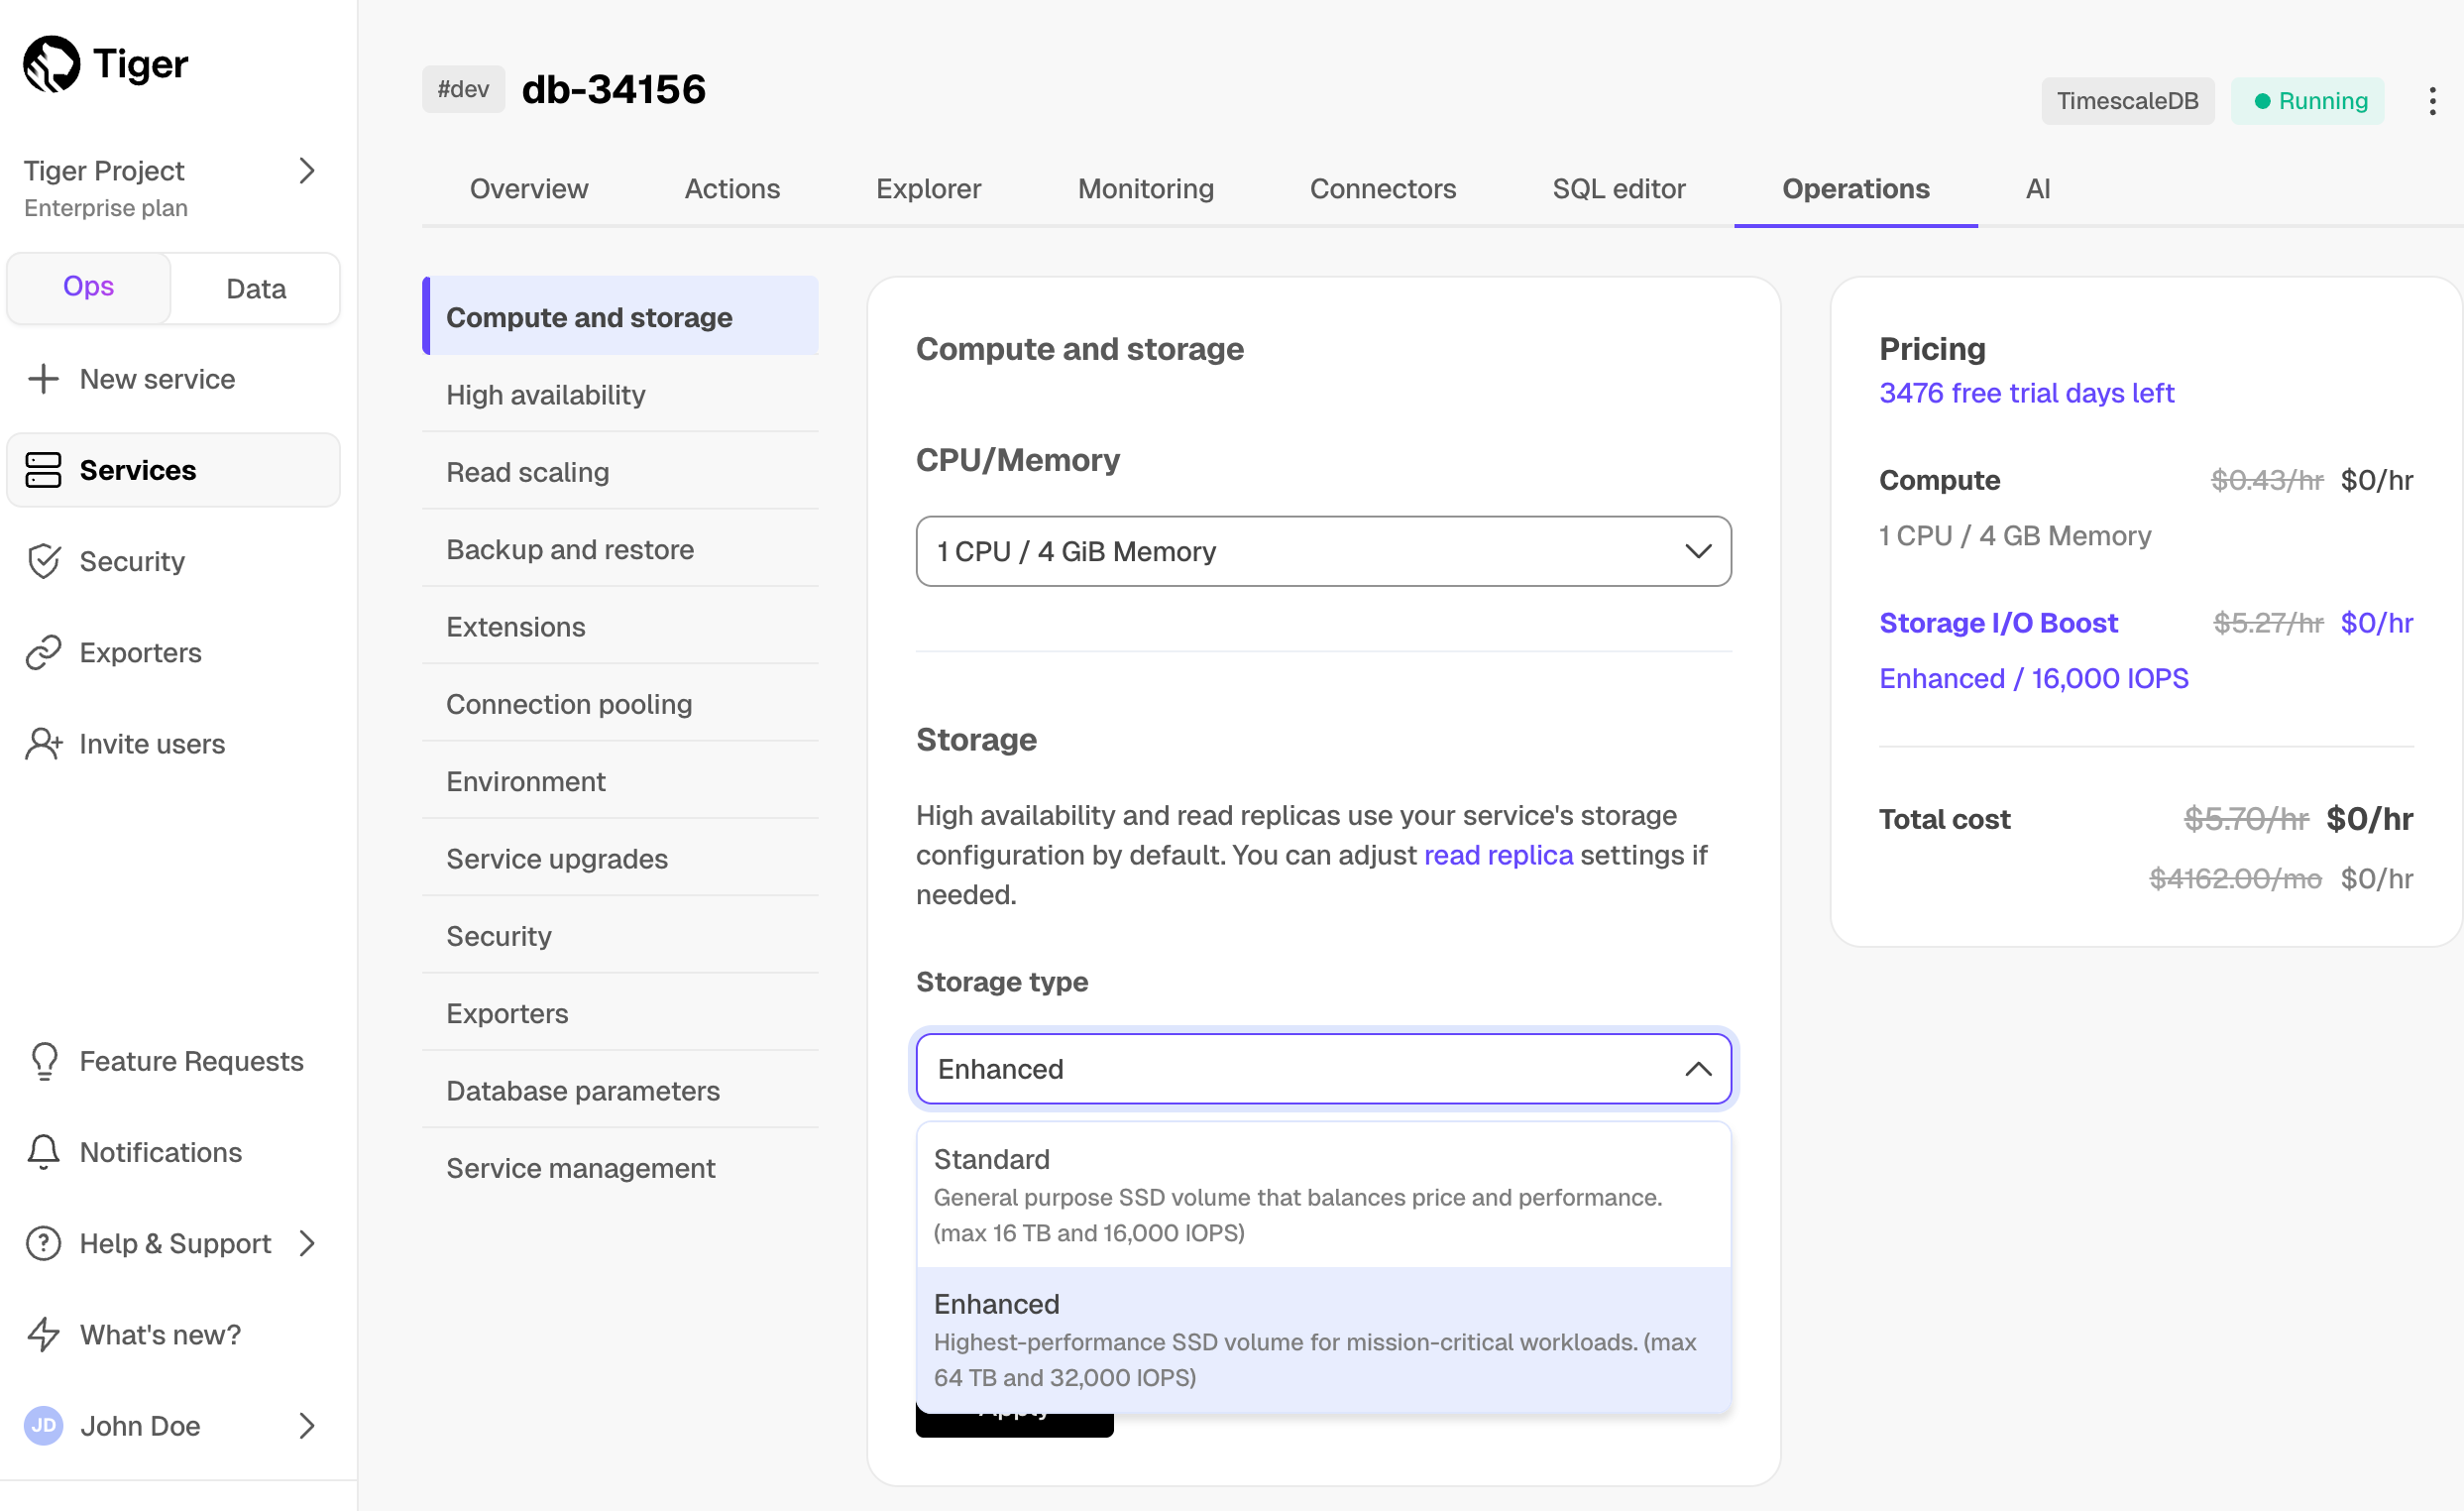
The enhanced storage is currently not available in sa-east-1.
- Select the IOPS value in the
I/O boostdropdown
Select between 8,000, 16,000, 24,000, and 32,0000 IOPS. The value that you can apply depends on the number of CPUs in your service. Tiger Cloud Console notifies you if your selected IOPS requires increasing the number of CPUs. To increase IOPS to 64,000, click Contact us and we will be in touch to confirm the details.
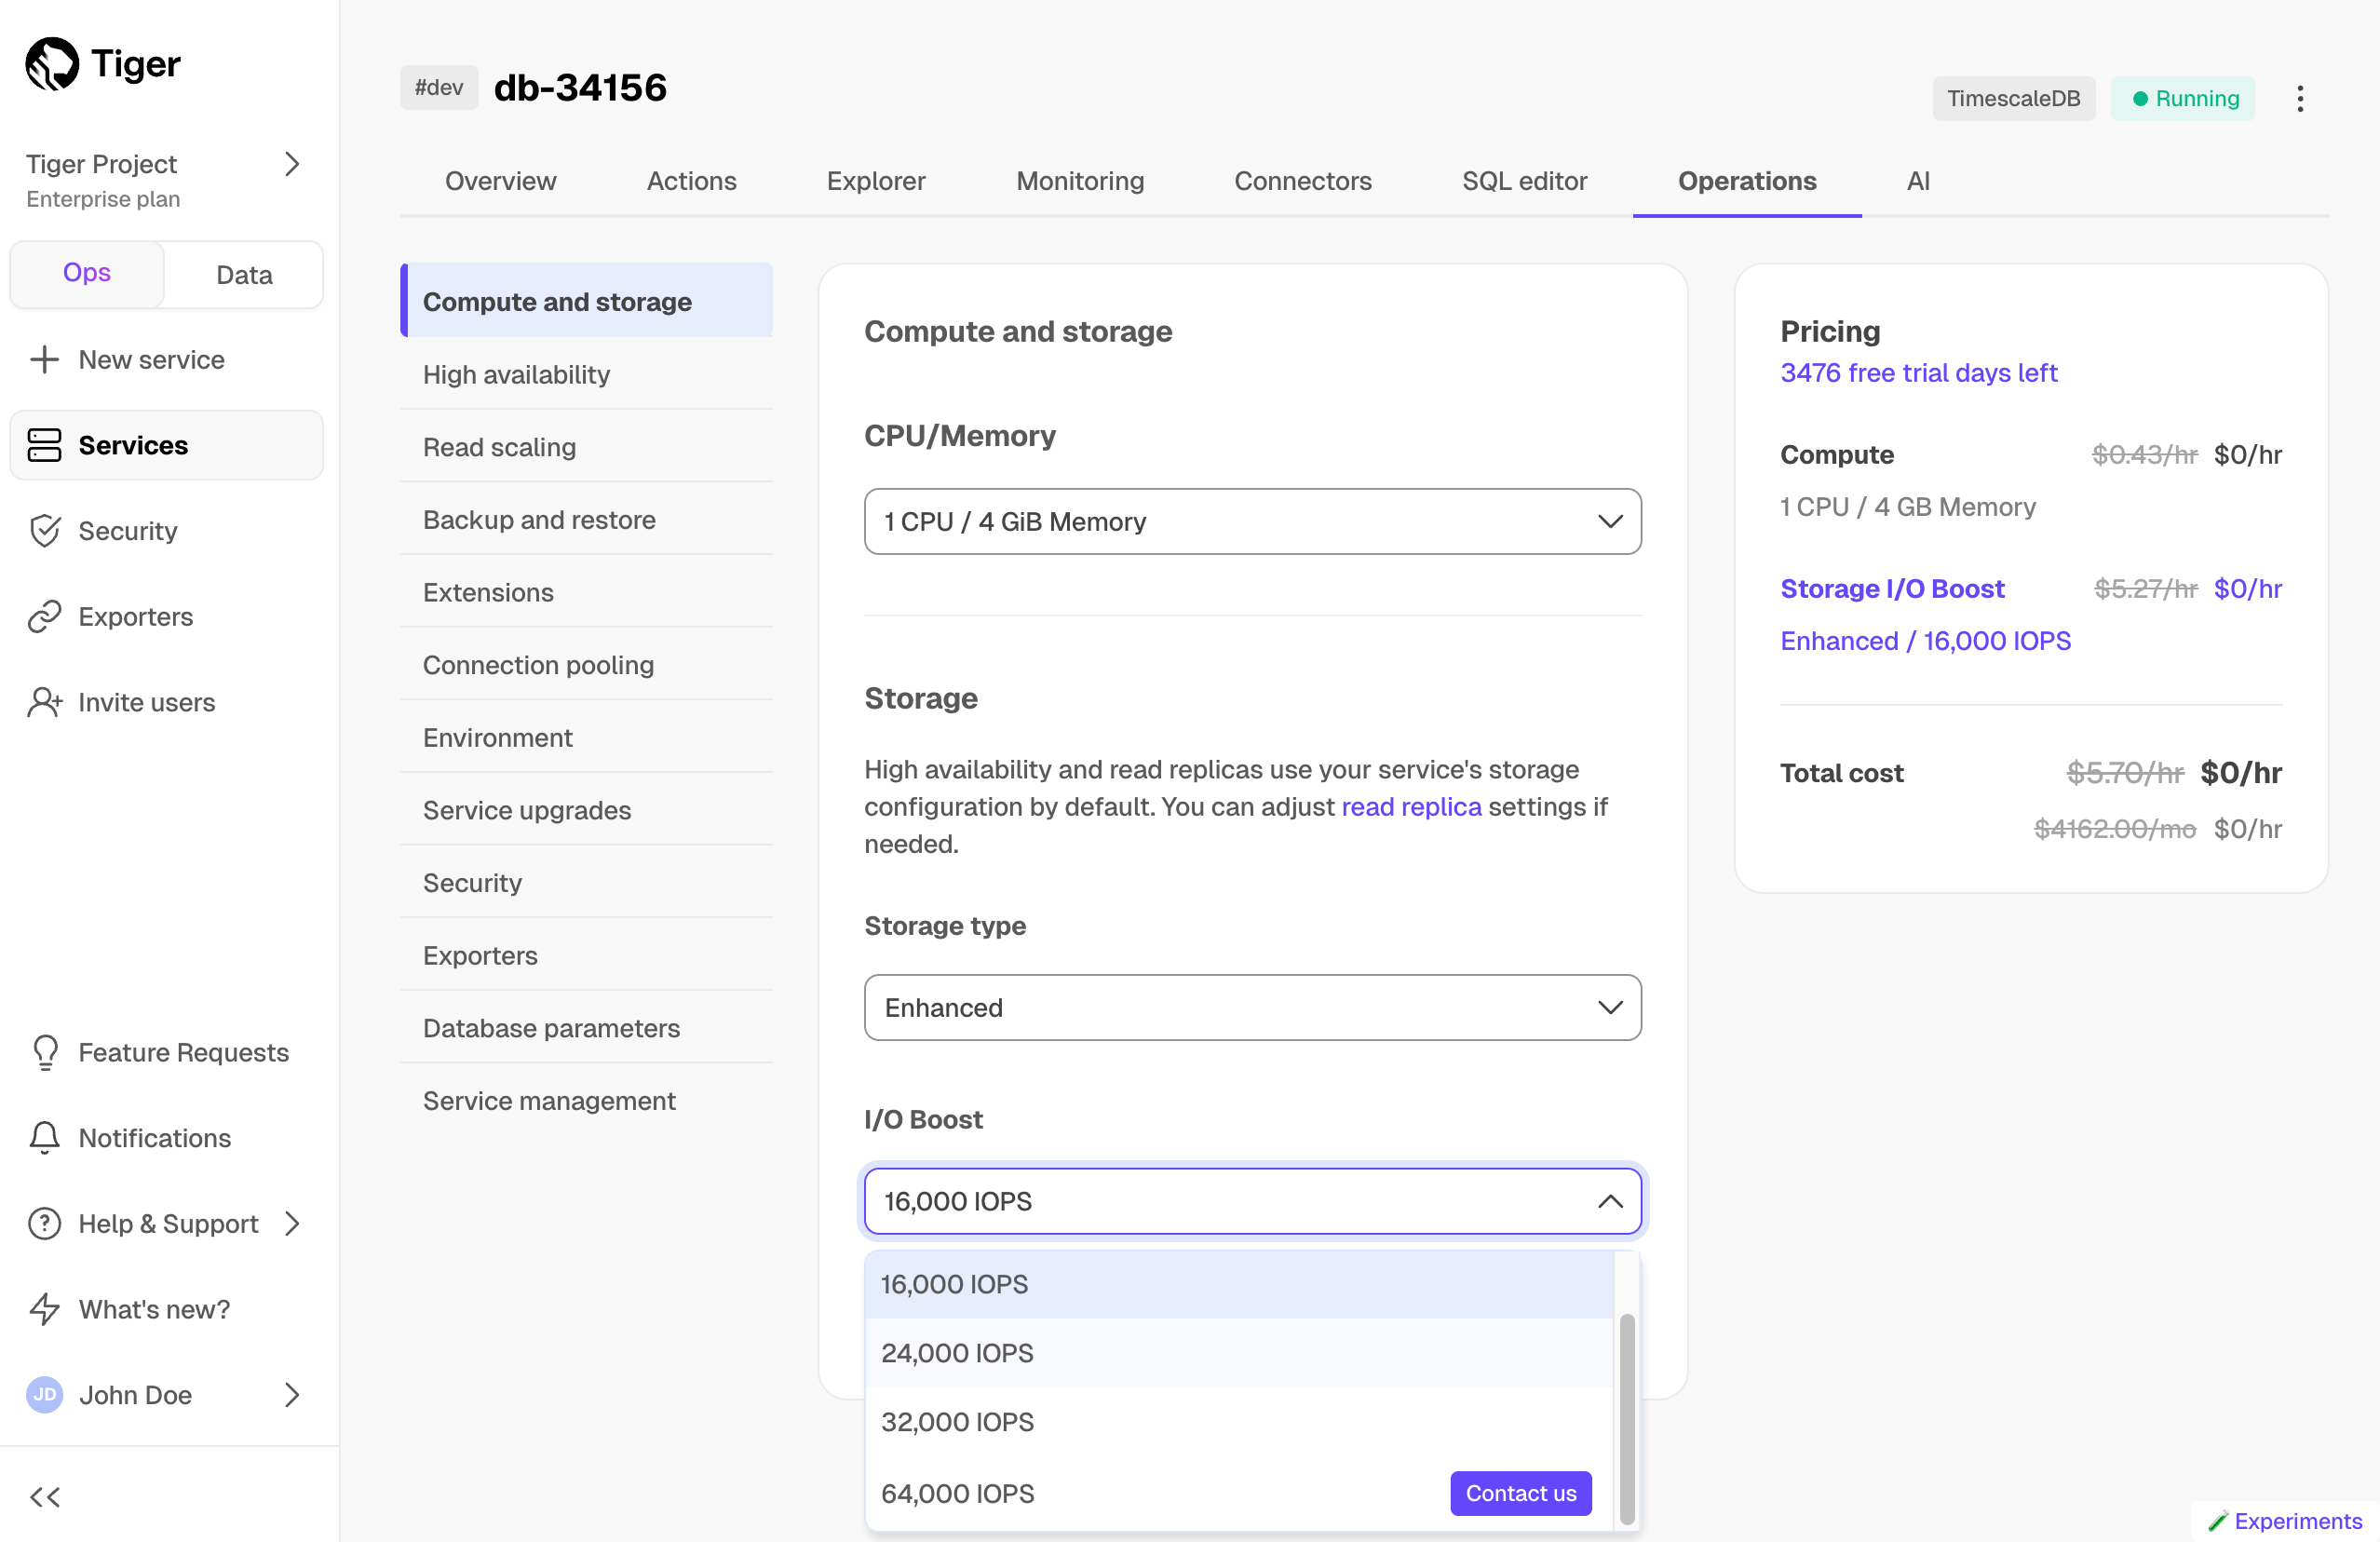
You change from enhanced storage to standard in the same way. If you are using over 16 TB of enhanced storage, changing back to standard is not available until you shrink your data to be under 16 TB. You can make changes to the storage type and I/O boost settings without any downtime. Wait at least 6 hours to attempt another change.
Low-cost object storage tier
You enable the low-cost object storage tier in Tiger Cloud Console and then tier the data with policies or manually.
Enable tiered storage
You enable tiered storage from the Overview tab in Tiger Cloud Console.
In [Tiger Cloud Console][console], select the service to modify
In
Explorer, clickStorage configuration>Tiering storage, then clickEnable tiered storage
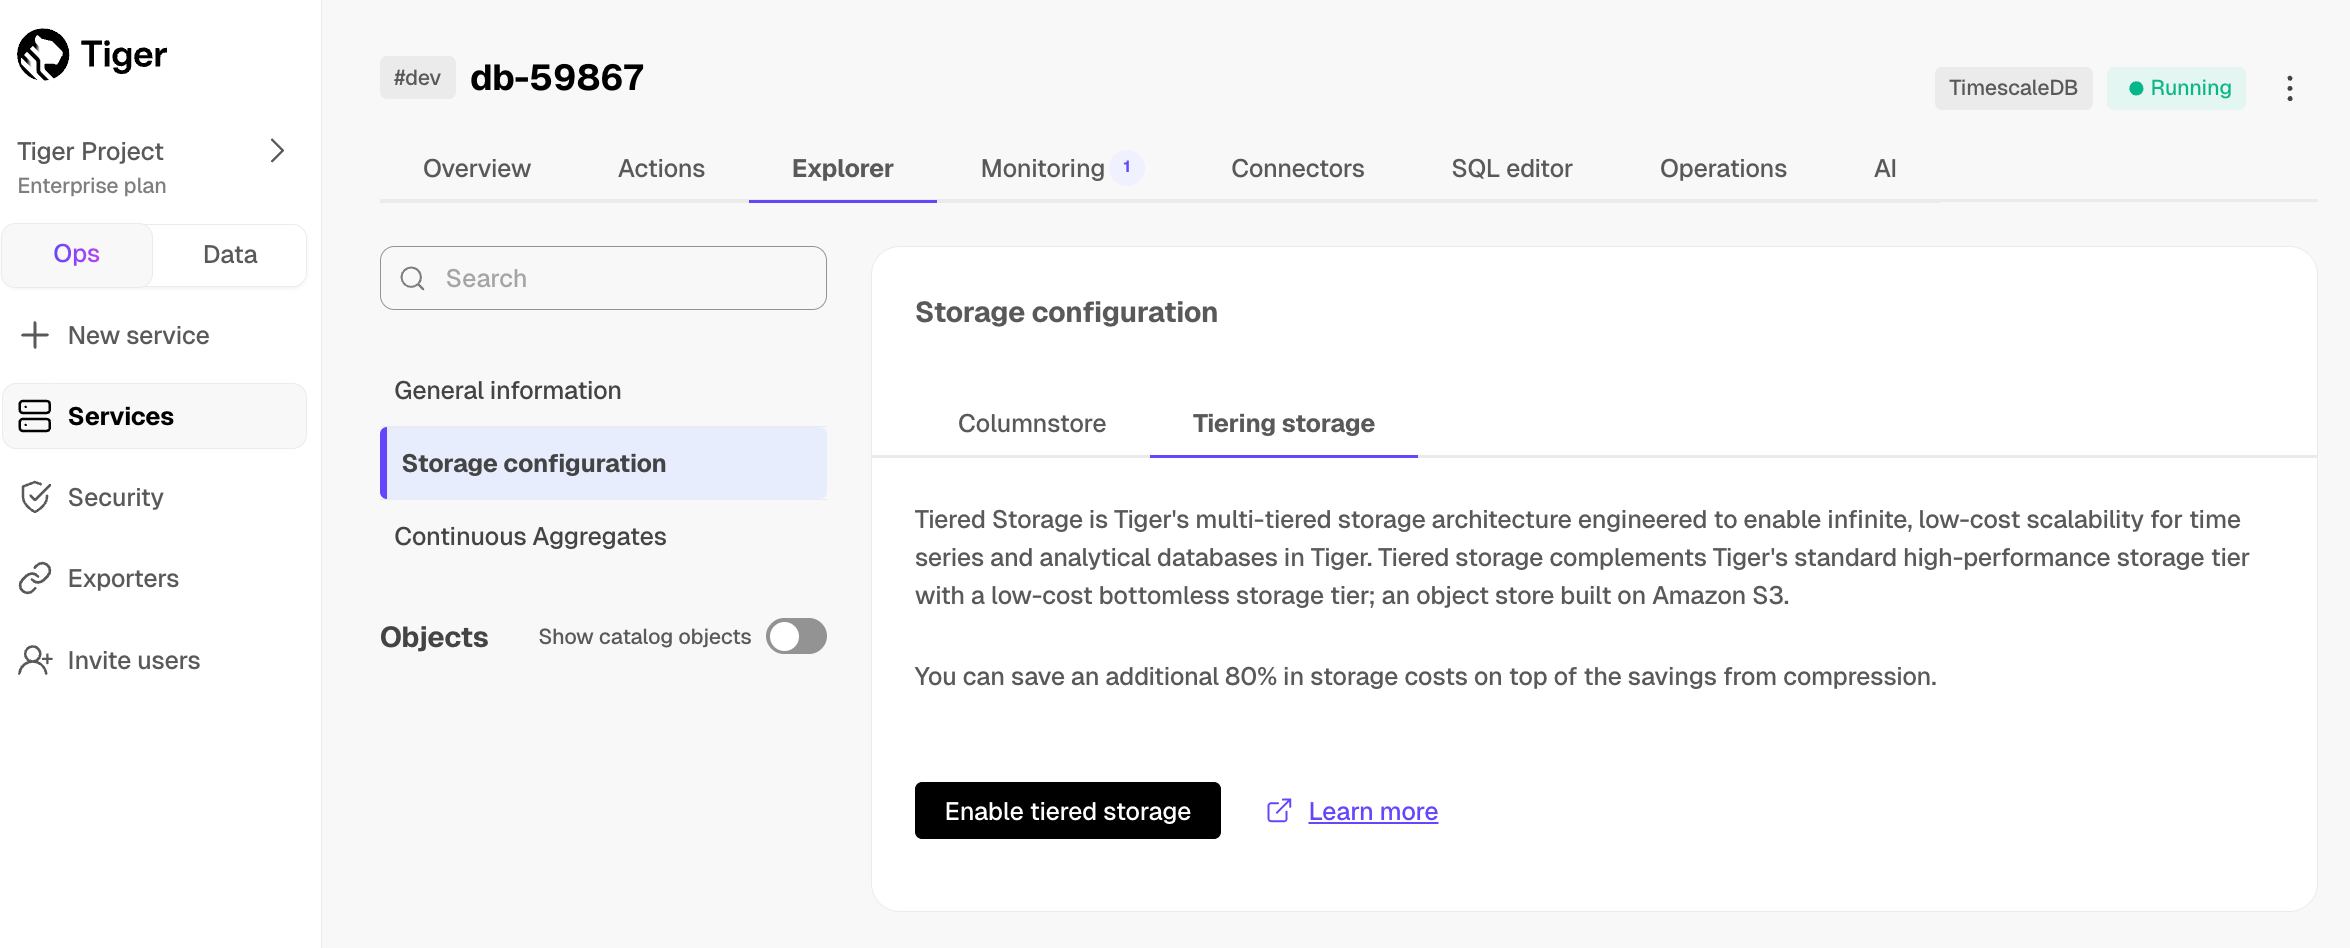
Once enabled, you can proceed to [tier data manually][manual-tier] or [set up tiering policies][tiering-policies]. When tiered storage is enabled, you see the amount of data in the tiered object storage.
Automate tiering with policies
A tiering policy automatically moves any chunks that only contain data older than the move_after threshold to the object storage tier. This works similarly to a [data retention policy][data-retention], but chunks are moved rather than deleted.
A tiering policy schedules a job that runs periodically to asynchronously migrate eligible chunks to object storage. Chunks are considered tiered once they appear in the timescaledb_osm.tiered_chunks view.
You can add tiering policies to [hypertables][hypertable], including [continuous aggregates][caggs]. To manage tiering policies, [connect to your service][connect-to-service] and run the queries below in the data mode, the SQL editor, or using psql.