Load energy consumption data
When you have your database set up, you can load the energy consumption data into the metrics hypertable.
This is a large dataset, so it might take a long time, depending on your network connection.
- Download the dataset:
Use your file manager to decompress the downloaded dataset, and take a note of the path to the
metrics.csvfile.At the psql prompt, copy the data from the
metrics.csvfile into your hypertable. Make sure you point to the correct path, if it is not in your current working directory:You can check that the data has been copied successfully with this command:
You should get five records that look like this:
===== PAGE: https://docs.tigerdata.com/_partials/_migrate_dual_write_dump_database_roles/ =====
Tiger Cloud services do not support roles with superuser access. If your SQL dump includes roles that have such permissions, you'll need to modify the file to be compliant with the security model.
You can use the following sed command to remove unsupported statements and permissions from your roles.sql file:
This command works only with the GNU implementation of sed (sometimes referred to as gsed). For the BSD implementation (the default on macOS), you need to add an extra argument to change the -i flag to -i ''.
To check the sed version, you can use the command sed --version. While the GNU version explicitly identifies itself as GNU, the BSD version of sed generally doesn't provide a straightforward --version flag and simply outputs an "illegal option" error.
A brief explanation of this script is:
CREATE ROLE "postgres"; andALTER ROLE "postgres": These statements are removed because they require superuser access, which is not supported by Timescale.(NO)SUPERUSER|(NO)REPLICATION|(NO)BYPASSRLS: These are permissions that require superuser access.GRANTED BY role_specification: The GRANTED BY clause can also have permissions that require superuser access and should therefore be removed. Note: according to the TimescaleDB documentation, the GRANTOR in the GRANTED BY clause must be the current user, and this clause mainly serves the purpose of SQL compatibility. Therefore, it's safe to remove it.
===== PAGE: https://docs.tigerdata.com/_partials/_install-self-hosted-debian-based-start/ =====
Install the latest Postgres packages
Run the Postgres package setup script
===== PAGE: https://docs.tigerdata.com/_partials/_free-plan-beta/ =====
The Free pricing plan and services are currently in beta.
===== PAGE: https://docs.tigerdata.com/_partials/_livesync-configure-source-database/ =====
- Tune the Write Ahead Log (WAL) on the Postgres source database
This will require a restart of the Postgres source database.
Create a user for the connector and assign permissions
Create
<pg connector username>:
You can use an existing user. However, you must ensure that the user has the following permissions.
Grant permissions to create a replication slot:
Grant permissions to create a publication:
Assign the user permissions on the source database:
If the tables you are syncing are not in the public schema, grant the user permissions for each schema you are syncing:
- On each table you want to sync, make
<pg connector username>the owner:
You can skip this step if the replicating user is already the owner of the tables.
- Enable replication
DELETEandUPDATEoperations
Replica identity assists data replication by identifying the rows being modified. Your options are that each table and hypertable in the source database should either have:
- A primary key: data replication defaults to the primary key of the table being replicated. Nothing to do.
- A viable unique index: each table has a unique, non-partial, non-deferrable index that includes only columns marked as
NOT NULL. If a UNIQUE index does not exist, create one to assist the migration. You can delete if after migration.
For each table, set REPLICA IDENTITY to the viable unique index:
- No primary key or viable unique index: use brute force.
For each table, set REPLICA IDENTITY to FULL:
For each UPDATE or DELETE statement, Postgres reads the whole table to find all matching rows. This results in significantly slower replication. If you are expecting a large number of UPDATE or DELETE operations on the table, best practice is to not use FULL.
===== PAGE: https://docs.tigerdata.com/_partials/_datadog-data-exporter/ =====
- In Tiger Cloud Console, open [Exporters][console-integrations]
- Click
New exporter - Select
MetricsforData typeandDatadogfor provider
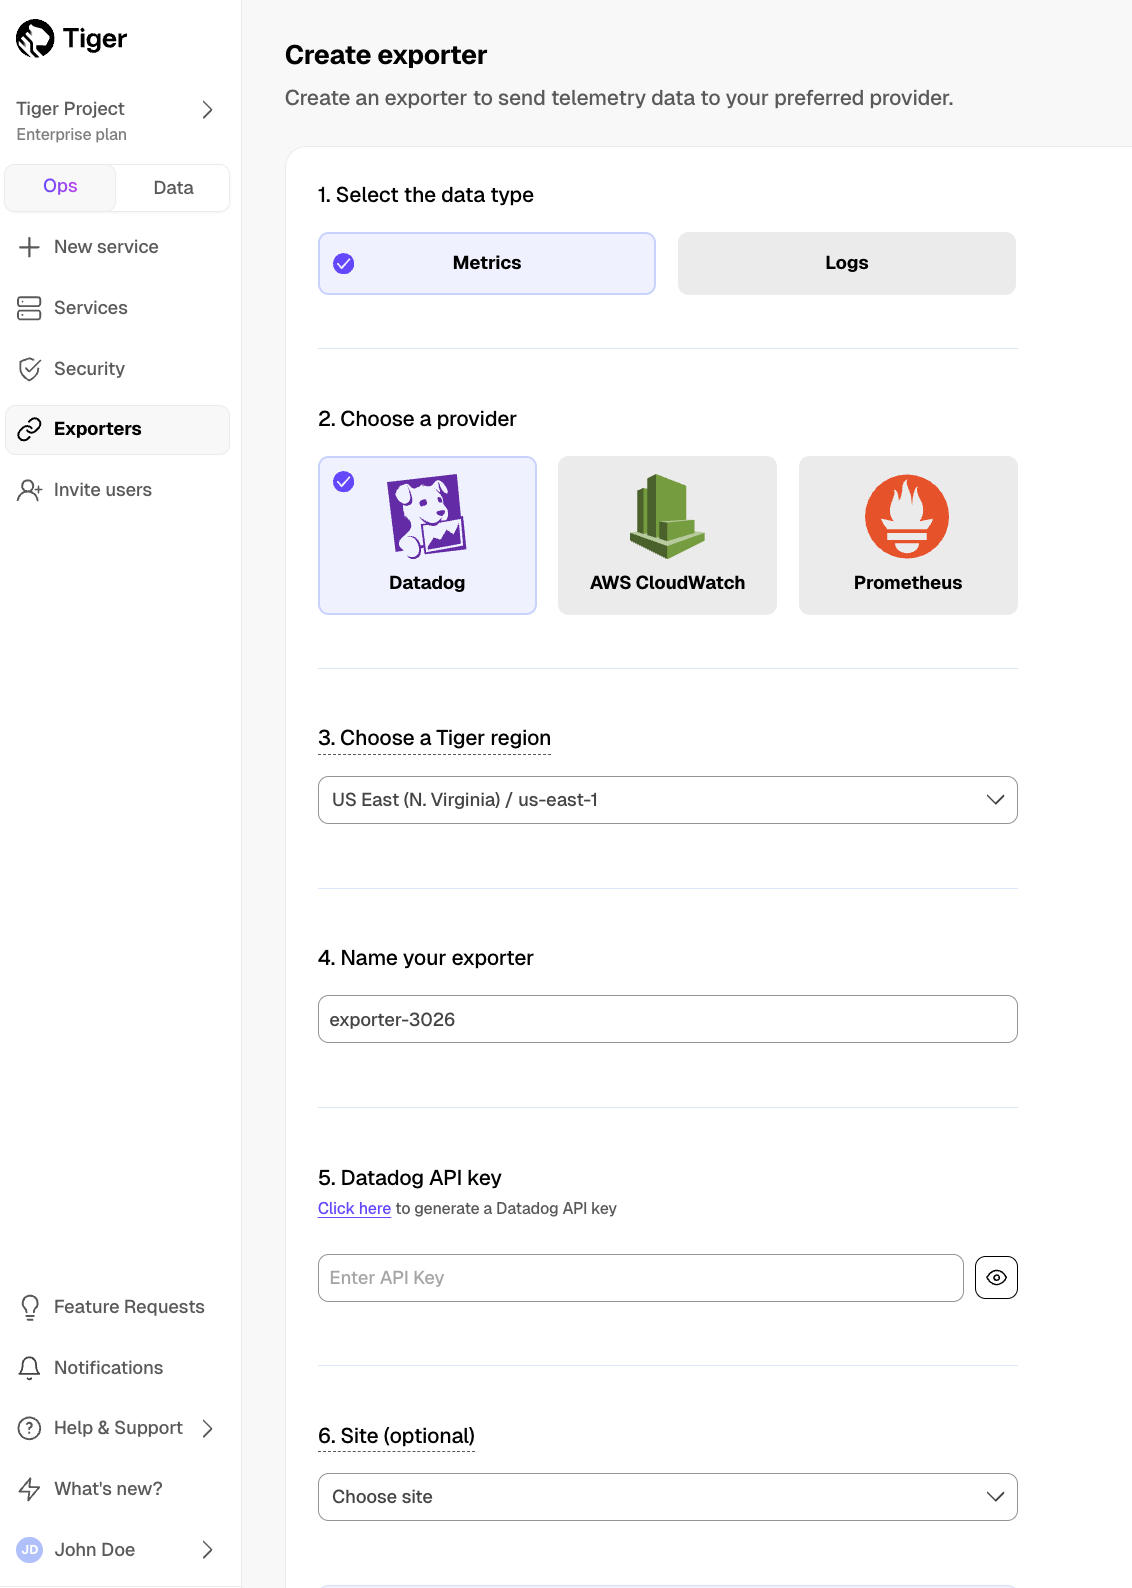
- Choose your AWS region and provide the API key
The AWS region must be the same for your Tiger Cloud exporter and the Datadog provider.
- Set
Siteto your Datadog region, then clickCreate exporter
===== PAGE: https://docs.tigerdata.com/_partials/_migrate_dual_write_6e_turn_on_compression_policies/ =====
6e. Enable policies that compress data in the target hypertable
In the following command, replace <hypertable> with the fully qualified table name of the target hypertable, for example public.metrics:
===== PAGE: https://docs.tigerdata.com/_partials/_install-self-hosted-redhat-rocky/ =====
- Install TimescaleDB
To avoid errors, do not install TimescaleDB Apache 2 Edition and TimescaleDB Community Edition at the same time.
Initialize the Postgres instance
Tune your Postgres instance for TimescaleDB
This script is included with the timescaledb-tools package when you install TimescaleDB. For more information, see [configuration][config].
Enable and start Postgres
Log in to Postgres as
postgres
You are now in the psql shell.
- Set the password for
postgres
When you have set the password, type \q to exit psql.
===== PAGE: https://docs.tigerdata.com/_partials/_cloud-mst-restart-workers/ =====
On Tiger Cloud and Managed Service for TimescaleDB, restart background workers by doing one of the following:
- Run
SELECT timescaledb_pre_restore(), followed bySELECT timescaledb_post_restore(). - Power the service off and on again. This might cause a downtime of a few minutes while the service restores from backup and replays the write-ahead log.
===== PAGE: https://docs.tigerdata.com/_partials/_migrate_live_setup_enable_replication/ =====
Replica identity assists data replication by identifying the rows being modified. Your options are that each table and hypertable in the source database should either have:
- A primary key: data replication defaults to the primary key of the table being replicated. Nothing to do.
- A viable unique index: each table has a unique, non-partial, non-deferrable index that includes only columns marked as
NOT NULL. If a UNIQUE index does not exist, create one to assist the migration. You can delete if after migration.
For each table, set REPLICA IDENTITY to the viable unique index:
- No primary key or viable unique index: use brute force.
For each table, set REPLICA IDENTITY to FULL:
For each UPDATE or DELETE statement, Postgres reads the whole table to find all matching rows. This results in significantly slower replication. If you are expecting a large number of UPDATE or DELETE operations on the table, best practice is to not use FULL.
===== PAGE: https://docs.tigerdata.com/_partials/_timescale-cloud-platforms/ =====
You use Tiger Data's open-source products to create your best app from the comfort of your own developer environment.
See the [available services][available-services] and [supported systems][supported-systems].
Available services
Tiger Data offers the following services for your self-hosted installations:
- 24/7 support no matter where you are.
- An experienced global ops and support team that can build and manage Postgres at scale.
Postgres, TimescaleDB support matrix
TimescaleDB and TimescaleDB Toolkit run on Postgres v10, v11, v12, v13, v14, v15, v16, and v17. Currently Postgres 15 and higher are supported.
| TimescaleDB version | Postgres 17 | Postgres 16 | Postgres 15 | Postgres 14 | Postgres 13 | Postgres 12 | Postgres 11 | Postgres 10 |
|---|---|---|---|---|---|---|---|---|
| 2.22.x | ✅ | ✅ | ✅ | ❌ | ❌ | ❌ | ❌ | ❌ |
| 2.21.x | ✅ | ✅ | ✅ | ❌ | ❌ | ❌ | ❌ | ❌ |
| 2.20.x | ✅ | ✅ | ✅ | ❌ | ❌ | ❌ | ❌ | ❌ |
| 2.17 - 2.19 | ✅ | ✅ | ✅ | ✅ | ❌ | ❌ | ❌ | ❌ |
| 2.16.x | ❌ | ✅ | ✅ | ✅ | ❌ | ❌ | ❌ | ❌ |
| 2.13 - 2.15 | ❌ | ✅ | ✅ | ✅ | ✅ | ❌ | ❌ | ❌ |
| 2.12.x | ❌ | ❌ | ✅ | ✅ | ✅ | ❌ | ❌ | ❌ |
| 2.10.x | ❌ | ❌ | ✅ | ✅ | ✅ | ✅ | ❌ | ❌ |
| 2.5 - 2.9 | ❌ | ❌ | ❌ | ✅ | ✅ | ✅ | ❌ | ❌ |
| 2.4 | ❌ | ❌ | ❌ | ❌ | ✅ | ✅ | ❌ | ❌ |
| 2.1 - 2.3 | ❌ | ❌ | ❌ | ❌ | ✅ | ✅ | ✅ | ❌ |
| 2.0 | ❌ | ❌ | ❌ | ❌ | ❌ | ✅ | ✅ | ❌ |
| 1.7 | ❌ | ❌ | ❌ | ❌ | ❌ | ✅ | ✅ | ✅ |
We recommend not using TimescaleDB with Postgres 17.1, 16.5, 15.9, 14.14, 13.17, 12.21. These minor versions [introduced a breaking binary interface change][postgres-breaking-change] that, once identified, was reverted in subsequent minor Postgres versions 17.2, 16.6, 15.10, 14.15, 13.18, and 12.22. When you build from source, best practice is to build with Postgres 17.2, 16.6, etc and higher. Users of Tiger Cloud and platform packages for Linux, Windows, MacOS, Docker, and Kubernetes are unaffected.
Supported operating system
You can deploy TimescaleDB and TimescaleDB Toolkit on the following systems:
| Operation system | Version |
|---|---|
| Debian | 13 Trixe, 12 Bookworm, 11 Bullseye |
| Ubuntu | 24.04 Noble Numbat, 22.04 LTS Jammy Jellyfish |
| Red Hat Enterprise | Linux 9, Linux 8 |
| Fedora | Fedora 35, Fedora 34, Fedora 33 |
| Rocky Linux | Rocky Linux 9 (x86_64), Rocky Linux 8 |
| ArchLinux (community-supported) | Check the [available packages][archlinux-packages] |
| Operation system | Version |
|---|---|
| Microsoft Windows | 10, 11 |
| Microsoft Windows Server | 2019, 2020 |
| Operation system | Version |
|---|---|
| macOS | From 10.15 Catalina to 14 Sonoma |
===== PAGE: https://docs.tigerdata.com/_partials/_migrate_install_psql_ec2_instance/ =====