LangChain Integration for pgvector, pgvectorscale, and pgai
LangChain is a popular framework for development applications powered by LLMs. pgai on Tiger Cloud has a native LangChain integration, enabling you to use it as a vector store and leverage all its capabilities in your applications built with LangChain.
Here are resources about using pgai on Tiger Cloud with LangChain:
- Getting started with LangChain and pgvectorscale: You'll learn how to use pgai on Tiger Data for (1) semantic search, (2) time-based vector search, (3) self-querying, and (4) how to create indexes to speed up queries.
- Postgres Self Querying: Learn how to use pgai on Tiger Data with self-querying in LangChain.
- Learn more about pgai on Tiger Data and LangChain: A blog post about the unique capabilities that pgai on Tiger Cloud brings to the LangChain ecosystem.
===== PAGE: https://docs.tigerdata.com/ai/llamaindex-integration-for-pgvector-and-timescale-vector/ =====
LlamaIndex Integration for pgvector and Tiger Data Vector
LlamaIndex integration for pgvector and Tiger Data Vector
LlamaIndex is a popular data framework for connecting custom data sources to large language models (LLMs). Tiger Data Vector has a native LlamaIndex integration that supports all the features of pgvector and Tiger Data Vector. It enables you to use Tiger Data Vector as a vector store and leverage all its capabilities in your applications built with LlamaIndex.
Here are resources about using Tiger Data Vector with LlamaIndex:
- Getting started with LlamaIndex and TigerData Vector: You'll learn how to use Tiger Data Vector for (1) similarity search, (2) time-based vector search, (3) faster search with indexes, and (4) retrieval and query engine.
- Time-based retrieval: Learn how to power RAG applications with time-based retrieval.
- Llama Pack: Auto Retrieval with time-based search: This pack demonstrates performing auto-retrieval for hybrid search based on both similarity and time, using the timescale-vector (Postgres) vector store.
- Learn more about TigerData Vector and LlamaIndex : How Tiger Data Vector is a better Postgres for AI applications.
===== PAGE: https://docs.tigerdata.com/ai/pgvectorizer/ =====
Embed your Postgres data with PgVectorizer
Embed Postgres data with PgVectorizer
PgVectorizer enables you to create vector embeddings from any data that you already have stored in Postgres. You can get more background information in the blog post announcing this feature, as well as the "how we built it" post going into the details of the design.
To create vector embeddings, simply attach PgVectorizer to any Postgres table to automatically sync that table's data with a set of embeddings stored in Postgres. For example, say you have a blog table defined in the following way:
import psycopg2
from langchain.docstore.document import Document
from langchain.text_splitter import CharacterTextSplitter
from timescale_vector import client, pgvectorizer
from langchain.embeddings.openai import OpenAIEmbeddings
from langchain.vectorstores.timescalevector import TimescaleVector
from datetime import timedeltawith psycopg2.connect(service_url) as conn:
with conn.cursor() as cursor:
cursor.execute('''
CREATE TABLE IF NOT EXISTS blog (
id INT PRIMARY KEY GENERATED BY DEFAULT AS IDENTITY,
title TEXT NOT NULL,
author TEXT NOT NULL,
contents TEXT NOT NULL,
category TEXT NOT NULL,
published_time TIMESTAMPTZ NULL --NULL if not yet published
);
''')You can insert some data as follows:
with psycopg2.connect(service_url) as conn:
    with conn.cursor() as cursor:
        cursor.execute('''
            INSERT INTO blog (title, author, contents, category, published_time) VALUES ('First Post', 'Matvey Arye', 'some super interesting content about cats.', 'AI', '2021-01-01');
        ''')
Now, say you want to embed these blogs and store the embeddings in Postgres. First, you need to define an embed_and_write function that takes a set of blog posts, creates the embeddings, and writes them into TigerData Vector. For example, if using LangChain, it could look something like the following.
def get_document(blog):
    text_splitter = CharacterTextSplitter(
        chunk_size=1000,
        chunk_overlap=200,
    )
    docs = []
    for chunk in text_splitter.split_text(blog['contents']):
        content = f"Author {blog['author']}, title: {blog['title']}, contents:{chunk}"
        metadata = {
            "id": str(client.uuid_from_time(blog['published_time'])),
            "blog_id": blog['id'],
            "author": blog['author'],
            "category": blog['category'],
            "published_time": blog['published_time'].isoformat(),
        }
        docs.append(Document(page_content=content, metadata=metadata))
    return docs

def embed_and_write(blog_instances, vectorizer):
    embedding = OpenAIEmbeddings()
    vector_store = TimescaleVector(
        collection_name="blog_embedding",
        service_url=service_url,
        embedding=embedding,
        time_partition_interval=timedelta(days=30),
    )

    metadata_for_delete = [{"blog_id": blog['locked_id']} for blog in blog_instances]
    vector_store.delete_by_metadata(metadata_for_delete)

    documents = []
    for blog in blog_instances:
        if blog['published_time'] != None:
            documents.extend(get_document(blog))

    if len(documents) == 0:
        return

    texts = [d.page_content for d in documents]
    metadatas = [d.metadata for d in documents]
    ids = [d.metadata["id"] for d in documents]
    vector_store.add_texts(texts, metadatas, ids)
Then, all you have to do is run the following code in a scheduled job (cron job, Lambda job, etc):
vectorizer = pgvectorizer.Vectorize(service_url, 'blog')
while vectorizer.process(embed_and_write) > 0:
    pass
Every time that job runs, it syncs the table with your embeddings. It syncs all inserts, updates, and deletes to an embeddings table called blog_embedding.
Now, you can simply search the embeddings as follows (again, using LangChain in the example):
embedding = OpenAIEmbeddings()
vector_store = TimescaleVector(
    collection_name="blog_embedding",
    service_url=service_url,
    embedding=embedding,
    time_partition_interval=timedelta(days=30),
)

res = vector_store.similarity_search_with_score("Blogs about cats")
res
[(Document(page_content='Author Matvey Arye, title: First Post, contents:some super interesting content about cats.', metadata=\{'id': '4a784000-4bc4-11eb-855a-06302dbc8ce7', 'author': 'Matvey Arye', 'blog_id': 1, 'category': 'AI', 'published_time': '2021-01-01T00:00:00+00:00'\}),
0.12595687795193833)]
===== PAGE: https://docs.tigerdata.com/README/ =====
<source media="(prefers-color-scheme: dark)" srcset="https://assets.timescale.com/docs/images/tigerdata-gradient-white.svg">
<source media="(prefers-color-scheme: light)" srcset="https://assets.timescale.com/docs/images/tigerdata-gradient-black.svg">
<img alt="Tiger Data logo" >
Tiger Cloud is the modern Postgres data platform for all your applications. It enhances Postgres to handle time series, events, real-time analytics, and vector search—all in a single database alongside transactional workloads.
This repository contains the current source for Tiger Data documentation available at https://docs.tigerdata.com/.
We welcome contributions! You can contribute to Tiger Data documentation in the following ways:
- [Create an issue][docs-issues] in this repository and describe the proposed change. Our doc team takes care of it.
- Update the docs yourself and have your change reviewed and published by our doc team.
Contribute to the Tiger Data docs
To make the contribution yourself:
Get the documentation source:
- No write access? [Fork this repository][github-fork].
- Already have a write access? [Clone this repository][github-clone].
Create a branch from
latest, make your changes, and raise a pull request back tolatest.Sign a Contributor License Agreement (CLA).
You have to sign the CLA only the first time you raise a PR. This helps to ensure that the community is free to use your contributions.
Review your changes.
The documentation site is generated in a separate private repository using [Gatsby][gatsby]. Once you raise a PR for any branch, GitHub automatically generates a preview for your changes and attaches the link in the comments. Any new commits are visible at the same URL. If you don't see the latest changes, try an incognito browser window. Automated builds are not available for PRs from forked repositories.
See the Contributing guide for style and language guidance.
Learn about Tiger Data
Tiger Data is Postgres made powerful. To learn more about the company and its products, visit tigerdata.com.
===== PAGE: https://docs.tigerdata.com/CONTRIBUTING/ =====
Contribute to Tiger Data documentation
Tiger Data documentation is open for contribution from all community members. The current source is in this repository.
This page explains the structure and language guidelines for contributing to Tiger Data documentation. See the [README][readme] for how to contribute.
Language
Write in a clear, concise, and actionable manner. Tiger Data documentation uses the [Google Developer Documentation Style Guide][google-style] with the following exceptions:
- Do not capitalize the first word after a colon.
- Use code font (back ticks) for UI elements instead of semi-bold.
Edit individual pages
Each major doc section has a dedicated directory with .md files inside, representing its child pages. This includes an index.md file that serves as a landing page for that doc section by default, unless specifically changed in the navigation tree. To edit a page, modify the corresponding .md file following these recommendations:
Regular pages should include:
- A short intro describing the main subject of the page.
- A visual illustrating the main concept, if relevant.
- Paragraphs with descriptive headers, organizing the content into logical sections.
- Procedures to describe the sequence of steps to reach a certain goal. For example, create a Tiger Cloud service.
- Other visual aids, if necessary.
- Links to other relevant resources.
API pages should include:
- The function name, with empty parentheses if it takes arguments.
- A brief, specific description of the function, including any possible warnings.
- One or two samples of the function being used to demonstrate argument syntax.
- An argument table with
Name,Type,Default,Required,Descriptioncolumns. - A return table with
Column,Type, andDescriptioncolumns.
Troubleshooting pages are not written as whole Markdown files, but are programmatically assembled from individual files in the
_troubleshootingfolder. Each entry describes a single troubleshooting case and its solution, and contains the following front matter:Key Type Required Description titlestring ✅ The title of the troubleshooting entry, displayed as a heading above it sectionThe literal string troubleshooting✅ Must be troubleshooting, used to identify troubleshooting entries during site buildproductsortopicsarray of strings ✅ (can have either or both, but must have at least one) The products or topics related to the entry. The entry shows up on the troubleshooting pages for the listed products and topics. errorsobject of form \{language: string, message: string\}❌ The error, if any, related to the troubleshooting entry. Displayed as a code block right underneath the title. languageis the programming language to use for syntax highlighting.keywordsarray of strings ❌ These are displayed at the bottom of every troubleshooting page. Each keyword links to a collection of all pages associated with that keyword. tagsarray of strings ❌ Concepts, actions, or things associated with the troubleshooting entry. These are not displayed in the UI, but they affect the calculation of related pages. Beneath the front matter, describe the error and its solution in regular Markdown. You can also use any other components allowed within the docs site.
The entry shows up on the troubleshooting pages for its associated products and topics. If the page doesn't already exist, add an entry for it in the page index, setting
typetoplaceholder. See Navigation tree.
Edit the navigation hierarchy
The navigation hierarchy of a doc section is governed by page-index/page-index.js within the corresponding directory. For example:
     {
        title: "Tiger Cloud services",
        href: "services",
        excerpt: "About Tiger Cloud services",
        children: [
          {
            title: "Services overview",
            href: "service-overview",
            excerpt: "Tiger Cloud services overview",
          },
          {
            title: "Service explorer",
            href: "service-explorer",
            excerpt: "Tiger Cloud services explorer",
          },
          {
            title: "Troubleshooting Tiger Cloud services",
            href: "troubleshooting",
            type: "placeholder",
          },
        ],
      },
See [Use Tiger Cloud section navigation][use-navigation] for reference.
To change the structure, add or delete pages in a section, modify the corresponding page-index.js. An entry in a page-index.js includes the following fields:
| Key | Type | Required | Description |
|---|---|---|---|
href | string | ✅ | The URL segment to use for the page. If there is a corresponding Markdown file, href must match the name of the Markdown file, minus the file extension. |
title | string | ✅ | The title of the page, used as the page name within the TOC on the left. Must be the same as the first header in the corresponding Markdown file. |
excerpt | string | ✅ | The short description of the page, used for the page card if pageComponents is set to featured-cards. Should be up to 100 characters. See pageComponents for details. |
type | One of [directory, placeholder, redirect-to-child-page] | ❌ | If no type is specified, the page is built as a regular webpage. The structure of its children, if present, is defined by children entries and the corresponding structure of subfolders. If the type is directory, the corresponding file becomes a directory. The difference of the directory page is that its child pages sit at the same level as the directory page. They only become children during the site build. If the type is placeholder, the corresponding page is produced programmatically upon site build. If not produced, the link in the navigation tree returns a 404. In particular, this is used for troubleshooting pages. If the type is redirect-to-child-page, no page is built and the link in the navigation tree goes directly to the first child. |
children | Array of page entries | ❌ | Child pages of the current page. For regular pages, the children should be located in a directory with the same name as the parent. The parent is the index.md file in that directory. Fordirectory pages, the children should be located in the same directory as the parent. |
pageComponents | One of [['featured-cards'], ['content-list']] | ❌ | Any page that has child pages can list its children in either card or list style at the bottom of the page. Specify the desired style with this key. |
featuredChildren | Array of URLs | ❌ | Similar to pageComponents, this displays the children of the current page, but only the selected ones. |
index | string | ❌ | If a section landing page needs to be different from the index.md file in that directory, this field specifies the corresponding Markdown file name. |
Reuse text in multiple pages
Partials allow you to reuse snippets of content in multiple places. All partials live in the _partials top-level directory. To make a new partial, create a new .md file in this directory. The filename must start with an underscore. Then import it into the target page as an .mdx file and reference in the relevant place. See [Formatting examples][formatting].
Formatting
In addition to all the [regular Markdown formatting][markdown-syntax], the following elements are available for Tiger Data docs:
- Procedure blocks
- Highlight blocks
- Tabs
- Code blocks without line numbers and the copy button
- Multi-tab code blocks
- Tags
See [Formatting examples][formatting] for how to use them.
Variables
Tiger Data documentation uses variables for its product names, features, and UI elements in Tiger Cloud Console with the following syntax: $VARIABLE_NAME. Variables do not work inside the following:
- Front matter on each page
- HTML tables and tabs
See the [full list of available variables][variables].
Links
- Internal page links: internal links do not need to include the domain name
https://docs.tigerdata.com. Use the:currentVersion:variable instead oflatestin the URL. - External links: input external links as is.
See [Formatting examples][formatting] for details.
Visuals
When adding screenshots to the docs, aim for a full-screen view to provide better context. Reduce the size of your browser so there is as little wasted space as possible.
Attach the image to your issue or PR, and the doc team uploads and inserts it for you.
SEO optimization
To make a documentation page more visible and clear for Google:
Include the
titleandexcerptmeta tags at the top of the page. These represent meta title and description required for SEO optimization.title: up to 60 characters, a short description of the page contents. In most cases a variation of the page title.excerpt: under 200 characters, a longer description of the page contents. In most cases a variation of the page intro.
Summarize the contents of each paragraph in the first sentence of that paragraph.
Include main page keywords into the meta tags, page title, first header, and intro. These are usually the names of features described in the page. For example, for a page dedicated to creating hypertables, you can use the keyword hypertable in the following way:
- Title: Create a hypertable in Tiger Cloud
- Description: Turn a regular Postgres table into a hypertable in a few steps, using Tiger Cloud Console.
- First header: Create a hypertable
Docs for deprecated products
The previous documentation source is in the deprecated repository called [docs.timescale.com-content][legacy-source].
===== PAGE: https://docs.tigerdata.com/mst/index/ =====
Managed Service for TimescaleDB
Managed Service for TimescaleDB (MST) is TimescaleDB hosted on Azure and GCP. MST is offered in partnership with Aiven.
Tiger Cloud is a high-performance developer focused cloud that provides Postgres services enhanced with our blazing fast vector search. You can securely integrate Tiger Cloud with your AWS, GCS or Azure infrastructure. [Create a Tiger Cloud service][timescale-service] and try for free.
If you need to run TimescaleDB on GCP or Azure, you're in the right place — keep reading.
===== PAGE: https://docs.tigerdata.com/.helper-scripts/README/ =====
README
This directory includes helper scripts for writing and editing docs content. It doesn't include scripts for building content; those are in the web-documentation repo.
Bulk editing for API frontmatter
API frontmatter metadata is stored with the API content it describes. This makes sense in most cases, but sometimes you want to bulk edit metadata or compare phrasing across all API references. There are 2 scripts to help with this. They are currently written to edit the excerpts field, but can be adapted for other fields.
extract_excerpts.sh
This extracts the excerpt from every API reference into a single file named extracted_excerpts.md.
To use:
cdinto the_scripts/directory.- If you already have an
extracted_excerpts.mdfile from a previous run, delete it. - Run
./extract_excerpts.sh. - Open
extracted_excerpts.mdand edit the excerpts directly within the file. Only change the actual excerpts, not the filename orexcerpt:label. Otherwise, the next script fails.
insert_excerpts.sh
This takes the edited excerpts from extracted_excerpts.md and updates the original files with the new edits. A backup is created so the data is saved if something goes horribly wrong. (If something goes wrong with the backup, you can always also restore from git.)
To use:
- Save your edited
extracted_excerpts.md. - Make sure you are in the
_scripts/directory. - Run
./insert_excerpts.sh. - Run
git diffto double-check that the update worked correctly. - Delete the unnecessary backups.
===== PAGE: https://docs.tigerdata.com/navigation/index/ =====
Find a docs page
Looking for information on something specific? There are several ways to find it:
- For help with the [Tiger Cloud Console][cloud-console], try the [Tiger Cloud Console index][cloud-console-index].
- For help on a specific topic, try browsing by [keyword][keywords].
- Or try the [full search][search], which also returns results from the Tiger Data blog and forum.
===== PAGE: https://docs.tigerdata.com/about/index/ =====
About Tiger Data products
===== PAGE: https://docs.tigerdata.com/use-timescale/index/ =====
Use Tiger Data products
This section contains information about using TimescaleDB and Tiger Cloud. If you're not sure how to find the information you need, try the [Find a docs page][find-docs] section.
===== PAGE: https://docs.tigerdata.com/use-timescale/OLD-cloud-multi-node/ =====
Multi-node
If you have a larger workload, you might need more than one Timescale instance. Multi-node can give you faster data ingest, and more responsive and efficient queries for many large workloads.
This section shows you how to use multi-node on Timescale. You can also set up multi-node on [self-hosted TimescaleDB][multinode-timescaledb].
Early access: TimescaleDB v2.18.0
In some cases, your processing speeds could be slower in a multi-node cluster, because distributed hypertables need to push operations down to the various data nodes. It is important that you understand multi-node architecture before you begin, and plan your database according to your specific environment.
Set up multi-node
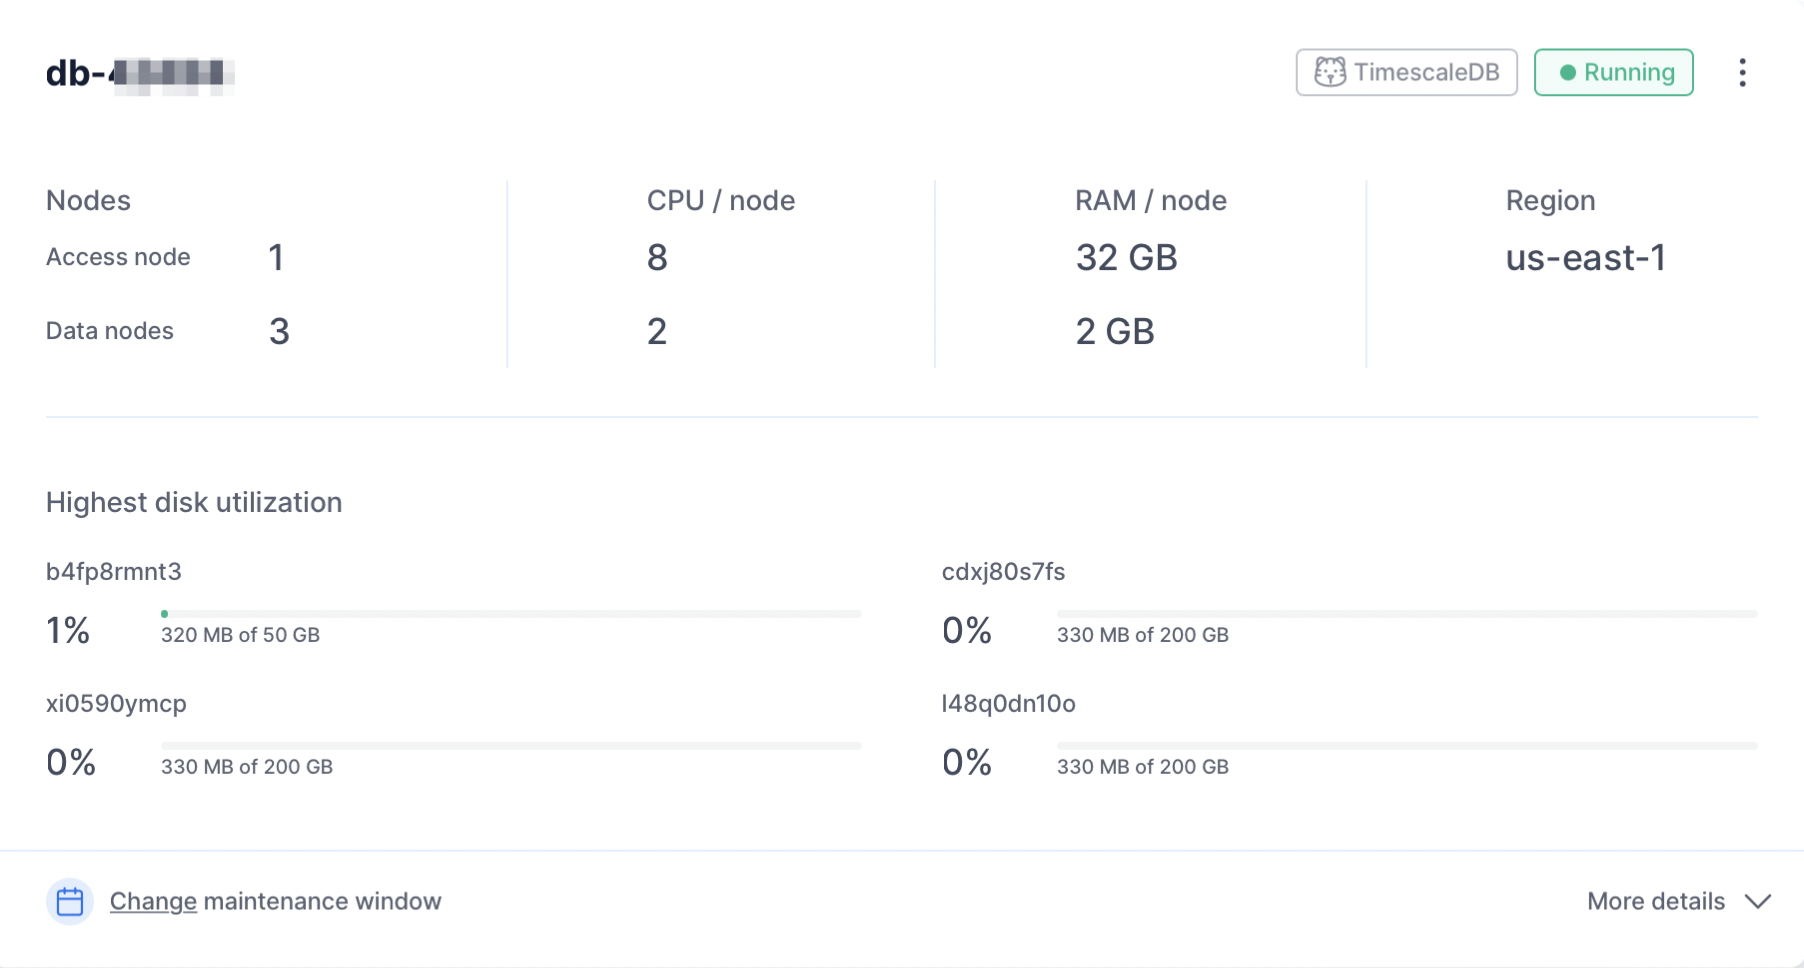
To create a multi-node cluster, you need an access node that stores metadata for the distributed hypertable and performs query planning across the cluster, and any number of data nodes that store subsets of the distributed hypertable dataset and run queries locally.
Setting up multi-node
- [Log in to your Tiger Cloud account][cloud-login] and click
Create Service. - Click
Advanced configuration. - Under
Choose your architecture, clickMulti-node. - The customer support team contacts you. When your request is approved, return to the screen for creating a multi-node service.
- Choose your preferred region, or accept the default region of
us-east-1. - Accept the default for the data nodes, or click
Editto choose the number of data nodes, and their compute and disk size. - Accept the default for the access node, or click
Editto choose the compute and disk size. - Click
Create service. Take a note of the service information, you need these details to connect to your multi-node cluster. The service takes a few minutes to start up. - When the service is ready, you can see the service in the Service Overview page. Click on the name of your new multi-node service to see more information, and to make changes.
===== PAGE: https://docs.tigerdata.com/_partials/_migrate_live_migration_rds_roles/ =====
pg_dumpall -d "source" \
  --quote-all-identifiers \
  --roles-only \
  --no-role-passwords \
  --file=roles.sql
AWS RDS does not permit dumping of roles with passwords, which is why the above command is executed with the --no-role-passwords. However, when the migration of roles to your Tiger Cloud service is complete, you need to manually assign passwords to the necessary roles using the following command:ALTER ROLE name WITH PASSWORD 'password';
Tiger Cloud services do not support roles with superuser access. If your SQL dump includes roles that have such permissions, you'll need to modify the file to be compliant with the security model.
You can use the following sed command to remove unsupported statements and permissions from your roles.sql file:
sed -i -E \
-e '/CREATE ROLE "postgres";/d' \
-e '/ALTER ROLE "postgres"/d' \
-e '/CREATE ROLE "rds/d' \
-e '/ALTER ROLE "rds/d' \
-e '/TO "rds/d' \
-e '/GRANT "rds/d' \
-e 's/(NO)*SUPERUSER//g' \
-e 's/(NO)*REPLICATION//g' \
-e 's/(NO)*BYPASSRLS//g' \
-e 's/GRANTED BY "[^"]*"//g' \
roles.sql
This command works only with the GNU implementation of sed (sometimes referred to as gsed). For the BSD implementation (the default on macOS), you need to add an extra argument to change the -i flag to -i ''.
To check the sed version, you can use the command sed --version. While the GNU version explicitly identifies itself as GNU, the BSD version of sed generally doesn't provide a straightforward --version flag and simply outputs an "illegal option" error.
A brief explanation of this script is:
CREATE ROLE "postgres"; andALTER ROLE "postgres": These statements are removed because they require superuser access, which is not supported by Timescale.(NO)SUPERUSER|(NO)REPLICATION|(NO)BYPASSRLS: These are permissions that require superuser access.CREATE ROLE "rds,ALTER ROLE “rds,TO "rds,GRANT "rds: Any creation or alteration of rds prefixed roles are removed because of their lack of any use in a Tiger Cloud service. Similarly, any grants to or from "rds" prefixed roles are ignored as well.GRANTED BY role_specification: The GRANTED BY clause can also have permissions that require superuser access and should therefore be removed. Note: Per the TimescaleDB documentation, the GRANTOR in the GRANTED BY clause must be the current user, and this clause mainly serves the purpose of SQL compatibility. Therefore, it's safe to remove it.
===== PAGE: https://docs.tigerdata.com/_partials/_migrate_set_up_align_db_extensions_timescaledb/ =====
Ensure that the source and target databases are running the same version of TimescaleDB.
Check the version of TimescaleDB running on your Tiger Cloud service:
bashpsql target -c "SELECT extversion FROM pg_extension WHERE extname = 'timescaledb';"Update the TimescaleDB extension in your source database to match the target service:
If the TimescaleDB extension is the same version on the source database and target service, you do not need to do this.
bashpsql source -c "ALTER EXTENSION timescaledb UPDATE TO '<version here>';"For more information and guidance, see Upgrade TimescaleDB.
Ensure that the Tiger Cloud service is running the Postgres extensions used in your source database.
- Check the extensions on the source database:bash
psql source -c "SELECT * FROM pg_extension;" - For each extension, enable it on your target Tiger Cloud service:bash
psql target -c "CREATE EXTENSION IF NOT EXISTS <extension name> CASCADE;"
- Check the extensions on the source database:
===== PAGE: https://docs.tigerdata.com/_partials/_beta/ =====
This feature is in beta. Beta features are experimental, and should not be used on production systems. If you have feedback, reach out to your customer success manager, or contact us.
===== PAGE: https://docs.tigerdata.com/_partials/_manage-a-data-exporter/ =====
Attach a data exporter to a Tiger Cloud service
To send telemetry data to an external monitoring tool, you attach a data exporter to your Tiger Cloud service. You can attach only one exporter to a service.
To attach an exporter:
- In [Tiger Cloud Console][console-services], choose the service
- Click
Operations>Exporters - Select the exporter, then click
Attach exporter - If you are attaching a first
Logsdata type exporter, restart the service
Monitor Tiger Cloud service metrics
You can now monitor your service metrics. Use the following metrics to check the service is running correctly:
timescale.cloud.system.cpu.usage.millicorestimescale.cloud.system.cpu.total.millicorestimescale.cloud.system.memory.usage.bytestimescale.cloud.system.memory.total.bytestimescale.cloud.system.disk.usage.bytestimescale.cloud.system.disk.total.bytes
Additionally, use the following tags to filter your results.
| Tag | Example variable | Description |
|---|---|---|
host | us-east-1.timescale.cloud | |
project-id | ||
service-id | ||
region | us-east-1 | AWS region |
role | replica or primary | For service with replicas |
node-id | For multi-node services |
Edit a data exporter
To update a data exporter:
- In Tiger Cloud Console, open [Exporters][console-integrations]
- Next to the exporter you want to edit, click the menu >
Edit - Edit the exporter fields and save your changes
You cannot change fields such as the provider or the AWS region.
Delete a data exporter
To remove a data exporter that you no longer need:
Disconnect the data exporter from your Tiger Cloud services
- In [Tiger Cloud Console][console-services], choose the service.
- Click
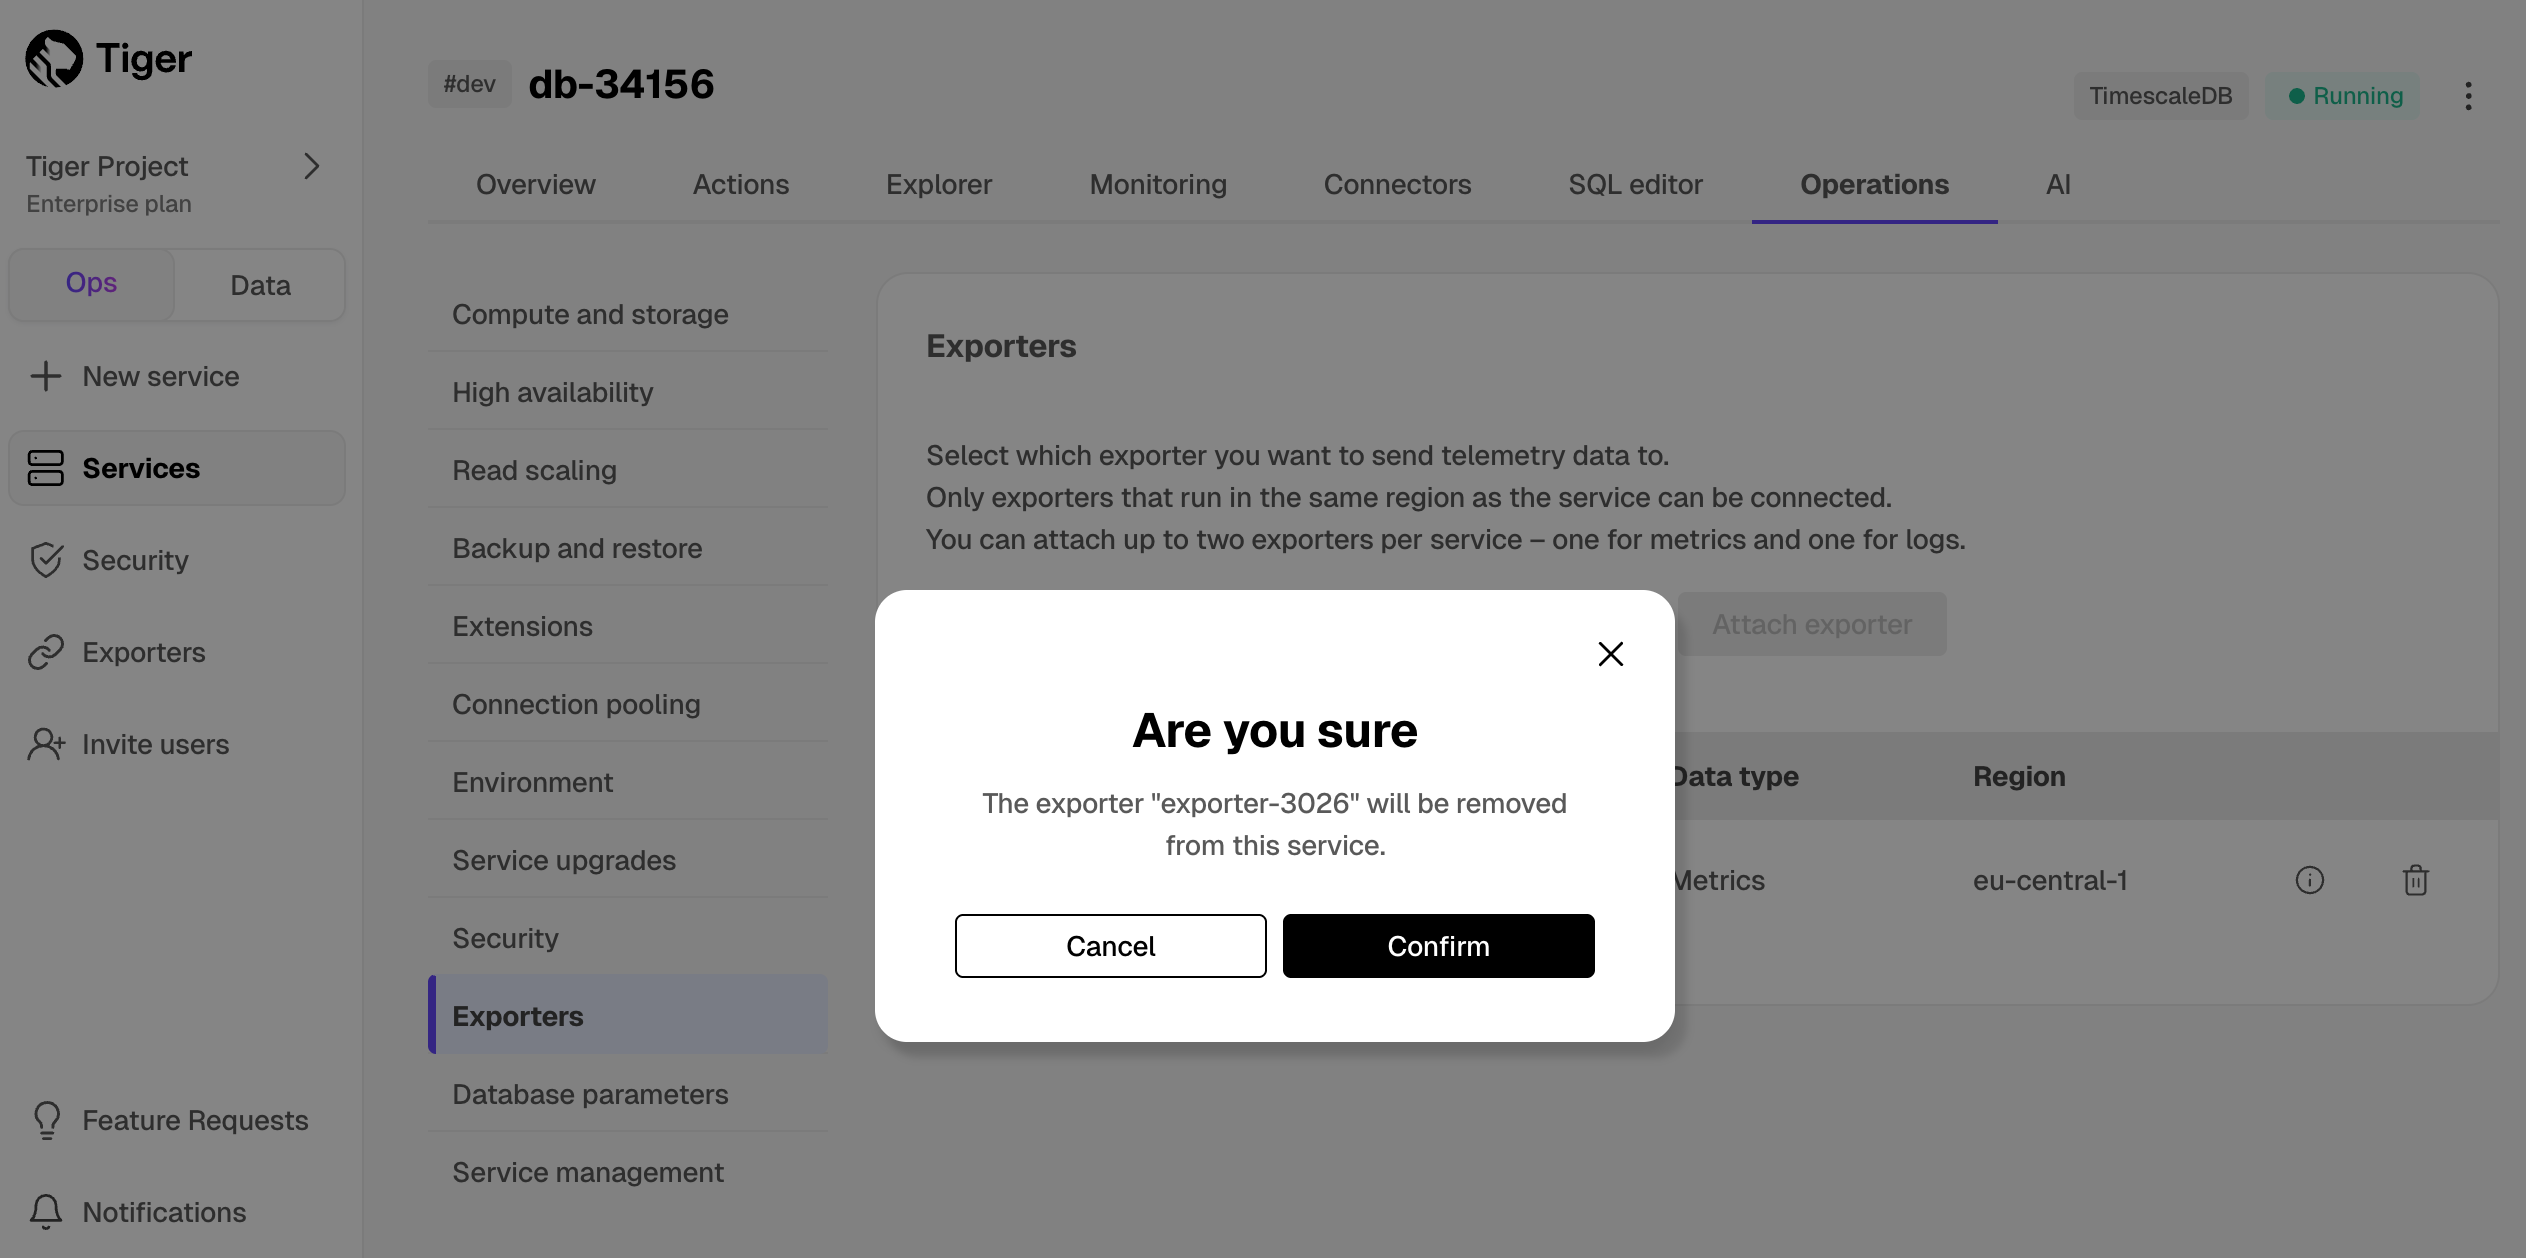
Operations>Exporters. - Click the trash can icon.
- Repeat for every service attached to the exporter you want to remove.
The data exporter is now unattached from all services. However, it still exists in your project.
Delete the exporter on the project level
- In Tiger Cloud Console, open [Exporters][console-integrations]
- Next to the exporter you want to edit, click menu >
Delete - Confirm that you want to delete the data exporter.
Reference
When you create the IAM OIDC provider, the URL must match the region you create the exporter in. It must be one of the following:
| Region | Zone | Location | URL |
|---|---|---|---|
ap-southeast-1 | Asia Pacific | Singapore | irsa-oidc-discovery-prod-ap-southeast-1.s3.ap-southeast-1.amazonaws.com |
ap-southeast-2 | Asia Pacific | Sydney | irsa-oidc-discovery-prod-ap-southeast-2.s3.ap-southeast-2.amazonaws.com |
ap-northeast-1 | Asia Pacific | Tokyo | irsa-oidc-discovery-prod-ap-northeast-1.s3.ap-northeast-1.amazonaws.com |
ca-central-1 | Canada | Central | irsa-oidc-discovery-prod-ca-central-1.s3.ca-central-1.amazonaws.com |
eu-central-1 | Europe | Frankfurt | irsa-oidc-discovery-prod-eu-central-1.s3.eu-central-1.amazonaws.com |
eu-west-1 | Europe | Ireland | irsa-oidc-discovery-prod-eu-west-1.s3.eu-west-1.amazonaws.com |
eu-west-2 | Europe | London | irsa-oidc-discovery-prod-eu-west-2.s3.eu-west-2.amazonaws.com |
sa-east-1 | South America | São Paulo | irsa-oidc-discovery-prod-sa-east-1.s3.sa-east-1.amazonaws.com |
us-east-1 | United States | North Virginia | irsa-oidc-discovery-prod.s3.us-east-1.amazonaws.com |
us-east-2 | United States | Ohio | irsa-oidc-discovery-prod-us-east-2.s3.us-east-2.amazonaws.com |
us-west-2 | United States | Oregon | irsa-oidc-discovery-prod-us-west-2.s3.us-west-2.amazonaws.com |
===== PAGE: https://docs.tigerdata.com/_partials/_early_access_2_18_0/ =====
Early access: TimescaleDB v2.18.0
===== PAGE: https://docs.tigerdata.com/_partials/_multi-node-deprecation/ =====
[Multi-node support is sunsetted][multi-node-deprecation].
TimescaleDB v2.13 is the last release that includes multi-node support for Postgres versions 13, 14, and 15.
===== PAGE: https://docs.tigerdata.com/_partials/_migrate_prerequisites/ =====
Best practice is to use an [Ubuntu EC2 instance][create-ec2-instance] hosted in the same region as your Tiger Cloud service to move data. That is, the machine you run the commands on to move your data from your source database to your target Tiger Cloud service.
Before you move your data:
Create a target [Tiger Cloud service][created-a-database-service-in-timescale].
Each Tiger Cloud service has a single Postgres instance that supports the [most popular extensions][all-available-extensions]. Tiger Cloud services do not support tablespaces, and there is no superuser associated with a service. Best practice is to create a Tiger Cloud service with at least 8 CPUs for a smoother experience. A higher-spec instance can significantly reduce the overall migration window.
To ensure that maintenance does not run while migration is in progress, best practice is to [adjust the maintenance window][adjust-maintenance-window].
===== PAGE: https://docs.tigerdata.com/_partials/_migrate_open_support_request/ =====
You can open a support request directly from [Tiger Cloud Console][support-link], or by email to support@tigerdata.com.
===== PAGE: https://docs.tigerdata.com/_partials/_install-self-hosted-debian-based-end/ =====
Update your local repository list
bashsudo apt updateInstall TimescaleDB
bashsudo apt install timescaledb-2-postgresql-17 postgresql-client-17To install a specific TimescaleDB [release][releases-page], set the version. For example:
sudo apt-get install timescaledb-2-postgresql-14='2.6.0*' timescaledb-2-loader-postgresql-14='2.6.0*'Older versions of TimescaleDB may not support all the OS versions listed on this page.
Tune your Postgres instance for TimescaleDB
bashsudo timescaledb-tuneBy default, this script is included with the
timescaledb-toolspackage when you install TimescaleDB. Use the prompts to tune your development or production environment. For more information on manual configuration, see [Configuration][config]. If you have an issue, runsudo apt install timescaledb-tools.Restart Postgres
bashsudo systemctl restart postgresqlLog in to Postgres as
postgresbashsudo -u postgres psqlYou are in the psql shell.
Set the password for
postgresbash\password postgresWhen you have set the password, type
\qto exit psql.
===== PAGE: https://docs.tigerdata.com/_partials/_prereqs-cloud-and-self/ =====
To follow the procedure on this page you need to:
Create a [target Tiger Cloud service][create-service].
This procedure also works for [self-hosted TimescaleDB][enable-timescaledb].
===== PAGE: https://docs.tigerdata.com/_partials/_migrate_live_setup_environment_awsrds/ =====
Set your connection strings
These variables hold the connection information for the source database and target Tiger Cloud service. In Terminal on your migration machine, set the following:
export SOURCE="postgres://<user>:<password>@<source host>:<source port>/<db_name>"
export TARGET="postgres://tsdbadmin:<PASSWORD>@<HOST>:<PORT>/tsdb?sslmode=require"
You find the connection information for your Tiger Cloud service in the configuration file you downloaded when you created the service.
Avoid using connection strings that route through connection poolers like PgBouncer or similar tools. This tool requires a direct connection to the database to function properly.
Align the extensions on the source and target
Ensure that the Tiger Cloud service is running the Postgres extensions used in your source database.
- Check the extensions on the source database:bash
psql source -c "SELECT * FROM pg_extension;" - For each extension, enable it on your target Tiger Cloud service:bash
psql target -c "CREATE EXTENSION IF NOT EXISTS <extension name> CASCADE;"
- Check the extensions on the source database:
Tune your source database
Updating parameters on a Postgres instance will cause an outage. Choose a time that will cause the least issues to tune this database.
Update the DB instance parameter group for your source database
In [https://console.aws.amazon.com/rds/home#databases:][databases], select the RDS instance to migrate.
Click
Configuration, scroll down and note theDB instance parameter group, then clickParameter groups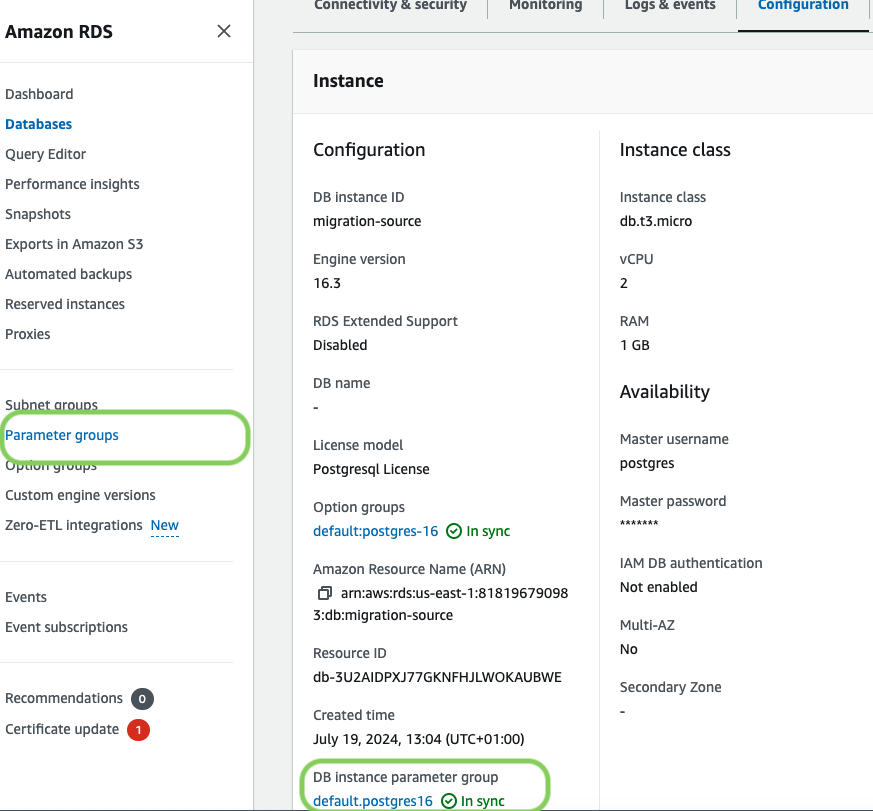
Click
Create parameter group, fill in the form with the following values, then clickCreate.- Parameter group name - whatever suits your fancy.
- Description - knock yourself out with this one.
- Engine type -
PostgreSQL - Parameter group family - the same as
DB instance parameter groupin yourConfiguration.
In
Parameter groups, select the parameter group you created, then clickEdit.Update the following parameters, then click
Save changes.rds.logical_replicationset to1: record the information needed for logical decoding.wal_sender_timeoutset to0: disable the timeout for the sender process.
In RDS, navigate back to your [databases][databases], select the RDS instance to migrate, and click
Modify.Scroll down to
Database options, select your new parameter group, and clickContinue.Click
Apply immediatelyor choose a maintenance window, then clickModify DB instance.Changing parameters will cause an outage. Wait for the database instance to reboot before continuing.
Verify that the settings are live in your database.
Enable replication
DELETEandUPDATEoperationsReplica identity assists data replication by identifying the rows being modified. Your options are that each table and hypertable in the source database should either have:
A primary key: data replication defaults to the primary key of the table being replicated. Nothing to do.
A viable unique index: each table has a unique, non-partial, non-deferrable index that includes only columns marked as
NOT NULL. If a UNIQUE index does not exist, create one to assist the migration. You can delete if after migration.For each table, set
REPLICA IDENTITYto the viable unique index:shellpsql -X -d source -c 'ALTER TABLE REPLICA IDENTITY USING INDEX <_index_name>'No primary key or viable unique index: use brute force.
For each table, set
REPLICA IDENTITYtoFULL:shellpsql -X -d source -c 'ALTER TABLE {table_name} REPLICA IDENTITY FULL'For each
UPDATEorDELETEstatement, Postgres reads the whole table to find all matching rows. This results in significantly slower replication. If you are expecting a large number ofUPDATEorDELETEoperations on the table, best practice is to not useFULL.
===== PAGE: https://docs.tigerdata.com/_partials/_migrate_source_target_note/ =====
In the context of migrations, your existing production database is referred to as the SOURCE database, the Tiger Cloud service that you are migrating your data to is the TARGET.
===== PAGE: https://docs.tigerdata.com/_partials/_not-available-in-free-plan/ =====
This feature is not available under the Free pricing plan.
===== PAGE: https://docs.tigerdata.com/_partials/_migrate_live_migration_docker_subcommand/ =====
Next, download the live-migration docker image:
docker run --rm -it --name live-migration \
    -e PGCOPYDB_SOURCE_PGURI=source \
    -e PGCOPYDB_TARGET_PGURI=target \
    --pid=host \
    -v ~/live-migration:/opt/timescale/ts_cdc \
    timescale/live-migration:latest --help

Live migration moves your PostgreSQL/TimescaleDB to your Tiger Cloud service with minimal downtime.

options:
  -h, --help            Show this help message and exit
  -v, --version         Show the version of live-migration tool

Subcommands:
  {snapshot,clean,migrate}
                        Subcommand help
    snapshot            Create a snapshot
    clean               Clean up resources
    migrate             Start the migration
Live-migration contains 3 subcommands:
- Snapshot
- Clean
- Migrate
On a high-level,
the snapshot subcommand creates a Postgres snapshot connection to the source database along with a replication slot. This is pre-requisite before running the migrate subcommand.
The migrate subcommand carries out the live-migration process by taking help of the snapshot and replication slot created by the snapshot subcommand.
The clean subcommand is designed to remove resources related to live migration. It should be run once the migration has successfully completed or, if you need to restart the migration process from the very start. You should not run clean if you want to resume the last interrupted live migration.
3.a Create a snapshot
Execute this command to establish a snapshot connection; do not interrupt the process. For convenience, consider using a terminal multiplexer such as tmux or screen, which enables the command to run in the background.
docker run --rm -it --name live-migration-snapshot \
    -e PGCOPYDB_SOURCE_PGURI=source \
    -e PGCOPYDB_TARGET_PGURI=target \
    --pid=host \
    -v ~/live-migration:/opt/timescale/ts_cdc \
    timescale/live-migration:latest snapshot
In addition to creating a snapshot, this process also validates prerequisites on the source and target to ensure the database instances are ready for replication.
For example, it checks if all tables on the source have either a PRIMARY KEY or REPLICA IDENTITY set. If not, it displays a warning message listing the tables without REPLICA IDENTITY and waits for user confirmation before proceeding with the snapshot creation.
2024-03-25T12:40:40.884 WARNING: The following tables in the Source DB have neither a primary key nor a REPLICA IDENTITY (FULL/INDEX)
2024-03-25T12:40:40.884 WARNING: UPDATE and DELETE statements on these tables will not be replicated to the Target DB
2024-03-25T12:40:40.884 WARNING:        - public.metrics
Press 'c' and ENTER to continue
3.b Perform live-migration
The migrate subcommand supports following flags
docker run --rm -it --name live-migration-migrate \
    -e PGCOPYDB_SOURCE_PGURI=source \
    -e PGCOPYDB_TARGET_PGURI=target \
    --pid=host \
    -v ~/live-migration:/opt/timescale/ts_cdc \
    timescale/live-migration:latest migrate --help

usage: main.py migrate [-h] [--dir DIR] [--resume] [--skip-roles] [--table-jobs TABLE_JOBS] [--index-jobs INDEX_JOBS]
                       [--skip-extensions [SKIP_EXTENSIONS ...]] [--skip-table-data SKIP_TABLE_DATA [SKIP_TABLE_DATA ...]]

options:
  -h, --help            Show this help message and exit
  --resume              Resume the migration
  --skip-roles          Skip roles migration
  --table-jobs TABLE_JOBS
                        Number of parallel jobs to copy "existing data" from source db to target db (Default: 8)
  --index-jobs INDEX_JOBS
                        Number of parallel jobs to create indexes in target db (Default: 8)
  --skip-extensions [SKIP_EXTENSIONS ...]
                        Skips the given extensions during migration. Empty list skips all extensions.
  --skip-table-data SKIP_TABLE_DATA [SKIP_TABLE_DATA ...]
                        Skips data from the given table during migration. However, the table schema will be migrated. To skip data from a
                        Hypertable, you will need to specify a list of schema qualified chunks belonging to the Hypertable. Currently, this
                        flag does not skip data during live replay from the specified table. Values for this flag must be schema qualified. Eg:
                        --skip-table-data public.exclude_table_1 public.exclude_table_2
Next, we will start the migration process. Open a new terminal and initiate the live migration, and allow it to run uninterrupted.
docker run --rm -it --name live-migration-migrate \
    -e PGCOPYDB_SOURCE_PGURI=source \
    -e PGCOPYDB_TARGET_PGURI=target \
    --pid=host \
    -v ~/live-migration:/opt/timescale/ts_cdc \
    timescale/live-migration:latest migrate
If the migrate command stops for any reason during execution, you can resume the migration from where it left off by adding a --resume flag. This is only possible if the snapshot command is intact and if a volume mount, such as ~/live-migration, is utilized.
===== PAGE: https://docs.tigerdata.com/_partials/_migrate_live_migration_step2/ =====
For the sake of convenience, connection strings to the source and target databases are referred to as source and target throughout this guide.
This can be set in your shell, for example:
export SOURCE="postgres://<user>:<password>@<source host>:<source port>/<db_name>"
export TARGET="postgres://<user>:<password>@<target host>:<target port>/<db_name>"
Do not use a Tiger Cloud connection pooler connection for live migration. There are a number of issues which can arise when using a connection pooler, and no advantage. Very small instances may not have enough connections configured by default, in which case you should modify the value of max_connections, in your instance, as shown on [Configure database parameters][configure-instance-parameters].
It's important to ensure that the old_snapshot_threshold value is set to the default value of -1 in your source database. This prevents Postgres from treating the data in a snapshot as outdated. If this value is set other than -1, it might affect the existing data migration step.
To check the current value of old_snapshot_threshold, run the command:
psql -X -d source -c 'show old_snapshot_threshold'If the query returns something other than -1, you must change it.
If you have a superuser on a self-hosted database, run the following command:
psql -X -d source -c 'alter system set old_snapshot_threshold=-1'Otherwise, if you are using a managed service, use your cloud provider's configuration mechanism to set old_snapshot_threshold to -1.
Next, you should set wal_level to logical so that the write-ahead log (WAL) records information that is needed for logical decoding.
To check the current value of wal_level, run the command:
psql -X -d source -c 'show wal_level'If the query returns something other than logical, you must change it.
If you have a superuser on a self-hosted database, run the following command:
psql -X -d source -c 'alter system set wal_level=logical'Otherwise, if you are using a managed service, use your cloud provider's configuration mechanism to set wal_level to logical.
Restart your database for the changes to take effect, and verify that the settings are reflected in your database.
===== PAGE: https://docs.tigerdata.com/_partials/_prometheus-integrate/ =====
[Prometheus][prometheus] is an open-source monitoring system with a dimensional data model, flexible query language, and a modern alerting approach.
This page shows you how to export your service telemetry to Prometheus:
- For Tiger Cloud, using a dedicated Prometheus exporter in Tiger Cloud Console.
- For self-hosted TimescaleDB, using [Postgres Exporter][postgresql-exporter].
Prerequisites
To follow the steps on this page:
[Download and run Prometheus][install-prometheus].
For Tiger Cloud:
Create a target [Tiger Cloud service][create-service] with the time-series and analytics capability enabled.
For self-hosted TimescaleDB:
- Create a target [self-hosted TimescaleDB][enable-timescaledb] instance. You need your [connection details][connection-info].
- [Install Postgres Exporter][install-exporter]. To reduce latency and potential data transfer costs, install Prometheus and Postgres Exporter on a machine in the same AWS region as your Tiger Cloud service.
Export Tiger Cloud service telemetry to Prometheus
To export your data, do the following:
To export metrics from a Tiger Cloud service, you create a dedicated Prometheus exporter in Tiger Cloud Console, attach it to your service, then configure Prometheus to scrape metrics using the exposed URL. The Prometheus exporter exposes the metrics related to the Tiger Cloud service like CPU, memory, and storage. To scrape other metrics, use Postgres Exporter as described for self-hosted TimescaleDB. The Prometheus exporter is available for [Scale and Enterprise][pricing-plan-features] pricing plans.
Create a Prometheus exporter
In [Tiger Cloud Console][open-console], click
Exporters>+ New exporter.Select
Metricsfor data type andPrometheusfor provider.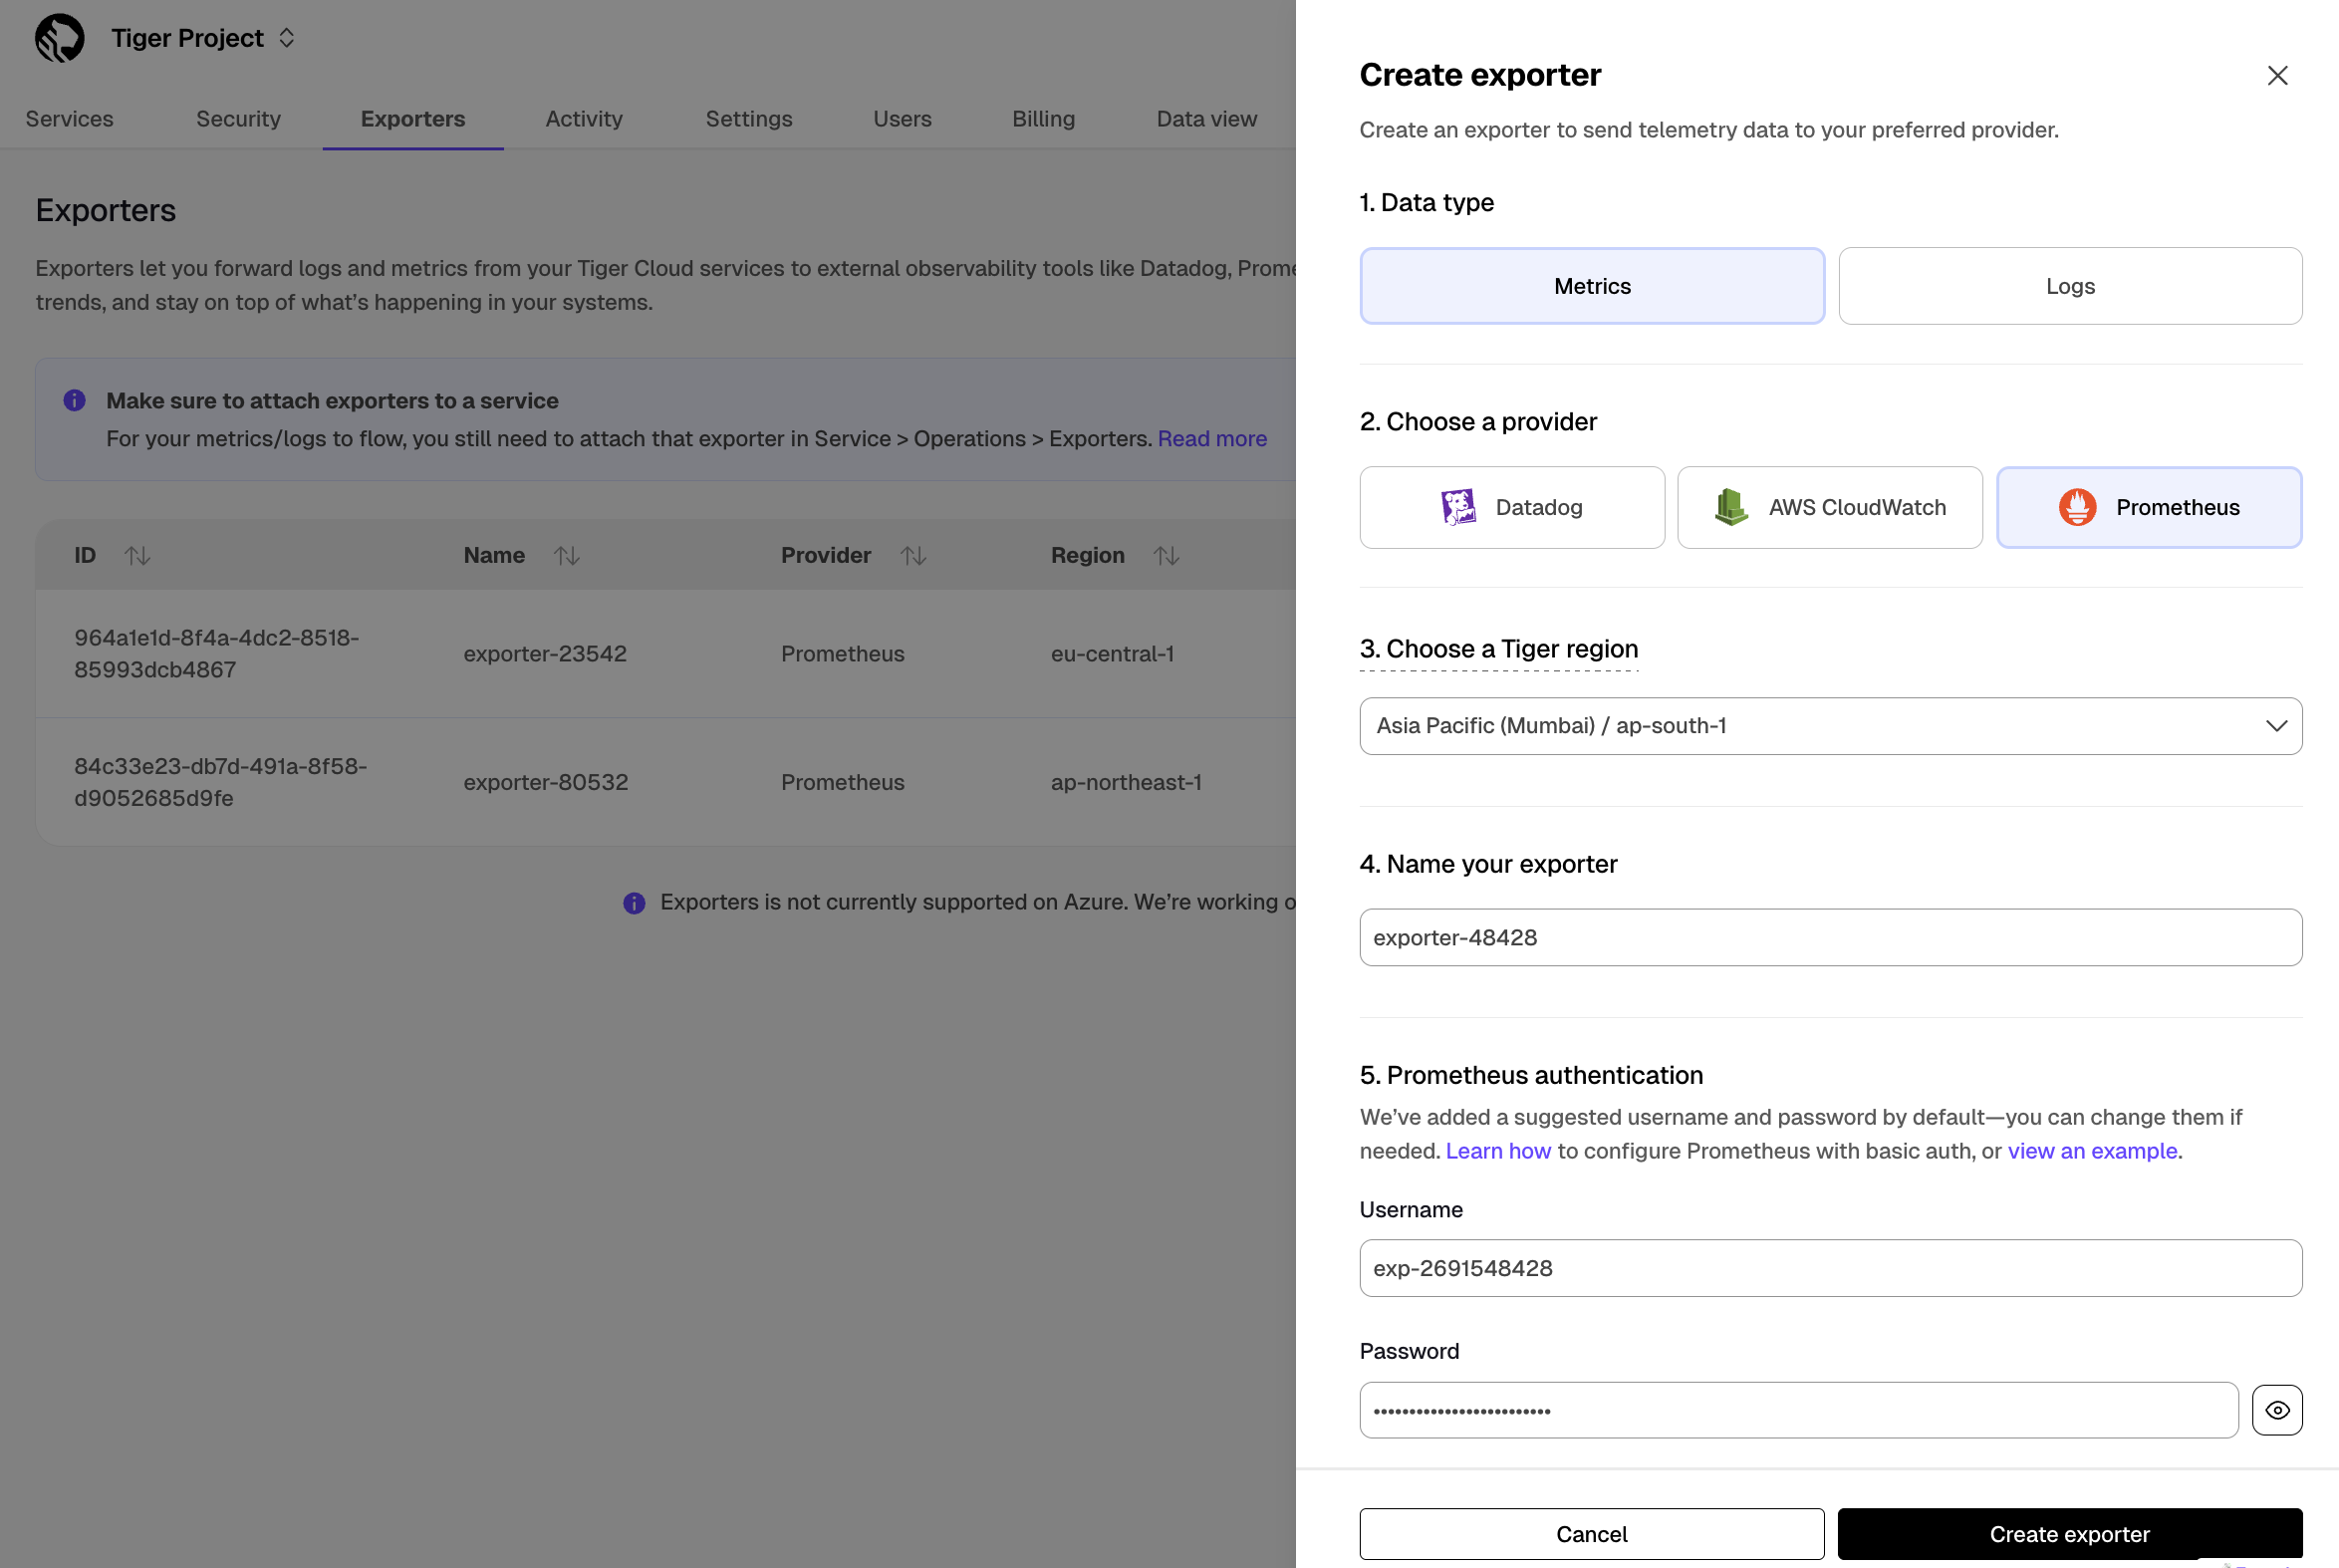
Choose the region for the exporter. Only services in the same project and region can be attached to this exporter.
Name your exporter.
Change the auto-generated Prometheus credentials, if needed. See [official documentation][prometheus-authentication] on basic authentication in Prometheus.
Attach the exporter to a service
Select a service, then click
Operations>Exporters.Select the exporter in the drop-down, then click
Attach exporter.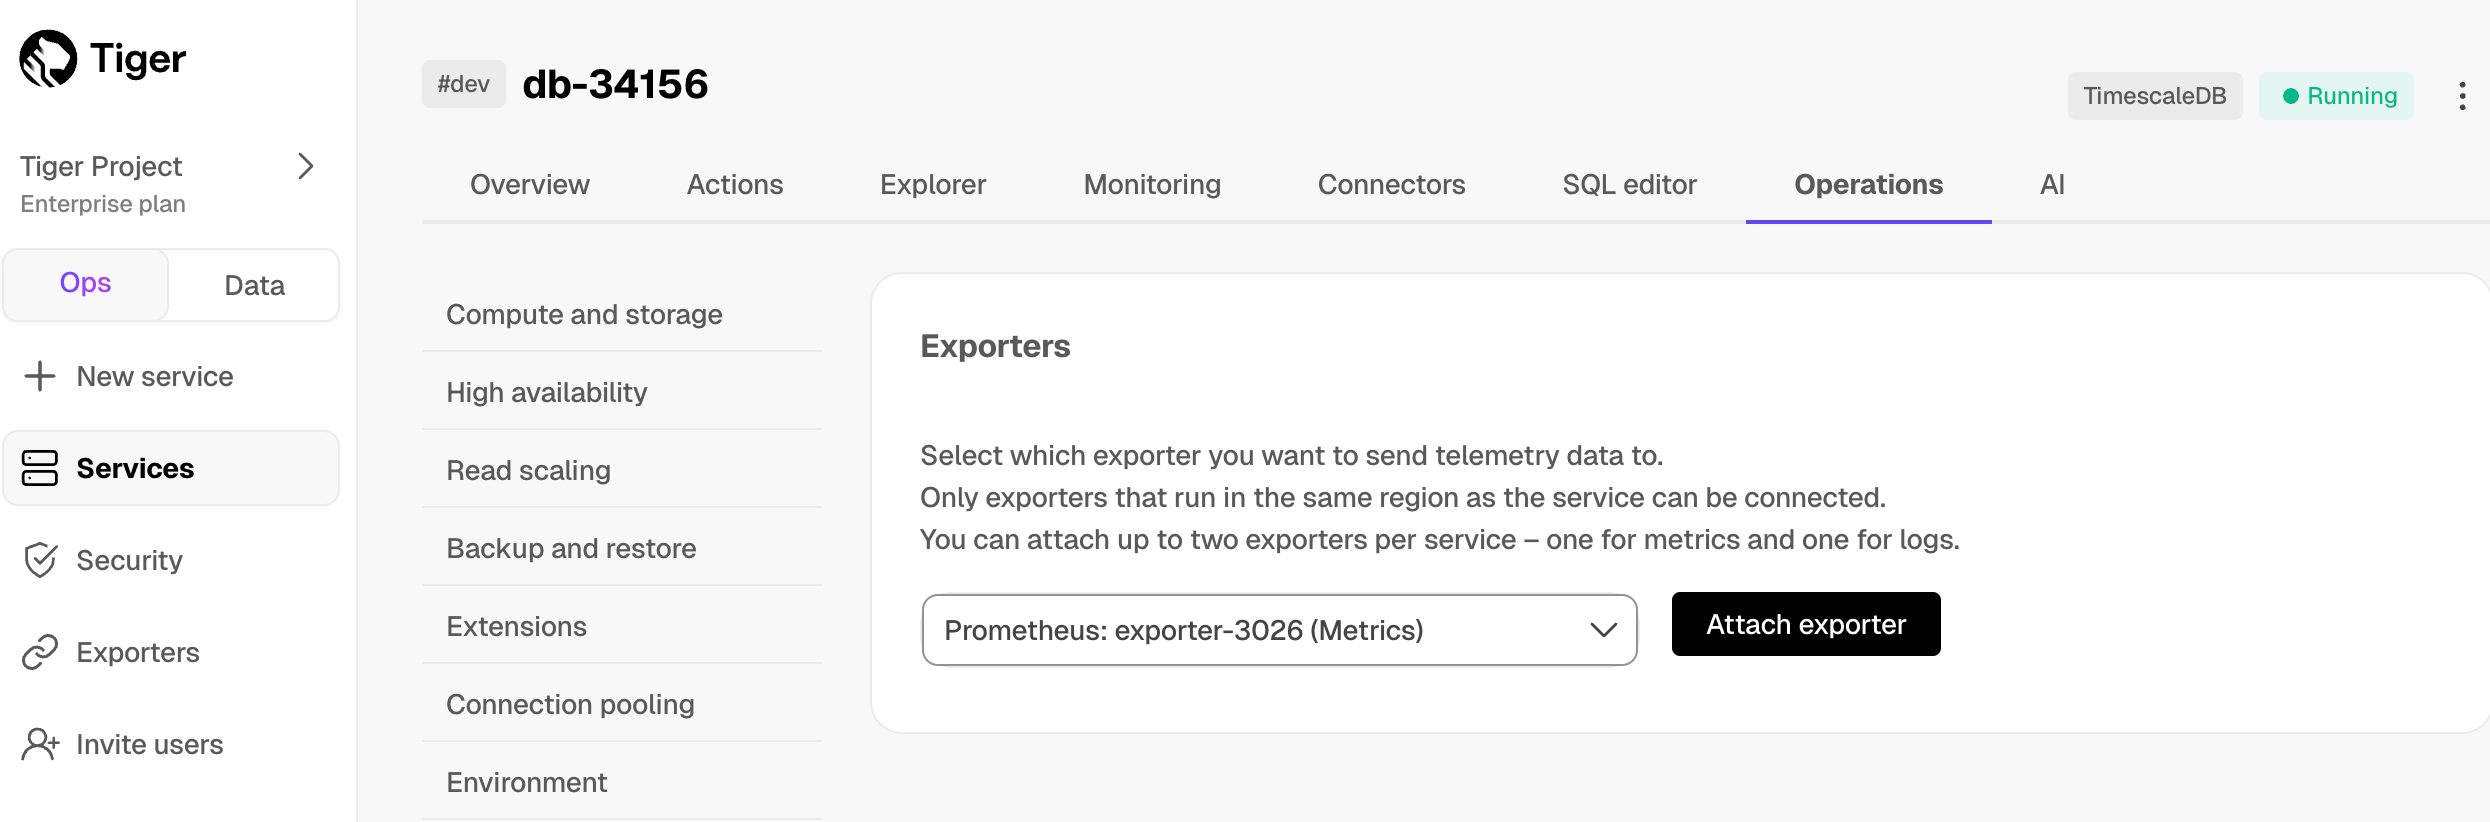
The exporter is now attached to your service. To unattach it, click the trash icon in the exporter list.
Configure the Prometheus scrape target
Select your service, then click
Operations>Exportersand click the information icon next to the exporter. You see the exporter details.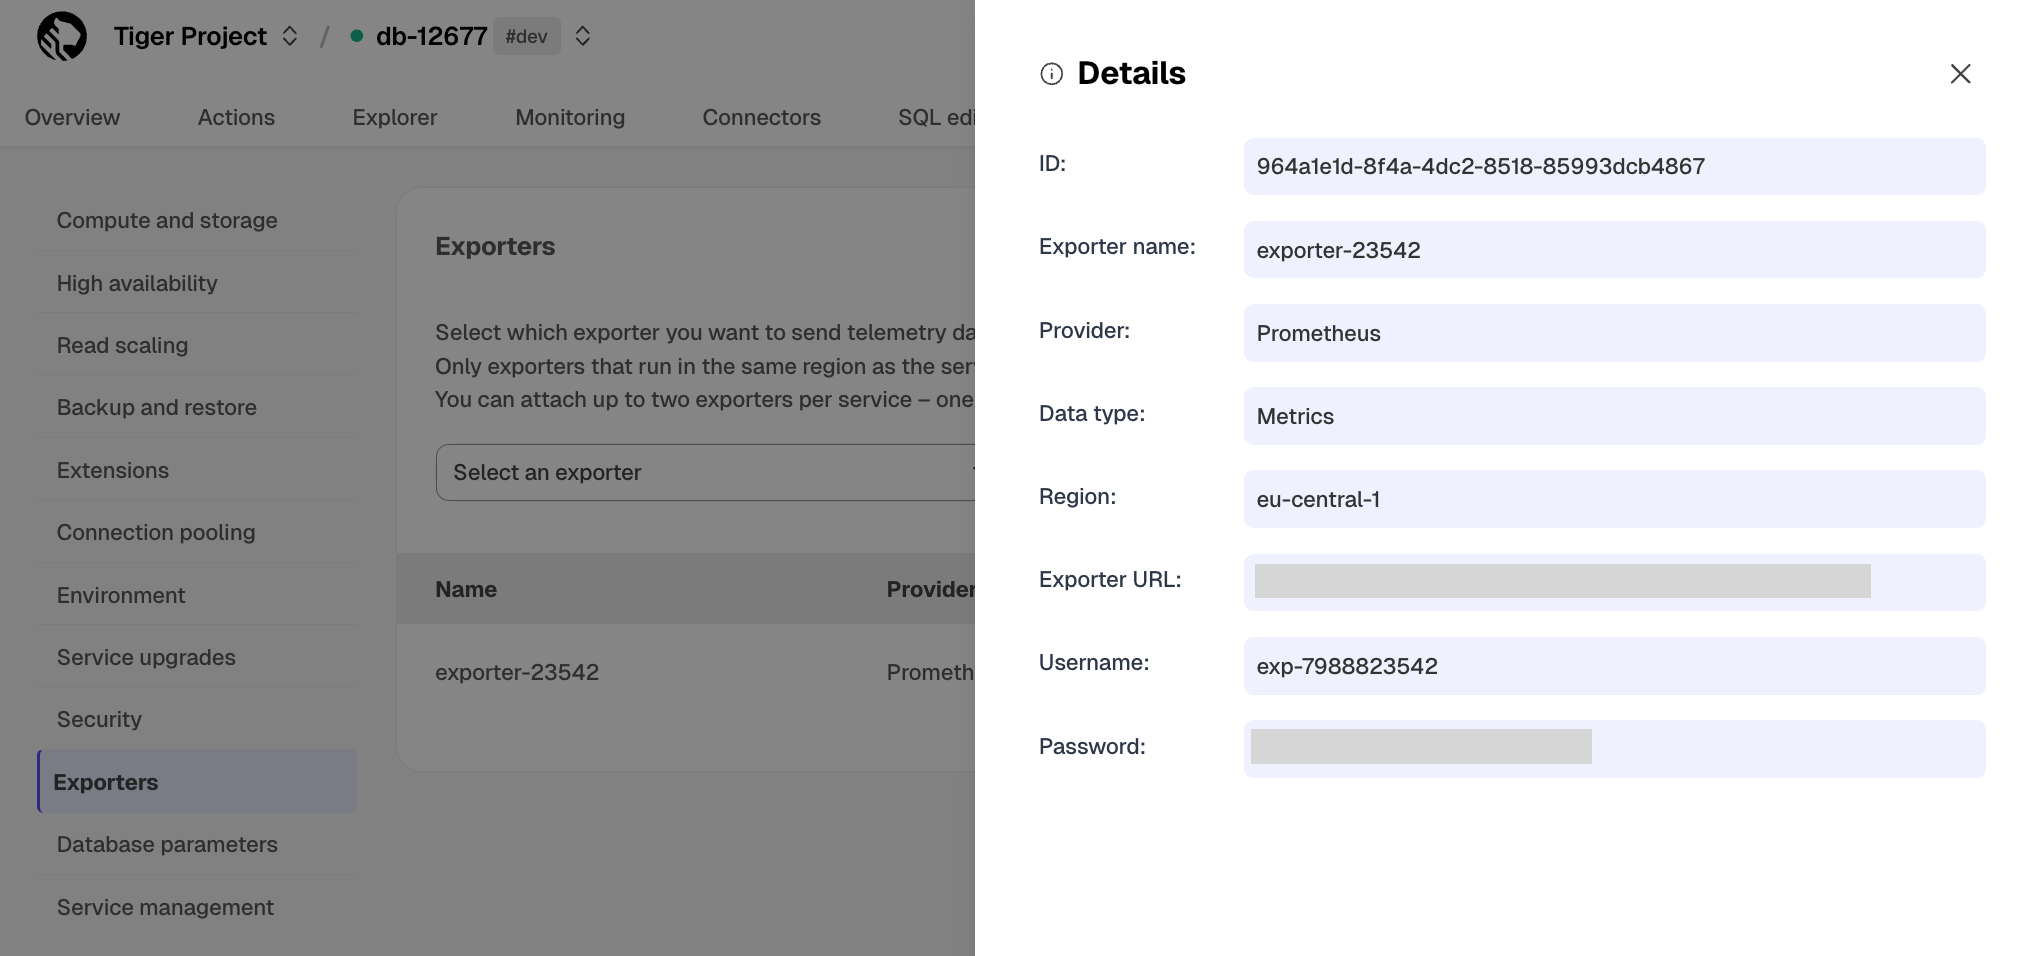
Copy the exporter URL.
In your Prometheus installation, update
prometheus.ymlto point to the exporter URL as a scrape target:ymlscrape_configs: - job_name: "timescaledb-exporter" scheme: https static_configs: - targets: ["my-exporter-url"] basic_auth: username: "user" password: "pass"See the [Prometheus documentation][scrape-targets] for details on configuring scrape targets.
You can now monitor your service metrics. Use the following metrics to check the service is running correctly:
timescale.cloud.system.cpu.usage.millicorestimescale.cloud.system.cpu.total.millicorestimescale.cloud.system.memory.usage.bytestimescale.cloud.system.memory.total.bytestimescale.cloud.system.disk.usage.bytestimescale.cloud.system.disk.total.bytes
Additionally, use the following tags to filter your results.
Tag Example variable Description hostus-east-1.timescale.cloudproject-idservice-idregionus-east-1AWS region rolereplicaorprimaryFor service with replicas
To export metrics from self-hosted TimescaleDB, you import telemetry data about your database to Postgres Exporter, then configure Prometheus to scrape metrics from it. Postgres Exporter exposes metrics that you define, excluding the system metrics.
Create a user to access telemetry data about your database
Connect to your database in [
psql][psql] using your [connection details][connection-info].Create a user named
monitoringwith a secure password:sqlCREATE USER monitoring WITH PASSWORD '<password>';Grant the
pg_read_all_statspermission to themonitoringuser:sqlGRANT pg_read_all_stats to monitoring;
Import telemetry data about your database to Postgres Exporter
Connect Postgres Exporter to your database:
Use your [connection details][connection-info] to import telemetry data about your database. You connect as the
monitoringuser:- Local installation:shell
export DATA_SOURCE_NAME="postgres://<user>:<password>@<host>:<port>/<database>?sslmode=<sslmode>" ./postgres_exporter - Docker:shell
docker run -d \
   -e DATA_SOURCE_NAME="postgres://<user>:<password>@<host>:<port>/<database>?sslmode=<sslmode>" \
   -p 9187:9187 \
   prometheuscommunity/postgres-exporter
- Local installation:
Check the metrics for your database in the Prometheus format:
- Browser: