Migrate your data, then start downtime
- Pull the live-migration docker image to you migration machine
To list the available commands, run:
To see the available flags for each command, run --help for that command. For example:
- Create a snapshot image of your source database in your Tiger Cloud service
This process checks that you have tuned your source database and target service correctly for replication, then creates a snapshot of your data on the migration machine:
Live-migration supplies information about updates you need to make to the source database and target service. For example:
If you have warnings, stop live-migration, make the suggested changes and start again.
- Synchronize data between your source database and your Tiger Cloud service
This command migrates data from the snapshot to your Tiger Cloud service, then streams transactions from the source to the target.
If the source Postgres version is 17 or later, you need to pass additional flag -e PGVERSION=17 to the migrate command.
During this process, you see the migration process:
If migrate stops add --resume to start from where it left off.
Once the data in your target Tiger Cloud service has almost caught up with the source database, you see the following message:
Wait until replay_lag is down to a few kilobytes before you move to the next step. Otherwise, data replication may not have finished.
Start app downtime
Stop your app writing to the source database, then let the the remaining transactions finish to fully sync with the target. You can use tools like the
pg_topCLI orpg_stat_activityto view the current transaction on the source database.Stop Live-migration.
Live-migration continues the remaining work. This includes copying TimescaleDB metadata, sequences, and run policies. When the migration completes, you see the following message:
===== PAGE: https://docs.tigerdata.com/_partials/_prereqs-cloud-account-only/ =====
To follow the steps on this page:
- Create a target [Tiger Data account][create-account].
===== PAGE: https://docs.tigerdata.com/_partials/_migrate_set_up_database_first_steps/ =====
- Take the applications that connect to the source database offline
The duration of the migration is proportional to the amount of data stored in your database. By disconnection your app from your database you avoid and possible data loss.
- Set your connection strings
These variables hold the connection information for the source database and target Tiger Cloud service:
You find the connection information for your Tiger Cloud service in the configuration file you downloaded when you created the service.
===== PAGE: https://docs.tigerdata.com/_partials/_install-self-hosted-redhat/ =====
Install the latest Postgres packages
Add the TimescaleDB repository
Update your local repository list
Install TimescaleDB
To avoid errors, do not install TimescaleDB Apache 2 Edition and TimescaleDB Community Edition at the same time.
On Red Hat Enterprise Linux 8 and later, disable the built-in Postgres module:
sudo dnf -qy module disable postgresql
Initialize the Postgres instance
Tune your Postgres instance for TimescaleDB
This script is included with the timescaledb-tools package when you install TimescaleDB. For more information, see [configuration][config].
Enable and start Postgres
Log in to Postgres as
postgres
You are now in the psql shell.
- Set the password for
postgres
When you have set the password, type \q to exit psql.
===== PAGE: https://docs.tigerdata.com/_partials/_chunk-interval/ =====
Postgres builds the index on the fly during ingestion. That means that to build a new entry on the index, a significant portion of the index needs to be traversed during every row insertion. When the index does not fit into memory, it is constantly flushed to disk and read back. This wastes IO resources which would otherwise be used for writing the heap/WAL data to disk.
The default chunk interval is 7 days. However, best practice is to set chunk_interval so that prior to processing, the indexes for chunks currently being ingested into fit within 25% of main memory. For example, on a system with 64 GB of memory, if index growth is approximately 2 GB per day, a 1-week chunk interval is appropriate. If index growth is around 10 GB per day, use a 1-day interval.
You set chunk_interval when you [create a hypertable][hypertable-create-table], or by calling [set_chunk_time_interval][chunk_interval] on an existing hypertable.
===== PAGE: https://docs.tigerdata.com/_partials/_migrate_live_tune_source_database_mst/ =====
- Enable live-migration to replicate
DELETEandUPDATEoperations
Replica identity assists data replication by identifying the rows being modified. Your options are that each table and hypertable in the source database should either have:
- A primary key: data replication defaults to the primary key of the table being replicated. Nothing to do.
- A viable unique index: each table has a unique, non-partial, non-deferrable index that includes only columns marked as
NOT NULL. If a UNIQUE index does not exist, create one to assist the migration. You can delete if after migration.
For each table, set REPLICA IDENTITY to the viable unique index:
- No primary key or viable unique index: use brute force.
For each table, set REPLICA IDENTITY to FULL:
For each UPDATE or DELETE statement, Postgres reads the whole table to find all matching rows. This results in significantly slower replication. If you are expecting a large number of UPDATE or DELETE operations on the table, best practice is to not use FULL.
===== PAGE: https://docs.tigerdata.com/_partials/_tutorials_hypertable_intro/ =====
Hypertables are Postgres tables in TimescaleDB that automatically partition your time-series data by time. Time-series data represents the way a system, process, or behavior changes over time. Hypertables enable TimescaleDB to work efficiently with time-series data. Each hypertable is made up of child tables called chunks. Each chunk is assigned a range of time, and only contains data from that range. When you run a query, TimescaleDB identifies the correct chunk and runs the query on it, instead of going through the entire table.
[Hypercore][hypercore] is the hybrid row-columnar storage engine in TimescaleDB used by hypertables. Traditional databases force a trade-off between fast inserts (row-based storage) and efficient analytics (columnar storage). Hypercore eliminates this trade-off, allowing real-time analytics without sacrificing transactional capabilities.
Hypercore dynamically stores data in the most efficient format for its lifecycle:
- Row-based storage for recent data: the most recent chunk (and possibly more) is always stored in the rowstore, ensuring fast inserts, updates, and low-latency single record queries. Additionally, row-based storage is used as a writethrough for inserts and updates to columnar storage.
- Columnar storage for analytical performance: chunks are automatically compressed into the columnstore, optimizing storage efficiency and accelerating analytical queries.
Unlike traditional columnar databases, hypercore allows data to be inserted or modified at any stage, making it a flexible solution for both high-ingest transactional workloads and real-time analytics—within a single database.
Because TimescaleDB is 100% Postgres, you can use all the standard Postgres tables, indexes, stored procedures, and other objects alongside your hypertables. This makes creating and working with hypertables similar to standard Postgres.
===== PAGE: https://docs.tigerdata.com/_partials/_hypertable-intro/ =====
Tiger Cloud supercharges your real-time analytics by letting you run complex queries continuously, with near-zero latency. Under the hood, this is achieved by using hypertables—Postgres tables that automatically partition your time-series data by time and optionally by other dimensions. When you run a query, Tiger Cloud identifies the correct partition, called chunk, and runs the query on it, instead of going through the entire table.
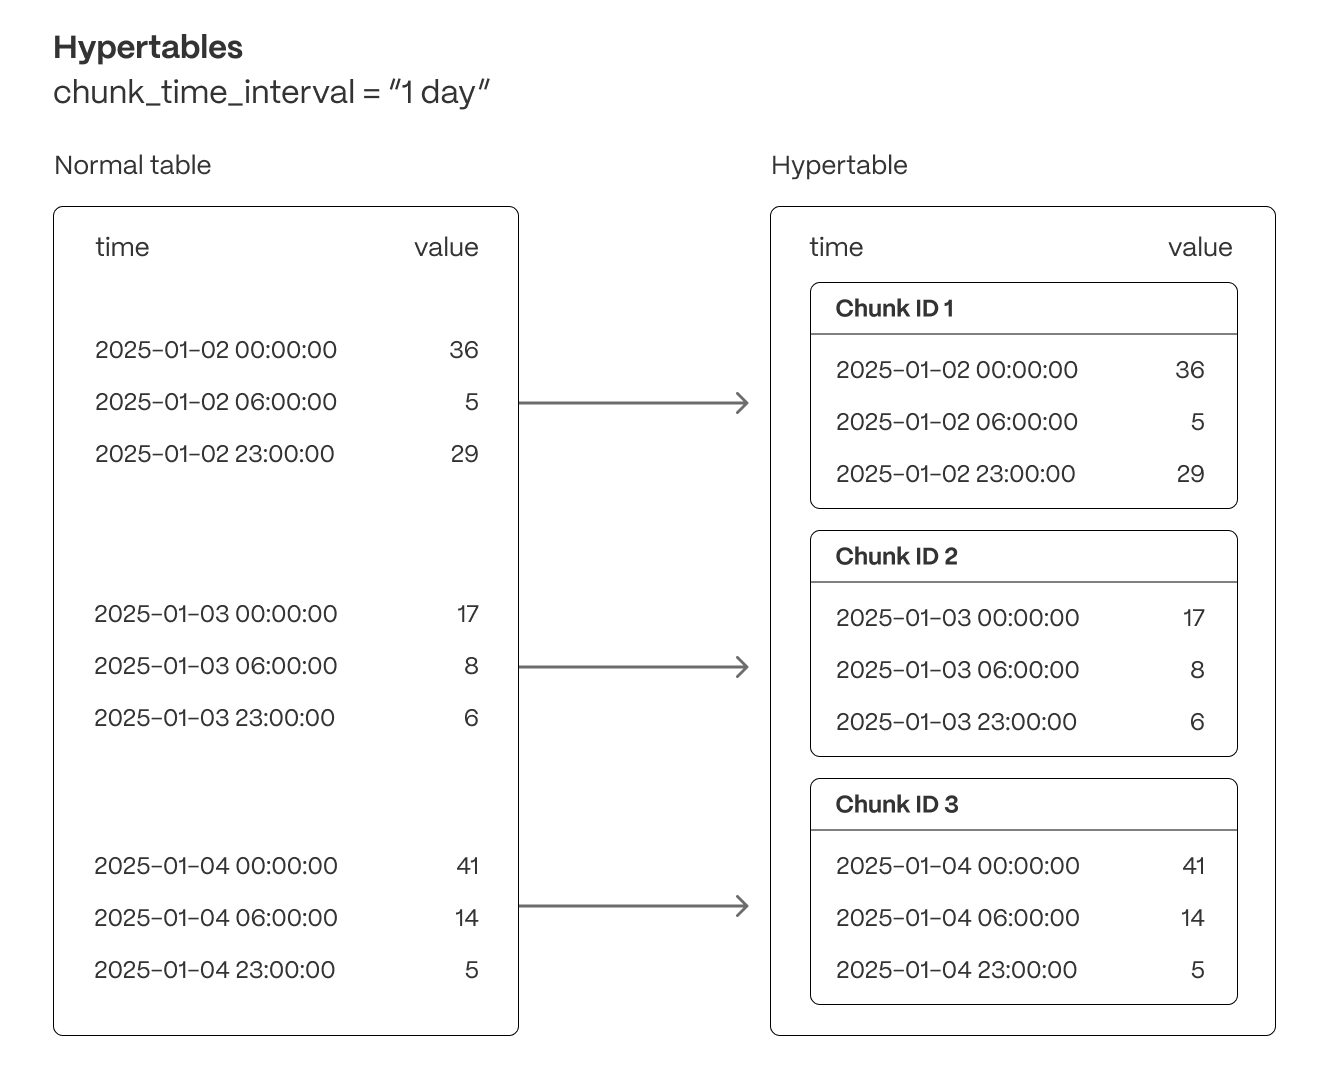
Hypertables offer the following benefits:
Efficient data management with [automated partitioning by time][chunk-size]: Tiger Cloud splits your data into chunks that hold data from a specific time range. For example, one day or one week. You can configure this range to better suit your needs.
Better performance with [strategic indexing][hypertable-indexes]: an index on time in the descending order is automatically created when you create a hypertable. More indexes are created on the chunk level, to optimize performance. You can create additional indexes, including unique indexes, on the columns you need.
Faster queries with [chunk skipping][chunk-skipping]: Tiger Cloud skips the chunks that are irrelevant in the context of your query, dramatically reducing the time and resources needed to fetch results. Even more—you can enable chunk skipping on non-partitioning columns.
Advanced data analysis with [hyperfunctions][hyperfunctions]: Tiger Cloud enables you to efficiently process, aggregate, and analyze significant volumes of data while maintaining high performance.
To top it all, there is no added complexity—you interact with hypertables in the same way as you would with regular Postgres tables. All the optimization magic happens behind the scenes.
Inheritance is not supported for hypertables and may lead to unexpected behavior.
===== PAGE: https://docs.tigerdata.com/_partials/_kubernetes-install-self-hosted/ =====
Running TimescaleDB on Kubernetes is similar to running Postgres. This procedure outlines the steps for a non-distributed system.
To connect your Kubernetes cluster to self-hosted TimescaleDB running in the cluster:
Create a default namespace for Tiger Data components
Create the Tiger Data namespace:
Set this namespace as the default for your session:
For more information, see [Kubernetes Namespaces][kubernetes-namespace].
- Set up a persistent volume claim (PVC) storage
To manually set up a persistent volume and claim for self-hosted Kubernetes, run the following command:
- Deploy TimescaleDB as a StatefulSet
By default, the [TimescaleDB Docker image][timescale-docker-image] you are installing on Kubernetes uses the default Postgres database, user and password. To deploy TimescaleDB on Kubernetes, run the following command:
Allow applications to connect by exposing TimescaleDB within Kubernetes
Create a Kubernetes secret to store the database credentials
Deploy an application that connects to TimescaleDB
Test the database connection
Create and run a pod to verify database connectivity using your [connection details][connection-info] saved in
timescale-secret:Launch the Postgres interactive shell within the created
test-pod:
You see the Postgres interactive terminal.
===== PAGE: https://docs.tigerdata.com/_partials/_caggs-migrate-permissions/ =====
You might get a permissions error when migrating a continuous aggregate from old to new format using cagg_migrate. The user performing the migration must have the following permissions:
- Select, insert, and update permissions on the tables
_timescale_catalog.continuous_agg_migrate_planand_timescale_catalog.continuous_agg_migrate_plan_step - Usage permissions on the sequence
_timescaledb_catalog.continuous_agg_migrate_plan_step_step_id_seq
To solve the problem, change to a user capable of granting permissions, and grant the following permissions to the user performing the migration:
===== PAGE: https://docs.tigerdata.com/_partials/_candlestick_intro/ =====
The financial sector regularly uses [candlestick charts][charts] to visualize the price change of an asset. Each candlestick represents a time period, such as one minute or one hour, and shows how the asset's price changed during that time.
Candlestick charts are generated from the open, high, low, close, and volume data for each financial asset during the time period. This is often abbreviated as OHLCV:
- Open: opening price
- High: highest price
- Low: lowest price
- Close: closing price
- Volume: volume of transactions
===== PAGE: https://docs.tigerdata.com/_partials/_start-coding-java/ =====
To follow the steps on this page:
- Create a target [Tiger Cloud service][create-service] with the Real-time analytics capability.
You need [your connection details][connection-info]. This procedure also works for [self-hosted TimescaleDB][enable-timescaledb].
- Install the [Java Development Kit (JDK)][jdk].
- Install the [PostgreSQL JDBC driver][pg-jdbc-driver].
All code in this quick start is for Java 16 and later. If you are working with older JDK versions, use legacy coding techniques.