Recommended vector distance for use in Postgres
Using cosine distance, especially on unit vectors, is recommended. These recommendations are based on OpenAI's recommendation as well as the fact that the ranking of different distances on unit vectors is preserved.
Vector search indexing (approximate nearest neighbor search)
In Postgres and other relational databases, indexing is a way to speed up queries. For vector data, indexes speed up the similarity search query shown above where you find the most similar embedding to some given query embedding. This problem is often referred to as finding the K nearest neighbors.
The term "index" in the context of vector databases has multiple meanings. It can refer to both the storage mechanism for your data and the tool that enhances query efficiency. These docs use the latter meaning.
Finding the K nearest neighbors is not a new problem in Postgres, but existing techniques only work with low-dimensional data. These approaches cease to be effective when dealing with data larger than approximately 10 dimensions due to the "curse of dimensionality." Given that embeddings often consist of more than a thousand dimensions(OpenAI's are 1,536) new techniques had to be developed.
There are no known exact algorithms for efficiently searching in such high-dimensional spaces. Nevertheless, there are excellent approximate algorithms that fall into the category of approximate nearest neighbor algorithms.
There are 3 different indexing algorithms available as part of pgai on Tiger Cloud: StreamingDiskANN, HNSW, and ivfflat. The table below illustrates the high-level differences between these algorithms:
| Algorithm | Build Speed | Query Speed | Need to rebuild after updates |
|---|---|---|---|
| StreamingDiskANN | Fast | Fastest | No |
| HNSW | Fast | Fast | No |
| ivfflat | Fastest | Slowest | Yes |
See the performance benchmarks for details on how the each index performs on a dataset of 1 million OpenAI embeddings.
Recommended index types
For most applications, the StreamingDiskANN index is recommended.
===== PAGE: https://docs.tigerdata.com/ai/sql-interface-for-pgvector-and-timescale-vector/ =====
Examples:
Example 1 (sql):
CREATE TABLE IF NOT EXISTS document_embedding  (
    id BIGINT PRIMARY KEY GENERATED BY DEFAULT AS IDENTITY,
    document_id BIGINT FOREIGN KEY(document.id)
    metadata JSONB,
    contents TEXT,
    embedding VECTOR(1536)
)
Example 2 (sql):
SELECT *
FROM document_embedding
ORDER BY embedding <=> $1
LIMIT 10
Export metrics to Amazon Cloudwatch
URL: llms-txt#export-metrics-to-amazon-cloudwatch
Contents:
- Prerequisites
- Create a data exporter
- Manage a data exporter
- Attach a data exporter to a Tiger Cloud service
- Monitor Tiger Cloud service metrics
- Edit a data exporter
- Delete a data exporter
- Reference
You can export telemetry data from your Tiger Cloud services with the time-series and analytics capability enabled to [Amazon CloudWatch][cloudwatch]. Available metrics include CPU usage, RAM usage, and storage. This integration is available for [Scale or Enterprise][pricing-plan-features] pricing plans.
This page shows you how to create an Amazon CloudWatch exporter in Tiger Cloud Console, and manage the lifecycle of data exporters.
To follow the steps on this page:
- Create a target [Tiger Cloud service][create-service] with real-time analytics enabled.
Create a data exporter
Tiger Cloud data exporters send telemetry data from a Tiger Cloud service to a third-party monitoring tools. You create an exporter on the [project level][projects], in the same AWS region as your service:
- In Tiger Cloud Console, open [Exporters][console-integrations]
- Click
New exporter - Select the data type and specify
AWS CloudWatchfor provider
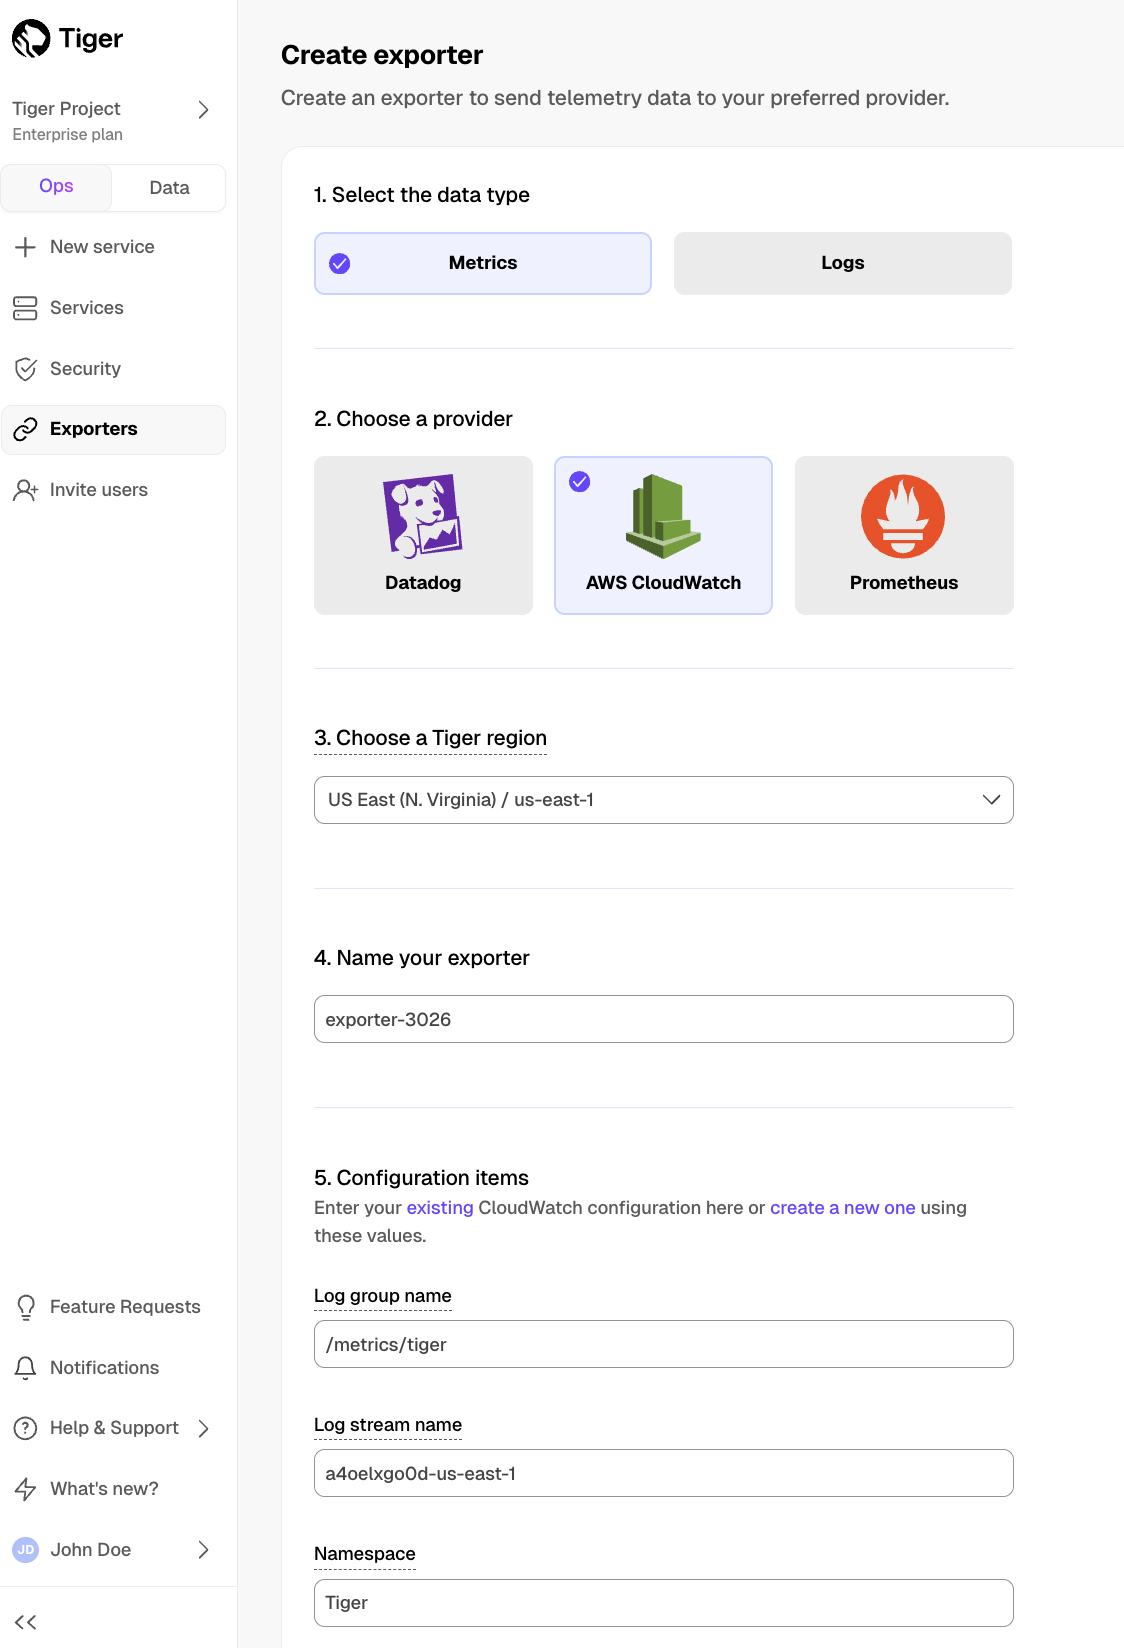
- Provide your AWS CloudWatch configuration
- The AWS region must be the same for your Tiger Cloud exporter and AWS CloudWatch Log group.
- The exporter name appears in Tiger Cloud Console, best practice is to make this name easily understandable.
- For CloudWatch credentials, either use an [existing CloudWatch Log group][console-cloudwatch-configuration] or [create a new one][console-cloudwatch-create-group]. If you're uncertain, use the default values. For more information, see [Working with log groups and log streams][cloudwatch-log-naming].
- Choose the authentication method to use for the exporter
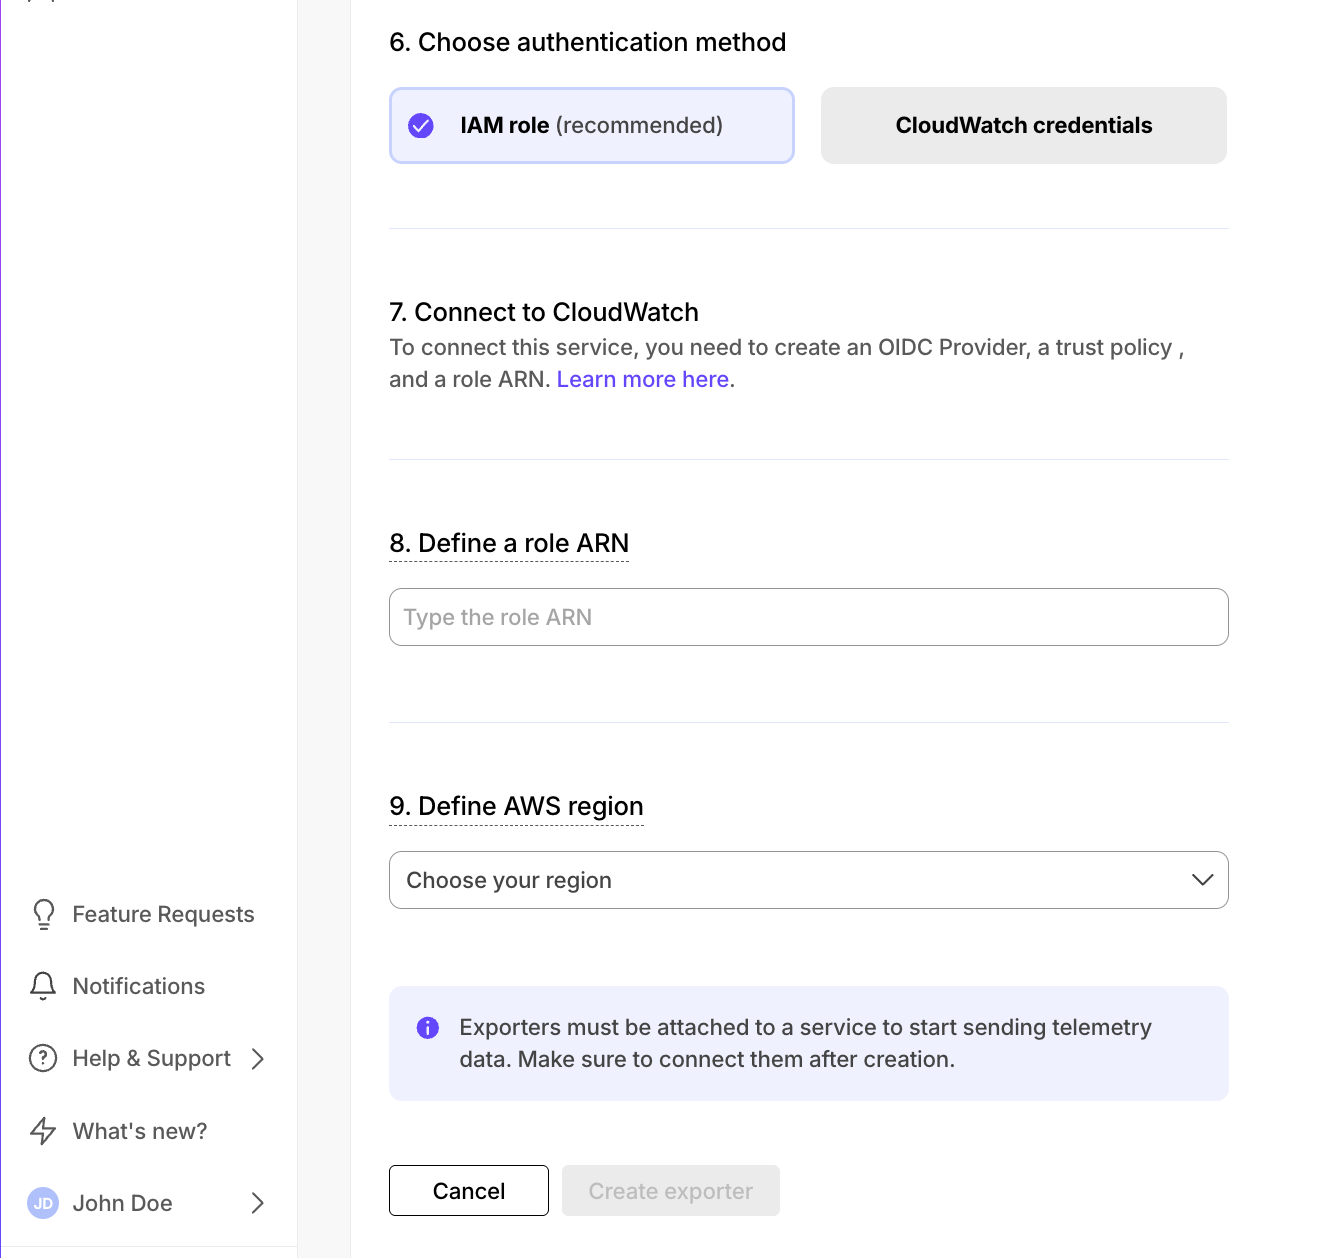
In AWS, navigate to [IAM > Identity providers][create-an-iam-id-provider], then click
Add provider.Update the new identity provider with your details:
Set Provider URL to the [region where you are creating your exporter][reference].
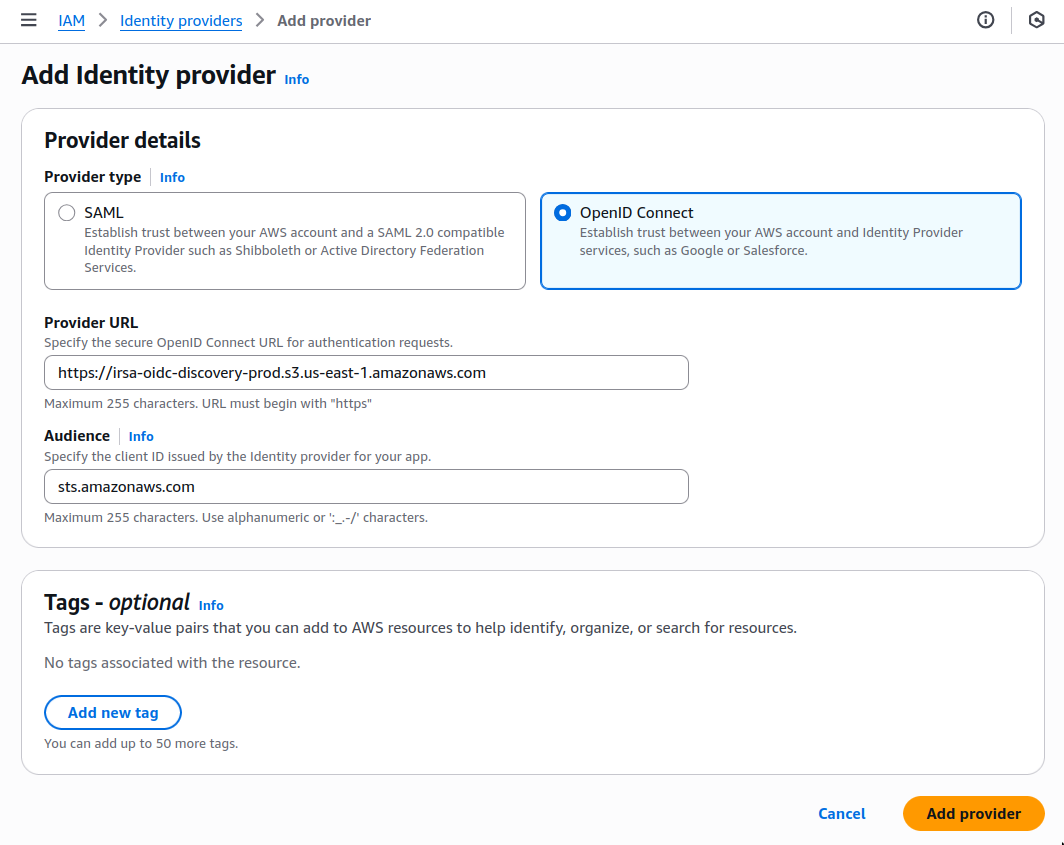
Click
Add provider.In AWS, navigate to [IAM > Roles][add-id-provider-as-wi-role], then click
Create role.Add your identity provider as a Web identity role and click
Next.
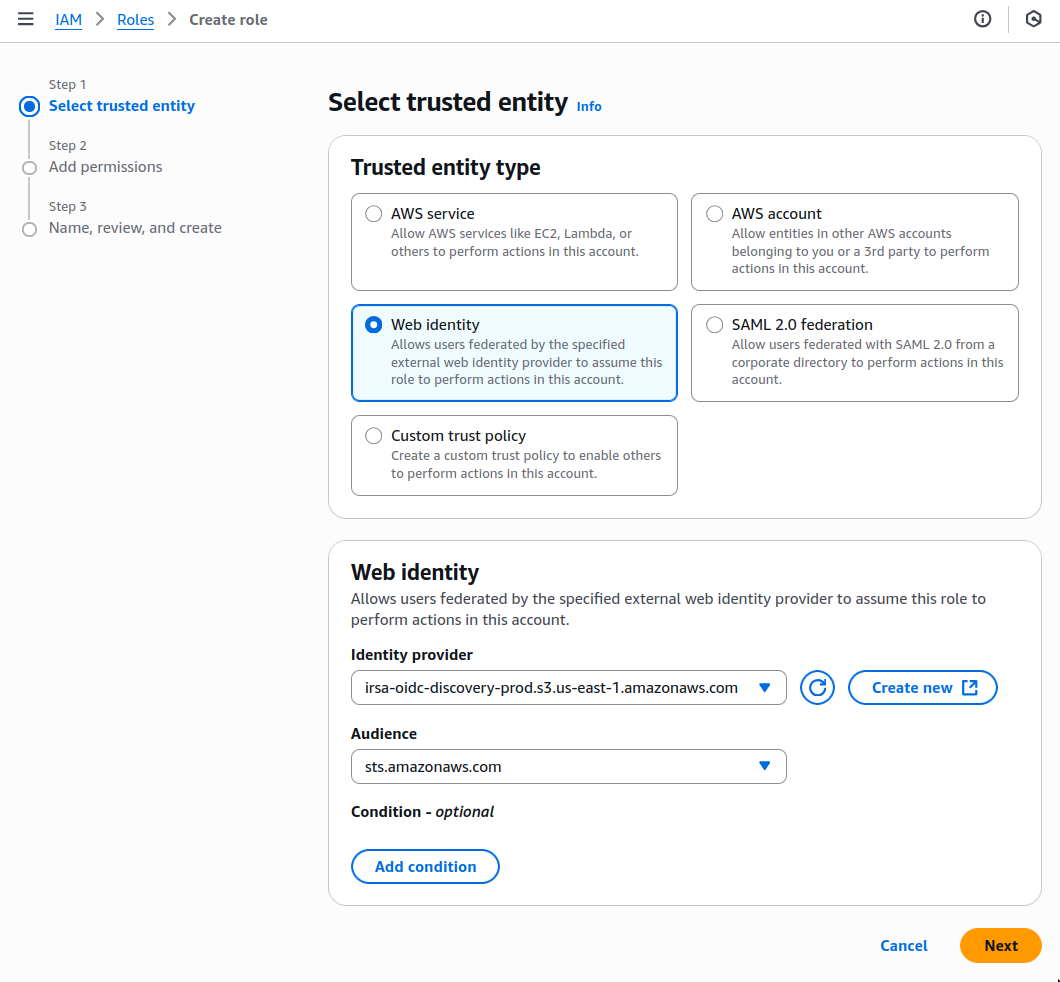
- Set the following permission and trust policies:
- Role with a Trust Policy:
When you use CloudWatch credentials, you link an Identity and Access Management (IAM) user with access to CloudWatch only with your Tiger Cloud service:
- Retrieve the user information from [IAM > Users in AWS console][list-iam-users].
If you do not have an AWS user with access restricted to CloudWatch only, [create one][create-an-iam-user]. For more information, see [Creating IAM users (console)][aws-access-keys].
- Enter the credentials for the AWS IAM user.
AWS keys give access to your AWS services. To keep your AWS account secure, restrict users to the minimum required permissions. Always store your keys in a safe location. To avoid this issue, use the IAM role authentication method.
- Select the AWS Region your CloudWatch services run in, then click
Create exporter.
Manage a data exporter
This section shows you how to attach, monitor, edit, and delete a data exporter.
Attach a data exporter to a Tiger Cloud service
To send telemetry data to an external monitoring tool, you attach a data exporter to your Tiger Cloud service. You can attach only one exporter to a service.
To attach an exporter:
- In [Tiger Cloud Console][console-services], choose the service
- Click
Operations>Exporters - Select the exporter, then click
Attach exporter - If you are attaching a first
Logsdata type exporter, restart the service
Monitor Tiger Cloud service metrics
You can now monitor your service metrics. Use the following metrics to check the service is running correctly:
timescale.cloud.system.cpu.usage.millicorestimescale.cloud.system.cpu.total.millicorestimescale.cloud.system.memory.usage.bytestimescale.cloud.system.memory.total.bytestimescale.cloud.system.disk.usage.bytestimescale.cloud.system.disk.total.bytes
Additionally, use the following tags to filter your results.
| Tag | Example variable | Description |
|---|---|---|
host | us-east-1.timescale.cloud | |
project-id | ||
service-id | ||
region | us-east-1 | AWS region |
role | replica or primary | For service with replicas |
node-id | For multi-node services |
Edit a data exporter
To update a data exporter:
- In Tiger Cloud Console, open [Exporters][console-integrations]
- Next to the exporter you want to edit, click the menu >
Edit - Edit the exporter fields and save your changes
You cannot change fields such as the provider or the AWS region.
Delete a data exporter
To remove a data exporter that you no longer need:
Disconnect the data exporter from your Tiger Cloud services
In [Tiger Cloud Console][console-services], choose the service.
- Click
Operations>Exporters. - Click the trash can icon.
- Repeat for every service attached to the exporter you want to remove.
- Click
The data exporter is now unattached from all services. However, it still exists in your project.
Delete the exporter on the project level
In Tiger Cloud Console, open [Exporters][console-integrations]
- Next to the exporter you want to edit, click menu >
Delete - Confirm that you want to delete the data exporter.
- Next to the exporter you want to edit, click menu >
When you create the IAM OIDC provider, the URL must match the region you create the exporter in. It must be one of the following:
| Region | Zone | Location | URL |
|---|---|---|---|
ap-southeast-1 | Asia Pacific | Singapore | irsa-oidc-discovery-prod-ap-southeast-1.s3.ap-southeast-1.amazonaws.com |
ap-southeast-2 | Asia Pacific | Sydney | irsa-oidc-discovery-prod-ap-southeast-2.s3.ap-southeast-2.amazonaws.com |
ap-northeast-1 | Asia Pacific | Tokyo | irsa-oidc-discovery-prod-ap-northeast-1.s3.ap-northeast-1.amazonaws.com |
ca-central-1 | Canada | Central | irsa-oidc-discovery-prod-ca-central-1.s3.ca-central-1.amazonaws.com |
eu-central-1 | Europe | Frankfurt | irsa-oidc-discovery-prod-eu-central-1.s3.eu-central-1.amazonaws.com |
eu-west-1 | Europe | Ireland | irsa-oidc-discovery-prod-eu-west-1.s3.eu-west-1.amazonaws.com |
eu-west-2 | Europe | London | irsa-oidc-discovery-prod-eu-west-2.s3.eu-west-2.amazonaws.com |
sa-east-1 | South America | São Paulo | irsa-oidc-discovery-prod-sa-east-1.s3.sa-east-1.amazonaws.com |
us-east-1 | United States | North Virginia | irsa-oidc-discovery-prod.s3.us-east-1.amazonaws.com |
us-east-2 | United States | Ohio | irsa-oidc-discovery-prod-us-east-2.s3.us-east-2.amazonaws.com |
us-west-2 | United States | Oregon | irsa-oidc-discovery-prod-us-west-2.s3.us-west-2.amazonaws.com |
===== PAGE: https://docs.tigerdata.com/use-timescale/data-retention/create-a-retention-policy/ =====
Examples:
Example 1 (json):
{
           "Version": "2012-10-17",
           "Statement": [
              {
                  "Effect": "Allow",
                  "Action": [
                      "logs:PutLogEvents",
                      "logs:CreateLogGroup",
                      "logs:CreateLogStream",
                      "logs:DescribeLogStreams",
                      "logs:DescribeLogGroups",
                      "logs:PutRetentionPolicy",
                      "xray:PutTraceSegments",
                      "xray:PutTelemetryRecords",
                      "xray:GetSamplingRules",
                      "xray:GetSamplingTargets",
                      "xray:GetSamplingStatisticSummaries",
                      "ssm:GetParameters"
                  ],
                  "Resource": "*"
              }
          ]
         }
Example 2 (json):
{
           "Version": "2012-10-17",
           "Statement": [
               {
                   "Effect": "Allow",
                   "Principal": {
                       "Federated": "arn:aws:iam::12345678910:oidc-provider/irsa-oidc-discovery-prod.s3.us-east-1.amazonaws.com"
                   },
                   "Action": "sts:AssumeRoleWithWebIdentity",
                   "Condition": {
                       "StringEquals": {
                           "irsa-oidc-discovery-prod.s3.us-east-1.amazonaws.com:aud": "sts.amazonaws.com"
                       }
                   }
               },
               {
                   "Sid": "Statement1",
                   "Effect": "Allow",
                   "Principal": {
                       "AWS": "arn:aws:iam::12345678910:role/my-exporter-role"
                   },
                   "Action": "sts:AssumeRole"
               }
           ]
         }
Write data
URL: llms-txt#write-data
Writing data in TimescaleDB works the same way as writing data to regular Postgres. You can add and modify data in both regular tables and hypertables using INSERT, UPDATE, and DELETE statements.
- [Learn about writing data in TimescaleDB][about-writing-data]
- [Insert data][insert] into hypertables
- [Update data][update] in hypertables
- [Upsert data][upsert] into hypertables
- [Delete data][delete] from hypertables
For more information about using third-party tools to write data into TimescaleDB, see the [Ingest data from other sources][ingest-data] section.
===== PAGE: https://docs.tigerdata.com/use-timescale/query-data/ =====
Get started with Tiger Data
URL: llms-txt#get-started-with-tiger-data
A Tiger Cloud service is a single optimised Postgres instance extended with innovations in the database engine such as TimescaleDB, in a cloud infrastructure that delivers speed without sacrifice.
A Tiger Cloud service is a radically faster Postgres database for transactional, analytical, and agentic workloads at scale.
It’s not a fork. It’s not a wrapper. It is Postgres—extended with innovations in the database engine and cloud infrastructure to deliver speed (10-1000x faster at scale) without sacrifice. A Tiger Cloud service brings together the familiarity and reliability of Postgres with the performance of purpose-built engines.
Tiger Cloud is the fastest Postgres cloud. It includes everything you need to run Postgres in a production-reliable, scalable, observable environment.
This section shows you how to:
- [Create and connect to a Tiger Cloud service][services-create]: choose the capabilities that match your business and engineering needs on Tiger Data's cloud-based Postgres platform.
- [Try the main features in Tiger Data products][test-drive]: rapidly implement the features in Tiger Cloud that enable you to ingest and query data faster while keeping the costs low.
- [Start coding with Tiger Data][start-coding]: quickly integrate Tiger Cloud and TimescaleDB into your apps using your favorite programming language.
- [Run queries from Tiger Cloud Console][run-queries-from-console]: securely interact with your data in the Tiger Cloud Console UI.
What next? [Try the key features offered by Tiger Data][try-timescale-features], see the [tutorials][tutorials], interact with the data in your Tiger Cloud service using [your favorite programming language][connect-with-code], integrate your Tiger Cloud service with a range of [third-party tools][integrations], plain old [Use Tiger Data products][use-timescale], or dive into the [API reference][use-the-api].
===== PAGE: https://docs.tigerdata.com/ai/index/ =====
Migrate with timescaledb-backfill
URL: llms-txt#migrate-with-timescaledb-backfill
Contents:
- Limitations
- Installation
- How to use
- Usage examples
- Stop and resume
- Inspect tasks progress
Dual-write and backfill is a method to write from your application to two databases at once, and gives tooling and guidance to move your existing data from the one database to the other. It is specifically catered for, and relies on, your data being predominantly append-only time-series data. As such, it comes with some caveats and prerequisites which live migration does not (dual-write and backfill does not support executing UPDATE or DELETE statements on your data). Additionally, it requires you to make changes to the ingest pipeline of your application.
The timescaledb-backfill tool is a command-line utility designed to support migrations from Tiger Cloud services by copying historic data from one database to another ("backfilling"). timescaledb-backfill efficiently copies hypertable and continuous aggregates chunks directly, without the need for intermediate storage, or converting chunks from the columnstore to the rowstore. It operates transactionally, ensuring data integrity throughout the migration process. It is designed to be used in the [dual-write and backfill][dual-write-backfill] migration procedure.
- The tool only supports backfilling of hypertables. Schema migrations and non-hypertable migrations should be handled separately before using this tool.
- The tool is optimized for append-only workloads. Other scenarios may not be fully supported.
- To prevent continuous aggregates from refreshing with incomplete data, any refresh and retention policies targeting the tables that are going to be backfilled should be turned off.
The tool performs best when executed in an instance located close to the target database. The ideal scenario is an EC2 instance located in the same region as the Tiger Cloud service. Use a Linux-based distribution on x86_64.
With the instance that will run the timescaledb-backfill ready, log in and download the tool's binary:
The timescaledb-backfill tool offers four main commands: stage, copy, verify and clean. The workflow involves creating tasks, copying chunks, verifying data integrity and cleaning up the administrative schema after the migration.
In the context of migrations, your existing production database is referred to as the SOURCE database, the Tiger Cloud service that you are migrating your data to is the TARGET.
- Stage Command: is used to create copy tasks for hypertable chunks based on the specified completion point (
--until). If a starting point (--from) is not specified, data will be copied from the beginning of time up to the completion point (--until). An optional filter (--filter) can be used to refine the hypertables and continuous aggregates targeted for staging.
The tables to be included in the stage can be controlled by providing filtering options:
--filter: this option accepts a POSIX regular expression to match schema-qualified hypertable names or continuous aggregate view names. Only hypertables and/or continuous aggregates matching the filter are staged.
By default, the filter includes only the matching objects, and does not concern itself with dependencies between objects. Depending on what is intended, this could be problematic for continuous aggregates, as they form a dependency hierarchy. This behaviour can be modified through cascade options.
For example, assuming a hierarchy of continuous aggregates for hourly, daily, and weekly rollups of data in an underlying hypertable called raw_data (all in the public schema). This could look as follows:
If the filter --filter='^public\.raw_data$' is applied, then no data from the continuous aggregates is staged. If the filter --filter='^public\.daily_agg$' is applied, then only materialized data in the continuous aggregate daily_agg is staged.
--cascade-up: when activated, this option ensures that any continuous aggregates which depend on the filtered object are included in the staging process. It is called "cascade up" because it cascades up the hierarchy. Using the example from before, if the filter --filter='^public\.raw_data$' --cascade up is applied, the data in raw_data, hourly_agg, daily_agg, and monthly_agg is staged.
--cascade-down: when activated, this option ensures that any objects which the filtered object depends on are included in the staging process. It is called "cascade down" because it cascades down the hierarchy. Using the example from before, if the filter --filter='^public\.daily_agg$' --cascade-down is applied, the data in daily_agg, hourly_agg, and raw_data is staged.
The --cascade-up and --cascade-down options can be combined. Using the example from before, if the filter --filter='^public\.daily_agg$' --cascade-up --cascade-down is applied, data in all objects in the example scenario is staged.
- Copy Command: processes the tasks created during the staging phase and copies the corresponding hypertable chunks to the target Tiger Cloud service.
In addition to the --source and --target parameters, the copy command takes one optional parameter:
--parallelism specifies the number of COPY jobs which will be run in parallel, the default is 8. It should ideally be set to the number of cores that the source and target database have, and is the most important parameter in dictating both how much load the source database experiences, and how quickly data is transferred from the source to the target database.
- Verify Command: checks for discrepancies between the source and target chunks' data. It compares the results of the count for each chunk's table, as well as per-column count, max, min, and sum values (when applicable, depending on the column data type).
In addition to the --source and --target parameters, the verify command takes one optional parameter:
--parallelism specifies the number of verification jobs which will be run in parallel, the default is 8. It should ideally be set to the number of cores that the source and target database have, and is the most important parameter in dictating both how much load the source and target databases experience during verification, and how long it takes for verification to complete.
- Refresh Continuous Aggregates Command: refreshes the continuous aggregates of the target system. It covers the period from the last refresh in the target to the last refresh in the source, solving the problem of continuous aggregates being outdated beyond the coverage of the refresh policies.
To refresh the continuous aggregates, the command executes the following SQL statement for all the matched continuous aggregates:
The continuous aggregates to be refreshed can be controlled by providing filtering options:
--filter: this option accepts a POSIX regular expression to match schema-qualified hypertable continuous aggregate view names.
By default, the filter includes only the matching objects, and does not concern itself with dependencies between objects. Depending on what is intended, this could be problematic as continuous aggregates form a dependency hierarchy. This behaviour can be modified through cascade options.
For example, assuming a hierarchy of continuous aggregates for hourly, daily, and weekly rollups of data in an underlying hypertable called raw_data (all in the public schema). This could look as follows:
If the filter --filter='^public\.daily_agg$' is applied, only materialized data in the continuous aggregate daily_agg will be updated. However, this approach can lead to potential issues. For example, if hourly_agg is not up to date, then daily_agg won't be either, as it requires the missing data from hourly_agg. Additionally, it's important to remember to refresh monthly_agg at some point to ensure its data remains current. In both cases, relying solely on refresh policies may result in data gaps if the policy doesn't cover the entire required period.
--cascade-up: when activated, this option ensures that any continuous aggregates which depend on the filtered object are refreshed. It is called "cascade up" because it cascades up the hierarchy. Using the example from before, if the filter --filter='^public\.daily_agg$' --cascade up is applied, the hourly_agg, daily_agg, and monthly_agg will be refreshed.
--cascade-down: when activated, this option ensures that any continuous aggregates which the filtered object depends on are refreshed. It is called "cascade down" because it cascades down the hierarchy. Using the example from before, if the filter --filter='^public\.daily_agg$' --cascade-down is applied, the data in daily_agg and hourly_agg will be refreshed.
The --cascade-up and --cascade-down options can be combined. Using the example from before, if the filter --filter='^public\.daily_agg$' --cascade-up --cascade-down is applied, then all the continuous aggregates will be refreshed.
Clean Command: removes the administrative schema (
__backfill) that was used to store the tasks once the migration is completed successfully.Backfilling with a filter and until date:
Running multiple stages with different filters and until dates:
Backfilling a specific period of time with from and until:
Refreshing a continuous aggregates hierarchy
The copy command can be safely stopped by sending an interrupt signal (SIGINT) to the process. This can be achieved by using the Ctrl-C keyboard shortcut from the terminal where the tool is currently running.
When the tool receives the first signal, it interprets it as a request for a graceful shutdown. It then notifies the copy workers that they should exit once they finish copying the chunk they are currently processing. Depending on the chunk size, this could take many minutes to complete.
When a second signal is received, it forces the tool to shut down immediately, interrupting all ongoing work. Due to the tool's usage of transactions, there is no risk of data inconsistency when using forced shutdown.
While a graceful shutdown waits for in-progress chunks to finish copying, a force shutdown rolls back the in-progress copy transactions. Any data copied into those chunks is lost, but the database is left in a transactional consistent state, and the backfill process can be safely resumed.
Inspect tasks progress
Each hypertable chunk that's going to be backfilled has a corresponding task stored in the target's database __backfill.task table. You can use this information to inspect the backfill's progress:
===== PAGE: https://docs.tigerdata.com/use-timescale/query-data/about-query-data/ =====
Examples:
Example 1 (sh):
wget https://assets.timescale.com/releases/timescaledb-backfill-x86_64-linux.tar.gz
tar xf timescaledb-backfill-x86_64-linux.tar.gz
sudo mv timescaledb-backfill /usr/local/bin/
Example 2 (sh):
timescaledb-backfill stage --source source --target target --until '2016-01-02T00:00:00'Example 3 (unknown):
raw_data -> hourly_agg -> daily_agg -> monthly_aggExample 4 (sh):
timescaledb-backfill stage --source source --target target \
    --until '2016-01-02T00:00:00' \
    --filter '^public\.daily_agg$' \
    --cascade-up \
    --cascade-down
Integrate Amazon CloudWatch with Tiger Cloud
URL: llms-txt#integrate-amazon-cloudwatch-with-tiger-cloud
Contents:
- Prerequisites
- Create a data exporter
- Attach a data exporter to a Tiger Cloud service
- Monitor Tiger Cloud service metrics
- Edit a data exporter
- Delete a data exporter
- Reference
[Amazon CloudWatch][cloudwatch] is a monitoring and observability service designed to help collect, analyze, and act on data from applications, infrastructure, and services running in AWS and on-premises environments.
You can export telemetry data from your Tiger Cloud services with the time-series and analytics capability enabled to CloudWatch. The available metrics include CPU usage, RAM usage, and storage. This integration is available for [Scale and Enterprise][pricing-plan-features] pricing tiers.
This pages explains how to export telemetry data from your Tiger Cloud service into CloudWatch by creating a Tiger Cloud data exporter, then attaching it to the service.
To follow the steps on this page:
- Create a target [Tiger Cloud service][create-service] with the Real-time analytics capability.
You need your [connection details][connection-info].
- Sign up for [Amazon CloudWatch][cloudwatch-signup].
Create a data exporter
A Tiger Cloud data exporter sends telemetry data from a Tiger Cloud service to a third-party monitoring tool. You create an exporter on the [project level][projects], in the same AWS region as your service:
- In Tiger Cloud Console, open [Exporters][console-integrations]
- Click
New exporter - Select the data type and specify
AWS CloudWatchfor provider
- Provide your AWS CloudWatch configuration
- The AWS region must be the same for your Tiger Cloud exporter and AWS CloudWatch Log group.
- The exporter name appears in Tiger Cloud Console, best practice is to make this name easily understandable.
- For CloudWatch credentials, either use an [existing CloudWatch Log group][console-cloudwatch-configuration] or [create a new one][console-cloudwatch-create-group]. If you're uncertain, use the default values. For more information, see [Working with log groups and log streams][cloudwatch-log-naming].
- Choose the authentication method to use for the exporter
In AWS, navigate to [IAM > Identity providers][create-an-iam-id-provider], then click
Add provider.Update the new identity provider with your details:
Set Provider URL to the [region where you are creating your exporter][reference].
Click
Add provider.In AWS, navigate to [IAM > Roles][add-id-provider-as-wi-role], then click
Create role.Add your identity provider as a Web identity role and click
Next.
- Set the following permission and trust policies:
- Role with a Trust Policy:
When you use CloudWatch credentials, you link an Identity and Access Management (IAM) user with access to CloudWatch only with your Tiger Cloud service:
- Retrieve the user information from [IAM > Users in AWS console][list-iam-users].
If you do not have an AWS user with access restricted to CloudWatch only, [create one][create-an-iam-user]. For more information, see [Creating IAM users (console)][aws-access-keys].
- Enter the credentials for the AWS IAM user.
AWS keys give access to your AWS services. To keep your AWS account secure, restrict users to the minimum required permissions. Always store your keys in a safe location. To avoid this issue, use the IAM role authentication method.
- Select the AWS Region your CloudWatch services run in, then click
Create exporter.
Attach a data exporter to a Tiger Cloud service
To send telemetry data to an external monitoring tool, you attach a data exporter to your Tiger Cloud service. You can attach only one exporter to a service.
To attach an exporter:
- In [Tiger Cloud Console][console-services], choose the service
- Click
Operations>Exporters - Select the exporter, then click
Attach exporter - If you are attaching a first
Logsdata type exporter, restart the service
Monitor Tiger Cloud service metrics
You can now monitor your service metrics. Use the following metrics to check the service is running correctly:
timescale.cloud.system.cpu.usage.millicorestimescale.cloud.system.cpu.total.millicorestimescale.cloud.system.memory.usage.bytestimescale.cloud.system.memory.total.bytestimescale.cloud.system.disk.usage.bytestimescale.cloud.system.disk.total.bytes
Additionally, use the following tags to filter your results.
| Tag | Example variable | Description |
|---|---|---|
host | us-east-1.timescale.cloud | |
project-id | ||
service-id | ||
region | us-east-1 | AWS region |
role | replica or primary | For service with replicas |
node-id | For multi-node services |
Edit a data exporter
To update a data exporter:
- In Tiger Cloud Console, open [Exporters][console-integrations]
- Next to the exporter you want to edit, click the menu >
Edit - Edit the exporter fields and save your changes
You cannot change fields such as the provider or the AWS region.
Delete a data exporter
To remove a data exporter that you no longer need:
Disconnect the data exporter from your Tiger Cloud services
In [Tiger Cloud Console][console-services], choose the service.
- Click
Operations>Exporters. - Click the trash can icon.
- Repeat for every service attached to the exporter you want to remove.
- Click
The data exporter is now unattached from all services. However, it still exists in your project.
Delete the exporter on the project level
In Tiger Cloud Console, open [Exporters][console-integrations]
- Next to the exporter you want to edit, click menu >
Delete - Confirm that you want to delete the data exporter.
- Next to the exporter you want to edit, click menu >
When you create the IAM OIDC provider, the URL must match the region you create the exporter in. It must be one of the following:
| Region | Zone | Location | URL |
|---|---|---|---|
ap-southeast-1 | Asia Pacific | Singapore | irsa-oidc-discovery-prod-ap-southeast-1.s3.ap-southeast-1.amazonaws.com |
ap-southeast-2 | Asia Pacific | Sydney | irsa-oidc-discovery-prod-ap-southeast-2.s3.ap-southeast-2.amazonaws.com |
ap-northeast-1 | Asia Pacific | Tokyo | irsa-oidc-discovery-prod-ap-northeast-1.s3.ap-northeast-1.amazonaws.com |
ca-central-1 | Canada | Central | irsa-oidc-discovery-prod-ca-central-1.s3.ca-central-1.amazonaws.com |
eu-central-1 | Europe | Frankfurt | irsa-oidc-discovery-prod-eu-central-1.s3.eu-central-1.amazonaws.com |
eu-west-1 | Europe | Ireland | irsa-oidc-discovery-prod-eu-west-1.s3.eu-west-1.amazonaws.com |
eu-west-2 | Europe | London | irsa-oidc-discovery-prod-eu-west-2.s3.eu-west-2.amazonaws.com |
sa-east-1 | South America | São Paulo | irsa-oidc-discovery-prod-sa-east-1.s3.sa-east-1.amazonaws.com |
us-east-1 | United States | North Virginia | irsa-oidc-discovery-prod.s3.us-east-1.amazonaws.com |
us-east-2 | United States | Ohio | irsa-oidc-discovery-prod-us-east-2.s3.us-east-2.amazonaws.com |
us-west-2 | United States | Oregon | irsa-oidc-discovery-prod-us-west-2.s3.us-west-2.amazonaws.com |
===== PAGE: https://docs.tigerdata.com/integrations/pgadmin/ =====
Examples:
Example 1 (json):
{
           "Version": "2012-10-17",
           "Statement": [
              {
                  "Effect": "Allow",
                  "Action": [
                      "logs:PutLogEvents",
                      "logs:CreateLogGroup",
                      "logs:CreateLogStream",
                      "logs:DescribeLogStreams",
                      "logs:DescribeLogGroups",
                      "logs:PutRetentionPolicy",
                      "xray:PutTraceSegments",
                      "xray:PutTelemetryRecords",
                      "xray:GetSamplingRules",
                      "xray:GetSamplingTargets",
                      "xray:GetSamplingStatisticSummaries",
                      "ssm:GetParameters"
                  ],
                  "Resource": "*"
              }
          ]
         }
Example 2 (json):
{
           "Version": "2012-10-17",
           "Statement": [
               {
                   "Effect": "Allow",
                   "Principal": {
                       "Federated": "arn:aws:iam::12345678910:oidc-provider/irsa-oidc-discovery-prod.s3.us-east-1.amazonaws.com"
                   },
                   "Action": "sts:AssumeRoleWithWebIdentity",
                   "Condition": {
                       "StringEquals": {
                           "irsa-oidc-discovery-prod.s3.us-east-1.amazonaws.com:aud": "sts.amazonaws.com"
                       }
                   }
               },
               {
                   "Sid": "Statement1",
                   "Effect": "Allow",
                   "Principal": {
                       "AWS": "arn:aws:iam::12345678910:role/my-exporter-role"
                   },
                   "Action": "sts:AssumeRole"
               }
           ]
         }
Multi-node
URL: llms-txt#multi-node
Contents:
- Set up multi-node
- Setting up multi-node
- Attach a data exporter to a Tiger Cloud service
- Monitor Tiger Cloud service metrics
- Edit a data exporter
- Delete a data exporter
- Reference
- Set your connection strings
- Align the extensions on the source and target
- Tune your source database
If you have a larger workload, you might need more than one Timescale instance. Multi-node can give you faster data ingest, and more responsive and efficient queries for many large workloads.
This section shows you how to use multi-node on Timescale. You can also set up multi-node on [self-hosted TimescaleDB][multinode-timescaledb].
Early access: TimescaleDB v2.18.0
In some cases, your processing speeds could be slower in a multi-node cluster, because distributed hypertables need to push operations down to the various data nodes. It is important that you understand multi-node architecture before you begin, and plan your database according to your specific environment.
To create a multi-node cluster, you need an access node that stores metadata for the distributed hypertable and performs query planning across the cluster, and any number of data nodes that store subsets of the distributed hypertable dataset and run queries locally.
Setting up multi-node
- [Log in to your Tiger Cloud account][cloud-login] and click
Create Service. - Click
Advanced configuration. - Under
Choose your architecture, clickMulti-node. - The customer support team contacts you. When your request is approved, return to the screen for creating a multi-node service.
- Choose your preferred region, or accept the default region of
us-east-1. - Accept the default for the data nodes, or click
Editto choose the number of data nodes, and their compute and disk size. - Accept the default for the access node, or click
Editto choose the compute and disk size. - Click
Create service. Take a note of the service information, you need these details to connect to your multi-node cluster. The service takes a few minutes to start up. - When the service is ready, you can see the service in the Service Overview page. Click on the name of your new multi-node service to see more information, and to make changes.
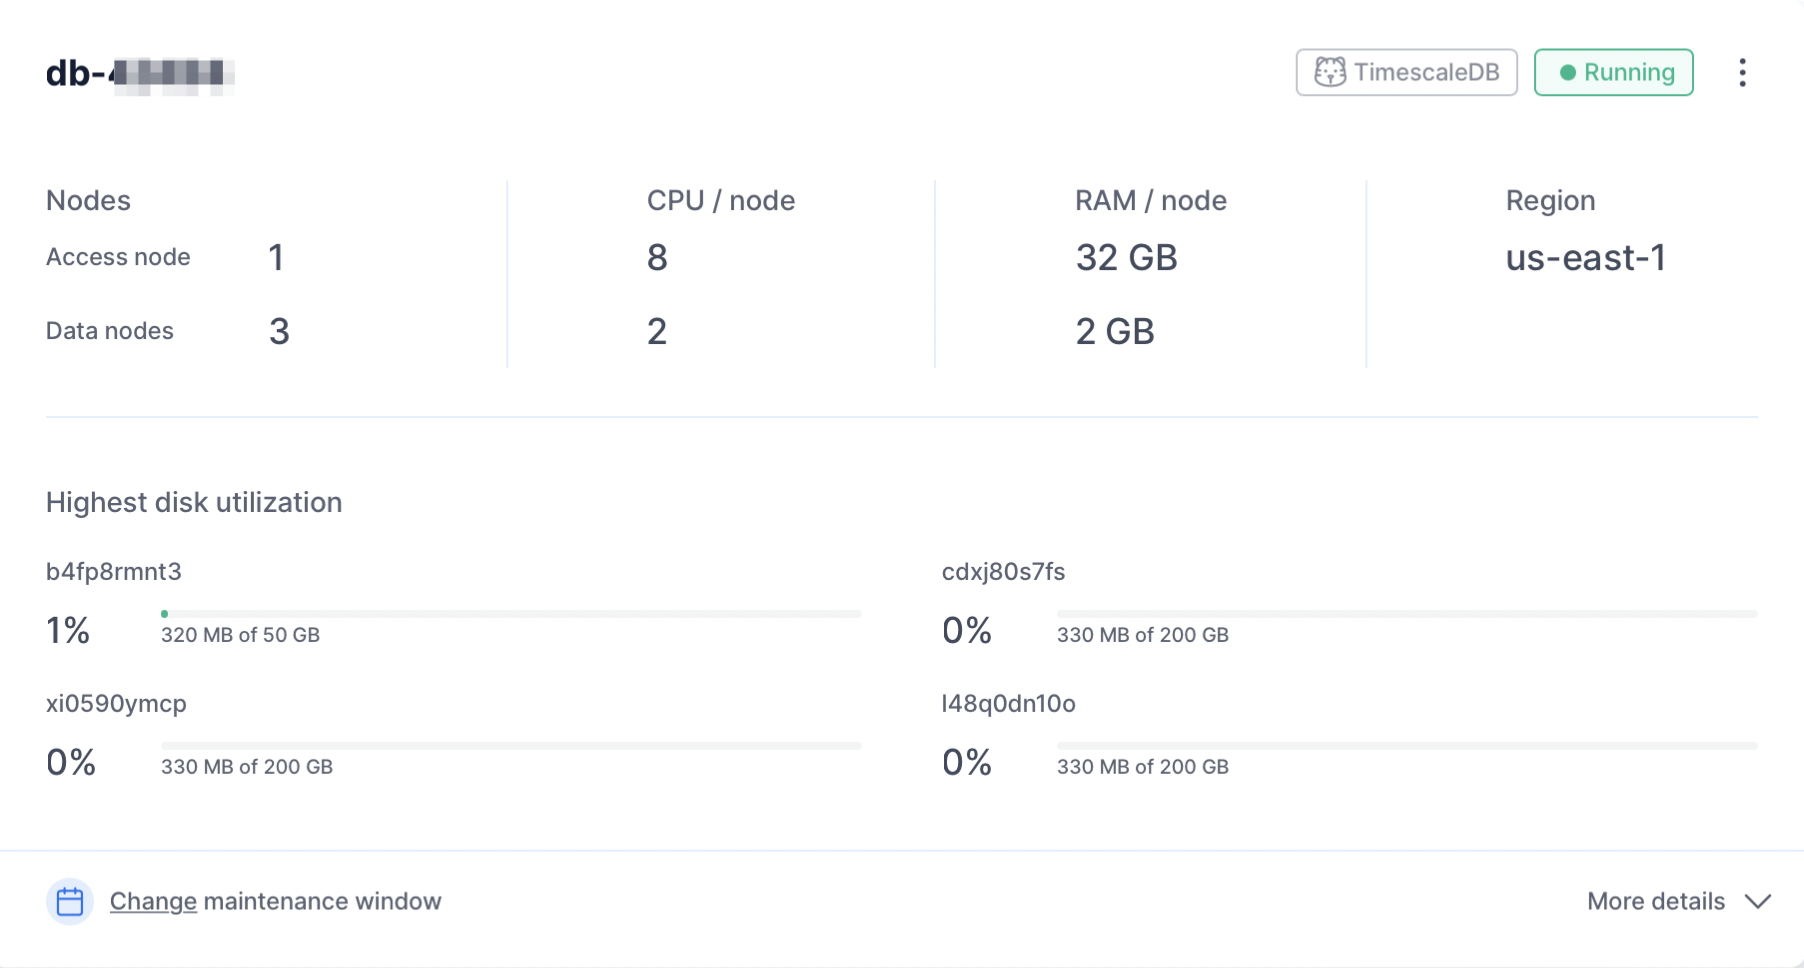
===== PAGE: https://docs.tigerdata.com/_partials/_migrate_live_migration_rds_roles/ =====
AWS RDS does not permit dumping of roles with passwords, which is why the above command is executed with the --no-role-passwords. However, when the migration of roles to your Tiger Cloud service is complete, you need to manually assign passwords to the necessary roles using the following command:ALTER ROLE name WITH PASSWORD 'password';
Tiger Cloud services do not support roles with superuser access. If your SQL dump includes roles that have such permissions, you'll need to modify the file to be compliant with the security model.
You can use the following sed command to remove unsupported statements and permissions from your roles.sql file:
This command works only with the GNU implementation of sed (sometimes referred to as gsed). For the BSD implementation (the default on macOS), you need to add an extra argument to change the -i flag to -i ''.
To check the sed version, you can use the command sed --version. While the GNU version explicitly identifies itself as GNU, the BSD version of sed generally doesn't provide a straightforward --version flag and simply outputs an "illegal option" error.
A brief explanation of this script is:
CREATE ROLE "postgres"; andALTER ROLE "postgres": These statements are removed because they require superuser access, which is not supported by Timescale.(NO)SUPERUSER|(NO)REPLICATION|(NO)BYPASSRLS: These are permissions that require superuser access.CREATE ROLE "rds,ALTER ROLE “rds,TO "rds,GRANT "rds: Any creation or alteration of rds prefixed roles are removed because of their lack of any use in a Tiger Cloud service. Similarly, any grants to or from "rds" prefixed roles are ignored as well.GRANTED BY role_specification: The GRANTED BY clause can also have permissions that require superuser access and should therefore be removed. Note: Per the TimescaleDB documentation, the GRANTOR in the GRANTED BY clause must be the current user, and this clause mainly serves the purpose of SQL compatibility. Therefore, it's safe to remove it.
===== PAGE: https://docs.tigerdata.com/_partials/_migrate_set_up_align_db_extensions_timescaledb/ =====
Ensure that the source and target databases are running the same version of TimescaleDB.
Check the version of TimescaleDB running on your Tiger Cloud service:
Update the TimescaleDB extension in your source database to match the target service:
If the TimescaleDB extension is the same version on the source database and target service, you do not need to do this.
For more information and guidance, see Upgrade TimescaleDB.
Ensure that the Tiger Cloud service is running the Postgres extensions used in your source database.
Check the extensions on the source database:
- For each extension, enable it on your target Tiger Cloud service:
===== PAGE: https://docs.tigerdata.com/_partials/_beta/ =====
This feature is in beta. Beta features are experimental, and should not be used on production systems. If you have feedback, reach out to your customer success manager, or contact us.
===== PAGE: https://docs.tigerdata.com/_partials/_manage-a-data-exporter/ =====
Attach a data exporter to a Tiger Cloud service
To send telemetry data to an external monitoring tool, you attach a data exporter to your Tiger Cloud service. You can attach only one exporter to a service.
To attach an exporter:
- In [Tiger Cloud Console][console-services], choose the service
- Click
Operations>Exporters - Select the exporter, then click
Attach exporter - If you are attaching a first
Logsdata type exporter, restart the service
Monitor Tiger Cloud service metrics
You can now monitor your service metrics. Use the following metrics to check the service is running correctly:
timescale.cloud.system.cpu.usage.millicorestimescale.cloud.system.cpu.total.millicorestimescale.cloud.system.memory.usage.bytestimescale.cloud.system.memory.total.bytestimescale.cloud.system.disk.usage.bytestimescale.cloud.system.disk.total.bytes
Additionally, use the following tags to filter your results.
| Tag | Example variable | Description |
|---|---|---|
host | us-east-1.timescale.cloud | |
project-id | ||
service-id | ||
region | us-east-1 | AWS region |
role | replica or primary | For service with replicas |
node-id | For multi-node services |
Edit a data exporter
To update a data exporter:
- In Tiger Cloud Console, open [Exporters][console-integrations]
- Next to the exporter you want to edit, click the menu >
Edit - Edit the exporter fields and save your changes
You cannot change fields such as the provider or the AWS region.
Delete a data exporter
To remove a data exporter that you no longer need:
Disconnect the data exporter from your Tiger Cloud services
In [Tiger Cloud Console][console-services], choose the service.
- Click
Operations>Exporters. - Click the trash can icon.
- Repeat for every service attached to the exporter you want to remove.
- Click
The data exporter is now unattached from all services. However, it still exists in your project.
Delete the exporter on the project level
In Tiger Cloud Console, open [Exporters][console-integrations]
- Next to the exporter you want to edit, click menu >
Delete - Confirm that you want to delete the data exporter.
- Next to the exporter you want to edit, click menu >
When you create the IAM OIDC provider, the URL must match the region you create the exporter in. It must be one of the following:
| Region | Zone | Location | URL |
|---|---|---|---|
ap-southeast-1 | Asia Pacific | Singapore | irsa-oidc-discovery-prod-ap-southeast-1.s3.ap-southeast-1.amazonaws.com |
ap-southeast-2 | Asia Pacific | Sydney | irsa-oidc-discovery-prod-ap-southeast-2.s3.ap-southeast-2.amazonaws.com |
ap-northeast-1 | Asia Pacific | Tokyo | irsa-oidc-discovery-prod-ap-northeast-1.s3.ap-northeast-1.amazonaws.com |
ca-central-1 | Canada | Central | irsa-oidc-discovery-prod-ca-central-1.s3.ca-central-1.amazonaws.com |
eu-central-1 | Europe | Frankfurt | irsa-oidc-discovery-prod-eu-central-1.s3.eu-central-1.amazonaws.com |
eu-west-1 | Europe | Ireland | irsa-oidc-discovery-prod-eu-west-1.s3.eu-west-1.amazonaws.com |
eu-west-2 | Europe | London | irsa-oidc-discovery-prod-eu-west-2.s3.eu-west-2.amazonaws.com |
sa-east-1 | South America | São Paulo | irsa-oidc-discovery-prod-sa-east-1.s3.sa-east-1.amazonaws.com |
us-east-1 | United States | North Virginia | irsa-oidc-discovery-prod.s3.us-east-1.amazonaws.com |
us-east-2 | United States | Ohio | irsa-oidc-discovery-prod-us-east-2.s3.us-east-2.amazonaws.com |
us-west-2 | United States | Oregon | irsa-oidc-discovery-prod-us-west-2.s3.us-west-2.amazonaws.com |
===== PAGE: https://docs.tigerdata.com/_partials/_early_access_2_18_0/ =====
Early access: TimescaleDB v2.18.0
===== PAGE: https://docs.tigerdata.com/_partials/_multi-node-deprecation/ =====
[Multi-node support is sunsetted][multi-node-deprecation].
TimescaleDB v2.13 is the last release that includes multi-node support for Postgres versions 13, 14, and 15.
===== PAGE: https://docs.tigerdata.com/_partials/_migrate_prerequisites/ =====
Best practice is to use an [Ubuntu EC2 instance][create-ec2-instance] hosted in the same region as your Tiger Cloud service to move data. That is, the machine you run the commands on to move your data from your source database to your target Tiger Cloud service.
Before you move your data:
- Create a target [Tiger Cloud service][created-a-database-service-in-timescale].
Each Tiger Cloud service has a single Postgres instance that supports the [most popular extensions][all-available-extensions]. Tiger Cloud services do not support tablespaces, and there is no superuser associated with a service. Best practice is to create a Tiger Cloud service with at least 8 CPUs for a smoother experience. A higher-spec instance can significantly reduce the overall migration window.
- To ensure that maintenance does not run while migration is in progress, best practice is to [adjust the maintenance window][adjust-maintenance-window].
===== PAGE: https://docs.tigerdata.com/_partials/_migrate_open_support_request/ =====
You can open a support request directly from [Tiger Cloud Console][support-link], or by email to support@tigerdata.com.
===== PAGE: https://docs.tigerdata.com/_partials/_install-self-hosted-debian-based-end/ =====
Update your local repository list
Install TimescaleDB
To install a specific TimescaleDB [release][releases-page], set the version. For example:
sudo apt-get install timescaledb-2-postgresql-14='2.6.0*' timescaledb-2-loader-postgresql-14='2.6.0*'
Older versions of TimescaleDB may not support all the OS versions listed on this page.
- Tune your Postgres instance for TimescaleDB
By default, this script is included with the timescaledb-tools package when you install TimescaleDB. Use the prompts to tune your development or production environment. For more information on manual configuration, see [Configuration][config]. If you have an issue, run sudo apt install timescaledb-tools.
Restart Postgres
Log in to Postgres as
postgres
You are in the psql shell.
- Set the password for
postgres
When you have set the password, type \q to exit psql.
===== PAGE: https://docs.tigerdata.com/_partials/_prereqs-cloud-and-self/ =====
To follow the procedure on this page you need to:
- Create a [target Tiger Cloud service][create-service].
This procedure also works for [self-hosted TimescaleDB][enable-timescaledb].
===== PAGE: https://docs.tigerdata.com/_partials/_migrate_live_setup_environment_awsrds/ =====
Set your connection strings
These variables hold the connection information for the source database and target Tiger Cloud service. In Terminal on your migration machine, set the following:
You find the connection information for your Tiger Cloud service in the configuration file you downloaded when you created the service.
Avoid using connection strings that route through connection poolers like PgBouncer or similar tools. This tool requires a direct connection to the database to function properly.
Align the extensions on the source and target
Ensure that the Tiger Cloud service is running the Postgres extensions used in your source database.
Check the extensions on the source database:
- For each extension, enable it on your target Tiger Cloud service:
Tune your source database
Updating parameters on a Postgres instance will cause an outage. Choose a time that will cause the least issues to tune this database.
Update the DB instance parameter group for your source database
In [https://console.aws.amazon.com/rds/home#databases:][databases], select the RDS instance to migrate.
Click
Configuration, scroll down and note theDB instance parameter group, then clickParameter groups
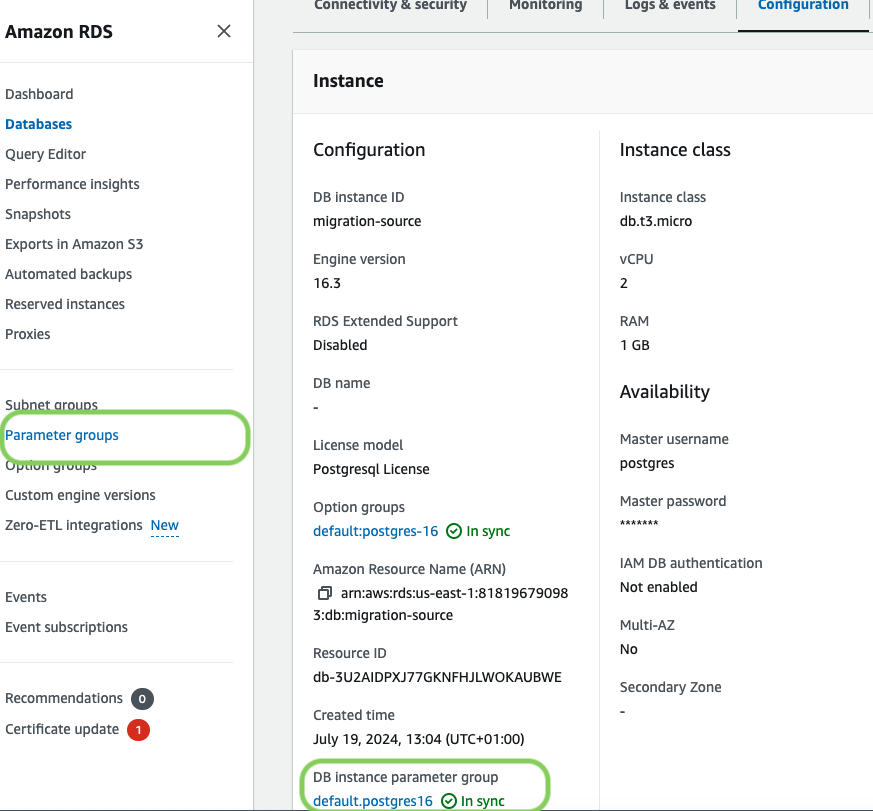
Click
Create parameter group, fill in the form with the following values, then clickCreate.- Parameter group name - whatever suits your fancy.
- Description - knock yourself out with this one.
- Engine type -
PostgreSQL - Parameter group family - the same as
DB instance parameter groupin yourConfiguration.
- In
Parameter groups, select the parameter group you created, then clickEdit. - Update the following parameters, then click
Save changes.rds.logical_replicationset to1: record the information needed for logical decoding.wal_sender_timeoutset to0: disable the timeout for the sender process.
In RDS, navigate back to your [databases][databases], select the RDS instance to migrate, and click
Modify.Scroll down to
Database options, select your new parameter group, and clickContinue.- Click
Apply immediatelyor choose a maintenance window, then clickModify DB instance.
- Click
Changing parameters will cause an outage. Wait for the database instance to reboot before continuing.
Verify that the settings are live in your database.
Enable replication
DELETEandUPDATEoperations
Replica identity assists data replication by identifying the rows being modified. Your options are that each table and hypertable in the source database should either have:
- A primary key: data replication defaults to the primary key of the table being replicated. Nothing to do.
- A viable unique index: each table has a unique, non-partial, non-deferrable index that includes only columns marked as
NOT NULL. If a UNIQUE index does not exist, create one to assist the migration. You can delete if after migration.
For each table, set REPLICA IDENTITY to the viable unique index:
- No primary key or viable unique index: use brute force.
For each table, set REPLICA IDENTITY to FULL:
For each UPDATE or DELETE statement, Postgres reads the whole table to find all matching rows. This results in significantly slower replication. If you are expecting a large number of UPDATE or DELETE operations on the table, best practice is to not use FULL.
===== PAGE: https://docs.tigerdata.com/_partials/_migrate_source_target_note/ =====
In the context of migrations, your existing production database is referred to as the SOURCE database, the Tiger Cloud service that you are migrating your data to is the TARGET.
===== PAGE: https://docs.tigerdata.com/_partials/_not-available-in-free-plan/ =====
This feature is not available under the Free pricing plan.
===== PAGE: https://docs.tigerdata.com/_partials/_migrate_live_migration_docker_subcommand/ =====
Next, download the live-migration docker image:
Live-migration contains 3 subcommands:
- Snapshot
- Clean
- Migrate
the snapshot subcommand creates a Postgres snapshot connection to the source database along with a replication slot. This is pre-requisite before running the migrate subcommand.
The migrate subcommand carries out the live-migration process by taking help of the snapshot and replication slot created by the snapshot subcommand.
The clean subcommand is designed to remove resources related to live migration. It should be run once the migration has successfully completed or, if you need to restart the migration process from the very start. You should not run clean if you want to resume the last interrupted live migration.
3.a Create a snapshot
Execute this command to establish a snapshot connection; do not interrupt the process. For convenience, consider using a terminal multiplexer such as tmux or screen, which enables the command to run in the background.
In addition to creating a snapshot, this process also validates prerequisites on the source and target to ensure the database instances are ready for replication.
For example, it checks if all tables on the source have either a PRIMARY KEY or REPLICA IDENTITY set. If not, it displays a warning message listing the tables without REPLICA IDENTITY and waits for user confirmation before proceeding with the snapshot creation.
3.b Perform live-migration
The migrate subcommand supports following flags
Next, we will start the migration process. Open a new terminal and initiate the live migration, and allow it to run uninterrupted.
If the migrate command stops for any reason during execution, you can resume the migration from where it left off by adding a --resume flag. This is only possible if the snapshot command is intact and if a volume mount, such as ~/live-migration, is utilized.
===== PAGE: https://docs.tigerdata.com/_partials/_migrate_live_migration_step2/ =====
For the sake of convenience, connection strings to the source and target databases are referred to as source and target throughout this guide.
This can be set in your shell, for example:
Do not use a Tiger Cloud connection pooler connection for live migration. There are a number of issues which can arise when using a connection pooler, and no advantage. Very small instances may not have enough connections configured by default, in which case you should modify the value of max_connections, in your instance, as shown on [Configure database parameters][configure-instance-parameters].
It's important to ensure that the old_snapshot_threshold value is set to the default value of -1 in your source database. This prevents Postgres from treating the data in a snapshot as outdated. If this value is set other than -1, it might affect the existing data migration step.
To check the current value of old_snapshot_threshold, run the command:
If the query returns something other than -1, you must change it.
If you have a superuser on a self-hosted database, run the following command:
Otherwise, if you are using a managed service, use your cloud provider's configuration mechanism to set old_snapshot_threshold to -1.
Next, you should set wal_level to logical so that the write-ahead log (WAL) records information that is needed for logical decoding.
To check the current value of wal_level, run the command:
If the query returns something other than logical, you must change it.
If you have a superuser on a self-hosted database, run the following command:
Otherwise, if you are using a managed service, use your cloud provider's configuration mechanism to set wal_level to logical.
Restart your database for the changes to take effect, and verify that the settings are reflected in your database.
===== PAGE: https://docs.tigerdata.com/_partials/_prometheus-integrate/ =====
[Prometheus][prometheus] is an open-source monitoring system with a dimensional data model, flexible query language, and a modern alerting approach.
This page shows you how to export your service telemetry to Prometheus:
- For Tiger Cloud, using a dedicated Prometheus exporter in Tiger Cloud Console.
- For self-hosted TimescaleDB, using [Postgres Exporter][postgresql-exporter].
To follow the steps on this page:
- [Download and run Prometheus][install-prometheus].
- For Tiger Cloud:
Create a target [Tiger Cloud service][create-service] with the time-series and analytics capability enabled.
- For self-hosted TimescaleDB:
- Create a target [self-hosted TimescaleDB][enable-timescaledb] instance. You need your [connection details][connection-info].
- [Install Postgres Exporter][install-exporter]. To reduce latency and potential data transfer costs, install Prometheus and Postgres Exporter on a machine in the same AWS region as your Tiger Cloud service.
Export Tiger Cloud service telemetry to Prometheus
To export your data, do the following:
To export metrics from a Tiger Cloud service, you create a dedicated Prometheus exporter in Tiger Cloud Console, attach it to your service, then configure Prometheus to scrape metrics using the exposed URL. The Prometheus exporter exposes the metrics related to the Tiger Cloud service like CPU, memory, and storage. To scrape other metrics, use Postgres Exporter as described for self-hosted TimescaleDB. The Prometheus exporter is available for [Scale and Enterprise][pricing-plan-features] pricing plans.
Create a Prometheus exporter
In [Tiger Cloud Console][open-console], click
Exporters>+ New exporter.Select
Metricsfor data type andPrometheusfor provider.
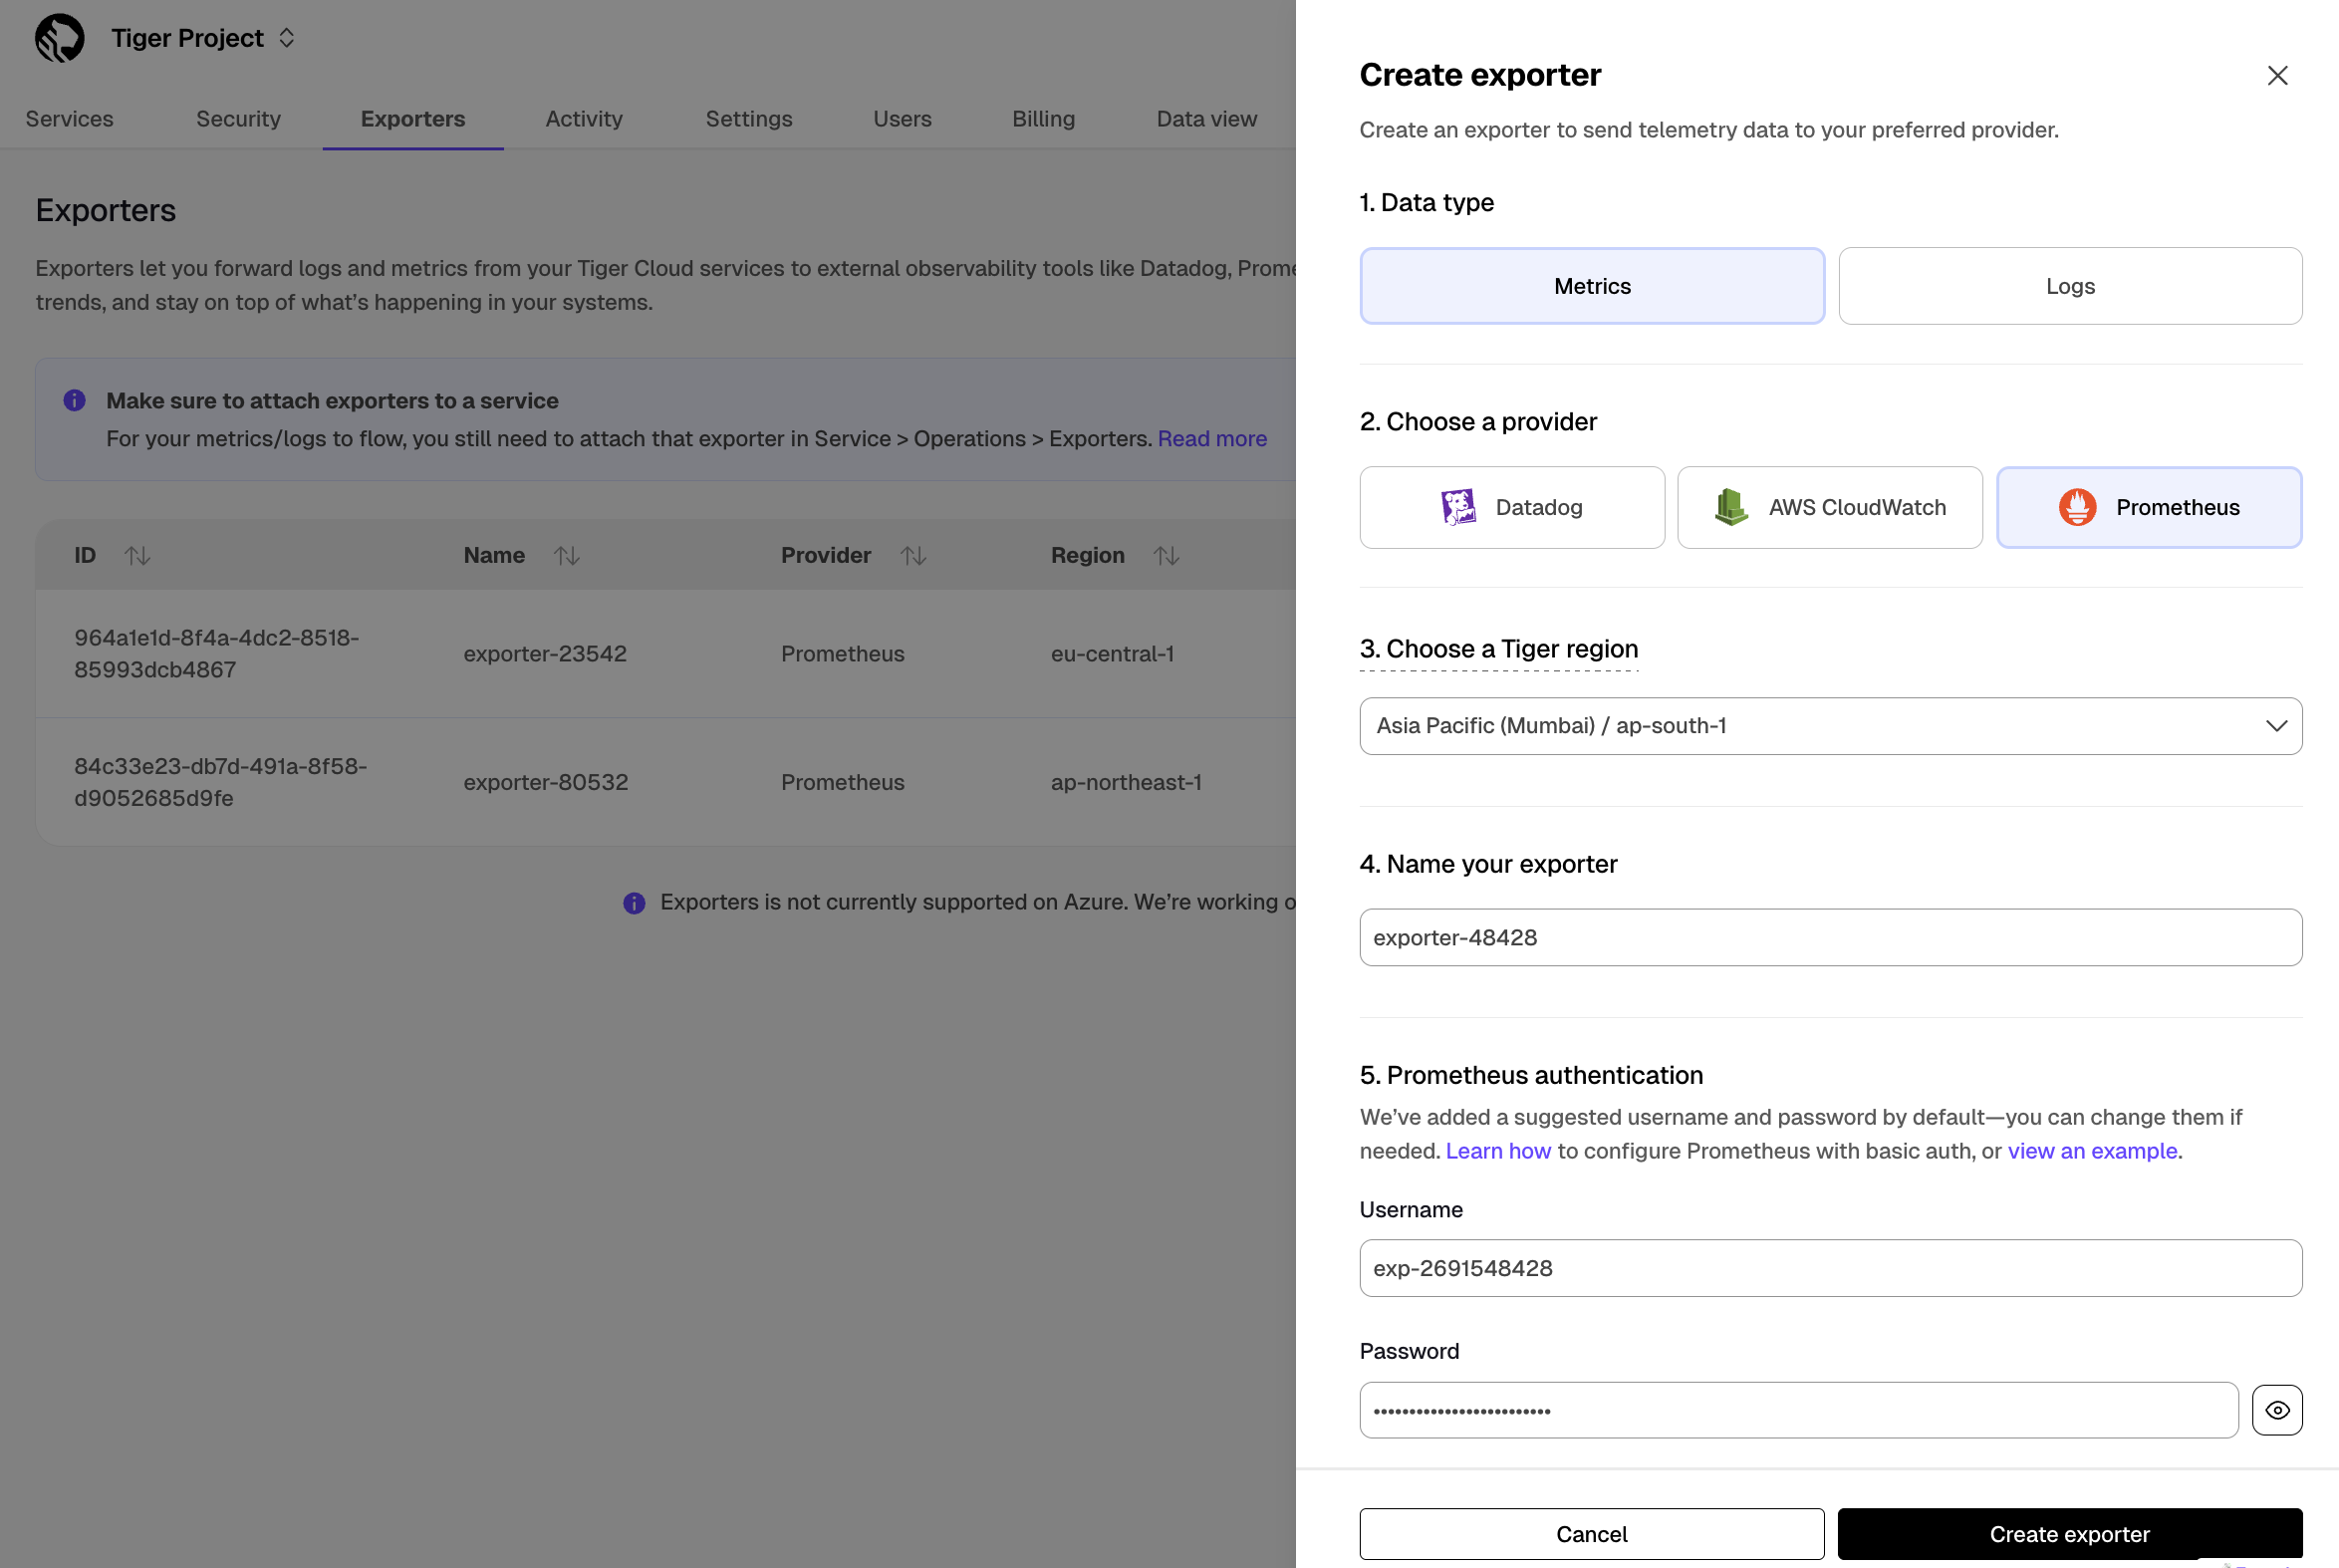
Choose the region for the exporter. Only services in the same project and region can be attached to this exporter.
Name your exporter.
Change the auto-generated Prometheus credentials, if needed. See [official documentation][prometheus-authentication] on basic authentication in Prometheus.
Attach the exporter to a service
Select a service, then click
Operations>Exporters.Select the exporter in the drop-down, then click
Attach exporter.
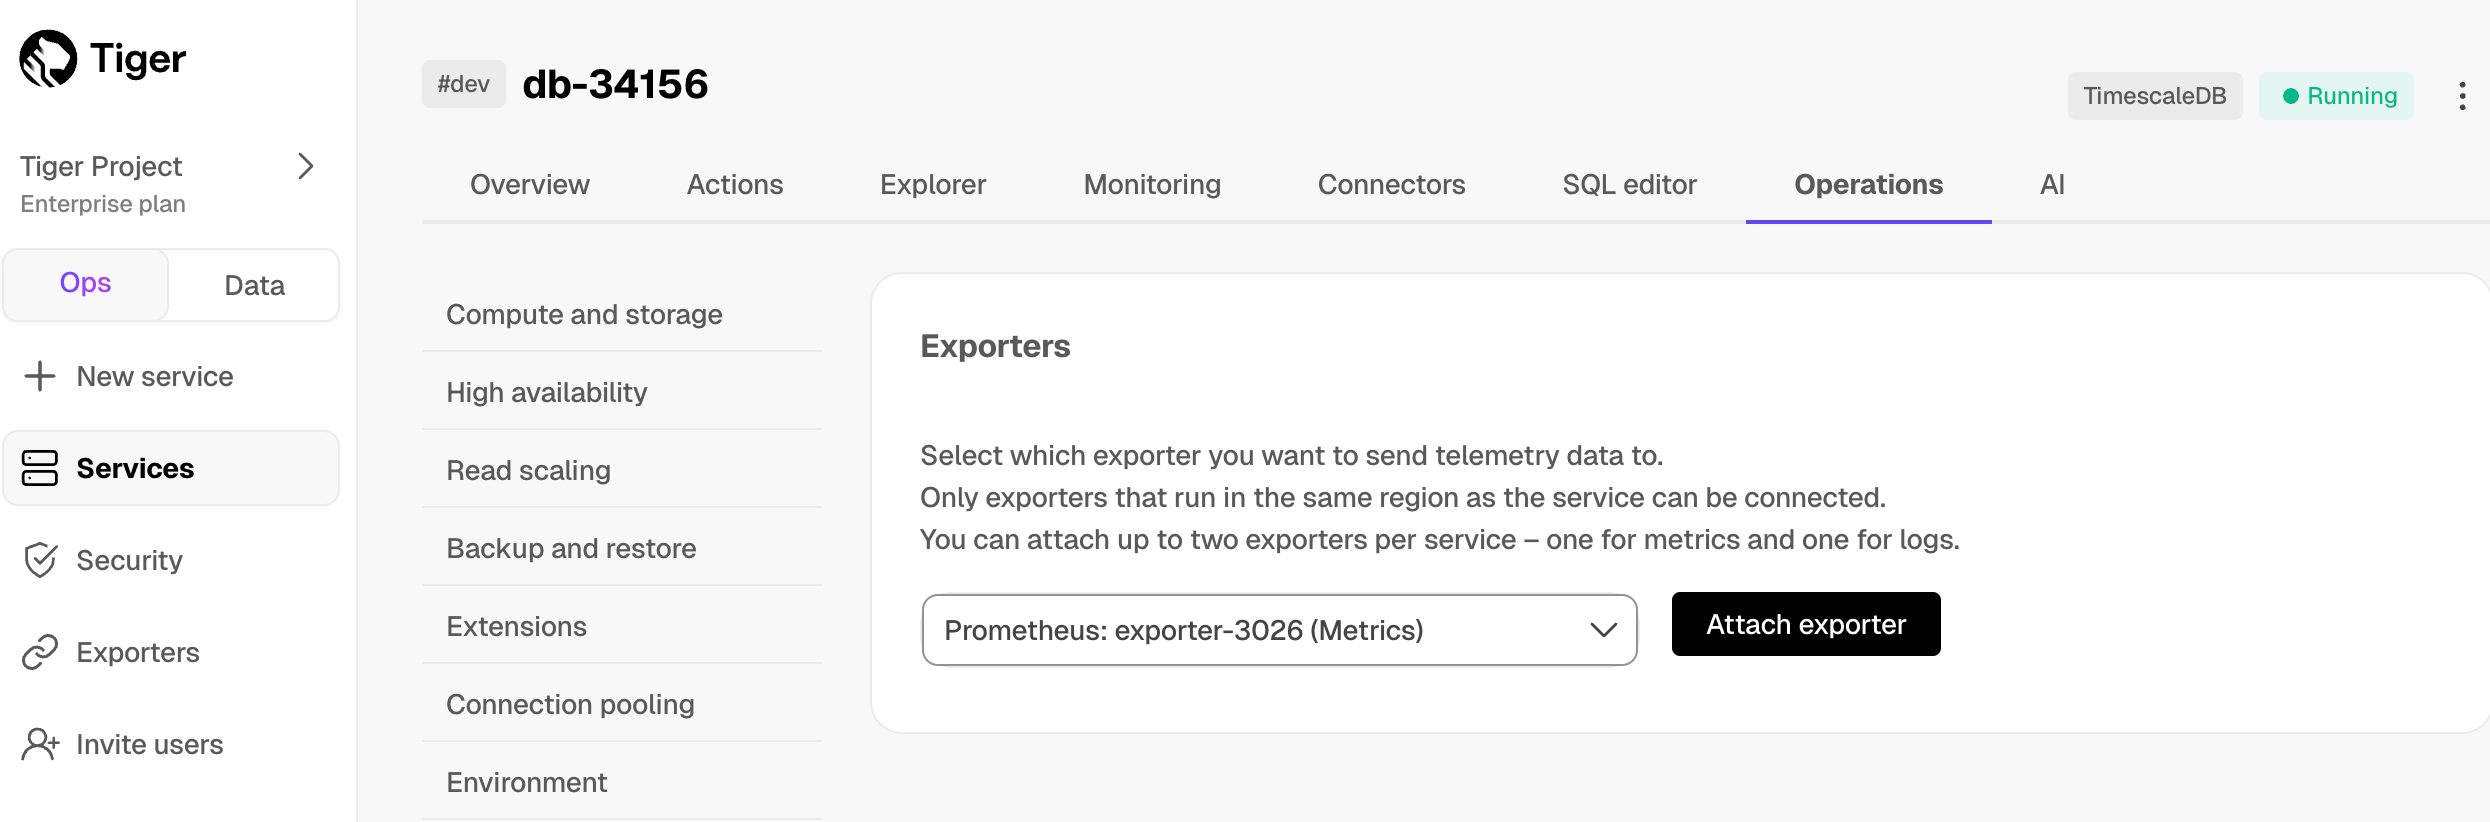
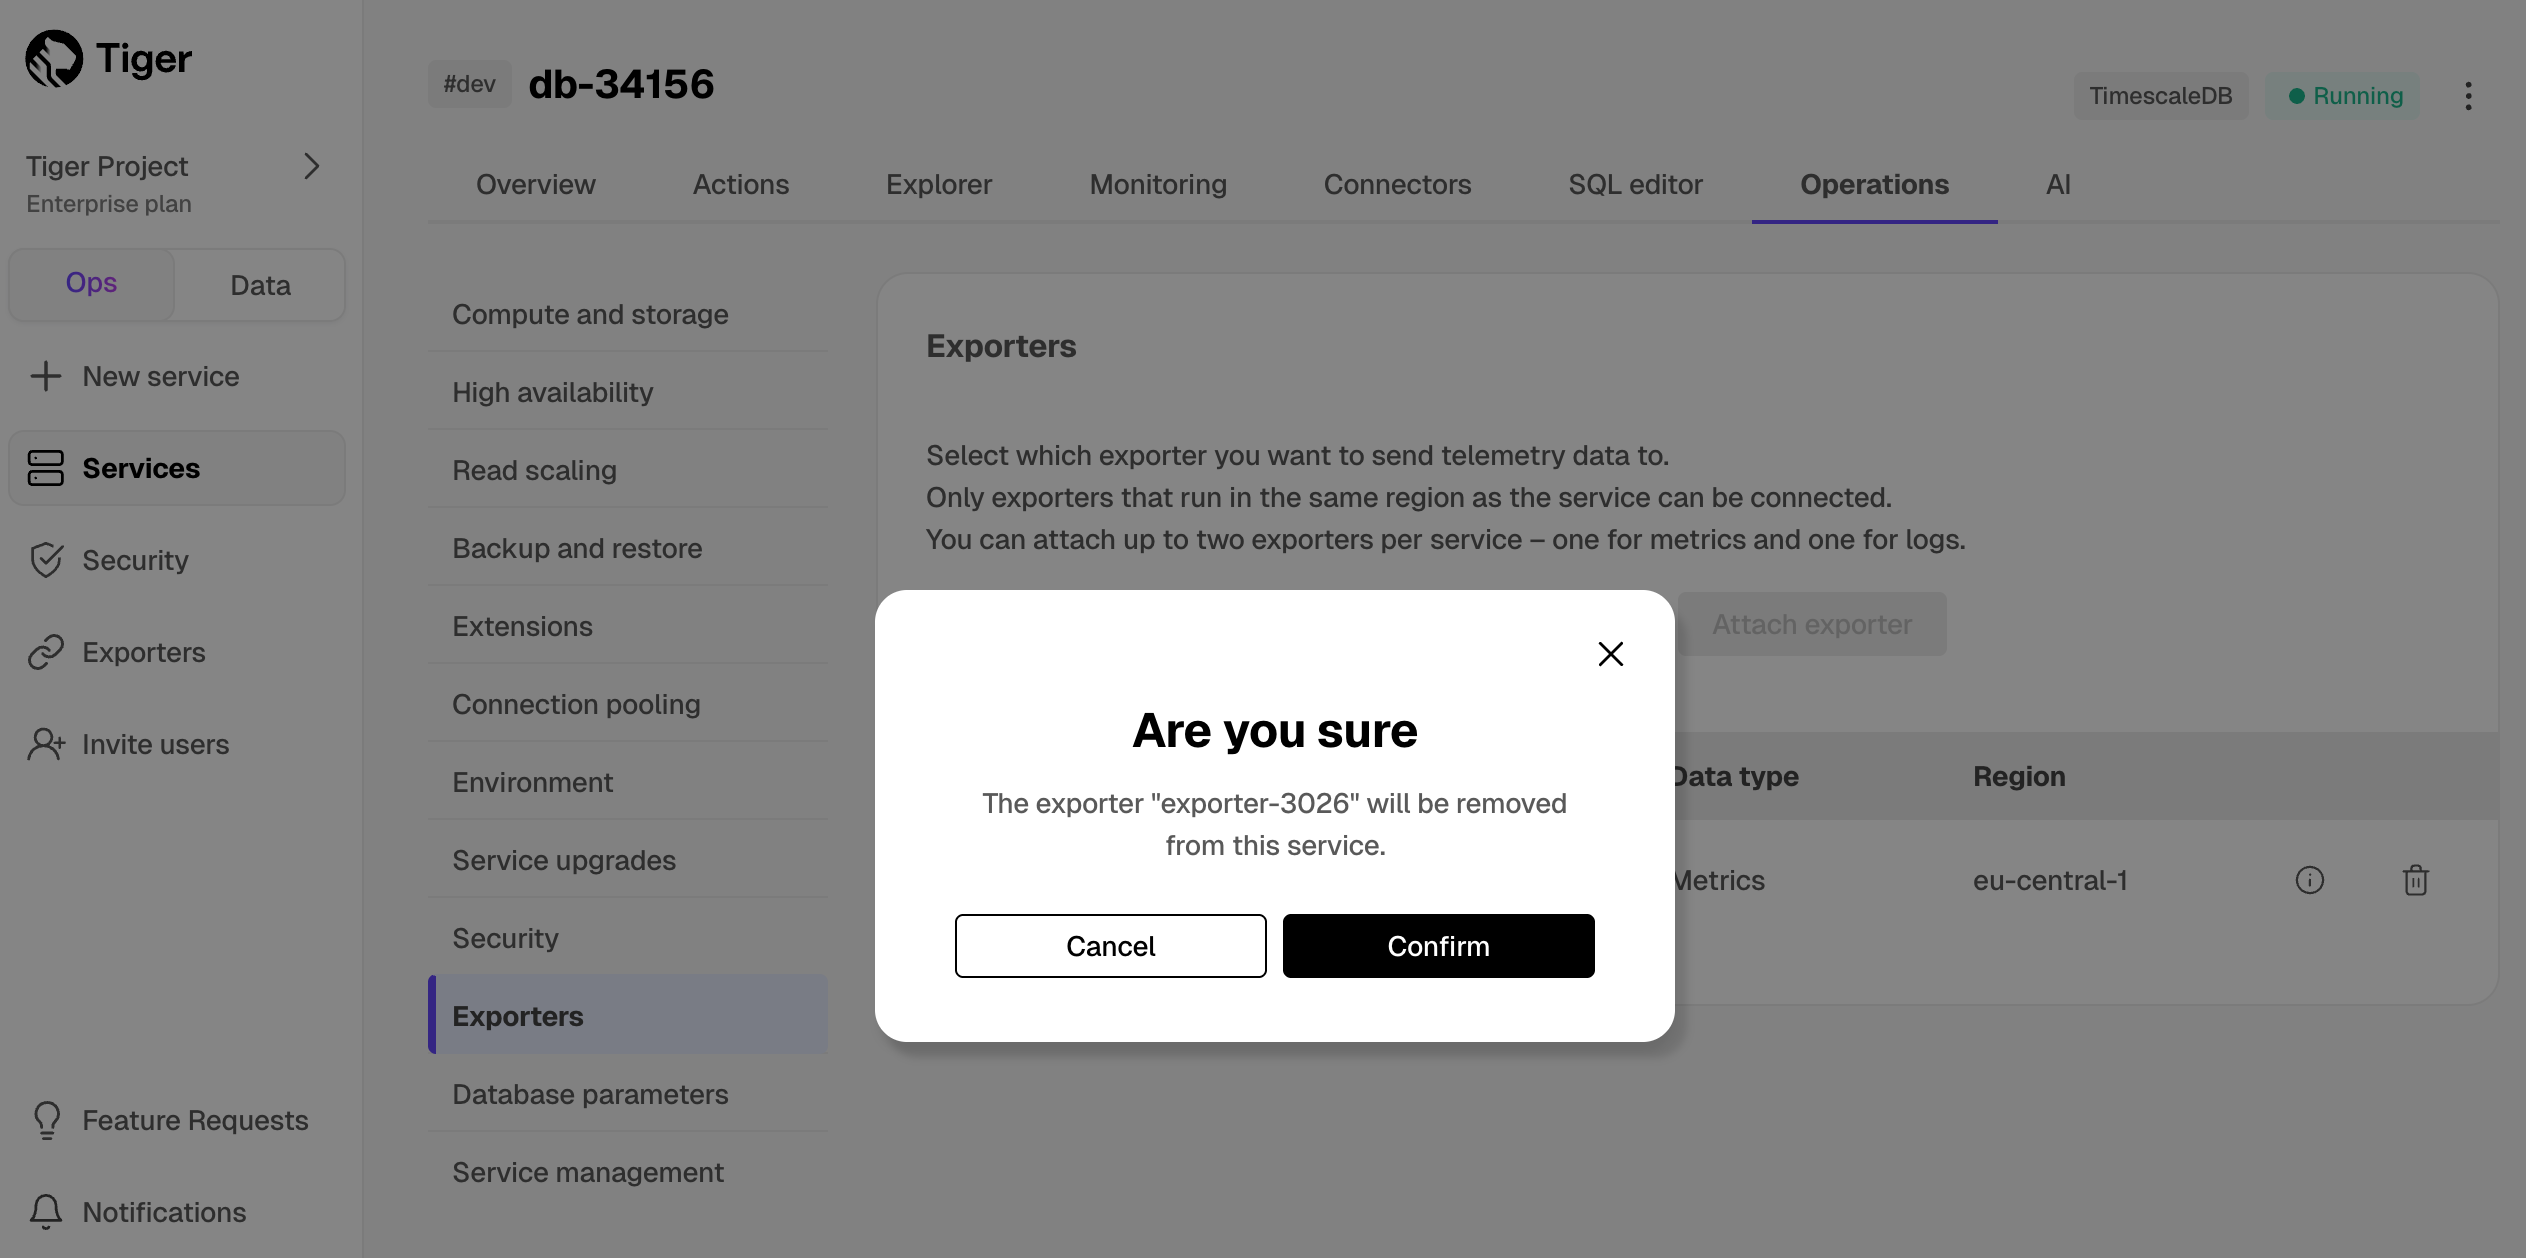
The exporter is now attached to your service. To unattach it, click the trash icon in the exporter list.
Configure the Prometheus scrape target
Select your service, then click
Operations>Exportersand click the information icon next to the exporter. You see the exporter details.
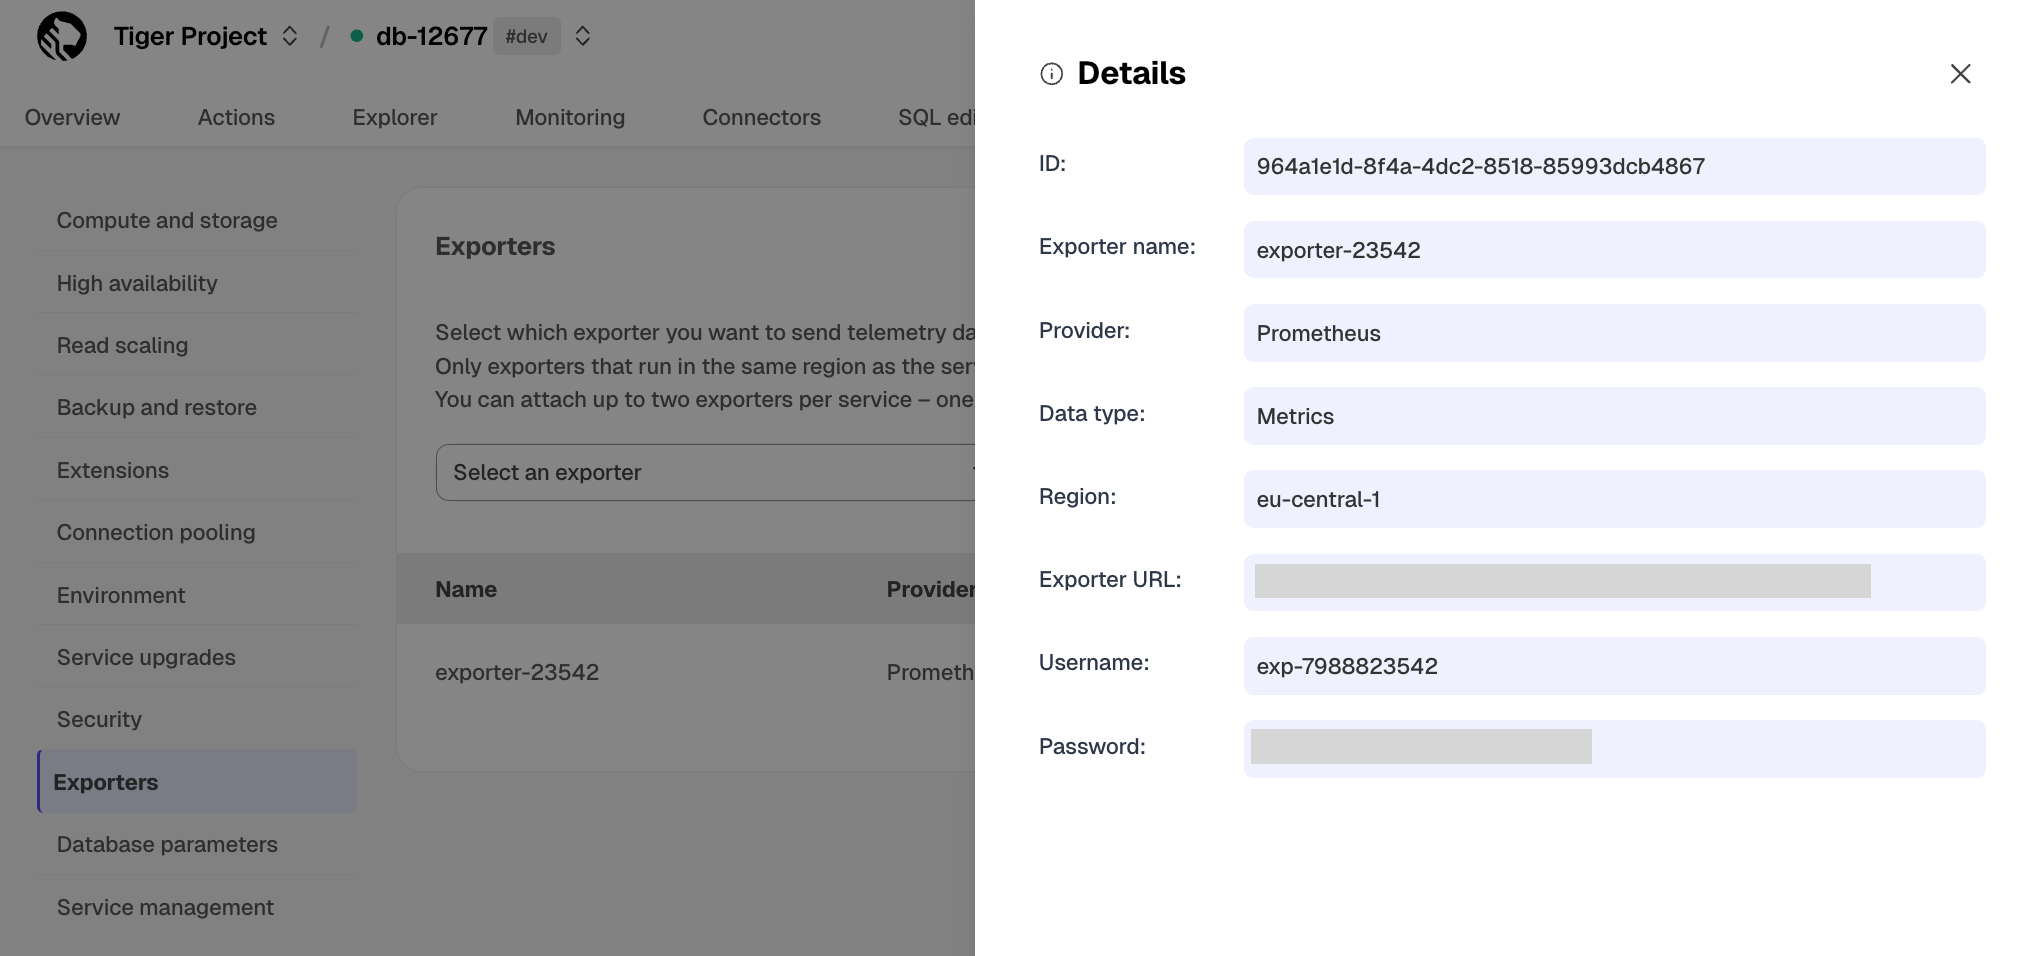
Copy the exporter URL.
In your Prometheus installation, update
prometheus.ymlto point to the exporter URL as a scrape target:
See the [Prometheus documentation][scrape-targets] for details on configuring scrape targets.
You can now monitor your service metrics. Use the following metrics to check the service is running correctly:
timescale.cloud.system.cpu.usage.millicorestimescale.cloud.system.cpu.total.millicorestimescale.cloud.system.memory.usage.bytestimescale.cloud.system.memory.total.bytestimescale.cloud.system.disk.usage.bytestimescale.cloud.system.disk.total.bytes
Additionally, use the following tags to filter your results.
|Tag|Example variable| Description | |-|-|----------------------------| |host|us-east-1.timescale.cloud| | |project-id|| | |service-id|| | |region|us-east-1| AWS region | |role|replica or primary| For service with replicas |
To export metrics from self-hosted TimescaleDB, you import telemetry data about your database to Postgres Exporter, then configure Prometheus to scrape metrics from it. Postgres Exporter exposes metrics that you define, excluding the system metrics.
Create a user to access telemetry data about your database
Connect to your database in [
psql][psql] using your [connection details][connection-info].Create a user named
monitoringwith a secure password:Grant the
pg_read_all_statspermission to themonitoringuser:Import telemetry data about your database to Postgres Exporter
Connect Postgres Exporter to your database:
Use your [connection details][connection-info] to import telemetry data about your database. You connect as the monitoring user:
Local installation:
- Docker:
- Check the metrics for your database in the Prometheus format: