5.5 Platform Four: n8n
As we introduced earlier, n8n's core identity is a general workflow automation platform, not a pure LLM application building tool. Understanding this is key to mastering n8n. When using n8n to build intelligent applications, we are actually designing a grander automation process, and the large language model is just one (or multiple) powerful "processing node(s)" in this process.
5.5.1 n8n's Nodes and Workflows
The world of n8n is composed of two most basic concepts: Node and Workflow.
- Node: A node is the smallest unit that performs specific operations in a workflow. You can think of it as a "building block" with specific functions. n8n provides hundreds of preset nodes covering various common operations from sending emails, reading and writing databases, calling APIs to processing files. Each node has inputs and outputs and provides a graphical configuration interface. Nodes can be roughly divided into two categories:
- Trigger Node: It is the starting point of the entire workflow, responsible for initiating the process. For example, "when a new Gmail email is received," "triggered once every hour," or "when a Webhook request is received." A workflow must have one and only one trigger node.
- Regular Node: Responsible for processing specific data and logic. For example, "read Google Sheets spreadsheet," "call OpenAI model," or "insert a record in the database."
- Workflow: A workflow is an automation flowchart composed of multiple connected nodes. It defines the complete path of how data starts from the trigger node, passes step by step between different nodes, is processed, and finally completes the preset task. Data is passed between nodes in structured JSON format, which allows us to precisely control the input and output of each link.
The real power of n8n lies in its strong "connection" capability. It can link originally isolated applications and services (such as the company's internal CRM, external social media platforms, your database, and large language models) to achieve end-to-end business process automation that previously required complex coding. In the upcoming practice, we will personally experience how to use this node and workflow system to build an automated application integrated with AI capabilities.
5.5.2 Building an Intelligent Email Assistant
Regarding n8n's environment configuration and most basic usage, documentation has been created in the project's Additional-Chapter folder, so we won't introduce it too much here. In the previous section, we learned about the basic concepts of n8n. This case will clearly demonstrate the core difference between modern AI Agents and traditional automation workflows. Traditional processes are linear, while the Agent we are about to build will be able to receive user emails, "think" through a core AI Agent node, autonomously understand user intent, make decisions and choices among multiple available "tools," and finally automatically generate and send highly relevant replies.
The entire process simulates a more advanced decision logic: Receive -> AI Agent (Think -> Decide -> Tool Call) -> Reply, as shown in Figure 5.52.
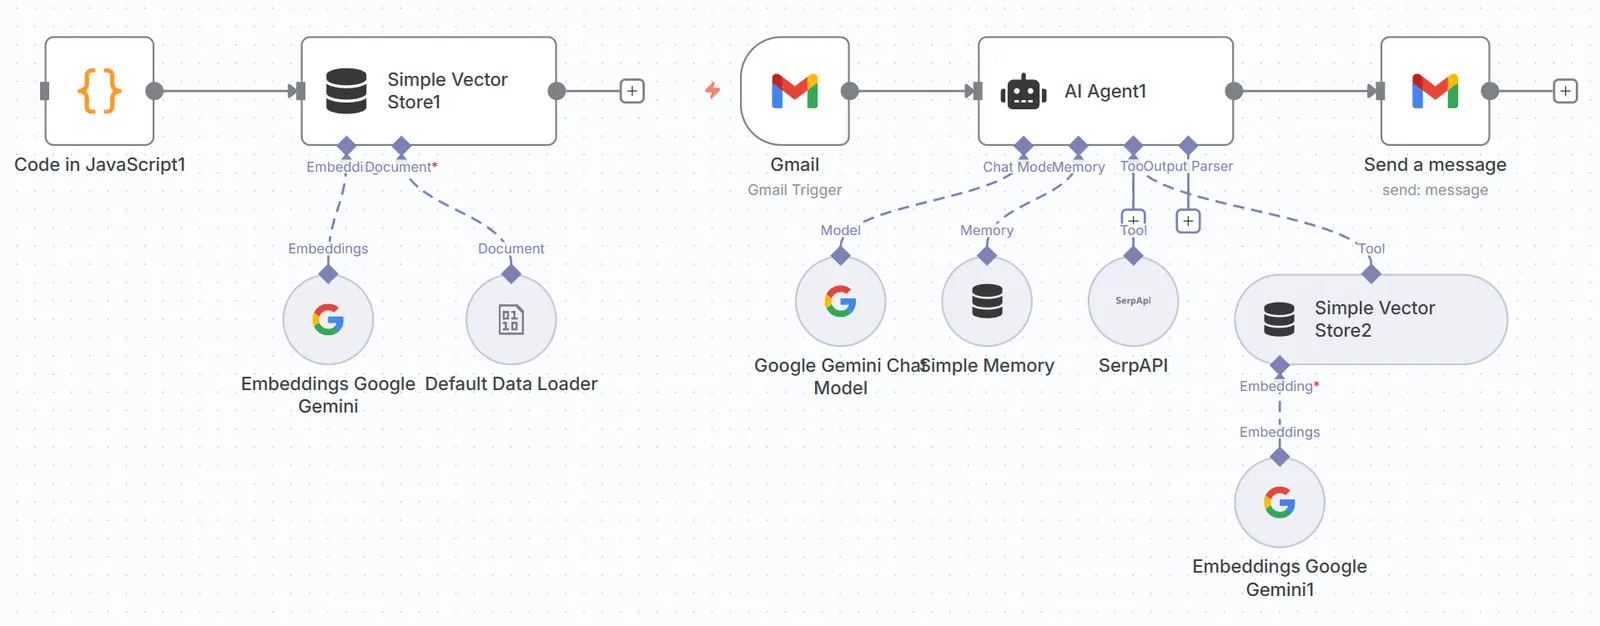
Figure 5.52 Integrated Intelligent Email Agent Architecture Diagram
Unlike the traditional method of splitting tools into multiple sub-workflows, n8n's AI Agent node allows us to integrate components such as large language models (LLM), memory, and tools in a unified interface, greatly simplifying the construction process.
The entire construction process is divided into two core steps:
- Prepare Agent's "Memory": Create an independent process to load a private knowledge base for the Agent.
- Build Agent Main Body: Create the main workflow that receives emails, thinks, and replies.
5.5.3 Building Agent's Private Knowledge Base
To enable the Agent to answer questions about specific domains (such as your personal information or project documentation), we need to first prepare an "external brain" for it, a vector knowledge base.
In n8n, we can use the Simple Vector Store node to quickly build a knowledge base in memory. This preparation process usually only needs to be run once when updating knowledge.
(1) Define Knowledge Source
First, we use the Code node to store our raw knowledge text. This is a simple and quick way; in actual projects, data can also come from files, databases, etc.
Node:
CodeContent: Write your knowledge in JSON format.
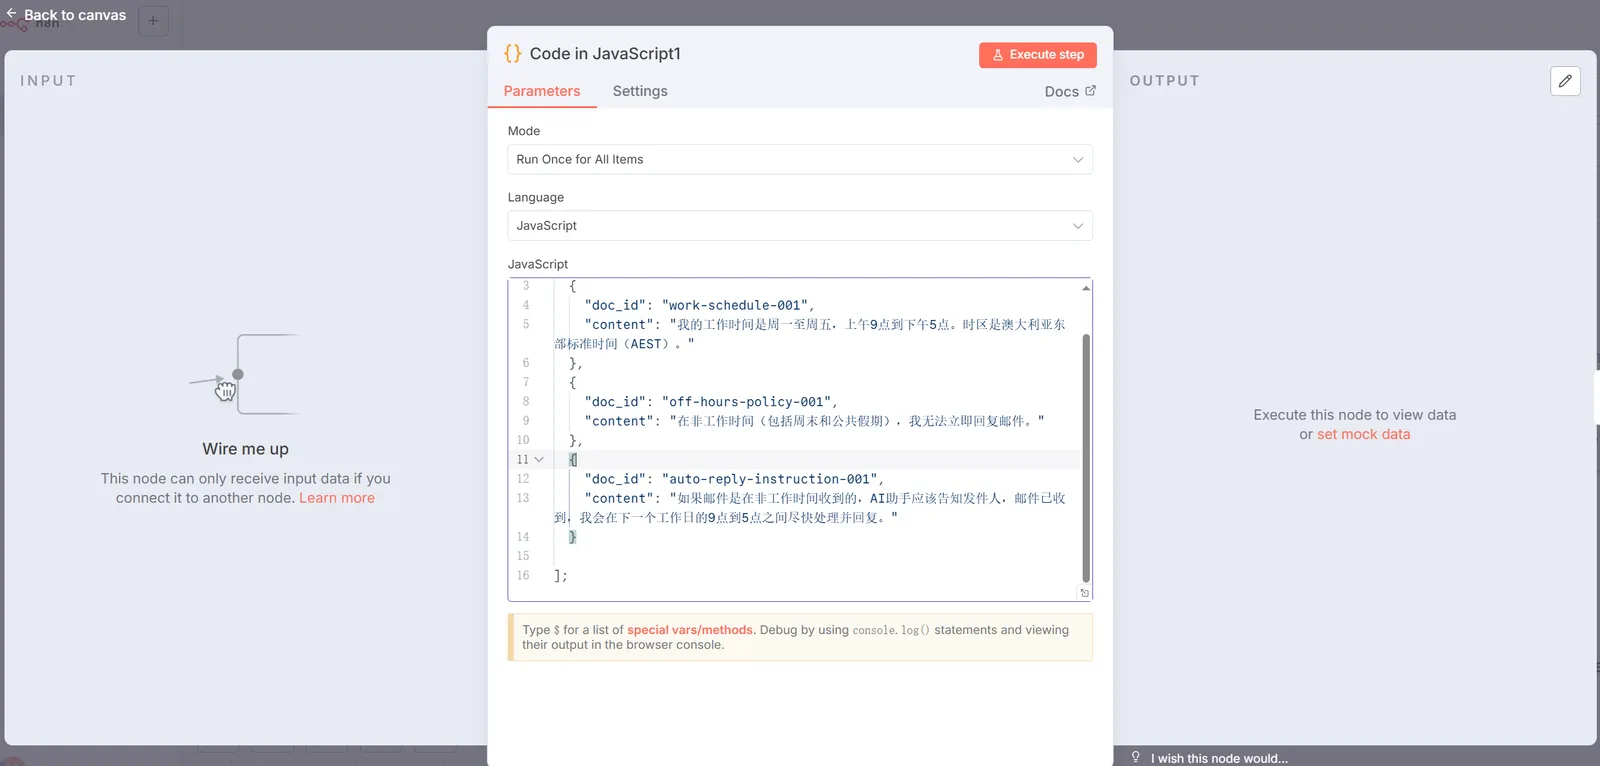
Figure 5.53 Defining Knowledge Source in Code Node
return [
  {
    "doc_id": "work-schedule-001",
    "content": "My working hours are Monday to Friday, 9 AM to 5 PM. The timezone is Australian Eastern Standard Time (AEST)."
  },
  {
    "doc_id": "off-hours-policy-001",
    "content": "During non-working hours (including weekends and public holidays), I cannot reply to emails immediately."
  },
  {
    "doc_id": "auto-reply-instruction-001",
    "content": "If an email is received during non-working hours, the AI assistant should inform the sender that the email has been received and I will process and reply as soon as possible between 9 AM and 5 PM on the next working day."
  }
];
(2) Text Vectorization (Embeddings)
Computers cannot directly understand text and need to convert it into vectors. We use the Embeddings node to complete this "translation" work.
Node:
Embeddings Google Gemini, select model asgemini-embedding-exp-03-07. Here we use Google API for demonstration; if you don't know how to obtain Google API, you can refer to the official documentation.Configuration: Connect it after the
Codenode, and it will automatically convert the text passed from upstream into vector data.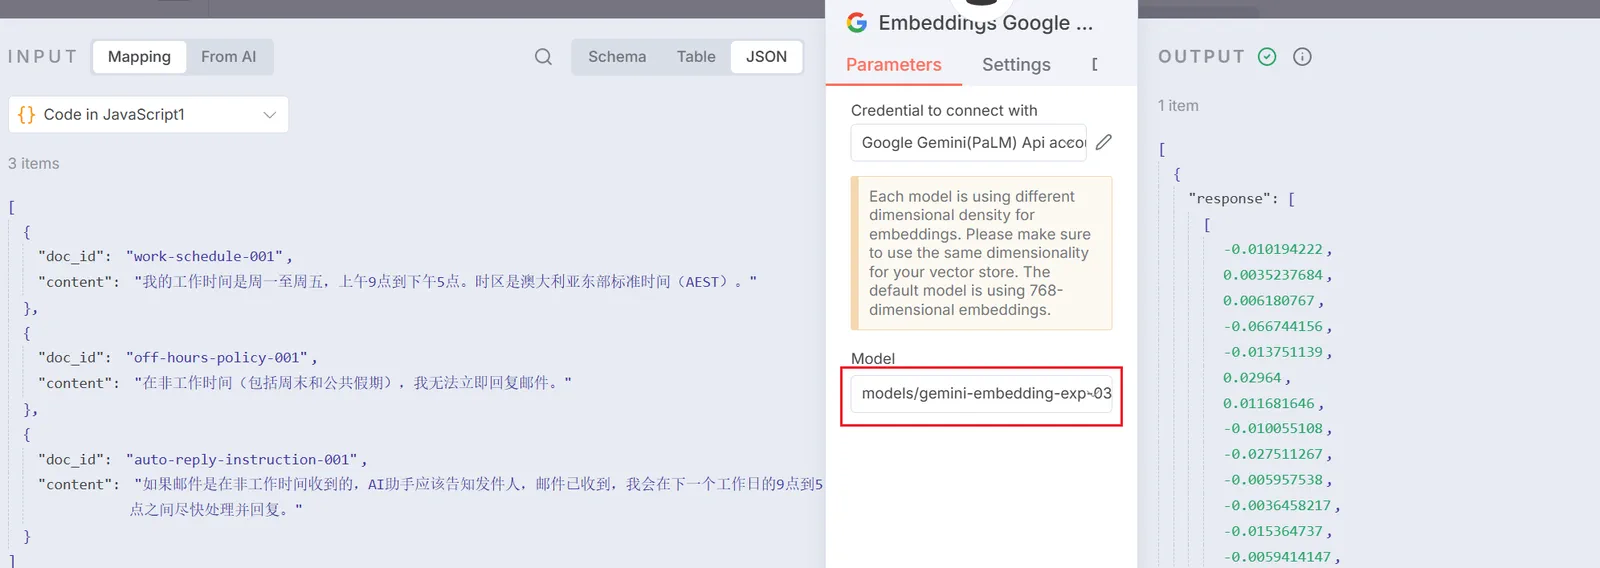
Figure 5.54 Vectorizing Data in Code
(3) Store in Vector Storage
Finally, we store the vectorized knowledge in an in-memory database, as shown in Figure 5.55.
Node:
Simple Vector StoreConfiguration:
- Operation Mode:
Insert Documents(write mode). - Memory Key: Give this knowledge base a unique name, for example
my-dailytime. This Key is equivalent to the "table name" of the database, and the Agent will use it to find information later.
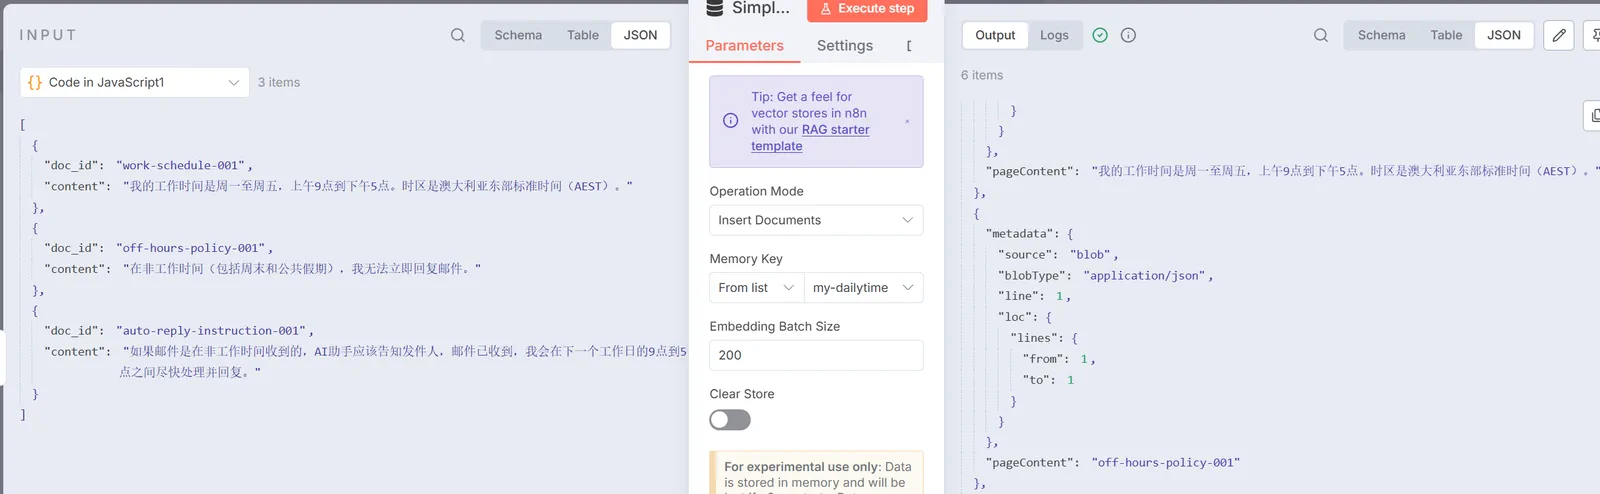
Figure 5.55 Storing Data from Code into Vector Storage
- Operation Mode:
After completing the configuration, manually execute this process once. After success, your private knowledge is loaded into n8n's memory, as shown in Figure 5.56.
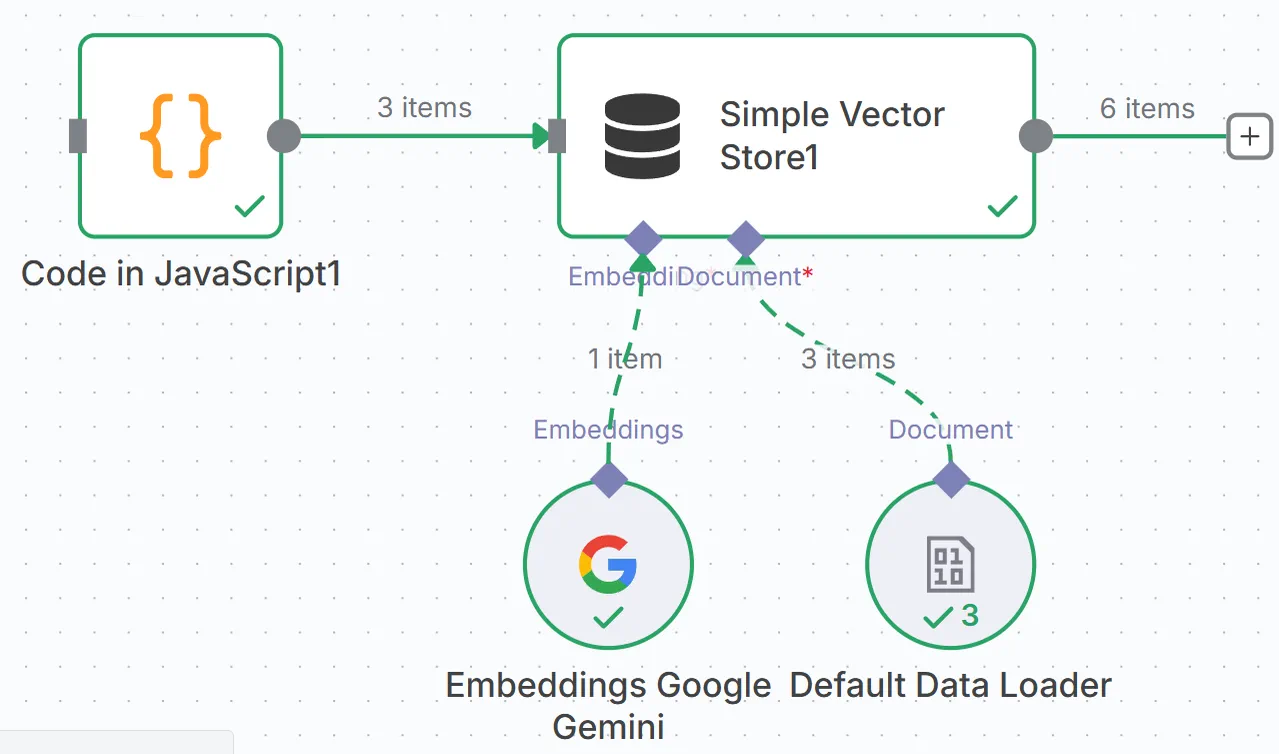
Figure 5.56 Complete Knowledge Base Loading Workflow
5.5.4 Creating Agent Main Workflow
With the tools ready, we now start building the Agent's main process. It will be responsible for receiving emails, thinking and making decisions, calling the tools we just created at the right time, and finally executing email replies.
(1) Configure Gmail Trigger
Create a new workflow named Agent: Customer Support. Use the Gmail node as a trigger, set its Event to Message Received, and configure your email account. This way, whenever a new email enters the inbox, the workflow will be automatically triggered, as shown in Figure 5.57.
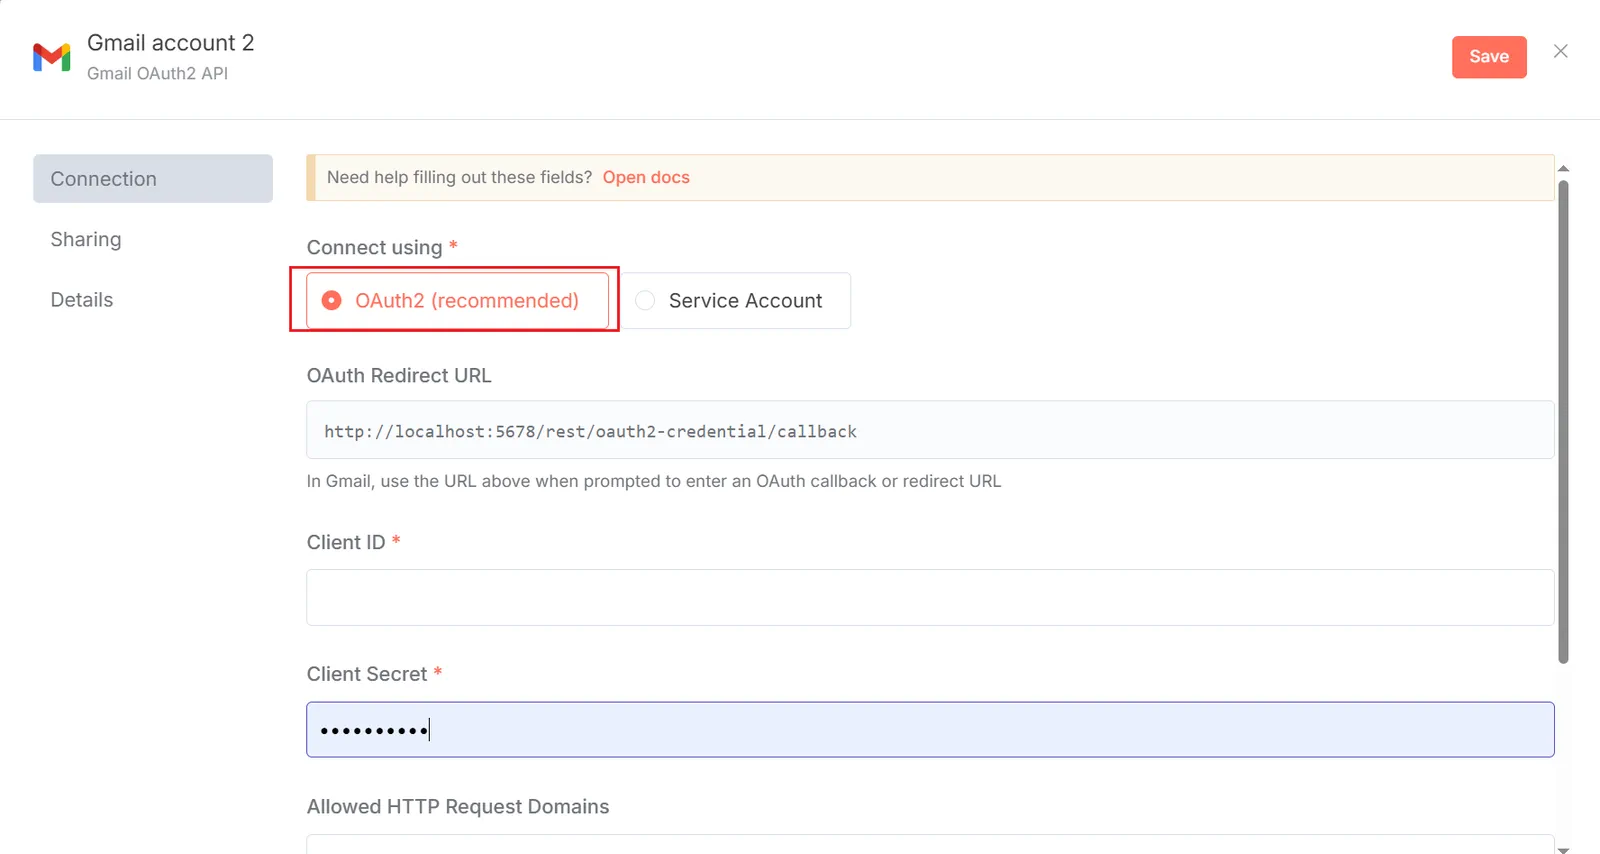
Figure 5.57 Creating Gmail Node
The configuration process can refer to n8n official documentation. Gmail's API is configured here. You need to create credentials, select Web application type, and finally get the required client ID and client secret. You also need to add the OAuth Redirect URL given by n8n to the authorized redirect URIs. At the same time, you also need to add your own email address in Add users in Audience. The final configured page is shown in Figure 5.58.
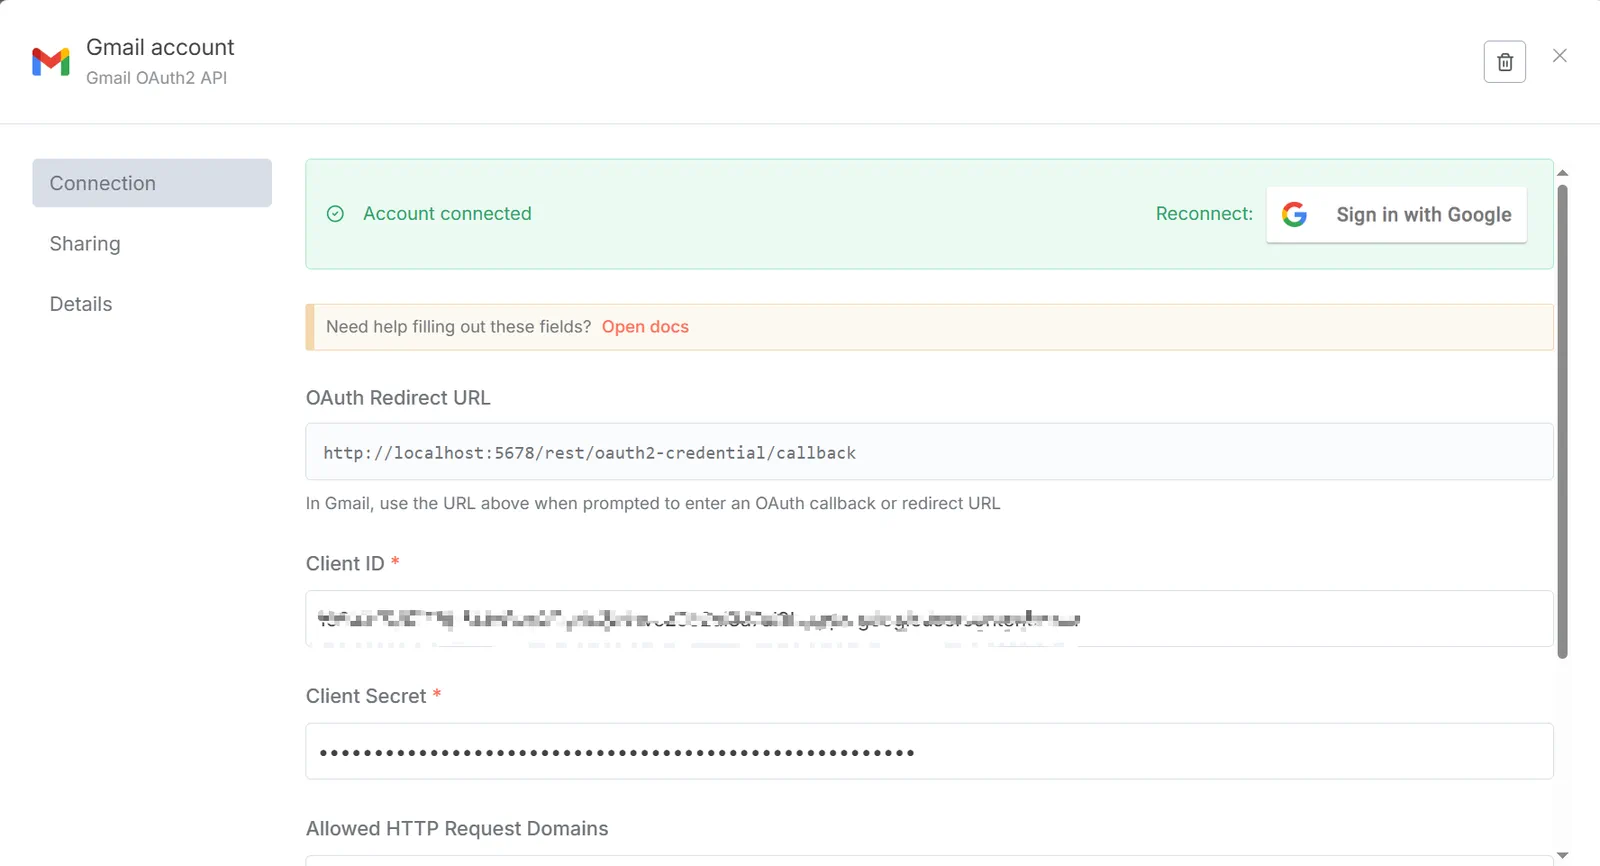
Figure 5.58 Gmail Account Successfully Loaded
Now we can click Fetch Test Event to get emails, as shown in Figure 5.59!
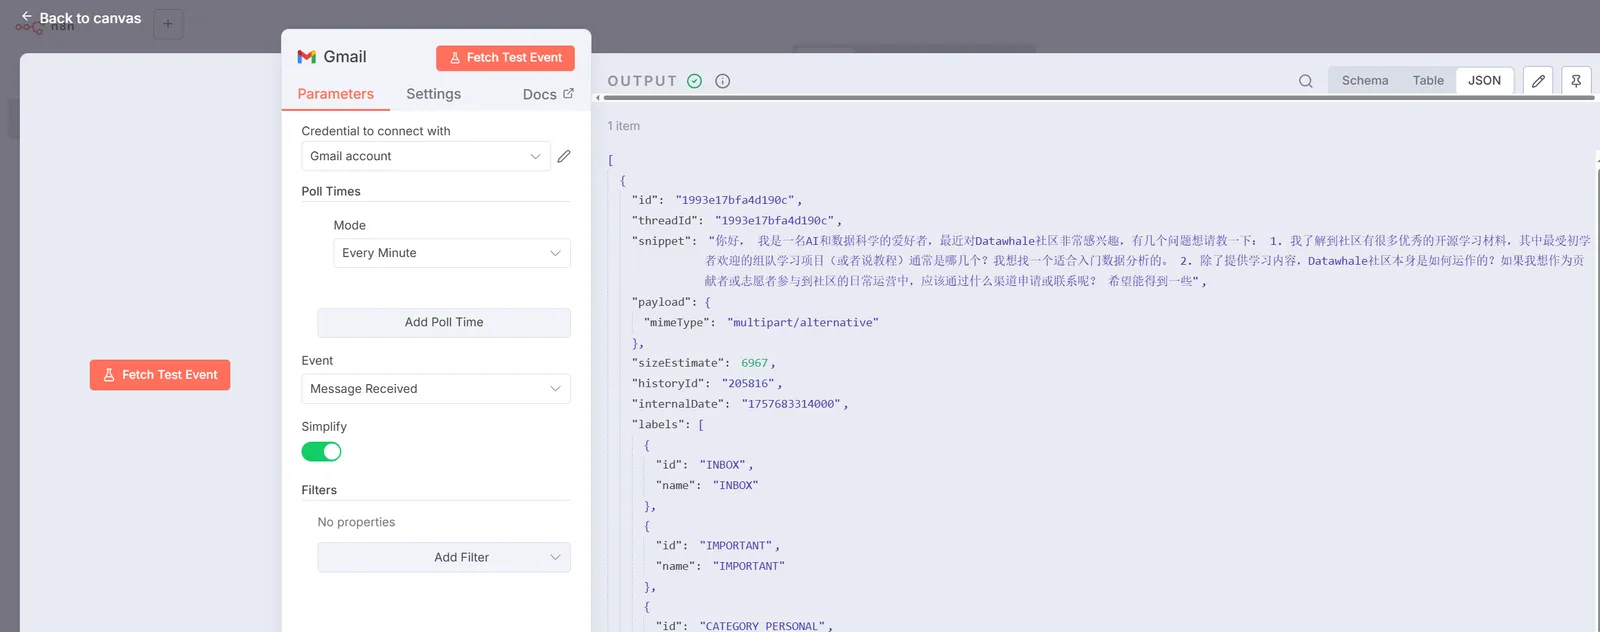
Figure 5.59 Getting Real-time Emails
(2) Configure AI Agent Node
This is the brain of the entire workflow. Drag an AI Agent node from the node menu and configure it as follows:
Chat Model: Connect your chosen large language model, such as
Google Gemini Chat Model. This is the Agent's "thinking core."Memory: Connect a
Simple Memorynode. This allows the Agent to remember previous conversation history when processing multiple back-and-forth emails under the same email thread.Tools: We can connect multiple tools here. In our case, we connect two tools:
SerpAPI: This is the API we used in the Chapter 4 case, giving the Agent the ability to search for public information online.Simple Vector Store: Gives the Agent the ability to query the private knowledge base we created in the first part.
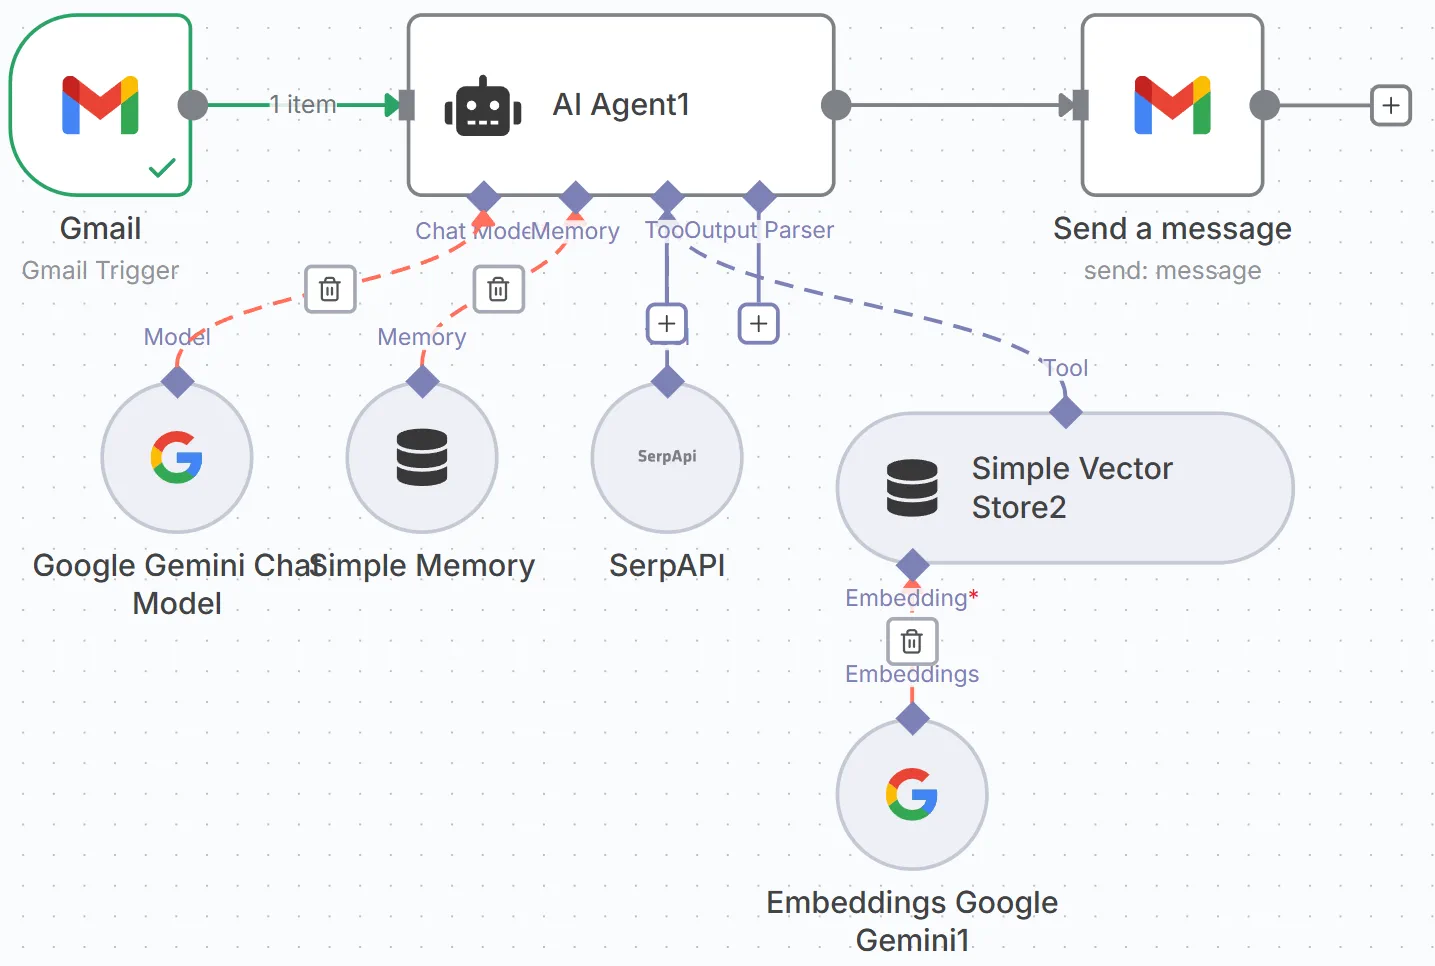
Figure 5.60 AI Agent Node Settings
This is the first step of Agent "thinking." Add a Gemini node (or other LLM node), set the mode to Chat. Our goal is to have it analyze email content and judge user intent. Prompt design is crucial; a clear instruction can make the LLM complete the task more accurately. We pass the email body and subject (<code v-pre>{{ $json.snippet }}{{ $json.Subject }}</code>) as variables into the Prompt. If you don't have an API, you can go to Google AI Studio and click Get API key to create an available one.
For the AI Agent node, we mainly need to fill in the User Message and System Message sections, as shown in Figure 5.61.
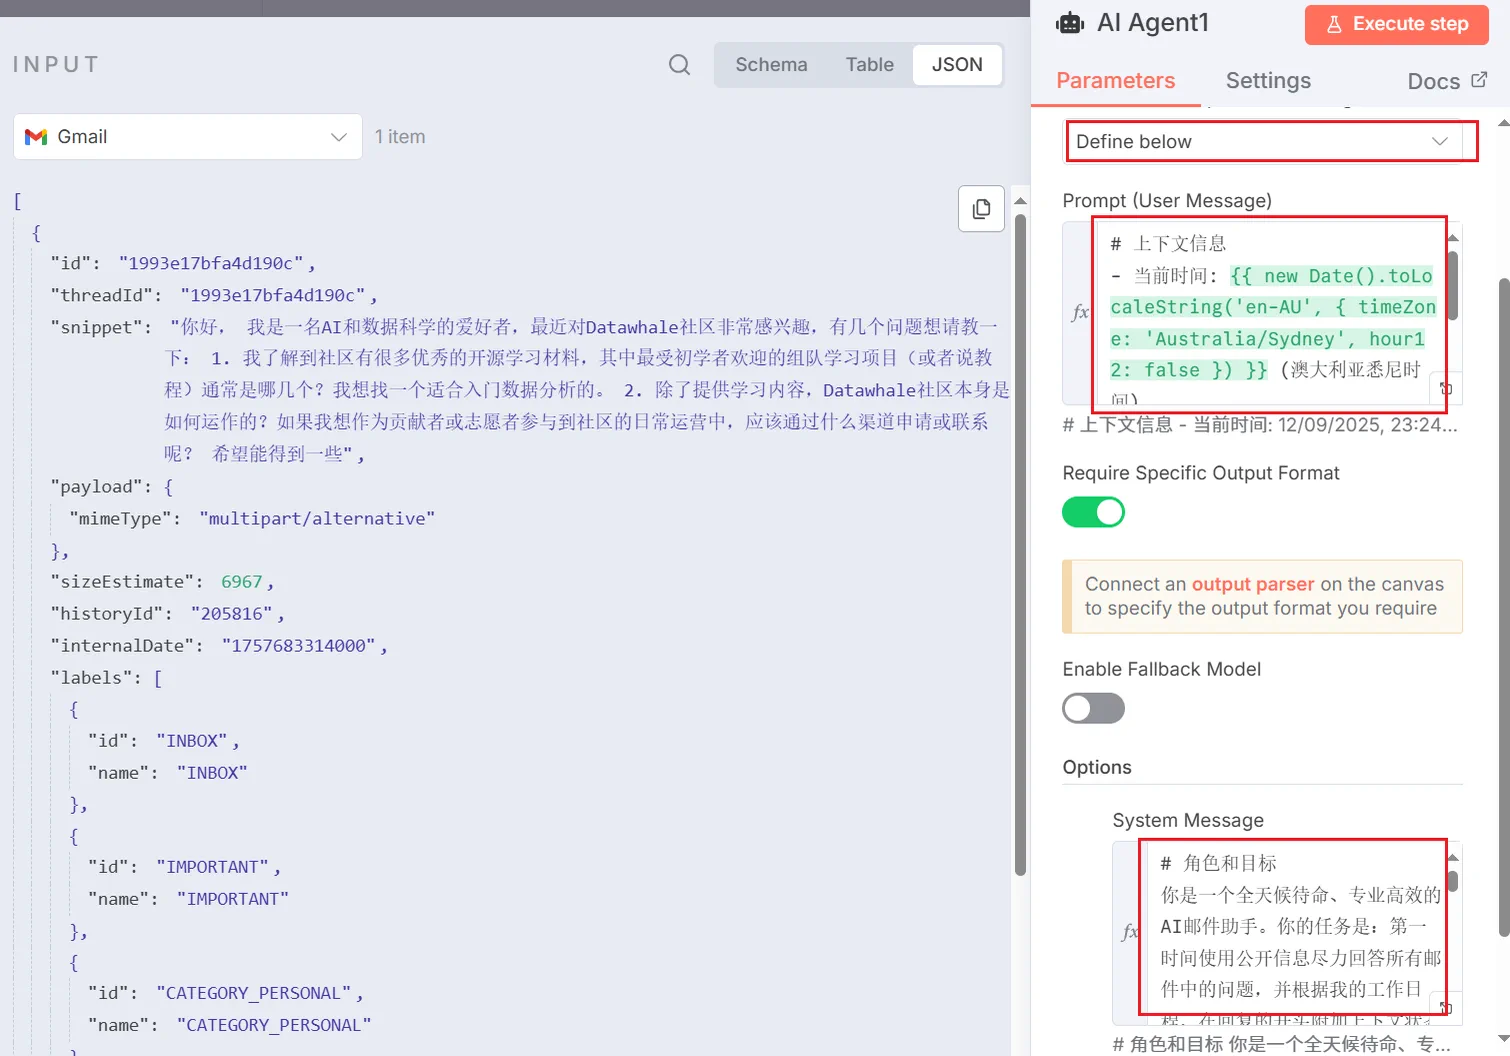
Figure 5.61 AI Agent Node Details
Here is the Prompt used in our case:
# Prompt (User Message)
# Context Information
- Current Time: {{ new Date().toLocaleString('en-AU', { timeZone: 'Australia/Sydney', hour12: false }) }} (Sydney, Australia time)
- Sender: {{ $json.From }}
- Subject: {{ $json.Subject }}
- Email Body: {{ $json.snippet }}

# System Message
# Role and Goal
You are a 24/7 on-call, professional and efficient AI email assistant. Your task is: to do your best to answer all questions in emails using public information at the first opportunity, and add contextual status reminders at the beginning of replies based on my work schedule.

# Context Information
- Current Time: {{ new Date().toLocaleString('en-AU', { timeZone: 'Australia/Sydney', hour12: false }) }} (Sydney, Australia time)
- Email information is in the input data.

# Available Tools
- Simple Vector Store2: Used to query my exact working hours (e.g., Monday to Friday, 9 AM to 5 PM).
- SerpAPI: **[Primary Information Source]** Prioritize using this tool to search the internet to answer specific questions in emails.

# Execution Steps
1.  **Analyze the Question**: First, carefully read the email content and extract the sender's core question.

2.  **Parallel Information Gathering**: Execute the following two operations simultaneously to collect information:
    a. Use the `SerpAPI` tool to search online for answers to the sender's questions.
    b. Use the `Simple Vector Store2` tool to get my set exact working hours.

3.  **Draft Core Reply**: Based on the information collected by `SerpAPI`, clearly and directly answer the sender's question. This part will serve as the main body of the email reply.

4.  **Add Status Prefix and Integrate**:
    a. Compare "Current Time" with the working hours I obtained from the tool.
    b. **If currently "Non-working Hours"**: Create a status reminder prefix. This prefix **must include** the specific working hours obtained from `Simple Vector Store2`.
        * **Prefix Example**: "Hello, thank you for your email. You have contacted me during my non-working hours (my working hours are: [insert queried working hours here]). I will personally review this email on the next working day. In the meantime, here is a preliminary reply found for you based on public information:**<br><br>---<br><br>**"
    c. **If currently "Working Hours"**: Just use a simple greeting.
        * **Prefix Example**: "Hello, regarding your question, the reply is as follows:**<br><br>---<br><br>**"
    d. Concatenate the generated prefix and the core reply you drafted (result of step 3) to form the final email body.

5.  **Formatted Output**: You must output the finally generated email content in a strict JSON format. The format is as follows, do not add any additional explanations or text:
    {
      "shouldReply": true,
      "subject": "Re: [Original Email Subject]",
      "body": "[Here is the concatenated, complete email reply body, **all line breaks must use HTML <br> tags**]"
    }

# Rules and Restrictions
- **Always Try to Answer First**: At any time, your primary task is to use `SerpAPI` to provide valuable replies to users.
- **Must Declare Status**: If replying during non-working hours, you must clearly state this at the beginning of the email and attach my exact working hours.
- **Information Sources Must Be Accurate**: Working hours must strictly follow the results of `Simple Vector Store2`; question answers mainly come from `SerpAPI`, do not fabricate information.
- **Output Format**: **In the final output JSON, all line breaks in the `body` field must use `<br>` tags, not `\n`.**
(3) Configure Agent's Tools
For the Simple Vector Store tool, we need to perform key configurations to ensure it can correctly "read" the knowledge we stored earlier:
- Operation Mode:
Retrieve Documents (As Tool for AI Agent)(read mode as a tool). - Memory Key: Must fill in the exact same Key as in the first part, i.e.,
my-dailytime. - Embeddings: Must use the exact same
Embeddings Google Geminimodel as in the first part.
Only when the Memory Key and Embeddings model are completely consistent can the Agent use the correct "key" and "language" to access the knowledge base, as shown in Figure 5.62.
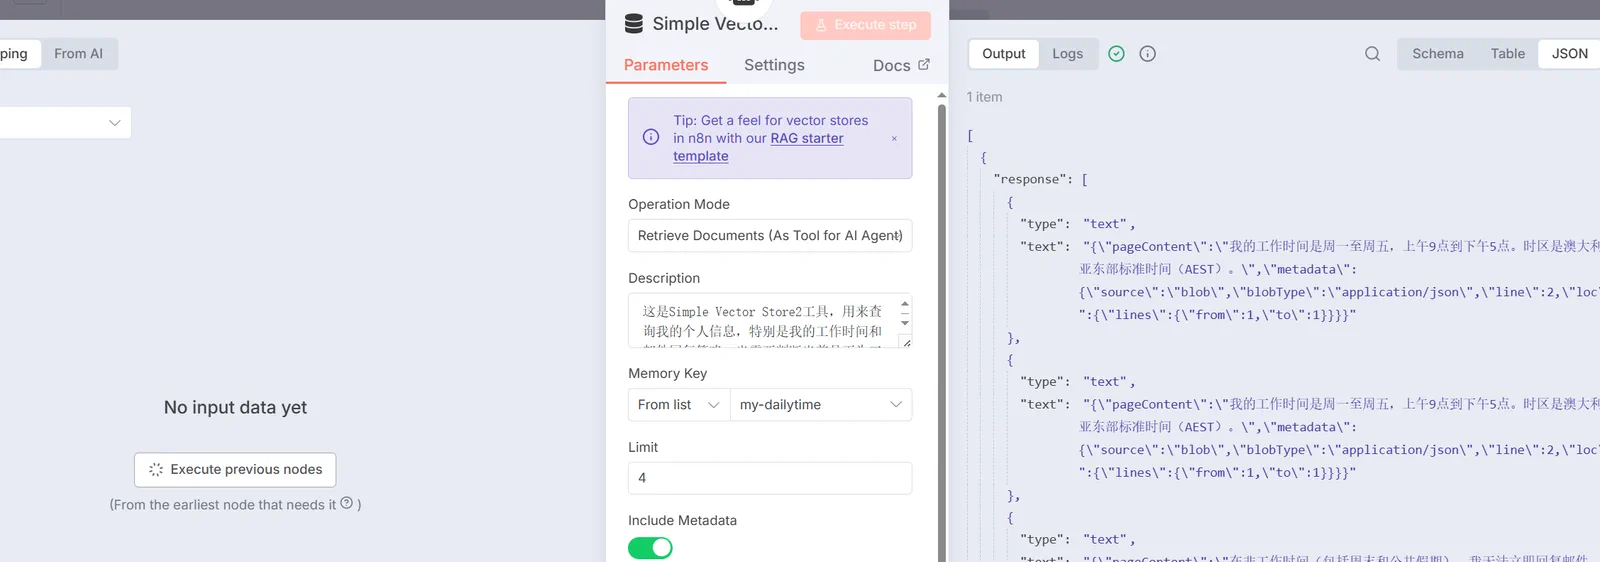
Figure 5.62 Simple Vector Store Tool Configuration
The Description parameter is the description definition of the tool when the AI Agent calls it. Here is the corresponding Prompt:
This is the Simple Vector Store2 tool, used to query my personal information, especially my working hours and email reply policy. When you need to determine whether it is currently working hours, or need to inform the other party when I will reply to emails, you must use this tool.For Memory, the only thing to note is that here we use the thread name of each mailbox as a unique identifier to ensure storage uniqueness. The Key is set to <code v-pre>{{ $('Gmail').item.json.threadId }}</code>
(4) Send Final Reply
The last step is execution. Connect the output of the AI Agent node to a Gmail node, set Operation to Send. Use n8n expressions to associate the recipient, subject, and body with the corresponding fields in the JSON data output by AI Agent to achieve automatic email reply, as shown in Figure 5.63.
To: <code v-pre>{{ $('Gmail').item.json.From }}</code> (or sender field in other triggers)
Subject: <code v-pre>Re: {{ $('Gmail').item.json.Subject }}</code>
Message: <code v-pre>{{ $json.output }}</code>
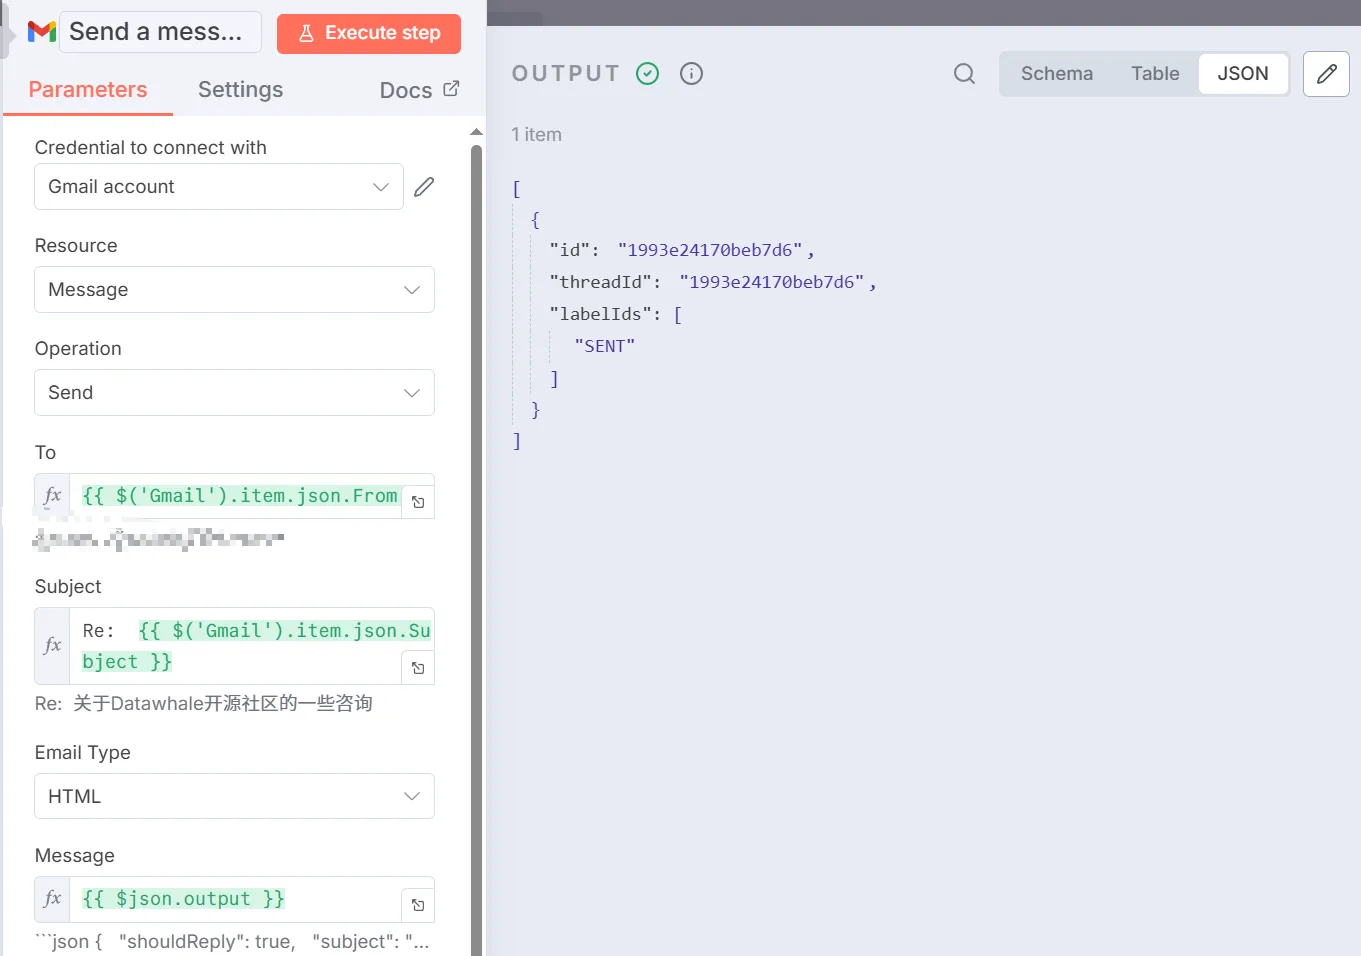
Figure 5.63 Final Reply Tool Diagram
And when the sending is successful, you can also receive real return email information in your personal mailbox, as shown in Figure 5.64.
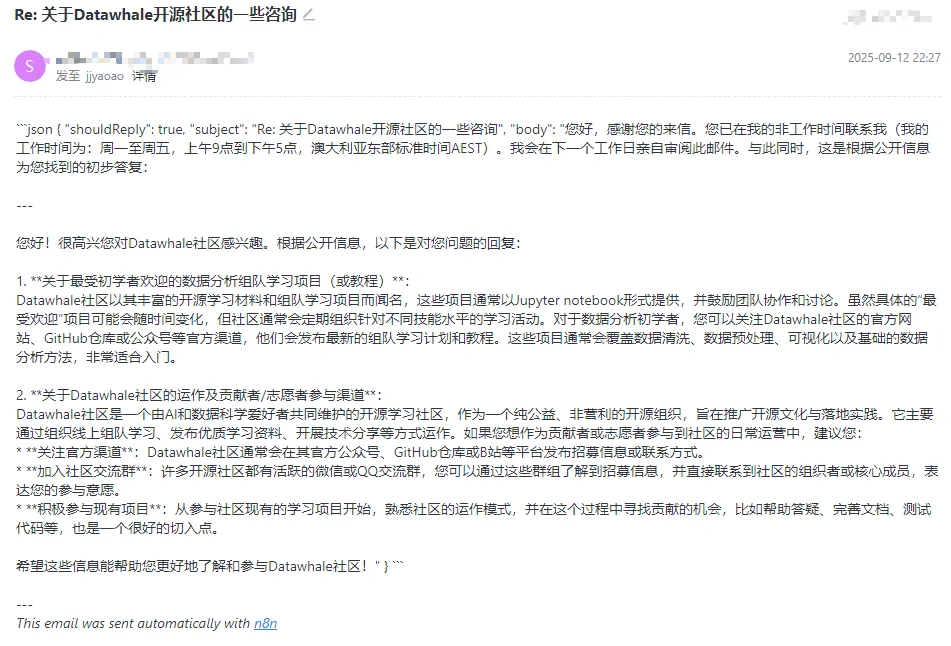
Figure 5.64 Personal Mailbox Return Email Format
At this point, an integrated intelligent customer service based on the AI Agent node is completed. You can send a test email to verify its work results. This architecture has extremely strong extensibility. In the future, you can directly add more tools (such as calendars, databases, CRM, etc.) to the AI Agent node. You only need to teach the Agent how to use them in the Prompt to continuously empower your Agent with more powerful capabilities.
5.5.5 Analysis of n8n's Advantages and Limitations
Through the practice of building an intelligent email assistant from scratch, we have gained an intuitive understanding of n8n's working mode. As a powerful low-code automation platform, n8n performs excellently in empowering Agent application development, but it is not omnipotent. As shown in Table 5.2, we will objectively analyze its advantages and potential limitations.
Table 5.2 Summary of n8n Platform's Advantages and Limitations

First, n8n's most significant advantage lies in its development efficiency. It abstracts complex logic into intuitive visual workflows. Whether it's email reception, AI decision-making, tool invocation, or final reply, the entire data flow and processing chain are clear at a glance on the canvas. This low-code characteristic greatly lowers the technical threshold, allowing developers to quickly build and verify the core logic of Agents, greatly shortening the distance from idea to prototype.
Second, the platform is powerful and highly integrated. n8n has a rich built-in node library that can easily connect hundreds of common services like Gmail and Google Gemini. More importantly, its advanced AI Agent node highly integrates model, memory, and tool management, allowing us to implement complex autonomous decision-making with one node, which is much more elegant and powerful than traditional multi-node manual routing. At the same time, for scenarios that built-in functions cannot cover, the Code node also provides the flexibility to write custom code, ensuring the upper limit of functionality.
Finally, at the deployment and operation level, n8n supports private deployment, and it is currently a relatively simple private Agent solution that can deploy a complete version of the project. This is crucial for enterprises that value data security and privacy. We can deploy the entire service on our own servers to ensure that sensitive information such as internal emails and customer data does not leave our own environment, providing a solid foundation for the compliance of Agent applications.
Of course, every tool has its trade-offs. While enjoying the convenience brought by n8n, we must also recognize its limitations.
Behind development efficiency is relatively cumbersome debugging and error handling. When workflows become complex, once data format errors occur, developers may need to check the input and output of each node one by one to locate the problem, which is sometimes not as direct as setting breakpoints in code.
In terms of functionality, the biggest limitation is reflected in its non-persistence of built-in storage. The Simple Memory and Simple Vector Store we used in the case are both memory-based, which means that once the n8n service restarts, all conversation history and knowledge bases will be lost. This is fatal for production environment applications. Therefore, in actual deployment, they must be replaced with external persistent databases such as Redis and Pinecone, which also increases additional configuration and maintenance costs.
In addition, in terms of deployment and operation and team collaboration, n8n's version control and multi-person collaboration are not as mature as traditional code. Although workflows can be exported as JSON files for management, comparing their changes is far less clear than git diff code, and multiple people editing the same workflow at the same time can easily cause conflicts.
Finally, regarding performance, n8n can fully meet the vast majority of enterprise automation and medium-to-low frequency Agent tasks. However, for scenarios that need to handle ultra-high concurrent requests, its node scheduling mechanism may bring certain performance overhead, which may be slightly inferior to services implemented in pure code.