10.5 Building Custom MCP Servers
In previous sections, we learned how to use existing MCP services. We also learned about the characteristics of different protocols. Now, let's learn how to build our own MCP server.
10.5.1 Creating Your First MCP Server
(1) Why Build a Custom MCP Server?
Although you can directly use public MCP services, in many practical application scenarios, you need to build custom MCP servers to meet specific needs.
Main motivations include the following:
- Encapsulating Business Logic: Encapsulate enterprise-specific business processes or complex operations as standardized MCP tools for unified invocation by agents.
- Accessing Private Data: Create a secure and controllable interface or proxy for accessing internal databases, APIs, or other private data sources that cannot be exposed to the public network.
- Performance Optimization: Perform deep optimization for high-frequency calls or application scenarios with strict response latency requirements.
- Custom Feature Extension: Implement specific functions not provided by standard MCP services, such as integrating proprietary algorithm models or connecting to specific hardware devices.
(2) Teaching Case: Weather Query MCP Server
Let's start with a simple weather query server and gradually learn MCP server development:
#!/usr/bin/env python3
"""Weather Query MCP Server"""

import json
import requests
import os
from datetime import datetime
from typing import Dict, Any
from hello_agents.protocols import MCPServer

# Create MCP server
weather_server = MCPServer(name="weather-server", description="Real weather query service")

CITY_MAP = {
    "Beijing": "Beijing", "Shanghai": "Shanghai", "Guangzhou": "Guangzhou",
    "Shenzhen": "Shenzhen", "Hangzhou": "Hangzhou", "Chengdu": "Chengdu",
    "Chongqing": "Chongqing", "Wuhan": "Wuhan", "Xi'an": "Xi'an",
    "Nanjing": "Nanjing", "Tianjin": "Tianjin", "Suzhou": "Suzhou"
}

def get_weather_data(city: str) -> Dict[str, Any]:
    """Get weather data from wttr.in"""
    city_en = CITY_MAP.get(city, city)
    url = f"https://wttr.in/{city_en}?format=j1"
    response = requests.get(url, timeout=10)
    response.raise_for_status()
    data = response.json()
    current = data["current_condition"][0]

    return {
        "city": city,
        "temperature": float(current["temp_C"]),
        "feels_like": float(current["FeelsLikeC"]),
        "humidity": int(current["humidity"]),
        "condition": current["weatherDesc"][0]["value"],
        "wind_speed": round(float(current["windspeedKmph"]) / 3.6, 1),
        "visibility": float(current["visibility"]),
        "timestamp": datetime.now().strftime("%Y-%m-%d %H:%M:%S")
    }

# Define tool function
def get_weather(city: str) -> str:
    """Get current weather for specified city"""
    try:
        weather_data = get_weather_data(city)
        return json.dumps(weather_data, ensure_ascii=False, indent=2)
    except Exception as e:
        return json.dumps({"error": str(e), "city": city}, ensure_ascii=False)

def list_supported_cities() -> str:
    """List all supported Chinese cities"""
    result = {"cities": list(CITY_MAP.keys()), "count": len(CITY_MAP)}
    return json.dumps(result, ensure_ascii=False, indent=2)

def get_server_info() -> str:
    """Get server information"""
    info = {
        "name": "Weather MCP Server",
        "version": "1.0.0",
        "tools": ["get_weather", "list_supported_cities", "get_server_info"]
    }
    return json.dumps(info, ensure_ascii=False, indent=2)

# Register tools to server
weather_server.add_tool(get_weather)
weather_server.add_tool(list_supported_cities)
weather_server.add_tool(get_server_info)

if __name__ == "__main__":
    weather_server.run()
(3) Testing Custom MCP Server
Then create a test script:
#!/usr/bin/env python3
"""Test Weather Query MCP Server"""

import asyncio
import json
import sys
import os

sys.path.insert(0, os.path.join(os.path.dirname(__file__), '..', 'HelloAgents'))
from hello_agents.protocols.mcp.client import MCPClient

async def test_weather_server():
    server_script = os.path.join(os.path.dirname(__file__), "14_weather_mcp_server.py")
    client = MCPClient(["python", server_script])

    try:
        async with client:
            # Test 1: Get server information
            info = json.loads(await client.call_tool("get_server_info", {}))
            print(f"Server: {info['name']} v{info['version']}")

            # Test 2: List supported cities
            cities = json.loads(await client.call_tool("list_supported_cities", {}))
            print(f"Supported cities: {cities['count']} cities")

            # Test 3: Query Beijing weather
            weather = json.loads(await client.call_tool("get_weather", {"city": "Beijing"}))
            if "error" not in weather:
                print(f"\nBeijing weather: {weather['temperature']}°C, {weather['condition']}")

            # Test 4: Query Shenzhen weather
            weather = json.loads(await client.call_tool("get_weather", {"city": "Shenzhen"}))
            if "error" not in weather:
                print(f"Shenzhen weather: {weather['temperature']}°C, {weather['condition']}")

            print("\n✅ All tests completed!")

    except Exception as e:
        print(f"❌ Test failed: {e}")

if __name__ == "__main__":
    asyncio.run(test_weather_server())
(4) Using Custom MCP Server in Agent
"""Using Weather MCP Server in Agent"""

import os
from dotenv import load_dotenv
from hello_agents import SimpleAgent, HelloAgentsLLM
from hello_agents.tools import MCPTool

load_dotenv()

def create_weather_assistant():
    """Create weather assistant"""
    llm = HelloAgentsLLM()

    assistant = SimpleAgent(
        name="Weather Assistant",
        llm=llm,
        system_prompt="""You are a weather assistant that can query city weather.
Use the mcp_get_weather tool to query weather, supports Chinese city names.
"""
    )

    # Add weather MCP tool
    server_script = os.path.join(os.path.dirname(__file__), "14_weather_mcp_server.py")
    weather_tool = MCPTool(server_command=["python", server_script])

    # Explicitly expand and register MCP sub-tools
    expanded_tools = weather_tool.get_expanded_tools()
    if not expanded_tools:
        raise RuntimeError("No weather MCP sub-tools were discovered. Check the server script, dependencies, and startup logs.")

    for expanded_tool in expanded_tools:
        assistant.add_tool(expanded_tool)

    return assistant

def demo():
    """Demo"""
    assistant = create_weather_assistant()

    print("\nQuery Beijing weather:")
    response = assistant.run("How's the weather in Beijing today?")
    print(f"Answer: {response}\n")

def interactive():
    """Interactive mode"""
    assistant = create_weather_assistant()

    while True:
        user_input = input("\nYou: ").strip()
        if user_input.lower() in ['quit', 'exit']:
            break
        response = assistant.run(user_input)
        print(f"Assistant: {response}")

if __name__ == "__main__":
    import sys
    if len(sys.argv) > 1 and sys.argv[1] == "demo":
        demo()
    else:
        interactive()
🔗 Connecting to MCP server...
✅ Connection successful!
🔌 Connection disconnected
✅ Tool 'mcp_get_weather' registered.
✅ Tool 'mcp_list_supported_cities' registered.
✅ Tool 'mcp_get_server_info' registered.
You: I want to query Beijing's weather
🔗 Connecting to MCP server...
✅ Connection successful!
🔌 Connection disconnected
Assistant: The current weather in Beijing is as follows:
- Temperature: 10.0°C
- Feels like: 9.0°C
- Humidity: 94%
- Weather condition: Light rain
- Wind speed: 1.7 m/s
- Visibility: 10.0 km
- Timestamp: October 9, 2025 13:46:40
Please bring rain gear and adjust your clothing according to weather changes.10.5.2 Uploading MCP Server
We created a real weather query MCP server. Now, let's publish it to the Smithery platform so developers worldwide can use our service.
(1) What is Smithery?
Smithery is the official publishing platform for MCP servers, similar to Python's PyPI or Node.js's npm. Through Smithery, users can:
- 🔍 Discover and search for MCP servers
- 📦 Install MCP servers with one click
- 📊 View server usage statistics and ratings
- 🔄 Automatically get server updates
(2) Preparing for Publication First, we need to organize the project into a standard publishing format. This folder has been organized in the code directory for your reference:
weather-mcp-server/
├── README.md           # Project documentation
├── LICENSE            # Open source license
├── Dockerfile         # Docker build configuration (recommended)
├── pyproject.toml     # Python project configuration (required)
├── requirements.txt   # Python dependencies
├── smithery.yaml      # Smithery configuration file (required)
└── server.py          # MCP server main file
Note that smithery.yaml is the configuration file for the Smithery platform:
name: weather-mcp-server
displayName: Weather MCP Server
description: Real-time weather query MCP server based on HelloAgents framework
version: 1.0.0
author: HelloAgents Team
homepage: https://github.com/yourusername/weather-mcp-server
license: MIT
categories:
  - weather
  - data
tags:
  - weather
  - real-time
  - helloagents
  - wttr
runtime: container
build:
  dockerfile: Dockerfile
  dockerBuildPath: .
startCommand:
  type: http
tools:
  - name: get_weather
    description: Get current weather for a city
  - name: list_supported_cities
    description: List all supported cities
  - name: get_server_info
    description: Get server information
Configuration explanation:
name: Unique identifier for the server (lowercase, hyphen-separated)displayName: Display namedescription: Brief descriptionversion: Version number (follows semantic versioning)runtime: Runtime environment (python/node)entrypoint: Entry filetools: Tool list
pyproject.toml is the standard configuration file for Python projects. Smithery requires this file because it will be packaged into a server later:
[build-system]
requires = ["setuptools>=61.0", "wheel"]
build-backend = "setuptools.build_meta"

[project]
name = "weather-mcp-server"
version = "1.0.0"
description = "Real-time weather query MCP server based on HelloAgents framework"
readme = "README.md"
license = {text = "MIT"}
authors = [
    {name = "HelloAgents Team", email = "xxx"}
]
requires-python = ">=3.10"
dependencies = [
    "hello-agents>=0.2.1",
    "requests>=2.31.0",
]

[project.urls]
Homepage = "https://github.com/yourusername/weather-mcp-server"
Repository = "https://github.com/yourusername/weather-mcp-server"
"Bug Tracker" = "https://github.com/yourusername/weather-mcp-server/issues"

[tool.setuptools]
py-modules = ["server"]
Configuration explanation:
[build-system]: Specifies build tool (setuptools)[project]: Project metadataname: Project nameversion: Version number (follows semantic versioning)dependencies: Project dependency listrequires-python: Python version requirement
[project.urls]: Project-related links[tool.setuptools]: setuptools configuration
Although Smithery automatically generates Dockerfile, providing a custom Dockerfile ensures successful deployment:
# Multi-stage build for weather-mcp-server
FROM python:3.12-slim-bookworm as base

# Set working directory
WORKDIR /app

# Install system dependencies
RUN apt-get update && apt-get install -y \
    --no-install-recommends \
    && rm -rf /var/lib/apt/lists/*

# Copy project files
COPY pyproject.toml requirements.txt ./
COPY server.py ./

# Install Python dependencies
RUN pip install --no-cache-dir --upgrade pip && \
    pip install --no-cache-dir -r requirements.txt

# Set environment variables
ENV PYTHONUNBUFFERED=1
ENV PORT=8081

# Expose port (Smithery uses 8081)
EXPOSE 8081

# Health check
HEALTHCHECK --interval=30s --timeout=3s --start-period=5s --retries=3 \
    CMD python -c "import sys; sys.exit(0)"

# Run the MCP server
CMD ["python", "server.py"]
Dockerfile configuration explanation:
- Base Image:
python:3.12-slim-bookworm- Lightweight Python image - Working Directory:
/app- Application root directory - Port:
8081- Smithery platform standard port - Start Command:
python server.py- Run MCP server
Here, we need to Fork the hello-agents repository, get the source code in code, and create a repository named weather-mcp-server using your own GitHub, changing yourusername to your GitHub username.
(3) Submit to Smithery
Open your browser and visit https://smithery.ai/. Log in to Smithery using your GitHub account. Click the "Publish Server" button on the page, enter your GitHub repository URL: https://github.com/yourusername/weather-mcp-server, and wait for publication.
Once publication is complete, you can see a page similar to this, as shown in Figure 10.10:
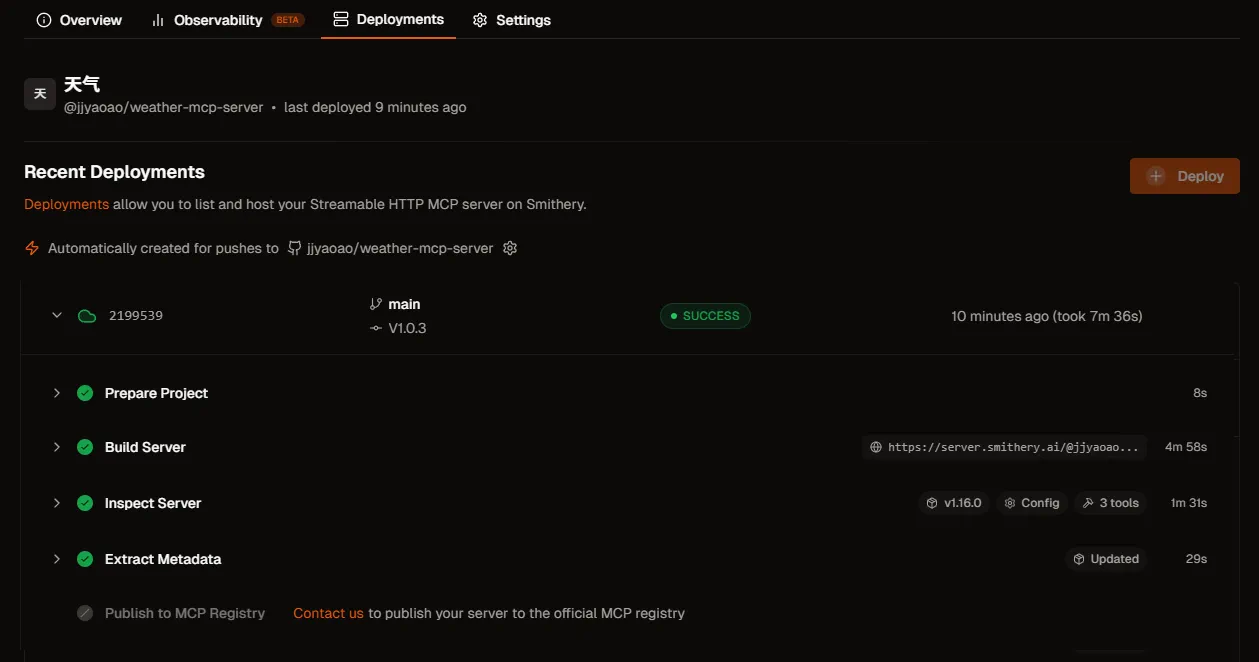
Figure 10.10 Smithery Publication Success Page
Once the server is successfully published, users can use it in the following ways:
Method 1: Through Smithery CLI
# Install Smithery CLI
npm install -g @smithery/cli

# Install your server
smithery install weather-mcp-server
Method 2: Configure in Claude Desktop
{
  "mcpServers": {
    "weather": {
      "command": "smithery",
      "args": ["run", "weather-mcp-server"]
    }
  }
}
Method 3: Use in HelloAgents
from hello_agents import SimpleAgent, HelloAgentsLLM
from hello_agents.tools.builtin.protocol_tools import MCPTool

agent = SimpleAgent(name="Weather Assistant", llm=HelloAgentsLLM())

# Use Smithery-installed server
weather_tool = MCPTool(
    server_command=["smithery", "run", "weather-mcp-server"]
)
agent.add_tool(weather_tool)

response = agent.run("How's the weather in Beijing today?")
Of course, this is just an example, and there are more usages to explore on your own. Figure 10.11 below shows the information included when an MCP tool is successfully published, displaying the service name "Weather", its unique identifier @jjyaoao/weather-mcp-server, and status information. The Tools area shows the methods we just implemented, and the Connect area provides technical information needed to connect and use this service, including the service's access URL address and configuration code snippets in multiple languages/environments. If you want to learn more, you can click this link.
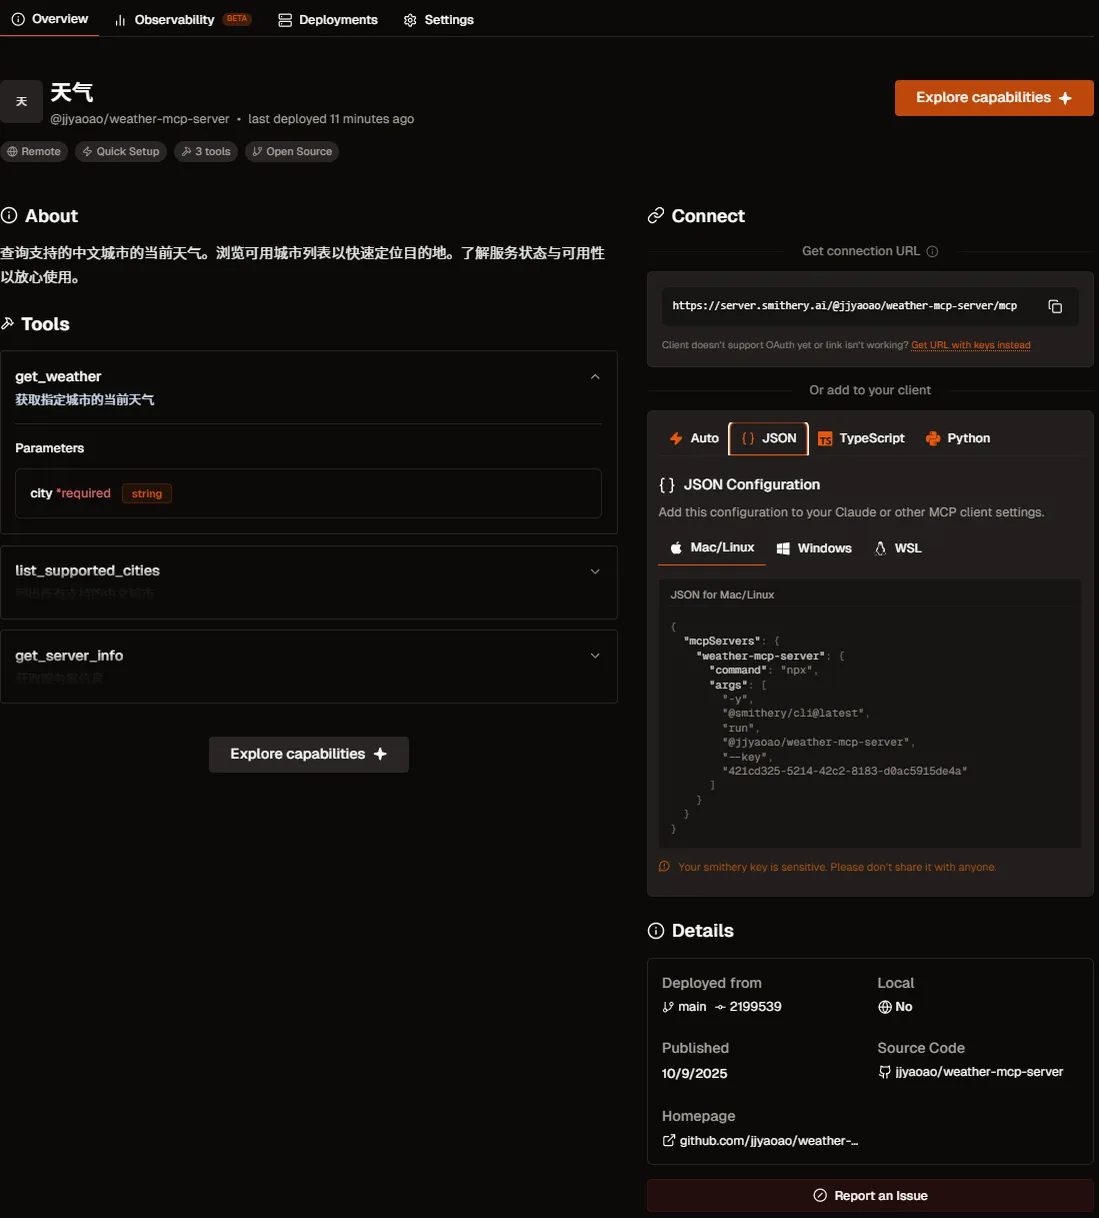
Figure 10.11 Successfully Published MCP Tool on Smithery
Now it's time to create your own MCP server!