15.1 Project Overview and Architecture Design
15.1.1 Why Build an AI Town
NPCs in traditional games can usually only say fixed lines or have limited interactions through preset dialogue trees. Even in the most complex RPG games, NPC dialogues are pre-written by scriptwriters. This approach is controllable but lacks real "intelligence" and "vitality".
Imagine if NPCs in games could understand anything you say, no longer limited to preset options. You can communicate with NPCs in natural language. NPCs will remember what you said last time, your relationship, and even your preferences. Each NPC has their own profession, personality, and speaking style. NPC attitudes towards you change with interactions, from strangers to friends, even close friends.
This is the new possibility that AI technology brings to games. By combining large language models with game engines, we can create NPCs that are truly "alive". This is not just a technical demonstration, but an exploration of future game forms. In educational games, NPCs can play historical figures and scientists, conducting interactive teaching with students. In virtual offices, NPCs can play colleagues and mentors, providing help and advice. NPCs can also serve as companions, conducting emotional communication with users, applied in mental health fields. Of course, the most direct application is to add AI NPCs to traditional games to enhance player experience.
15.1.2 Technical Architecture Overview
Cyber Town adopts a game engine + back-end service separation architecture, divided into four layers, as shown in Figure 15.1.
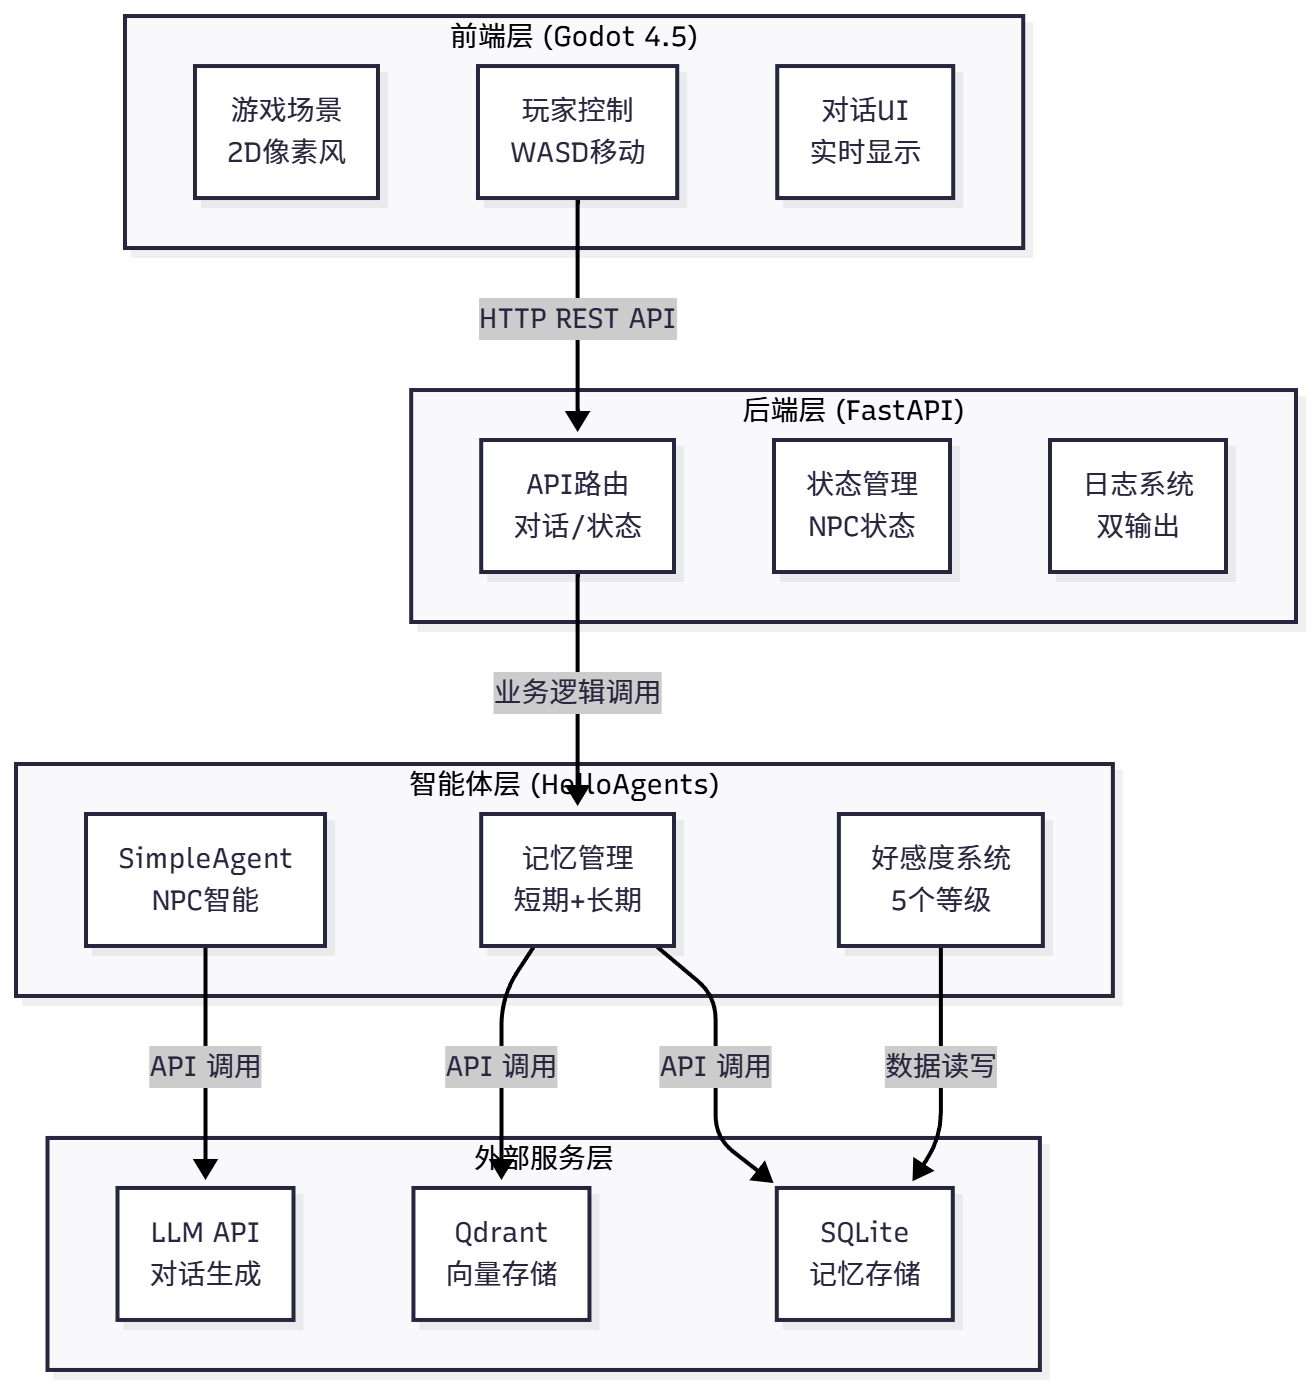
Figure 15.1 Cyber Town Technical Architecture
The front-end layer uses the Godot 4.5 game engine, responsible for game rendering, player control, NPC display, and dialogue UI. Godot is an open-source 2D/3D game engine, very suitable for quickly developing pixel-style games. The back-end layer uses the FastAPI framework, responsible for API routing, NPC state management, dialogue processing, and logging. FastAPI is a modern Python web framework with excellent performance and easy development. The agent layer uses our own HelloAgents framework, responsible for NPC intelligence, memory management, and affection calculation. Each NPC is a SimpleAgent instance with independent memory and state. The external service layer provides LLM capabilities, vector storage, and data persistence, including LLM API, Qdrant vector database, and SQLite relational database.
The data flow process is shown in Figure 15.2:
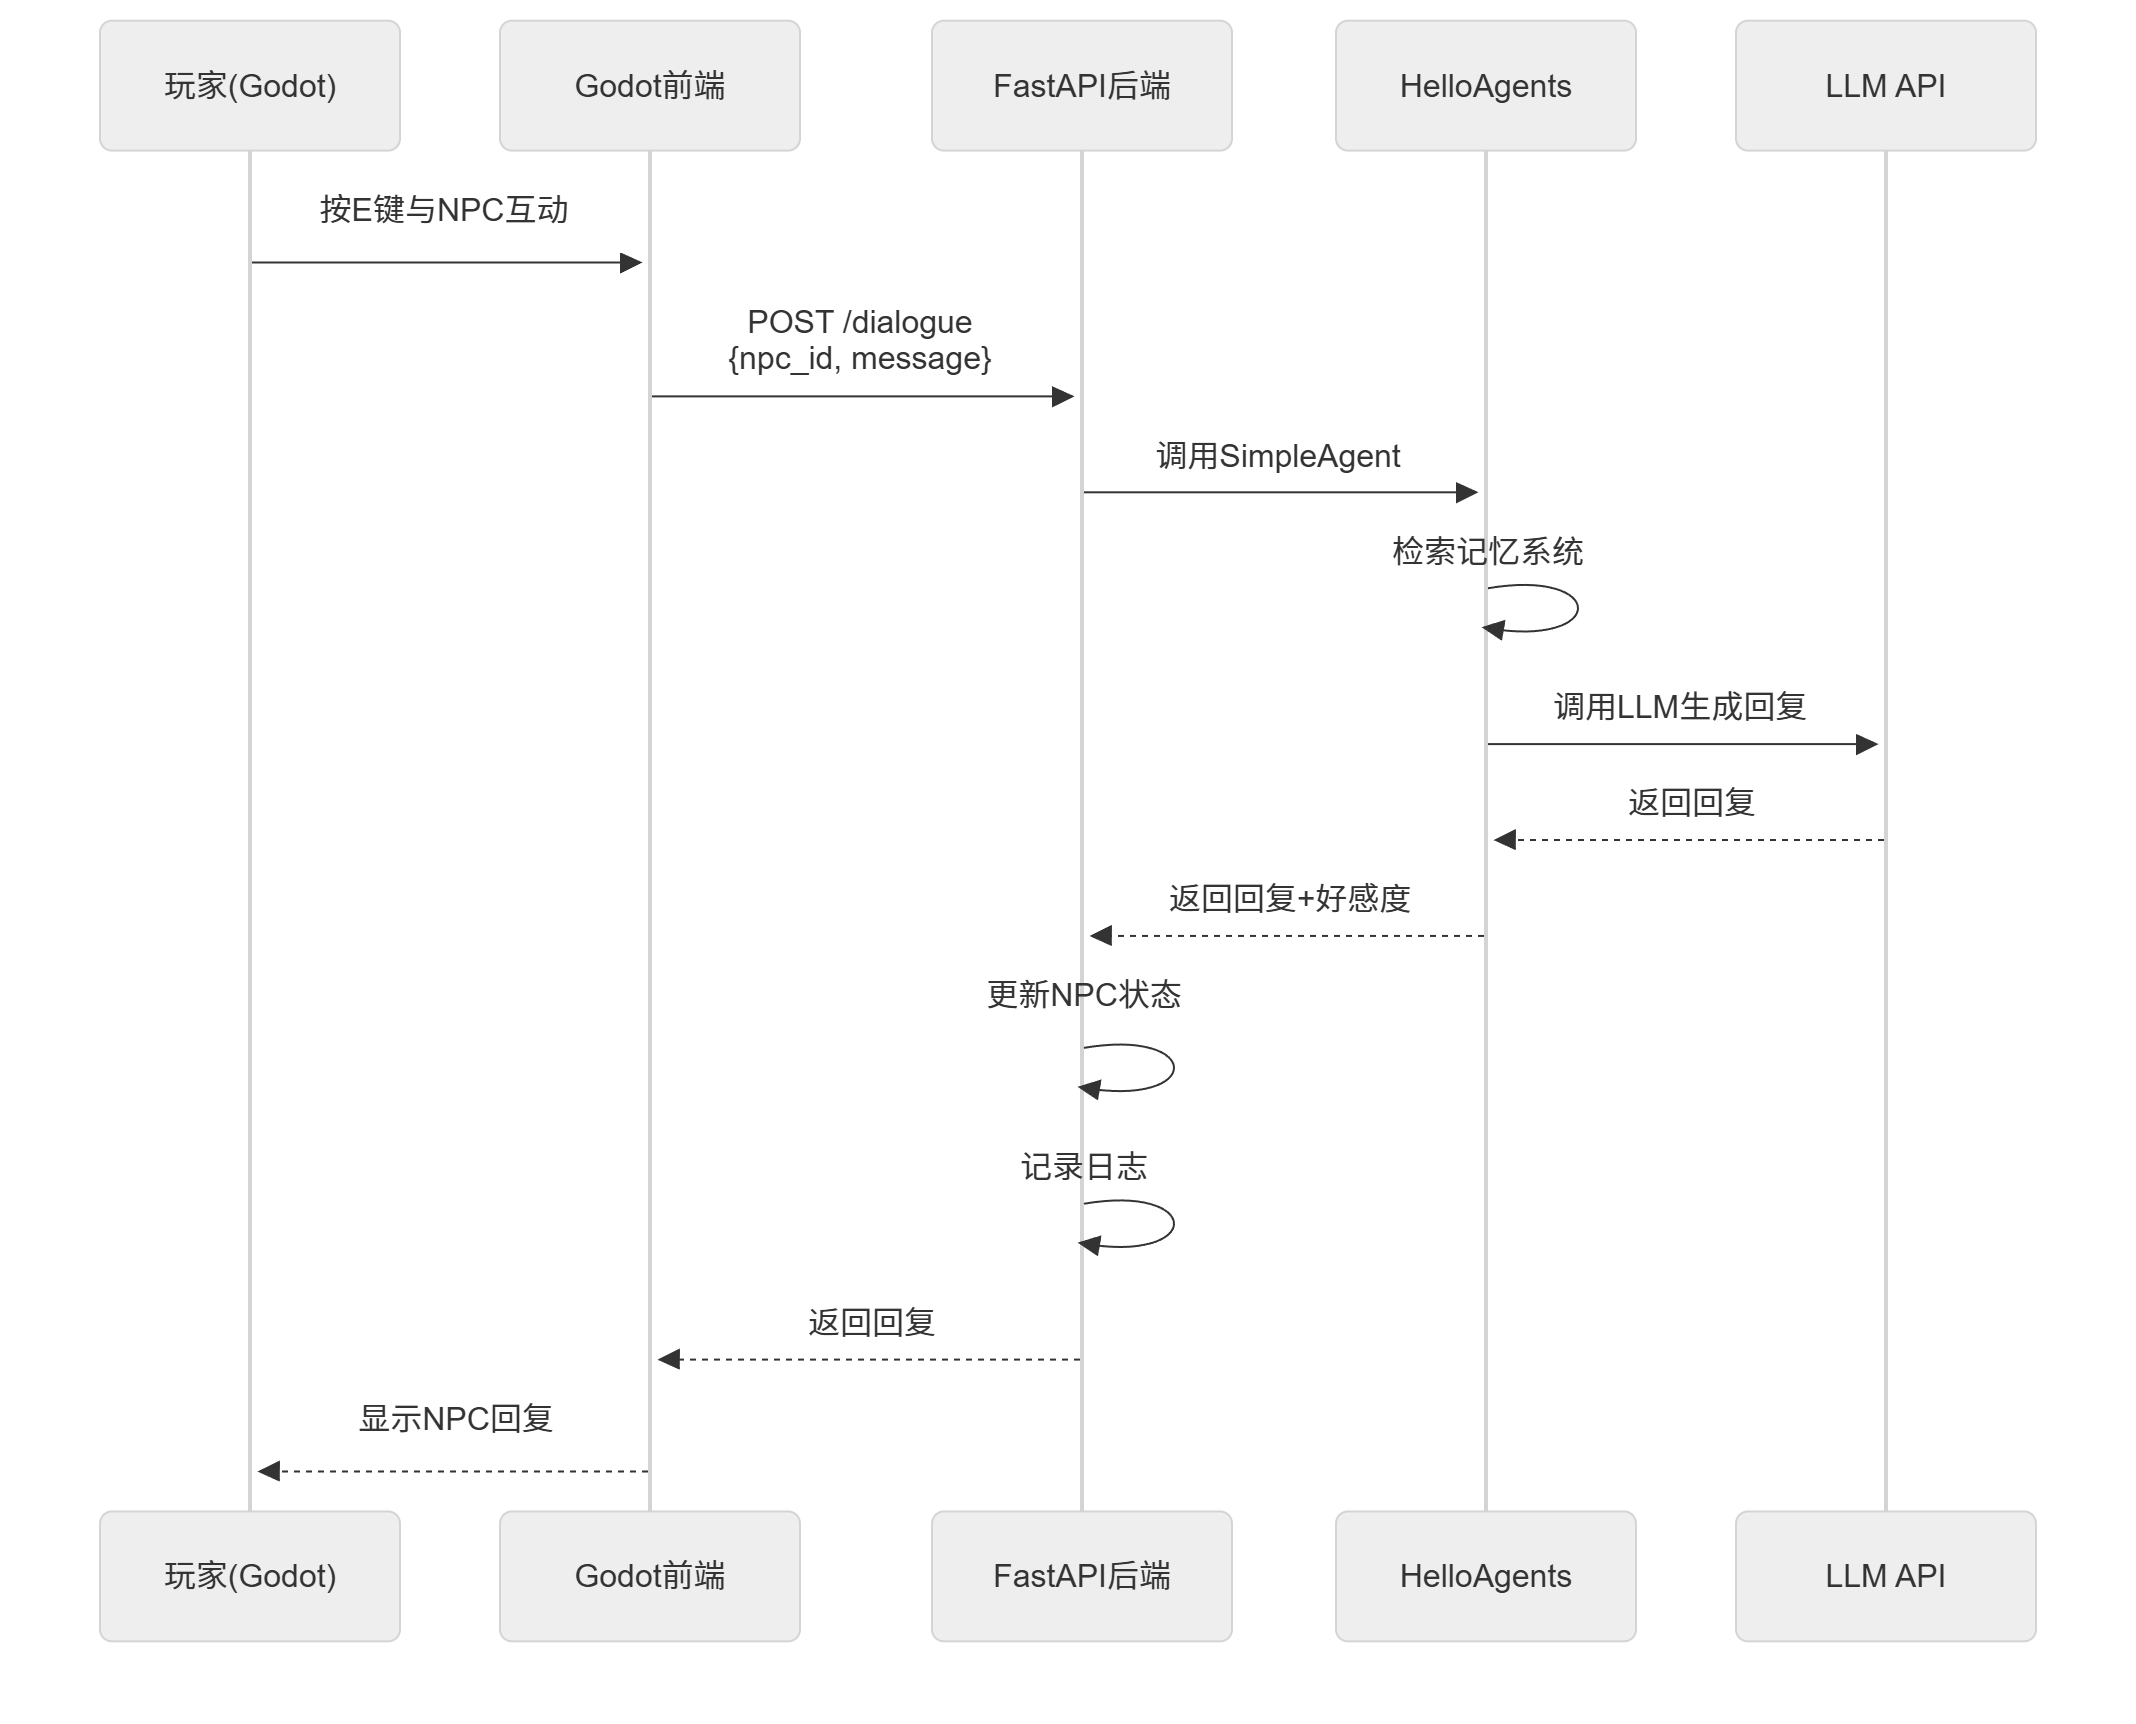
Figure 15.2 Data Flow Process
Players press the E key in Godot to interact with NPCs, and Godot sends dialogue requests to the FastAPI back-end via HTTP API. The back-end calls HelloAgents' SimpleAgent to process the dialogue, the Agent retrieves relevant history from the memory system, and then calls the LLM to generate a reply. The back-end updates NPC state and affection, records logs to console and file, and finally returns the reply to the Godot front-end. Godot displays the NPC reply and updates the UI, completing a complete interaction loop.
The project structure is as follows, making it easy for you to locate the source code:
Helloagents-AI-Town/
├── helloagents-ai-town/           # Godot game project
│   ├── project.godot              # Godot project configuration
│   ├── scenes/                    # Game scenes
│   │   ├── main.tscn              # Main scene (office)
│   │   ├── player.tscn            # Player character
│   │   ├── npc.tscn               # NPC character
│   │   └── dialogue_ui.tscn       # Dialogue UI
│   ├── scripts/                   # GDScript scripts
│   │   ├── main.gd                # Main scene logic
│   │   ├── player.gd              # Player control
│   │   ├── npc.gd                 # NPC behavior
│   │   ├── dialogue_ui.gd         # Dialogue UI logic
│   │   ├── api_client.gd          # API client
│   │   └── config.gd              # Configuration management
│   └── assets/                    # Game assets
│       ├── characters/            # Character sprites
│       ├── interiors/             # Interior scenes
│       ├── ui/                    # UI materials
│       └── audio/                 # Sound effects and music
│
└── backend/                       # Python back-end
    ├── main.py                    # FastAPI main program
    ├── agents.py                  # NPC Agent system
    ├── relationship_manager.py    # Affection management
    ├── state_manager.py           # State management
    ├── logger.py                  # Logging system
    ├── config.py                  # Configuration management
    ├── models.py                  # Data models
    ├── requirements.txt           # Python dependencies
    └── .env.example               # Environment variable example
Detailed architecture design and data flow will be introduced in subsequent sections.
15.1.3 Quick Experience: Run the Project in 5 Minutes
Before diving into implementation details, let's first run the project to see the final result. This way you'll have an intuitive understanding of the entire system.
Environment Requirements:
- Godot 4.2 or higher
- Python 3.10 or higher
- LLM API key (OpenAI, DeepSeek, Zhipu, etc.)
Get the Project:
You can check code/chapter15/Helloagents-AI-Town, or clone the complete hello-agents repository from GitHub.
Start the Back-End:
# 1. Enter backend directory
cd Helloagents-AI-Town/backend

# 2. Install dependencies
pip install -r requirements.txt

# 3. Configure environment variables
cp .env.example .env
# Edit .env file, fill in your API key

# 4. Start back-end service
python main.py
After successful startup, you will see the following output:
============================================================
🎮 Cyber Town back-end service starting...
============================================================
✅ All services started!
📡 API address: http://0.0.0.0:8000
📚 API documentation: http://0.0.0.0:8000/docs
============================================================
Start Godot:
Godot installation is very simple. Windows provides a direct .exe file, and Mac also provides a .dmg file. You can download directly from the official website (Windows / Mac)
Open the Godot engine, click the "Import" button, browse to Helloagents-AI-Town/helloagents-ai-town/scenes/main.tscn, and click "Import and Edit". After Godot imports the resources, press F5 or click the "Run" button to start the game.
Experience Core Features:
After the game starts, you will see a pixel-style Datawhale office scene, as shown in Figure 15.3.
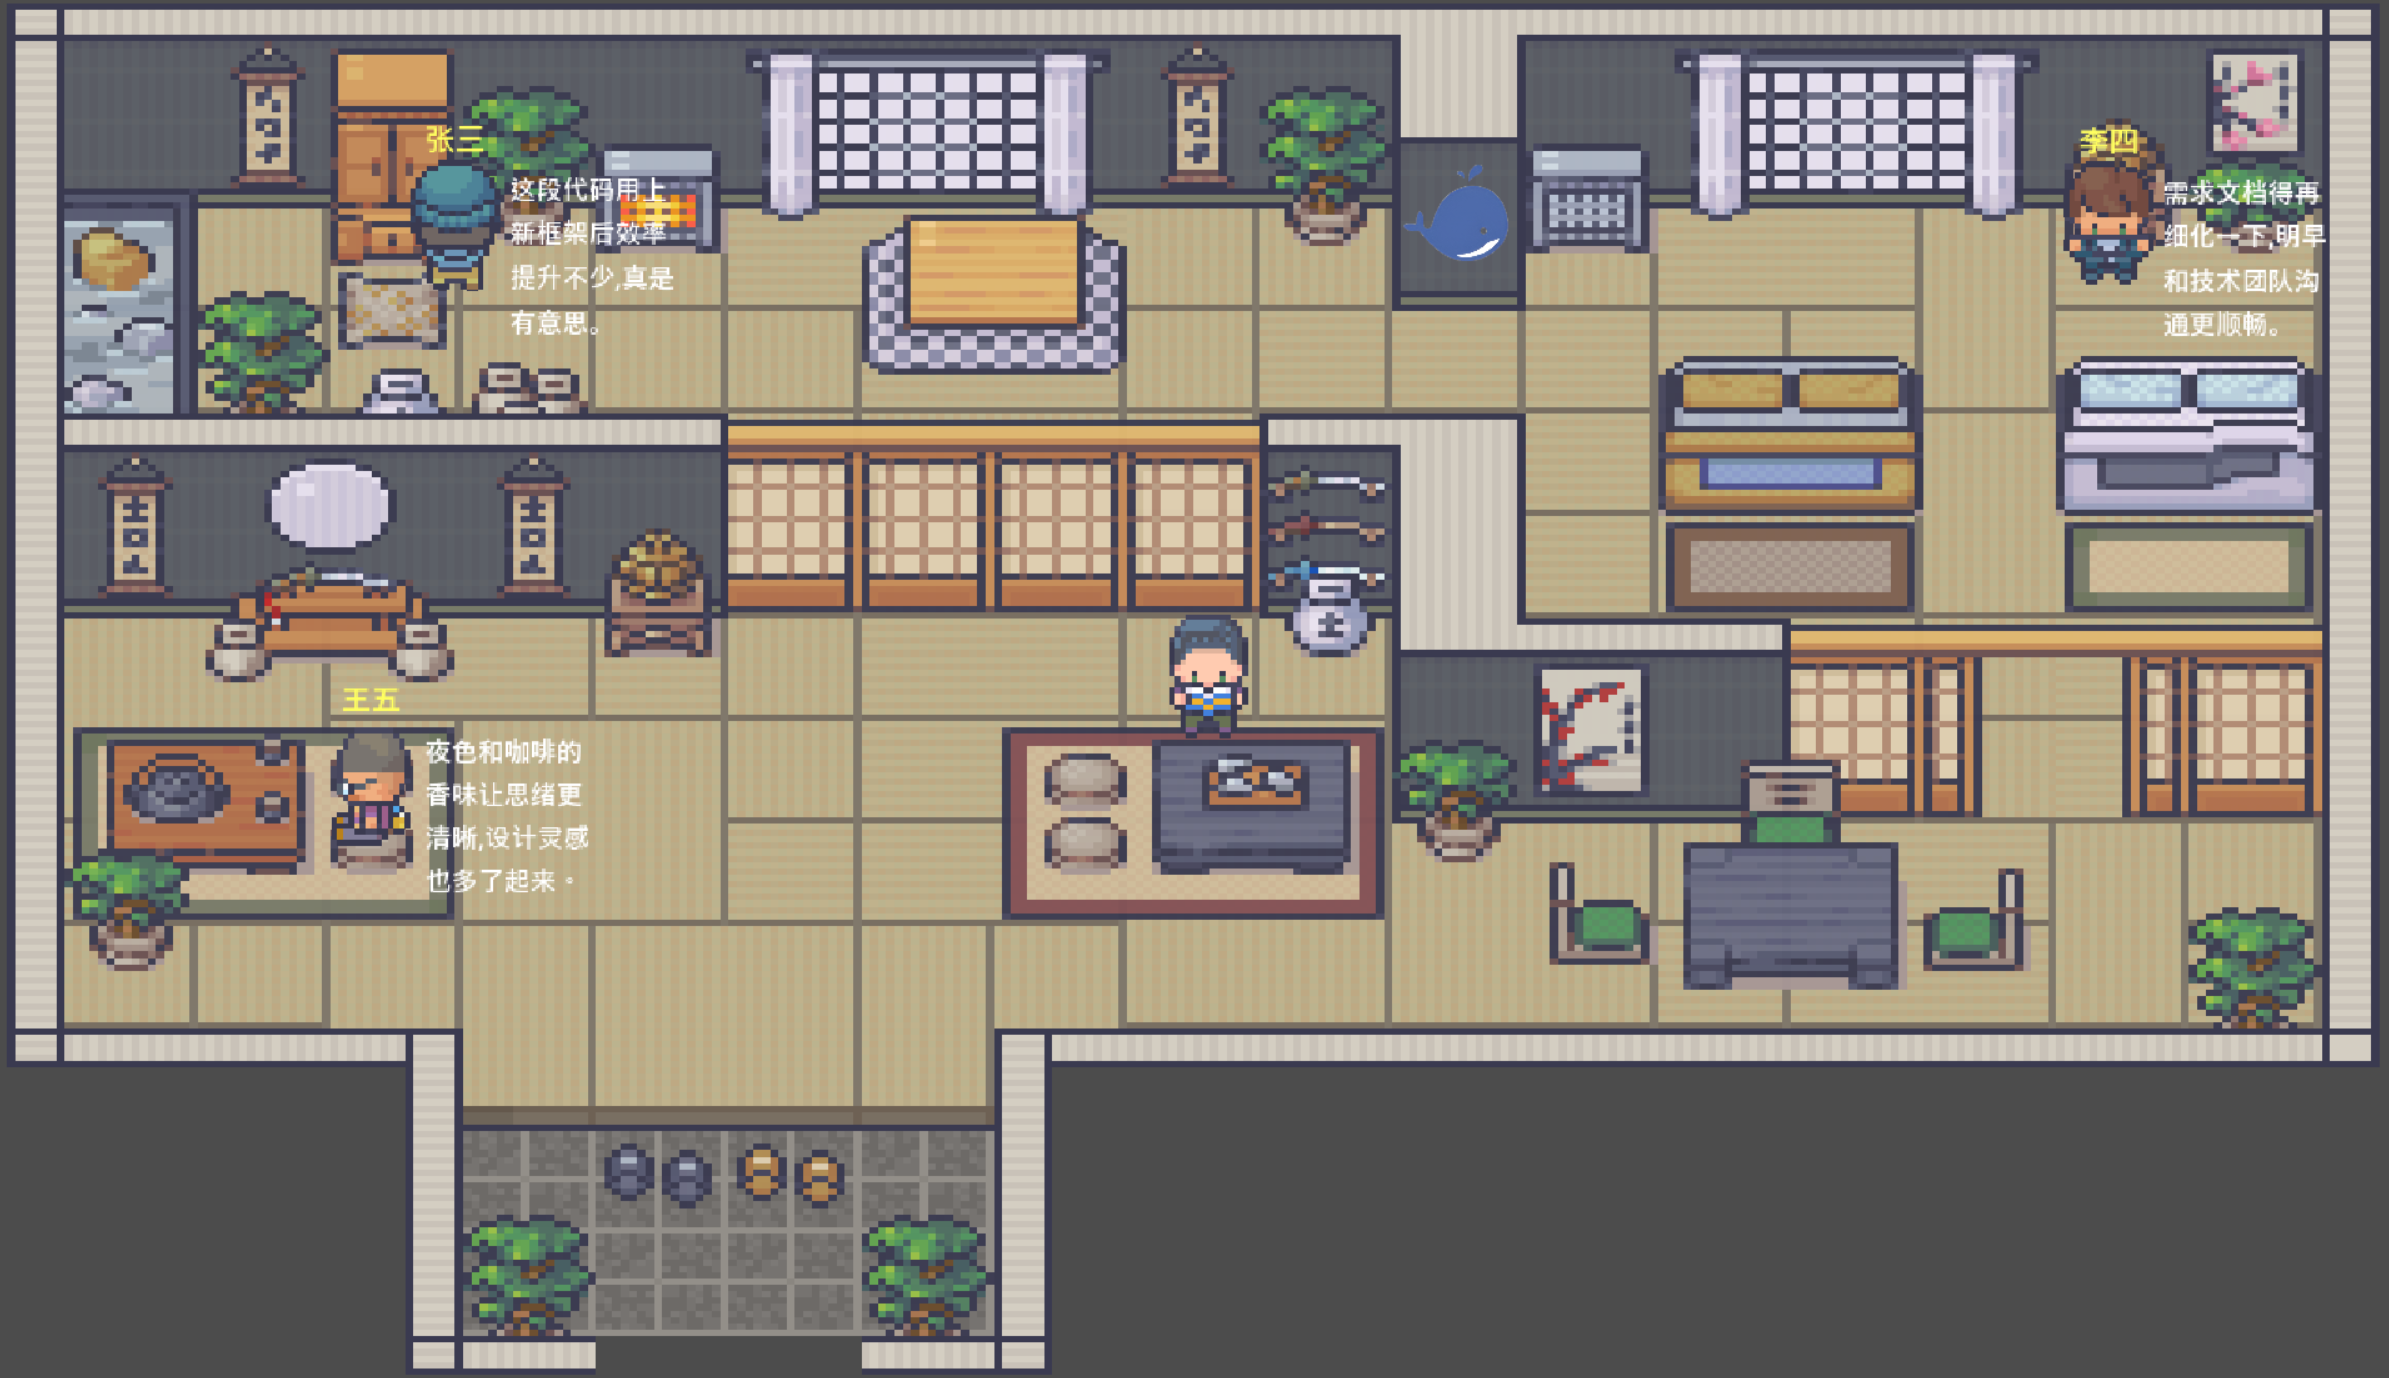
Figure 15.3 Cyber Town Game Scene
Use WASD keys to move the player character. When you walk near an NPC, the screen will display a "Press E to interact" prompt. After pressing the E key, a dialogue box will pop up, and you can enter anything you want to say, as shown in Figure 15.4.
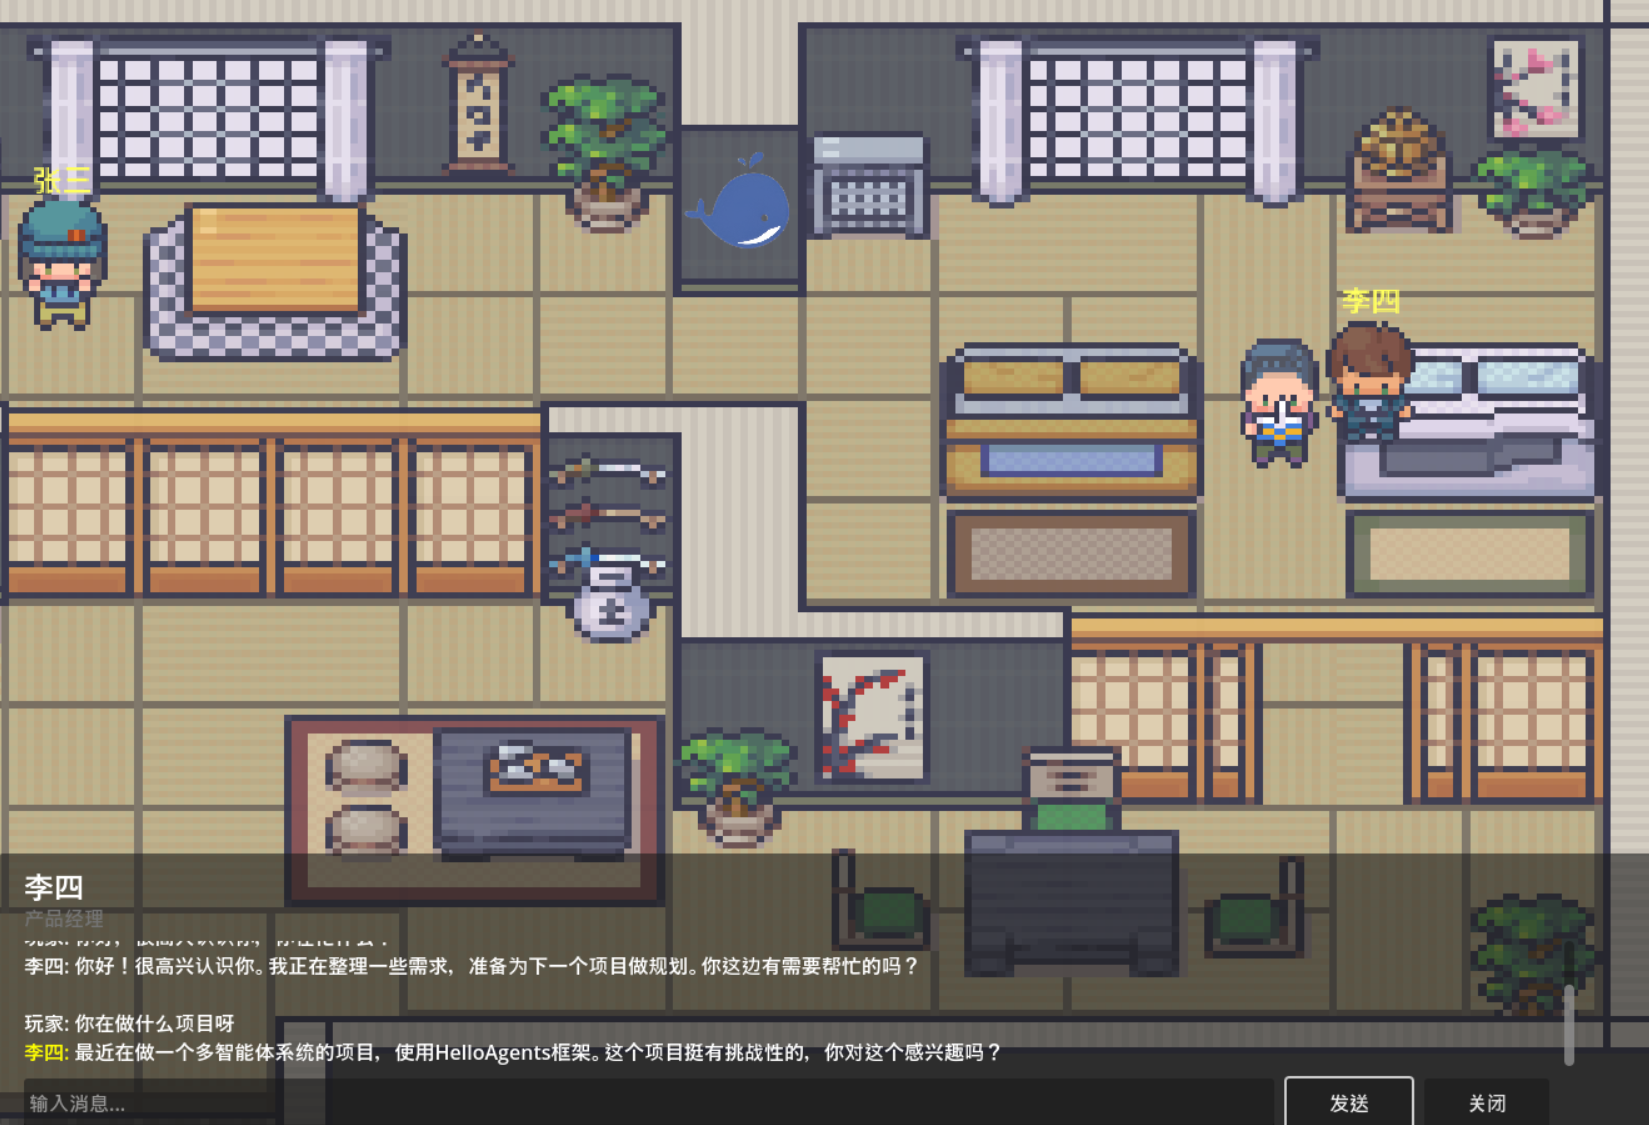
Figure 15.4 Dialogue Interface with NPC
NPCs will respond based on their role settings (Python engineer, product manager, UI designer) and your interaction history. As the conversation progresses, the NPC's affection towards you will gradually increase, from "stranger" to "familiar", then to "friendly", "intimate", and even "close friend".
The affection system is implemented in the back-end. Each conversation adjusts the affection value based on the player's message content and sentiment analysis. Although the affection value is not directly displayed in the front-end game interface, all affection changes are recorded in detail in the back-end logs. You can view the affection changes for each conversation in the backend/logs/dialogue_YYYY-MM-DD.log file. The log file records detailed information for each conversation, including: current affection value, retrieved relevant memories, NPC's reply, affection change amount (+2.0, +3.0, etc.), reason for change (friendly greeting, normal communication, etc.), and sentiment analysis results (positive, neutral, etc.). This design allows developers to clearly track the relationship development between NPCs and players, and also provides a data foundation for adding affection UI to the front-end later.
All conversations are recorded in the back-end log files. You can view them in real-time with the following command:
# In the backend directory
python view_logs.py
This simple experience demonstrates the core features of AI Town. Next, we will dive into how to implement these features.