10.2 MCP Protocol in Practice
Now, let's dive into MCP and master how to enable agents to access external tools and resources.
10.2.1 MCP Protocol Concept Introduction
(1) MCP: The "USB-C" for Agents
Imagine that your agent might need to do many things simultaneously, such as:
- Read documents from the local file system
- Query PostgreSQL databases
- Search code on GitHub
- Send Slack messages
- Access Google Drive
Traditionally, you would need to write adapter code for each service, handling different APIs, authentication methods, error handling, etc. This is not only labor-intensive but also difficult to maintain. More importantly, different LLM platforms have vastly different function call implementations, requiring extensive code rewrites when switching models.
MCP's emergence changed all this. Just as USB-C unified the connection methods for various devices, MCP unified the interaction methods between agents and external tools. Whether you use Claude, GPT, or other models, as long as they support the MCP protocol, they can seamlessly access the same tools and resources.
(2) MCP Architecture
The MCP protocol adopts a three-layer architecture design of Host, Client, and Servers. Let's understand how these components work together through the scenario in Figure 10.5.
Suppose you are using Claude Desktop and asking: "What documents are on my desktop?"
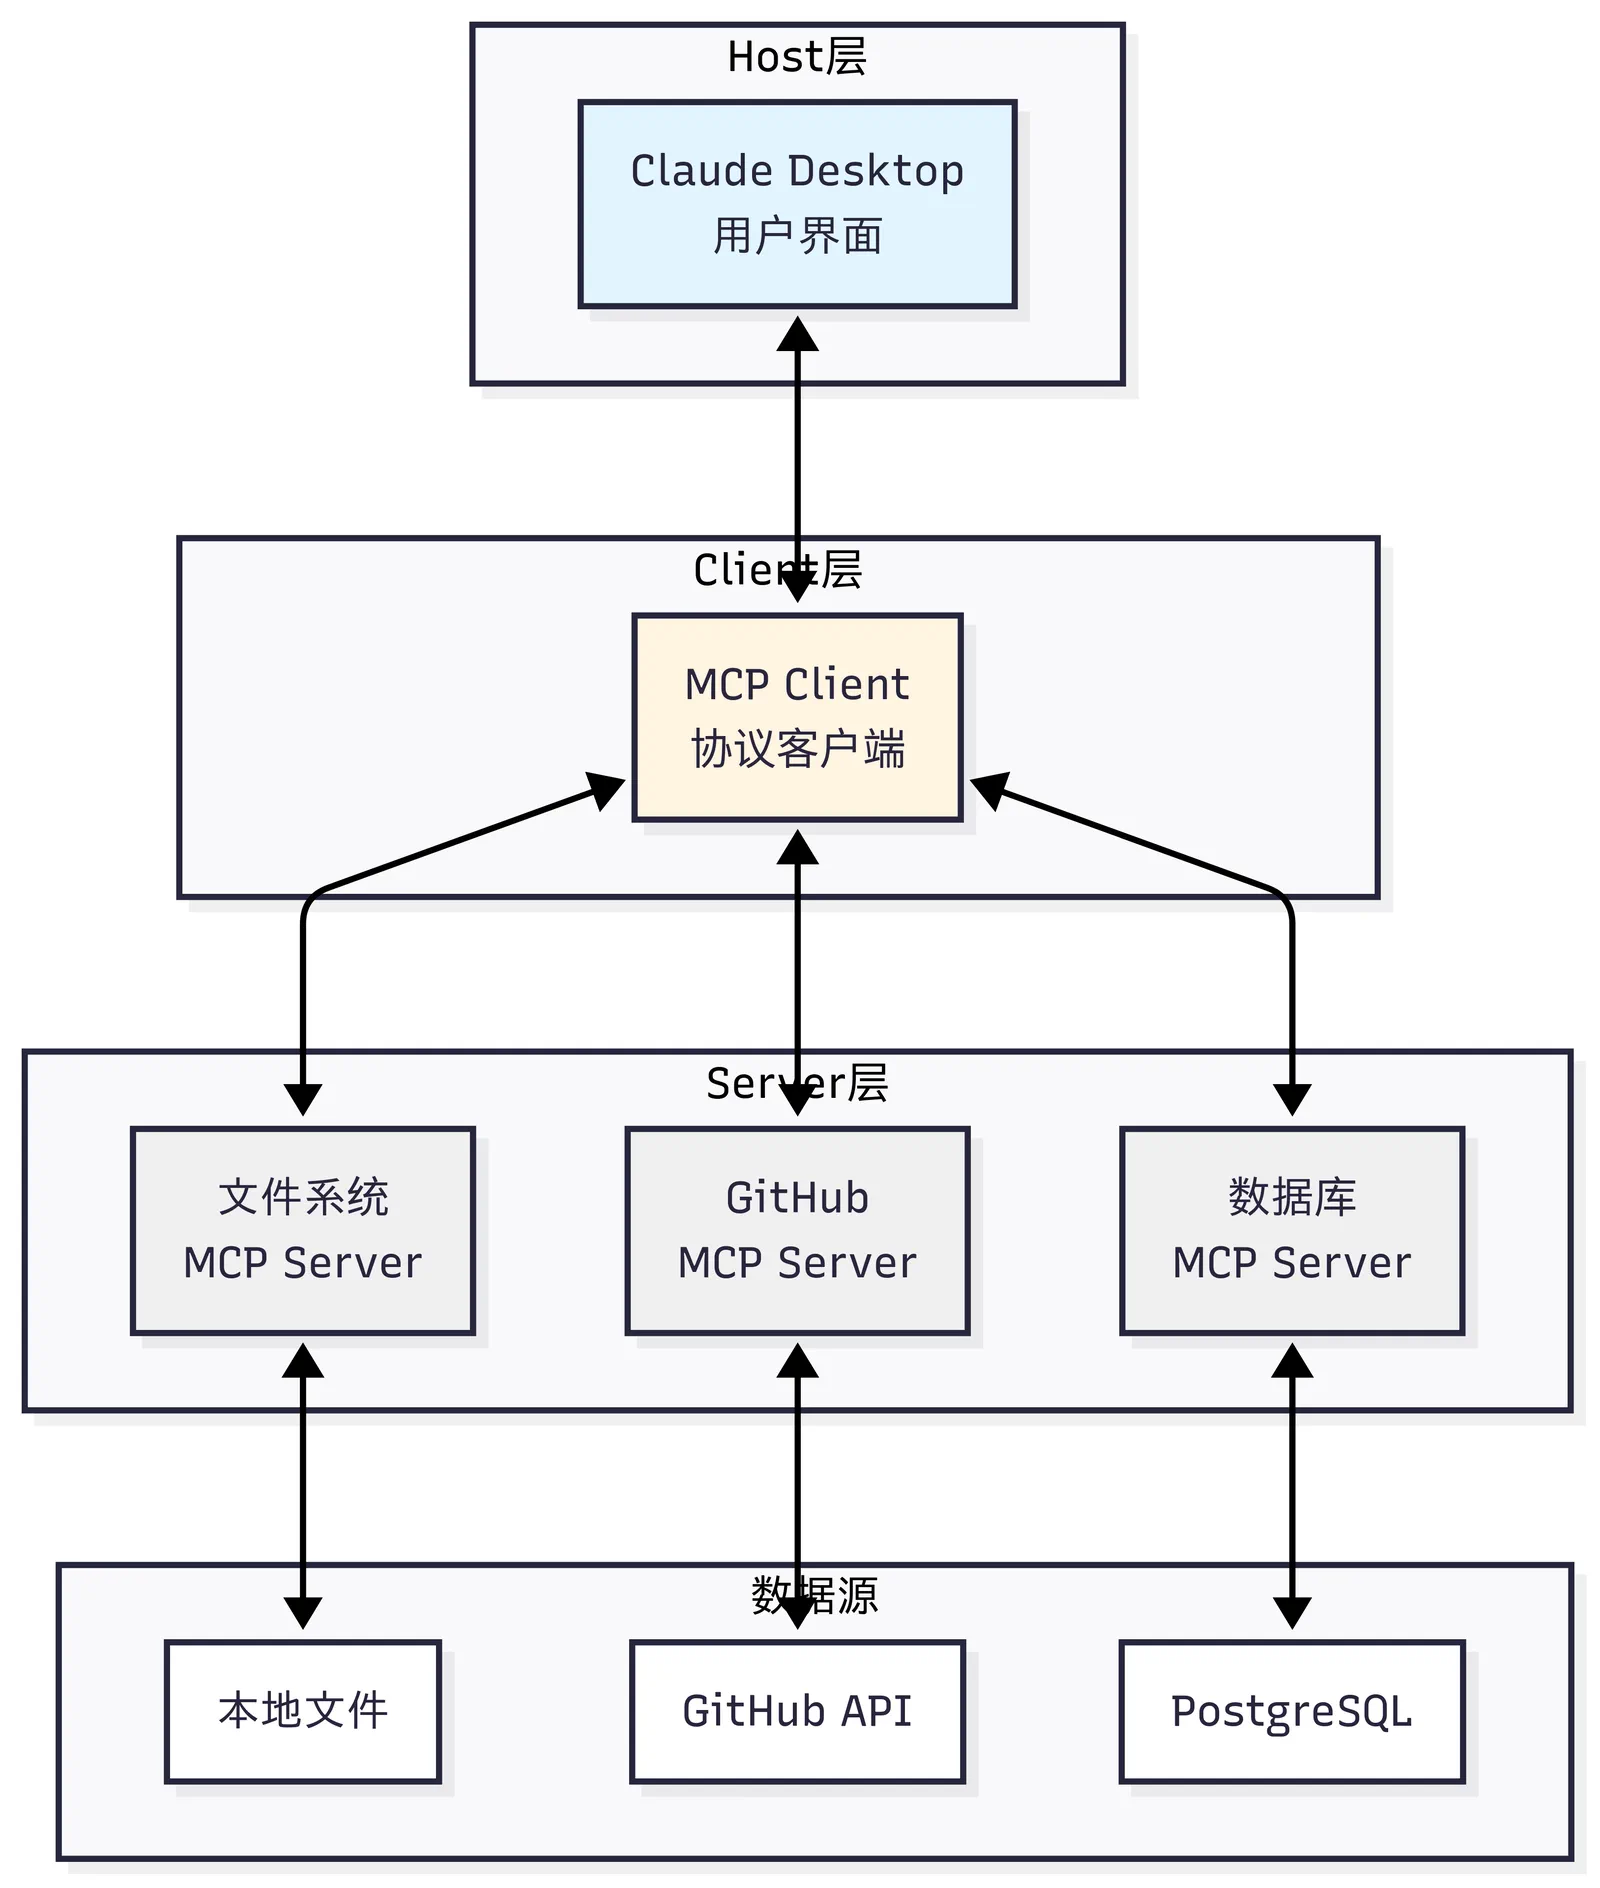
Figure 10.5 MCP Case Demonstration
Responsibilities of the Three-Layer Architecture:
Host (Host Layer): Claude Desktop acts as the Host, responsible for receiving user questions and interacting with the Claude model. The Host is the interface users directly interact with, managing the entire conversation flow.
Client (Client Layer): When the Claude model decides it needs to access the file system, the MCP Client built into the Host is activated. The Client is responsible for establishing connections with the appropriate MCP Server, sending requests, and receiving responses.
Server (Server Layer): The file system MCP Server is called, executes the actual file scanning operation, accesses the desktop directory, and returns the list of found documents.
Complete Interaction Flow: User question → Claude Desktop (Host) → Claude model analysis → Needs file information → MCP Client connection → File system MCP Server → Execute operation → Return result → Claude generates answer → Display on Claude Desktop
The advantage of this architectural design lies in separation of concerns: The Host focuses on user experience, the Client focuses on protocol communication, and the Server focuses on specific functionality implementation. Developers only need to focus on developing the corresponding MCP Server without caring about the implementation details of the Host and Client.
(3) Core Capabilities of MCP
As shown in Table 10.2, the MCP protocol provides three core capabilities, forming a complete tool access framework:
Table 10.2 MCP Core Capabilities

The difference between these three capabilities is: Tools are active (execute operations), Resources are passive (provide data), Prompts are instructive (provide templates).
(4) MCP Workflow
Let's understand the complete workflow of MCP through a specific example, as shown in Figure 10.6:
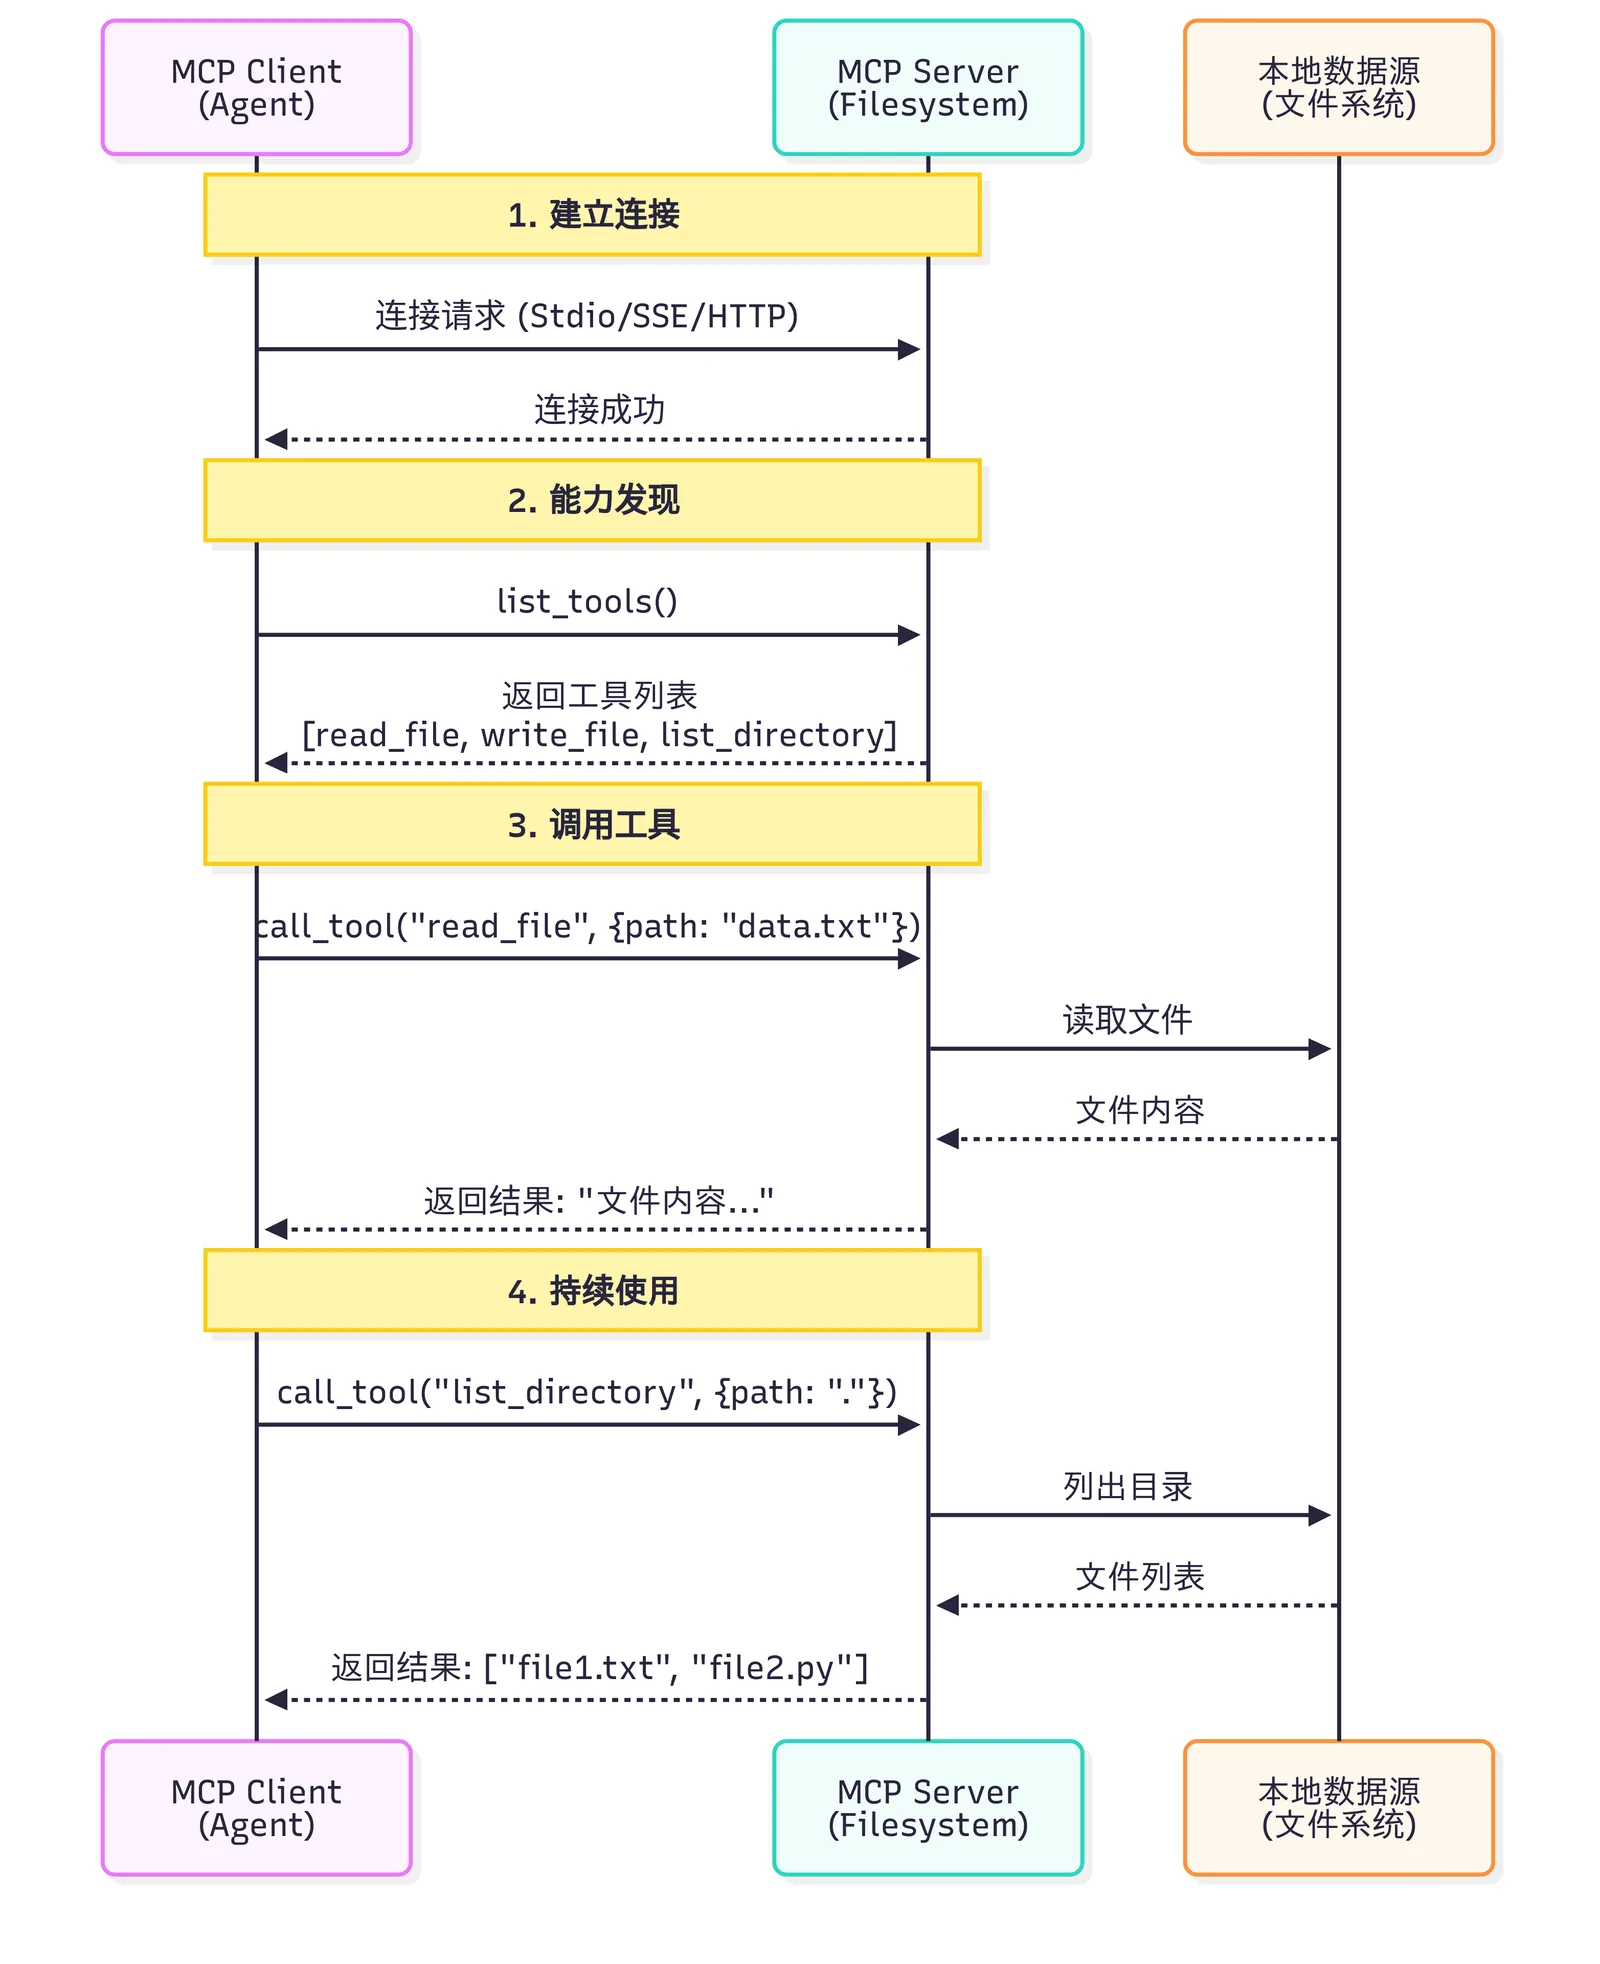
Figure 10.6 MCP Case Demonstration
A key question is: How does Claude (or other LLMs) decide which tools to use?
When a user asks a question, the complete tool selection process is as follows:
Tool Discovery Phase: After the MCP Client connects to the Server, it first calls
list_tools()to obtain description information for all available tools (including tool name, function description, parameter definition)Context Building: The Client converts the tool list into a format the LLM can understand and adds it to the system prompt. For example:
You can use the following tools:
- read_file(path: str): Read the content of the file at the specified path
- search_code(query: str, language: str): Search in the codebase
Model Reasoning: The LLM analyzes the user's question and available tools, deciding whether to call tools and which tool to call. This decision is based on the tool descriptions and current conversation context
Tool Execution: If the LLM decides to use a tool, the Client executes the selected tool through the MCP Server and obtains the result
Result Integration: The tool execution result is sent back to the LLM, which combines the result to generate the final answer
This process is fully automated, and the LLM will decide whether to use and how to use tools based on the quality of tool descriptions. Therefore, writing clear and accurate tool descriptions is crucial.
(5) Differences Between MCP and Function Calling
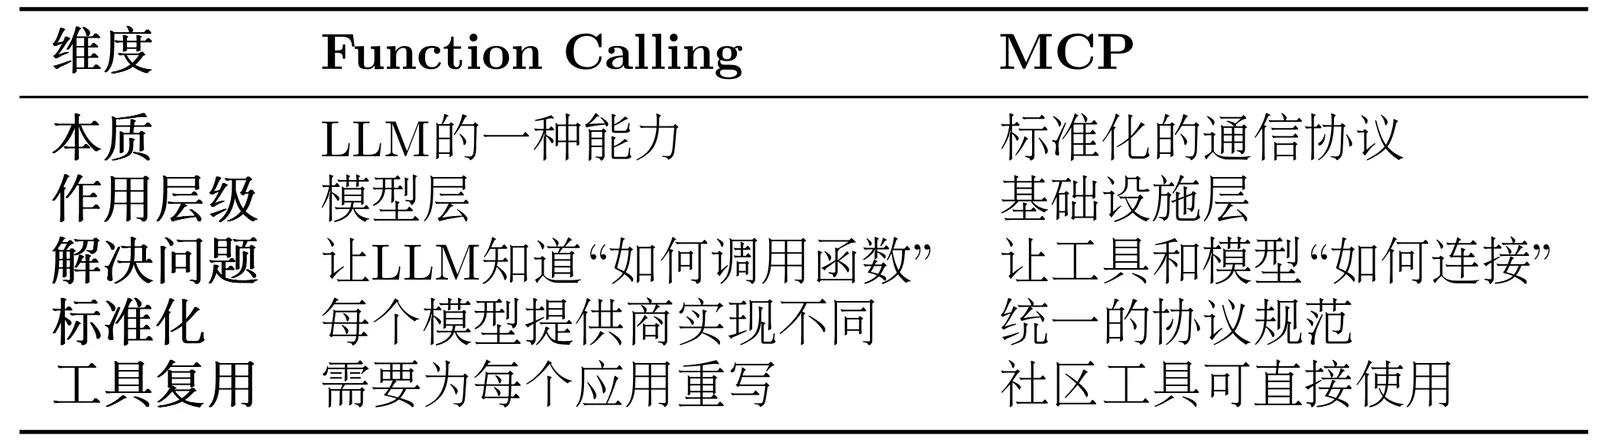
Many developers ask: I'm already using Function Calling, why do I still need MCP? Let's understand their differences through Table 10.3.
Table 10.3 Function Calling vs MCP Comparison
Here we use the example of an agent needing to access GitHub repositories and the local file system to compare two implementations of the same task in detail.
Method 1: Using Function Calling
# Step 1: Define functions for each LLM provider
# OpenAI format
openai_tools = [
    {
        "type": "function",
        "function": {
            "name": "search_github",
            "description": "Search GitHub repositories",
            "parameters": {
                "type": "object",
                "properties": {
                    "query": {"type": "string", "description": "Search keywords"}
                },
                "required": ["query"]
            }
        }
    }
]

# Claude format
claude_tools = [
    {
        "name": "search_github",
        "description": "Search GitHub repositories",
        "input_schema": {  # Note: not parameters
            "type": "object",
            "properties": {
                "query": {"type": "string", "description": "Search keywords"}
            },
            "required": ["query"]
        }
    }
]

# Step 2: Implement tool functions yourself
def search_github(query):
    import requests
    response = requests.get(
        "https://api.github.com/search/repositories",
        params={"q": query}
    )
    return response.json()

# Step 3: Handle different model response formats
# OpenAI response
if response.choices[0].message.tool_calls:
    tool_call = response.choices[0].message.tool_calls[0]
    result = search_github(**json.loads(tool_call.function.arguments))

# Claude response
if response.content[0].type == "tool_use":
    tool_use = response.content[0]
    result = search_github(**tool_use.input)
Method 2: Using MCP
from hello_agents.protocols import MCPClient

# Step 1: Connect to community-provided MCP server (no need to implement yourself)
github_client = MCPClient([
    "npx", "-y", "@modelcontextprotocol/server-github"
])

fs_client = MCPClient([
    "npx", "-y", "@modelcontextprotocol/server-filesystem", "."
])

# Step 2: Unified calling method (model-independent)
async with github_client:
    # Automatically discover tools
    tools = await github_client.list_tools()

    # Call tool (standardized interface)
    result = await github_client.call_tool(
        "search_repositories",
        {"query": "AI agents"}
    )

# Step 3: Any model supporting MCP can use it
# OpenAI, Claude, Llama, etc. all use the same MCP client
First, it needs to be clarified that Function Calling and MCP are not in competition, but rather complementary. Function Calling is a core capability of large language models, reflecting the model's inherent intelligence, enabling the model to understand when to call functions and precisely generate corresponding call parameters. In contrast, MCP plays the role of an infrastructure protocol, solving the engineering problem of how tools connect with models at the engineering level, describing and calling tools in a standardized way.
We can use a simple analogy to understand: Function Calling is equivalent to learning the skill of "how to make a phone call", including when to dial, how to communicate with the other party, and when to hang up. MCP, on the other hand, is that globally unified "telephone communication standard" that ensures any phone can successfully dial another.
After understanding their complementary relationship, let's next see how to use the MCP protocol in HelloAgents.
10.2.2 Using MCP Client
HelloAgents implements complete MCP client functionality based on FastMCP 2.0. We provide both asynchronous and synchronous APIs to suit different usage scenarios. For most applications, the asynchronous API is recommended as it better handles concurrent requests and long-running operations. Below we will provide a step-by-step operation demonstration.
(1) Connecting to MCP Server
The MCP client supports multiple connection methods, with the most common being Stdio mode (communicating with local processes through standard input/output):
import asyncio
from hello_agents.protocols import MCPClient

async def connect_to_server():
    # Method 1: Connect to community-provided file system server
    # npx will automatically download and run the @modelcontextprotocol/server-filesystem package
    client = MCPClient([
        "npx", "-y",
        "@modelcontextprotocol/server-filesystem",
        "."  # Specify root directory
    ])

    # Use async with to ensure connection is properly closed
    async with client:
        # Use client here
        tools = await client.list_tools()
        print(f"Available tools: {[t['name'] for t in tools]}")

    # Method 2: Connect to custom Python MCP server
    client = MCPClient(["python", "my_mcp_server.py"])
    async with client:
        # Use client...
        pass

# Run async function
asyncio.run(connect_to_server())
(2) Discovering Available Tools
After successful connection, the first step is usually to query what tools the server provides:
async def discover_tools():
    client = MCPClient(["npx", "-y", "@modelcontextprotocol/server-filesystem", "."])

    async with client:
        # Get all available tools
        tools = await client.list_tools()

        print(f"Server provides {len(tools)} tools:")
        for tool in tools:
            print(f"\nTool name: {tool['name']}")
            print(f"Description: {tool.get('description', 'No description')}")

            # Print parameter information
            if 'inputSchema' in tool:
                schema = tool['inputSchema']
                if 'properties' in schema:
                    print("Parameters:")
                    for param_name, param_info in schema['properties'].items():
                        param_type = param_info.get('type', 'any')
                        param_desc = param_info.get('description', '')
                        print(f"  - {param_name} ({param_type}): {param_desc}")

asyncio.run(discover_tools())

# Output example:
# Server provides 5 tools:
#
# Tool name: read_file
# Description: Read file content
# Parameters:
#   - path (string): File path
#
# Tool name: write_file
# Description: Write file content
# Parameters:
#   - path (string): File path
#   - content (string): File content
(3) Calling Tools
When calling tools, simply provide the tool name and parameters conforming to JSON Schema:
async def use_tools():
    client = MCPClient(["npx", "-y", "@modelcontextprotocol/server-filesystem", "."])

    async with client:
        # Read file
        result = await client.call_tool("read_file", {"path": "my_README.md"})
        print(f"File content:\n{result}")

        # List directory
        result = await client.call_tool("list_directory", {"path": "."})
        print(f"Current directory files: {result}")

        # Write file
        result = await client.call_tool("write_file", {
            "path": "output.txt",
            "content": "Hello from MCP!"
        })
        print(f"Write result: {result}")

asyncio.run(use_tools())
Here's a safer way to call MCP services for reference:
async def safe_tool_call():
    client = MCPClient(["npx", "-y", "@modelcontextprotocol/server-filesystem", "."])

    async with client:
        try:
            # Try to read a potentially non-existent file
            result = await client.call_tool("read_file", {"path": "nonexistent.txt"})
            print(result)
        except Exception as e:
            print(f"Tool call failed: {e}")
            # Can choose to retry, use default value, or report error to user

asyncio.run(safe_tool_call())
(4) Accessing Resources
Besides tools, MCP servers can also provide resources:
# List available resources
resources = client.list_resources()
print(f"Available resources: {[r['uri'] for r in resources]}")

# Read resource
resource_content = client.read_resource("file:///path/to/resource")
print(f"Resource content: {resource_content}")
(5) Using Prompt Templates
MCP servers can provide predefined prompt templates:
# List available prompts
prompts = client.list_prompts()
print(f"Available prompts: {[p['name'] for p in prompts]}")

# Get prompt content
prompt = client.get_prompt("code_review", {"language": "python"})
print(f"Prompt content: {prompt}")
(6) Complete Example: Using GitHub MCP Service
Let's see how to use the community-provided GitHub MCP service through a complete example, using the encapsulated MCP Tools:
"""
GitHub MCP Service Example

Note: Need to set environment variable
    Windows: $env:GITHUB_PERSONAL_ACCESS_TOKEN="your_token_here"
    Linux/macOS: export GITHUB_PERSONAL_ACCESS_TOKEN="your_token_here"
"""

from hello_agents.tools import MCPTool

# Create GitHub MCP tool
github_tool = MCPTool(
    server_command=["npx", "-y", "@modelcontextprotocol/server-github"]
)

# 1. List available tools
print("📋 Available tools:")
result = github_tool.run({"action": "list_tools"})
print(result)

# 2. Search repositories
print("\n🔍 Search repositories:")
result = github_tool.run({
    "action": "call_tool",
    "tool_name": "search_repositories",
    "arguments": {
        "query": "AI agents language:python",
        "page": 1,
        "perPage": 3
    }
})
print(result)
10.2.3 MCP Transport Methods Explained
An important feature of the MCP protocol is transport agnosticism. This means the MCP protocol itself does not depend on specific transport methods and can run on different communication channels. HelloAgents, based on FastMCP 2.0, provides complete transport method support, allowing you to choose the most appropriate transport mode based on actual scenarios.
(1) Transport Methods Overview
HelloAgents' MCPClient supports five transport methods, each with different use cases, as shown in Table 10.4:
Table 10.4 MCP Transport Methods Comparison

(2) Transport Method Usage Examples
from hello_agents.tools import MCPTool

# 1. Memory Transport - Memory transport (for testing)
# No parameters specified, uses built-in demo server
mcp_tool = MCPTool()

# 2. Stdio Transport - Standard input/output transport (local development)
# Use command list to start local server
mcp_tool = MCPTool(server_command=["python", "examples/mcp_example_server.py"])

# 3. Stdio Transport with Args - Command transport with parameters
# Can pass additional parameters
mcp_tool = MCPTool(server_command=["python", "examples/mcp_example_server.py", "--debug"])

# 4. Stdio Transport - Community server (npx method)
# Use npx to start community MCP server
mcp_tool = MCPTool(server_command=["npx", "-y", "@modelcontextprotocol/server-filesystem", "."])

# 5. HTTP/SSE/StreamableHTTP Transport
# Note: MCPTool is mainly for Stdio and Memory transport
# For HTTP/SSE and other remote transports, recommend using MCPClient directly
(3) Memory Transport
Use case: Unit testing, rapid prototyping
from hello_agents.tools import MCPTool

# Use built-in demo server (Memory transport)
mcp_tool = MCPTool()

# List available tools
result = mcp_tool.run({"action": "list_tools"})
print(result)

# Call tool
result = mcp_tool.run({
    "action": "call_tool",
    "tool_name": "add",
    "arguments": {"a": 10, "b": 20}
})
print(result)
(4) Stdio Transport - Standard Input/Output Transport
Use case: Local development, debugging, Python script servers
from hello_agents.tools import MCPTool

# Method 1: Use custom Python server
mcp_tool = MCPTool(server_command=["python", "my_mcp_server.py"])

# Method 2: Use community server (file system)
mcp_tool = MCPTool(server_command=["npx", "-y", "@modelcontextprotocol/server-filesystem", "."])

# List tools
result = mcp_tool.run({"action": "list_tools"})
print(result)

# Call tool
result = mcp_tool.run({
    "action": "call_tool",
    "tool_name": "read_file",
    "arguments": {"path": "README.md"}
})
print(result)
(5) HTTP Transport
Use case: Production environment, remote services, microservice architecture
# Note: MCPTool is mainly for Stdio and Memory transport
# For HTTP/SSE and other remote transports, recommend using underlying MCPClient

import asyncio
from hello_agents.protocols import MCPClient

async def test_http_transport():
    # Connect to remote HTTP MCP server
    client = MCPClient("http://api.example.com/mcp")

    async with client:
        # Get server information
        tools = await client.list_tools()
        print(f"Remote server tools: {len(tools)} tools")

        # Call remote tool
        result = await client.call_tool("process_data", {
            "data": "Hello, World!",
            "operation": "uppercase"
        })
        print(f"Remote processing result: {result}")

# Note: Requires actual HTTP MCP server
# asyncio.run(test_http_transport())
(6) SSE Transport - Server-Sent Events Transport
Use case: Real-time communication, streaming processing, long connections
# Note: MCPTool is mainly for Stdio and Memory transport
# For SSE transport, recommend using underlying MCPClient

import asyncio
from hello_agents.protocols import MCPClient

async def test_sse_transport():
    # Connect to SSE MCP server
    client = MCPClient(
        "http://localhost:8080/sse",
        transport_type="sse"
    )

    async with client:
        # SSE is especially suitable for streaming processing
        result = await client.call_tool("stream_process", {
            "input": "Large data processing request",
            "stream": True
        })
        print(f"Streaming processing result: {result}")

# Note: Requires MCP server supporting SSE
# asyncio.run(test_sse_transport())
(7) StreamableHTTP Transport - Streaming HTTP Transport
Use case: HTTP scenarios requiring bidirectional streaming communication
# Note: MCPTool is mainly for Stdio and Memory transport
# For StreamableHTTP transport, recommend using underlying MCPClient

import asyncio
from hello_agents.protocols import MCPClient

async def test_streamable_http_transport():
    # Connect to StreamableHTTP MCP server
    client = MCPClient(
        "http://localhost:8080/mcp",
        transport_type="streamable_http"
    )

    async with client:
        # Supports bidirectional streaming communication
        tools = await client.list_tools()
        print(f"StreamableHTTP server tools: {len(tools)} tools")

# Note: Requires MCP server supporting StreamableHTTP
# asyncio.run(test_streamable_http_transport())
10.2.4 Using MCP Tools in Agents
Previously, we learned how to use the MCP client directly. But in practical applications, we prefer to have agents automatically call MCP tools rather than manually writing calling code. HelloAgents provides the MCPTool wrapper, allowing MCP servers to seamlessly integrate into the agent's tool chain.
(1) Automatic Expansion Mechanism of MCP Tools
HelloAgents' MCPTool has a feature: automatic expansion. When you add an MCP tool to an Agent, it automatically expands all tools provided by the MCP server into independent tools, allowing the Agent to call them like ordinary tools.
Method 1: Using Built-in Demo Server
We previously implemented calculator tool functions, and here we convert them into MCP services. This is the simplest usage method.
from hello_agents import SimpleAgent, HelloAgentsLLM
from hello_agents.tools import MCPTool

agent = SimpleAgent(name="Assistant", llm=HelloAgentsLLM())

# No configuration needed, automatically uses built-in demo server
mcp_tool = MCPTool(name="calculator")
agent.add_tool(mcp_tool)
# ✅ MCP tool 'calculator' expanded into 6 independent tools

# Agent can directly use expanded tools
response = agent.run("Calculate 25 times 16")
print(response)  # Output: The result of 25 times 16 is 400
Tools after automatic expansion:
calculator_add- Addition calculatorcalculator_subtract- Subtraction calculatorcalculator_multiply- Multiplication calculatorcalculator_divide- Division calculatorcalculator_greet- Friendly greetingcalculator_get_system_info- Get system information
When the Agent calls, it only needs to provide parameters, for example: [TOOL_CALL:calculator_multiply:a=25,b=16], and the system will automatically handle type conversion and MCP calls.
Method 2: Connecting to External MCP Servers
In actual projects, you need to connect to more powerful MCP servers. These servers can be:
- Community-provided official servers (such as file system, GitHub, database, etc.)
- Custom servers you write yourself (encapsulating business logic)
from hello_agents import SimpleAgent, HelloAgentsLLM
from hello_agents.tools import MCPTool

agent = SimpleAgent(name="File Assistant", llm=HelloAgentsLLM())

# Example 1: Connect to community-provided file system server
fs_tool = MCPTool(
    name="filesystem",  # Specify unique name
    description="Access local file system",
    server_command=["npx", "-y", "@modelcontextprotocol/server-filesystem", "."]
)
agent.add_tool(fs_tool)

# Example 2: Connect to custom Python MCP server
# For how to write custom MCP servers, refer to Section 10.5
custom_tool = MCPTool(
    name="custom_server",  # Use different name
    description="Custom business logic server",
    server_command=["python", "my_mcp_server.py"]
)
agent.add_tool(custom_tool)

# Agent can now automatically use these tools!
response = agent.run("Please read the my_README.md file and summarize its main content")
print(response)
When using multiple MCP servers, be sure to specify a different name for each MCPTool. This name will be added as a prefix to the expanded tool names to avoid conflicts. For example: name="fs" will expand to fs_read_file, fs_write_file, etc. If you need to write your own MCP server to encapsulate specific business logic, refer to Section 10.5.
(2) How MCP Tool Automatic Expansion Works
Understanding the automatic expansion mechanism helps you better use MCP tools. Let's dive into how it works:
# User code
fs_tool = MCPTool(name="fs", server_command=[...])
agent.add_tool(fs_tool)

# What happens internally:
# 1. MCPTool connects to server, discovers 14 tools
# 2. Creates wrapper for each tool:
#    - fs_read_text_file (parameters: path, tail, head)
#    - fs_write_file (parameters: path, content)
#    - ...
# 3. Registers to Agent's tool registry

# Agent call
response = agent.run("Read README.md")

# Inside Agent:
# 1. Identifies need to call fs_read_text_file
# 2. Generates parameters: path=README.md
# 3. Wrapper converts to MCP format:
#    {"action": "call_tool", "tool_name": "read_text_file", "arguments": {"path": "README.md"}}
# 4. Calls MCP server
# 5. Returns file content
The system automatically converts types based on tool parameter definitions:
# Agent calls calculator
agent.run("Calculate 25 times 16")

# Agent generates: a=25,b=16 (string)
# System automatically converts to: {"a": 25.0, "b": 16.0} (number)
# MCP server receives correct number type
(3) Practical Case: Intelligent Document Assistant
Let's build a complete intelligent document assistant. Here we demonstrate with a simple multi-agent orchestration:
"""
Multi-Agent Collaborative Intelligent Document Assistant

Uses two SimpleAgents for division of labor:
- Agent1: GitHub search expert
- Agent2: Document generation expert
"""
from hello_agents import SimpleAgent, HelloAgentsLLM
from hello_agents.tools import MCPTool
from dotenv import load_dotenv

# Load environment variables from .env file
load_dotenv(dotenv_path="../HelloAgents/.env")

print("="*70)
print("Multi-Agent Collaborative Intelligent Document Assistant")
print("="*70)

# ============================================================
# Agent 1: GitHub Search Expert
# ============================================================
print("\n[Step 1] Creating GitHub search expert...")

github_searcher = SimpleAgent(
    name="GitHub Search Expert",
    llm=HelloAgentsLLM(),
    system_prompt="""You are a GitHub search expert.
Your task is to search GitHub repositories and return results.
Please return clear, structured search results, including:
- Repository name
- Brief description

Keep it concise, don't add extra explanations."""
)

# Add GitHub tool
github_tool = MCPTool(
    name="gh",
    server_command=["npx", "-y", "@modelcontextprotocol/server-github"]
)
github_searcher.add_tool(github_tool)

# ============================================================
# Agent 2: Document Generation Expert
# ============================================================
print("\n[Step 2] Creating document generation expert...")

document_writer = SimpleAgent(
    name="Document Generation Expert",
    llm=HelloAgentsLLM(),
    system_prompt="""You are a document generation expert.
Your task is to generate structured Markdown reports based on provided information.

The report should include:
- Title
- Introduction
- Main content (listed in points, including project names, descriptions, etc.)
- Summary

Please output the complete Markdown format report content directly, do not use tools to save."""
)

# Add file system tool
fs_tool = MCPTool(
    name="fs",
    server_command=["npx", "-y", "@modelcontextprotocol/server-filesystem", "."]
)
document_writer.add_tool(fs_tool)

# ============================================================
# Execute Task
# ============================================================
print("\n" + "="*70)
print("Starting task execution...")
print("="*70)

try:
    # Step 1: GitHub search
    print("\n[Step 3] Agent1 searching GitHub...")
    search_task = "Search for GitHub repositories about 'AI agent', return the top 5 most relevant results"

    search_results = github_searcher.run(search_task)

    print("\nSearch results:")
    print("-" * 70)
    print(search_results)
    print("-" * 70)

    # Step 2: Generate report
    print("\n[Step 4] Agent2 generating report...")
    report_task = f"""
Based on the following GitHub search results, generate a Markdown format research report:

{search_results}

Report requirements:
1. Title: # AI Agent Framework Research Report
2. Introduction: Explain this is a GitHub project survey about AI Agents
3. Main findings: List found projects and their features (including names, descriptions, etc.)
4. Summary: Summarize common characteristics of these projects

Please output the complete Markdown format report directly.
"""

    report_content = document_writer.run(report_task)

    print("\nReport content:")
    print("=" * 70)
    print(report_content)
    print("=" * 70)

    # Step 3: Save report
    print("\n[Step 5] Saving report to file...")
    import os
    try:
        with open("report.md", "w", encoding="utf-8") as f:
            f.write(report_content)
        print("✅ Report saved to report.md")

        # Verify file
        file_size = os.path.getsize("report.md")
        print(f"✅ File size: {file_size} bytes")
    except Exception as e:
        print(f"❌ Save failed: {e}")

    print("\n" + "="*70)
    print("Task completed!")
    print("="*70)

except Exception as e:
    print(f"\n❌ Error: {e}")
    import traceback
    traceback.print_exc()
github_searcher will call gh_search_repositories during this process to search GitHub projects. The obtained results will be returned to document_writer as input, further guiding report generation, and finally saving the report to report.md.
10.2.5 MCP Community Ecosystem
A huge advantage of the MCP protocol is its rich community ecosystem. Anthropic and community developers have created a large number of ready-made MCP servers, covering various scenarios such as file systems, databases, API services, etc. This means you don't need to write tool adapters from scratch and can directly use these verified servers.
Here are three resource repositories for the MCP community:
Awesome MCP Servers (https://github.com/punkpeye/awesome-mcp-servers)
- Community-maintained curated list of MCP servers
- Contains various third-party servers
- Categorized by function, easy to find
MCP Servers Website (https://mcpservers.org/)
- Official MCP server directory website
- Provides search and filtering functions
- Contains usage instructions and examples
Official MCP Servers (https://github.com/modelcontextprotocol/servers)
- Servers officially maintained by Anthropic
- Highest quality, most complete documentation
- Contains implementations of commonly used services
Tables 10.5 and 10.6 show commonly used official MCP servers and popular community MCP servers:
Table 10.5 Commonly Used Official MCP Servers
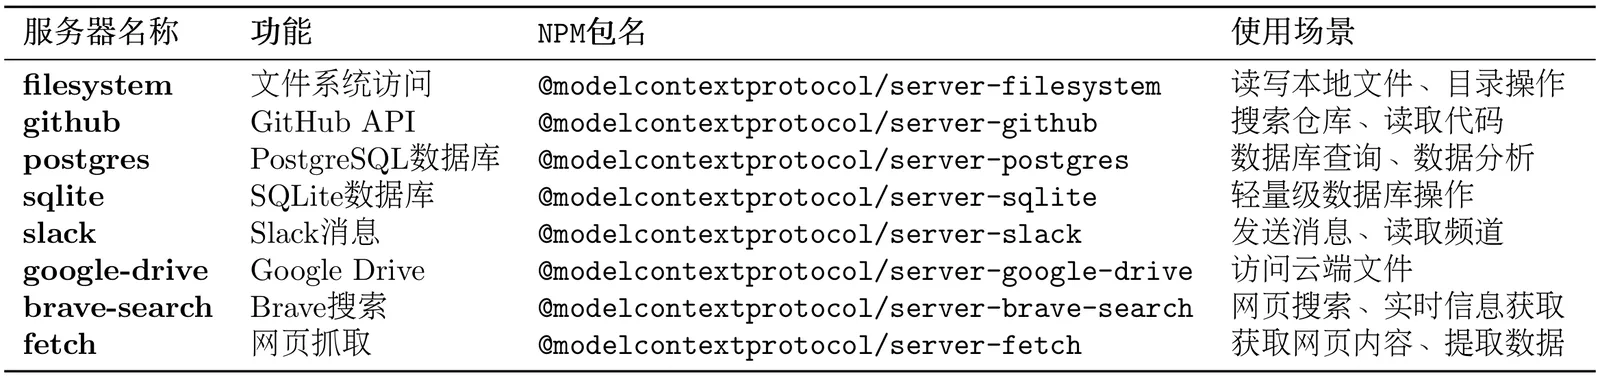
Table 10.6 Popular Community MCP Servers
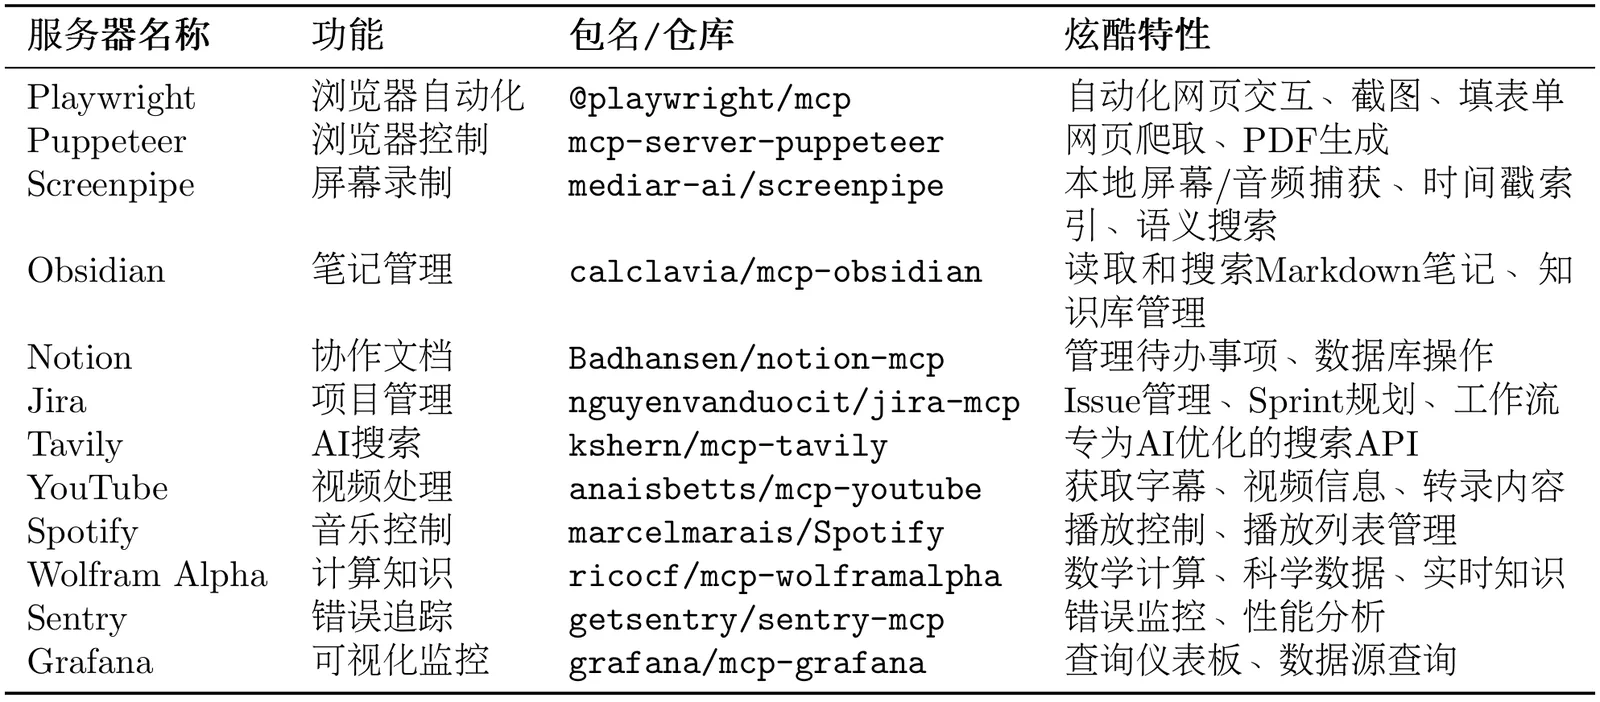
Here are some particularly interesting case TODOs for reference:
Automated Web Testing (Playwright)
python# Agent can automatically: # - Open browser to visit website # - Fill forms and submit # - Screenshot to verify results # - Generate test reports playwright_tool = MCPTool( name="playwright", server_command=["npx", "-y", "@playwright/mcp"] )Intelligent Note Assistant (Obsidian + Perplexity)
python# Agent can: # - Search latest tech news (Perplexity) # - Organize into structured notes # - Save to Obsidian knowledge base # - Automatically establish links between notesProject Management Automation (Jira + GitHub)
python# Agent can: # - Create Jira tasks from GitHub Issues # - Sync code commits to Jira # - Automatically update Sprint progress # - Generate project reportsContent Creation Workflow (YouTube + Notion + Spotify)
python# Agent can: # - Get YouTube video subtitles # - Generate content summaries # - Save to Notion database # - Play background music (Spotify)
Through this section's explanation, I hope you can explore more MCP implementation cases, and contributions to HelloAgents are welcome! Next, let's learn about the A2A protocol.