13.5 Front-End Development Details
13.5.1 Front-End and Back-End Separation Web Architecture
Before starting front-end development, we need to understand the architecture pattern of modern Web applications. In early Web development, front-end and back-end were mixed together. For example, technologies like PHP and JSP had HTML templates and business logic code written in the same file. This approach is convenient in small projects, but encounters many problems in large projects: front-end and back-end developers need frequent coordination, code is difficult to reuse, and testing is difficult.
Modern Web applications generally adopt a front-end and back-end separation architecture. The back-end is only responsible for providing API interfaces and returning data in JSON format. The front-end is an independent application that calls back-end APIs through HTTP requests, obtains data, and then renders pages. This architecture has several obvious advantages: front-end and back-end can be developed, deployed, and tested independently; the front-end can be a Web application, mobile application, or desktop application, all using the same set of back-end APIs; the front-end can use modern frameworks and toolchains to provide a better user experience.
In our intelligent travel assistant project, the back-end is implemented with Python and FastAPI, providing a core API interface POST /api/trip/plan that receives travel requirements and returns travel plans. The front-end is implemented with Vue 3 and TypeScript, and is a single-page application (SPA). Users fill in forms in the browser, click the "Start Planning" button, the front-end sends an HTTP request to the back-end, waits for a response, and then renders the result page. Throughout this process, the page doesn't refresh, and the user experience is very smooth.
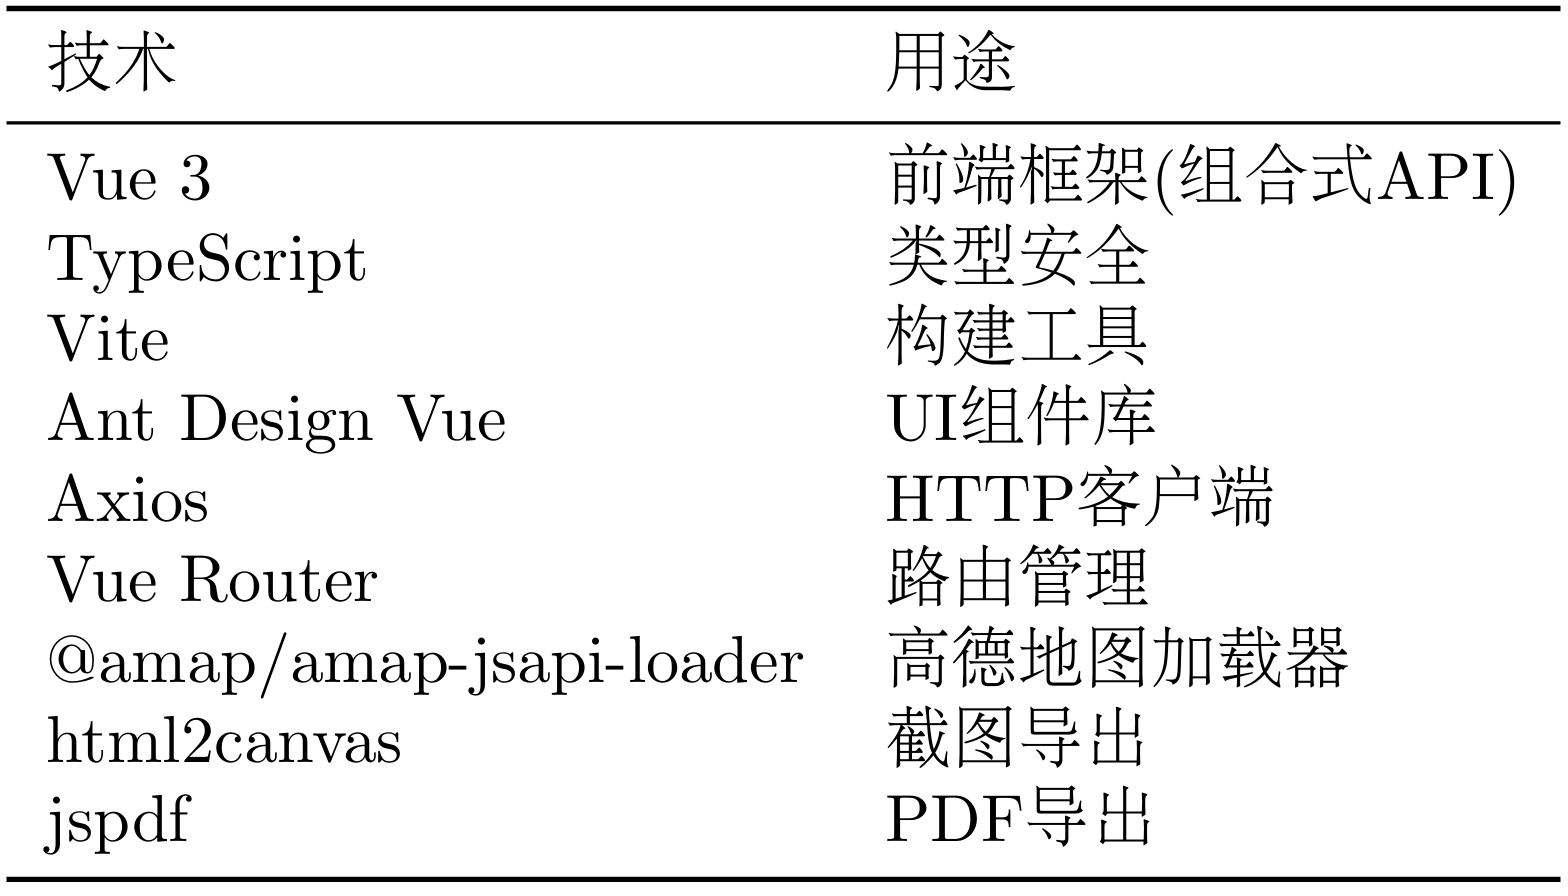
The choice of front-end technology stack needs to consider several factors: development efficiency, performance, ecosystem, and learning curve. As shown in Table 13.2, the project chose the following technology stack:
Table 13.2 Front-End Technology Stack
The project's directory structure is as follows:
frontend/
├── src/
│   ├── views/              # Page components
│   │   ├── Home.vue        # Home page (form)
│   │   └── Result.vue      # Result page
│   ├── services/           # API services
│   │   └── api.ts
│   ├── types/              # Type definitions
│   │   └── index.ts
│   ├── router/             # Router configuration
│   │   └── index.ts
│   ├── App.vue
│   └── main.ts
├── package.json
├── vite.config.ts
└── tsconfig.json
The views directory stores page components, the services directory stores API call logic, the types directory stores TypeScript type definitions, and the router directory stores router configuration.
13.5.2 Type Definitions
In Section 13.2, we used Pydantic to define data models on the back-end, such as Location, Attraction, DayPlan, TripPlan, etc. On the front-end, we need to define corresponding TypeScript types.
Let's see how to define these types. First is the most basic Location type, representing longitude and latitude coordinates:
// frontend/src/types/index.ts
export interface Location {
  longitude: number
  latitude: number
}
This type definition corresponds exactly to the back-end Pydantic model. Note that TypeScript uses the interface keyword to define types, field types are separated by colons, and no default values are needed.
Next is the Attraction type, representing attraction information:
export interface Attraction {
  name: string
  address: string
  location: Location
  visit_duration: number
  description: string
  category?: string
  rating?: number
  image_url?: string
  ticket_price?: number
}
Note that we use the Location type as a field type here, which is a nested type. The question mark ? indicates an optional field, corresponding to Optional in the back-end Pydantic model.
Similarly, we define types like Meal, Hotel, Budget, WeatherInfo, etc. Finally, the top-level TripPlan type:
export interface TripPlan {
  city: string
  start_date: string
  end_date: string
  days: DayPlan[]
  weather_info: WeatherInfo[]
  overall_suggestions: string
  budget?: Budget
}
There's also the request type TripPlanRequest, corresponding to the back-end request model:
export interface TripPlanRequest {
  city: string
  start_date: string
  end_date: string
  days: number
  preferences: string
  budget: string
  transportation: string
  accommodation: string
}
What are these type definitions for? First, when we call the API, TypeScript will check whether the data we pass conforms to the TripPlanRequest type. If we accidentally write days as a string, TypeScript will immediately report an error. Second, when we receive the API response, TypeScript will check whether the response data conforms to the TripPlan type. If the back-end's data structure changes, the front-end will immediately discover it. Finally, the IDE can provide code completion based on type definitions. When we type tripPlan., the IDE will automatically list all available fields.
13.5.3 API Service Encapsulation
With type definitions, we can encapsulate API calls. We create an api.ts file and use Axios to send HTTP requests:
import axios from 'axios'
import type { TripPlanRequest, TripPlan } from '../types'

const api = axios.create({
  baseURL: 'http://localhost:8000/api',
  timeout: 120000, // 2-minute timeout
  headers: {
    'Content-Type': 'application/json'
  }
})
Here we create an Axios instance and configure the base URL, timeout, and request headers. Why is the timeout set to 2 minutes? Because generating a travel plan requires calling multiple Agents, each Agent needs to call the LLM and external APIs, and the entire process may take 10-30 seconds. If the timeout is too short, the request will be interrupted.
Next we add interceptors. Interceptors can execute some common logic before sending requests and after receiving responses, such as logging, error handling, authentication, etc.:
// Request interceptor
api.interceptors.request.use(
  config => {
    console.log('Sending request:', config)
    return config
  },
  error => Promise.reject(error)
)

// Response interceptor
api.interceptors.response.use(
  response => {
    console.log('Received response:', response)
    return response
  },
  error => {
    console.error('Request failed:', error)
    return Promise.reject(error)
  }
)
Finally, we define the API function, which is the only entry point for the front-end to call the back-end:
// Generate travel plan
export const generateTripPlan = async (request: TripPlanRequest): Promise<TripPlan> => {
  const response = await api.post<TripPlan>('/trip/plan', request)
  return response.data
}
Note the type signature of this function: the parameter is of type TripPlanRequest, and the return value is of type Promise<TripPlan>. This means TypeScript will check whether the parameters passed by the caller meet the requirements, and will also check whether the use of the return value is correct.
13.5.4 Home Form Design
The Home page is the user's entry point, containing a form for users to fill in travel requirements. We use Vue 3's Composition API to organize the code:
Here we use ref to create reactive variables. formData is the form data, of type TripPlanRequest. loading indicates whether it's loading, loadingProgress indicates the loading progress, and loadingStatus indicates the loading status text.
The form submission logic is as follows:
const handleSubmit = async () => {
  loading.value = true
  loadingProgress.value = 0

  // Simulate progress updates
  const progressInterval = setInterval(() => {
    if (loadingProgress.value < 90) {
      loadingProgress.value += 10
      if (loadingProgress.value <= 30) loadingStatus.value = '🔍 Searching for attractions...'
      else if (loadingProgress.value <= 50) loadingStatus.value = '🌤️ Querying weather...'
      else if (loadingProgress.value <= 70) loadingStatus.value = '🏨 Recommending hotels...'
      else loadingStatus.value = '📋 Generating itinerary...'
    }
  }, 500)

  try {
    const response = await generateTripPlan(formData.value)
    clearInterval(progressInterval)
    loadingProgress.value = 100
    router.push({ name: 'result', state: { tripPlan: response } })
  } catch (error) {
    clearInterval(progressInterval)
    message.error('Failed to generate plan, please try again')
  } finally {
    loading.value = false
  }
}
This code does several things. First, it sets loading to true to display the loading state. Then, it starts a timer that updates the progress bar and status text every 500 milliseconds. This is a simulated progress because we can't accurately know the back-end's processing progress. But this lets users know the system is working, rather than being stuck.
Next, it calls the generateTripPlan function to send the API request. This is an asynchronous operation, and we use await to wait for the response. If the request succeeds, clear the timer, set progress to 100%, then navigate to the result page and pass the travel plan data. If the request fails, display an error message. Finally, whether successful or failed, set loading to false to hide the loading state.
The template part uses Ant Design Vue components:
<template>
  <div class="home-container">
    <div class="page-header">
      <h1 class="page-title">✈️ Intelligent Travel Assistant</h1>
      <p class="page-subtitle">AI-Powered Personalized Travel Planning</p>
    </div>

  </div>
</template>
Note the v-model:value directive, which implements two-way data binding. When users type in the input box, formData.city automatically updates. When the value of formData.city changes, the input box content also automatically updates.
13.5.5 Result Page Display
The Result page is the core of the entire application, displaying the generated travel plan. This page includes several parts: itinerary overview, budget details, map visualization, daily itinerary details, and weather information.
First is map visualization. We use the Amap JS API to mark attraction locations on the map:
import AMapLoader from '@amap/amap-jsapi-loader'

const initMap = async () => {
  const AMap = await AMapLoader.load({
    key: 'your_amap_web_key',
    version: '2.0'
  })

  map = new AMap.Map('amap-container', {
    zoom: 12,
    center: [116.397128, 39.916527]
  })

  // Add attraction markers
  tripPlan.value.days.forEach((day) => {
    day.attractions.forEach((attraction, index) => {
      const marker = new AMap.Marker({
        position: [attraction.location.longitude, attraction.location.latitude],
        title: attraction.name,
        label: { content: `${index + 1}`, direction: 'top' }
      })
      map.add(marker)
    })
  })
}
This code first loads the Amap SDK, then creates a map instance, and finally iterates through all attractions to create a marker for each. The marker's position is the attraction's longitude and latitude coordinates, which are obtained from the back-end's Attraction object.
The export function uses the html2canvas and jsPDF libraries. html2canvas can convert DOM elements to Canvas, and then we can export the Canvas as an image or PDF:
import html2canvas from 'html2canvas'
import jsPDF from 'jspdf'

// Export as image
const exportAsImage = async () => {
  const element = document.getElementById('trip-plan-content')
  const canvas = await html2canvas(element, { scale: 2 })
  const link = document.createElement('a')
  link.download = `${tripPlan.value.city} Travel Plan.png`
  link.href = canvas.toDataURL()
  link.click()
}

// Export as PDF
const exportAsPDF = async () => {
  const element = document.getElementById('trip-plan-content')
  const canvas = await html2canvas(element, { scale: 2 })
  const imgData = canvas.toDataURL('image/png')
  const pdf = new jsPDF('p', 'mm', 'a4')
  const imgWidth = 210
  const imgHeight = (canvas.height * imgWidth) / canvas.width
  pdf.addImage(imgData, 'PNG', 0, 0, imgWidth, imgHeight)
  pdf.save(`${tripPlan.value.city} Travel Plan.pdf`)
}
Through these front-end technologies, we implemented a complete Web application. Users can fill in forms in the browser, submit requests, wait for AI to generate travel plans, then view detailed itinerary arrangements, see attraction locations on the map, and export as images or PDFs. The entire process is smooth and natural - this is the charm of modern Web applications.