Module 05: Model Context Protocol (MCP)
Table of Contents
- Video Walkthrough
- What You'll Learn
- What is MCP?
- How MCP Works
- The Agentic Module
- Running the Examples
- Quick Start
- Key Concepts
- Congratulations!
Video Walkthrough
Watch this live session that explains how to get started with this module:
What You'll Learn
You've built conversational AI, mastered prompts, grounded responses in documents, and created agents with tools. But all those tools were custom-built for your specific application. What if you could give your AI access to a standardized ecosystem of tools that anyone can create and share? In this module, you'll learn how to do just that with the Model Context Protocol (MCP) and LangChain4j's agentic module. We first showcase a simple MCP file reader and then show how it easily integrates into advanced agentic workflows using the Supervisor Agent pattern.
What is MCP?
The Model Context Protocol (MCP) provides exactly that - a standard way for AI applications to discover and use external tools. Instead of writing custom integrations for each data source or service, you connect to MCP servers that expose their capabilities in a consistent format. Your AI agent can then discover and use these tools automatically.
The diagram below shows the difference — without MCP, every integration requires custom point-to-point wiring; with MCP, a single protocol connects your app to any tool:
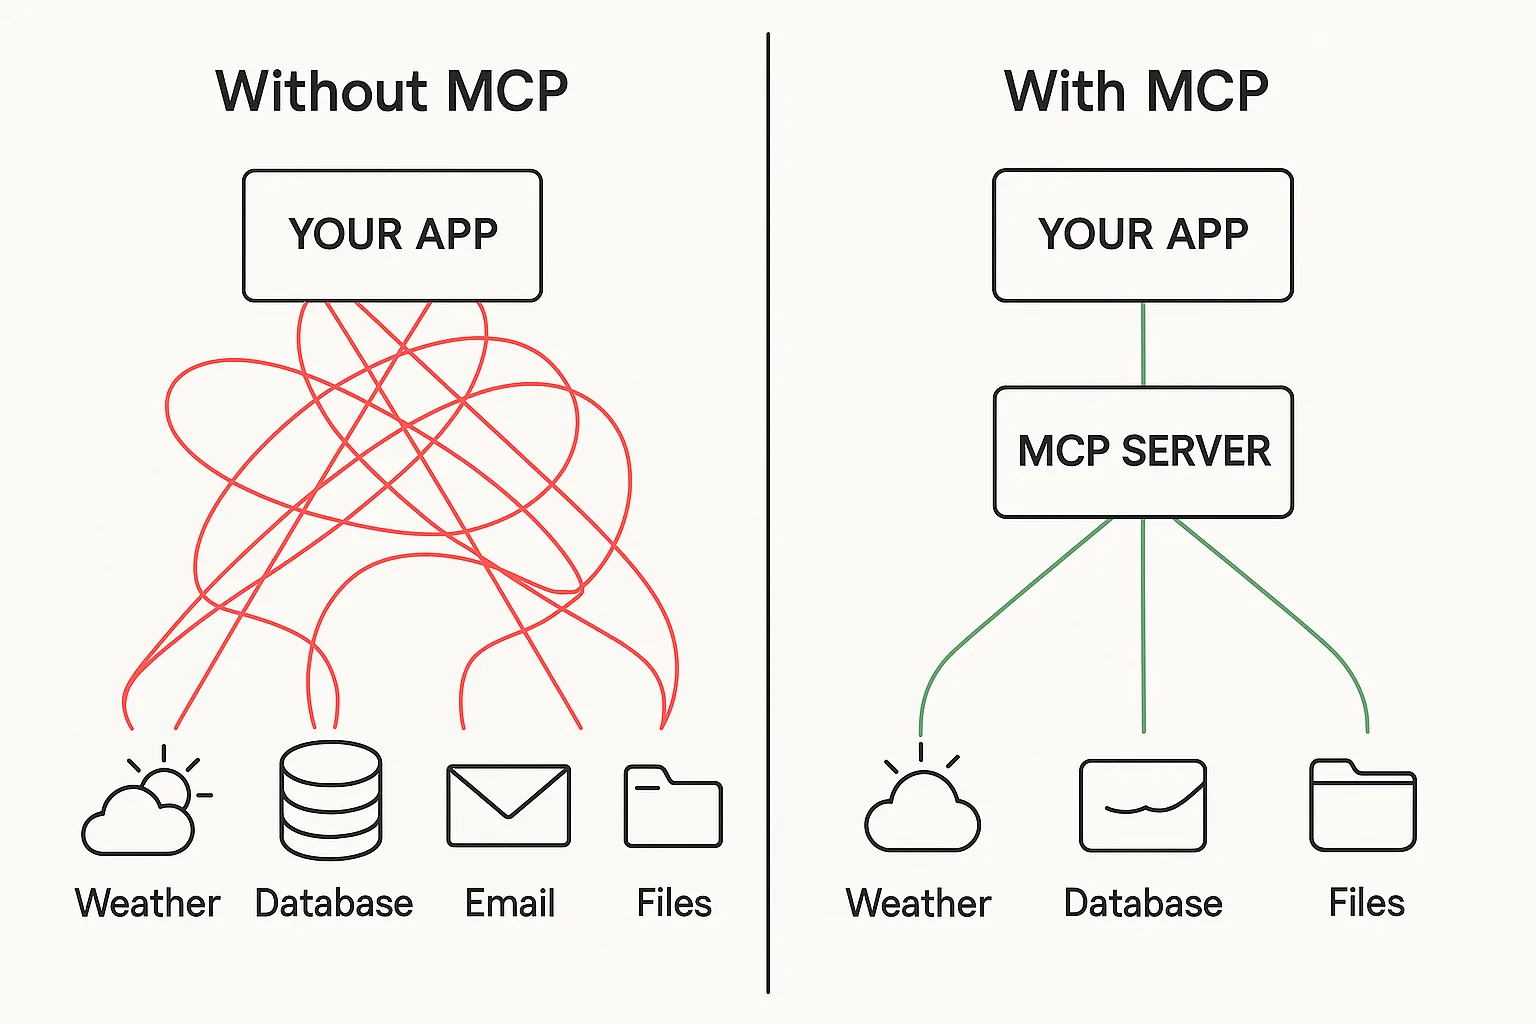
Before MCP: Complex point-to-point integrations. After MCP: One protocol, endless possibilities.
MCP solves a fundamental problem in AI development: every integration is custom. Want to access GitHub? Custom code. Want to read files? Custom code. Want to query a database? Custom code. And none of these integrations work with other AI applications.
MCP standardizes this. An MCP server exposes tools with clear descriptions and schemas. Any MCP client can connect, discover available tools, and use them. Build once, use everywhere.
The diagram below illustrates this architecture — a single MCP client (your AI application) connects to multiple MCP servers, each exposing their own set of tools through the standard protocol:
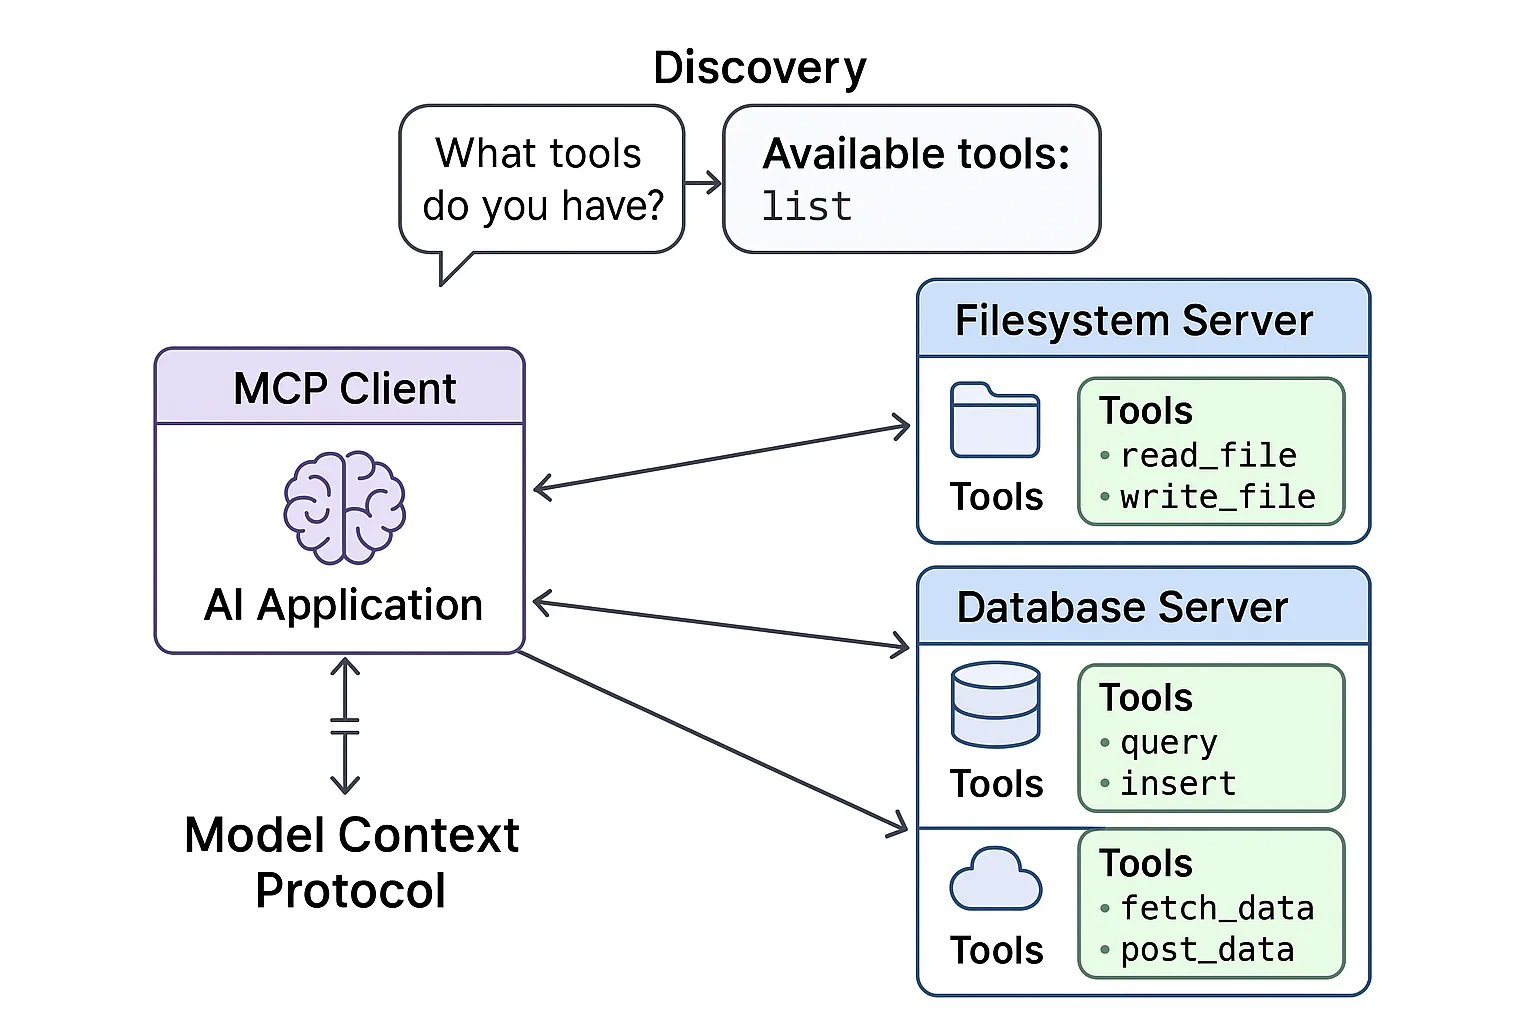
Model Context Protocol architecture - standardized tool discovery and execution
How MCP Works
Under the hood, MCP uses a layered architecture. Your Java application (the MCP client) discovers available tools, sends JSON-RPC requests through a transport layer (Stdio or HTTP), and the MCP server executes operations and returns results. The following diagram breaks down each layer of this protocol:
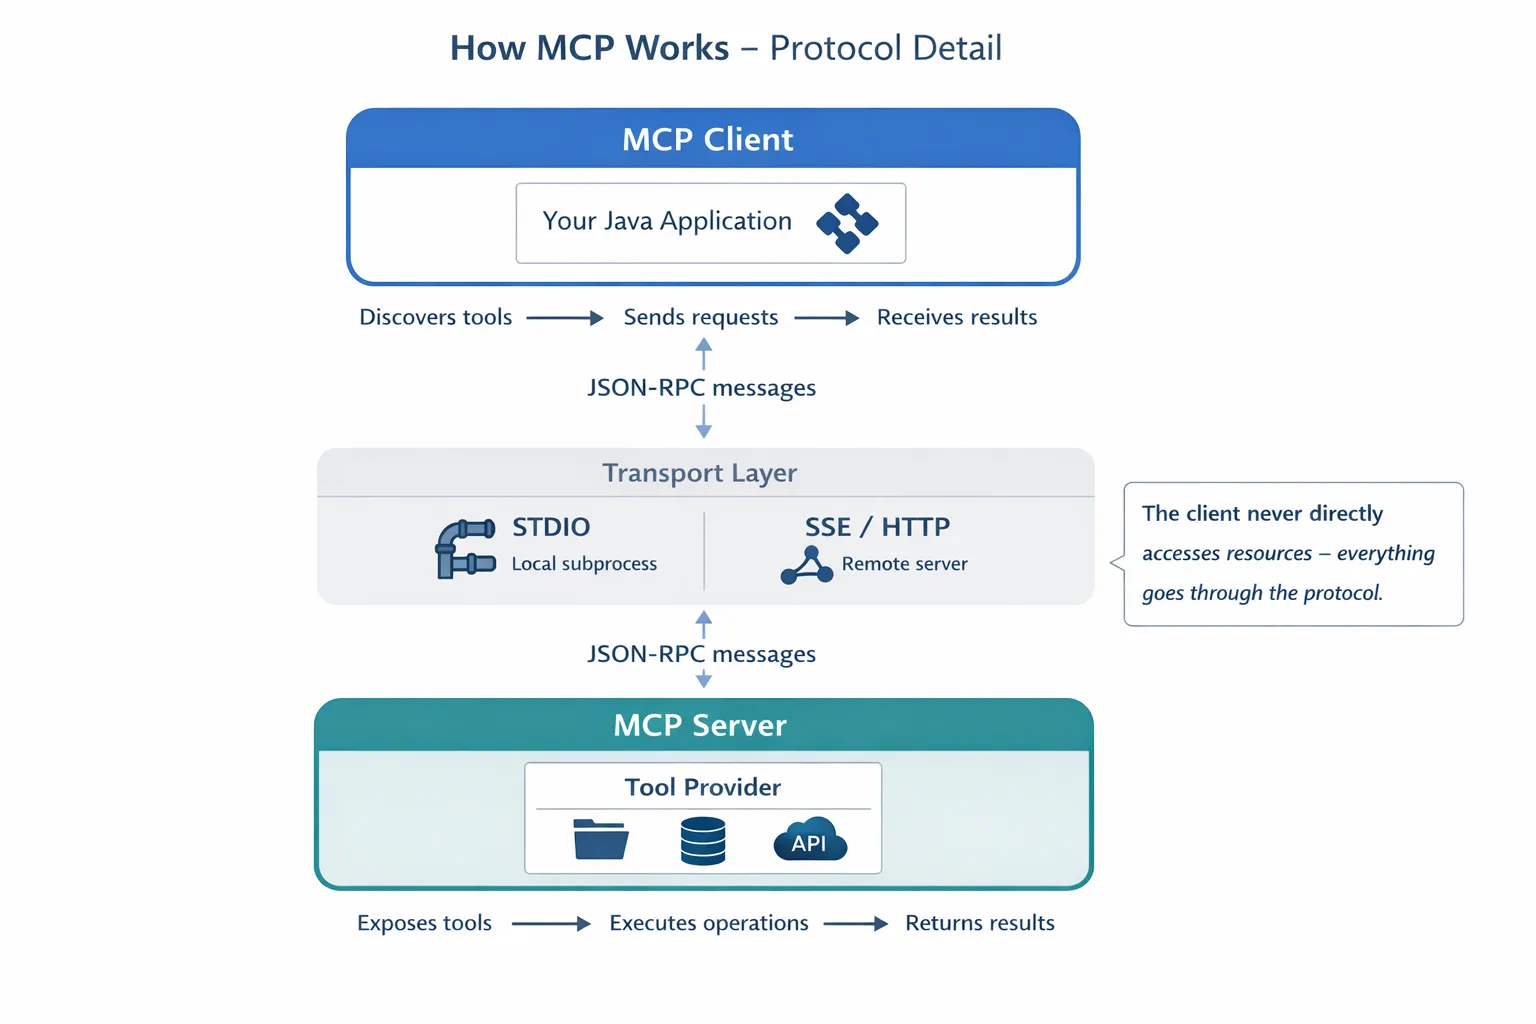
How MCP works under the hood — clients discover tools, exchange JSON-RPC messages, and execute operations through a transport layer.
Server-Client Architecture
MCP uses a client-server model. Servers provide tools - reading files, querying databases, calling APIs. Clients (your AI application) connect to servers and use their tools.
To use MCP with LangChain4j, add this Maven dependency:
<dependency>
    <groupId>dev.langchain4j</groupId>
    <artifactId>langchain4j-mcp</artifactId>
    <version>${langchain4j.version}</version>
</dependency>
Tool Discovery
When your client connects to an MCP server, it asks "What tools do you have?" The server responds with a list of available tools, each with descriptions and parameter schemas. Your AI agent can then decide which tools to use based on user requests. The diagram below shows this handshake — the client sends a tools/list request and the server returns its available tools with descriptions and parameter schemas:
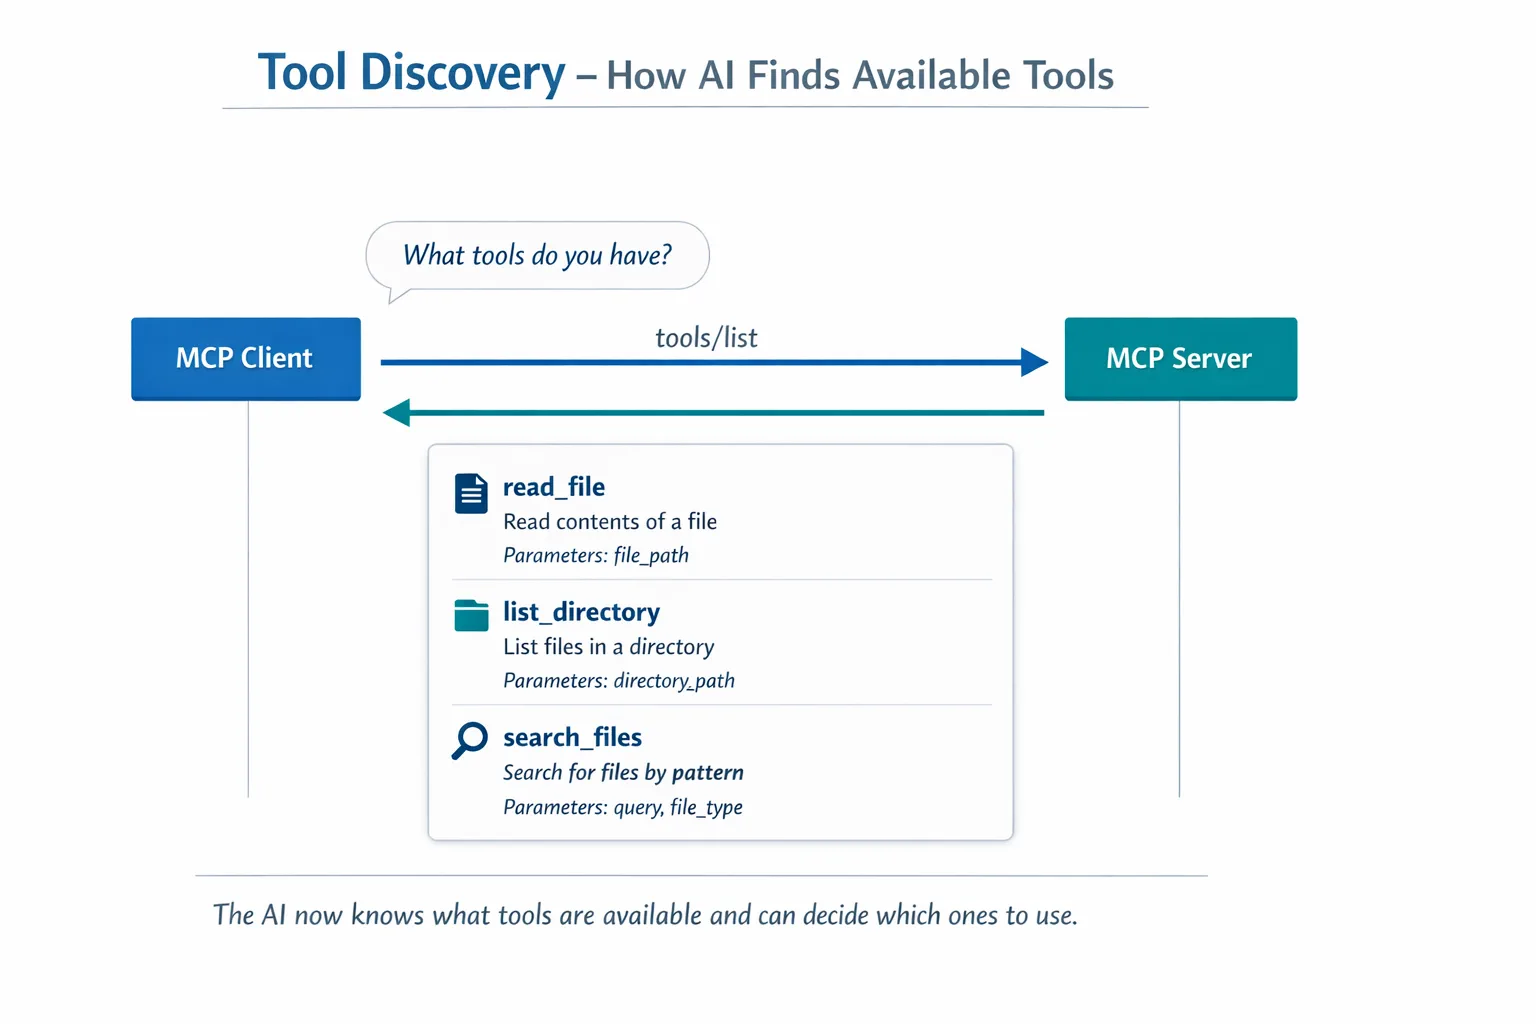
The AI discovers available tools at startup — it now knows what capabilities are available and can decide which ones to use.
Transport Mechanisms
MCP supports different transport mechanisms. The two options are Stdio (for local subprocess communication) and Streamable HTTP (for remote servers). This module demonstrates the Stdio transport:
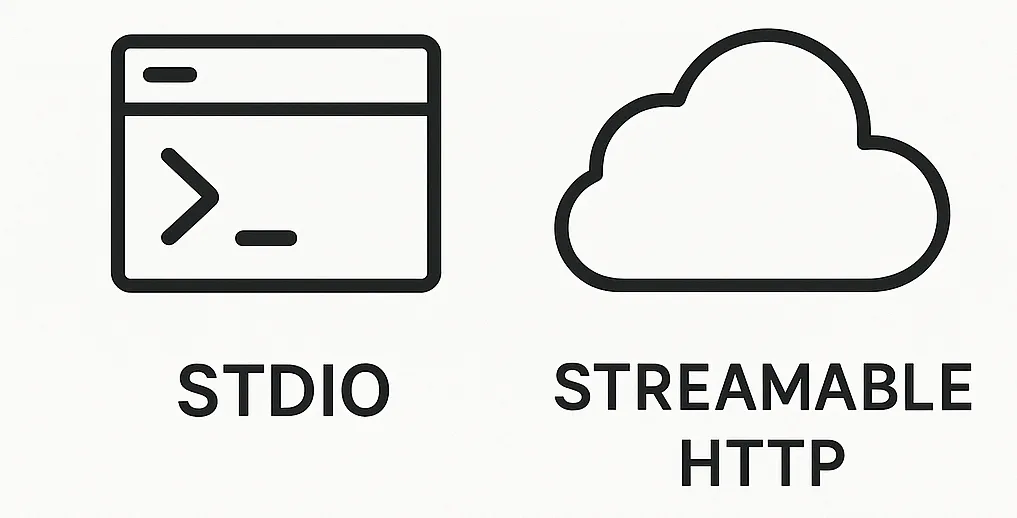
MCP transport mechanisms: HTTP for remote servers, Stdio for local processes
Stdio - StdioTransportDemo.java
For local processes. Your application spawns a server as a subprocess and communicates through standard input/output. Useful for filesystem access or command-line tools.
McpTransport stdioTransport = new StdioMcpTransport.Builder()
    .command(List.of(
        npmCmd, "exec",
        "@modelcontextprotocol/server-filesystem@2025.12.18",
        resourcesDir
    ))
    .logEvents(false)
    .build();
The @modelcontextprotocol/server-filesystem server exposes the following tools, all sandboxed to the directories you specify:
| Tool | Description |
|---|---|
read_file | Read the contents of a single file |
read_multiple_files | Read multiple files in one call |
write_file | Create or overwrite a file |
edit_file | Make targeted find-and-replace edits |
list_directory | List files and directories at a path |
search_files | Recursively search for files matching a pattern |
get_file_info | Get file metadata (size, timestamps, permissions) |
create_directory | Create a directory (including parent directories) |
move_file | Move or rename a file or directory |
The following diagram shows how Stdio transport works at runtime — your Java application spawns the MCP server as a child process and they communicate through stdin/stdout pipes, with no network or HTTP involved:
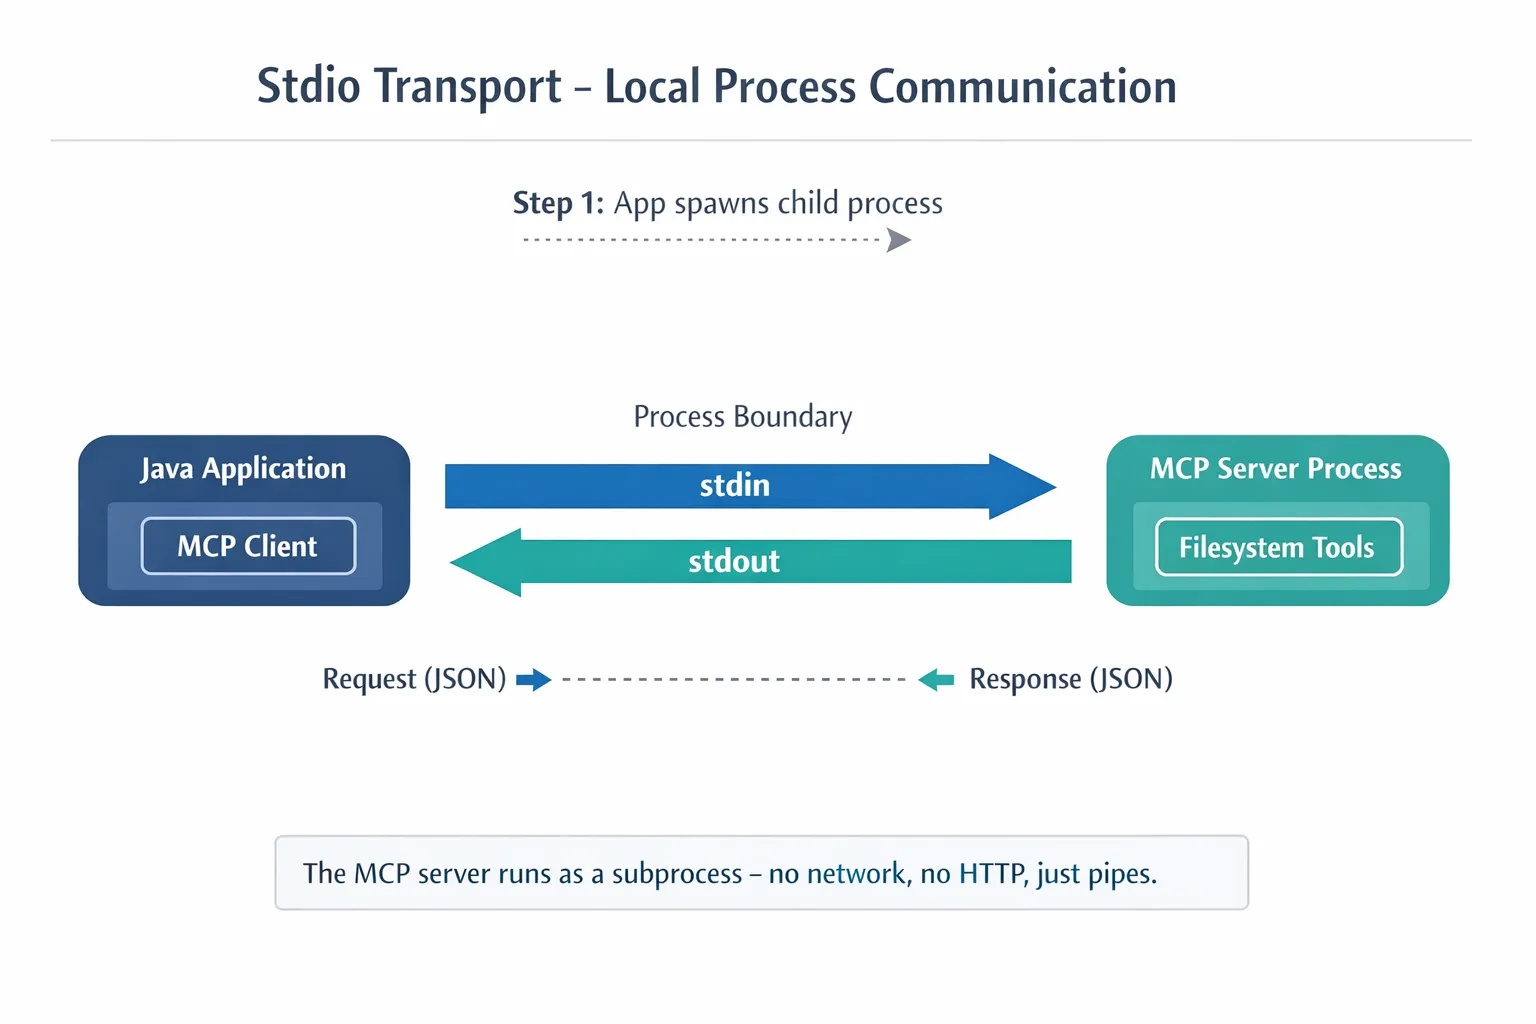
Stdio transport in action — your application spawns the MCP server as a child process and communicates through stdin/stdout pipes.
🤖 Try with GitHub Copilot Chat: Open
StdioTransportDemo.javaand ask:
- "How does Stdio transport work and when should I use it vs HTTP?"
- "How does LangChain4j manage the lifecycle of spawned MCP server processes?"
- "What are the security implications of giving AI access to the file system?"
The Agentic Module
While MCP provides standardized tools, LangChain4j's agentic module provides a declarative way to build agents that orchestrate those tools. The @Agent annotation and AgenticServices let you define agent behavior through interfaces rather than imperative code.
In this module, you'll explore the Supervisor Agent pattern — an advanced agentic AI approach where a "supervisor" agent dynamically decides which sub-agents to invoke based on user requests. We'll combine both concepts by giving one of our sub-agents MCP-powered file access capabilities.
To use the agentic module, add this Maven dependency:
<dependency>
    <groupId>dev.langchain4j</groupId>
    <artifactId>langchain4j-agentic</artifactId>
    <version>${langchain4j.mcp.version}</version>
</dependency>
Note: The
langchain4j-agenticmodule uses a separate version property (langchain4j.mcp.version) because it is released on a different schedule than the core LangChain4j libraries.
⚠️ Experimental: The
langchain4j-agenticmodule is experimental and subject to change. The stable way to build AI assistants remainslangchain4j-corewith custom tools (Module 04).
Running the Examples
Prerequisites
- Completed Module 04 - Tools (this module builds on custom tool concepts and compares them with MCP tools)
.envfile in root directory with Azure credentials (created byazd upin Module 01)- Java 21+, Maven 3.9+
- Node.js 16+ and npm (for MCP servers)
Note: If you haven't set up your environment variables yet, see Module 01 - Introduction for deployment instructions (
azd upcreates the.envfile automatically), or copy.env.exampleto.envin the root directory and fill in your values.
Quick Start
Using VS Code: Simply right-click on any demo file in the Explorer and select "Run Java", or use the launch configurations from the Run and Debug panel (make sure your .env file is configured with Azure credentials first).
Using Maven: Alternatively, you can run from the command line with the examples below.
File Operations (Stdio)
This demonstrates local subprocess-based tools.
✅ No prerequisites needed - the MCP server is spawned automatically.
Using the Start Scripts (Recommended):
The start scripts automatically load environment variables from the root .env file:
Bash:
cd 05-mcp
chmod +x start-stdio.sh
./start-stdio.sh
PowerShell:
cd 05-mcp
.\start-stdio.ps1
Using VS Code: Right-click on StdioTransportDemo.java and select "Run Java" (ensure your .env file is configured).
The application spawns a filesystem MCP server automatically and reads a local file. Notice how the subprocess management is handled for you.
Expected output:
Assistant response: The file provides an overview of LangChain4j, an open-source Java library
for integrating Large Language Models (LLMs) into Java applications...
Supervisor Agent
The Supervisor Agent pattern is a flexible form of agentic AI. A Supervisor uses an LLM to autonomously decide which agents to invoke based on the user's request. In the next example, we combine MCP-powered file access with an LLM agent to create a supervised file read → report workflow.
In the demo, FileAgent reads a file using MCP filesystem tools, and ReportAgent generates a structured report with an executive summary (1 sentence), 3 key points, and recommendations. The Supervisor orchestrates this flow automatically:
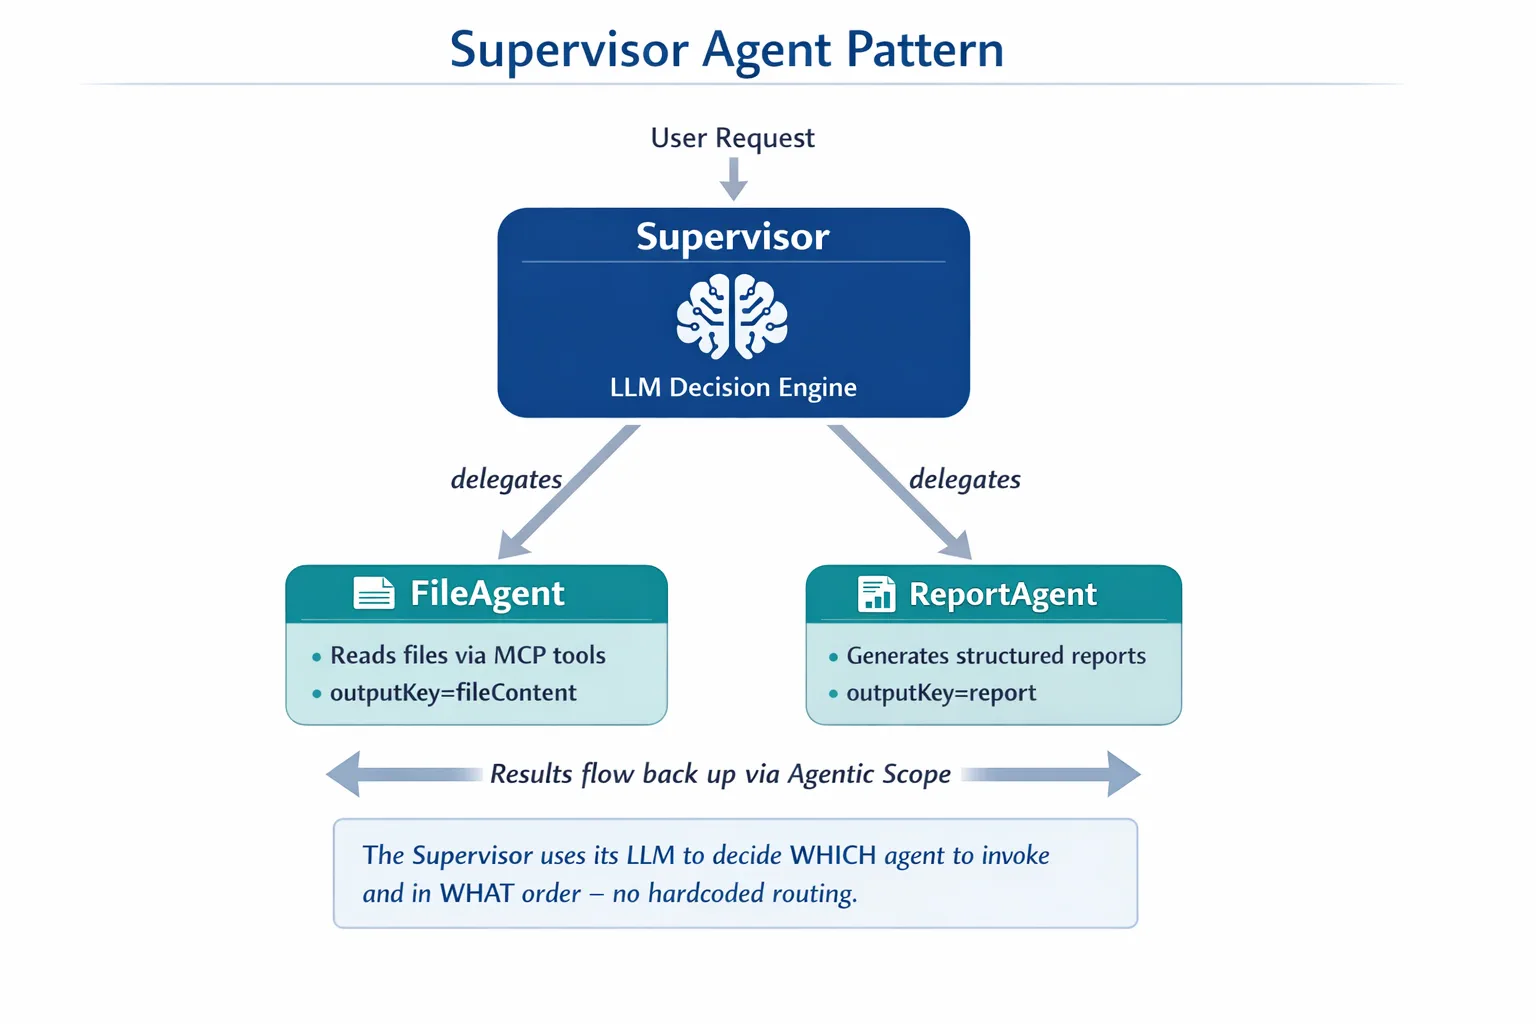
The Supervisor uses its LLM to decide which agents to invoke and in what order — no hardcoded routing needed.
Here's what the concrete workflow looks like for our file-to-report pipeline:
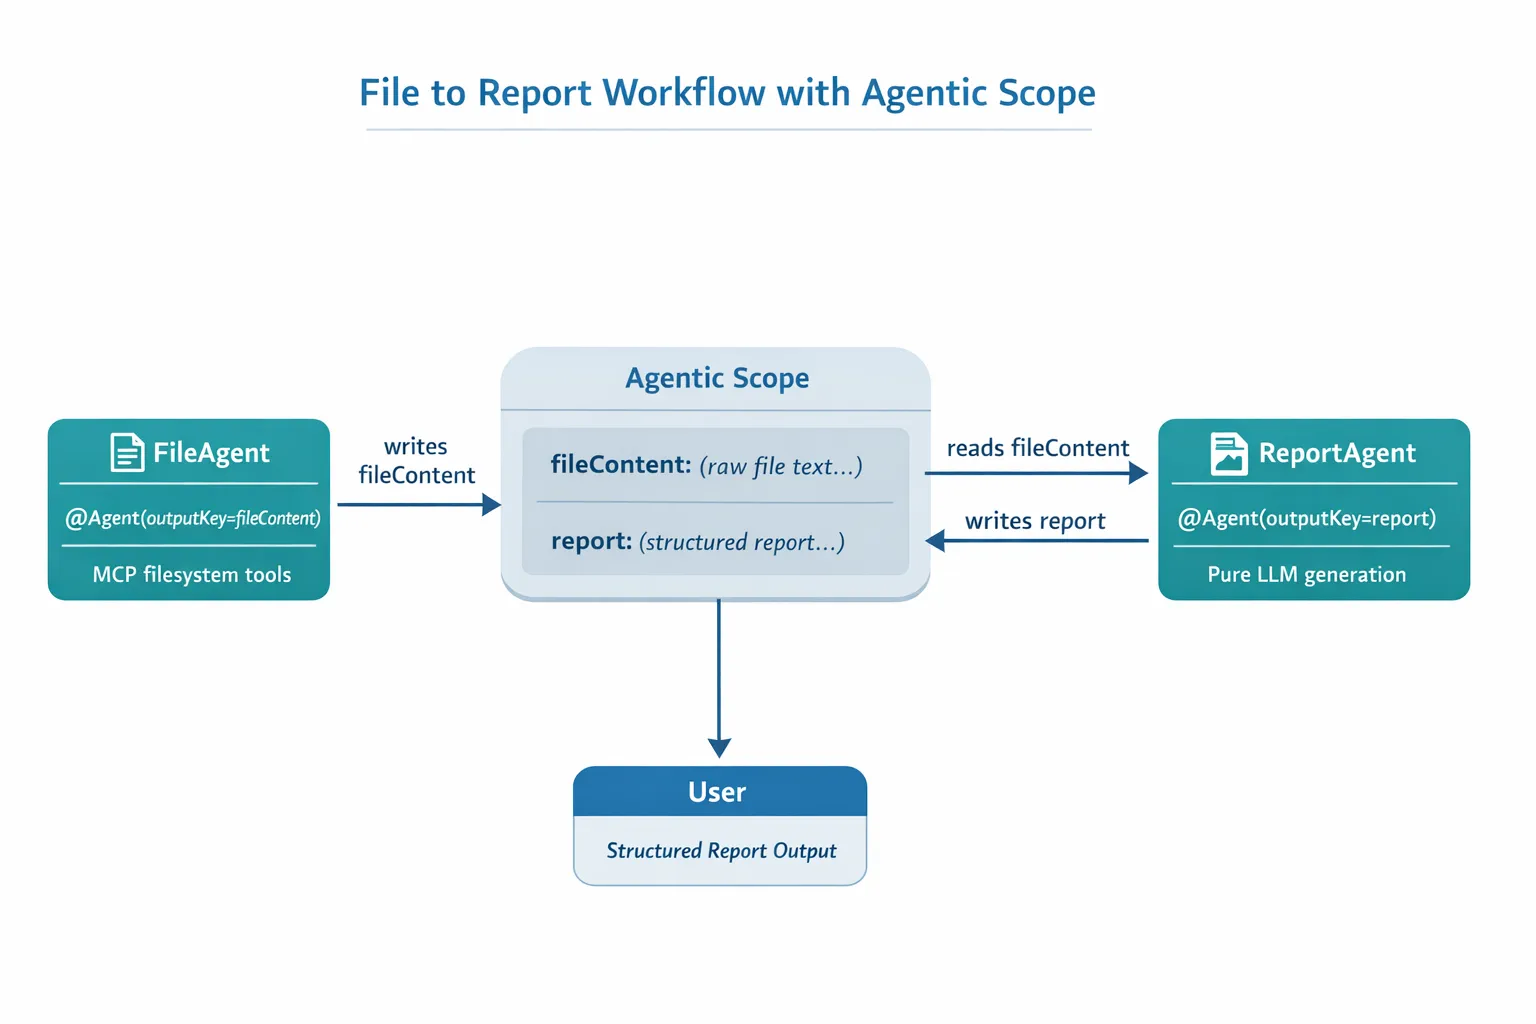
FileAgent reads the file via MCP tools, then ReportAgent transforms the raw content into a structured report.
The following sequence diagram traces the full Supervisor orchestration — from spawning the MCP server, through the Supervisor's autonomous agent selection, to the tool calls over stdio and the final report:
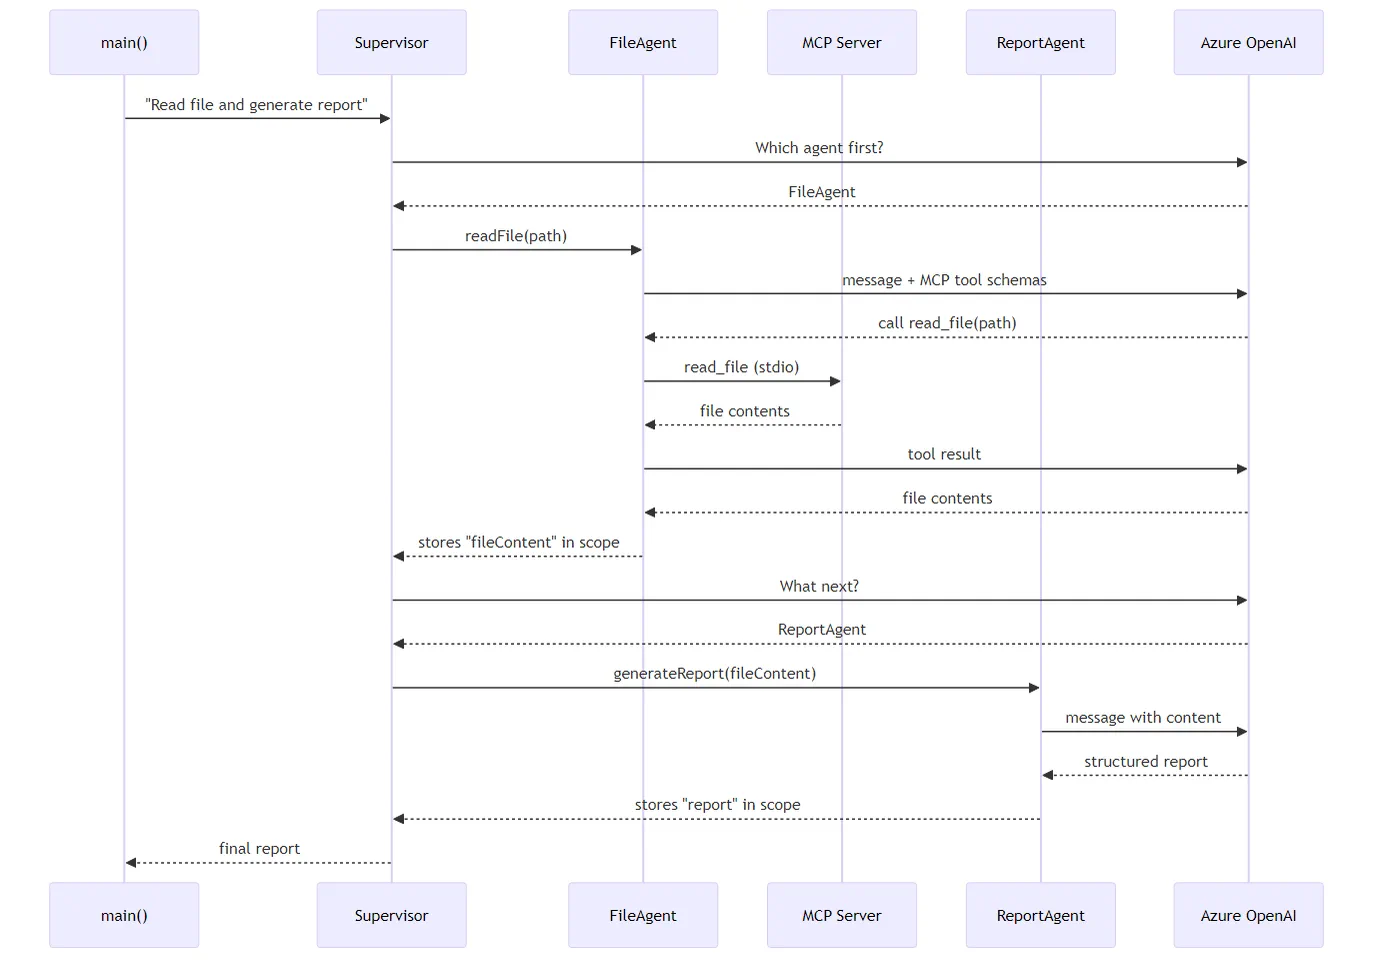
The Supervisor autonomously invokes FileAgent (which calls the MCP server over stdio to read the file), then invokes ReportAgent to generate a structured report — each agent stores its output in the shared Agentic Scope.
Each agent stores its output in the Agentic Scope (shared memory), allowing downstream agents to access previous results. This demonstrates how MCP tools integrate seamlessly into agentic workflows — the Supervisor doesn't need to know how files are read, only that FileAgent can do it.
Running the Demo
The start scripts automatically load environment variables from the root .env file:
Bash:
cd 05-mcp
chmod +x start-supervisor.sh
./start-supervisor.sh
PowerShell:
cd 05-mcp
.\start-supervisor.ps1
Using VS Code: Right-click on SupervisorAgentDemo.java and select "Run Java" (ensure your .env file is configured).
How the Supervisor Works
Before building agents, you need to connect the MCP transport to a client and wrap it as a ToolProvider. This is how the MCP server's tools become available to your agents:
// Create an MCP client from the transport
McpClient mcpClient = new DefaultMcpClient.Builder()
        .transport(stdioTransport)
        .build();

// Wrap the client as a ToolProvider — this bridges MCP tools into LangChain4j
ToolProvider mcpToolProvider = McpToolProvider.builder()
        .mcpClients(List.of(mcpClient))
        .build();
Now you can inject mcpToolProvider into any agent that needs MCP tools:
// Step 1: FileAgent reads files using MCP tools
FileAgent fileAgent = AgenticServices.agentBuilder(FileAgent.class)
        .chatModel(model)
        .toolProvider(mcpToolProvider)  // Has MCP tools for file operations
        .build();

// Step 2: ReportAgent generates structured reports
ReportAgent reportAgent = AgenticServices.agentBuilder(ReportAgent.class)
        .chatModel(model)
        .build();

// Supervisor orchestrates the file → report workflow
SupervisorAgent supervisor = AgenticServices.supervisorBuilder()
        .chatModel(model)
        .subAgents(fileAgent, reportAgent)
        .responseStrategy(SupervisorResponseStrategy.LAST)  // Return the final report
        .build();

// The Supervisor decides which agents to invoke based on the request
String response = supervisor.invoke("Read the file at /path/file.txt and generate a report");
How FileAgent Discovers MCP Tools at Runtime
You may wonder: how does FileAgent know how to use the npm filesystem tools? The answer is that it doesn't — the LLM figures it out at runtime through tool schemas.
The FileAgent interface is just a prompt definition. It has no hardcoded knowledge of read_file, list_directory, or any other MCP tool. Here's what happens end-to-end:
- Server spawns:
StdioMcpTransportlaunches the@modelcontextprotocol/server-filesystemnpm package as a child process - Tool discovery: The
McpClientsends atools/listJSON-RPC request to the server, which responds with tool names, descriptions, and parameter schemas (e.g.,read_file— "Read the complete contents of a file" —{ path: string }) - Schema injection:
McpToolProviderwraps these discovered schemas and makes them available to LangChain4j - LLM decides: When
FileAgent.readFile(path)is called, LangChain4j sends the system message, user message, and the list of tool schemas to the LLM. The LLM reads the tool descriptions and generates a tool call (e.g.,read_file(path="/some/file.txt")) - Execution: LangChain4j intercepts the tool call, routes it through the MCP client back to the Node.js subprocess, gets the result, and feeds it back to the LLM
This is the same Tool Discovery mechanism described above, but applied specifically to the agent workflow. The @SystemMessage and @UserMessage annotations guide the LLM's behavior, while the injected ToolProvider gives it the capabilities — the LLM bridges the two at runtime.
🤖 Try with GitHub Copilot Chat: Open
FileAgent.javaand ask:
- "How does this agent know which MCP tool to call?"
- "What would happen if I removed the ToolProvider from the agent builder?"
- "How do tool schemas get passed to the LLM?"
Response Strategies
When you configure a SupervisorAgent, you specify how it should formulate its final answer to the user after the sub-agents have completed their tasks. The diagram below shows the three available strategies — LAST returns the final agent's output directly, SUMMARY synthesizes all outputs through an LLM, and SCORED picks whichever scores higher against the original request:
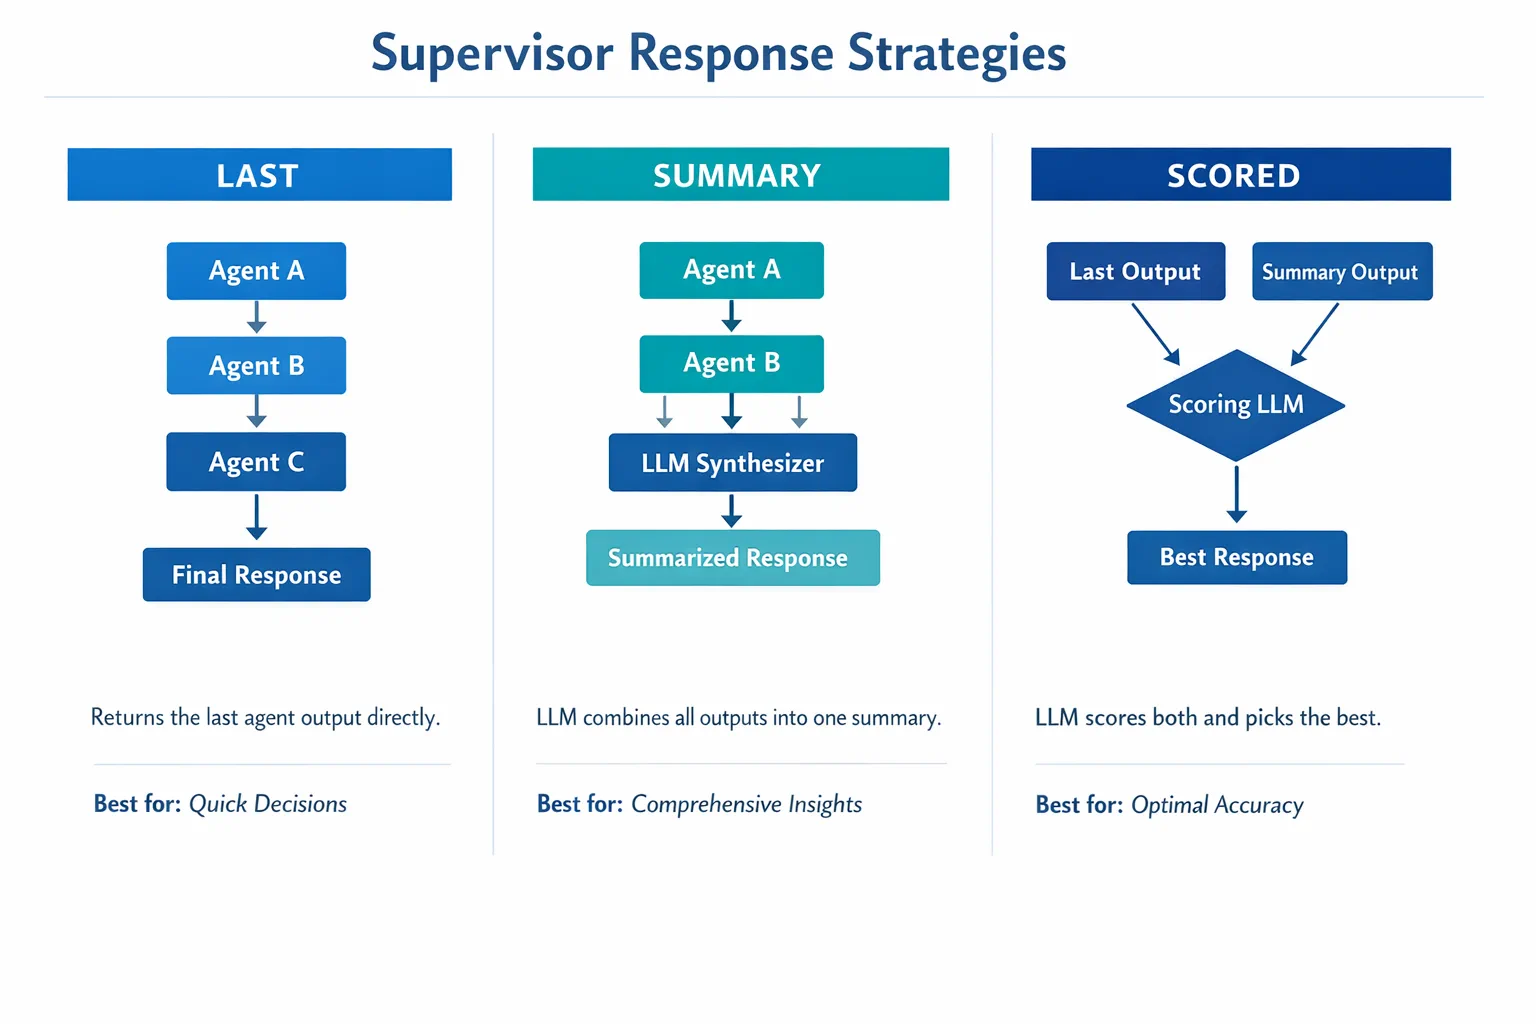
Three strategies for how the Supervisor formulates its final response — choose based on whether you want the last agent's output, a synthesized summary, or the best-scoring option.
The available strategies are:
| Strategy | Description |
|---|---|
| LAST | The supervisor returns the output of the last sub-agent or tool called. This is useful when the final agent in the workflow is specifically designed to produce the complete, final answer (e.g., a "Summary Agent" in a research pipeline). |
| SUMMARY | The supervisor uses its own internal Language Model (LLM) to synthesize a summary of the entire interaction and all sub-agent outputs, then returns that summary as the final response. This provides a clean, aggregated answer to the user. |
| SCORED | The system uses an internal LLM to score both the LAST response and the SUMMARY of the interaction against the original user request, returning whichever output receives the higher score. |
See SupervisorAgentDemo.java for the complete implementation.
🤖 Try with GitHub Copilot Chat: Open
SupervisorAgentDemo.javaand ask:
- "How does the Supervisor decide which agents to invoke?"
- "What's the difference between Supervisor and Sequential workflow patterns?"
- "How can I customize the Supervisor's planning behavior?"
Understanding the Output
When you run the demo, you'll see a structured walkthrough of how the Supervisor orchestrates multiple agents. Here's what each section means:
======================================================================
  FILE → REPORT WORKFLOW DEMO
======================================================================

This demo shows a clear 2-step workflow: read a file, then generate a report.
The Supervisor orchestrates the agents automatically based on the request.
The header introduces the workflow concept: a focused pipeline from file reading to report generation.
--- WORKFLOW ---------------------------------------------------------
  ┌─────────────┐      ┌──────────────┐
  │  FileAgent  │ ───▶ │ ReportAgent  │
  │ (MCP tools) │      │  (pure LLM)  │
  └─────────────┘      └──────────────┘
   outputKey:           outputKey:
   'fileContent'        'report'

--- AVAILABLE AGENTS -------------------------------------------------
  [FILE]   FileAgent   - Reads files via MCP → stores in 'fileContent'
  [REPORT] ReportAgent - Generates structured report → stores in 'report'
Workflow Diagram shows the data flow between agents. Each agent has a specific role:
- FileAgent reads files using MCP tools and stores raw content in
fileContent - ReportAgent consumes that content and produces a structured report in
report
--- USER REQUEST -----------------------------------------------------
  "Read the file at .../file.txt and generate a report on its contents"
User Request shows the task. The Supervisor parses this and decides to invoke FileAgent → ReportAgent.
--- SUPERVISOR ORCHESTRATION -----------------------------------------
  The Supervisor decides which agents to invoke and passes data between them...

  +-- STEP 1: Supervisor chose -> FileAgent (reading file via MCP)
  |
  |   Input: .../file.txt
  |
  |   Result: LangChain4j is an open-source, provider-agnostic Java framework for building LLM...
  +-- [OK] FileAgent (reading file via MCP) completed

  +-- STEP 2: Supervisor chose -> ReportAgent (generating structured report)
  |
  |   Input: LangChain4j is an open-source, provider-agnostic Java framew...
  |
  |   Result: Executive Summary...
  +-- [OK] ReportAgent (generating structured report) completed
Supervisor Orchestration shows the 2-step flow in action:
- FileAgent reads the file via MCP and stores the content
- ReportAgent receives the content and generates a structured report
The Supervisor made these decisions autonomously based on the user's request.
--- FINAL RESPONSE ---------------------------------------------------
Executive Summary
...

Key Points
...

Recommendations
...

--- AGENTIC SCOPE (Data Flow) ----------------------------------------
  Each agent stores its output for downstream agents to consume:
  * fileContent: LangChain4j is an open-source, provider-agnostic Java framework...
  * report: Executive Summary...
Explanation of Agentic Module Features
The example demonstrates several advanced features of the agentic module. Let's have a closer look at Agentic Scope and Agent Listeners.
Agentic Scope shows the shared memory where agents stored their results using @Agent(outputKey="..."). This allows:
- Later agents to access earlier agents' outputs
- The Supervisor to synthesize a final response
- You to inspect what each agent produced
The diagram below shows how Agentic Scope works as shared memory in the file-to-report workflow — FileAgent writes its output under the key fileContent, ReportAgent reads that and writes its own output under report:
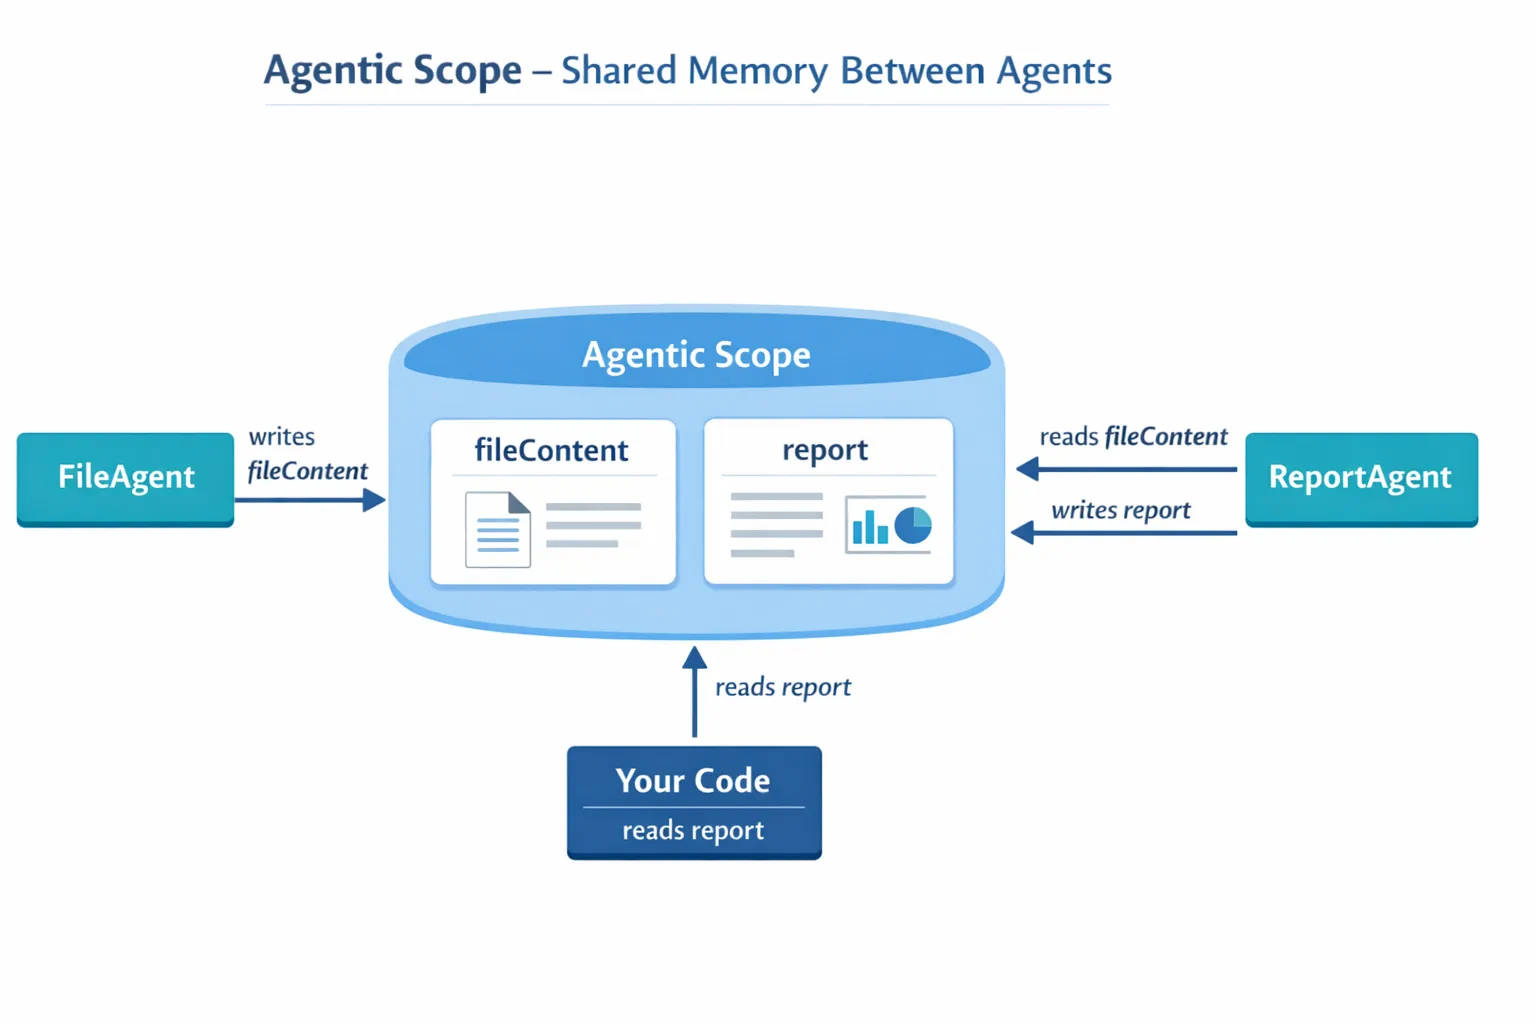
Agentic Scope acts as shared memory — FileAgent writes fileContent, ReportAgent reads it and writes report, and your code reads the final result.
ResultWithAgenticScope<String> result = supervisor.invokeWithAgenticScope(request);
AgenticScope scope = result.agenticScope();
String fileContent = scope.readState("fileContent");  // Raw file data from FileAgent
String report = scope.readState("report");            // Structured report from ReportAgent
Agent Listeners enable monitoring and debugging of agent execution. The step-by-step output you see in the demo comes from an AgentListener that hooks into each agent invocation:
- beforeAgentInvocation - Called when the Supervisor selects an agent, letting you see which agent was chosen and why
- afterAgentInvocation - Called when an agent completes, showing its result
- inheritedBySubagents - When true, the listener monitors all agents in the hierarchy
The following diagram shows the full Agent Listener lifecycle, including how onError handles failures during agent execution:
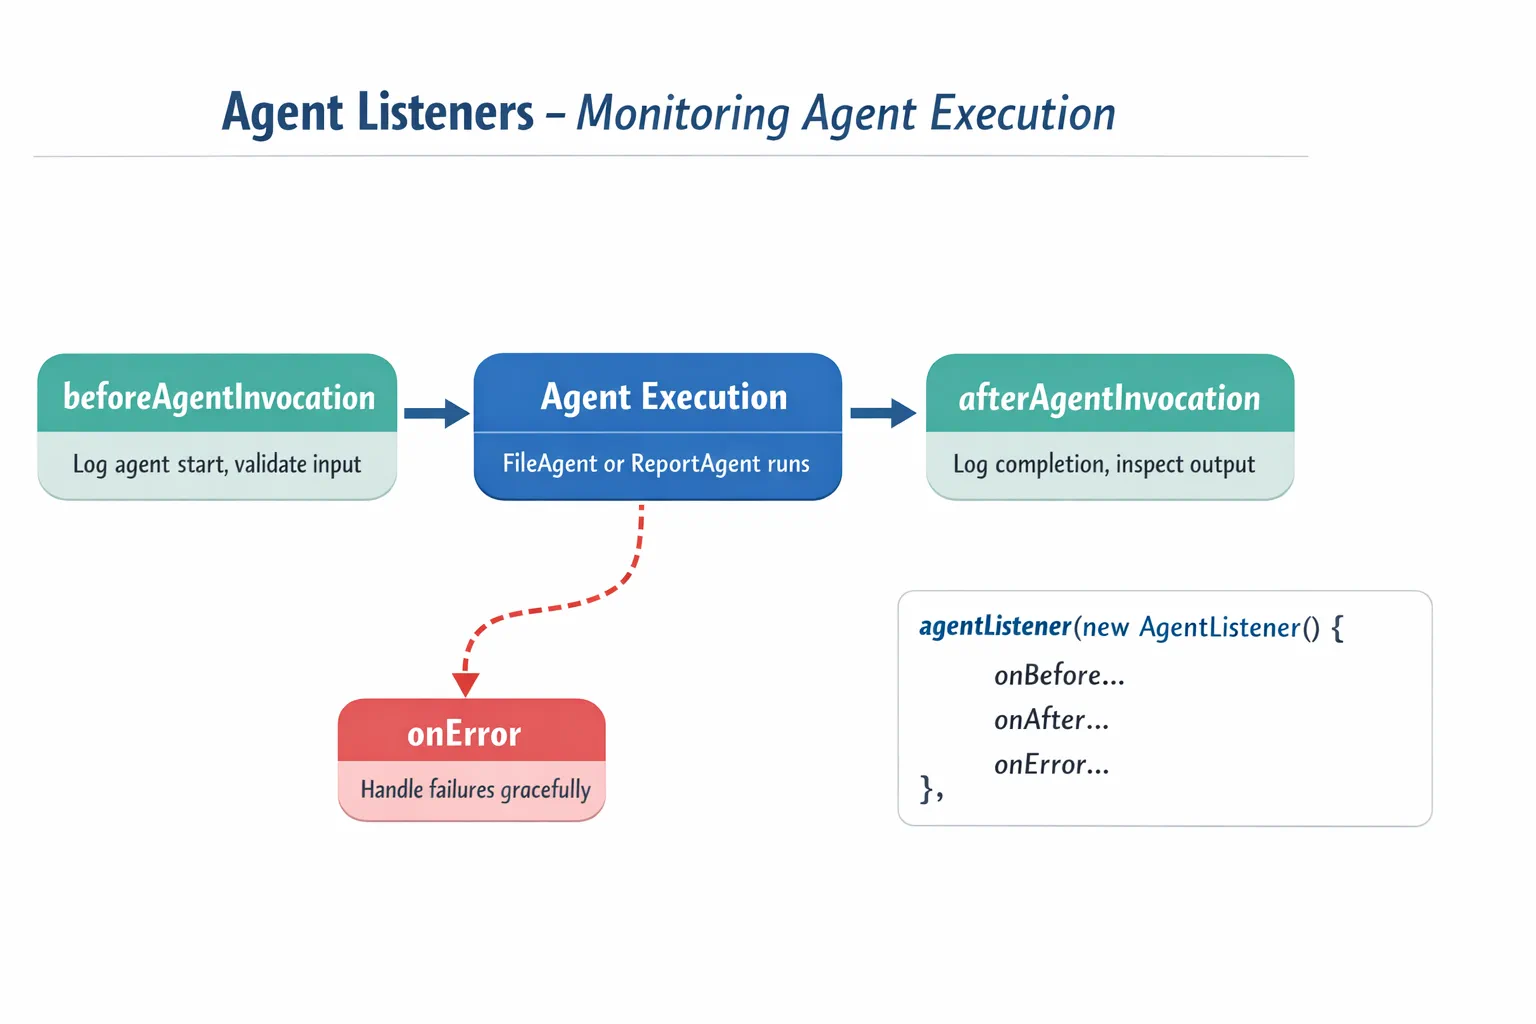
Agent Listeners hook into the execution lifecycle — monitor when agents start, complete, or encounter errors.
AgentListener monitor = new AgentListener() {
    private int step = 0;

    @Override
    public void beforeAgentInvocation(AgentRequest request) {
        step++;
        System.out.println("  +-- STEP " + step + ": " + request.agentName());
    }

    @Override
    public void afterAgentInvocation(AgentResponse response) {
        System.out.println("  +-- [OK] " + response.agentName() + " completed");
    }

    @Override
    public boolean inheritedBySubagents() {
        return true; // Propagate to all sub-agents
    }
};
Beyond the Supervisor pattern, the langchain4j-agentic module provides several powerful workflow patterns. The diagram below shows all five — from simple sequential pipelines to human-in-the-loop approval workflows:
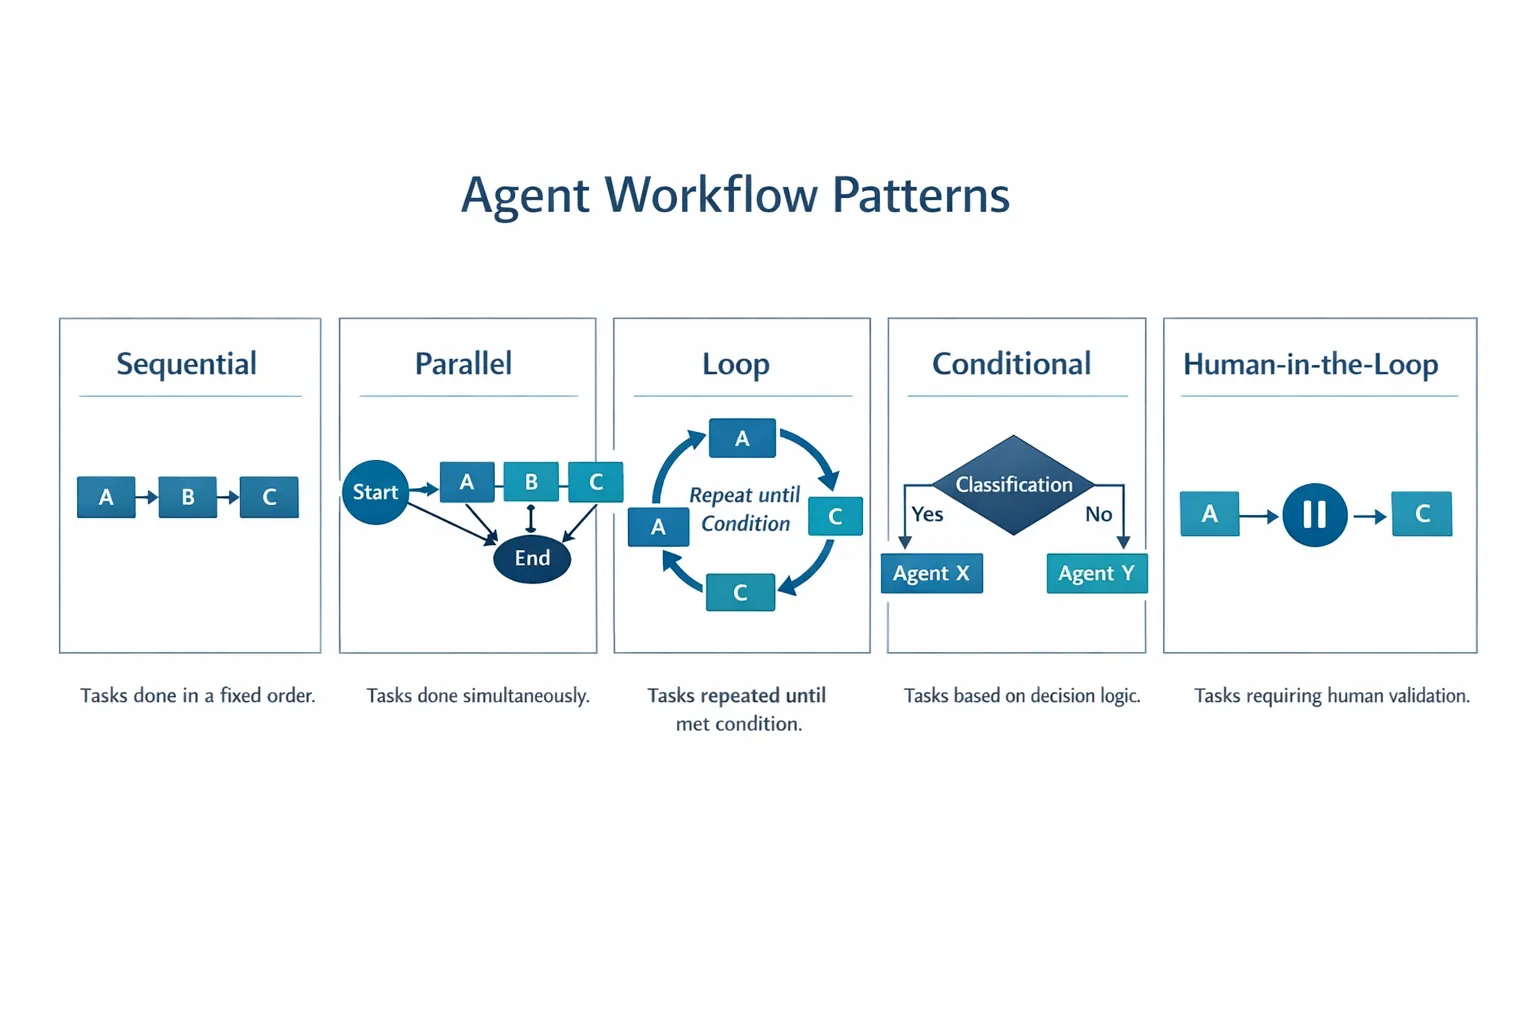
Five workflow patterns for orchestrating agents — from simple sequential pipelines to human-in-the-loop approval workflows.
| Pattern | Description | Use Case |
|---|---|---|
| Sequential | Execute agents in order, output flows to next | Pipelines: research → analyze → report |
| Parallel | Run agents simultaneously | Independent tasks: weather + news + stocks |
| Loop | Iterate until condition met | Quality scoring: refine until score ≥ 0.8 |
| Conditional | Route based on conditions | Classify → route to specialist agent |
| Human-in-the-Loop | Add human checkpoints | Approval workflows, content review |
Key Concepts
Now that you've explored MCP and the agentic module in action, let's summarize when to use each approach.
One of MCP's biggest advantages is its growing ecosystem. The diagram below shows how a single universal protocol connects your AI application to a wide variety of MCP servers — from filesystem and database access to GitHub, email, web scraping, and more:
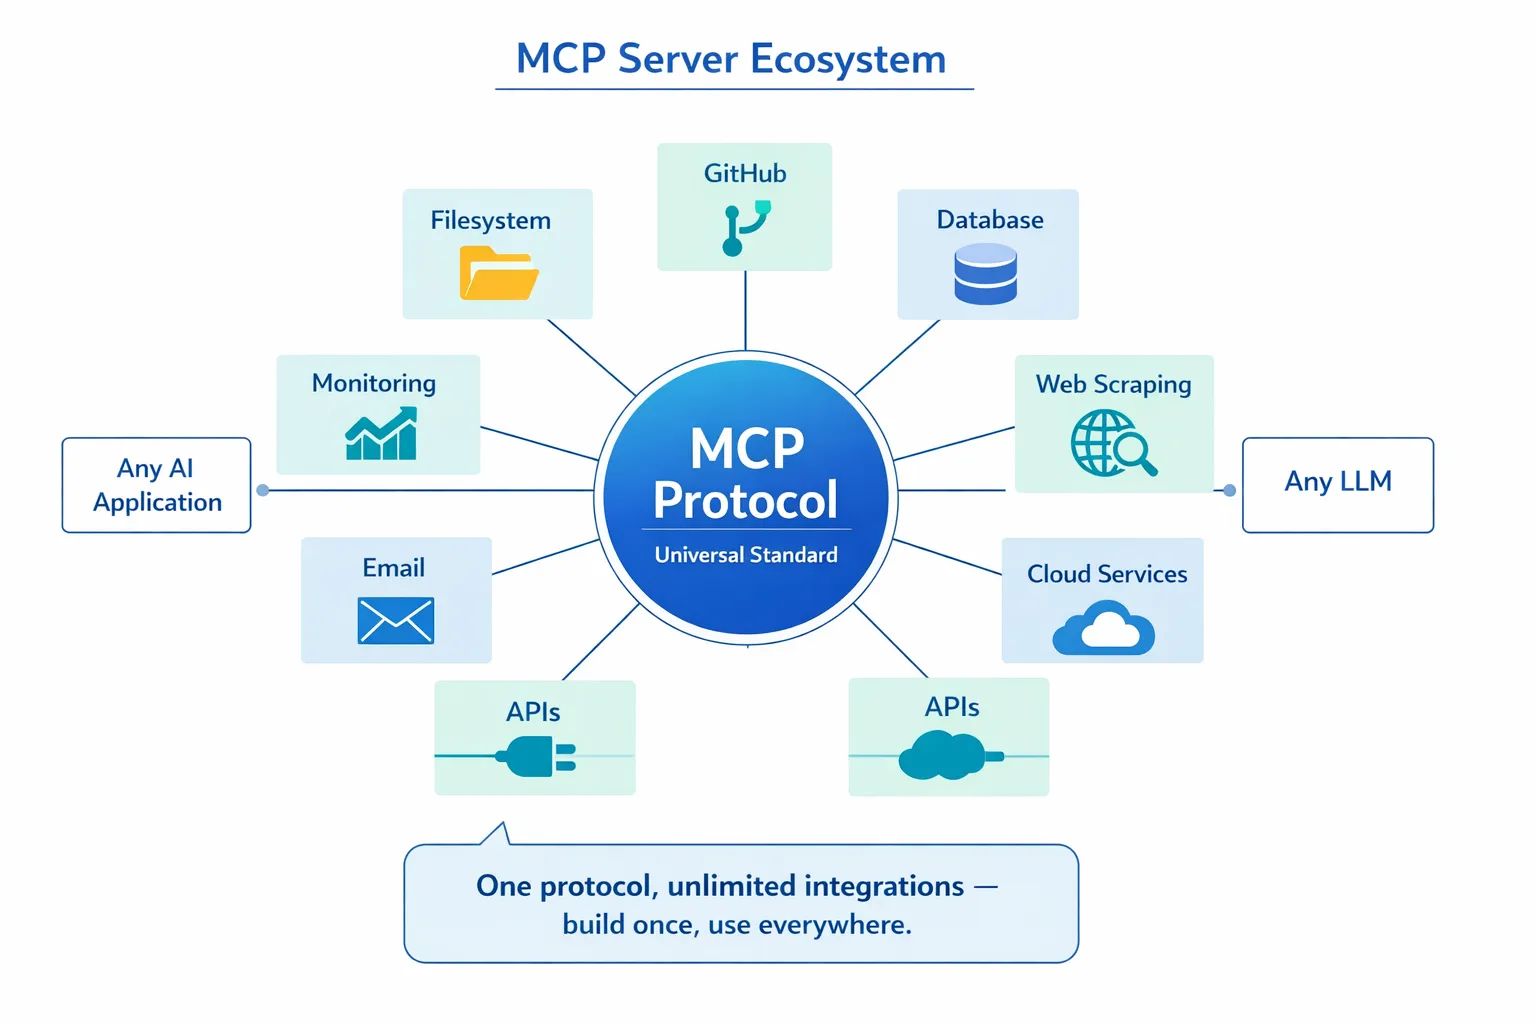
MCP creates a universal protocol ecosystem — any MCP-compatible server works with any MCP-compatible client, enabling tool sharing across applications.
MCP is ideal when you want to leverage existing tool ecosystems, build tools that multiple applications can share, integrate third-party services with standard protocols, or swap tool implementations without changing code.
The Agentic Module works best when you want declarative agent definitions with @Agent annotations, need workflow orchestration (sequential, loop, parallel), prefer interface-based agent design over imperative code, or are combining multiple agents that share outputs via outputKey.
The Supervisor Agent pattern shines when the workflow isn't predictable in advance and you want the LLM to decide, when you have multiple specialized agents that need dynamic orchestration, when building conversational systems that route to different capabilities, or when you want the most flexible, adaptive agent behavior.
To help you decide between the custom @Tool methods from Module 04 and MCP tools from this module, the following comparison highlights the key trade-offs — custom tools give you tight coupling and full type safety for app-specific logic, while MCP tools offer standardized, reusable integrations:
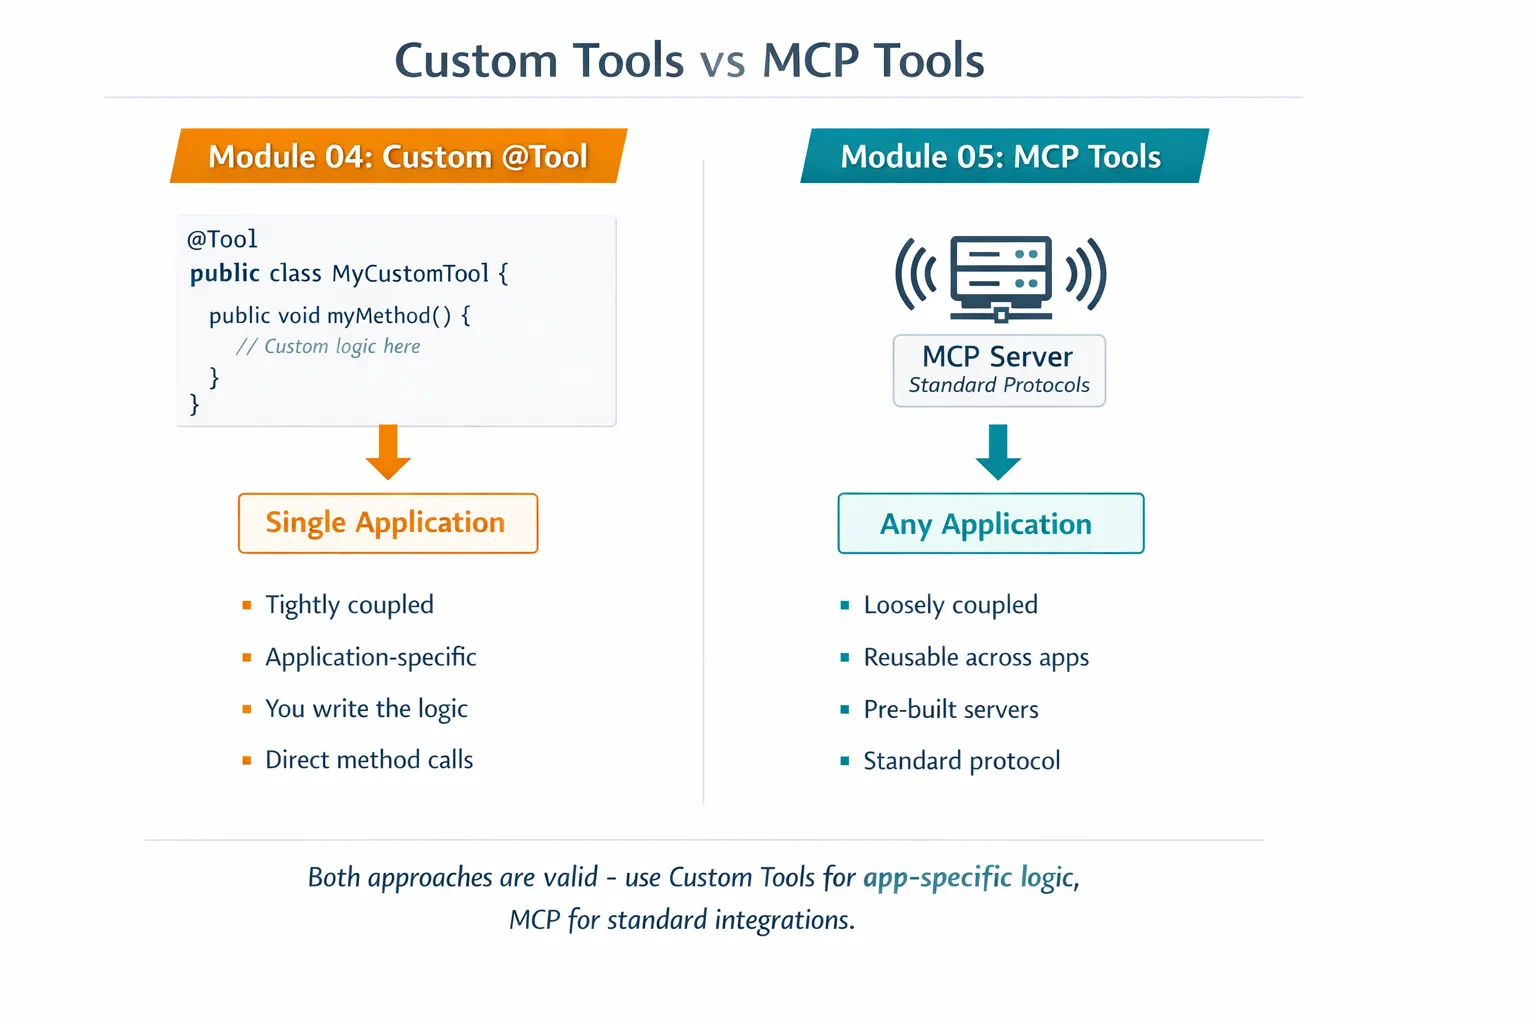
When to use custom @Tool methods vs MCP tools — custom tools for app-specific logic with full type safety, MCP tools for standardized integrations that work across applications.
Congratulations!
You've made it through all five modules of the LangChain4j for Beginners course! Here's a look at the full learning journey you've completed — from basic chat all the way to MCP-powered agentic systems:
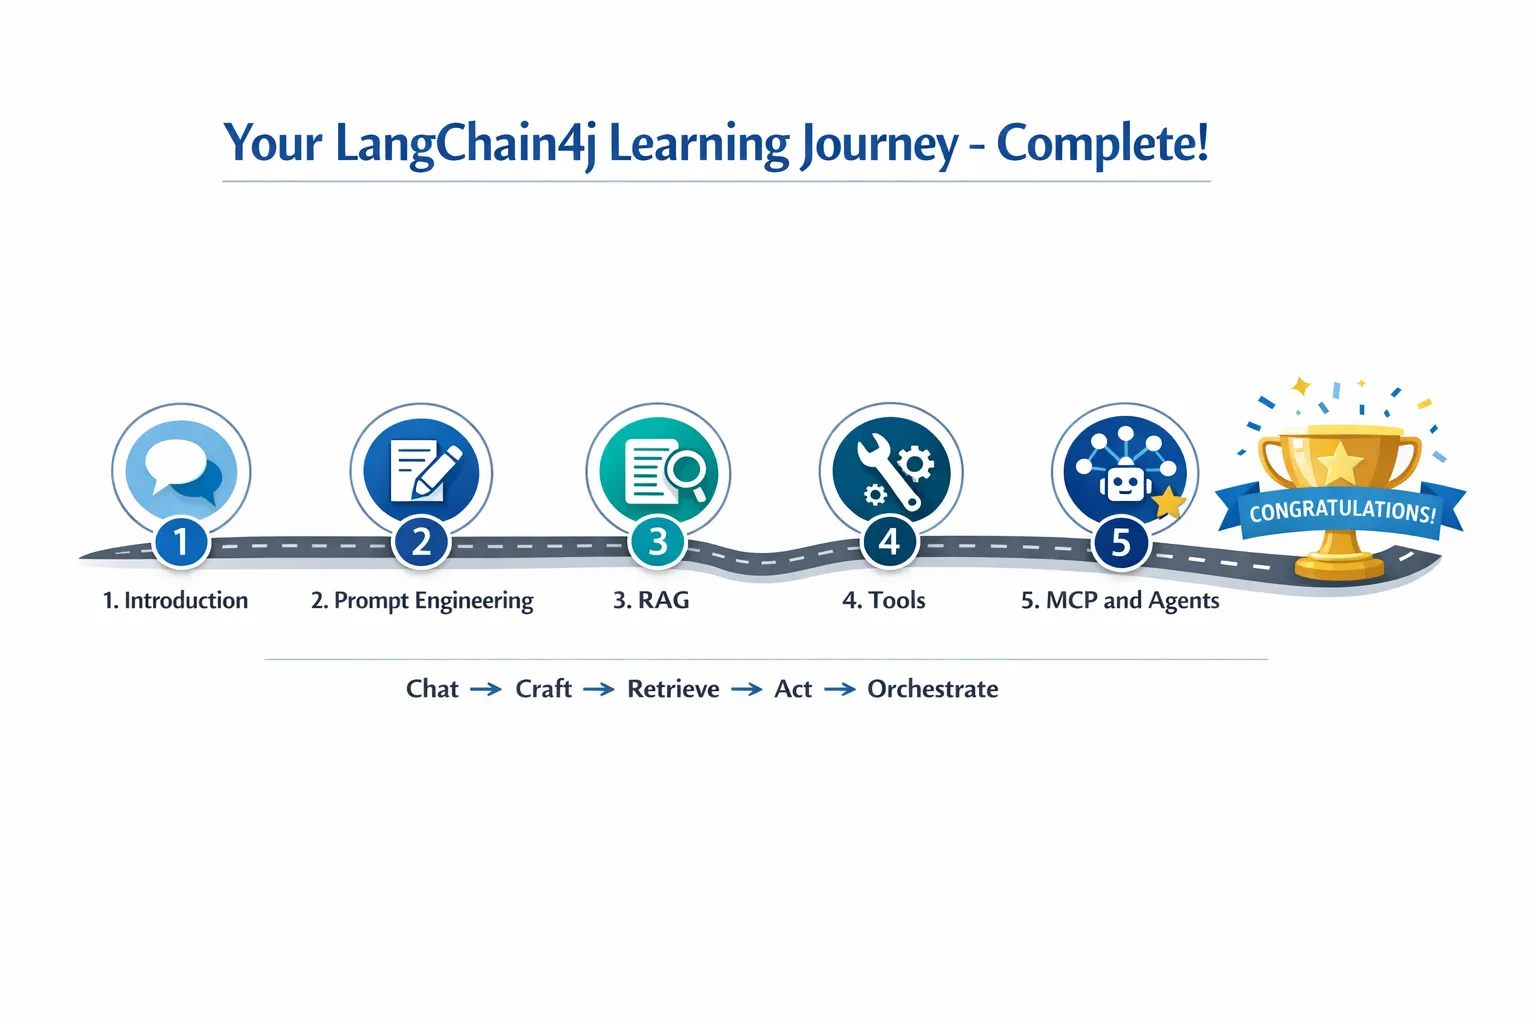
Your learning journey through all five modules — from basic chat to MCP-powered agentic systems.
You've completed the LangChain4j for Beginners course. You've learned:
- How to build conversational AI with memory (Module 01)
- Prompt engineering patterns for different tasks (Module 02)
- Grounding responses in your documents with RAG (Module 03)
- Creating basic AI agents (assistants) with custom tools (Module 04)
- Integrating standardized tools with the LangChain4j MCP and Agentic modules (Module 05)
What's Next?
After completing the modules, explore the Testing Guide to see LangChain4j testing concepts in action.
Official Resources:
- LangChain4j Documentation - Comprehensive guides and API reference
- LangChain4j GitHub - Source code and examples
- LangChain4j Tutorials - Step-by-step tutorials for various use cases
Thank you for completing this course!
Navigation: ← Previous: Module 04 - Tools | Back to Main