Module 03: RAG (Retrieval-Augmented Generation)
Table of Contents
- Video Walkthrough
- What You'll Learn
- Prerequisites
- Understanding RAG
- How It Works
- Run the Application
- Using the Application
- Key Concepts
- When RAG Matters
- Next Steps
Video Walkthrough
Watch this live session that explains how to get started with this module:
What You'll Learn
In the previous modules, you learned how to have conversations with AI and structure your prompts effectively. But there's a fundamental limitation: language models only know what they learned during training. They can't answer questions about your company's policies, your project documentation, or any information they weren't trained on.
RAG (Retrieval-Augmented Generation) solves this problem. Instead of trying to teach the model your information (which is expensive and impractical), you give it the ability to search through your documents. When someone asks a question, the system finds relevant information and includes it in the prompt. The model then answers based on that retrieved context.
Think of RAG as giving the model a reference library. When you ask a question, the system:
- User Query - You ask a question
- Embedding - Converts your question to a vector
- Vector Search - Finds similar document chunks
- Context Assembly - Adds relevant chunks to the prompt
- Response - LLM generates an answer based on the context
This grounds the model's responses in your actual data instead of relying on its training knowledge or making up answers.
Prerequisites
- Completed Module 01 - Introduction (Azure OpenAI resources deployed, including the
text-embedding-3-smallembedding model) .envfile in root directory with Azure credentials (created byazd upin Module 01)
Note: If you haven't completed Module 01, follow the deployment instructions there first. The
azd upcommand deploys both the GPT chat model and the embedding model used by this module.
Understanding RAG
The diagram below illustrates the core concept: instead of relying on the model's training data alone, RAG gives it a reference library of your documents to consult before generating each answer.
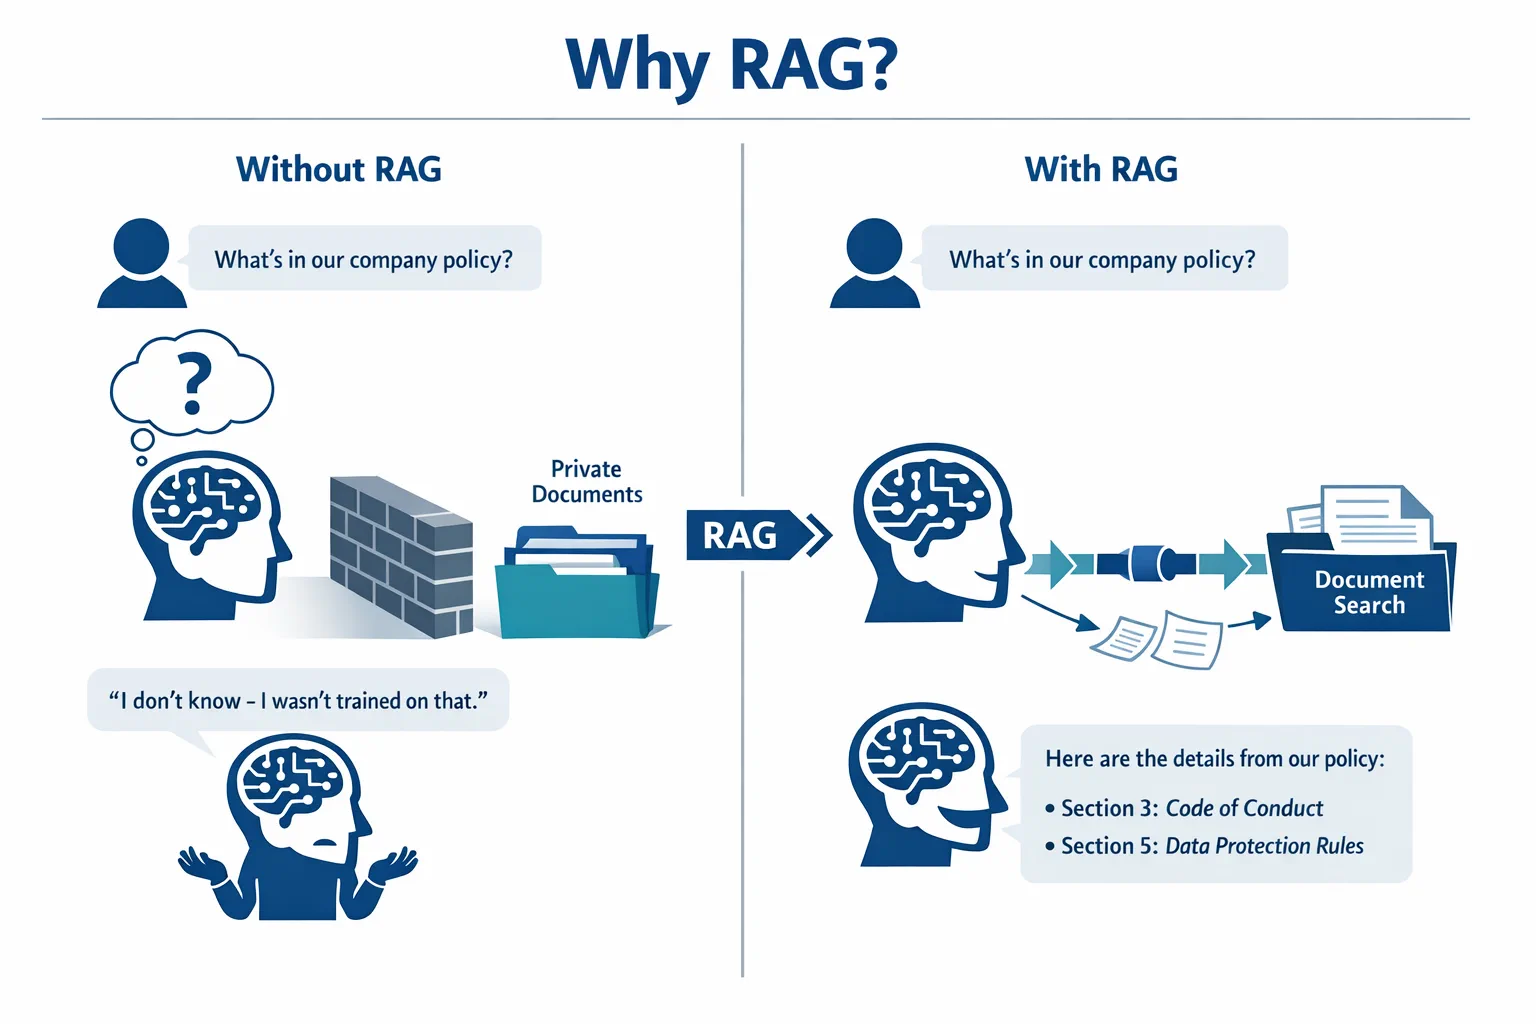
This diagram shows the difference between a standard LLM (which guesses from training data) and a RAG-enhanced LLM (which consults your documents first).
Here's how the pieces connect end-to-end. A user's question flows through four stages — embedding, vector search, context assembly, and answer generation — each building on the previous one:
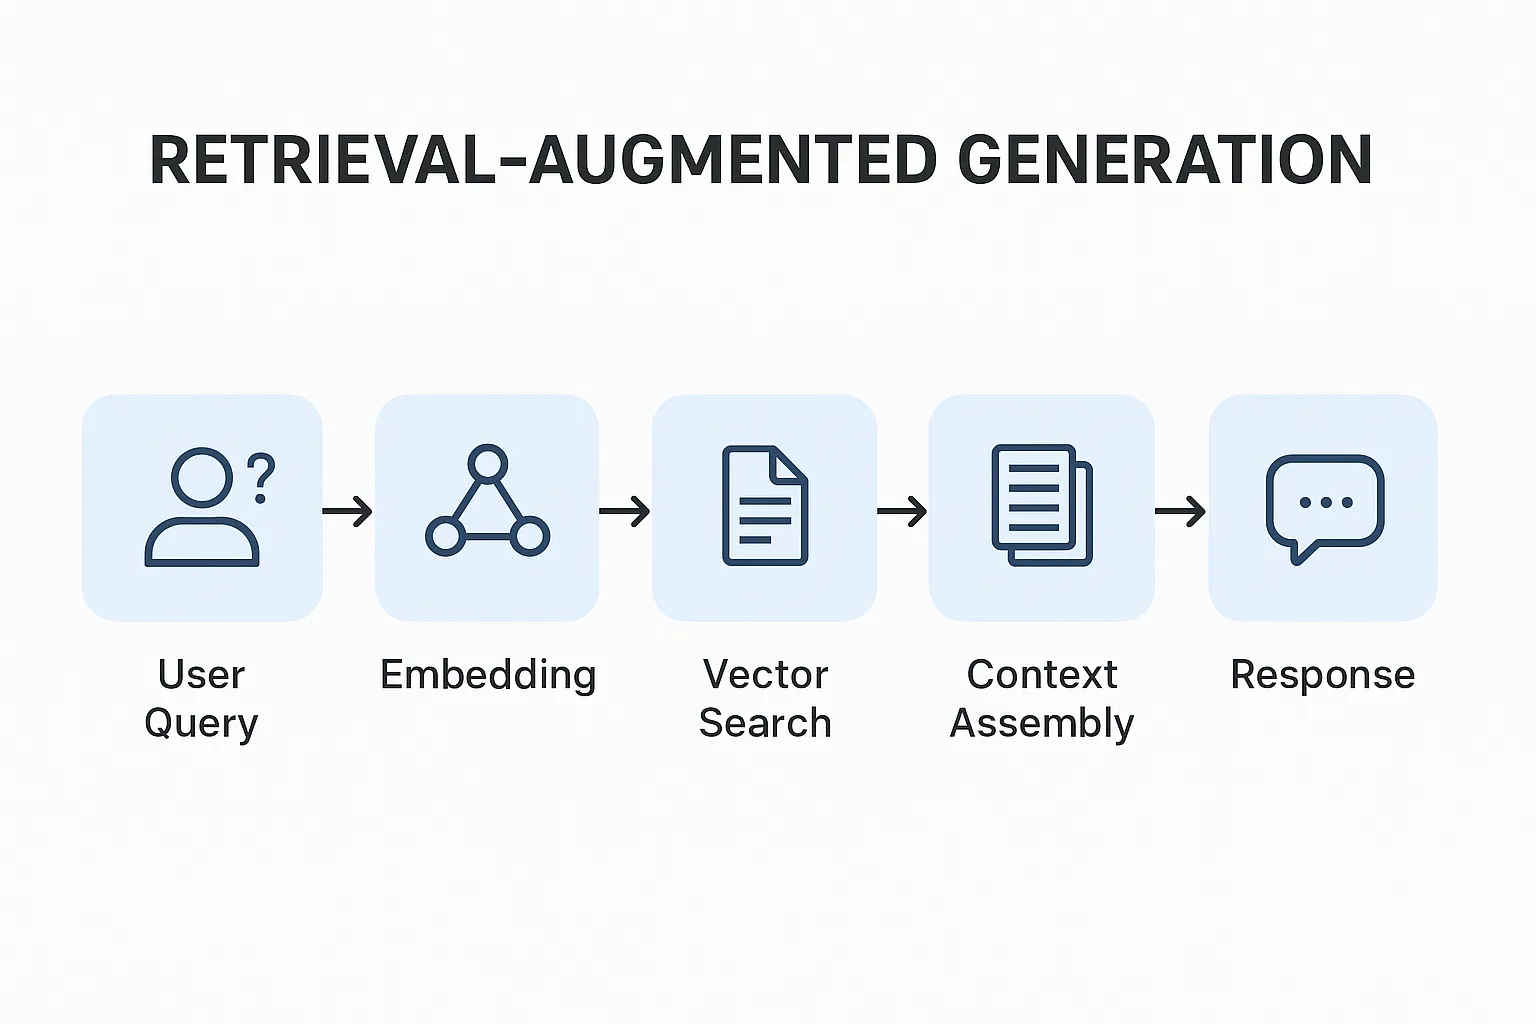
This diagram shows the end-to-end RAG pipeline — a user query flows through embedding, vector search, context assembly, and answer generation.
The rest of this module walks through each stage in detail, with code you can run and modify.
Which RAG Approach Does This Tutorial Use?
LangChain4j offers three ways to implement RAG, each with a different level of abstraction. The diagram below compares them side by side:
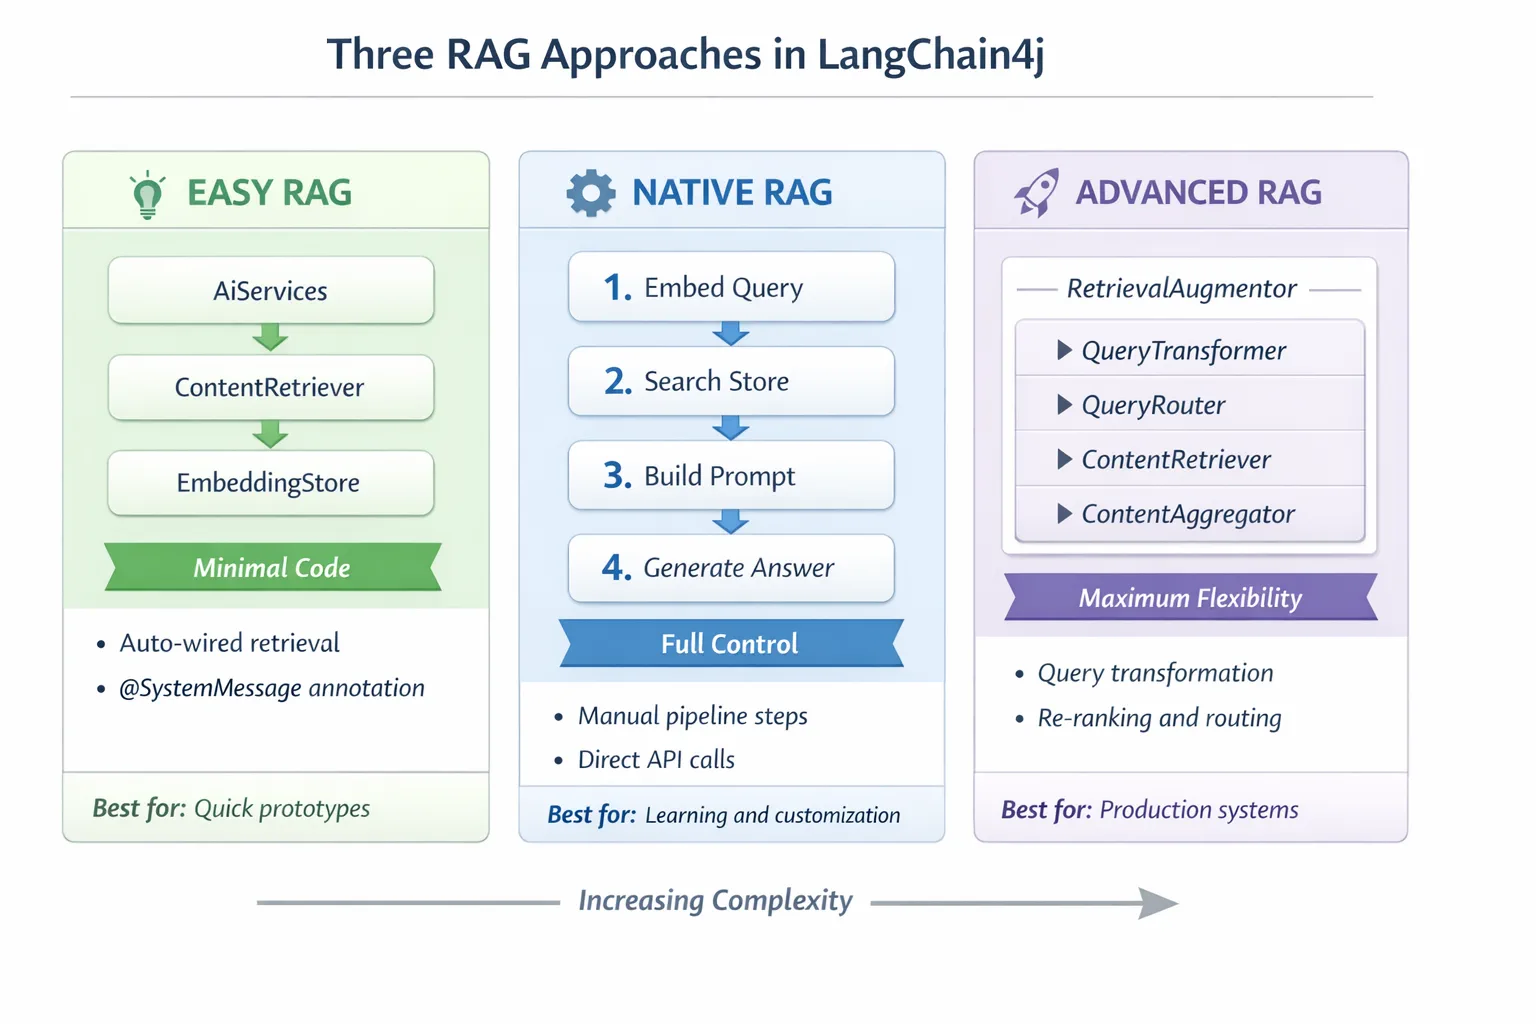
This diagram compares the three LangChain4j RAG approaches — Easy, Native, and Advanced — showing their key components and when to use each one.
| Approach | What It Does | Trade-off |
|---|---|---|
| Easy RAG | Wires everything automatically through AiServices and ContentRetriever. You annotate an interface, attach a retriever, and LangChain4j handles embedding, searching, and prompt assembly behind the scenes. | Minimal code, but you don't see what's happening at each step. |
| Native RAG | You call the embedding model, search the store, build the prompt, and generate the answer yourself — one explicit step at a time. | More code, but every stage is visible and modifiable. |
| Advanced RAG | Uses the RetrievalAugmentor framework with pluggable query transformers, routers, re-rankers, and content injectors for production-grade pipelines. | Maximum flexibility, but significantly more complexity. |
This tutorial uses the Native approach. Each step of the RAG pipeline — embedding the query, searching the vector store, assembling the context, and generating the answer — is written out explicitly in RagService.java. This is intentional: as a learning resource, it's more important that you see and understand every stage than that the code is minimized. Once you're comfortable with how the pieces fit together, you can graduate to Easy RAG for quick prototypes or Advanced RAG for production systems.
💡 Curious about Easy RAG? LangChain4j also offers an Easy RAG approach where
AiServicesand aContentRetrieverhandle embedding, searching, and prompt assembly automatically. This module takes the more explicit path — breaking open that pipeline so you can see and control each stage yourself.
The diagram below shows the Easy RAG pipeline. Notice how AiServices and EmbeddingStoreContentRetriever hide all the complexity — you load a document, attach a retriever, and get answers. The Native approach in this module breaks each of those hidden steps open:
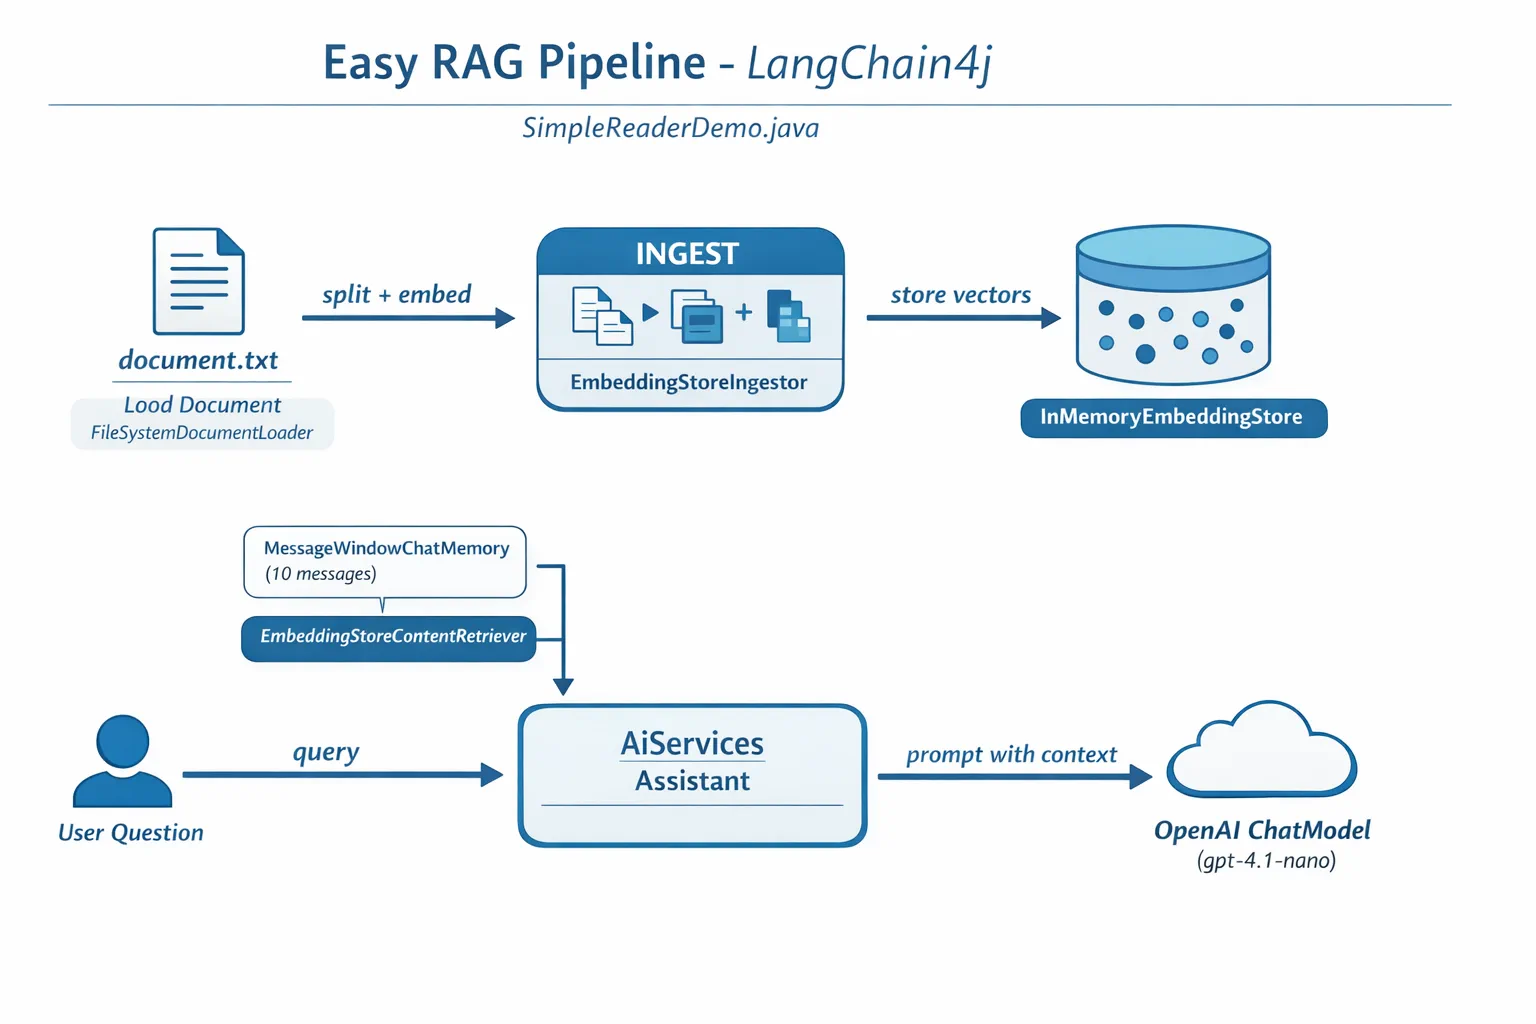
This diagram shows the Easy RAG pipeline. Compare this with the Native approach used in this module: Easy RAG hides the embedding, retrieval, and prompt assembly behind AiServices and ContentRetriever — you load a document, attach a retriever, and get answers. The Native approach in this module breaks that pipeline open so you call each stage (embed, search, assemble context, generate) yourself, giving you full visibility and control.
How It Works
The RAG pipeline in this module breaks down into four stages that run in sequence every time a user asks a question. First, an uploaded document is parsed and chunked into manageable pieces. Those chunks are then converted into vector embeddings and stored so they can be compared mathematically. When a query arrives, the system performs a semantic search to find the most relevant chunks, and finally passes them as context to the LLM for answer generation. The sections below walk through each stage with the actual code and diagrams. Let's look at the first step.
Document Processing
When you upload a document, the system parses it (PDF or plain text), attaches metadata such as the filename, and then breaks it into chunks — smaller pieces that fit comfortably in the model's context window. These chunks overlap slightly so you don't lose context at the boundaries.
// Parse the uploaded file and wrap it in a LangChain4j Document
Document document = Document.from(content, metadata);

// Split into 300-token chunks with 30-token overlap
DocumentSplitter splitter = DocumentSplitters
    .recursive(300, 30);

List<TextSegment> segments = splitter.split(document);
The diagram below shows how this works visually. Notice how each chunk shares some tokens with its neighbors — the 30-token overlap ensures no important context falls between the cracks:
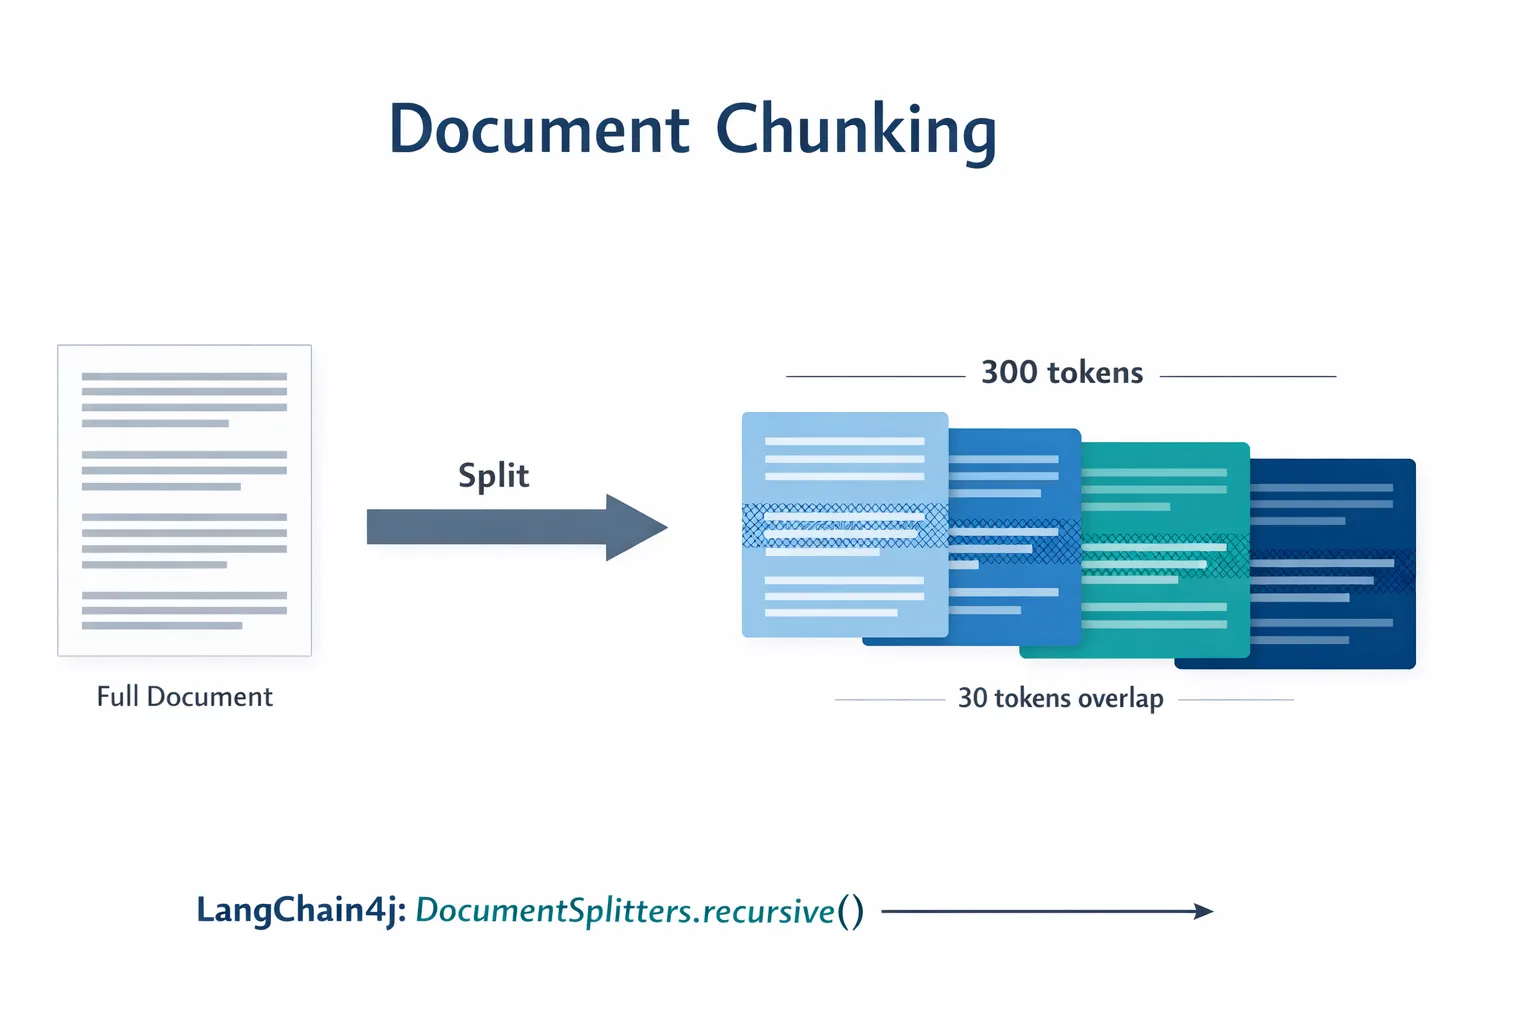
This diagram shows a document being split into 300-token chunks with 30-token overlap, preserving context at chunk boundaries.
🤖 Try with GitHub Copilot Chat: Open
DocumentService.javaand ask:
- "How does LangChain4j split documents into chunks and why is overlap important?"
- "What's the optimal chunk size for different document types and why?"
- "How do I handle documents in multiple languages or with special formatting?"
Creating Embeddings
Each chunk is converted into a numerical representation called an embedding — essentially a meaning-to-numbers converter. The embedding model isn't "intelligent" the way a chat model is; it can't follow instructions, reason, or answer questions. What it can do is map text into a mathematical space where similar meanings land near each other — "car" near "automobile," "refund policy" near "return my money." Think of a chat model as a person you can talk to; an embedding model is an ultra-good filing system.
The diagram below visualizes this concept — text goes in, numerical vectors come out, and similar meanings produce nearby vectors:
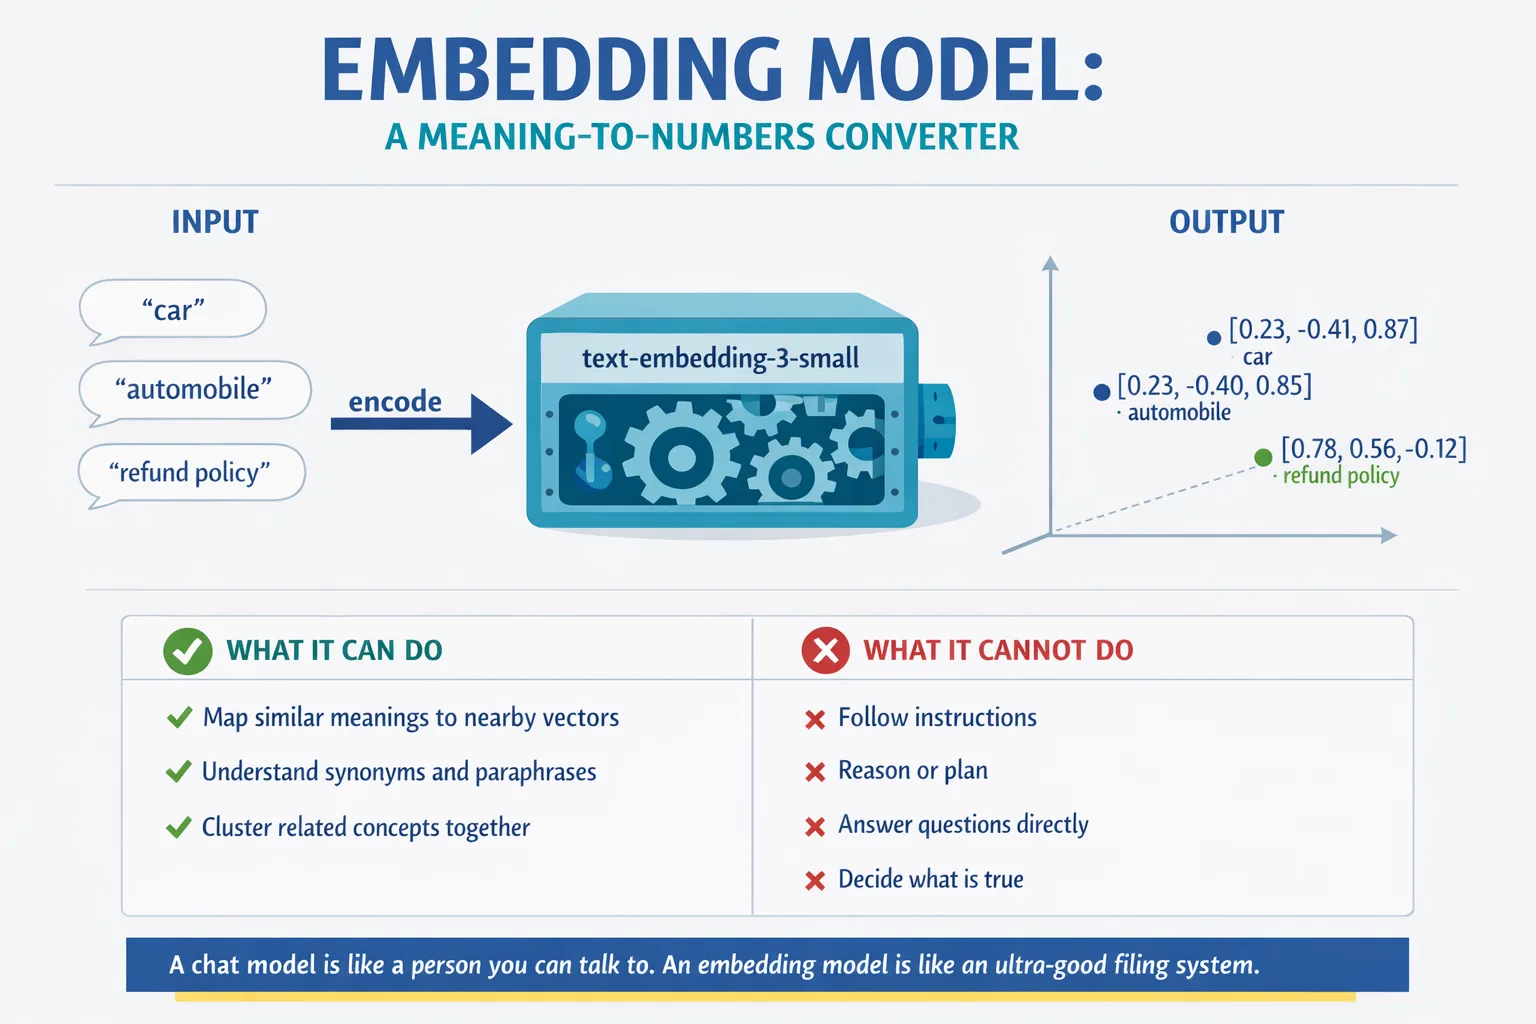
This diagram shows how an embedding model converts text into numerical vectors, placing similar meanings — like "car" and "automobile" — near each other in vector space.
@Bean
public EmbeddingModel embeddingModel() {
    return OpenAiOfficialEmbeddingModel.builder()
        .baseUrl(azureOpenAiEndpoint)
        .apiKey(azureOpenAiKey)
        .modelName(azureEmbeddingDeploymentName)
        .build();
}

EmbeddingStore<TextSegment> embeddingStore =
    new InMemoryEmbeddingStore<>();
The class diagram below shows the two separate flows in a RAG pipeline and the LangChain4j classes that implement them. The ingestion flow (runs once at upload time) splits the document, embeds the chunks, and stores them via .addAll(). The query flow (runs each time a user asks) embeds the question, searches the store via .search(), and passes the matched context to the chat model. Both flows meet at the shared EmbeddingStore<TextSegment> interface:
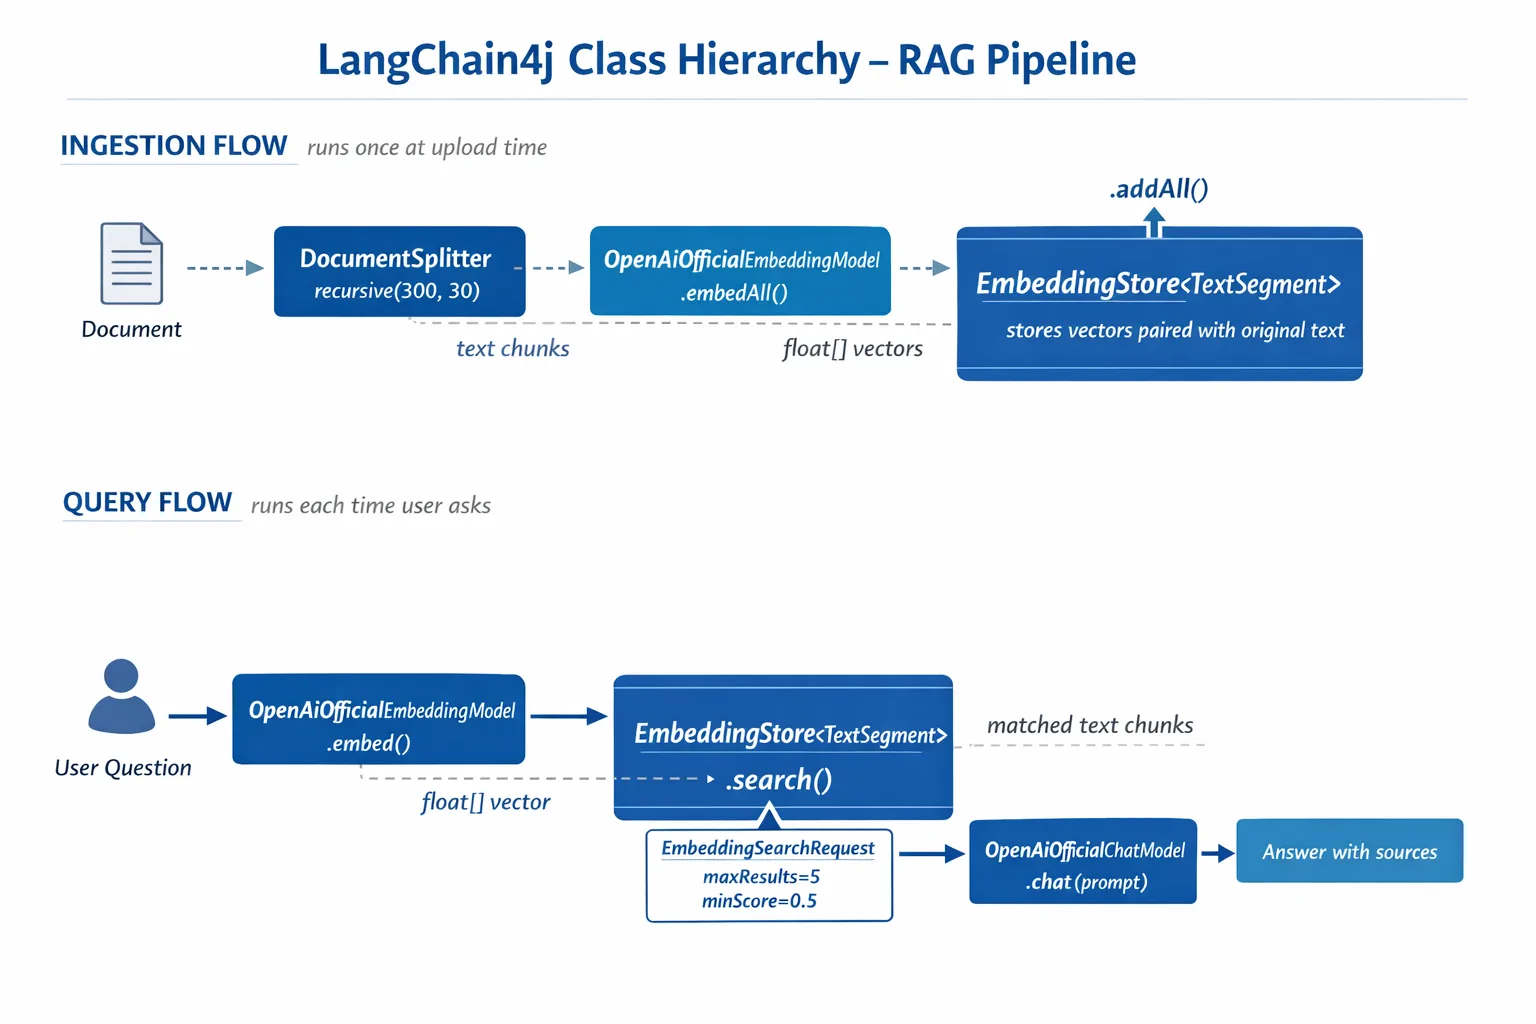
This diagram shows the two flows in a RAG pipeline — ingestion and query — and how they connect through a shared EmbeddingStore.
Once embeddings are stored, similar content naturally clusters together in vector space. The visualization below shows how documents about related topics end up as nearby points, which is what makes semantic search possible:
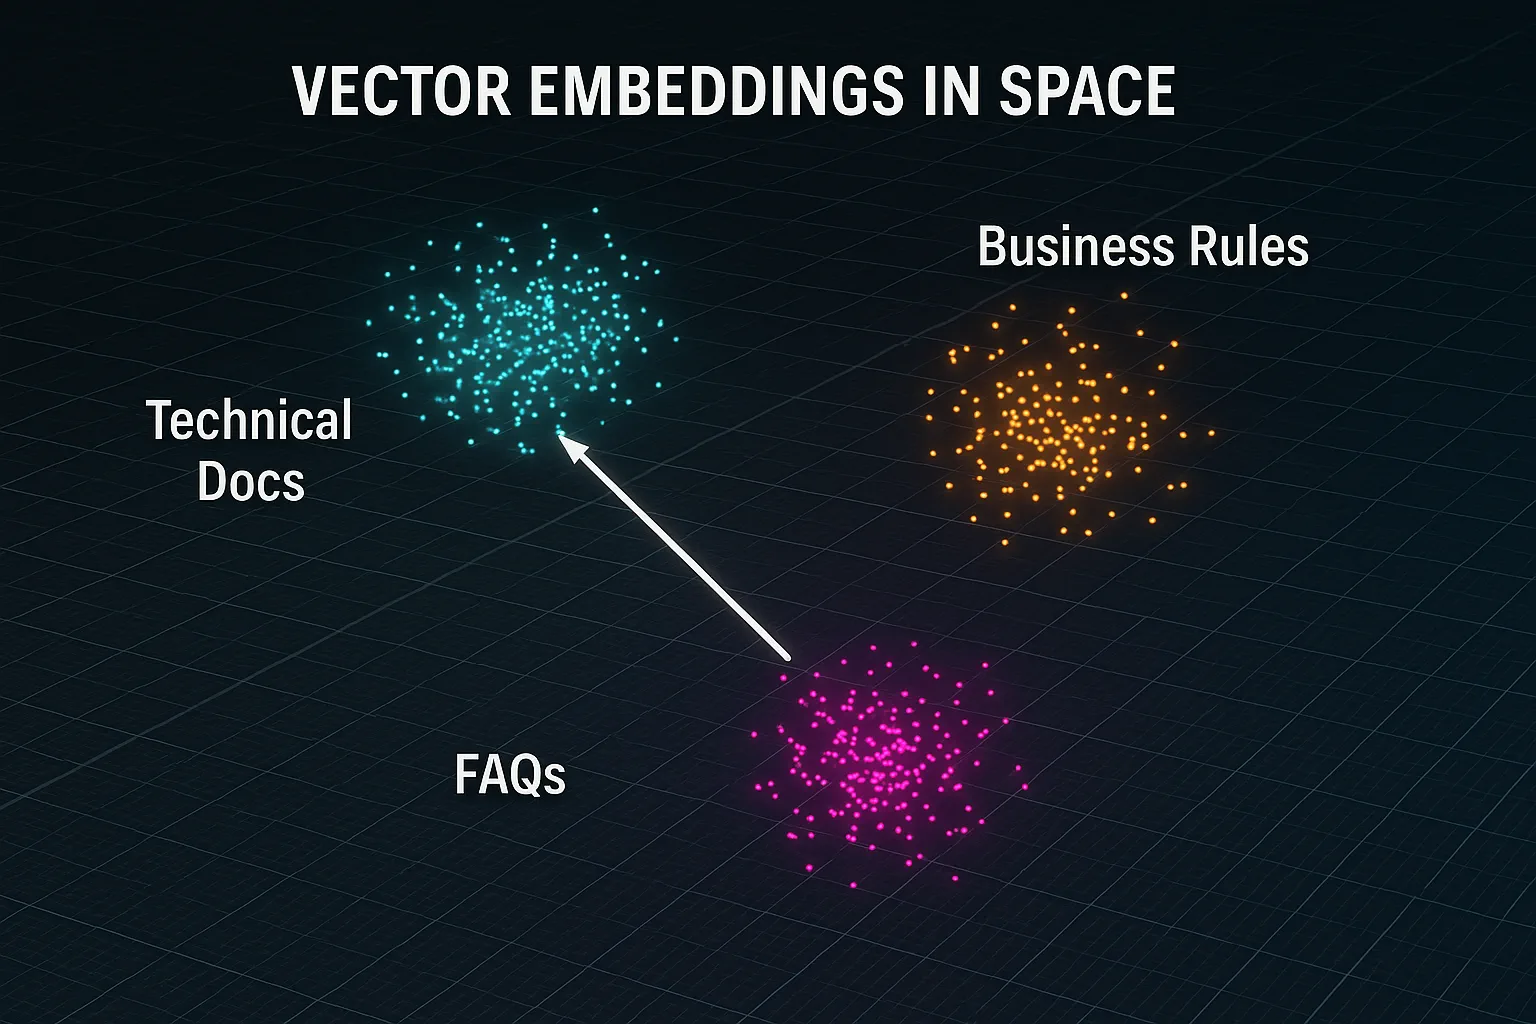
This visualization shows how related documents cluster together in 3D vector space, with topics like Technical Docs, Business Rules, and FAQs forming distinct groups.
When a user searches, the system follows four steps: embed the documents once, embed the query on each search, compare the query vector against all stored vectors using cosine similarity, and return the top-K highest-scoring chunks. The diagram below walks through each step and the LangChain4j classes involved:
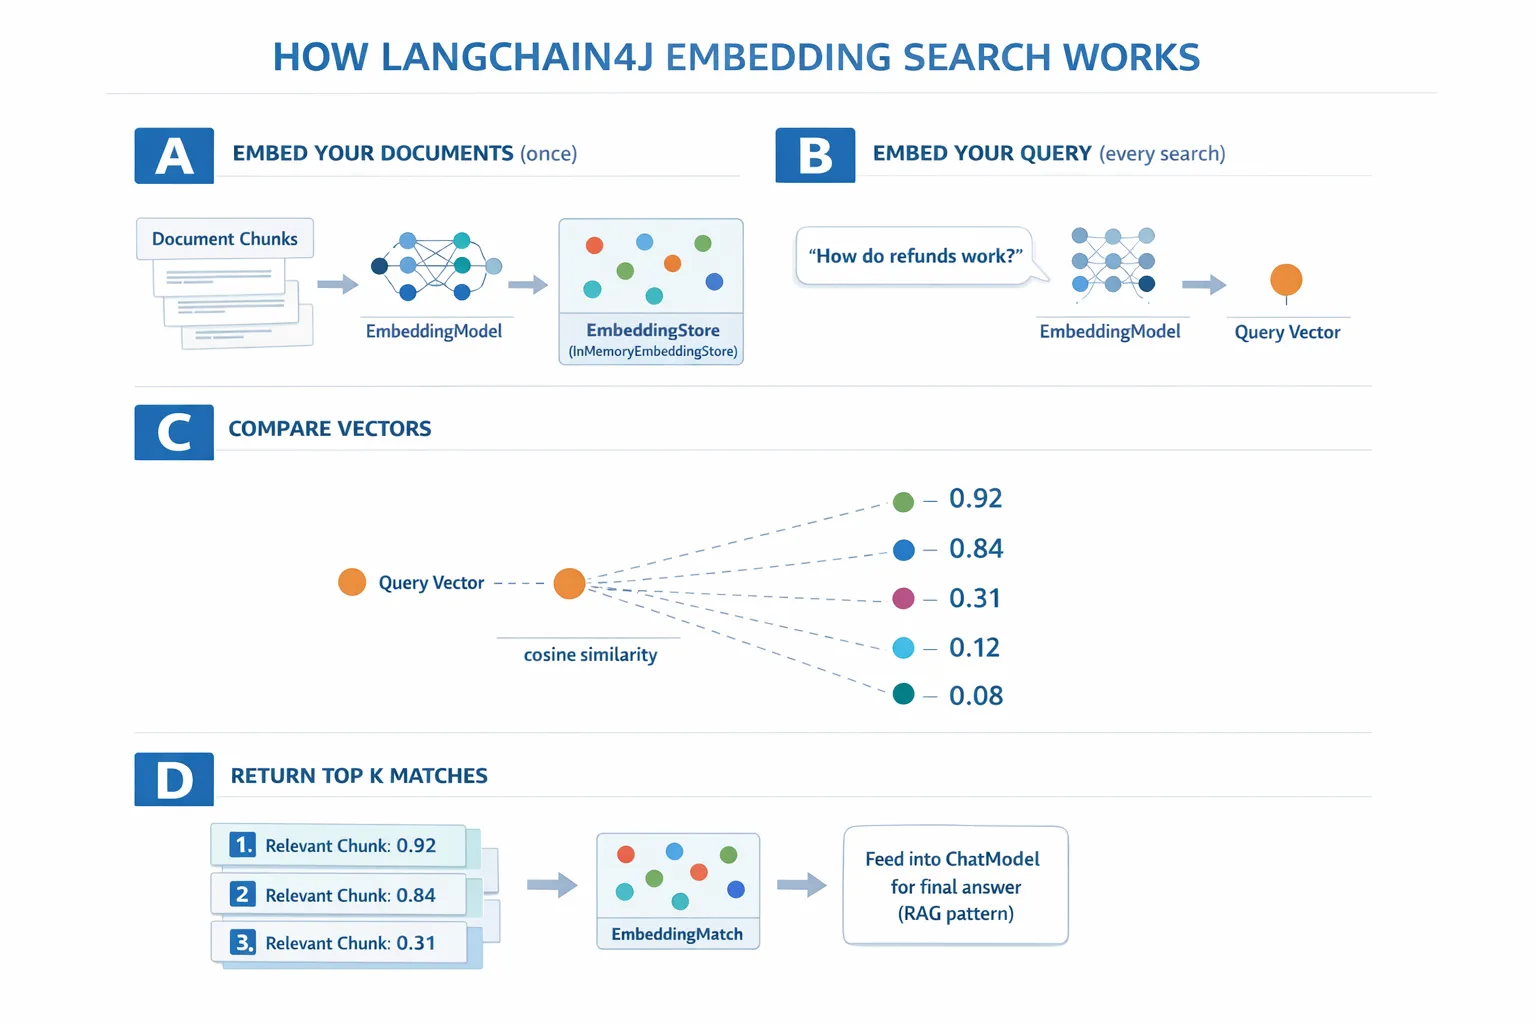
This diagram shows the four-step embedding search process: embed documents, embed the query, compare vectors with cosine similarity, and return the top-K results.
Semantic Search
When you ask a question, your question also becomes an embedding. The system compares your question's embedding against all the document chunks' embeddings. It finds the chunks with the most similar meanings - not just matching keywords, but actual semantic similarity.
Embedding queryEmbedding = embeddingModel.embed(question).content();

EmbeddingSearchRequest searchRequest = EmbeddingSearchRequest.builder()
    .queryEmbedding(queryEmbedding)
    .maxResults(5)
    .minScore(0.5)
    .build();

EmbeddingSearchResult<TextSegment> searchResult = embeddingStore.search(searchRequest);
List<EmbeddingMatch<TextSegment>> matches = searchResult.matches();

for (EmbeddingMatch<TextSegment> match : matches) {
    String relevantText = match.embedded().text();
    double score = match.score();
}
The diagram below contrasts semantic search with traditional keyword search. A keyword search for "vehicle" misses a chunk about "cars and trucks," but semantic search understands they mean the same thing and returns it as a high-scoring match:
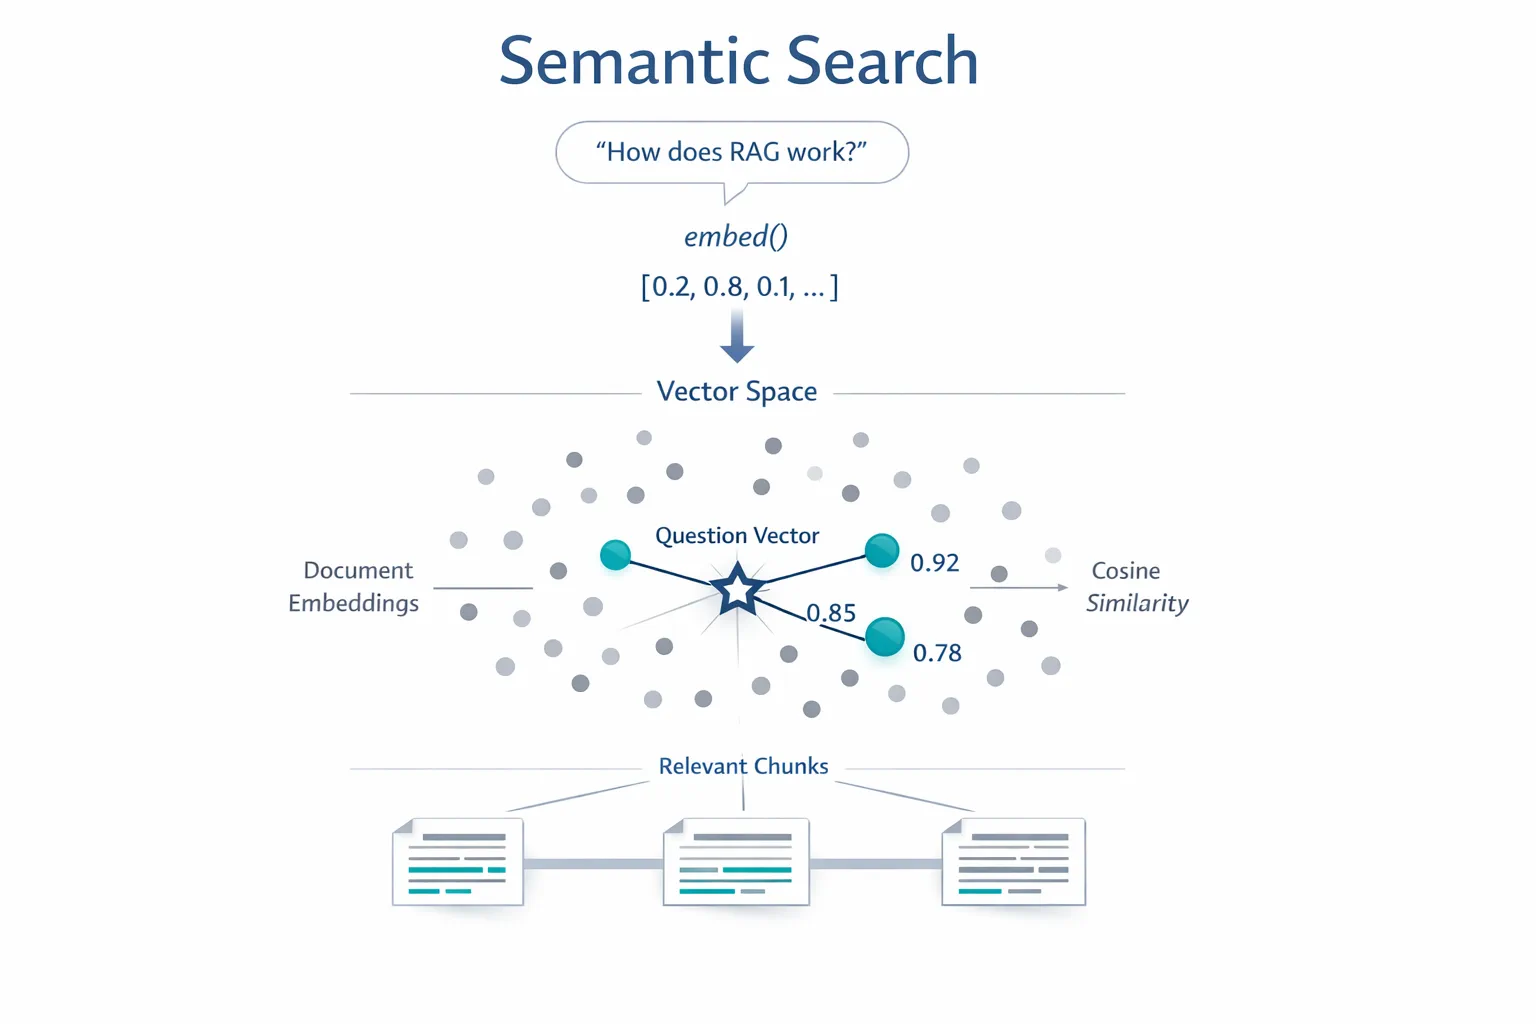
This diagram compares keyword-based search with semantic search, showing how semantic search retrieves conceptually related content even when exact keywords differ.
Under the hood, similarity is measured using cosine similarity — essentially asking "are these two arrows pointing in the same direction?" Two chunks can use completely different words, but if they mean the same thing their vectors point the same way and score close to 1.0:
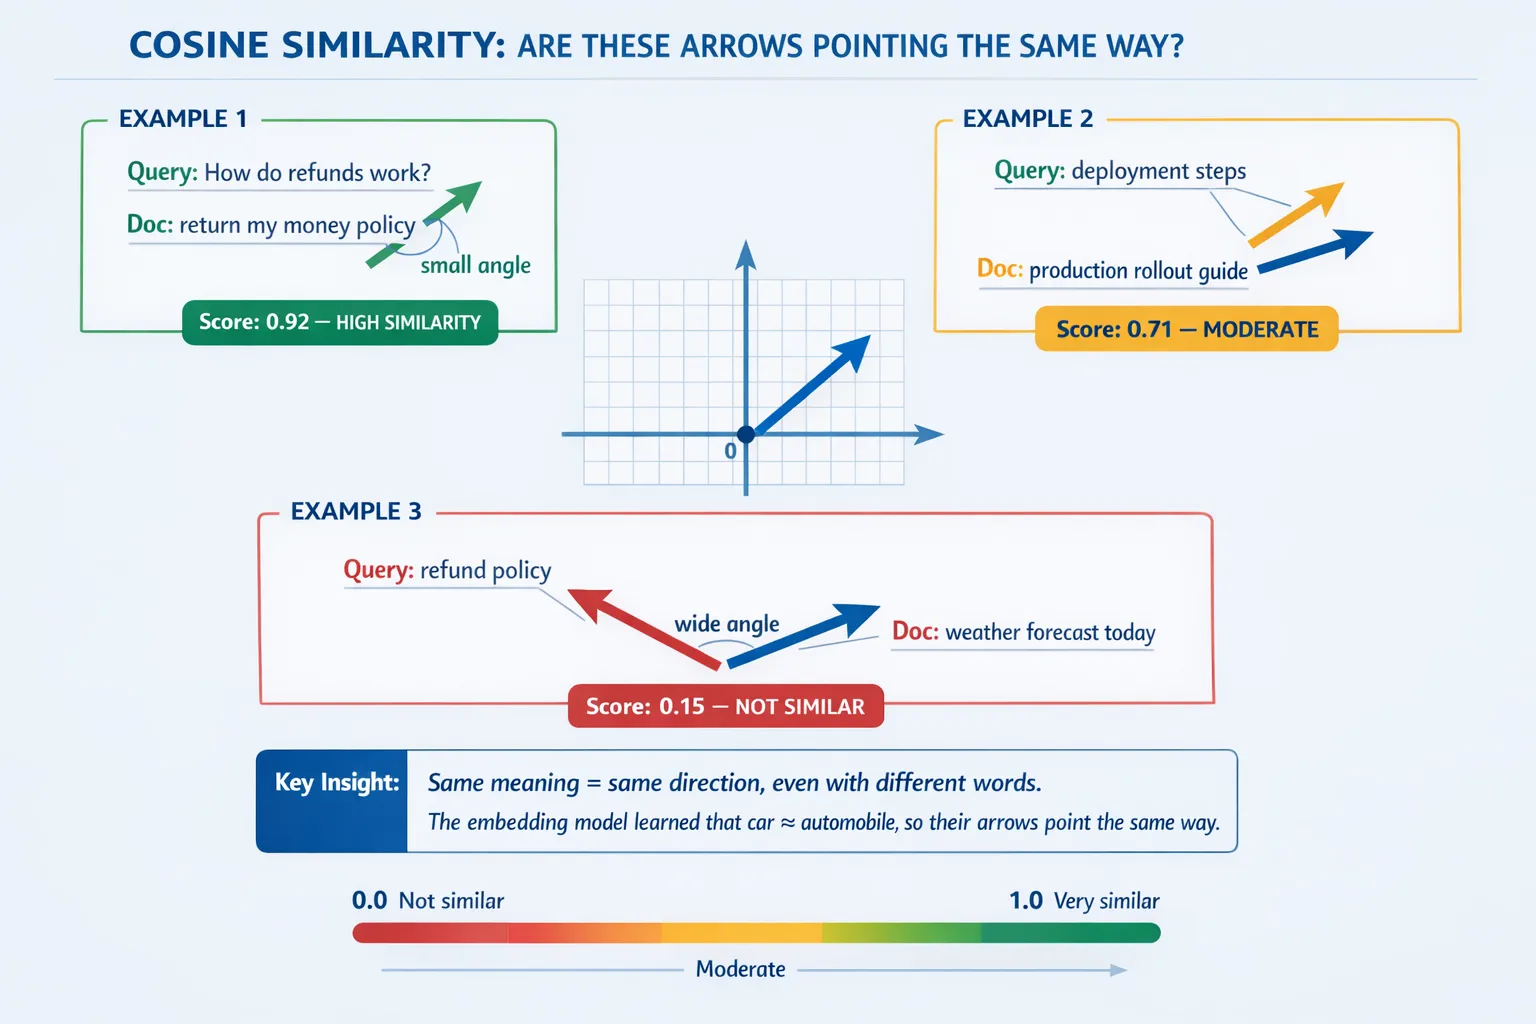
This diagram illustrates cosine similarity as the angle between embedding vectors — more aligned vectors score closer to 1.0, indicating higher semantic similarity.
🤖 Try with GitHub Copilot Chat: Open
RagService.javaand ask:
- "How does similarity search work with embeddings and what determines the score?"
- "What similarity threshold should I use and how does it affect results?"
- "How do I handle cases where no relevant documents are found?"
Answer Generation
The most relevant chunks are assembled into a structured prompt that includes explicit instructions, the retrieved context, and the user's question. The model reads those specific chunks and answers based on that information — it can only use what's in front of it, which prevents hallucination.
String context = matches.stream()
    .map(match -> match.embedded().text())
    .collect(Collectors.joining("\n\n"));

String prompt = String.format("""
    Answer the question based on the following context.
    If the answer cannot be found in the context, say so.

    Context:
    %s

    Question: %s

    Answer:""", context, request.question());

String answer = chatModel.chat(prompt);
The diagram below shows this assembly in action — the top-scoring chunks from the search step are injected into the prompt template, and the OpenAiOfficialChatModel generates a grounded answer:
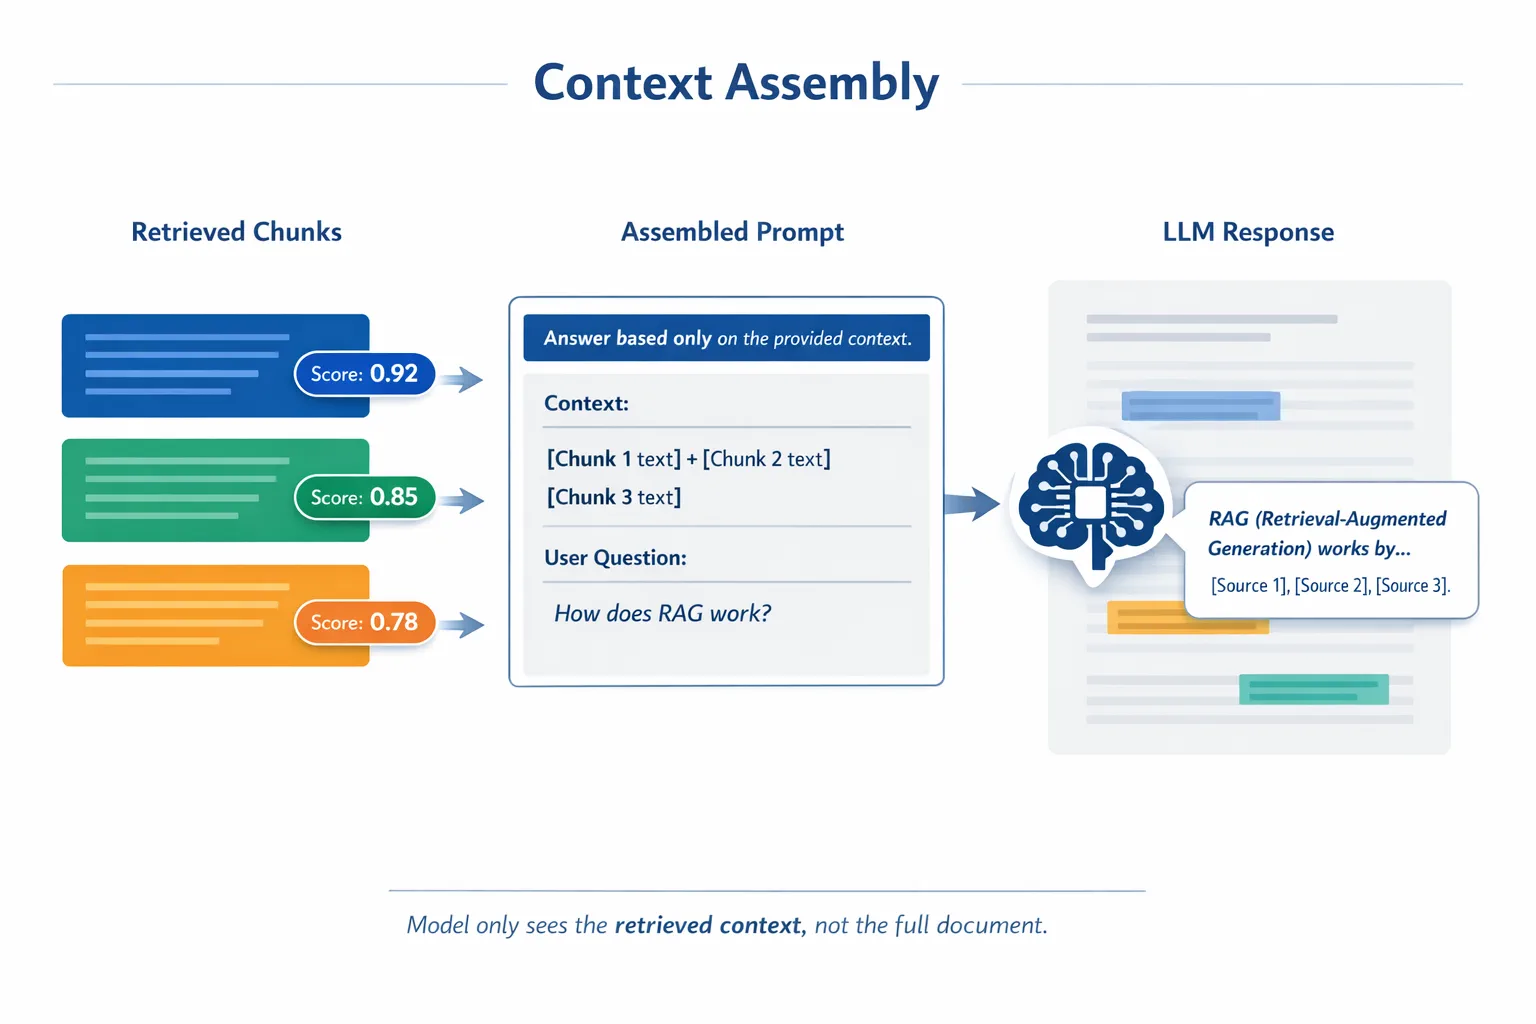
This diagram shows how the top-scoring chunks are assembled into a structured prompt, allowing the model to generate a grounded answer from your data.
Run the Application
Verify deployment:
Ensure the .env file exists in the root directory with Azure credentials (created during Module 01). Run this from the module directory (03-rag/):
Bash:
cat ../.env # Should show AZURE_OPENAI_ENDPOINT, API_KEY, DEPLOYMENTPowerShell:
Get-Content ..\.env # Should show AZURE_OPENAI_ENDPOINT, API_KEY, DEPLOYMENTStart the application:
Note: If you already started all applications using
./start-all.shfrom the root directory (as described in Module 01), this module is already running on port 8081. You can skip the start commands below and go directly to http://localhost:8081.
Option 1: Using Spring Boot Dashboard (Recommended for VS Code users)
The dev container includes the Spring Boot Dashboard extension, which provides a visual interface to manage all Spring Boot applications. You can find it in the Activity Bar on the left side of VS Code (look for the Spring Boot icon).
From the Spring Boot Dashboard, you can:
- See all available Spring Boot applications in the workspace
- Start/stop applications with a single click
- View application logs in real-time
- Monitor application status
Simply click the play button next to "rag" to start this module, or start all modules at once.
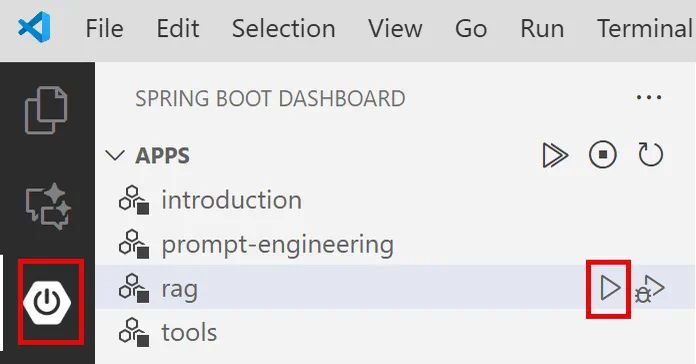
This screenshot shows the Spring Boot Dashboard in VS Code, where you can start, stop, and monitor applications visually.
Option 2: Using shell scripts
Start all web applications (modules 01-04):
Bash:
cd ..  # From root directory
./start-all.sh
PowerShell:
cd ..  # From root directory
.\start-all.ps1
Or start just this module:
Bash:
cd 03-rag
./start.sh
PowerShell:
cd 03-rag
.\start.ps1
Both scripts automatically load environment variables from the root .env file and will build the JARs if they don't exist.
Note: If you prefer to build all modules manually before starting:
Bash:
bashcd .. # Go to root directory mvn clean package -DskipTestsPowerShell:
powershellcd .. # Go to root directory mvn clean package -DskipTests
Open http://localhost:8081 in your browser.
To stop:
Bash:
./stop.sh  # This module only
# Or
cd .. && ./stop-all.sh  # All modules
PowerShell:
.\stop.ps1  # This module only
# Or
cd ..; .\stop-all.ps1  # All modules
Using the Application
The application provides a web interface for document upload and questioning.

This screenshot shows the RAG application interface where you upload documents and ask questions.
Upload a Document
Start by uploading a document - TXT files work best for testing. A sample-document.txt is provided in this directory that contains information about LangChain4j features, RAG implementation, and best practices - perfect for testing the system.
The system processes your document, breaks it into chunks, and creates embeddings for each chunk. This happens automatically when you upload.
Ask Questions
Now ask specific questions about the document content. Try something factual that's clearly stated in the document. The system searches for relevant chunks, includes them in the prompt, and generates an answer.
Check Source References
Notice each answer includes source references with similarity scores. These scores (0 to 1) show how relevant each chunk was to your question. Higher scores mean better matches. This lets you verify the answer against the source material.

This screenshot shows query results with the generated answer, source references, and relevance scores for each retrieved chunk.
Experiment with Questions
Try different types of questions:
- Specific facts: "What is the main topic?"
- Comparisons: "What's the difference between X and Y?"
- Summaries: "Summarize the key points about Z"
Watch how the relevance scores change based on how well your question matches document content.
Key Concepts
Chunking Strategy
Documents are split into 300-token chunks with 30 tokens of overlap. This balance ensures each chunk has enough context to be meaningful while staying small enough to include multiple chunks in a prompt.
Similarity Scores
Every retrieved chunk comes with a similarity score between 0 and 1 that indicates how closely it matches the user's question. The diagram below visualizes the score ranges and how the system uses them to filter results:
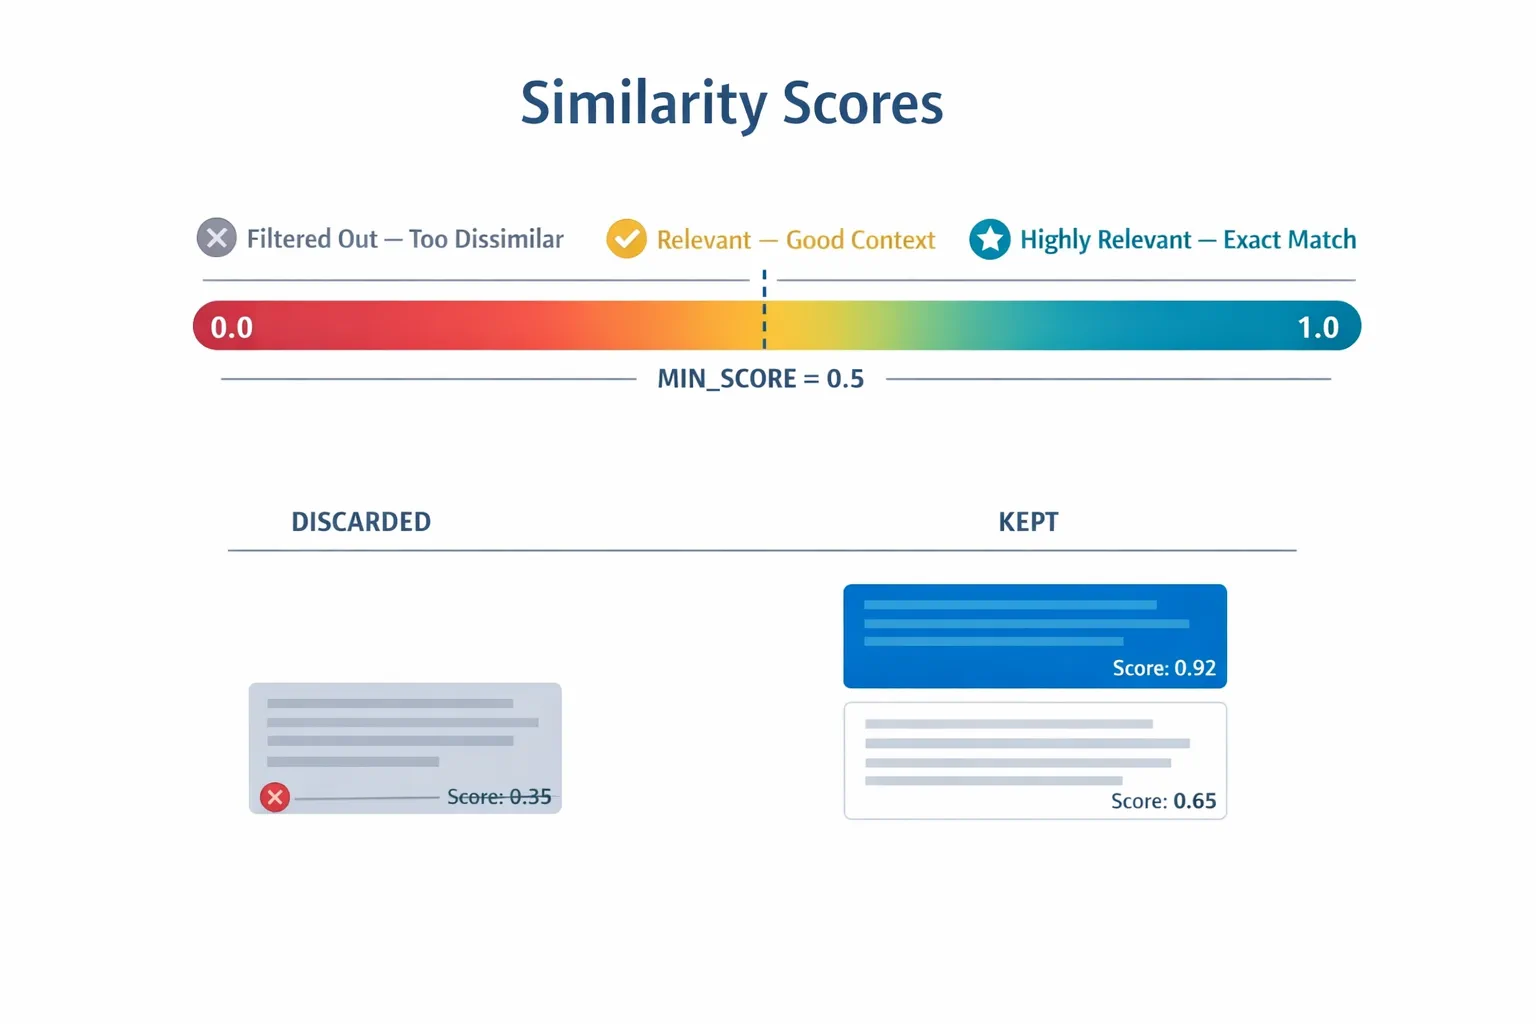
This diagram shows score ranges from 0 to 1, with a minimum threshold of 0.5 that filters out irrelevant chunks.
Scores range from 0 to 1:
- 0.7-1.0: Highly relevant, exact match
- 0.5-0.7: Relevant, good context
- Below 0.5: Filtered out, too dissimilar
The system only retrieves chunks above the minimum threshold to ensure quality.
Embeddings work well when meaning clusters cleanly, but they have blind spots. The diagram below shows the common failure modes — chunks that are too large produce muddy vectors, chunks that are too small lack context, ambiguous terms point to multiple clusters, and exact-match lookups (IDs, part numbers) don't work with embeddings at all:
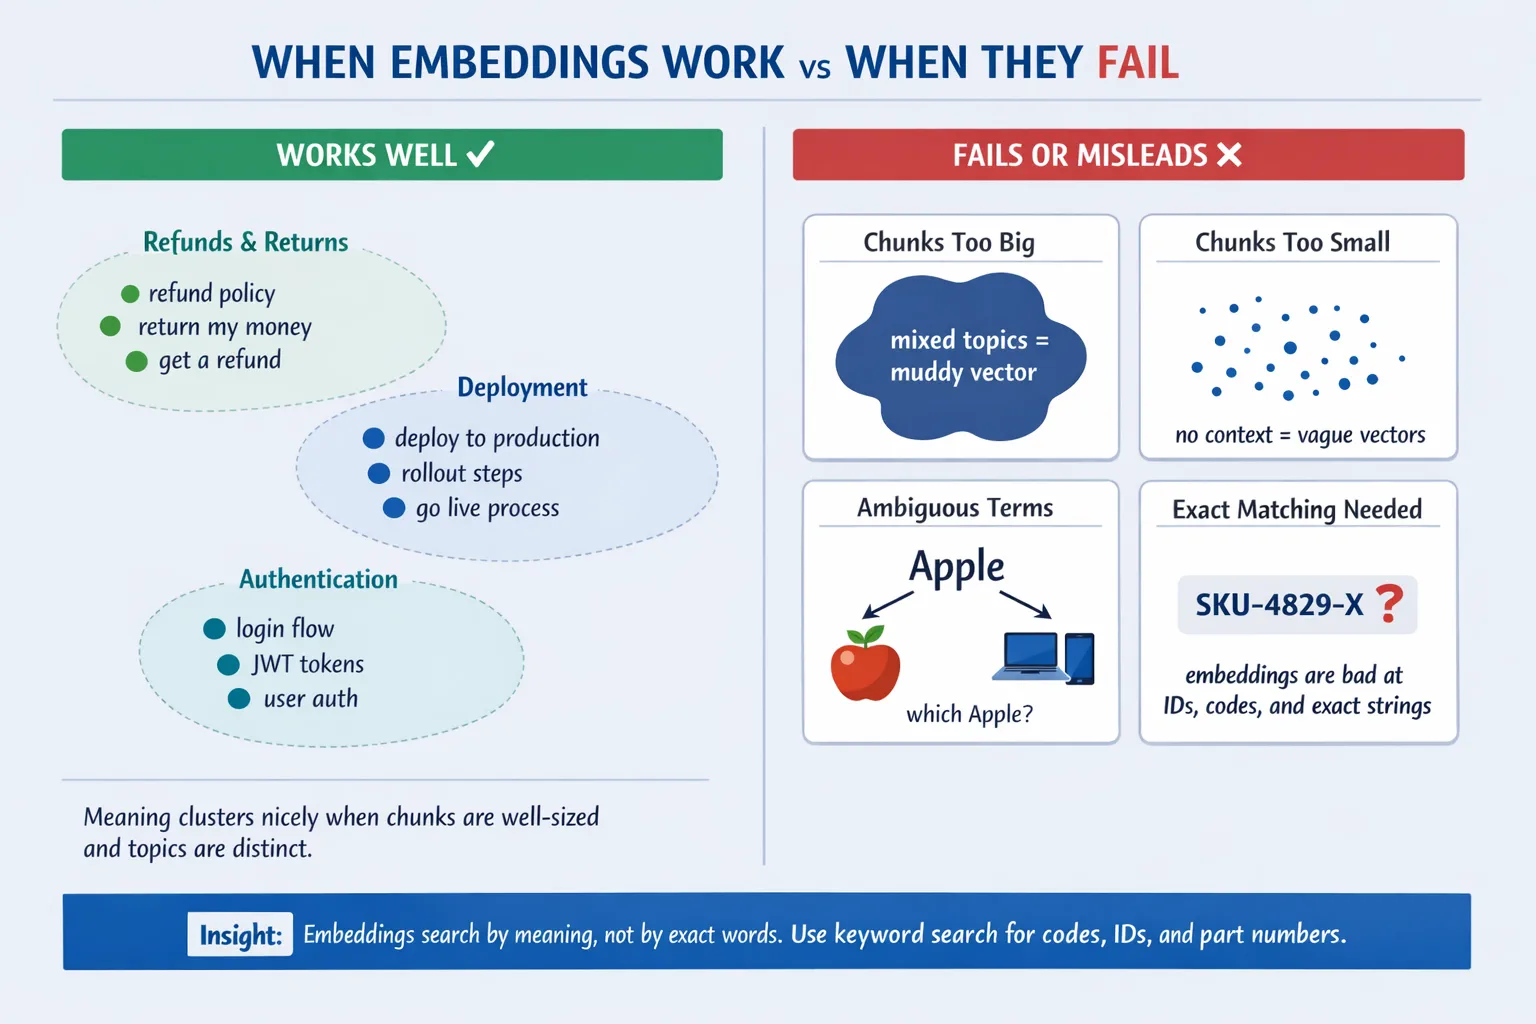
This diagram shows common embedding failure modes: chunks too large, chunks too small, ambiguous terms that point to multiple clusters, and exact-match lookups like IDs.
In-Memory Storage
This module uses in-memory storage for simplicity. When you restart the application, uploaded documents are lost. Production systems use persistent vector databases like Qdrant or Azure AI Search.
Context Window Management
Each model has a maximum context window. You can't include every chunk from a large document. The system retrieves the top N most relevant chunks (default 5) to stay within limits while providing enough context for accurate answers.
When RAG Matters
RAG isn't always the right approach. The decision guide below helps you determine when RAG adds value versus when simpler approaches — like including content directly in the prompt or relying on the model's built-in knowledge — are sufficient:
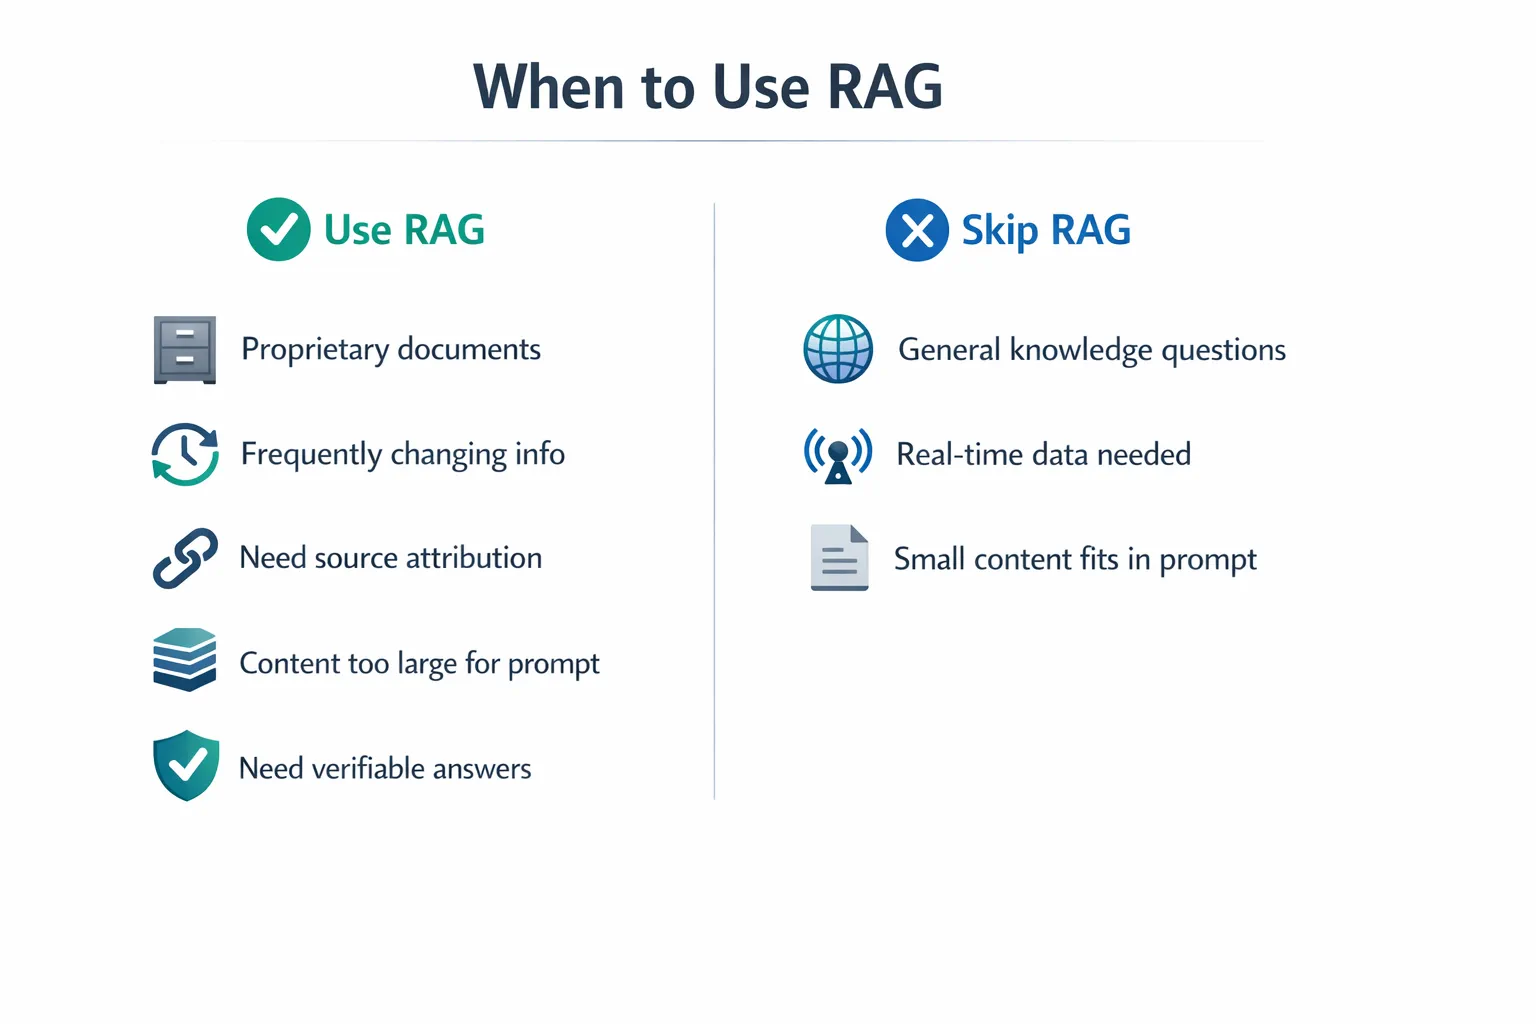
This diagram shows a decision guide for when RAG adds value versus when simpler approaches are sufficient.
Next Steps
Next Module: 04-tools - AI Agents with Tools
Navigation: ← Previous: Module 02 - Prompt Engineering | Back to Main | Next: Module 04 - Tools →