🚀 Installation and Usage Guide for the Second Brain Offline Module
This guide will help you set up and run the Second Brain Offline Module which contains the code for Modules 1-5.
📑 Table of Contents
- 📋 Prerequisites
- 🎯 Getting Started
- 📁 Project Structure
- 🏗️ Set Up Your Local Infrastructure
- ⚡️ Running the Code for Each Module
- 🔧 Utlity Commands
- 🧊 Setup Notion (optional)
📋 Prerequisites
Local Tools
For all the modules, you'll need the following tools installed locally:
| Tool | Version | Purpose | Installation Link |
|---|---|---|---|
| Python | 3.12 | Programming language runtime | Download |
| uv | ≥ 0.4.30 | Python package installer and virtual environment manager | Download |
| GNU Make | ≥ 3.81 | Build automation tool | Download |
| Git | ≥2.44.0 | Version control | Download |
| Docker | ≥27.4.0 | Containerization platform | Download |
📌 Windows users also need to install WSL (Click to expand)
We will be using Unix commands across the course, so if you are using Windows, you will need to install WSL, which will install a Linux kernel on your Windows machine and allow you to use the Unix commands from our course (this is the recommended way to write software on Windows).
Cloud Services
Also, the course requires access to these cloud services. The authentication to these services is done by adding the corresponding environment variables to the .env file:
| Service | Purpose | Cost | Environment Variable | Setup Guide | Starting with Module |
|---|---|---|---|---|---|
| OpenAI API | LLM API | Pay-per-use | OPENAI_API_KEY | Quick Start Guide | Module 2 |
| Hugging Face | MLOps | Free tier | HUGGINGFACE_ACCESS_TOKEN | Quick Start Guide | Module 3 |
| Comet | Experiment tracking | Free tier | COMET_API_KEY | Quick Start Guide | Module 4 |
| Opik | LLM evaluation and prompt monitoring | Free tier (Hosted on Comet - same API Key) | COMET_API_KEY | Quick Start Guide | Module 6 |
When working locally, the infrastructure is set up using Docker. Thus, you can use the default values found in the config.py file for all the infrastructure-related environment variables.
But, in case you want to deploy the code, you'll need to setup the following services with their corresponding environment variables:
| Service | Purpose | Cost | Required Credentials | Setup Guide |
|---|---|---|---|---|
| MongoDB | document database (with vector search) | Free tier | MONGODB_URI | 1. Create a free MongoDB Atlas account 2. Create a Cluster </br> 3. Add a Database User </br> 4. Configure a Network Connection |
🎯 Getting Started
1. Clone the Repository
Start by cloning the repository and navigating to the project directory:
git clone https://github.com/decodingml/second-brain-ai-assistant-course.git
cd second-brain-ai-assistant-course
2. Installation
First deactivate any active virtual environment and move to the second-brain-offline directory:
deactivate
cd apps/second-brain-offline
To install the dependencies and activate the virtual environment, run the following commands:
uv venv .venv-offline
. ./.venv-offline/bin/activate # or source ./.venv-offline/bin/activate
uv pip install -e .
We use Crawl4AI for crawling. To finish setting it up you have to run some post-installation setup commands (more on why this is needed in their docs):
# Run post-installation setup
uv pip install -U "crawl4ai==0.4.247" # We have to upgrade crawl4ai to support these CLI commands (we couldn't add it to pyproject.toml due to ZenML version incompatibility with Pydantic).
crawl4ai-setup

# Verify your installation
crawl4ai-doctor
IMPORTANT
As crawling can often fail, both during installation and while running the crawling logic, you can skip the crawling step and use our pre-computed dataset. More on this in the Running the ML pipelines / Lessons section.
After running the doctor command, you should see something like this:
[INIT].... → Running Crawl4AI health check...
[INIT].... → Crawl4AI 0.4.247
[TEST].... ℹ Testing crawling capabilities...
[EXPORT].. ℹ Exporting PDF and taking screenshot took 0.84s
[FETCH]... ↓ https://crawl4ai.com... | Status: True | Time: 3.91s
[SCRAPE].. ◆ Processed https://crawl4ai.com... | Time: 11ms
[COMPLETE] ● https://crawl4ai.com... | Status: True | Total: 3.92s
[COMPLETE] ● ✅ Crawling test passed!3. Environment Configuration
Before running any command, you have to set up your environment:
- Create your environment file:bash
cp .env.example .env - Open
.envand configure the required credentials following the inline comments and the recommendations from the Cloud Services section.
📁 Project Structure
At Decoding ML we teach how to build production ML systems. Thus, instead of splitting the code into separate modules, the course follows the structure of a real-world Python project:
.
├── configs/                   # ZenML configuration files
├── pipelines/                 # ZenML ML pipeline definitions
├── src/second_brain_offline/  # Main package directory
│   ├── application/           # Application layer
│   ├── domain/                # Domain layer
│   ├── infrastructure/        # Infrastructure layer
│   ├── config.py              # Configuration settings
│   └── utils.py               # Utility functions
├── steps/                     # ZenML pipeline steps
├── tests/                     # Test files
├── tools/                     # Entrypoint scripts that use the Python package
├── .env.example               # Environment variables template
├── .python-version            # Python version specification
├── Makefile                   # Project commands
└── pyproject.toml             # Project dependencies
🏗️ Set Up Your Local Infrastructure
We use Docker to set up the local infrastructure (ZenML, MongoDB).
WARNING
Before running the command below, ensure you do not have any processes running on port 27017 (MongoDB) and 8237 (ZenML).
To start the Docker infrastructure, run:
make local-infrastructure-upTo stop the Docker infrastructure, run:
make local-infrastructure-downNOTE
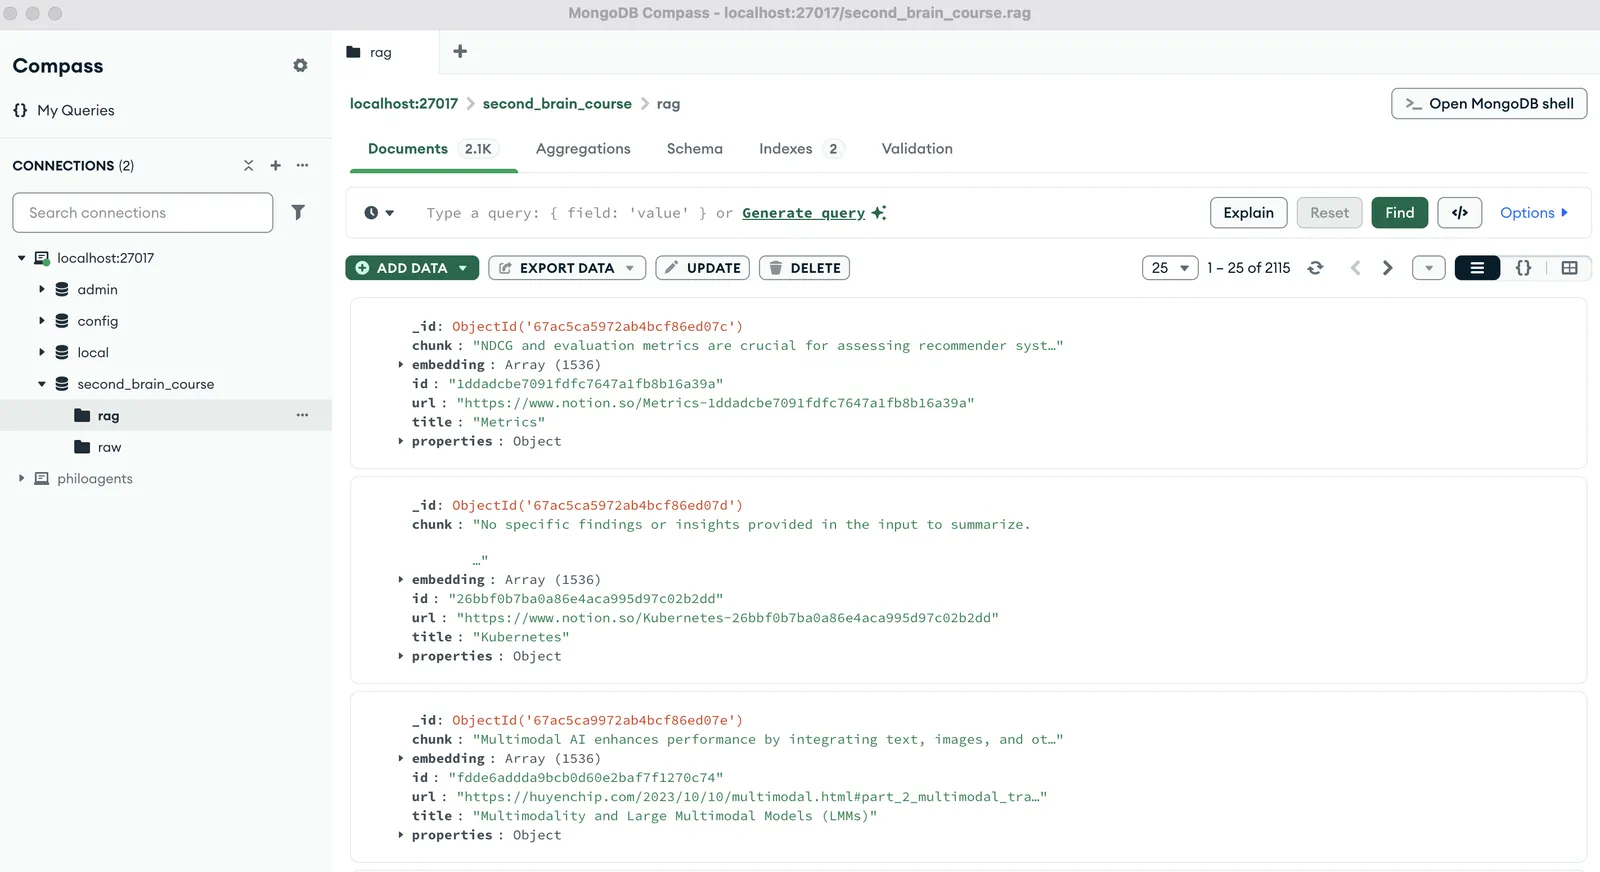
To visualize the raw and RAG data from MongoDB, we recommend using MongoDB Compass or Mongo's official IDE plugin (e.g., MongoDB for VS Code). To connect to the working MongoDB instance, use the MONGODB_URI value from the .env file or found inside the config.py file.
⚡️ Running the Code for Each Module
To simulate the course modules, we split the CLI commands and offline ML pipelines you must run per module so you know exactly where you are in the course.
Module 1: Build your Second Brain AI assistant
No code to run for this module, as it lays down the overall architecture of the Second Brain AI assistant.
We recommend to read the first lesson to better understand the AI system architecture of the Second Brain AI assistant, where we teach best practices for building production ML systems using MLOps best practices.
Module 2: ETL pipeline
Populate the MongoDB database with the Notion and crawled raw data (required for Module 3 and Module 5).
Prepare Notion data
Download our prepared Notion dataset from S3 (recommended):
make download-notion-dataset
# Validate using test: make test-download-notion-dataset
OR if you want to collect your own Notion data (optional - if you want to use your own data):
make collect-notion-data-pipelineIMPORTANT
If running make download-notion-dataset fails, type https://decodingml-public-data.s3.eu-central-1.amazonaws.com/second_brain_course/notion/notion.zip in your browser to download the dataset manually. Unzip notion.zip and place it under the data directory as follows: data/notion (create the data directory if it doesn't exist).
Run the ETL pipeline
Run the ETL pipeline to crawl, score and ingest the Notion data into MongoDB:
make etl-pipelineRunning criteria:
- Running costs: ~$0.5
- Running time: ~30 minutes
OR if you want to avoid any costs or waiting times, you can use our pre-computed dataset to populate MongoDB. Also, as crawling can often fail and it is more compute-heavy, you can use this command to skip the crawling step (the outcome will be the same as using make etl-pipeline):
make download-crawled-dataset
# Validate using test: make test-download-crawled-dataset
make etl-precomputed-pipeline
IMPORTANT
If running make download-crawled-dataset fails, type https://decodingml-public-data.s3.eu-central-1.amazonaws.com/second_brain_course/crawled/crawled.zip in your browser to download the dataset manually. Unzip crawled.zip and place it under the data directory as follows: data/crawled (create the data directory if it doesn't exist).
Module 3: Generate Fine-tuning Dataset
NOTE: To run this module, you must populate MongoDB with raw data as described in Module 2.
make generate-dataset-pipelineRunning criteria:
- Running costs: ~$1.5
- Running time: ~60 minutes
OR in case you want to avoid any costs or waiting times, you can use our pre-computed dataset available on Hugging Face, which is already set as the default value in the required ZenML configs: pauliusztin/second_brain_course_summarization_task.
Module 4: Fine-tuning and Deploying Summarization LLM
Fine-tuning and Evaluating the Summarization LLM
As Notebooks are popular when it comes to LLM fine-tuning, we provide a notebook for each step of the fine-tuning process.
For the full fine-tuning we used Google Colab Pro, with an L4 GPU. But the notebooks will also run with the free tier of Google Colab on an T4 GPU. But to work on a T4 GPU we have to leverage QLoRA instead of LoRA, which makes the fine-tuning process slower. To conclude, you can run them with 0 costs on Google Colab.
| Purpose | Notebook | Useful Resources |
|---|---|---|
| Training |  | Example of an experiment using the Comet experiment tracker |
| Inference | | Our fine-tuned LLM available on Hugging Face |
| Evaluation | | Our fine-tuned LLM available on Hugging Face |
Running criteria:
- Running costs: $0 (running on Google Colab free tier)
- Training running time: ~4 and 12 hours (depending on the GPU and number of iterations)
- Evaluation running time: <30 minutes
OR in case you want to avoid any costs or waiting times, you can deploy our fine-tuned LLM available on Hugging Face: pauliusztin/Meta-Llama-3.1-8B-Instruct-Second-Brain-Summarization.
Deploying the Summarization LLM (Optional)
This step is optional, in case you want to learn to deploy your fine-tuned LLM and use it in the agentic app. We are offering the possability to use OpenAI instead of our custom fine-tuned LLM, to avoid forcing you to deploy the model resulting in additional costs.
We will use Hugging Face Inference Endpoints to deploy the fine-tuned LLM.
To deploy the model, you have to follow these steps:
- Login to Hugging Face Inference Endpoints
- Add your billing information
- Use our step-by-step guide to deploy the model: Creating Inference Endpoint Guide
IMPORTANT
We will use an A10G GPU to deploy the model, which costs ~$1.00 per hour.
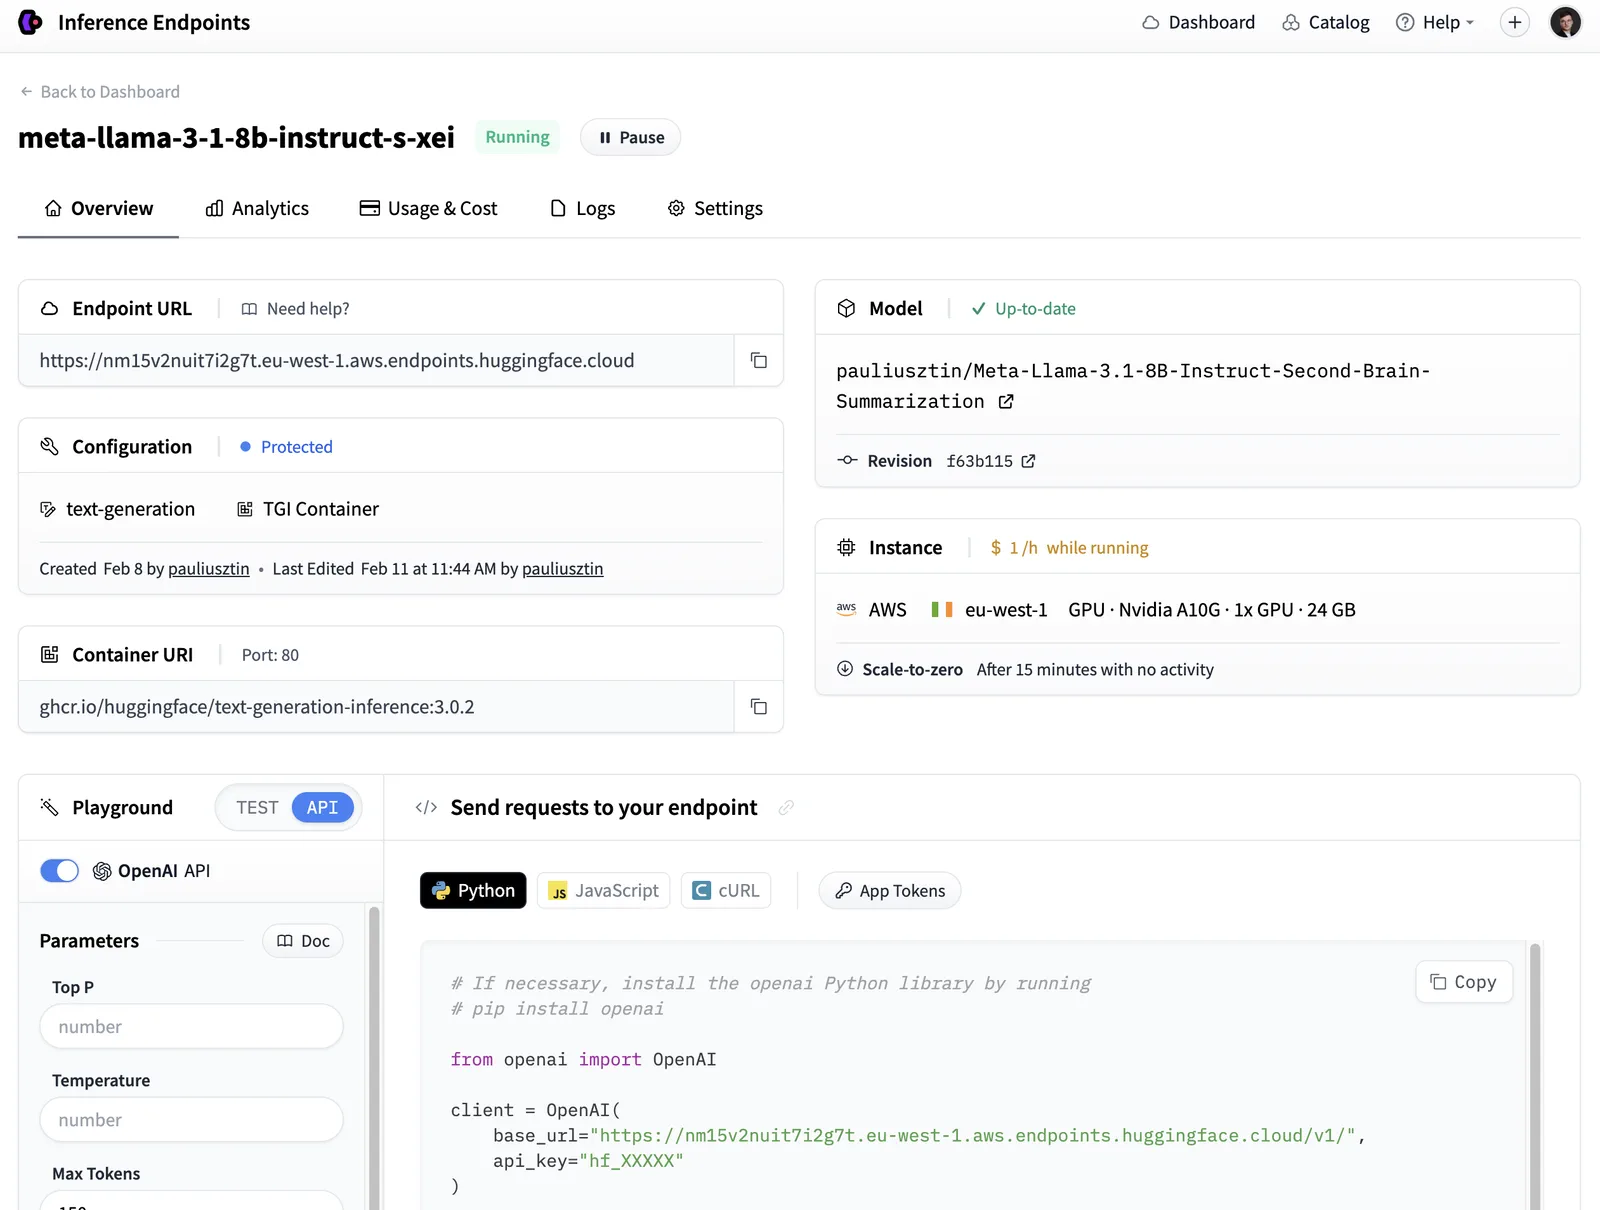
To hook the Hugging Face Inference Endpoint to the code and the RAG ingestion pipeline, you need to set the HUGGINGFACE_DEDICATED_ENDPOINT and HUGGINGFACE_ACCESS_TOKEN environment variables in the .env file, as follows (you can use the same HF token you used so far):
HUGGINGFACE_DEDICATED_ENDPOINT=https://um18v2aeit3f6g1b.eu-west-1.aws.endpoints.huggingface.cloud/v1/
HUGGINGFACE_ACCESS_TOKEN=hf_...
IMPORTANT
When configuring the HUGGINGFACE_DEDICATED_ENDPOINT, you need to make sure that the endpoint URL ends with /v1/, as seen in the image above. You can copy the valid URL from the API tab in the Playground section of the dashboard, as seen in the image below.
After setting the environment variables, you can check that it works by running the following command:
make check-huggingface-dedicated-endpointYou should see something about the Eiffel Tower in the output:
The main facts of the Eiffel Tower from the text are as follows :
- **Height :** The Eiffel Tower stands at a height of 324 metres (1,063 ft).
- **Bases measurement:** The base of the tower is a square with each side measuring 125 metres (410 ft).
....
Module 5: RAG Feature Pipeline - Populate the RAG Vector Database
NOTE: To run this module, you must populate MongoDB with raw data as described in Module 2.
We support multiple RAG ingestion methods using either OpenAI or your deployed Hugging Face models, with parent or contextual retrieval algorithms.
Recommended progression:
- Start with parent retrieval (fastest, simplest)
- Move to simple contextual retrieval with OpenAI
- Try simple contextual with Hugging Face Inference Endpoints (if you've deployed your model)
- Finally, run the full-fledged contextual retrieval algorithm with OpenAI models
IMPORTANT
Before switching algorithms, run make delete-rag-collection to clear existing embeddings.
To make the ingestion faster or cheaper, you can adjust the ingestion parameters in configs/*.yaml:
fetch_limit: Number of documents to processcontent_quality_score_threshold: Filtering aggressiveness
5.1. Parent Retrieval Algorithm with OpenAI models
make delete-rag-collection
make compute-rag-vector-index-openai-parent-pipeline
Running criteria:
- Cost (OpenAI API): ~$0.05
- Time: ~2 minutes
- Indexes all docs
Check that the RAG ingestion worked:
make check-rag-openai-parent5.2. Simple Contextual Retrieval Algorithm with OpenAI models
Run the ingestion pipeline:
make delete-rag-collection
make compute-rag-vector-index-openai-contextual-simple-pipeline
Running criteria:
- Cost (OpenAI API): ~$0.15
- Time: ~20 minutes
- Indexes ~120 docs
Check that the RAG ingestion worked:
make check-rag-openai-contextual-simple5.3. Simple Contextual Retrieval Algorithm with Hugging Face Inference Endpoints (Optional)
Before running this step, make sure you have deployed your Hugging Face model to Hugging Face Inference Endpoints and that it is not idle (it goes idle out-of-box after 15 minutes of inactivity).
Run the ingestion pipeline:
make delete-rag-collection
make compute-rag-vector-index-huggingface-contextual-simple-pipeline
Running criteria:
- Cost (Hugging Face Inference Endpoints): ~$0.6
- Time: ~40 minutes
- Indexes ~60 docs
Check that the RAG ingestion worked:
make check-rag-huggingface-contextual-simple5.4. Full-fledged Contextual Retrieval Algorithm with OpenAI models
Run the ingestion pipeline:
make delete-rag-collection
make compute-rag-vector-index-openai-contextual-pipeline
Running criteria:
- Cost (OpenAI API): ~$0.1
- Time: ~11 minutes
- Indexes ~20 docs
Check that the RAG ingestion worked:
make check-rag-openai-contextualLesson 6: Agentic App
The Agentic App sits in the online environment, which is implemented as a different Python application.
Go to the apps/second-brain-online folder and follow the instructions there to set it up and run it.
🔧 Utlity Commands
Formatting
make format-check
make format-fix
Linting
make lint-check
make lint-fix
Tests
make test🧊 Setup Notion (optional)
In case you want to use your own Notion data, you can follow these steps to set up an integration and read from your Notion database:
- Go to https://www.notion.so/profile.
- Create an integration following this tutorial.
- Copy your integration secret, and set the
NOTION_SECRET_KEYenvironment variable in the.envfile. - Share your database with the integration:
- Open your Notion database
- Click the '...' menu in the top right
- Click 'Add connections'
- Select your integration
- Get the correct database ID:
- Open your database in Notion
- Copy the ID from the URL:(The database ID is the part between the workspace name and the question mark)
https://www.notion.so/{workspace}/{database_id}?v={view_id} - Update the
database_idsparameter in theconfigs/collect_notion_data.yamlfile with your database ID(s). Just make sure to remove ours and add only yours.